The CSS 2 guidelines provide a few more powerful selectors that give you even finer control over web page styling. Like some of the selectors you've seen previously, the selectors in this section don't work in Windows Internet Explorer 6 and earlier. (But you can try the JavaScript workaround in the box on the previous page.)
Similar to the descendent selectors described earlier in this chapter, CSS lets you format the children of another tag with a child selector. The child selector uses an additional symbol—an angle bracket (>) to indicate the relationship between the two elements. For example, the selector body > h1 selects any <h1> tag that's a child of the <body> tag.
Unlike a descendent selector, which applies to all descendents of a tag (children, grandchildren, and so on), the child selector lets you specify which child of which parent you mean. For example, in Figure 3-6, there are two <h2> tags. Using a plain old descendent selector—body h2 —selects both <h2> tags. Even though both <h2> tags are inside of the <body> tag, only the second one is a child of the <body> tag. The first <h2> is directly inside of a <div> tag, so its parent is <div>. Since the two <h2> tags have different parents, you can use a child selector to get at them individually. To select only the second <h2> tag, your child selector looks like this: body > h2. If you want the first <h2> tag, then you must use this child selector instead: div > h2.
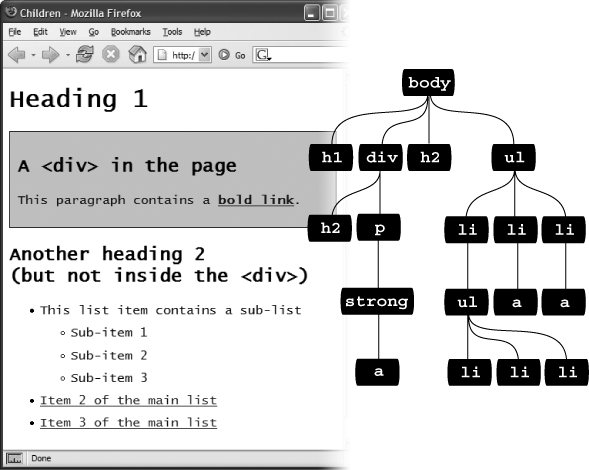
Parent-child relationships aren't the only ones in the HTML family tree. Sometimes you need to select a tag based not on its parent tag but on its surrounding siblings—the tags that share a common parent. A tag that appears immediately after another tag in HTML is called an adjacent sibling. In Figure 3-6, the <div> tag is the adjacent sibling of the <h1> tag, the <p> tag is the adjacent sibling of the <h2> tag, and so on.
Using an adjacent sibling selector, you can, for example, give the first paragraph after each heading different formatting from the paragraphs that follow. Suppose you want to remove the margin that appears above that <p> tag so that it sits right below the heading without any gap. Or perhaps you want to give the paragraph a distinct color and font size, like a little introductory statement.
The adjacent sibling selector uses a plus sign (+) to join one element to the next. So to select every paragraph following each <h2> tag, use this selector: h2 + p (spaces are optional, so h2+p works as well). The last element in the selector (p, in this case) is what gets the formatting, but only when it's directly after its brother <h2>.
CSS provides a way to format a tag based on any attributes it has. For example, say you want to place borders around the images on your page—but only around the important photos. You don't want to include your logo, buttons, and other little doodads that also have an <img> tag. Fortunately, you realize that you've given all the photos descriptions using the title attribute, which means you can use an attribute selector to identify just the important images.
Tip
The HTML title attribute is a great way to add tooltips (pop-up messages) to links and images on a page. It's also one way to inform search engines about the useful information on a web page. Learn more about it at http://webdesign.about.com/od/htmltags/a/aa101005.htm.
With attribute selectors, you can single out tags that have a particular property. For example, here's how to select all <img> tags with a title attribute:
img[title]
The first part of the selector is the name of the tag (img ) while the attribute's name goes in brackets: [title].
CSS doesn't limit attribute selectors to tag names: You can combine them with classes, too. For example, .photo[title] selects every element with the .photo class style and an HTML title attribute.
To get more specific, you can select elements that not only share a particular attribute but also have an exact value set for that attribute. For example, when you want to highlight links that point to a particular URL, create an eye-catching attribute selector, like so:
a[href="http://www.cosmofarmer.com"]{ color:red; font-weight:bold; }Adding a value to an attribute selector is very useful when working with forms. Many form elements have the same tag, even if they look and act differently. The checkbox, text box, Submit button, and other form fields all share the <input> tag. The type attribute's value is what gives the field its form and function. For example, <input type="text"> creates a text box, and <input type="checkbox"> creates a checkbox.
To select just text boxes in a form, for example, use this selector:
input[type="text"]
The attribute selector is very versatile. It lets you not only find tags that have a specific value for an attribute (for example, find all form fields with a type of checkbox) but even select elements with an attribute value that begins with, ends with, or contains a specific value. While this might sound like overkill, it's actually quite handy.
For example, suppose you want to create a specific style to highlight external links (links that point outside of your own website) to indicate, "Hey, you'll leave this site if you click this." Assuming you don't use absolute links to link to any pages in your own site, you can assume that any external link begins with http://—the first part of any absolute link.
If that's the case, the selector would look like this:
a[href^="http://"]
The ^= translates to "begins with," so you can use this selector to format any link that begins with http://. You can use it to style a link that points to http://www.google.com as well as a link to http://www.sawmac.com. In other words, it selects any external link.
Note
This selector won't work for any secure connections over SSL—in other words any links that begin with https://. To create a style that affects those as well, you could create a group selector (Constructing Group Selectors) like this:
a[href^="http://"], a[href^=" https://"]
Similarly, there are times when you want to select an element with an attribute that ends in a specific value. Again, links are handy for this task. Say you want to add a little document icon next to any links that point to a PDF file. Since PDF documents end in.pdf, you know a link pointing to one of those files will end in.pdf—for example, <a href="download_instructions.pdf">. So to select just those types of links, you'd create a selector like this:
a[href$=".pdf"]
The full style might look something like this:
a[href$=".pdf"] {
  background-image: url(doc_icon.png) no-repeat;
  padding-left: 15px;
};
Don't worry too much about the particular properties in this style—you'll learn about padding on Control Space with Margins and Padding and background-images on Background Images. Just pay attention to that cool selector: $= translates to "ends with." You can use this selector to format links that point to Word docs ([a href$=".doc"]), movies ([a href$=".mov"]), and so on.
Finally, you can even select elements with attributes that contain another value. For example, say you like to highlight photos of your employees throughout the site. You might want all of those photos to have a common style, like a thick green border and a gray background. One way to do this is to create a class style—.headshot, for example—and manually add a class attribute to the appropriate <img> tags. However, if you name the photos consistently, then there's a faster method.
For example, say you name each of those images with the word headshot in them—for example mcfarland_headshot.png, mccord_headshot.jpg, headshot_albert.jpg, and so on. Each of these files has the word headshot somewhere in the file, so the src attribute of the <img> tag used to insert each image also contains the word headshot. You can create a selector for just those images like this:
img[src*="headshot"]
This translates to "select all images whose src attribute has the word headshot somewhere in it." It's a simple, elegant way to format just those images.
Internet Explorer 6, of course, doesn't understand attribute selectors, so use them only if the missing style won't drastically affect how IE 6 displays the page. In many cases, you can use attribute selectors just to add a little eye-candy for those with modern browsers.
Note
The CSS 3 guidelines promise even more variations on selectors. Chapter 16 covers some of the most promising selectors (and ones that you'll actually find in real web browsers).