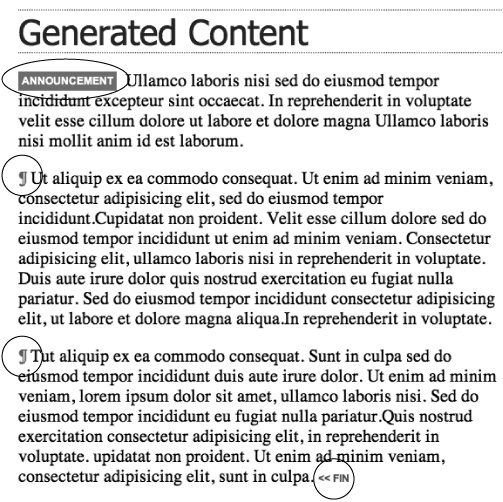
Sometimes you want to add some content without necessarily adding any code to your HTML. For example, say you wanted to display the word "Announcement" before the first paragraph of a news announcement (see Figure 16-8). You could just put that into your HTML, but that would require extra work and extra code. It's also not really integral to the actual content; it's just a sort of introduction to the text. Also, if you later wanted to change "Announcement" to "News" you'd have the time-consuming task of identifying and changing that text throughout your site.
There's an easier way to insert stuff that isn't really part of an element's content. It's called generated content, and it's been around since CSS 2.1. However, it hasn't been very useful until Internet Explorer 8 came on the scene. Now, every major browser (except IE 6 and IE 7) understands generated content.
Note
You encountered generated content earlier in the book. It's part of one method for dealing with float problems (see Graphic Bullets).
You add generated content with the content property in combination with either the :before or :after pseudo-elements. You use :before to place stuff before a tag, and :after to place content after a tag. For example, say you want to add a paragraph symbol (¶) at the beginning of each paragraph (Figure 16-8) to add typographic distinction (or just to show off). You can do that with this style:
p:before {
  content: "¶";
}
The selector—p:before—applies to the location right before the beginning of the content inside the paragraph. The content property indicates what you want to place before each paragraph (in this case, a paragraph symbol). You can put any text you like between quotes, and it will appear in the specified location (before or after the tag). Beware: The text between quotes is printed as is, so you can't include HTML as part of the content (well, you can, but the tags will appear onscreen). So for example, if you had this style:
p:before {
  content: "<h2>Announcement</h2>";
}
You wouldn't end up with a heading 2 before each paragraph, just the text "<h2>Announcement</h2>".
You can even insert an image by specifying a URL like this:
p:before {
  content: url("images/symbol.png");
}
And you can combine text with an image, like this:
p:before {
  content: "Paragraph" url("images/symbol.png");
}
This code prints the text "Paragraph" and adds the image symbol.png at the front of each paragraph.
You can style generated content like other elements, using any CSS property. For example, in Figure 16-8, the "Announcement" text uses a different font than the paragraph, and has a background color. That first paragraph has a class of announcement, so here's the style that creates the look pictured in Figure 16-8:
.announcement:before {
  content: "ANNOUNCEMENT";
  font: bold .6em Arial, Helvetica, sans-serif;
  color: #FFF;
  padding: 4px;
  background-color:red;
  margin-right: 10px;
}
All of those CSS properties apply to the :before pseudo-element, and since that holds the text "ANNOUNCEMENT," all of the properties are applied to that text.
