
Once you embrace the idea of uncommon crochet, you sign on for much more than simply crochet. When you add felting, sewing, embroidery, and loads of embellishments, the crochet fabric becomes a canvas for your personal creative expression. In this chapter, I talk about shaping, construction and finishing, fiber substitutions, and identifying and correcting the common mistakes that plague stitchers of all abilities.
Swatch is a term that makes many people cringe because it’s one extra little step between you and immediate project gratification. A swatch is simply a small sample of crocheted fabric that you create before you make a project to ensure that the fiber and hook you are using produce the proper gauge. If the gauge in your swatch doesn’t match the gauge in your pattern, your finished project won’t turn out as expected.
If you’re using the fiber that’s called for in the pattern, but your gauge doesn’t match, make a swatch with varying hook sizes until you get the gauge you’re looking for. If you have to substitute a different fiber, make a swatch with the new fiber to make sure the hook you are using still produces the proper gauge. The swatch will also show you how the new fiber will behave in the pattern of stitches you are making. If you will eventually be starching, felting, or blocking your project, you can try it on your swatch first to make sure you get the results you want.
Swatches are also great for sampling new stitch patterns. As you learn the basic stitches, make practice swatches over and over until you can produce neat and uniform fabric.
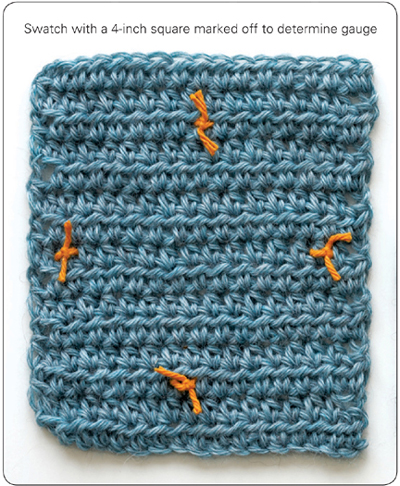
To figure out whether you can make the same gauge as the one called for in the pattern, make a 5-inch-square (13 cm) swatch using the exact fiber in the pattern (or one that is similar in thickness and fiber content) and the suggested hook size and stitch pattern. To determine how many stitches are needed to make a 5-inch-square (13 cm) swatch, do a little simple math. If the gauge in the pattern says there should be 16 stitches over 4 inches (10 cm), then you know there are 4 stitches per inch (16 ÷ 4 = 4). To make the foundation chain, simply multiply the number of stitches per inch by how many inches you want the swatch to be: 4 stitches per inch × 5-inch swatch = 20 stitches. Then, work as many rows as it takes to make a 5-inch (13 cm) square and you’re ready to check your gauge.
 TIP: Things to do with your swatches:
• Felt wool swatches and use as coasters.
• Felt wool swatches and cut them up for appliqués.
• Use cotton fiber swatches as washcloths.
• Sew them together to make a patchwork pillow or bag.
• Create a swatch diary for future reference, noting the type of fiber, hook size, gauge, and stitches.
Once your swatch is done, use your hands to smooth it out on a hard, flat surface. Using either a gauge tool, a stiff ruler, or a measuring tape, count the number of stitches across the center 4 inches (10 cm). Next, count how many rows you have within 4 inches (10 cm). These two numbers represent your gauge. The next step is to compare your gauge to the gauge listed in the pattern.
Most patterns specify a gauge over 4 inches (10 cm) to get an average number of stitches per inch, so why do I suggest that the swatch be at least 5 inches (13 cm)? The stitches at the edge of the swatch tend to be uneven compared to the stitches in the center of the piece, so you need to add a few stitches at each edge of the swatch that won’t be included in the gauge. Now, a 5-inch (13 cm) swatch may sound like a lot of wasted time and fiber, so if you must, go ahead and size it down to save time. Make the swatch 3 inches (7.5 cm) square, measure the stitches and rows within 2 inches (5 cm), then just double the number of stitches to figure out the gauge over 4 inches (10 cm), or cut it in half to figure out the per-inch gauge. It’s your project, so you can make the swatch as big or as little as you want; the whole point is to get the most accurate information possible.
So, how close did your gauge come to the gauge listed in the pattern? If it’s right on, then you’re ready to start stitching. If your gauge is off the mark by even a quarter of an inch, then you’ll need to make some adjustments.
Because gauge is dependent on the fiber, hook size, stitch pattern, and tension of the person creating it, there are a few ways you can adjust your gauge to hit the gauge required for the project.
1. If you’re getting more stitches per inch than the pattern calls for, then your stitches are smaller than they should be. Try increasing the hook size to make bigger stitches.
2. If you’re getting fewer stitches per inch than the pattern calls for, then your stitches are larger than they should be. Try decreasing the hook size to make smaller stitches.
3. If the pattern calls for a bulky fiber and your fiber is thin, try carrying more than one strand of fiber as you crochet to make the overall fiber thicker, or use a fiber with a thickness that is more suitable to the pattern.
4. If the pattern calls for a thin fiber and your fiber is bulky, choose another fiber because you won’t be able to make it work with that particular pattern.
Once you’ve made some adjustments, crochet a new swatch and check your gauge again to make sure you match the gauge listed in the pattern.
One thing that sets crochet apart from knitting is how easy it is to sculpt the crocheted fabric into any shape or form. Shaping the fabric is simply a process of increasing or decreasing the number of stitches in a row or round to make it bigger or smaller. You control where the shaping takes place to create curves and dents as needed.
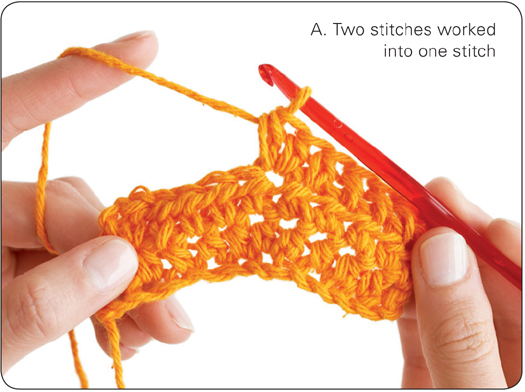
To increase means to add stitches to make a section of the fabric bigger. You can add stitches by placing two or more stitches into one stitch or space (see photo A) or by creating additional stitches at the beginning or end of a row. The patterns in this book will specify which of the above methods works best for that project.
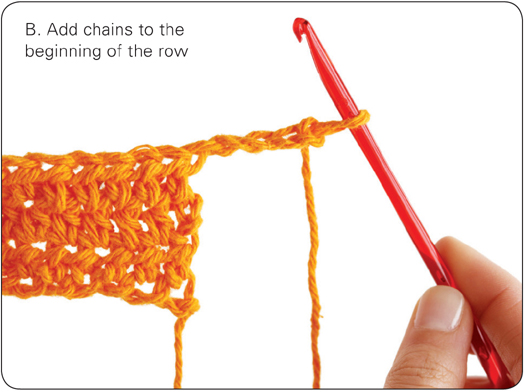
To add multiple stitches at the beginning of a row, create one chain for each stitch you add (see photo B). Be sure to add the required number of chains for the turning chain (see chart) based on the stitch you’re using, then skip the turning chain, work the first stitch in the following chain, and continue working across the chains and stitches from the previous row.
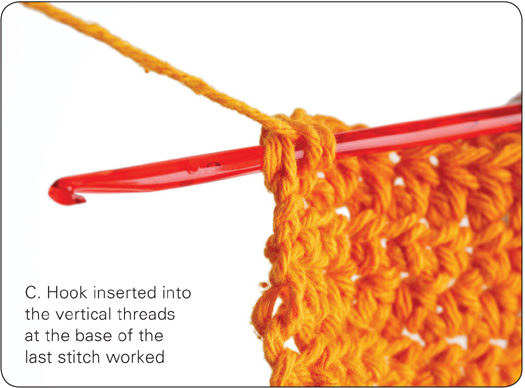
To add multiple stitches at the end of the row (see photo C), simply work one stitch into each stitch on the previous row as usual and then make the first additional stitch by inserting the hook into the vertical threads found at the base of the last stitch worked and work as a foundation stitch row. Create another increase by working a foundation stitch into the chain found at the base of the foundation stitch row just completed. Continue working a foundation stitch for each increase as needed.
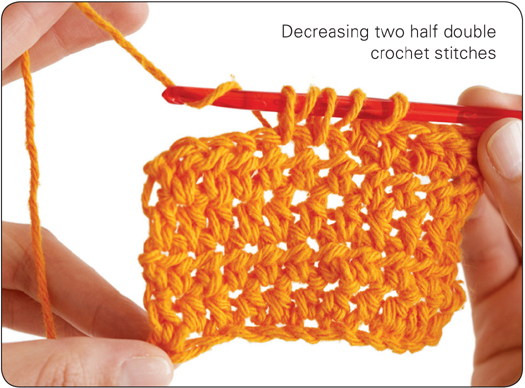
To decrease means to reduce stitches to make a section of the fabric smaller. You can decrease stitches by crocheting two or more stitches together, skipping stitches, or leaving stitches unworked. The patterns in this book will specify which of the methods works best for that project.
To crochet two or more stitches together (see photo) work each stitch to the last step, leaving one additional loop on the hook. When you’ve worked each stitch to be decreased, yarn over and draw a loop through all the stitches on the hook.
To skip a stitch, you work in each stitch as usual until you come to the spot where you need to decrease. Decrease by skipping the stitch indicated, then work directly into the following stitch. You can skip one or more stitches at a time.
To decrease at the beginning of a row, you can work two stitches together, skip the first stitch, or work one slip stitch for each desired decrease. Slip stitches are not counted in the final row count, so do not work into the slip stitches on the return row.
To decrease at the end of a row, you can work two stitches together or simply stop and turn, leaving the desired number of decreases unworked.
In crochet, as in knitting, it’s possible to work a piece in rows, meaning you work back and forth, turning the piece at the end of each row. Although working in rows is easy, working in the round is both easy and fun. When you work in the round, you open up a ton of creative possibilities in terms of the shapes you can create: circles, squares, tubes, triangles, and you name it can become bags, bowls, boxes, vases, and anything else you can imagine.
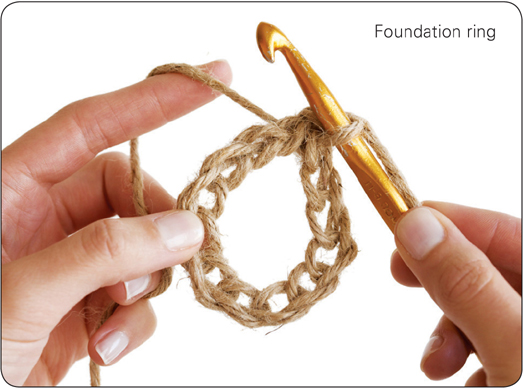
When you work a project in the round, the first round is generally worked around a center stitch or space. This center stitch or space is created using one of two methods. For projects shaped like a tube (Lace Vases) or motifs (Corde Market Bag), start with a foundation ring, which has an open center. For projects that require a closed center like Red’s Goodie Basket, start with an adjustable ring.
Start the circle by making your foundation row of chain stitches. Join the last chain to the first chain with a slip stitch to form a ring. The number of chain stitches in the foundation ring determines how large the center opening will be. Start with as little as three chain stitches to create a very small space in the center or start with ten or twenty chains to create a larger space in the center. The space can be left open to create lacy motifs or it can be functional and used as a buttonhole.
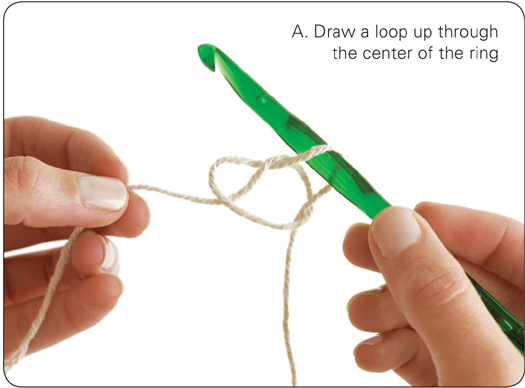
An adjustable ring is simply the beginning of a slip knot that hasn’t been pulled tight into a knot. Work the first round of stitches into the open slip knot loop, then pull the tail end until the center is closed.
1. Leaving a 6-inch (15 cm) tail, wrap the yarn around two fingers to form a ring and use the hook to draw a loop up through the center of the ring. With the hook still in the loop, remove the ring from your fingers, grasp the ring with the left hand, and chain 1 (see photo A).
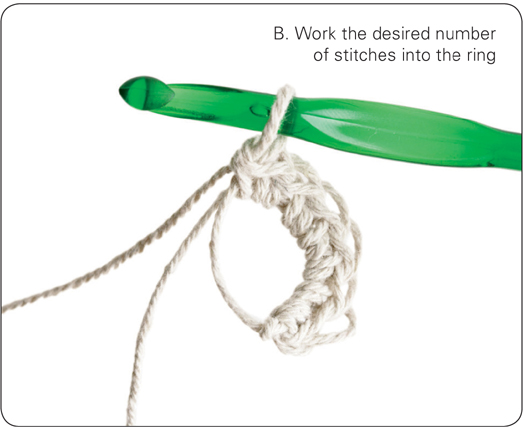
2. Make the required number of turning chains for the stitch you’re creating and work the desired number of stitches into the ring (see photo B).
3. Once you’ve made a round of stitches, pull the tail end to close the center of the circle (see photo C).

Once you have a foundation ring or an adjustable ring, you will continue to work in either a spiral or a joined round. Working in a spiral is perfect for projects where you don’t want a visible seam (like Red’s Goodie Basket). Working in joined rounds creates a concentric pattern of circles with a seam line (like the Random Stripe Tote). If you are doing color work, join your rounds so you can complete one band of color on one round and start a new color on the next round. Changing colors while working in a spiral will create a zigzag where the color change occurs.
Working in joined rounds creates a seam along one side of the pattern by “joining” the last stitch of the round to the first stitch of the round with a slip stitch. You can affect the appearance of the seam by changing the direction in which you’re working at the beginning of each round. If you join the end of the round and continue to work the next round in the same forward direction, each row of stitches will look the same and your seam will travel diagonally along the work. However, if you join the end of the round and then turn the piece to work in the opposite direction, the rows change in appearance and you create a seam that runs straight up and down. If the project is long and thin, like the Lace Vases, a traveling seam might disrupt the project’s appearance, so a vertical or invisible seam is more desirable. Sometimes the seam alignment is important and other times the texture and pattern created by working in the same or opposite directions is more important. The patterns in this book will indicate which method to use based on the needs of the project.
TIP: The slip stitch at the end of each round is not considered a stitch unless otherwise instructed. If you work in joined rounds without turning at the end of each round, it is common to accidentally work an extra stitch into the slip stitch from the previous round. To help yourself learn to recognize the slip stitch, use stitch markers to mark the first and last stitch or count your stitches to make sure you aren’t gaining any. If you are turning at the end of each round, simply skip the slip stitch from the previous round and begin the round in the next stitch.
To work a spiral, you work in one continuous round without joining or making a turning chain. Working in a spiral creates a seamless fabric; however, it can be easy to lose track of how many rounds you’ve worked. To help keep track of the rounds, place a stitch marker in the first stitch of the first round. After you complete a full round, work the next stitch into the marked stitch, remove the marker, and move it to the new stitch you’ve just created.
When the turning chain counts as a stitch, you are usually required to work the last stitch of the next row or round into the turning chain. In this case, the pattern will instruct you to work the stitch into a specific chain of the turning chain.
For example: dc in 3rd ch of beg ch-5
Means: Double crochet into the third chain stitch of the turning chain that was made with 5 chains
To figure out which chain stitch you need to work into, begin counting the chain stitches at the base of the turning chain. Count chain stitches from the bottom up to find the chain you’re supposed to work your stitch into. In the example above, you work a double crochet in the third chain from the bottom of the turning chain.
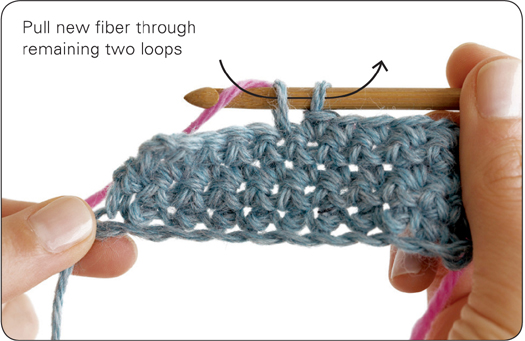
To add a new fiber, work the last stitch with the old fiber until there are two loops left on the hook. Drop the old fiber to the back of the work and finish the stitch by pulling the new fiber through the remaining two loops (see photo below). Tug the old fiber to tighten it and then cut it, leaving a 4- to 6-inch (10 to 15 cm) tail. Continue to work using the new fiber.
Whenever possible, change fibers at the end of a row. Keeping your tail ends at the edges of the fabric makes it easier to hide them when you’re finished and generally less conspicuous. There will of course be times when you need to change the fiber in the middle of the fabric. It’s not a big deal, and you change the fiber the same way. In both methods, make sure the ends of both old and new fibers are at least 6 inches (15 cm) long so you can weave them in when you’re finished. (See the tip in Weaving in Ends to learn how to hide the tail ends as you change the fiber.)
This is the process of tidying up all the loose fiber ends sticking out of your fabric when you finish the project. If done correctly, the tail ends will be hidden and your work will look neat and polished. Use a yarn or tapestry needle to weave in the tail ends with most fibers. Leather cord and wire can simply be woven in with your fingers or pulled through stitches with a crochet hook.
To weave in your ends:
• If the tail end comes out at the top or bottom edges of the work, weave it in under both loops of the stitches.
• If the tail end comes out along the side edges, or row ends, of the fabric, weave it vertically through the threads along the edge.
• If the tail end comes out somewhere within the fabric, weave it horizontally or vertically through the posts of the stitches. Either way, weave the tail on the wrong side or back of the work.
To make the finishing process easy and virtually invisible:
• Leave a 6-inch (15 cm) tail at the beginning of the work and any time you start or end a fiber along the way. Short tails are difficult to hide and tend to stick out of the fabric.
• Start a new ball of fiber at the edge of the work whenever possible.
• Never tie the tail ends into knots. Knots leave a conspicuous bump in the fabric.
• If there is already a knot in the fiber from the manufacturer, cut the knot out, leaving a 6-inch (15 cm) tail, and then start the new strand of fiber.
• Weave in your ends as you go (see the Tip below) to make the finishing process quick and easy.
TIP: To save yourself time at the end of a project, weave the tails in as you go. It may feel a little awkward at first, but after some practice you’ll do it automatically. To weave in the beginning tail of a new fiber, lay the new fiber on top of the previous row a few inches before you need it. Continue to stitch with the old fiber, working over the new tail to conceal it. Complete the fiber switch as usual. If you don’t need the old fiber any longer, fasten it off and leave a few inches for the tail end. Lay the tail end on top of the previous row and continue stitching with the new fiber, working over the old tail to conceal it.
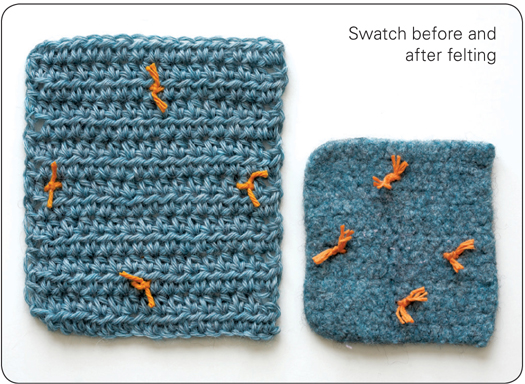
What most people call felting is actually the process of fulling. The difference between the two terms refers to whether or not the fibers have been worked up into a piece of fabric before being agitated in hot water. Fulling is shrinking a piece of fabric that has been crocheted, woven, or knit, while felting is shrinking loose pieces of animal fiber, like roving. For the sake of familiarity, I refer to the process of shrinking crocheted fabric as felting (but at least now you know the real meanings!). The key elements of felting are heat, soap, water, and agitation. The water must be hot and soapy to get the fibers to open up, and the agitation is necessary for encouraging the fibers to tangle and lock together.
The cool thing about felting is that it will completely transform a project from something big and loose and possibly unattractive into something beautiful and functional. It also hides mistakes. If you have a hole in the fabric or forgot to make a few decreases, it will all be covered up in the wash. After it’s shrunk to the desired size, you can stretch, smooth, and shape most mistakes right out of the fabric.
More information about how to design your own felted projects is here.
What types of yarn will felt? You can only felt yarns that are made of untreated animal fibers, such as alpaca, sheep, rabbit, and even dog fur. Wools that say superwash on the label cannot be felted because they have been treated to prevent felting in the wash. You can try to felt blended yarns containing only a percentage of animal fiber, but I recommend that you felt a test swatch first to make sure you’ll get your desired result. Note that not all yarns felt in the same way: some felt more quickly and others felt with more texture.
What if I’m using a different yarn than is called for in a pattern? If you need to substitute a yarn and the finished size of the project is important, always felt a test swatch of the new yarn. Some yarns yield drastically different results than others. Refer to the tips on designing your own felted project to learn more about making substitute yarn work in any project.
What size hook should I use? To have room to shrink, your stitches must be loose, so use a larger hook size than what is normally recommended for the yarn when you plan to felt your project. All of the projects in this book will direct you to the proper hook size for successful felting.
How much will the fabric shrink? The longer you wash the item, the more it will shrink. Generally I’ve found that crocheted fabric shrinks anywhere from 15 to 35 percent, and it’s unlikely that the width and length will shrink evenly. The only way to know how a particular yarn will react is to felt a test swatch.
Can I put a felted project in the dryer? Putting a felted project in the dryer may help remove excess water and shorten the drying time; however, the dryer may also cause warps or creases.
Can I felt lace or textured stitch patterns? Basic stitch patterns deliver the best results when felting. Lace and textured stitch patterns get lost in felted fabric. Remember to felt a test swatch when you’re using a new stitch pattern to make sure you get your desired result.
How do I keep edges from stretching? Open edges tend to stretch more in the wash than edges that have been joined together. To keep any unattached edges from felting unevenly use a cotton fiber either to loosely baste them or to work a row of single crochet along the edge.
Can I change the thickness of the fabric? The easiest way to adjust the thickness of a finished fabric is to change the stitch or yarn weight before you felt. Try working with a double strand of wool to create a thick fabric or working in the front loop only to create a thin fabric.
How can I find out whether my unlabeled stash yarn will felt? Wrap the yarn around your fingers a few times and break it off. Dip the loop in a bowl of hot water with a little soap and rub it quickly between your hands. If it gets fuzzy and tangled together, it’s good to go. If you can restore the yarn to its original condition, put it back in the stash.
Can I cut felted fabric? Yep. Cut, sew, glue, embroider, bead—whatever you want, it should hold together.
To felt your crocheted project in the washing machine:
1. Place your project in a zippered laundry bag or pillow- case and either zip it closed or close it tightly with a rubber band. Encasing the project in a bag will keep lumps of wool from bunching up in the machine.
2. Set the machine to the smallest load setting, the hot wash, and the cold rinse. Heat is essential to the felting process, so if you don’t think the water is getting hot enough, add a pot of boiling water to turn it up a notch.
3. Put three to four tablespoons of baking soda or a small amount of detergent in the machine and add an old pair of jeans, a shoe, or a rubber ball to increase agitation. Check the machine often (to keep it from moving on to the rinse and spin cycles) until your project reaches the desired size and texture. I leave the machine lid open so I can reset the wash cycle as many times as necessary until it’s done.
4. Remove your project from the bag and gently roll it in a towel to remove the excess water.
5. Remove any basting stitches and shape your project by pulling and smoothing out any warps or wrinkles. Insert a form if necessary to help the object keep its shape while it dries.
To felt your crocheted project by hand:
Using hot, soapy water, vigorously scrub the project until it’s felted to the desired consistency. To increase the agitation, scrub the piece on a bamboo sushi mat or washboard. Felt small pieces, projects with raw edges that have been cut, or spots that need extra attention by hand. Note that felting by hand will take a little longer than felting by machine and it will leave your hands in desperate need of moisturizer.
Blocking is a simple finishing technique that helps shape and relax a piece of crocheted fabric to prepare it for assembly or give the final project a neat and polished appearance. Blocking lets you stretch and shape the fabric, smooth out the stitches, neaten up the edges, and relax stiff, crunchy, and curly fibers. While there are several ways to block your work, the basic steps for all methods include:
2. Stretching and shaping the pieces to the desired size, using a form if necessary.
3. Allowing the piece to dry.
To successfully block a project, you need a few tools: a blocking surface, water, rust-proof pins, a ruler, and a form (if necessary for shaping). The blocking surface should be flat, something you can stick pins into, and something that can get wet. You can purchase a blocking board, which is made specifically for the process, or you can create your own surface by folding up a towel or using an ironing board. (I used a towel when blocking most of the projects in this book.) If you don’t use a blocking board, which has a grid of ruled lines to make uniform shaping easier, use a ruler to measure the piece when you’re blocking to a certain size.
Different fibers prefer different methods of blocking. If the fiber you’re using doesn’t come with a wash-and-care label, use the methods below as a guide or block a small sample swatch before you block the finished project to make sure you get the desired result.
The wet block method soaks the fabric to relax sturdy fibers like jute, hemp, and sisal. Although plant fibers tend to be stiff and inelastic in their natural state, a simple wet block can give the project a softer drape. Animal fibers may also be wet blocked to give the project a polished appearance, but handle them gently because they tend to felt in the presence of heat and agitation. Do not wet block delicate fibers like silk, which may fall apart or become water damaged.
To wet block:
1. Submerge the piece in a bowl, sink, or tub of cool water, and then gently roll it in a towel to remove the excess water. Do not wring.
2. Lay the piece on a flat blocking surface, shape it to the desired size, and pin the edges to the blocking surface.
3. Allow the piece to dry completely. Drying time can be a few hours to several days depending on the thickness of the fiber.
The steam block method, which uses steam to relax and soften the fabric, is the most versatile process because it works well on most fibers, including those that shouldn’t get thoroughly wet. Be very careful when steam blocking synthetic fibers, as they can become scorched with too much heat. You will need a fabric steamer or an iron with a steam setting. Do not let the steam touch the fabric directly.
To steam block:
1. Lay the piece on a flat blocking surface, shape it to the desired size, and pin the edges to the blocking surface.
2. Move the steamer (or a steam iron set to steam) 5 to 10 inches (13 to 25.5 cm) above the fabric until the entire piece is damp. Alternatively, you could thoroughly wet a thin towel or piece of linen, wring it out to remove the excess water, and lay this over the pinned piece. Then press lightly on the towel with a steam iron until the entire piece is damp. Remove the towel.
3. Allow the piece to dry completely. Drying time can be a few hours to several days depending on the thickness of the fiber.
The spray block method is the gentlest process, using a misting of water to relax the fabric for a nice drape. This method is best for delicate fibers like silk, any fiber that can’t be wet or steam blocked, and projects that only require light blocking to shape the piece. You will need a spray bottle filled with water.
To spray block:
1. Lay the piece on a flat blocking surface, shape it to the desired size, and pin the edges to the blocking surface.
2. Mist the fabric evenly with water until damp.
3. Allow the piece to dry completely. Drying time can be a few hours to several days depending on the thickness of the fiber.
Some projects, like felted bags or starched containers, need to be formed into a three-dimensional shape while they dry. The trick is to find an object that has the shape or dimension you want for your project. To block with a form, insert the form into the piece, wet the piece according to the blocking method you are using, stretch the fabric around the form to achieve the desired shape, and then set it aside to dry completely. If you are using objects as forms that really shouldn’t get wet, like your brother’s favorite DVD or the book you just borrowed from a friend, place the object in a plastic bag before you block.
Here are a few ideas for forms you might be able to find around the house:
• Plastic drawers, boxes, or containers
• Wadded-up plastic grocery bags
• Plastic canvas (the stuff used for cross-stitch or needlepoint is also used to give bags or boxes structure; find it at craft stores); cut or bend it to shape
• Balloons
• Bowls, glasses, or bottles
• Wadded-up newspaper
• DVDs
• Books: hardcovers, paperbacks, phone, or other
There are a few methods for joining crocheted fabrics together. You can stitch them together with fiber and a needle, crochet them together with a hook, or sew them together with a sewing machine. Whether the seam is visible or not depends on which way the fabrics are held together during the seaming process. If you join the pieces with the right sides of the fabric together, you will end up with a virtually invisible seam. If you hold the wrong sides of the fabric together, the seam will be visible from the outside. Intentionally working the seam so it’s visible from the outside is usually done for decorative reasons. Work under at least two threads for each layer of fabric to ensure that the seam is secure. This creates a bulkier seam than if you worked under just one loop, but you don’t want your seams stretching.
You can use a variety of common sewing stitches to create a seam. I usually use the backstitch, whipstitch, running stitch, or basting stitch. Any of these stitches can be worked in thread, yarn, or fiber. The size of the needle you need depends on the thickness of the fiber and the type of fabric you’re working with. The needle should be able to sew through the fabric without stretching it and the eye of the needle should be large enough to accommodate the thread or fiber. Before you start stitching, secure the fiber (do this at the end of your seam, too) by sewing a few short stitches in the same location, working over the tail end to keep it in place. If you are sewing with a thick fiber, you can weave in the tail ends instead.
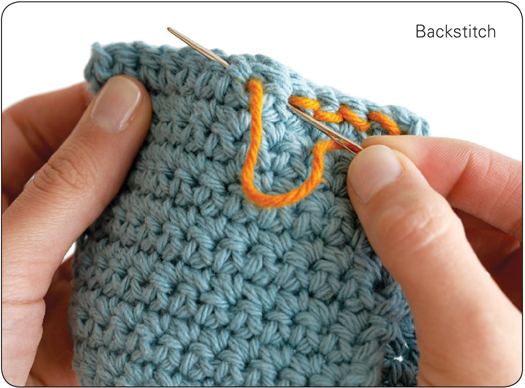
The backstitch is often used to create invisible seams along the inside (or wrong side) of the fabric. This method creates a secure, inelastic seam because each stitch overlaps the previous one. Use the backstitch for seams that require strength.
1. Pin the pieces together with right or wrong sides facing according to the pattern instructions. Be sure to align the edges of the pieces, with rows or stitch patterns lining up.
2. Cut and thread an 18-inch (46 cm) length of fiber onto your needle. With one side of the fabric facing you, bring the needle from back to front through all layers.
3. Take a small stitch ¼ inch (0.5 cm) back, pushing the needle from front to back, then bring the needle from back to front ½ inch (1 cm) forward.
4. Repeat step 3 along the seam.
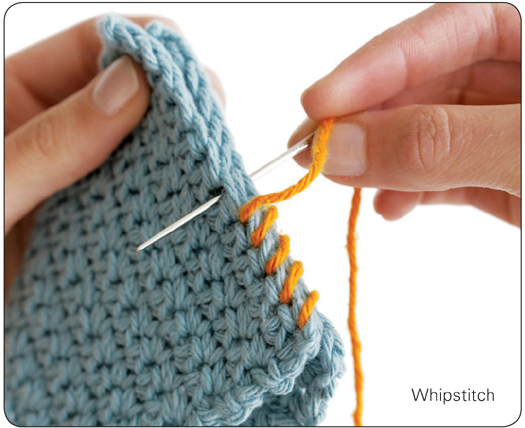
The whipstitch looks like the spiral binding of a book. It can be used for an inside seam or to create a decorative edge on an outside seam. The whipstitch creates a more flexible seam than the backstitch.
1. Pin the pieces together with right or wrong sides facing according to the pattern instructions. Be sure to align the edges of the pieces, with rows or stitch patterns lining up.
2. Cut and thread an 18-inch (46 cm) length of fiber onto your needle. With one side of the fabric facing you, bring the needle from back to front through all layers.
3. Bring the needle over the top of both edges and insert it from back to front again, through all layers, about ¼ inch (0.5 cm) further along the fabric.
4. Repeat step 3 along the seam.
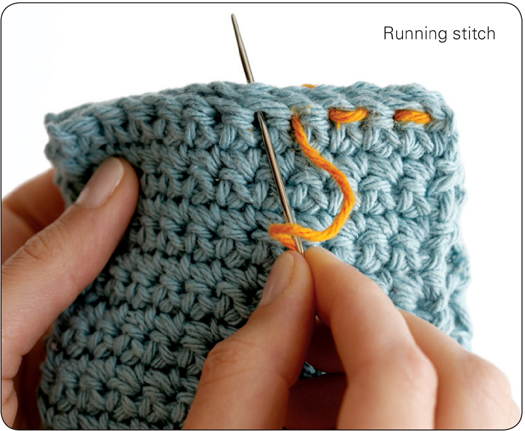
The running stitch is one of the most basic stitches in sewing. It’s used for gathering fabric, decorative outlining, making temporary seams (also known as basting), and sewing basic seams that won’t take too much strain. Running stitches are spaced ⅛ to ¼ inch (0.3 to 0.5 cm) apart for seaming. Basting stitches are simply longer running stitches, spaced ½ to ¾ inch (1 to 2 cm) apart. Basting stitches are used to temporarily hold fabrics together or to mark a stitching line.
1. Pin the pieces together with right or wrong sides facing according to the pattern instructions. Be sure to align the edges of the pieces, with rows or stitch patterns lining up.
2. Cut and thread an 18-inch (46 cm) length of fiber onto your needle.
3. With one side of the fabric facing you and working from right to left, weave the point of the needle in and out of the fabric, through all layers. Keep the stitches even and consistent, placing the same amount of space between each one.
The most common method of crocheting pieces together is to work a slip stitch or single crochet through both layers of fabric. You can also join pieces together with chain stitches (as described in the Corde Market Bag). A crocheted seam can be worked on the right sides of the fabric to create a decorative and visible seam (see the Vintage Satchel), or from the wrong side so the seam is hidden (as in the Jute Filet Bag). Unless otherwise instructed, always work under at least two threads for each layer of fabric to make the seam secure.
Joining pieces together with a slip stitch creates a strong, inelastic seam.
1. Pin the pieces together with right or wrong sides facing according to the pattern instructions. Be sure to align the edges of the pieces, with rows or stitch patterns lining up.
2. With one side of the fabric facing you, join yarn by bringing a loop through the first stitch from both layers from back to front with the hook. Pull the tail end to 4 to 6 inches (10 to 15 cm) to the back and hold it out of the way for weaving in later.
3. Insert the hook from front to back, through both layers, ¼ to ½ inch (0.5 to 1 cm) farther along the fabric, yarn over, and pull a loop through to the front, then through the loop on the hook.
4. Repeat step 3 along the seam. Fasten off and weave in ends.
Joining pieces with single crochet creates a flexible, ridged seam that can be used for decorative purposes when worked on the right sides of the project.
1. Pin the pieces together with right or wrong sides facing according to the pattern instructions. Be sure to align the edges of the pieces, with rows or stitch patterns lining up.
2. With one side of the fabric facing you, join yarn by bringing a slip knot through the first stitch from back to front with the hook. Pull the tail end 4 to 6 inches (10 to 15 cm) to the back and either hold it out of the way for weaving in later or lay it on top of the fabric edges so you can work over it as you join them together.
3. Yarn over and pull a loop through the loop on the hook.
4. Insert the hook from front to back, through both layers, ¼ to ½ inch (0.5 to 1 cm) farther along the fabric. Yarn over and pull a loop through to the front (2 loops on hook), yarn over and pull through both loops on the hook.
5. Repeat step 4 along the seam. Fasten off and weave in ends.
I love to make bags with stylish linings, but my first attempts at sewing were crude at best. I broadened my creative horizons by learning hand- and machine-sewing skills, so if you don’t have a lot of sewing experience, here are a few tips for preparing and sewing woven fabrics to your crocheted projects.
• Prewash fabrics to remove excess dyes and to avoid shrinkage after you’ve sewn it into your project.
• Always measure everything twice.
• To make sturdy seams, use a backstitch or a combination of a few running stitches and a backstitch.
• Finger press or iron the seam allowances flat before you sew the seam. Pressing the hem can be used as a substitute or in addition to using pins, but it helps keep the edges from sliding out of place while you work.
• Get yourself some fusible webbing. It is a piece of fiber that fuses fabrics together to hold them in place before sewing and to add stability to lighter weight fabrics.
Many of the patterns in this book feature embellishments that make the project unique. Buttons, beads, and ribbons are embellishments that you can find in most craft stores. Felted beads and embroidered stitches are embellishments that you can create yourself. Embroidery may look difficult at first, but the basic stitches—running stitch, backstitch, and whipstitch—are easy to master with a little practice. Decorative stitches, like the blanket stitch and French knot, are described in patterns throughout the book. I learned most of my embroidery skills through books and websites with lots of pictures and video stitch guides. The Readers Digest Complete Guide to Needlework (Readers Digest, 1979) has step-by-step instructions, photographs, and illustrations for all types of needlework, including sewing, crochet, knitting, macramé, quilting, appliqué, and embroidery. Check it out.
Although many projects in this book were designed to be made with nontraditional fibers, you can pretty easily substitute more mainstream yarns if you choose.
When substituting yarns and fibers in these patterns—or in any pattern—choose an alternate fiber that is similar in content, texture, and thickness. For instance, string and cotton yarns are very similar in size and fiber content, so they are easily interchangeable. Sisal, on the other hand, is a highly textured, thick twine. If you tried to substitute it for a cotton project like the Strappy Clutch, you would end up with an unpleasantly rough and large clutch.
Once you’ve selected a fiber, create a sample swatch using the suggested hook size to determine whether the fiber is suitable for the pattern. First compare your gauge to the pattern gauge. If the gauge matches, you can move on to drape. If the gauge is off, try a new hook size until you get the gauge needed for the pattern. If the gauge is way off, you may want to reconsider the new fiber.
Once the question of gauge has been settled, assess the swatch for drape. Drape is a term that describes the way a fabric hangs. If you think about the drapes or curtains in your living rooom, you can imagine how the word applies to crocheted fabric. A soft and lacy bag with fluidity in its structure is considered to have better drape than a container with stiff sides. The content, texture, and thickness of a fiber affect how the finished fabric will drape. An animal fiber like wool is soft and stretchy; it is more likely to produce a fabric with better drape than the same pattern made with a strong, inelastic plant fiber like cotton. A thick fiber with lots of texture like sisal will produce a stiff and rigid fabric with considerably less drape than a smooth and slick fiber like string or thin leather cord.
If your gauge is off and the fiber is wrong, the drape of the project changes and you won’t end up with what you expect. Even if the gauge is right, the fiber still may not produce the intended drape. For example, if you’re making a container that stands up on its own, you need tight stitches and a strong fiber. Big, loose stitches and a soft, limp fiber won’t give you the desired drape. Changing the hook size can alter how a fabric drapes. If the fabric isn’t behaving the way you want it to, try changing the size of the hook. Go up in size for a looser stitch and more drape, or go down in size for a tighter stitch and less drape. (For more information about drape, see here.)
If the new yarn or fiber has the proper gauge and a similar drape, it’s suitable for the project and you’re good to go.
This section addresses a few of the most common problems you’ll run into when crocheting, why they happen, and—most important—how to fix them.
The Problem: The edges of the fabric are getting narrower.
What’s Happening? You’ve lost stitches somewhere along the way.
Why? Stitches are commonly lost at the beginning or end of a row because it’s hard to tell where the first or last stitch of the row is.
To Fix It: Count the number of stitches in the row. If you’ve lost several stitches and it’s noticeable, hold up the piece and try to figure out where it started to narrow, then go ahead and carefully pull out the stitches to that point. Count the number of stitches in that row and if you have the right number of stitches, begin to stitch again.
If you’ve only lost one or two stitches, work the next row with the same number of increases to get you back on track. Hold up the work and see whether the fix is noticeable. If it’s not, then do your best to forget about it. If it is, see above.
To keep the problem from happening in the future, use a stitch marker to mark the first and last stitch of the row. When you work your way back to the marker you’ll know where to place your first or last stitch. Count the stitches in the row every few inches to make sure you have them all.
The Problem: The edges of the fabric are getting wider.
What’s Happening? You’ve added stitches somewhere along the way.
Why? Stitches are commonly added at the beginning or end of a row because it’s hard to tell where the first or last stitch of the row is.
To Fix It: Count the number of stitches in the row. If you’ve added several stitches and it’s noticeable, hold up the piece and try to figure out where it started to get wider, then go ahead and carefully pull out the stitches to that point. Count the number of stitches in that row and if you have the right number of stitches, begin to stitch again.
If you’ve only added one or two stitches, work the next row with the same number of decreases to get you back on track. Hold up the work and see whether the fix is noticeable. If it’s not, then do your best to forget about it. If it is, see above.
To keep the problem from happening in the future, use a stitch marker to mark the first and last stitch of the row. When you work your way back to the marker you’ll know where to place your first or last stitch. Count the stitches in the row every few inches to make sure you have them all.
The Problem: The edges of the fabric are curling.
What’s Happening? The tension in the stitches may be too tight or the content of the fiber may just create a stiff fabric.
Why? There are two reasons why your tension may be too tight. (1) You may be pulling the working yarn too tightly as you work the stitches, or (2) the hook size is too small for the fiber.
To Fix It: Try stretching the work to see whether it loosens up the stitches.
Loosen up your tension. Try changing the way you hold the working yarn. If you are wrapping the yarn around the pinkie or index finger more than once, take off a loop to allow the yarn to flow more smoothly.
Try working with a larger hook size.
Block it. If you are just too far gone and the piece is almost done, try blocking it to reduce the curl.
The Problem: The foundation edge is narrower or tighter than the rest of the fabric.
What’s Happening? The foundation chain stitches are too tight.
Why? The chain stitch is narrow and doesn’t have the supporting threads that bigger stitches have, so it’s easy to make the foundation chain too tight.
To Fix It: Try to keep the chain stitches loose. Some of the slack in the stitch will be taken up by the following row of stitches.
If you have trouble adjusting your chain tension, try using a hook one size larger to make the chain, then switch back to the project hook on the following row.
Use the foundation stitch rows to create a foundation edge that is more even with the rest of the work.
The Problem: There are gaps along the edges of the work.
What’s Happening? The turning chain may be too loose.
Why? Sometimes the standard turning chain doesn’t work well with the fiber or your particular tension.
To Fix It: Omit one chain from the standard turning chain for the stitch you are using.
The Problem: I’m struggling to slide the hook through the stitches.
What’s Happening? Your tension is too tight or the hook is pointing in the wrong direction.
Why? Holding the fiber too tightly and pointing the grooved end of the hook in the wrong direction are common mistakes for beginning crocheters.
To Fix It: Try loosening up the amount of tension applied with the hand controlling the yarn.
Be sure to point the grooved end of the hook toward the inside point of the stitch.
Keep the chain stitches loose and fat. Any slack in the stitch will be taken up by the following row of stitches.