If you’ve made it this far, you’re ready to play. In the previous chapters you’ve learned how to use basic stitches, simple techniques, and uncommon materials to create unique and functional projects. The projects in this chapter were inspired by my personal obsessions with structure and form using traditional and alternative materials and techniques.
I see myself as a functional creator. I don’t like having a lot of knick-knacks around the house, so when I make something, it has to have a practical application of some sort—at least most of the time. Occasionally, however, I become taken with the concept of form over function.
The Sushi project is a perfect example. My family loves to eat sushi, so the project was a natural extension of something we enjoy doing together. With the sushi mastered, I turned to the Sake Set, spending night after night stitching and frogging until I was satisfied. Sometimes you just have to forego the planning process and pick up a hook to see what will happen.
The projects in this chapter (and the tips and techniques that follow) were conceptualized, designed, and mastered through random experimentation. I include my advice here so you don’t have to learn the hard way like I did. Actually, sometimes making mistakes is the best way to learn and design. Either way, just have fun with this stuff.
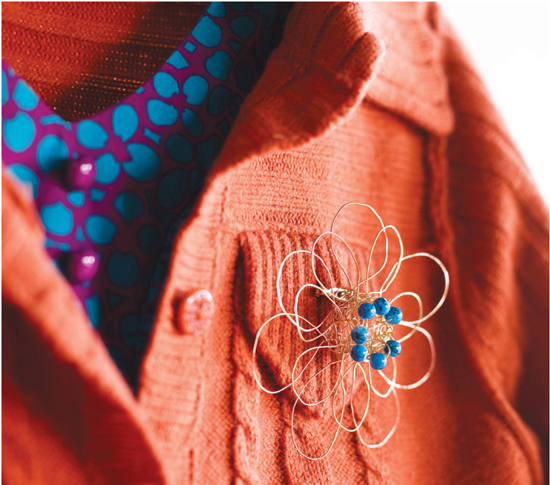
My most recent obsessive period started after a friend inspired me to try crocheting with wire. For one whole week, I wrangled spool after spool of wire, working up several variations on a gold wire circle with beads that would eventually become the Wire Flower.
Working with wire isn’t exactly like working with yarn or other natural fibers. In crochet, we hold pliable fibers by weaving them over and under our fingers to maintain tension. Because tension is already built into wire, you don’t need to hold it the same way you hold yarn. The more you bend the wire, the harder and stiffer it becomes until it reaches a breaking point. So the less often you bend the wire, the better.
Try one of these methods for holding the wire to see which is most comfortable for you:
Method 1: For the smallest amount of tension, use only the left thumb and middle finger to pinch and control the wire coming off the spool.
Method 2: For more tension, drape the wire over your left index finger and then pinch it between your thumb and middle finger.
You don’t need a slip knot to start the chain when you’re working with wire; simply twist it into a loop large enough to fit on the hook. And instead of circling the hook around the wire, use the hand that is holding the wire to wrap it around the hook, and then draw the hook through the chain or stitch. If you try to maintain a tight tension, you will find yourself struggling against the wire. Keep a loose tension and make smooth, deliberate movements. Don’t worry about imperfect loops and stitches as you go. The finesse is in the finishing. Once the project is done, block it by using your fingers or pliers to stretch and shape the loops.
Because wire is stiff, it doesn’t show texture and pattern very well. Keep to basic, simple stitches like single and double crochet. When planning big wire projects, work it up in stash thread or cheap wire first to avoid the possibility of making a mistake. Unfortunately, mistakes in wire aren’t as forgiving as they are when you’re using pliable fibers. If you do make a mistake, you can rip back a few stitches by taking them out slowly and carefully. If you have to rip back more than a few stitches, it’s best to start over.
Wire will eat your hooks for breakfast, lunch, and dinner, cutting annoying grooves into wood and plastic hooks, and scratching the paint off color-coated metal hooks. Use only steel or uncoated aluminum hooks.
Wire ends can be woven in through the stitches like yarn, but they can also be wrapped around a few wires of a stitch to secure. Be sure to hide and trim any ends to keep them from poking out.
Simple wire crochet can be done with basic crochet supplies and a sharp pair of scissors. However, the addition of a few wire work supplies can make things easier and more comfortable. These basic tools are available at craft stores.
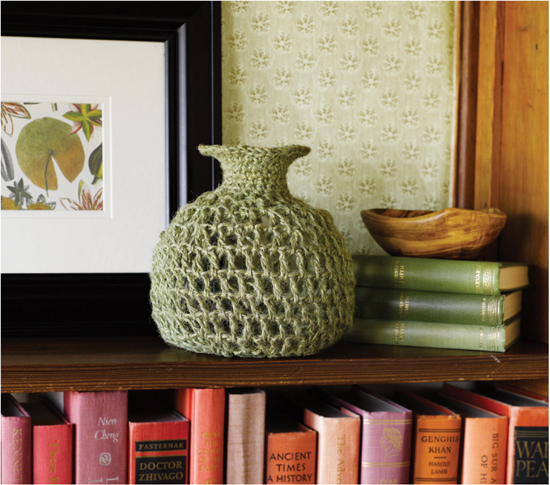
Wire is used in the Jute Vase, the Wire Flower and the Petite Fleur Vases.
 TIP: Wire cutters—used to cut wire. The pointy tips get into small, tight spaces.
Flat-nosed pliers—used to grip the wire and smooth out the kinks.
Round-nose pliers—used to make wire loops and your own closures.
Needle-nose pliers—used to grip, bend, and cut wire. The long pointed ends can get into small spaces.
Crocheting with beads adds color and texture to any piece. Beads can be sewn on after a project has been crocheted, but they can also be worked into the project as you go. Here are some tips for working with beads:
• Select beads that can be strung onto the fiber you are working with. If your chosen beads don’t fit, string them onto a coordinating thread and work the thread together with the fiber, pulling the bead up the thread before completing the stitch.
• Beads must be strung before you begin. This means you have to know how many beads are needed in advance. If you are extremely precise, string exactly what you need. If you like to have some wiggle room, string more than you think you’ll need.
• Don’t despair if you’ve run out of beads before you’re done. Cut the fiber, add more beads, and weave the ends in.
Beads will always be added to the back of the fabric. This is important to remember because if you are working in the round, then the back side of the fabric will become the right side. If you are working in rows and the project is double sided, you can work beads on both sides. To keep beads on the right side of the fabric only you will have to turn at the end of each row or round and only add them when working on the wrong side.
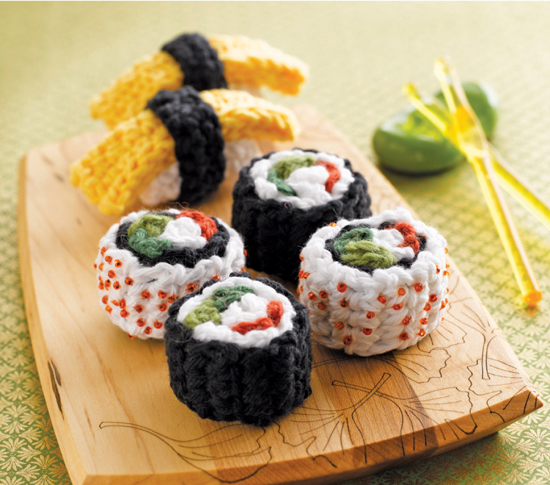
Beads are used in Sushi and the Wire Flower.
The trick to designing a felted project is to figure out how big your pre-felted piece needs to be in order to end up with the desired post-felting size. Start with a test swatch that’s at least 5 inches (13 cm) square to get a good shrink assessment. (My default test swatch for worsted-weight wool is a half double crochet stitch pattern created with a 5.5 mm hook and a single strand of yarn.) If you want to experiment with different stitches, hook sizes, and fibers, create separate swatches for each one to see what effect the changes have on the felted result. Be sure to log your results in a stitch diary for future reference. Note the brand of yarn, yarn weight, hook size, and stitch pattern along with the pre-felt and post-felt gauges as described below.
Say you want to make a bag that measures 10 by 12 inches (25.5 by 30.5 cm) after felting.
1. Create a 5-inch-square (13 cm) test swatch using the hook and stitch pattern you will use in the project.
2. Mark off a 4-inch (10 cm) square on the swatch using knotted scraps of a contrasting colored fiber that won’t felt (cotton works great).
3. Count and record the number of stitches and rows within the 4-inch (10 cm) square to get the gauge, then divide by 4 to get your gauge per inch. (In this example: 3½ stitches and 3 rows = 1 inch [2.5 cm].)
4. Felt the test swatch to your desired texture (see photo).
5. Measure your marked-off square to figure out how much it has shrunk. (In this example: The 4-inch [10 cm] square is now 3 by 3½ inches [7.5 by 9 cm] after felting.)
6. Divide the final number of inches in width and height by 4 to get the shrink percentage: 3 ÷ 4 = .75 (width) and 3½ ÷ 4 = .875 (length).
7. Work backward from the shrink percentage to figure out how big the project needs to be before felting. For a bag that will be 10 by 12 inches (25.5 by 30.5 cm): 10 ÷ .75 = 13.3 inches (34 cm) wide before felting and 12 ÷ .875 = 13.7 inches (35 cm) long before felting.
8. Using the gauge of 3½ stitches and 3 rows per inch, we can calculate how many stitches and rows we need to work with to make the bag: 13.3 inches (34 cm) × 3.5 stitches per inch = 46.6 (or 47) stitches wide and 13.7 inches (35 cm) × 3 rows per inch = 41.1 (or 41) rows long.
To create this bag, you can either: (1) work two 13.3 by 13.7-inch (34 by 35 cm) panels and sew them together before felting, (2) double the number of stitches in the width and work the bag in a tube to create the front and back at the same time, or (3) double the number of rows to create a long rectangle, fold it in half, and seam the sides.
Felting is used in The Tube Bag, the Vintage Satchel, and the Martini Bag.
Crocheted mesh is a lacelike fabric that can be used on its own or combined with other materials for texture, contrast, and structure. A versatile little stitch pattern, mesh creates material for garments, bags, accessories, and home décor. By itself, mesh fabric is lacy and fluid, perfect for an expandable market bag. To make the mesh more structured, use a heavy fiber like jute. Add texture and color by weaving ribbon or strips of fabric through the spaces. To add more interest to the stitch pattern, try filling in a few mesh blocks using the same stitch you are using for the mesh grid.
Mesh is created by alternating stitches with spaces. The height of the spaces is determined by the height of the stitches. You can use singles, doubles, trebles, or any stitch you desire. The width and shape of the spaces are determined by how many chains are made and how many stitches are skipped. When creating the foundation row for the pattern, make sure each mesh pattern repeat will fit.
For example, if you are making a rectangular shape you might work (double crochet in next stitch, chain 3, skip 3 stitches). In order to fit this pattern repeat, the previous row needs to have a multiple of 4 stitches to work from (3 skipped stitches + 1 dc = 4 stitches). If you are working in rows, include one extra stitch in the foundation row to work the last stitch into. If you’re working in rounds, you don’t need the extra stitch, just join the last chain space to the first stitch.
Mesh is used in the Jute Filet Bag and Lace Vases.

These projects were designed to be springboards to creativity and I hope they inspire you to try something different the next time you pick up your hook.
Holding one strand of MC and one strand of CC together, make an adjustable ring.
Rnd 1: Ch 4 (counts as dc, ch 1), (dc, ch 1) 6 times into ring, dc into ring, hdc in 3rd ch of beg ch-4 to join – 8 ch-1 sps.
Rnd 2: Ch 4 (counts as dc, ch 1), (dc, ch 1) in space made by hdc join, (dc, ch 1) twice in each ch-1 sp around to last ch-1 sp, (dc, ch 1, dc) in last ch-1 sp, hdc in 3rd ch of beg ch-4 to join – 16 ch-1 sps.
Rnd 3: Ch 4 (counts as dc, ch 1), *(dc, ch 1) twice in next ch-1 sp, (dc, ch 1) in next ch-1 sp; rep from * around to last ch-1 sp, (dc, ch 1, dc) in last ch-1 sp, hdc in 3rd ch of beg ch-4 to join – 24 ch-1 sps.
Rnd 4: Ch 4 (counts as dc, ch 1), (dc, ch 1) in sp made by hdc join, *(dc, ch 1) in each of next 2 ch-1 sps, (dc, ch 1) twice in next ch-1 sp; rep from * around to last 2 ch-1 sps, (dc, ch 1) in next ch-1 sp, dc in last ch-1 sp, hdc in 3rd ch of beg ch-4 to join – 32 ch-1 sps.
Rnd 5: Ch 4 (counts as dc, ch 1), *(dc, ch 1) twice in next ch-1 sp, (dc, ch 1) in each of next 7 ch-1 sps; rep from * twice, (dc, ch 1) twice in next ch-1 sp, (dc, ch 1) in each of next 5 ch-1 sps, dc in last ch-1 sp, hdc in 3rd ch of beg ch-4 to join – 36 ch-1 sps.
Rnd 6: Ch 4 (counts as dc, ch 1), (dc, ch 1) in each ch-1 sp around, hdc in 3rd ch of beg ch-4 to join.
Rnds 7–8: Rep Rnd 6.
Rnd 9: Ch 4 (counts as dc, ch 1), (dc, ch 1) in each of next 2 ch-1 sps, *dc2tog over next 2 ch-1 sps, (dc, ch 1) in each of next 4 sts; rep from * around, ending dc2tog over next 2 ch-1 sps, dc in last ch-1 sp, hdc in 3rd ch of beg ch-4 to join – 30 ch-1 sps.
Rnd 10: Ch 4 (counts as dc, ch 1), *dc2tog over next 2 ch-1 sps, (dc, ch 1) in each of next 3 ch-1 sps; rep from * around, ending dc2tog over next 2 ch-1 sps, (dc, ch 1) in next ch-1 sp, dc in last ch-1 sp, hdc in 3rd ch of beg ch-4 to join – 24 ch-1 sps.
Rnd 11: Ch 4 (counts as dc, ch 1), *dc2tog over next 2 ch-1 sps, (dc, ch 1) in each of next 2 ch-1 sps; rep from * around, ending dc2tog over next 2 ch-1 sps, dc in last ch-1 sp, hdc in 3rd ch of beg ch-4 to join – 18 ch-1 sps.
Rnd 12: Ch 2 (counts as hdc), hdc in each ch-1 sp around, sl st in first hdc to join – 18 hdc.
NECK
Rnds 1–4: Ch 1, sc in first st, sc in each st around, sl st in first sc to join.
Rnd 5: Ch 1, 2 sc in first st, *sc in each of next 2 sts, 2 sc in next st; rep from * around, ending sc in each of last 2 sts – 24 sc.
Rnd 6: Ch 1, sc in each st around.
Rnd 7: Ch 1, sc in each of first 2 sts, *2 sc in next st, sc in each of next 2 sts; rep from * around, ending 2 sc in last st – 32 sc.
Rnd 8: Ch 1, 2 sc in first st, *sc in each of next 3 sts, 2 sc in next st; rep from * around, ending sc in each of last 3 sts, sl st in first sc to join – 40 sc.
Fasten off and weave in ends with yarn needle.
Holding the open end of the balloon, insert the round end into the vase. Blow up the balloon until the vase is rounded and smooth. Keeping the end of the balloon pinched closed, adjust any stitches that look out of place, then let the air out of the balloon.
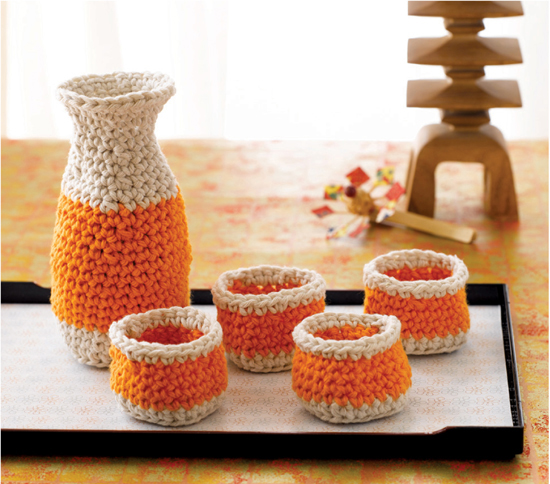
PITCHER
Using MC and larger hook, make an adjustable ring.
Rnd 1: Work 8 sc into ring, join with a sl st in first sc – 8 sc.
Rnd 2: Sc in first st, *3 sc in next st, sc in next st; rep from * twice, 3 sc in last st, join with sl st in first sc – 16 sc.
Rnd 3: Sc in each of first 2 sts, *3 sc in next st, sc in each of next 3 sts; rep from * twice, 3 sc in next st, sc in last st, join with sl st in first sc – 24 sc.
Rnd 4: Sc in each of first 3 sts, *3 sc in next st, sc in each of next 5 sts; rep from * twice, 3 sc in next st, sc in each of last 2 sts, join with sl st in first sc – 32 sc.
Rnd 5: Working through blo, sc in each st around, join with sl st in first sc.
Rnd 6: Working through both loops, sc in each st around, join with sl st in first sc.
Rnd 7: Sc in each st around, change to CC, join with sl st in first sc.
Rnds 8–14: Sc in each st around, join with sl st in first sc.
Rnd 15: Sc in each of first 2 sts, *sc2tog over next 2 sts, sc in each of next 6 sts; rep from * twice, sc2tog over next 2 sts, sc in each of the last 4 sts, join with sl st in first sc – 28 sc.
Rnd 16: Rep Rnd 6.
Rnd 17: Sc in each of first 3 sts, *sc2tog over next 2 sts, sc in each of next 5 sts; rep from * twice, sc2tog over next 2 sts, sc in each of the last 2 sts, join with sl st in first sc – 24 sc.
Rnd 18: Rep Rnd 6.
Rnd 19: Sc in each of first 2 sts, *sc2tog over next 2 sts, sc in each of next 4 sts; rep from * twice, sc2tog over next 2 sts, sc in each of the last 2 sts, change to MC, join with sl st in first sc – 20 sc.
Rnd 20: Rep Rnd 6.
Rnd 21: Sc in each of first 3 sts, *sc2tog over next 2 sts, sc in each of next 3 sts; rep from * twice, sc2tog over next 2 sts, sc in last st, join with sl st in first sc – 16 sc.
Rnd 22: Rep Rnd 6.
Rnd 23: Sc in each of first 2 sts, *sc2tog over next 2 sts, sc in each of next 2 sts; rep from * twice, sc2tog over next 2 sts, join with sl st in first sc – 12 sc.
Rnd 24–25: Rep Rnd 6.
Rnd 26: Sc in each of first 2 sts, *2 sc in next st, sc in each of next 2 sts; rep from * twice, 2 sc in next st, join with sl st in first sc, turn – 16 sc.
Rnd 27: Ch 1, sc in joining sl st, sc in each of next 2 sts, 2 sc in next st, sc in each of next 3 sts, 3 sc in next st (forms the pouring spout), *sc in each of next 3 sts, 2 sc in next st; rep from * once, join with sl st in first sc – 21 sc.
Fasten off and weave in loose ends with yarn needle.
CUPS (Make 4)
Using larger hook and MC, make an adjustable ring.
Rnd 1: Work 8 sc into ring, join with a sl st in first sc – 8 sc.
Rnd 2: Sc in first st, *3 sc in next st, sc in next st; rep from * twice, 3 sc in last st, join with sl st in first sc – 16 sc.
Rnd 3: Sc in each of first 2 sts, *3 sc in next st, sc in each of next 3 sts; rep from * twice, 3 sc in next st, sc in last st, join with sl st in first sc – 24 sc.
Rnd 4: Working through the blo, sc in each st around, join with sl st in first sc.
Rnd 5: Working through both loops, sc in each st around, change to CC, join with sl st in first sc.
Rnd 6–7: Sc in each st around, join with sl st in first sc.
Rnd 8: Switch to smaller hook, sc2tog over first 2 sts, *sc in each of next 4 sts, sc2tog over next 2 sts; rep from * twice, sc in each of the last 4 sts, change to MC, join with sl st in first sc – 20 sc.
Rnd 9: Work 2 sc in first st, *sc in each of next 4 sts, 2 sc in next st; rep from * twice, sc in each of last 4 sts, join with sl st in first sc – 24 sc.
Fasten off and weave in loose ends with yarn needle.
The pattern can be made using one or more colors. I think my next one will be stripes of multiple colors.
Embroider a Japanese symbol or design on the front of the pitcher. Any embellishments, including embroidery or buttons, need to be added before forming the narrow neck at the top of the pitcher (around Rnds 16–17), otherwise the opening becomes too small to work through. I made the blue and brown version shown here with a round base. Start with 8 sc in an adjustable ring and work a circle in sc as directed here for four rnds (for the pitcher) and three rnds (for the cups). Follow the pattern above beg with Rnd 5 (for the pitcher) and Rnd 5 (for the cups). I embroidered a little tree using wool yarn and French knots for flowers.
Substitute 50 to 100 yards (46 to 91.5 m) of double-knit (dk) to worsted-weight cotton yarn, lightweight jute twine, hemp, or raffia … even acrylics would work as long you play with the hook size to ensure your stitches are tight.

Sake Set with embroidery
~ return to pattern ~
10 to 20 yards (9 to 18 m) #1 white
10 to 20 yards (9 to 18 m) #2 black
3 to 5 yards (2.7 to 4.5 m) #10 yellow
5 yards (4.5 m) #439 grass
5 yards (4.5 m) #766 avocado
IMITATION CRAB FILLING
With white yarn, ch 5.
Row 1: Sc in 2nd ch from hook and in each ch across, turn – 4 sc.
Row 2: Ch 1, sc in each st across, turn.
Rep Row 2 working a total of 7 rows in white, then 3 rows in paprika, for a piece that measures about 2½ inches (6.5 cm) long. Fasten off and weave in ends with yarn needle.
AVOCADO AND CUCUMBER FILLING
With avocado yarn, ch 5.
Row 1: Sc in 2nd ch from hook and in each ch across, turn – 4 sc.
Row 2: Ch 1, sc in each st across, turn.
Rep Row 2 working a total of 4 rows in avocado, then 4 rows in grass, for a piece that measures about 2 inches (5 cm) long. Fasten off and weave in ends.
RICE
With white yarn, ch 5.
Row 1: Sc in 2nd ch from hook and in each ch across, turn – 4 sc.
Row 2: Ch 1, sc in each st across, turn.
Rep Row 2 for 11 rows or until piece measures about 3 inches (7.5 cm). Fasten off, leaving a 6-inch (15 cm) tail for sewing.
NORI
With black yarn, work as for Rice for 15 rows or until piece measures 4 inches (10 cm).
Roll crab piece up beg with the short white end and ending with the crab. Roll each short end of the avocado/cucumber piece in toward the center.
Holding filling pieces together, wrap the rice around the filling and sew short ends together, catching a bit of filling in the sts to secure (see photo below).
Wrap nori around rice roll and sew ends together, catching a bit of the rice in the sts to secure. Weave in loose ends.

RICE
With white yarn, ch 7.
Row 1: Sc in 2nd ch from hook and in each ch across, turn – 6 sc.
Row 2: Ch 1, sc in each st across, turn.
Rep Row 2 until piece measures 4 inches (10 cm). Fasten off, leaving a 6-inch (15 cm) tail for sewing.
Roll short end over 3 times widthwise and whipstitch last row to folded edge. Fasten off and weave in ends.
CROCHETED EGG
With yellow yarn, ch 12.
Row 1: Sc in 2nd ch from hook and in each ch across, turn – 11 sc.
Row 2: Ch 1, sc in each st across, turn.
Rep Row 2 until piece measures 2 inches (5 cm).
Fold in half widthwise and and sl st long edges together. Fasten off and weave in ends.
Lay egg on top of rice.
NORI
With black yarn, ch 14 or until piece wraps around center of egg and rice.
Row 1: Sc in 2nd ch from hook and in each ch across, turn – 13 sc.
Rows 2–3: Ch 1, sc in each st across, turn.
Wrap nori around the egg and rice. Sew ends of nori together, catching a bit of the rice in the sts to secure. Fasten off and weave in ends.
An inside-out California roll is just a standard California roll with the nori wrapped around the filling and the rice on the outside. Sometimes, the roll is served topped with toasted sesame seeds or fish eggs. To make an inside-out California roll, simply use black yarn for the rice instructions and white yarn for the nori instructions. Thread 50 to 100 orange seed beads on orange thread for fish eggs (or use beige seed beads and beige thread for sesame seeds) and sew them onto the outside of the roll.
Use the patterns here to make your own tasty sushi creations, like spider rolls or sashimi.
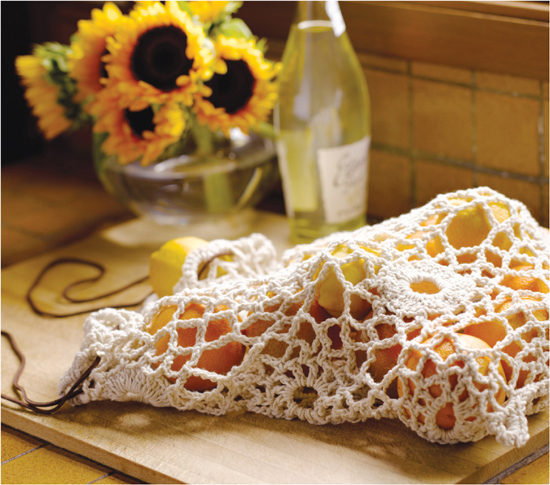
LAYOUT
Working horizontally, build 6 staggered rows with 3 motifs in each row. The first 5 rows should each consist of 1 dense motif and 2 lacy motifs; the sixth row consists of lacy motifs only. Join the first row of motifs to the sixth to create a tube. To create an even edge at the bottom, fill in the empty spots of every other row with a half motif.
JOINING THE MOTIFS
Join the motifs as you create them. Each motif is joined in the third rnd by two arches on each side. It sounds more difficult than it is, and once you get the hang of it, the project will go quickly.
Create the first motif (Motif A) without joining to anything. Once you reach the third rnd of the second motif (Motif B): Work the first 3 chains for one ch-7 arch of Motif B, sl st in the 4th, or center ch, of a corresponding arch on Motif A, pulling the yarn through the ch on Motif A and the loop on the hook. Ch 3, sc in 3rd ch of next ch-5 arch of Motif B. Repeat this process to connect the next arch of both Motif B and the corresponding arch on Motif A. Complete the joining rnd for Motif B and begin the third motif, joining the third motif to Motif B in the two arches opposite Motif A. With the first few motifs you will only be joining 2 motifs together. As you build the bag, the motif you are working on will need to join to 2 or more motifs, with the final motif joining on all sides.
As you get further along the bag, you might find that you’ve skipped over an arch or you need to undo a joining rnd in order to add another motif. It’s easy to unjoin a motif, even if it’s in the middle of the bag. Simply find the ending tail and unknot. Carefully pull the tail end to unravel the chains and stitches until you’re past the problem area, then rework the joining round and fasten off.
Fill in the bottom spaces at the end of every other round by joining 2 half motifs B and 1 half motif A to make the bottom edge straight across.
FULL MOTIF A (Lace)
With string and hook, ch 12, sl st in first ch to form ring.
Rnd 1: Ch 6 (counts as dc, ch 3), dc into ring, work (ch 3, dc) into ring 10 times, ch 1, dc in 3rd ch of beg ch-6 (counts as last ch-3 sp) – 12 ch-3 arches.

Rnd 2: Ch 1, sc in same dc, (ch 5, sc in center ch of next ch-3 sp) around, ch 2, tr in first sc (counts as last ch-5 sp) – 12 ch-5 arches.
Joining Rnd 3: Ch 1, sc in same tr, (ch 7, sc in center ch of next ch-5 sp) around, ending ch 7, sl st in first sc to join – 12 ch-7 arches. Fasten off.
FULL MOTIF B (Dense Center Circle)
Ch 14.
Rnd 1: Ch 3 (counts as dc), work 35 dc into ring, sl st in 3rd ch of beg ch-3 – 36 dc.
Rnd 2: Ch 1, sc in first st, (ch 5, sk next 2 dc, sc in next dc) around until 2 dc rem, ch 2, tr in first sc to join – 12 ch-5 arches.

Joining Rnd 3: Ch 1, sc in tr, (ch 7, sc in 3rd ch of next ch-5) around ending ch 7, sl st in first sc to join – 12 ch-7 arches. Fasten off.
HALF MOTIF A (Lace)
Ch 12, sl st in first ch to form ring.
Rnd 1: Ch 6 (counts as dc, ch 3), dc into ring, (ch 3, dc) into ring 6 times, turn – 7 ch-3 arches.
Rnd 2: Ch 5, (sc in center ch of next ch-3 sp, ch 5) around ending ch 2, tr in 5th ch of beg ch-6, turn – 7 ch-5 arches.
Joining Rnd 3: Ch 1, sc in same st, (ch 7, sc in center ch of next ch-5 sp) around – 6 ch-7 arches. Fasten off.

HALF MOTIF B (Dense Center Circle)
Ch 14.
Rnd 1: Ch 3 (counts as dc), work 22 more dc into ring, turn – 23 dc.
Rnd 2: Ch 1, sc in same st, (ch 5, sk next 2 dc, sc in next dc) around ending ch 2, tr in last st (counts as last ch-5 sp), turn – 7 ch-5 arches.
Joining Rnd 3: Ch 1, sc in same st, (ch 7, sc in center ch of next ch-5) around – 6 ch-7 arches. Fasten off.
TIP: You can also just work the joining sl st into the ch-7 space of the next motif if it’s too tedious to work directly into the center ch.

Turn the bag inside out and lay flat. With bottom edges pressed together and working through both layers, sc evenly across through the unjoined arches and dc posts along the edge to create the seam.
Fasten off and weave in loose ends with yarn needle. Turn RS out.
Join yarn through any free arch along the top edge and ch 1. Sc evenly along the top edge working 7 sc in the spaces of the unjoined arches and 3 sc in the spaces of the joined arches. Fasten off and weave in loose ends.
Weave leather lacing through the arches along the top edge. Leaving about 5 inches (13 cm) free, knot the two ends together with an overhand knot.
Cotton, linen, or 1-mm jute twine would be great substitutions for the kitchen string in this bag.
Increase the size of your bag by simply adding more motifs. Adding motifs to each row will make your bag longer; adding more rows of motifs will make it wider.
To make the top edge of the bag a straight edge, work an additional 3 half motifs and join them as you did for the bottom edge.
FIRST LAYER
String the beads onto the gold wire. Make a loop ½ inch (1 cm) in diameter and twist the base of the loop 2 times to secure. Insert the hook through the ring and draw up a loop, ch 1.
Rnd 1: Work 7 bsc into ring.
Rnd 2: Working through flo of the previous rnd, [insert hook in next st, yo and draw up a loop to about ¾ inch (2 cm) long, remove the hook from the loop, twist the base of the loop 2 or 3 times] 7 times – 7 petals.
Fasten off, leaving a 6-inch tail (15 cm).
SECOND LAYER
With copper wire, make a loop ½ inch (1 cm) in diameter and twist the base of the loop 2 times to secure. Insert the hook through the ring and draw up a loop, ch 1.
Rnd 1: Work 7 sc into ring.
Rnd 2: Rep Rnd 2 from first layer, pulling each loop to 1¼ inches (3 cm) long.
Fasten off, leaving a 6-inch (15 cm) tail.
Lay the first layer of petals on top of the second layer of petals. Using the tail end, whipstitch the tail through the stitches and around the center of both layers to secure. Secure the pin back using the second tail end or an extra length of wire.
After pulling and wrapping, your flower may be in need of a little TLC. Using your fingers, open the petals and smooth out any kinks.
The loops on each petal are adjustable; pull them out to make longer or shorter petals.
Add more beads or extra layers.
Make 2 of the first layer only with short loops, then attach to a pair of earring hooks by securing a jump ring to the back of the first round.
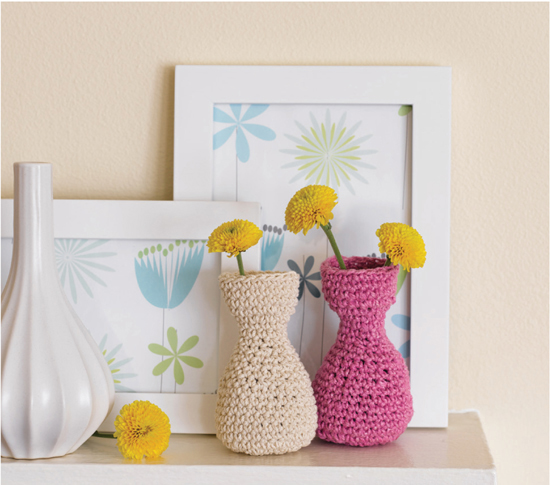
Make an adjustable ring.
Rnd 1: Ch 1, work 6 sc into ring – 6 sc.
Rnd 2: Work 2 sc in each st around – 12 sc.
Rnd 3: *Sc in next st, 2 sc in next st; rep from * around – 18 sc.
Rnd 4: *2 sc in next st, sc in each of next 2 sts; rep from * around – 24 sc.
Rnd 5: *Sc in each of next 3 sts, 2 sc in next st; rep from * around – 30 sc.
Rnds 6–10: Sc in each st around.
Rnd 11: *Sc2tog over next 2 sts, sc in each of next 3 sts; rep from * around – 24 sc.
Rnd 12: Rep Rnd 6.
Rnd 13: *Sc in each of next 2 sts, sc2tog over next 2 sts; rep from * around – 18 sc.
Rnd 14: Rep Rnd 6.
Rnd 15: *Sc2tog over next 2 sts, sc in next st; rep from * around – 12 sc.
Rnds 16–18: Rep Rnd 6.
Rnd 19: *2 sc in next st, sc in each of next 2 sts; rep from * around – 16 sc.
Rnd 20: *Sc in each of next 3 sts, 2 sc in next st; rep from * around – 20 sc
Rnds 21–23: Rep Rnd 6.
Sl st in each of next 2 sts. Fasten off and weave in loose ends with a yarn needle.
Make a dent with your thumb in the center ring at the bottom of the vase to help it sit flat. Insert the glass or plastic tube, add a little water and a flower, and you’re done.
To increase or decrease the width of the vase, work additional rounds at the base, increasing each round by 6 stitches (to make it wider) or work fewer rounds of increases (to make it skinnier). Work an increased or decreased number of even rounds (Round 6) to make the vase taller or shorter.
To make a hemp and copper wire vase, you need 15 yards (14 m) of 20-pound Hemp Basics hemp twine in #4000 black, 24 yards (22 m) of Elite Better Beads 28-gauge metallic wire in copper, and 3.75 (F/5) and 4.5 (G/7) hooks. Beginning with the hemp and the smaller hook, work the above pattern through Round 9. Switch to the copper wire and the larger hook for the remainder of the pattern. When crocheting with wire, hold the wire loosely and do not pull the stitches to tighten.
You can use any fiber you want with this pattern, but you might not get the sizes shown. Adjust the size of your hook if you change fibers. You don’t want to hurt your hands when working the stitches, but you do need to keep the stitches as tight as you comfortably can to help the vase keep its structure.
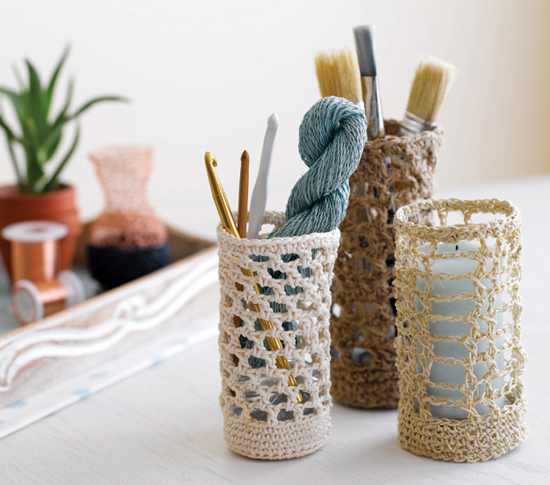
OPEN BASE
Fsc 36, leaving a 4-inch (10 cm) tail.
Rnds 1–6: Ch 1, sc in each st around, sl st in first sc to join.
RECTANGLES AND SQUARES MESH PATTERN
Rnd 1: Ch 4 (counts as dc, ch 1), sk next st, (dc in next st, ch 3, sk next 3 sts, dc in next st, ch 1, sk next st) around ending with ch 3, sl st in 3rd ch of beg ch-4 to join.
Rnd 2: Ch 4 (counts as dc, ch 1), sk next ch-1 sp, (dc in next dc, ch 3, sk next ch-3 sp, dc in next dc, ch 1, sk next ch-1 sp) around ending with ch 3, sl st in 3rd ch of beg ch-4 to join.
Rep Rnd 2 until desired height.
Last rnd: Ch 1, sc in same st as sl st, sc around working 1 sc in each dc, 1 sc in each ch-1 sp and 3 sc in each ch-3 sp, sl st in first sc to join.
Fasten off and weave in any loose ends. Follow Finishing instructions to stiffen fiber.
50 yards (46 m) 100% cotton medium-weight kitchen string in white
Size 3.5 mm (E/4) hook
CLOSED BASE
Rnd 1: Ch 1, 6 sc into ring, sl st in first sc to join – 6 sc.
Rnd 2: Ch 1, 2 sc in each st around, sl st in first sc to join – 12 sc.
Rnd 3: Ch 1, sc in first st, (2 sc in next st, sc in next st) around, 2 sc in last st, sl st in first sc to join – 18 sc.
Rnd 4: Ch 1, 2 sc in first st, (sc in each of next 2 sts, 2 sc in next st) around, ending sc in last st, sl st in first sc to join – 24 sc.
Rnd 5: Ch 1, sc in each of first 3 sts, (2 sc in next st, sc in each of next 3 sts) around, ending 2 sc in last st, sl st in first sc to join – 30 sc.
Rnd 6: Ch 1, 2 sc in first st, (sc in each of next 4 sts, 2 sc in next st) around, ending sc in each of last 4 sts, sl st in first sc to join – 36 sc.
Rnd 7: Ch 1, sc in blo of each st around, sl st in first sc to join.
Rnds 8–10: Ch 1, sc in each st around, sl st in first sc to join.
BASIC MESH PATTERN
Rnd 1: Ch 5 (counts as dc, ch 2), sk next 2 sts, (dc in next st, ch 2, skip next 2 sts) around until 3 sts rem, dc in next st, hdc in 3rd ch of beg ch-5 to join – 12 squares.
The joining hdc creates the last sp of the rnd and sets you up in the correct position to begin the next rnd in the center of the last sp.
Rnd 2: Ch 5 (counts as dc, ch 2), (dc in next ch-2 sp, ch 2) around until 1 sp rem, dc in last ch-2 sp, hdc in 3rd ch of beg ch-5 to join.
Rep Rnd 2 until desired height.
Last rnd: Ch 1, 2 sc in sp created by joining hdc, work 3 dc in each ch-2 sp around to end, sc in same sp as the first sc, sl st in first sc to join.
Fasten off and weave in any loose ends. Follow Finishing instructions to stiffen fiber.
50 yards (46 m) lightweight jute twine in brown
Size 5.0 mm (H/8) hook
Work Closed Base as for Kitchen String vase through Rnd 5.
Next rnd: Ch 1, sc in blo of each st around, sl st in first sc to join.
Continue to work sc through both loops for 3 rnds.
STACKED MESH PATTERN
Rnd 1: Ch 5 (counts as dc, ch 2), sk next 2 sts, *dc in each of next 4 sts, ch 2, sk next 2 sts, dc in next st, ch 2, skip next 2 sts; rep from * around, sl st in 3rd ch of beg ch-5 to join.
This is a basic square pattern; replace an occasional ch-2 with 2 dc in each of next 2 ch sts to form random blocks of dc sts.
Rnd 2: Ch 5 (counts as dc, ch 2), (dc in next dc, ch 2) around, sl st in 3rd ch of beg ch-5 to join.
Rep Rnd 2 until desired height.
Last rnd: Ch 1, sc in same st as sl st, sc evenly around working 1 sc in each st and 2 sc in each ch-2 sp, sl st in first sc to join.
Fasten off and weave in any loose ends. Follow Finishing instructions to stiffen fiber.
Using 3 parts fabric stiffener (glue) to 1 part water, pour enough glue mixture to cover the bottom of a plastic bag. Place the cylinder in the bag and squish to cover the surface with the solution. Remove the cylinder and pat with a paper towel to remove excess glue. Bend a piece of plastic mesh into a tube to make the form, or use a glass big enough to help the cylinder keep its shape while it dries. Insert the form, smooth the piece to the desired shape, and set in a warm place to dry completely. It should only take a couple of hours to set.
You can stitch up the bases with almost any fiber, including jute, twine, and cotton thread.
Make the vases larger or smaller by adding or removing rounds of increases to change the width and adjusting the rows to change the height.
Experiment with the mesh patterns, using taller stitches and additional chain stitches to create larger spaces.
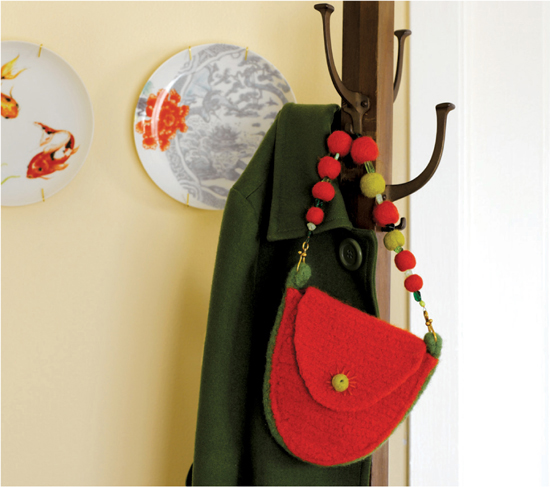
BAG
1 skein #9465 pimento (MC)
1 skein #2409 olive (CC)
FELTED BEADS
FRONT
With MC, ch 9.
Row 1: Hdc in 2nd ch from hook and in each ch across, turn – 8 hdc.
Row 2: Ch 3, hdc in 2nd ch from hook, hdc in next ch, hdc-flo in each st across, [hdc into the vertical threads on the side of the last st (see here)] twice, turn – 12 hdc.
Rows 3–4: Rep Row 2 ending with 20 hdc.
Row 5: Ch 1, 2 hdc-flo in the first st, hdc-flo in each st across to last st, 2 hdc-flo in last st, turn – 22 hdc.
Rows 6–7: Rep Row 5 ending with 26 hdc.
Row 8: Ch 1, hdc-flo in each st across, turn.
Row 9: Rep Row 5 – 28 hdc.
Rows 10–11: Rep Rows 8 and 9 ending with 30 hdc.
Rows 12–20: Rep Row 8.
Fasten off and loosely weave in ends with a yarn needle.
BACK
Work as for front but do not fasten off. Continue on to flap.
FLAP
Rows 1–5: Ch 1, hdc-flo in each st across, turn.
Row 6: Do not ch 1, skip first st, hdc-flo in each st across to last st, turn leaving rem st unworked – 28 sts.
Repeat Row 6, decreasing each row by 2 sts, until there are only 10 sts remaining.
Fasten off and loosely weave in ends.
GUSSET
With CC, ch 6.
Row 1: Hdc in 2nd ch from hook and in each ch across, turn – 5 hdc.
Row 2: Ch 1, hdc-flo in each st across, turn.
Rep Row 2 until gusset measures about 24 inches (61 cm).
Fasten off and loosely weave in ends.
With WS together, pin the gusset to the front panel leaving 2 inches (5 cm) of gusset extending from each side of the top edge for the strap tabs. Join MC and sc gusset and front together. Repeat for back, leaving flap unattached.
Fold tabs down 1 inch (2.5 cm) to WS and sew to gusset, creating a pocket for the clasp hook after felting.
With yarn needle and cotton yarn or thread, baste the opening of the front and back together. Baste the flap to the front panel of the bag.
Follow the instructions for felting in the washing machine. Once the bag has felted to size, roll it in a towel to remove any excess water. Remove the cotton basting thread and shape the flap as shown. If the flap is a little wonky, trim it with a pair of sharp scissors. Give any rough edges a quick felt by hand using hot, soapy water. Stuff the bag with plastic grocery bags to form the shape, pin the flap to the bag, and set it in a warm place to dry completely.
FELTED BEADS FOR STRAP (Make 10 of varying sizes from ½ to 1½ inches [1 to 4 cm] in diameter, plus one bead ½ inch [1 cm] in diameter for the button)
Prepare a bowl of hot water with a squirt of detergent or 2 tablespoons of baking soda. Take a strand of roving about 16 inches (40.5 cm) long and 1 inch (2.5 cm) wide. Spread and fluff the fibers a little to loosen. Begin rolling the wool into a ball, wrapping the loose roving around your fingers as you would wind a ball of yarn (see photo at left), until it is roughly twice as big as you want it to be after felting. Dip the ball into the water to get it thoroughly wet. Pat the ball with your fingers to encourage the fibers to latch onto each other. As the fibers begin to mat and intertwine, gently roll the ball between your hands. As the ball starts to shrink you can roll it more quickly and firmly. If you need to add more fiber, simply take additional roving, fan out the fibers, and wrap them around the ball, then dip the ball in water and roll it between your hands. Repeat the wrap, dip, and roll until the ball is about the size you want it to be. Dip it in cold water to remove any excess detergent, roll it in a towel to remove any excess water, and set it in a warm place to dry completely.
To make the bead hole, push a knitting needle, skewer, or toothpick all the way through the center of the bead.

• Be gentle with the beads at first until the fibers begin to adhere to each other.
• Try to keep the inside of the bead a little loose and lofty to make it easier to poke a hole through. To do this, keep the first layer of roving pretty loose. As you add layers of roving, felt the additional layers more tightly by rubbing the bead more vigorously.
•If the bead isn’t the right size, add more layers of loose roving and continue felting.
•If the bead won’t stick together in some places, trim it with scissors, then add more layers of loose roving.
BUTTON HOLE
Poke a knitting needle or other pointy object through the bag flap 1½ to 2 inches (4 to 5 cm) from the bottom edge. Trim around the hole to widen it until the small felted bead can push through. Use the orange yarn and a yarn needle to embroider or stitch around the hole with a blanket stitch. Pull a small piece of yarn through the button and make a French knot. Using the button hole as a guide, push the tail ends from the French knot through the front panel and make a couple of small sts in the same spot to secure the button.
STRINGING THE BEADS
Lay out the felted and glass beads for the strap and reposition until you like the pattern. Begin to string the beads onto the wire, adding a crimp bead after the first 2 or 3 beads and before the last 2 or 3 beads (do not crimp yet). Draw out another 5 inches (13 cm) of beading wire and cut. Thread one end of the beading wire through the small ring of one hook closure, then thread the wire back through the first couple of beads and the crimping bead. Pushing the crimping bead snug against the bead below it, crimp the bead with needle-nose pliers to secure the wire end. Repeat for the second end of the beading wire, pulling the wire tight to make sure there isn’t a lot of excess wire between beads. Snip any extra wire. Attach the hook closures to the gusset tabs on the bag. If the pocket of a tab happened to felt shut, just poke a knitting needle or pen through to loosen it up.
Add chain stitches to the gusset to make it wider. The wider the gusset, the deeper the bag.
Use all glass beads to create the strap.
Cut the felted beads in half to make half-moon beads or cut the rounded end off opposing sides to make a flat bead.
Loosely layer additional colors of roving around the bead to give it a mottled effect.