Sometimes the easiest way to spark your creativity is to make an existing pattern. As you work, think about ways you could change the pattern to suit your personality by making it bigger or smaller, changing the stitch pattern or fiber, or adding embellishments. I use this approach with cooking. I’ll follow a recipe the first time, then start adding and subtracting ingredients based on my likes and dislikes—and sometimes my empty pantry. It’s true that occasionally I end up with a culinary disaster, but more often than not, I discover a new and tasty dish.
In “Create,” I offer up some very basic patterns using simple stitches and techniques. If you like the projects as they are, go ahead and follow the instructions to make what you see in the photos. If you want to customize the project to your own taste, I’ve included ideas for tweaking the original project—to adjust the size or fiber—at the end of the pattern.
With The Tube Bag, you’ll learn to use basic stitches and felting to create a fashionable bag with very little construction. I follow the main pattern with three easy adaptations to get you started customizing your own projects. The Jute Filet Bag uses a sturdy fiber and introduces the concept of adding a simple lining. With the Vintage Satchel, you will play with variations on a basic stitch and practice sewing pieces together. In the Patchwork Handbag, you will work up crocheted squares using uncomplicated stitches, then combine them with squares of fabric and a lining.
Start with the basic project, and then let your creativity run wild. In the next chapter, I’ll talk about the basic principles of designing a project, including specific techniques for shaping and embellishing.
Loosely ch 100, sl st in first ch to form a ring.
Hdc-flo in each ch around, do not join in the first st. Continue working hdc-flo in each st around in a spiral until piece measures 12 inches (30.5 cm) from foundation ch. Sl st in next st. Fasten off and continue to Finishing or one of the following adaptations to customize your bag.
Turn the bag inside out. Pressing the tube flat, join yarn through both layers of the first st on one end and slip stitch the tube together to form the bottom. Fold the bottom corner points in 1 inch (2.5 cm) with the tip of the point aligned with the seam and sew a couple of stitches to secure (see photo.) This creates a paper bag–like base for the bag. Turn the bag right side out. Thread the scrap cotton yarn onto yarn needle and baste the opening of the bag closed. Follow the instructions here for felting in the washing machine. Once the bag has felted to size, roll it in a towel to remove the excess water and then remove the basting thread. Insert the form and set the bag in a warm and dry area to dry completely (this may take up to a couple of days).
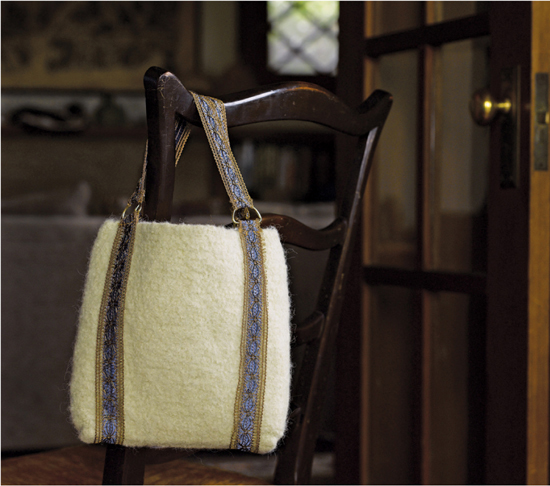
Cut two long pieces of ribbon to 22 inches (56 cm) and two short pieces to 14 inches (35 cm). To attach the D-rings, thread the end of one long piece through one D-ring, fold the end over ¼ inch (0.5 cm) twice to hide the raw edge, and sew the hem close to the D-ring. Add a D-ring to the three remaining ends of the two long pieces of ribbon in the same manner. Next, attach one end of a short piece of ribbon to the attached D-ring of a long piece of ribbon and attach the second end of the short piece to a D-ring on the second long piece of ribbon. Repeat for the second short piece of ribbon until all pieces are connected in an oval.
The short ribbon pieces will make up the handles of the bag, and the long ribbon pieces are sewn to the bag. Wrap the long ribbons around the front, bottom, and back of the bag about 1 inch (2.5 cm) in from the sides. Sew the ribbons in place using ⅛-inch backstitches and matching thread.
To substitute the yarn, use 325 yards (297 m) of 100 percent animal fiber in a worsted weight; do not use superwash.
To make the bag wider, add stitches to the foundation chain.
To make the bag longer, add additional rounds.
Follow the instructions for making The Tube Bag but do not fasten off. Continue on to make the flap.
FLAP
Ch 2, turn. Hdc-flo in each of next 50 sts across, ch 2, turn. Working in rows, continue in hdc-flo for 9 inches (23 cm) from beginning of flap.
Fasten off and loosely weave in ends.
Turn the bag inside out. Thread the wool yarn onto the large-eye yarn needle and whipstitch one end of the tube together to form the bottom. Make sure the flap spans the width of the back. Fold the bottom corner points in 1 inch (2.5 cm) with the tip of the points aligned with the seam and work a couple of stitches to secure (see photo). Turn the bag right side out. With the scrap of cotton yarn, loosely baste) the opening of the bag together, then baste the flap to the front with the edges aligned with the sides of the bag.
Follow the instructions for felting in the washing machine. Once the bag has felted to size, roll it in a towel to remove the excess water and then remove the basting stitches. Insert the form; make sure it fits snugly. Pull the edges of the flap to reshape if necessary, then pin the flap to the bag, making sure the edges line up evenly with the sides of the bag. Set in a warm place and allow the bag to dry completely (this may take up to a couple of days).
HANDLES
Once the bag has dried, sew the strap tabs to the sides of the bag using the sewing needle and matching doubled thread.
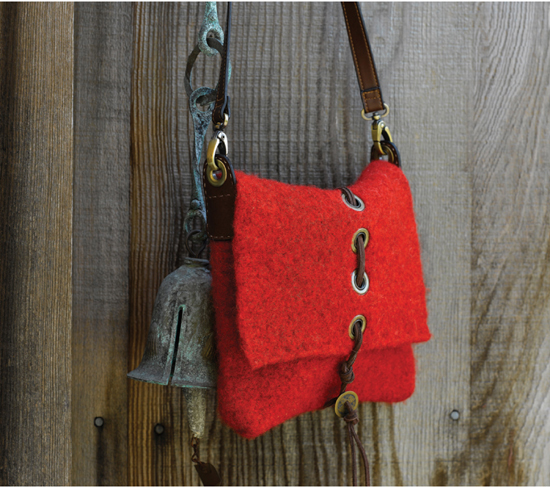
Using the knitting needle, make four holes evenly spaced up the center of the flap. Trim the holes to the size of the grommet center and attach the grommets per the manufacturer’s directions. Fold the leather lacing in half. Make an overhand knot 1 inch (2.5 cm) from the folded end to form a loop. Beginning with the grommet closest to the bottom edge of the flap, thread both tail ends of the lacing from front to back, then weave in and out of the grommets. Bring the lacing around the back of the bag and up to the front. Thread the tail ends through the Chinese coin. Pull the coin through the loop and make an overhand knot with the long laces to keep the coin from sliding off.
Try some simple embroidery to embellish the Hong Kong Bag. The tree trunk is outlined with split stitches and several autumnal colors for the leaves were made with French knots. I ended up giving this bag to my mom for her birthday, but she was kind enough to allow me to include a photo of it here.
To substitute the yarn, use 450 yards (411 m) of 100 percent animal fiber in worsted weight; do not use superwash.
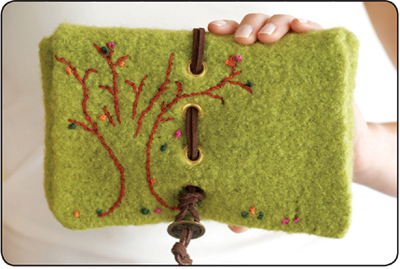
Hong Kong Bag variation with embroidery
~ return to pattern ~
1 skein #2403 brown (MC)
1 skein #8913 pink (CC)
1 skein #2427 burgundy (CC2)
BAG
Follow the instructions for The Tube Bag but add one increase in every other round. Place your increases randomly in the round, being sure not to stack them right on top of each other. To make the colorblock stripe, begin with MC and work for 9 inches (23 cm), then switch to CC for the remaining 3 inches (7.5 cm). Fasten off and loosely weave in ends.
HANDLES
With CC2, ch 280.
Row 1: Hdc in 2nd ch from hook and in each ch across, turn.
Rows 2–5: Ch 2, hdc in each st across, turn.
Fold the piece in half so you are seaming the long edges together and loosely sl st through both layers. Fasten off and weave in loose ends.
Holding two strands of CC2, ch 50. Fasten off.
Turn the bag inside out. Thread the wool yarn onto the large-eye yarn needle and whipstitch the shorter end of the tube together to form the bottom. Fold the bottom corner points in 1 inch (2.5 cm), with the tip of the point aligned with the seam, and work a couple of stitches to secure (see photo). Turn the bag right side out.
Place the bag, handle, and motif cord in a laundry bag or pillowcase and follow the instructions for felting in the washing machine. Once the pieces have felted to size, roll each one in a towel to remove the excess water. Shape the bag, flaring out the top edge, and pin it to a folded towel so it retains its shape as it dries. Cut the handle into two equal pieces and hand-felt the cut ends by scrubbing them with hot water and a small amount of soap. Set the pieces in a warm place to dry completely (this may take up to a couple of days).
Once the pieces are dry, use the knitting needle to make two holes for the handles on each side of the bag about 2 inches (5 cm) from the top edge and equally spaced from the sides. Using the small scissors, snip the opening wide enough to slide one end of the strap through. If you feel that the fabric at the openings needs a little smoothing out, scrub the raw edges with hot, soapy water until the stitches become invisible. Thread each end of the handles into the holes from the inside out and make an overhand knot close to each end.
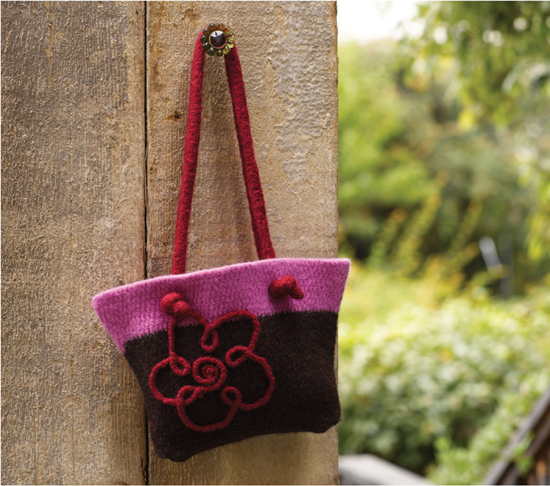
Shape the felted cord into a flower design on the front of the bag. Pin the design in place to keep it from moving while you work. Couch the design to the bag (see photo) using the same color yarn and the large-eye yarn needle. Finish by placing a stitch through the tail end of the cord and weave in any ends on the wrong side of the bag.
To substitute the yarns, use 440 yards [400 m] total (220 yards [200 m] of MC, 110 yards [100 m] each of CC and CC2) of 100 percent animal fiber in a worsted weight; do not use superwash.
Instead of using the colorblock shown, make this bag all in one color.
Make the top edge even wider by adding more increases. Increase every other round by two stitches or work one increase on each round.

Flower Basket Bag (detail)
~ return to pattern ~
Follow the instructions for The Tube Bag but do not fasten off. Continue on to shape the top for the handles.
BEGIN SHAPING
Row 1: Hdc-flo in next st, [hdc-flo2tog, hdc-flo in each of next 31 sts] three times – 97 hdc.
Row 2: Hdc-flo in each of next 16 sts, [hdc-flo2tog, hdc-flo in each of next 30 sts] twice, hdc-flo2tog, hdc-flo in each of next 15 sts – 94 hdc.
Row 3: Hdc-flo in next st, [hdc-flo2tog, hdc-flo in each of next 29 sts] three times – 91 hdc.
Row 4: Hdc-flo in each of next 15 sts, [hdc-flo2tog, hdc-flo in each of next 28 sts] twice, hdc-flo2tog, hdc-flo in each of next 14 sts – 88 hdc.
Row 5: Hdc-flo in next st, [hdc-flo2tog, hdc-flo in each of next 27 sts] three times – 85 hdc.
Row 6: Hdc-flo in each of next 14 sts, [hdc-flo2tog, hdc-flo in each of next 26 sts] twice, hdc-flo2tog, hdc-flo in each of next 13 sts – 82 hdc.
Row 7: Hdc-flo in each of next 2 sts, [hdc-flo2tog, hdc-flo in each of next 11 sts] six times, hdc-flo in each of next 2 sts – 76 hdc.
Row 8: Hdc-flo in each of next 8 sts, [hdc-flo2tog, hdc-flo in each of next 10 sts] five times, hdc-flo2tog, hdc-flo in each of next 6 sts – 70 hdc.
Row 9: Hdc-flo in each of next 2 sts, [hdc-flo2tog, hdc-flo in each of next 9 sts] six times, hdc-flo in each of next 2 sts – 64 hdc.
Row 10: Hdc-flo in each of next 7 sts, [hdc-flo2tog, hdc-flo in each of next 8 sts] five times, hdc-flo2tog, hdc-flo in each of next 5 sts – 58 hdc.
Row 11: Hdc-flo in each of next 2 sts, [hdc-flo2tog, hdc-flo in each of next 7 sts] six times, hdc-flo in each of next 2 sts – 52 hdc.
Row 12: Hdc-flo in each of next 6 sts, [hdc-flo2tog, hdc-flo in each of next 6 sts] five times, hdc-flo2tog, hdc-flo in each of next 4 sts – 46 hdc.
Row 13: Hdc-flo in each of next 2 sts, [hdc-flo2tog, hdc-flo in each of next 5 sts] six times, hdc-flo in each of next 2 sts – 40 hdc.
Row 14: Hdc-flo in next 5 sts, [hdc-flo2tog, hdc-flo in each of next 4 sts] five times, hdc-flo2tog, hdc-flo in each of next 3 sts – 34 hdc.
Fasten off and loosely weave in ends.
Turn the bag inside out. Thread the wool yarn onto the large-eye yarn needle and whipstitch the widest end of the tube together to form the bottom. Turn the bag right side out.
Follow the instructions for felting in the washing machine. Once the bag has felted to size, roll it in a towel to remove the excess water. Hand shape the bag, set it in a warm place, and allow it to dry completely (this may take up to a couple of days).
Once the bag has dried, use the scissors to cut a 2-inch-wide (5 cm) oval for the handle. The top of the oval should be centered about 2 inches (5 cm) from the top edge. Cut a slit 3½ inches (9 cm) long along each side of the opening at the top to separate the handles.

CUTOUTS
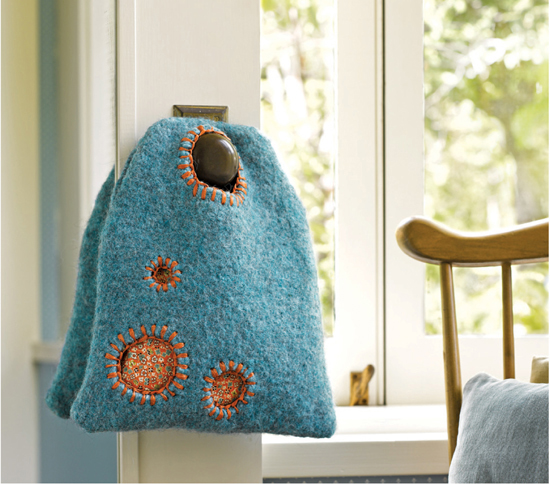
Cut three circles out of paper to use as templates. The circles shown are 2 inches (5 cm), 1½ inches (3.5 cm), and ¾ inch (2 cm) in diameter. Choose whatever size circles you want as long as they are no bigger than 2 inches (5 cm) in diameter. Pin the templates to the bag in your desired locations, then trace around them with chalk. Using the scissors, cut out the circles. If necessary, hand felt the cut edges by scrubbing them with hot, soapy water until the stitches become invisible.
Using the chalk, draw a guideline ½ inch (1 cm) around each cutout. With the Wraffia threaded onto the large-eye yarn needle, blanket stitch around each of the openings. Weave in the ends on the wrong side.
LINING
The lining will need to be doubled because it will be seen from both the inside and the outside through the cutouts.
Cut two 11 inch (28 cm) by 18 inch (46 cm) pieces of lining fabric. Working with one piece at a time, fold the fabric in half with the right sides together to make an 11 inch (28 cm) by 9 inch (23 cm) piece. With the folded edge at the bottom, sew the two sides together with a ½-inch (1 cm) seam allowance, leaving the top edge open. Repeat for the second lining.
Turn one lining right side out and insert it into the second lining. The right side of each lining should face each other. Sew the linings together ¼ inch (0.5 cm) from the top edge, but leave a gap of several inches open at the end. Fasten off.
Reach through the gap and carefully ease out the inside bag (see photo). Push the inner lining into the outer lining. To close the gap, push the seam allowance inward and pin or press with an iron (see photo).
Insert the double lining into the bag and pin the top edge to the bag under the cutout handles. With needle and thread, sew the lining to the bag ¼ inch (0.5 cm) from the top edge of the lining with ¼-inch (0.5 cm) backstitches. Tack down the bottom corners of the lining to the bottom of the bag with a few stitches to secure.

To substitute the yarn, use 400 yards (366 m) of 100 percent animal fiber in a worsted weight; do not use superwash. To substitute the raffia, use 10 yards (9 m) of coordinating fiber to stitch around the cut edges.
Fsc 56, sl st in first fsc to join, taking care not to twist chain.
Rnds 1–3: Ch 1 (does not count as sc), sc in each st around, sl st in first sc to join – 56 sc.
Rnd 4: Ch 7 (counts as dc and ch 4), *sk next 3 sts, dc in next st, ch 4; rep from * around ending last mesh with ch 1, dc in 3rd ch of beg ch-7 to join – 14 mesh spaces.
 TIP: Notice how we joined the round with a double crochet into the beginning chain? Sometimes when you’re working in rounds and you want to end in the middle of a space, like a chain space, you can work one of the basic stitches to replace the chains. For example, if you are working a ch-3 space and you want to be in the middle of the next ch-3 space to begin the next round, simply work one chain and a double crochet in the first stitch. Play with stitches and chains to see what looks right for your mesh or lace.
Rnds 5–12: Ch 7 (counts as dc and ch 4), *dc in next ch-4 sp, ch 4; rep from * around ending last mesh with ch 1, dc in 3rd ch of beg ch-7 to join.
Rnd 13: Ch 1, 3 sc in same ch-4 sp, work 4 sc in each ch-4 sp around ending with 1 sc in first ch-4 sp, sl st in first sc to join – 56 sc.
Rnds 14–16: Ch 1 (does not count as sc), sc in each st around, sl st in first sc to join.
Fasten off.
Turn the bag inside out. Holding the edges of one end of the tube together, join the jute in the first st through both layers with a sl st. Ch 1 and sl st through both layers of each st across to close the bottom of the bag. Fasten off and weave in loose ends. Turn the bag RS out.
Wet block to finished measurements.
LINING
Fold the fabric in half with RS together and lay it on a flat surface. Lay the bag on top of the fabric with the folded edge at the bottom. Trace around the three sides of the bag with chalk, adding an extra ½ inch (1 cm) for the seam allowance and leaving the folded edge intact. Cut along the chalk lines.
With RS together and the folded edge at the bottom, sew the sides together with a ½-inch (1 cm) seam allowance, leaving the top open. Turn right side out and insert the lining into the bag. Fold the top edge of the lining ¼ inch (0.5 cm) to the back. With the raw edge hidden by the band of sc sts at the top of the bag, hand-stitch the lining to the bag about ¼ inch (0.5 cm) from the top edge. Tack down the bottom corners of the lining to the bottom of the bag with a few sts to secure.
HANDLES
If you need to widen the holes on the handle to accommodate the jute twine, drill through every other hole on the handle. Attach the handles with the small-eye yarn needle and jute using a simple running stitch and weave in any loose ends.
The mesh pattern works in multiples of four sts. To make the bag wider or narrower, simply add or remove 4 chains for every 1 mesh sp, which is equal to about 2 inches (5 cm) in width.
You can use any sturdy fiber for this bag. Cotton or other plant fibers will help the bag retain its durability and structure. Wool or synthetic fibers will require you to carry a strand of matching cotton thread to reduce the inherent stretch of the fiber. Remember that you may need to adjust your hook size when working with thicker or thinner fibers; always check your gauge before you begin.
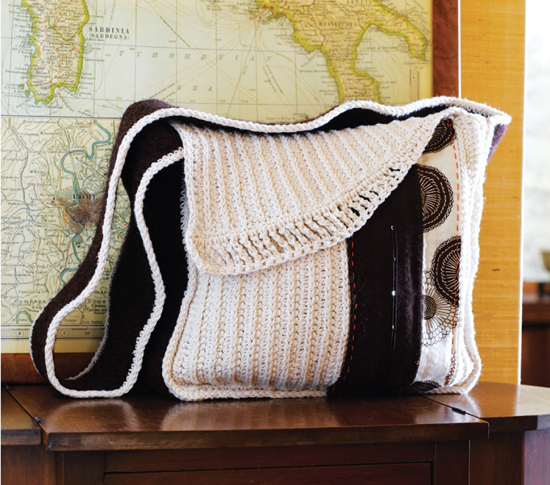
STRAP/GUSSET
With CC and larger hook, fhdc 295, join with sl st in first fhdc to form ring, taking care not to twist ch.
Rnds 1–8: Ch 1, hdc-flo in each st around, sl st in first hdc to join. Fasten off.
With MC, join yarn with a sl st in any st on one side of the strap, ch 1 and loosely sc in each st around. Fasten off. Rep for second side. Fold the strap in half twice widthwise, then loosely baste the edges together to keep the strap from stretching in the wash. It is not necessary to weave in ends.
Follow the instructions for felting in the washing machine. When the strap has felted to the desired texture, roll it in a towel to remove any excess water. Cut and remove the basting sts, then stretch and shape the strap with gentle tugs to work out any uneven edges. Set in a warm place to dry completely. Remove the cotton crochet sts.
FRONT
With smaller hook, fsc 44.
Row 1 (RS): Ch 1, hdc in 2nd ch from hook and in each ch across, turn – 44 hdc.
Row 2: Ch 1, sc-fml in each st across, turn.
Rows 3–38: Rep Rows 1 and 2.
EDGING
With RS facing, work one round of sc evenly around the entire piece to create a border. Work three sc in each corner st, and on edges where you work into the row ends, simply work one sc in each row end, making the edge even and smooth. Sl st in first sc of border to join.
Fasten off and weave in loose ends.
With smaller hook, fsc 60.
Row 1 (RS): Ch 1, hdc in each st across, turn – 60 hdc.
Row 2: Ch 1, sc-fml in each st across, turn.
Rows 3–14: Rep Rows 1 and 2.
BEGIN SHAPING FLAP
Row 1 (RS): Ch 1, hdc2tog over first 2 sts, hdc in each st across, turn – 59 hdc.
Row 2: Ch 1, sc-fml in each st across, turn.
Rows 3–20: Repeat Rows 1 and 2.
Work evenly in alternating stitch pattern without decreasing for four rows.
EDGING
With RS facing, work one rnd of sc evenly around entire piece to create a border. Work three sc in each corner st, and on edges where you work into the row ends, simply work one sc in each row end, making the edge even and smooth. Sl st in first sc of border to join and turn to work Flap Edge.
FLAP EDGE
The last row is a decorative edge for the bottom of the flap. A series of sts, gradually increasing in height, helps accentuate the curved shaping along the edge of the flap.
With WS facing, ch 1, sc in each of first 5 sts, esc in each of next 3 sts, dc in each of next 3 sts, edc in each of next 3 sts, tr in each of next 3 sts, etr in each of next 3 sts, dtr in each of next 3 sts, edtr in each st to the end of the flap edge.
Fasten off and weave in loose ends with large-eye yarn needle.
FABRIC STRIPS
With RS together, sew one long edge of the fabric scraps together with a ½-inch (1 cm) seam allowance to create a fabric panel. Press open the seam. Cut the fusible web to fit the fabric panel, then trim an additional ½ inch (1 cm) off all sides so the web is slightly smaller than the fabric. With the paper side up, center the web on the WS of the fabric panel and iron, leaving a ½-inch (1 cm) border of fabric on all sides.
FRONT
Remove the paper backing from the fusible web on the fabric panel. Fold all four edges of the fabric over to the WS and finger press along the folded edge. Place the fabric panel in the desired location on the front panel and iron in place. With embroidery floss threaded onto a needle, sew the fabric ¼ inch (0.5 cm) from the edge to the front using a ¼-inch (0.5 cm) running stitch.
Pin the front panel to the felted gusset around three sides with WS together, leaving the top edge unattached for the opening. With smaller hook and RS facing, sc the front panel to the gusset, working under two threads of the crocheted panel and through the holes in the strap. Sc evenly around the three sides of the bag, working 3 sc in each corner, then continue in sc around remaining edge of strap only, sl st in beginning st, turn.
Next round: Ch 1, sl st in each st around. Fasten off.
BACK
First you need to figure out where the back panel becomes the flap. The shaped edge of the back is the flap edge, the straight edge on the opposite side is the bottom edge. Beg at the bottom corner, count 44 stitches up each side, and place a marker. The remainder of the back panel, above the markers, is considered the flap and will not be attached to the gusset.
Pin the back panel to the gusset using the stitch markers and front panel as a guide, leaving the flap unattached. Before joining, make sure the back and front panels are even. Join back panel to gusset same as for front. Fasten off and weave in loose ends.
LINING
Fold the lining fabric in half with RS together. Tuck the flap into the bag so the top edge is flush with the front panel, then lay it on top of the fabric, leaving about 2 inches (5 cm) of the folded fabric edge extending at the bottom. With chalk, trace a line 2 inches (5 cm) from either side of the bag and ½ inch (1 cm) from the top edge of the bag. Leaving the folded edge intact, cut along the trace lines. With RS together, sew the sides of the lining together using a ½-inch (1 cm) seam allowance. Insert the lining into the bag and pull out the bag flap. Fold the top edge of the lining down ½ inch (1 cm) to the WS and pin in place around the opening of the bag. With needle and thread, use ⅛-inch (0.3 cm) backstitches to sew the top edge of the lining to the bag.
To substitute the yarns, use 400 yards (365 m) of 100 percent cotton in worsted weight (MC) and 250 yards (230 m) of 100 percent animal fiber in worsted weight (CC); do not use superwash.
Because the front and back panels are worked from side to side, adjusting the number of rows you make will make the bag wider or narrower.
If you don’t like the length of the finished strap, you can adjust it. Before crocheting the front and back panels to the strap, pin everything together and try it on for size. If the strap is too long, determine how much you need to remove and cut out a section where the strap hits the shoulder. Whipstitch or sew the short ends together. Hand felt the seam by scrubbing with hot water and a little soap until the sts have blended into the rest of the fabric.
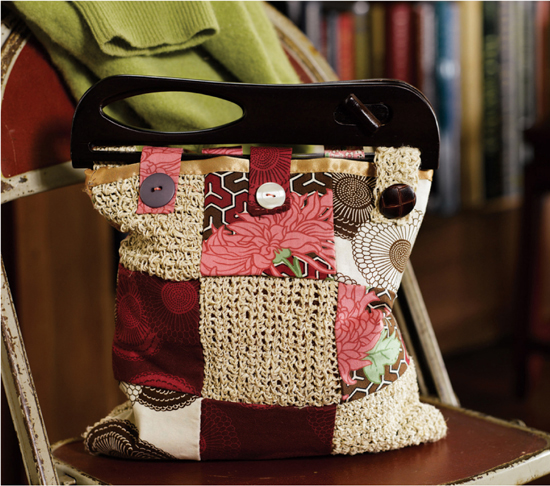
BASIC SQUARE (Make 2)
With hemp, fsc 18.
Rows 1–16: Ch 1, sc in each st across, turn.
Fasten off and weave in loose ends.
ALTERNATE BASIC SQUARE (Make 2)
Follow the instructions for the Basic Square above, but work all sts in flo.
WOVEN SQUARE (Make 2)
With hemp, fsc 18.
Row 1: Ch 1, sc in each of first two sts, (ch 1, sk 1 st, sc in next st) across, turn.
Row 2: Ch 1, sc in first st, sc in first ch-1 sp, (ch 1, sk 1 st, sc in next st) across, turn.
Rows 3–15: Rep Row 2 or until desired square size.
Row 16: Ch 1, sc in each st and ch-1 sp across.
Fasten off and weave in loose ends.
FABRIC SQUARES (Make 12)
Set aside the neutral-colored fat quarter that you will be fusing to the back of the squares. Cut one 8-inch (20 cm) square from each of the four fat quarters to be used on the outside of the bag.
Lay the fusible web, paper side up, on top of the fusing fabric. Cut four 8-inch (20 cm) square pieces of fusible web along with the fabric. Working with one square of web and fusing fabric at a time, press with an iron to fuse the layers together. Remove the paper backing from the fusible web and lay one of the coordinating fabric squares on top. Press with an iron to fuse. Repeat for all squares. Cut four 4-inch (10 cm) squares from each of the 8-inch fused fabric squares, for a total of 12 squares.
CROCHETED TABS (Make 2)
Fsc 20.
Rows 1–4: Ch 1, sc in each st across, turn – 20 sc.
Fasten off and weave in ends.
Follow the instructions to wet block each crocheted square to 4 inches (10 cm) square.

LINING
Fold the gold lining fabric in half with RS together and place on a flat surface. Lay the bag on top of the fabric with the folded edge at the bottom. Trace around the remaining three sides of the bag with chalk, adding an extra ½ inch (1 cm) for the seam allowance. Cut along the chalk lines, leaving the folded edge intact. With RS together, sew the two sides together, leaving the top open. Do not turn inside out.
PATCHWORK PANEL (Make 2)
Lay out all of the 4-inch (10 cm) squares (hemp and crochet) on a flat surface in 3 rows of 3 squares for the front and the back. Look at the sample in the photograph for guidance or play with the layout of colors and pattern until you reach a desired order.
Working on one panel at a time, sew 3 squares together to form a row and then sew 3 rows together to form a panel as follows: with RS together, pin the first 2 squares of the first row together and sew. Next, sew the third square to the second square to complete the first row. Put down the first row and begin the next row. Continue to sew the squares together, working across in rows until you have 3 rows of 3 squares each. Next sew the 3 rows together, with RS together, to form a 3 × 3 square panel.
Once both panels are made, sew the front panel to the back panel with RS together around the sides and bottom, leaving the top open. Place a damp towel on top of the bag and press with an iron to smooth out and flatten the seams. Turn RS out. Place a damp towel on top of the bag again and press with an iron to smooth out and flatten the outside of the seams.
With the patchwork handbag RS out and the gold lining fabric RS in, insert the patchwork handbag into the lining so the RS are facing each other. Sew the two together ½ inch (1 cm) from the top edge, leaving a gap of about 4 inches (10 cm) open at the end. Fasten off. Reach through the gap and gently ease out the patchwork bag and then stuff the lining into the bag. Push the remaining seam allowance of the gap to the WS and pin. Working through both the outside layer of lining and the patchwork panel, sew all the way around the bag ¼ inch (0.5 cm) from the top.
FABRIC TABS (Make 4)
Now that the bag is assembled, sift through the remaining scraps of fabric to make your tabs. You will need 2 crocheted tabs and 4 fabric tabs. Since the tabs will be centered on one of the top squares of the bag, choose a fabric that will complement, but not match, each square. Once you’ve settled on the fabrics, cut a 2½ by 5-inch (6.5 by 13 cm) rectangle from each of the four fabrics. With RS facing, fold the fabric in half lengthwise and sew the long edges together with a ¼-inch (0.5 cm) seam allowance to make a tube. Press the seam open and then turn the tube RS out. Flatten the tube so that the seam is in the center and press with an iron. Fold the short ends over ¼ inch (0.5 cm) twice to the side with a seam and hem in place using a coordinating thread.
Attach Handles
Straddle a tab through the handle so one end is centered over one square and the other end is in the same spot on the inside of the bag. Sew along the bottom edge of the tab working through all layers. Sew a button to the front of each tab.
To substitute the fiber, use 133 yards (122 m) of any double-knit (dk) or light worsted-weight fiber.
The size of this bag is completely adjustable. To change the size of the squares, inc or dec the number of sts in the foundation row to make the width larger or smaller. To adjust the height, simply work in rows until you have a perfect square. Alternatively, you can add more squares to make the bag bigger.
To design your own patchwork theme, simply crochet a few squares using any lightweight fiber. Cut several squares of coordinating fabrics to the same size and play with the design. When mixing up your own fabrics and fibers, try to match them to each other: hemp pairs well with cotton fabrics, and wool or felted fibers are a great match for knit fabrics.