Chapter 3: Basic Bead Stringing Techniques
Basic bead stringing is a good place to begin your journey into jewelry making. The techniques are simple, and you can find all the beads and supplies you’ll need at any local bead shop or craft store. In this chapter, you’ll learn how to lay out a design and string beads using the most popular bead-stringing materials. You’ll discover that the method used to finish the ends of a beaded strand depends on the type of stringing material you choose.
String and Finish Beading Wire
String and Finish Beading Cord
String and Finish Beading Thread
Lay Out a Design
You can save time and create more satisfying jewelry by laying out your beaded designs before you begin stringing.
Get Ready
Arrange the Beads and Findings
Using a bead board is a great way to lay out and organize your designs, whether you’re following project instructions or creating a new design from scratch. It’s much easier to rearrange beads when they are sitting on the board than to restring a beaded strand later.

Most boards have measurement marks to help you keep track of strand lengths. It’s not uncommon for these measurements to be slightly off, so it’s a good idea to check the accuracy of your board’s measurements with a tape measure before using it for the first time. If needed, you can make corrections by marking the board with a permanent marker.
Keep in mind the design principles from Chapter 2 as you arrange your beads and findings on the board. If you’re creating a design that includes larger focal beads, try positioning those beads first; then fill in the design with your smaller accent and spacer beads.
If your design has a clasp, lay the clasp pieces on the board along with the beads. This way, you can see how the clasp design looks with your beads and how the clasp will affect the jewelry’s length.

Bead Reaming
Design layout is a good time to inspect your beads for rough or sharp drill holes. Use a bead reamer to smooth the holes so that they won’t damage your stringing material later.
Simply choose a reamer with a tip that fits into the hole of your bead, and gently twist the reamer—or the bead—back and forth a few times. Some crafters keep the end of the reamer wet by dipping it into water occasionally while they work. This lubricates the reamer and may help it to last longer.

You can also use a reamer to slightly enlarge holes in pearls, which are very soft. Use care when reaming holes in glass beads to avoid chipping them.
Determine the Jewelry Length
You should decide how long you want your jewelry to be before you begin stringing beads. The length you choose depends on the size of the person who will wear it, and how you would like the jewelry to look. Here are some typical length measurements for necklaces, bracelets, and anklets.
Style or Size Common Measurements

Select a Stringing Material
As you may recall from Chapter 1, there are many bead-stringing materials. Some are very soft and require that you use a beading needle. A needle may be built into one end of the string, or you may need to attach one yourself. Other stringing materials are relatively stiff and do not require a needle.
By experimenting, you’ll discover which materials you most enjoy working with, and which match your personal design style.
How to Select a Stringing Material
Start thinking about the type of stringing material you’ll use during the design phase of your project. The type and size of stringing material you need depends on the textures, sizes, and weights of beads in your design and how you’d like your jewelry to look, feel, and wear.
Use the chart on the next page to become familiar with how the most popular bead-stringing materials can be used. To review the definitions of these materials, refer to Chapter 1.

What is “tiger tail,” and when would I use it?
Tiger tail is sometimes used as a generic name for all nylon-coated beading wire. However, it most commonly refers to early, lower-tech versions of the beading wire that most jewelry artisans use today.

Original tiger tail was a revolutionary stringing material because it was strong and didn’t require a beading needle. Its main drawback was that it kinked easily. Not only did this affect the appearance and lay of some jewelry, but the kinked portions of cable tended to weaken and break. The newer beading wires are softer and more resistant to kinking than those early versions.
Basic tiger tail is still sold by many suppliers, and it’s less expensive than the newer wires. You may want to use it for heavier necklaces, which are less likely to kink.

Select a Finishing Method
You probably already know how to thread a bead onto wire or string. A bigger challenge is deciding how to finish the ends of a beaded strand. Finishing refers to the techniques used to close strand ends so that the beads don’t fall off, and so that you can attach a clasp. Usually, you will want to finish one end of a strand before you begin stringing beads. You’ll finish the other end after all of your beads are strung.
How to Select a Finishing Method
The chart below indicates which finishing methods and findings are recommended for the most popular types of stringing material. You will learn how to apply each of these methods in the following sections of this chapter.

Choosing a Clasp
There are a lot of pre-made clasp styles that you can use. When you choose a clasp, consider how the various styles of clasps function. Simple hook clasps are easy to use, but they may not be secure enough for lighter-weight bracelets or necklaces.
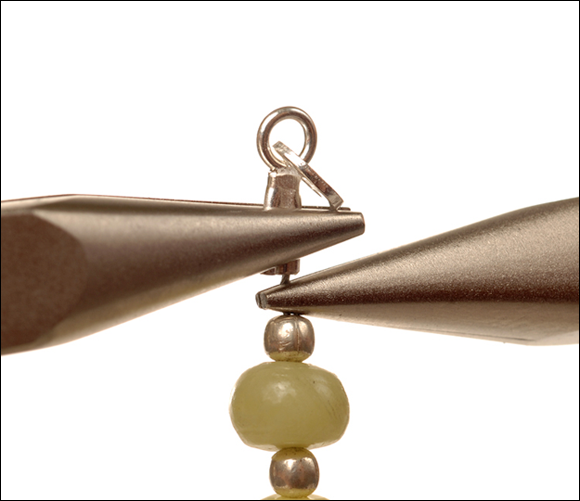
Toggle clasps have an elegant look, but you should provide a little extra length in your toggle-clasped designs (see the photo below). To close a toggle clasp, you need to pull its bar end into and completely through its loop end, and then allow the bar to rest back inside the loop. If your jewelry isn’t long enough to accommodate this movement, it could weaken over time from being pulled too tightly.

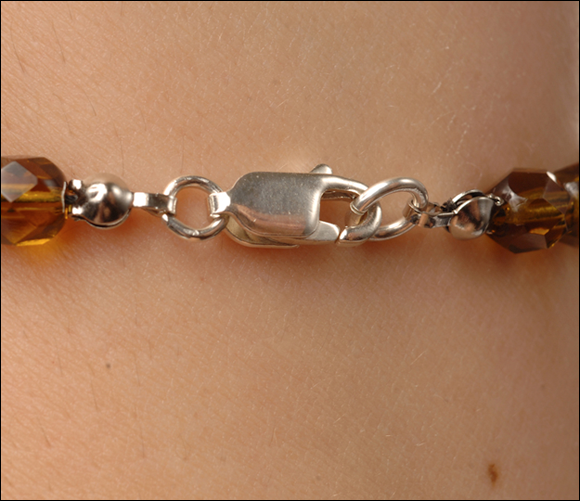
Spring clasps and lobster clasps usually provide a secure closure, but larger fingers or arthritic hands may have difficulty using them. To minimize frustration, choose larger sizes of these clasps, especially for bracelets. In Chapter 1, you can review the various types of clasps that are available.
String and Finish Beading Wire
Before you begin a beading-wire project, you need to decide which wire to use, based on the types and sizes of beads in your design.
How to Select the Proper Beading Wire
Beading wire packaging is typically marked with up to three separate measurements. Here’s a brief explanation of each.
Number of Strands
As explained in Chapter 1, beading wire is made up of many small steel strands that are wound together. Typically, the number of these strands determines the beading wire’s flexibility. Beading wire that contains more steel strands is more flexible than beading wire with fewer strands.

More-flexible beading wire has a softer feel and resists kinking better than less-flexible beading wire. However, more-flexible beading wire is usually more expensive than less-flexible varieties.
Beading Wire Size
Beading wire size is denoted by its diameter. Smaller-diameter beading wire is recommended for smaller, lighter-weight beads. Larger beading wire is preferred for larger-holed or heavier beads. If you use beading wire that is smaller than recommended for the beads you’re using, your jewelry may break prematurely.
Beading wire diameter is usually measured in thousandths of an inch. You can find nylon-coated beading wire ranging from about .010 inch (very small) to about .024 inch (large).
Use the following chart as a general reference when deciding which wire to use for a given project. Refer to the wire manufacturer’s literature for product-specific recommendations.

Pound Test Strength
Some beading wire is also labeled with its pound test strength. Manufacturers use this measurement to indicate wire strength. It denotes the maximum weight the wire can hold under testing conditions without breaking.
Pound test strength is a good general indicator of how strong is a certain size and type of wire. However, do not take it too literally. Many factors affect the durability of your jewelry, including how much friction is caused by the beads and end findings. Therefore, a necklace strung on “7-pound test” wire would not necessarily hold up under the weight of a 7-pound pendant.
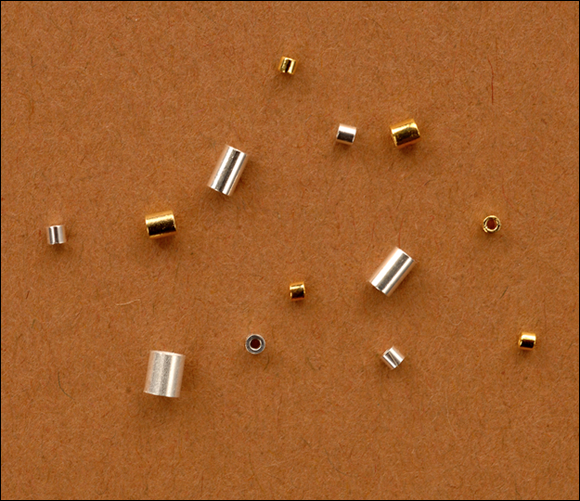
How to Attach Crimps to Beading Wire
Using crimps is the best way to finish beading wire. As described in Chapter 1, there are three main types of crimps: crimp beads, crimp tubes, and crimp ends. You can attach crimp beads and crimp ends using chain nose pliers, and you can use either chain nose pliers or crimping pliers to attach crimp tubes.
Attach Crimp Beads or Crimp Tubes Using Chain Nose Pliers
1 Beginning with a length of beading wire about 6 inches longer than the desired jewelry length, string a crimp bead or tube onto one end.
2 Position the crimp about 3 inches from the end of the beading wire.

Step 2
3 Holding the crimp in place with one hand, use the other hand to pull the end of the beading wire back into and through the crimp.
4 Continue holding the crimp in place, and gently pull the beading wire end until you have created a small loop.

Step 4
Note: Be sure that this loop is large enough to loosely hold a jump ring.
5 Use chain nose pliers to squeeze the crimp flat. The crimp should now be secured over both strands of beading wire.

Step 5
6 Using small wire cutters or nippers, trim the tail of extra beading wire close to the crimp.
The crimp is now in place, as shown here (a).

Step 6A
7 After stringing on all of the beads in your design, string on the second crimp and position it close to the last bead.
8 Repeat Step 3 to begin making a loop.

Step 8
9 When the loop starts to become small and the beading wire more difficult to pull through using your fingers, use chain nose pliers to gently hold the crimp close to the last bead, while you continue pulling the wire to complete the loop.

Step 9
10 Repeat Steps 5–6.
11 Attach a clasp part to each end of the strand using jump rings.
The completed strand is shown here.

Learn How to Open and Close Jump Rings
You will probably use jump rings in most of your jewelry creations. It’s important to learn how to open and close them properly to ensure that they are not weakened and will remain closed during wear.
To open a jump ring, hold it in front of you using two pairs of chain nose pliers, with the ring opening facing upward. Gently twist one end of the ring toward you and the other end away from you. To close the ring, twist the ends back in the opposite direction, and wiggle them together until the ring is completely closed.

Never pull or push the ends of a jump ring with a side-to-side motion. This can weaken the metal and deform the ring’s shape.
Attach Crimp Tubes Using Crimping Pliers
If you don’t like the look of flattened crimp beads or tubes, you can use specialty crimping pliers—instead of chain nose pliers—to make a crimp tube appear more rounded.
1 When you’re ready to close the crimp tube, place it inside the V-shaped indentation in the pliers.
2 Use your fingers to position both beading wire strands so that each strand is up against one side of the tube, on either side of the “V” in the indentation.

Step 2
3 Gently squeeze down the pliers.

Step 3
4 Turn the beading wire sideways so that the “V” shape you just created is pointed to the side.
5 Place the crimp into the rounded indentation in the pliers, and squeeze them closed over the crimp.

Step 5
The final rounded crimp is shown here (a).

Step 5A
How do I know which size of crimp to use?
Crimp beads are available in different diameters, and crimp tubes come in different diameters and lengths. Both measurements typically range from 1–3mm.
Interestingly, many artisans disagree on which crimps are the best to use. For example, some believe that long crimp tubes are more secure than short ones, while others don’t like the look of long tubes and insist that short tubes work well if attached properly.
You may need to experiment to see which styles and sizes you like best. In the meantime, ask the manufacturer or supplier of your beading wire which sizes they recommend for the beading wires they offer. The most popular beading wire makers have Web sites with this information, and the best jewelry supply companies provide similar information in their catalogs or on their own Web sites. Refer to the Appendix for a list of suppliers who may be of help.
Attach Crimp Ends
Crimp ends have pre-attached rings or clasp parts. You crimp them directly to the ends of your beading wire.
1 Insert the first wire end into the opening in the crimp end.
2 Use chain nose pliers to squeeze down on the collapsible part of the crimp (usually the middle area).

Step 2
3 After stringing on all of your beads, use the tips of one pair of chain nose pliers to hold the beading wire just after the last bead.
4 Trim the end of the beading wire short, so that it will fit inside the crimp end as far as possible.

Step 4
5 Insert the beading wire end into the crimp end, and use a second pair of chain nose pliers to squeeze down the crimp.
Step 5
The final beaded strand with the crimp ends in place is shown here (a).

Step 5A
Ways to Hide Crimps
By now, you may have noticed that crimp beads and tubes are not the most attractive elements of your designs. You can improve the appearance of tubes by using crimping pliers, but the best way to deal with the problem is to hide your crimps altogether.
Try using one of these techniques to give your work a more professional appearance.
Use Crimp Covers
Crimp covers are special findings that you can secure over crimp tubes. They make crimps look more like beads so that they blend with your design. Most are intended for use with crimp tubes that have been closed with crimping pliers. You use the rounded indentation of the crimping pliers to attach the covers to your crimps.

Use Bead Tips
Bead tips are most commonly used to cover finishing-knots in cord. You can also use them to cover crimps. Because bead tips have metal “claws” for attaching jump rings and clasps, you won’t need to make wire loops after your crimps. Instead, just attach a crimp to the end of your wire, and then cover the crimp with a bead tip. For more information on using bead tips, see “String and Finish Beading Cord,” later in this chapter.

Use Bullet Ends
Once you have some basic wire-wrap skills, you can use small-diameter bullet ends to hide crimps. Use a head pin to pull the end of the strand into the bullet end, and then use round nose pliers to loop and wrap the end of the pin to hold the strand in place. You will learn to use this technique to make multiple-strand bead jewelry using cone ends in Chapter 4.

Ways to Cover Beading Wire Loops
The loops at the ends of your beading-wire jewelry probably won’t be too unsightly, but they do contrast a little with the look of metal findings. Bullet ends and bead tips provide a workable solution by hiding loops, or eliminating the need for them entirely.
Here are some other possibilities for disguising beading-wire loops in your designs.
Use French Bullion Wire
This tiny, coiled wire is most often used for finishing silk cord. Its main purpose is to protect cord from breakage, but bullion can also be used with beading wire to give end loops a metallic look.
To use it, string a short length of bullion onto your beading wire before sliding it back through the crimp to make a loop. For more information on using bullion, see “Use French Bullion Wire on Cord,” later in this chapter.

Use Wire Guardians
Wire Guardians are specialty findings that are designed to protect beading wire loops, while also giving them a more professional appearance. You attach them by stringing them onto your beading wire after a crimp bead, before you string the wire back through the crimp (similar to bullion wire).
You may want to experiment with Wire Guardians to see how you like them. They are not intended to completely cover the beading wire, and you should be careful not to string them too tightly. For best results, always follow the manufacturer’s instructions carefully.

What are Scrimps?
Scrimps are specialty findings made by the same company that invented Wire Guardians. You can use Scrimps in place of regular crimp beads or crimp tubes.
You attach a Scrimp by stringing it onto your beading wire as you would a crimp bead. Then, you use a screwdriver to fasten a tiny screw in the side of the Scrimp. The screw locks down over the wires inside, holding them in place.

Scrimps can give your jewelry a more professional appearance than traditional crimps. However, they do not cover beading-wire loops. You’ll still need to use bullion or Wire Guardians for that purpose.
String and Finish Beading Cord
The best way to finish cord is with knots and end findings. Depending on the type of cord you use, you may or may not need a beading needle. (See chart.) Always be sure to use a style of end finding that is appropriate for the type of cord you’re using.
Needles Used with Cord
Use a beading needle when your cord is too thin and soft to thread directly through your beads. You can attach a needle by threading it onto the cord, doubling the cord back, and tying the double strands together with a square knot.
If you’d prefer to string your beads on a single strand, you can tie a small double-overhand knot behind the needle to hold it onto the cord. (See “Tie an Overhand Knot” later in this chapter.) Choose a needle with an eye small enough to keep the knot from slipping through, and make sure the knot can pass through your beads. Another option is to leave the cord unknotted, and just be careful not to let the needle fall off while stringing.
Here’s a look at the most common needles used with bead-stringing cord.
Twisted Wire Needles
Twisted wire needles are made from thin, twisted strands of steel or brass wire. A wire loop at the end forms the eye. This is the kind of needle you find on needle-attached cards of silk cord. You can also purchase them separately.

The wire in twisted wire needles is relatively soft. You can collapse the eyes to fit them through smaller-holed beads.
Beading Needles
Beading needles look like very thin, sharp sewing needles. They are popular for stringing seed beads on very thin cord, like braided nylon, or on beading thread. You will use them for bead weaving in Chapter 5. These needles look like very thin, sharp sewing needles, and their eyes are small enough to pass through tiny bead holes. If you have trouble threading them, try using a special beading-needle threader designed specifically for beading needles and beading thread. They are available at some bead shops and in beading supply catalogs.

Big Eye Needles
Big eye needles look like long, flexible sewing needles that are slit lengthwise down the middle. Instead of threading your stringing material through a regular eye, you string it through the slit.
You can use these needles to thread suede cord through beads with larger holes, or to string beads on ribbon.

Make a Faux Needle
Sometimes you don’t need a real needle on your cord, just a way to stiffen the end and keep it from unraveling as you bead. Try dipping the end of the cord in clear nail polish or instant bond glue and allowing it to dry. This creates a kind of faux needle, which you can simply trim off when you finish stringing.

Knots Used with Cord
The most common knots you’ll use on cord are the overhand knot, the double-overhand knot, and the square knot. (These knots are also used with beading thread; see “String and Finish Beading Thread” later in this chapter.)
Tie an Overhand Knot
You can use a single overhand knot to knot between two beads.
1 Pull the end of your cord back up and over itself to form a loop.
2 Thread the cord end through the loop.

3 Pull the cord end to tighten the knot. The photo on the right shows a close-up of the overhand knot you just created.

Note: You will learn how to properly place overhand knots between beads in Chapter 4.
Tie a Double-Overhand Knot
A double-overhand knot is simply one overhand knot tied on top of another. You can use it to finish single cord ends.
1 Make an overhand knot.

2 Repeat this procedure, slowly pulling a second overhand knot into position over, or just next to, the first knot.

Tie a Square Knot
Use a square knot to tie together two cord ends, or to tie a cord back onto itself after making a loop.
1 Beginning with one strand in each hand, wrap the left strand around the right strand. The strands will look twisted around each other.

Step 1
2 Now wrap the right strand over and around the left strand, creating a second twist.

Step 2
3 Pull down the second twist snugly onto the first twist.

Step 3
4 Pull the two strand ends to tighten the knot.

Step 4
How is a square knot different from a double-overhand knot?
The most important difference between these knots is the number of strands involved.
You use a double-overhand knot when you’re knotting a single strand. You make a square knot when you’re fastening two strands together.
As you probably noticed, the procedures for making the two knots are also a little different. The double-overhand knot loops back around itself. With the square knot, one strand wraps around the other.

Ways to Keep Beads from Falling Off of Cord Before Finishing
Usually, you finish one end of beading cord, string on all of your beads, and then finish the other end. However, there are times when you will want to string your beads before you finish the ends.
For example, if you make a long necklace with no clasp, you may want to string all of the beads first, and then tie the ends together with a single square knot. Alternatively, you may want to string several beaded strands and tie them all together at the ends. You’ll see how this method works for multiple-strand necklaces and tassels in Chapter 4.
When you use one of these techniques, you will need a way to keep beads from falling off of the cord while you work. Here are the most common methods
Use Masking Tape
Fold a piece of masking or drafting tape around the first cord end. Make sure you leave enough of an extra “tail” between the tape and the end of the cord to knot the strand later. To remove the tape, simply peel it apart. Alternatively, you can tape the first cord end directly to your work surface.

Use Bead Stoppers
Bead Stoppers are specially designed little coils of stainless steel wire. You squeeze the looped ends with your fingers to open the coil, slip the cord inside, and then release the ends to clamp the cord.

Use Alligator Clips
You can also use small, metal alligator clips to clamp cord. They are especially useful for larger-diameter cord.

Basic Ways to Finish Cord
Use Bead Tips on Cord
Bead tips look like little clamshells that close over a knot. They have an open end loop, or “claw,” which you can attach to a jump ring and clasp.
1 Thread your cord into the hole at the base of the bead tip, with the clamshell opening facing the end of the cord.
2 Tie a double-overhand knot between the end of the cord and the bead tip.
3 Trim off the end of the cord close to the knot.

4 Slide the bead tip up over the knot.
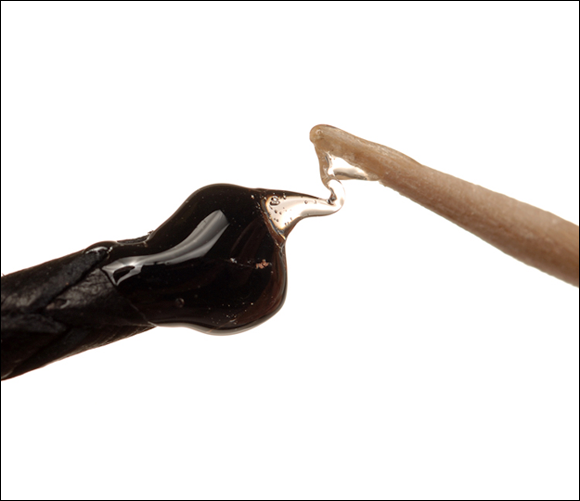
5 Apply a drop of E6000 glue to the knot, inside the bead tip.

Step 5
6 Use flat nose pliers to close the clamshell over the knot, with the knot contained inside.

Step 6
7 After stringing on all of your beads, repeat Steps 1–6 to finish the other end of the cord.
Note: If necessary, use a beading awl to position the second knot inside the second bead tip. For more information on using a beading awl with knots, see Chapter 4.
8 Use chain nose pliers to open each claw, and slip in a jump ring that you’ve already attached to a clasp finding.
9 Close down each claw using chain nose pliers.

Step 9
The bead tips with the clasps attached are shown here (a).
Step 9A
Use French Bullion Wire on Cord
French bullion wire can protect your end loops from damage, while giving them a more professional appearance.
1 String on a bead with a hole large enough for the cord to pass through twice.
2 Use sharp side cutters to cut a length of bullion about 1⁄2 inch long.
3 String the bullion onto the cord, next to the bead.

Step 3
4 Thread the cord back into the bead to create a loop in the bullion, leaving a cord tail of several inches at the end.

Step 4
5 Tie a square knot at the base of the bullion loop.
6 If desired, apply a tiny drop of E6000 glue to the knot.
7 String on the beads for your design, and repeat Steps 1–4 to apply bullion to the other end of the cord.

Step 7
8 To conceal the cord tails at each knot, use a twisted wire beading needle to thread them back into the beaded strand.

Step 8
9 Attach clasp findings to each bullion loop using jump rings.
The bullion loop with clasps attached are shown here (a).

Step 9A
Use Coil Ends
You can use coil ends to finish larger-diameter cord, like satin rattail and leather. Choose a size that fits snugly over your cord.
1 After trimming your cord to the desired length, slide a coil end onto the end until the tip of the cord is flush with the top coil of the coil end.

Step 1
2 Use chain nose pliers to squeeze down the first coil of the coil end.

Step 2
3 Turn the cord and squeeze evenly all the way around the first coil until it is securely attached to the cord.

Step 3
4 String the beads for your design.
5 Repeat Steps 1–4 to finish the other end.
Note: For added security, you can add a drop of E6000 glue near the end of the cord before attaching the coil end.
The coil ends with clasps attached is shown here.

Use End Caps
End caps work like coil ends but have a more formal look. Unlike coil ends, you must use glue to attach them.
1 After trimming your cord to the desired length, apply a drop of E6000 glue to the last few millimeters of the cord end.
Step 1
2 Slide an end cap over the end of the cord, as far as it will go.

Step 2
3 Quickly wipe away any excess glue with a paper towel.
4 Gently string on the beads for your design, being careful not to dislodge the end cap.
Note: If the end cap moves, wait until the glue sets before stringing your beads.
5 Repeat Steps 1–2 to attach the other end cap.
6 Allow the glue to set for 24 hours.
7 Attach clasp findings to both end caps using jump rings.
The end caps with the clasp attached are shown here.

How can I make a simple pendant necklace?
You can make a simple cord necklace without using any beads at all. Slide a pendant with a pre-attached bail over larger-diameter cord made of leather, suede, or rubber. Finish the ends with coil ends, end caps, or fold-over crimps.

Use Fold-Over Crimp Ends
You can use fold-over crimp ends to finish soft or flat cord, like satin or suede. They also work for folded-over ends of ribbon (see the Tip below).
1 After trimming your cord to the desired length, lay the very end of the cord inside the fold-over crimp, with the little “wings” of the crimp facing up.

Step 1
Note: Fold-over crimp ends tend to hold pretty well on their own, but for added security you can add a drop of glue to the inside back of the crimp end before placing the cord inside.
2 Using chain nose or flat nose pliers, slowly squeeze down one wing of the crimp end, so that it clamps down securely onto the cord.

Step 2
3 Repeat this process for the second wing, squeezing it down over the first.

Step 3
4 String on all of the beads for your design.
5 Repeat Steps 1–4 to finish the other cord end.
6 Attach clasp findings to each crimp-end loop using jump rings to complete the cord ends.

Finishing Ribbon
You can use ribbon as a stringing material instead of cord to hold a pendant (see the Briolette Pendant Ribbon Necklace project in Chapter 11) or to string large-holed beads. As mentioned in Chapter 1, the most popular types of ribbon for jewelry are made of organza or satin. You can cut both of these materials easily with sharp scissors, and you can knot them using the same knots you use with cord.
The best findings to use for finishing ribbon are fold-over crimp ends and clamp ends. If you use a crimp end that is narrower than the ribbon, fold-over the very end of the ribbon before inserting it into the crimp end. If you use a clamp end, select one that is just slightly wider than the ribbon you use. Simply insert the end of the ribbon into the clamp end, and squeeze the clamp end closed using chain nose pliers. As with crimp ends, you can use a small amount of E6000 glue to help keep clamp ends secure.

Finish Stretch Cord
Knotting is the best way to finish stretch cord. You can hide the knot by covering it with a larger-holed bead.
1 Attach an alligator clip or Bead Stopper to the cord, at least 4 inches from the end.
2 String the beads for your design, leaving at least 4 inches at the other end of the strand.

Step 2
3 String on one last bead with a hole just large enough to cover a knot in the cord.

Step 3
4 Holding both ends of the cord together, carefully remove the alligator clip or Bead Stopper.
5 Tie a square knot.

Step 5
6 Apply a small drop of E6000 glue to the knot.

Step 6
7 Slide the larger-holed bead over the knot.

Step 7
8 Use a paper towel to wipe away any extra glue.
9 Allow the glue to set for 24 hours.
10 Use sharp scissors to trim off the extra tails of cord.

String and Finish Beading Thread
Although beading thread is usually used for beaded lace and bead weaving (see Chapters 4 and 5), you can also use it to string simple strands of small, lightweight beads.

You can finish these designs with bead tips or French bullion wire, or with the bead-and-loop or button-and-loop clasps you’ll learn to make in Chapter 4.
For information about thread and needle sizes, see Chapter 5.
Ways to String and Finish a Simple Beading Thread Design
Use Bead Tips on Beading Thread
You can attach bead tips to thread in a way similar to when you attach them to cord by closing the bead tips over knots. However, this method is more difficult with thread because thread is very thin. To keep the bead tips from slipping off, you will need to use much smaller bead tips or make multiple knots on top of one another. Here is an easier method that uses seed beads in place of knots.
1 Apply thread conditioner to a length of beading thread that is twice the desired jewelry length, plus about 20 inches.

2 String on a beading needle, and position it halfway along the strand.

3 String on one seed bead and then a bead tip with the open clam shell facing the ends of the thread.
4 String on another seed bead.
5 Position the two seed beads and the bead tip about 8 inches from the ends of the thread.
6 String the needle back down through the bead tip and the first seed bead you strung on in Step 3.

7 Tie a square knot just below the first seed bead.
8 String on all the beads for the design.
9 At the other end of the beaded strand, string another bead tip (with the open clamshell facing the needle) and one more seed bead.
10 String the needle back through the bead tip and the very next seed bead in the strand, and tie a double overhand knot.

11 String the needle back through the next 2 inches of beads in the strand and bring it out again.
12 Trim off the needle and thread close to the strand.

13 Go back to the first end of the strand and thread the needle onto one of the thread tails, and then string back through the strand and trim it off, as you did in Steps 11–12.
14 Repeat Step 13 for the other thread tail.
15 Use chain nose pliers to close each bead tip and use jump rings to attach clasp findings.
The bead tips with the clasps attached are shown here.

Use French Bullion Wire on Beading Thread
You can also use French bullion wire on thread in a way similar to when you use it on cord.
1 Prepare your thread by completing Steps 1–2 of “Use Bead Tips on Beading Thread.”
2 Complete all of the steps for “Use French Bullion Wire on Cord,” earlier in this chapter, using the beading thread in place of cord and the beading needle in place of the big eye needle.

The ends are now complete, as shown here.

Why do my bead tips only have half a clamshell?
Traditionally, there was a difference between a “bead tip” and a “clamshell” end. Original bead tips did not close completely over knots. Instead, they simply held onto an end knot and provided a claw for attaching findings.
Today, most artisans use full-clamshell style bead-tip findings, and the terms “bead tip” and “clamshell” are used interchangeably.
The old style of bead tip is still available, but you’ll find that clamshells give your jewelry a more professional look.

String and Finish Memory Wire
You can finish memory wire jewelry without using any end findings at all.
For best results, design multiple-coil bracelets to have at least three coils. Necklaces and anklets typically have just one coil. Remember that larger beads may make memory wire jewelry uncomfortable to wear. Keep in mind that you should only cut memory wire with heavy, household, or specialty memory-wire cutters; it will damage your regular side cutters.

Ways to Finish Memory Wire
Finish Memory Wire by Looping
1 After cutting the desired number of loops of memory wire from the coil, firmly grasp one end of the wire with round nose pliers.
2 Roll the pliers away from you to create a loop.

Step 2
3 Use flat nose pliers to wiggle the loop closed, as if you were closing a jump ring.

Step 3
4 String on all of the beads for your design, leaving about 3⁄4 inch of bare wire at the other end.
5 Holding the wire up so that no beads fall off, position the round nose pliers at the end of the wire as you did in Step 1, and create a loop.

Step 5
6 Use flat nose pliers to close the loop, as you did in Step 3.
7 If you want, you can attach a bead drop or charm to one or both end loops, either directly or using a jump ring. (To learn how to make bead and wire drops, see Chapter 6.)
The completed coil bracelet is shown here (a).

Step 7A
Use Memory Wire End Caps
For a more professional look, try finishing your memory wire jewelry with end caps instead of loops. Some even have built-in loops for attaching drops or charms.
1 After cutting the desired number of loops of memory wire from the coil, dip one end into E6000 glue.

Step 1
2 Slide the end into the hole in a memory wire end cap as far as it will go.

Step 2
3 Set the project aside for 24 hours, to allow the glue to fully set.
4 Apply a tiny drop of glue to the end cap where it connects with the memory wire.

Step 4
5 String on all of the beads for your design, leaving a little extra bare wire at the end to attach the other end cap.
6 Holding the wire up to keep the beads from falling off, clamp a small alligator clip to the wire, up against the beads.

Step 6
7 Perform Steps 1–2 on the other end of the wire.
8 Carefully remove the alligator clip.

Step 8
9 Repeat Step 4.
10 Slide the last bead in the design up against the memory cap, so that it sticks in the glue.
11 Set the project aside for another 24 hours to allow the glue to fully set.
The completed memory wire bracelets with end caps is shown here (a).

Step 11A