Chapter 11: Intermediate Projects
The projects in this chapter involve slightly more complicated techniques than those in Chapter 10. You can use them to practice intermediate skills like working with multiple strands, creating elaborate wirework designs, weaving more substantial beaded fabrics, and developing more complicated macramé work and braids. As with the projects in Chapter 10, some resources for the tools, supplies, and materials used in these projects are listed in the Appendix.
Briolette Pendant Ribbon Necklace
Gothic Bead Lace Collar Necklace
Cherry Blossom Loomwork Bracelet
Byzantine and Turquoise Drop Earrings
Modern Square Stitch Table Mat
Beaded Framework Link Bracelet
Four-Strand Braided Leather Bracelet
Multi-Strand Tin Cup Anklet
This project uses traditional tin cup styling to create a casual anklet that is lightweight, secure, and comfortable to wear. The multiple strands are finished using the traditional beaded tassel-making technique.

Tools, Supplies, and Materials
Tools and Supplies
• Knotting awl, darning needle, or knotting tool
• 1 handmade folded-card tin cup necklace spacer with a length of 1⁄2 inch.
• Alligator clamp (for securing the spacer)
• Sharp scissors or nippers
• Bead reamer
• E6000 glue
Materials
These materials will make one anklet that measures about 101⁄2 inches long.

• 1 2-meter card of size No. 2 jade green silk cord with attached twisted-wire needle
• 1 2-meter card of size No. 2 beige silk cord with attached twisted-wire needle
• 2 carved latticework wood beads (10mm)
• 25 chartreuse green off-round pearl beads (5mm)
• 9 light-bronze round seed pearl beads (4mm)
• 2 brass or gold-tone jump rings, 18 gauge (4mm OD)
• 1 wirework toggle clasp (T-bar and eye) made with brass or gold-tone wire
How to Make the Multi-Strand Tin Cup Anklet
The tasks required for this project are covered in Chapter 4.
1 Remove all of the jade green silk cord from its card and give it a couple of gentle tugs to help straighten it out.
2 Tape off the cord about 6 inches from the end.
3 String on one of the wood latticework beads.
4 Use the folded-card spacer and the knotting tool to make a knot in the cord 1⁄2 inch away from the wood latticework bead (to review how to use the folded-card spacer, see The "Tin Cup" Necklace).

5 String on the first chartreuse pearl bead, following the pattern of beads used in the example.
6 Make another knot to hold the bead in place.
7 Continue using the folded-card spacer to space and knot nine more chartreuse pearl beads.
8 Clamp the folded-card spacer to the cord after the last set of knotted beads.
9 String on the second wood latticework bead.
10 Tape off the strand on the other side of the wood bead and remove the spacer. (It’s fine for now if the wood bead slides down away from the tape.)

11 Trim the cord about 6 inches away from the tape that you applied in Step 11.
12 Remove all of the beige cord from its card, and tug it a little to help straighten it.
13 Tape it off about 6 inches from the end as you did with the first cord.
14 Thread the cord through the wood latticework bead that you strung onto the first strand in Step 4. Now both strands are strung through the first wood bead together, and both are taped off behind the wood bead.
15 Use the folded-card spacer card and the knotting tool to make a knot 1⁄2 inch away from the wood latticework bead. Continue adding beads and knots to complete the strand.

16 When you finish all of the knotted beads for the second strand, clamp on the folded-card spacer again.
17 Thread the cord through the wood bead on this end (the one that you strung onto the first strand in Step 10).
18 Tape off the second strand on the other side of the wood bead, as you did with the first strand.
19 Use this same method to add the next strand of cord following the pattern in the example. Now all three strands are knotted and beaded, and their ends are strung through each of the two wood latticework beads.
20 Beginning with one end, remove the tape from all three strands.
21 Thread a jump ring over all three cord ends. Make a double overhand knot to secure the jump ring in place.

22 Place a tiny drop of E6000 glue on the knot.
23 Slide the wood bead over the knot.
24 Repeat Steps 21–24 on the other side of the anklet.
25 Allow the glue at both ends to set.
26 Trim off the extra cord tails at the inside edge of each wood bead.
27 Attach the clasp parts to the jump ring.

Beaded Multi-Knot Hemp Choker
This design uses high-quality bleached hemp cord to create small, tight knots with a more even look than natural twine. The pale cream color of the cord nicely accents the blue and green ceramic beads, and the lightweight fish-vertebrae beads add texture.

Tools, Supplies, and Materials
Tools and Supplies
• Sharp scissors or nippers
• Yard stick and/or ruler for measuring
• Knotting board with T-pins (or a knotting board alternative)
• Masking tape
Materials
These materials create one choker that measures about 141⁄2 inches long. (To make it longer, increase the number of square knots at the beginning and end.)

• 6 yards of .9mm, 10-pound test bleached hemp twine cord
• 6 fish-vertebrae beads (4mm x 8mm)
• 4 kaolin ceramic beads in chartreuse (6mm x 7mm)
• 2 four-sided glazed ceramic tube beads in blue and brown
• 1 carved black jade convex-tube focal bead (15mm x 12mm)
• 2 copper jump rings, 18 gauge (6mm OD)
• 1 wire fold-over clasp made with 20-gauge copper wire
• 1 wire-wrapped clasp eye made with 20-gauge copper wire
How to Make the Beaded Multi-Knot Hemp Choker
The tasks required for this project are covered in Chapter 9.
1 Cut the hemp cord into the following lengths:
• 1 4-yard length (for the working cords)
• 1 11⁄2-yard length (for the filler cords)
• 2 9-inch lengths (for the wrapping cords)
2 Fold-over the 4-yard and 11⁄2-yard lengths in half and hold them together.
3 Use a lark’s head knot to attach the cords to one jump ring.
4 Anchor the jump ring to the knotting board.

5 Make a 1⁄4-inch-long wrap knot around all four cords just below the jump ring, and trim off the cord tails.
6 Make about 1 inch of macramé square knots.
7 String a fish-vertebrae bead vertically onto the filler cords.
8 Make about 7⁄8 inch of half knots.
9 String another fish-vertebrae bead vertically onto the filler cords.
10 Make about 7⁄8 inch of macramé square knots.
11 String a kaolin ceramic bead horizontally onto the filler cords.
12 Make another 7⁄8 inch of half knots.
13 String a four-side ceramic bead vertically onto the filler cords.
14 Make about 3⁄8 inch of macramé square knots.
15 String on another vertical fish-vertebrae bead.

16 Make another 3⁄8 inch of macramé square knots.
17 String on another horizontal kaolin ceramic bead.
18 Make two macramé square knot picots.
19 String the jade focal bead vertically onto the filler cords.
20 Complete the second half of the choker by knotting and stringing beads in reverse order of the first side.
21 String on the second jump ring.
22 Fold-over all four cords about 1⁄2 inch away from the last macramé square knot.
23 Using the wrap cord, make a 1⁄4-inch-long wrap knot around all four cords between the last macramé square knot and the jump ring, and trim off the excess cord tails.
24 Open each jump ring and attach the clasp and clasp eye.

Briolette Pendant Ribbon Necklace
Organza ribbon makes an elegant base for wire pendants that are made with a jig. This design features a spiraled variation of the Celtic knot connector, accented with pretty, wrapped gemstone briolettes.

Tools, Supplies, and Materials
Tools and Supplies
• Sharp scissors
• Side cutters
• Round nose pliers
• Flat nose pliers
• Chain nose pliers
• Wire jig
• Masking tape
Materials

• Enough 1⁄2-inch wide, olive organza ribbon to create a three-strand necklace in the length of your choice using end cones
• 3 faceted natural agate briolettes, 1 pale and 2 dark (8mm x 12mm)
• 1 faceted carnelian briolette (8mm x 12mm)
• About 11 inches of 26-gauge gold-colored copper wire
• About 41⁄2 inches of gold-colored copper wire, 20 gauge
• 1 approximately 81⁄4-inch length of gold-colored copper wire, flush-cut at both ends, 18 gauge
• 4 gold-colored jump rings, 18 gauge (4mm OD)
• 2 gold-colored jump rings, 18 gauge (4.5mm OD)
• 2 gold-tone end cones (19mm x 6mm)
• 1 wirework “S” hook made from 18-gauge gold-colored copper wire
• 1 wirework clasp eye made from 20-gauge gold-colored copper wire
How to Make the Briolette Pendant Ribbon Necklace
The tasks required for this project are covered in Chapter 4.
Make the Bail
1 Using 18-gauge wire directly from the coil or spool, wrap the end of the wire around a large peg in the jig to create a large loop.
2 Use side cutters to trim off the excess wire and make the end of the wire flush.
3 Use your fingers to close the loop.
4 Trim the loop off of the coil or spool, making a blunt cut about 14mm below the loop.
5 Using round nose pliers, make a small loop below the large loop, facing the opposite direction.

Make the Pendant
1 Arrange medium pegs on the jig in the Celtic knot pattern (see Celtic Knot Looped Connectors").
2 Place the 81⁄4-inch length of 18-gauge wire horizontally beneath the top peg, with 11⁄2 inches of wire protruding from one side, as shown in the example.
3 Hold the wire tail against the jig surface with one hand as you create the Celtic knot pattern with the wire.
4 Remove the wire from the jig.
5 Create a matching spiral on the other end of the connector, facing the opposite direction to the first.
6 Using the 26-gauge wire, convert all four briolettes into wrapped drops.
7 Use jump rings to attach the two dark natural agate briolette drops and the carnelian drop to the lower portion of the pendant, as shown.
8 Attach the bail by securing the upper spiral of the pendant to the smallloop on the bail, and slip the loop of the pale carnelian drop onto the small loop of the bail before closing it.

Assemble the Necklace
1 Align the three strands of organza ribbon.
2 Attach an end cone to one end of the strands by using the 20-gauge wire to make an eye pin (see Chapter 6).
3 String the bail over all three strands of ribbon.
4 Attach the second end cone to the other end of the ribbons, making sure that all three ribbons are equal in length.
5 Attach the “S” hook and clasp eye to the ends of the necklace using the 4.5mm OD jump rings.

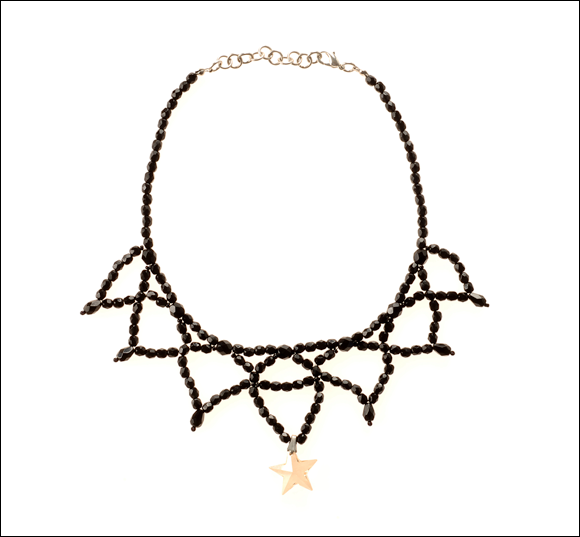
Gothic Bead Lace Collar Necklace
This project uses an embellished version of the beaded lace pattern and Czech glass fire polished beads for a draped, romantic look. This design is called a collar necklace because it is very short and is worn against the neck. If you’d like to make it longer, simply increase the number of 4mm beads you string on at the beginning and end of the upper strand. If Gothic is not your style, you can replicate the design using beads with more vibrant colors.
Tools, Supplies, and Materials
Tools and Supplies
• Size #10 beading needle
• Sharp scissors or nippers
• Masking tape
• E6000 glue
Materials
These materials make a collar necklace that is adjustable between about 121⁄2 and 14 inches long.

• One 23-inch length of conditioned size B beading thread in black.
• One 11⁄2-yard length of conditioned size B beading thread in black.
• 101 round Czech glass fire polish beads in black (4mm)
• 7 Czech glass fire polish beads in black (6mm)
• 6 faceted teardrop Czech glass fire polish beads in black (7mm x 5mm)
• 26 size 11/0 Czech seed beads in black
• 1 crystal star pendant in golden shadow (20mm)
• 1 silver tone prong bail
• 2 silver-tone clamshell bead tips
• 12 silver-tone jump rings, 18 gauge (5mm OD)
• 1 silver tone lobster clasp
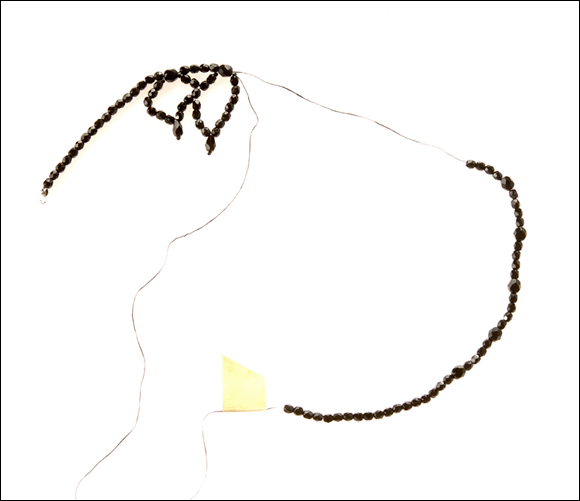
How to Make the Gothic Bead Lace Necklace
The tasks required for this project are covered in Chapters 3 and 4.
1 Attach the bail to the star pendant by inserting the prongs into either side of the pendant hole and squeezing them closed with your fingers.
2 Set the pendant aside.
3 Align one end of the 23-inch strand of thread with one end of the 11⁄2-yard strand.
4 Tie two double overhand knots, one on top of the other, with both strands, about one inch from the ends.
5 String one bead tip onto both strands, and use the glue to secure it over the knots.
6 Thread the needle onto the upper strand of thread, and fold-over a few inches of thread so that you can hold it onto the needle with your fingers.
7 String on 17 4mm beads and one 6mm bead.
8 String on four more 4mm beads and another 6mm bead.
9 Repeat Step 6 five more times.
10 String on 17 4mm beads to complete the upper strand.
11 Remove the needle and tape off the end of the upper strand about 3 inches past the final bead.
12 Thread the needle onto the lower strand of thread.
13 String through the first 18 beads in the upper row.
14 Bring the needle out again and pull the thread taut.
15 String on one seed bead and six 4mm beads.
16 String on one teardrop bead and another seed bead.
17 Pull the thread taut again, and string back up through the teardrop bead.
18 String on six more 4mm beads and another seed bead.
19 String back through the next bead on the top row and out again, and pull the first lace loop taut.
20 Slide-over the beads in the top row that are to the right of the bead you strung through in Step 17, and tie an overhand knot around the top strand of thread to secure the first loop.
Note: Use the needle to help position the knot.
21 Slide-back the upper beads, and continue the design by following the pattern below, tying an overhand knot around the upper strand after you complete each lace loop.

Note: Before you string on the pendant, string on two seed beads to support the bail.
22 When you reach the center drop, first string the shorter loop (1) then string up to the top and back down again to create the longer one (2).
23 When all of the lace loops are complete, string back through the last 17 beads in the upper strand.
24 Carefully remove the tape from the top strand.
25 Finish both thread ends with a single bead tip, like you did in Step 1, using the needle to help you position the final knots inside the bead tip.
26 Attach the lobster clasp to one of the bead tips using jump rings.
27 Connect the rest of the jump rings to make the extender chain, and attach it to the other bead tip.

Cherry Blossom Loomwork Bracelet
Loom weaving is a fun way to create longer lengths of beaded fabric with neatly aligned rows. In this project, a band of fabric becomes a bracelet when you finish it with pre-made clamp ends.

Tools, Supplies, and Materials
Tools and Supplies
• A beading loom that is long enough to accommodate about 7 inches of beaded fabric, plus 1⁄8-inch of selvage at each end
• 1 size #12 beading needle that is about 2 inches long
• Sharp scissors or nippers
• E6000 glue
• Toothpick
• Flat nose pliers
• Thread conditioner
• Optional: Sticky note to help you keep your place in the pattern
Materials
These materials will make one bracelet that measures about 7 inches long.

• 354 size 11/0 Japanese seed beads in opaque black
• 154 size 11/0 Japanese seed beads in transparent earth brown
• 46 size 11/0 Japanese seed beads in white-lined translucent light brown
• 51 size 11/0 Japanese seed beads in rose-lined crystal clear
• 32 size 11/0 Japanese seed beads in transparent-light-pink with aurora borealis finish
• About 7 yards of size B beading thread in black
• 2 silver-tone metal clamp ends (13mm)
• 2 silver-tone jump rings, 18 gauge (5mm OD)
• 1 silver tone toggle clasp
How to Make the Cherry Blossom Loomwork Bracelet
The tasks required for this project are covered in Chapter 5.
1 Set up the loom with 10 vertical rows of warp thread.
2 Using a separate length of conditioned thread, weave on all 71 horizontal rows of beads, following the pattern shown below, with about 1⁄8 inch of selvage at each end. (You can use a sticky note to mark your place at each row in the pattern as you work, to help you keep your place.)

3 Seal the last few rows of each selvage with E6000 glue, and allow the glue to dry.

4 Trim the design off of the loom.
5 Apply glue to the first 1⁄8-inches of beads at both ends of the design.
6 Use a toothpick to fold each selvage against the back of the design to glue it in place.
7 When the glue has dried beneath the selvage, apply another drop of glue to the selvage on the back of the design, and to the first 1⁄8-inches of beads on the front of the design at each end.
8 Insert each end of the design into one of the metal clamp ends.
9 Use flat nose pliers to gently squeeze each clamp end closed, being careful not to break any of the beads inside.
10 After the glue has fully set, use jump rings to attach the toggle clasp parts to the ends of the bracelet.

Byzantine and Turquoise Drop Earrings
The Byzantine chain is usually used in bracelets and necklaces, but you can also use it to make chunky drop earrings. In this design, a short length of sterling-silver Byzantine chain is accented by a turquoise cube bead drop.

Tools, Supplies, and Materials
Tools and Supplies
• Chain nose pliers
• Flat nose pliers
• Side cutters
• Chasing hammer
• Bench block
• Needle file
• Safety pin
Materials
These materials will make one pair of earrings.

• 28 sterling-silver jump rings, 18 gauge (5.5mm OD)
• 2 sterling-silver jump rings, 18 gauge (4mm OD)
• 2 wirework earring hooks made from 22-gauge sterling-silver wire
• 2 natural blue turquoise beads (6mm)
• 2 7⁄8-inch lengths of 20-gauge dead-soft sterling-silver wire
How to Make the Byzantine and Turquoise Drop Earrings
The tasks required for this project are covered in Chapters 6 and 7.
1 Use both sets of pliers, the safety pin, and the 28 6mm OD jump rings to create two lengths of Byzantine chain containing 14 jump rings each, as shown in the example.
2 Connect the top two rings in each length of chain to each earring hook using the two 4mm OD jump rings.
3 Use the hammer and bench block to convert each of the 7⁄8-inch lengths of 20-gauge wire into paddle head pins.
4 Smooth the edges of the paddles using the needle file.

5 String each turquoise bead onto each head pin.
6 Use the side cutters to trim each head pin about 1⁄4-inch above each bead. (Be sure to make flush cuts.)
7 Use round nose pliers to create a loop above the bead on each head pin.
8 Attach each head-pin loop directly to the bottom two rings in each of the Byzantine chains.

Wirework Bead Cuff Bracelet
This cuff bracelet design features double-twisted wire, double-wrapped wire beads, and ornate, handmade sterling-silver beads from Bali. You can make it using copper wire as shown, or sterling-silver wire for a more formal look.

Tools, Supplies, and Materials
Tools
Note: Because 14-gauge wire is thick and takes extra force to bend and cut, always use strong, good-quality tools when you work with it.
• Round nose pliers
• Heavy-duty side cutters
• 2mm round mandrel
• Bracelet mandrel (or bracelet mandrel substitute)
• Needle file
Materials
These materials will make one medium-sized, adjustable cuff bracelet.

• 1 81⁄4-inch length of 14-gauge copper wire
• 3 29-inch lengths of 20-gauge copper wire
• 3 7-inch lengths of 18-gauge copper wire
• 2 12-inch lengths of double-twisted copper 20-gauge wire with 15 twists per inch
• 2 sterling-silver scroll-design Bali beads (12mm x 7mm)
• 2 sterling-silver daisy-spacer Bali beads (2.5mm x 8mm)
How to Make the Wirework Bead Cuff Bracelet
The tasks required for this project are covered in Chapter 7.
1 Create three double-wrapped wire beads using the three 29-inch lengths of 20-gauge wire, the three 7-inch lengths of 18-gauge wire, and the 2mm mandrel.
2 Wrap each 12-inch length of double-twisted wire snugly around the mandrel to create two 11⁄4-inch coils.

3 Use round nose pliers to create a loop at one end of the 14-gauge wire.
4 String each component onto the 14-gauge wire in the order shown.

5 Use the round nose pliers to create a loop at the other end of the 14-gauge wire.
6 Use a bracelet mandrel (or bracelet mandrel substitute) to bend the bracelet into a round shape.
7 Perfect the cuff-bracelet shape by bending the bracelet gently inward with your fingers.
Modern Square Stitch Table Mat
The square stitch is a fun weave for creating decorative household items as well as for jewelry. In this project, a large sheet of beaded fabric becomes a trendy table mat. It makes a nice base for a candle and candle holder, and you can even use it as a wall hanging.

Tools, Supplies, and Materials
Tools and Supplies
• Size #10 beading needle
• Sharp scissors or nippers
• Thread conditioner
Materials
These materials will make one coaster that measures approximately 5 inches long by 41⁄4 inches wide.

• About 17 yards of size D beading thread in chartreuse
• 528 size 8/0 cylinder beads in fuchsia-lined crystal
• 520 size 8/0 cylinder beads in matte silver-lined orange
• 212 size 8/0 cylinder beads in silver-lined orange
• 472 size 8/0 cylinder beads in matte silver-lined chartreuse
• 293 size 8/0 cylinder beads in opaque turquoise green
• A sheet of adhesive-back foam in black that measures about 47⁄8 inches long by about 4 inches wide.
How to Make the Modern Square Stitch Table Mat
The tasks required for this project are covered in Chapter 5.

1 Thread the needle onto 2 or 3 yards of conditioned beading thread.
2 Fold-over the end of the thread a few inches past the needle, and hold it against the needle with your fingers.
3 String on a stop bead and secure it about 8 inches from the end of the thread.
4 Weave the entire square stitch pattern shown, beginning at the bottom-left corner.

Note: You will begin to run out of thread several times before finishing the pattern. Whenever you have only 6–8 inches of thread left to work with, weave-in and begin a new piece of thread as usual.
5 Weave-in and trim the thread when you finish the pattern.
6 Return to the beginning of the pattern and remove the stop bead.
7 Weave the thread tail into the first two rows of the pattern, and trim off any excess.
8 Align the beaded fabric with the adhesive foam sheet, and press it into place on one side of the fabric.
The bottom of the mat, with the foam sheet in place, is shown here.

Beaded Framework Link Bracelet
This bracelet is made up of beaded framework links that are made using a jig and round nose pliers. Copper is a good choice for this design because it is soft enough to bend at a larger gauge, and it is much more economical than sterling silver.

Tools and Materials
Tools
• Wire jig made of metal
• Round nose pliers
• Heavy-duty side cutters
• Needle file
• Chain nose pliers
• Flat nose pliers
• Nylon jaw pliers
Materials
These materials will make one bracelet that measures about 71⁄2 inches long.

• 6 10-inch lengths of 24-gauge copper wire
• 6 12-inch lengths of 24-gauge copper wire
• 6 51⁄2-inch lengths of 14-gauge copper wire
• About 375 mixed-color Czech glass seed beads in a variety of sizes
• 2 jump rings, 14 gauge (10mm OD)
• 2 wirework hook clasps made with 16-gauge copper wire, with loops large enough to fit loosely over 14-gauge jump rings
How to Make the Beaded Framework Link Bracelet
The tasks required for this project are covered in Chapters 3, 7, and 8.
Make the Links
1 Arrange four medium-sized pegs on the jig in a square formation about 3⁄8 inch apart.
2 Center one 51⁄2-inch length of 14-gauge wire along one side of the square formation.
3 Bend the 14-gauge wire around all four pegs, as shown. One side of the square will have double wire.


4 Remove the wire from the jig.
5 If necessary, use flat nose pliers or nylon jaw pliers to straighten the sides of the square you just made.
6 Holding the double wire together with your fingers, use a 10-inch length of 24-gauge wire to wrap both wires together at the center, creating about a 1⁄2-inch length of wraps.

7 Trim off any extra 24-gauge wire at each end of the wraps, and use chain nose pliers to flatten the ends against the 14-gauge wire.
8 Grasp one end of the wrapped wires with flat nose pliers and bend the 14-gauge wire tail to a 90-degree angle.

9 Repeat Step 8 on the other end of the wraps.
10 Use a needle file to smooth the edges of the wire tails, as needed.
11 Using a length of 12-inch 24-gauge wire, wrap the link with coordinating mixed Czech glass beads, leaving a space of about 1⁄8 inch at each end of the link. Use the nylon jaw pliers as needed to straighten the wire as you work.
12 Repeat these steps to complete a total of six framework links.

Connect the Links
1 Using round nose pliers, convert both 14-gauge wire tails on each framework link into loops that point in the same direction.
2 Use flat nose pliers to gently open each loop.
3 Connect the links by inserting non-looped ends into looped ends, and using flat nose pliers to close each loop as you go along.
Attach the Clasp
1 Attach the two 14-gauge jump rings to the non-looped end of the last framework link.
2 Attach the two 18-gauge wire-hook clasps to the loops on the first framework link. You can now fasten the bracelet by inserting the hook clasps into the jump rings on the other end.

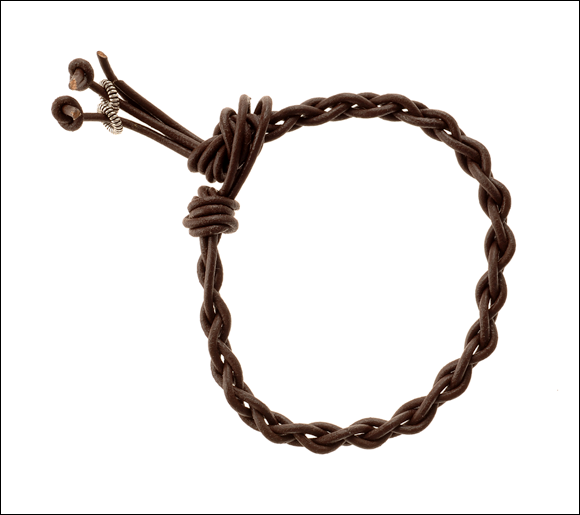
Four-Strand Braided Leather Bracelet
Leather is a traditional, yet challenging, cord medium for round braids. You will need a little more finger dexterity with leather than with smaller, softer cord, but the results are worth the effort. If you would like to make this design using the six-strand round braid instead of the four-strand braid, be sure to switch to a smaller-diameter cord.
Tools, Supplies, and Materials
Tools and Supplies
• Knotting board with T-pins (or a knotting board alternative; a clipboard works especially well for this project)
• Sharp scissors, nippers, or side cutters
Materials
These materials will make one bracelet that measures about 8 inches long, not including the fringe.

• 2 21⁄4-yard lengths of 1.8mm leather cord in brown
• 2 Hill Tribe sterling silver coiled rings (8mm OD)
How to Make the Four-Strand Braided Leather Bracelet
The tasks required for this project are covered in Chapters 3 and 9.
1 Align both lengths of leather cord and fold them over at their centers.
2 Tie a temporary overhand knot with all four strands near the cord ends.
3 Tie another overhand knot to create a loop at the folded-over end of the cords, using the knot from Step 2 as a guide to determine the size of the loop. The loop should fit over the knot from Step 2, but not too loosely or too tightly.

4 Remove the overhand knot that you made in Step 2.
5 Anchor the loop securely to the knotting board.
6 Braid 71⁄2 inches of four-strand round braids.
7 Tie an overhand knot with all four cords against the end of the round braids, and pull it tight.
8 String each of the two Hill Tribe sterling silver rings onto separate strands of cord tail, securing each with a single-strand overhand knot.
9 Cleanly trim the end of each fringe piece at an angle, about a 1⁄2 inch away from each overhand knot.
10 Trim the other two fringe strands, at similar angles, to the desired length.
