Chapter 9: Macramé Knotting and Beading
Macramé and braided jewelry is fun and casual, and it can range from very simple to surprisingly complex. Many popular designs are made with natural fiber cords like hemp or jute. You can also knot and braid soft leather, satin, nylon, or cotton cord. You’ll begin this chapter by learning some standard terminology, and then learn how to set up your knotting board and create the most common knots and braids.
Add Beads Between Macramé Knots
Cord Terminology
When you make macramé jewelry, you work with multiple strands of cord that all have different purposes. The cords may be the same color, material, and size, but they have different names depending on their function. These names are used in most project instructions, and so it’s good to become familiar with them.
Working Cords
Working cords include all of the cords that you use as part of your design. There are two main types of working cords: filler cords and knotting cords.

Filler Cords
When you begin a macramé jewelry project, your first step is to secure the filler cords. These are long, straight cords that you hold down, or anchor, so that you can tie knots around them using other cords.
Knotting Cords
Knotting cords (also called tying cords) are the cords you use to tie knots around filler cords. You can anchor them to your work surface with tape or pins.
Anchor Cord
An anchor cord (also called a holding cord) may or may not be part of a design. It is typically anchored at both ends, and you tie working cords directly to it.
Wrapping Cord
You use a wrapping cord whenever you make a wrap knot. It is a loose length of cord that wraps around a bundle of working cords to hold them together.

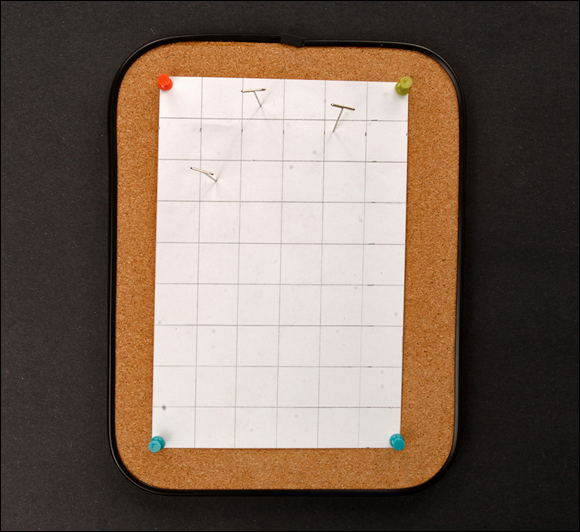
Set Up a Knotting Board
Your macramé work area can be either fixed or portable. If you don’t need to move your work from place to place, you can anchor your cords to any heavy or immoveable object, like a table leg or an eye hook fastened to a wall. However, if you prefer a portable work area, or a setup that is simply more convenient, you can use a knotting board.
Types of Knotting Boards
You can buy a pre-made knotting board from a jewelry making supplier or you can make your own. If you’re short on time or resources, you can even use a standard office clipboard in place of a knotting board.
Pre-Made Knotting Boards
Pre-made knotting boards make macramé knotting easier, and they’re relatively inexpensive. They are typically made of rigid fiberboard covered with paper and a layer of shrink-wrap plastic. Often, they are packaged with a supply of steel T-pins for anchoring cords. Most pre-made boards are marked on one side with a 1-inch grid that you can use to keep your work even and to make your jewelry to the desired length.

You can anchor your work to the board in various ways. The simplest method is to horizontally attach an anchor cord to the top of the board. Insert T-pins through the cord and into the board at both ends. Before you begin knotting, tie your working cords to the anchor cord. Another option is to tape a metal ring (like a washer or thin shower curtain ring) to the board and attach your working cords to it.
Homemade Knotting Boards
You can make your own knotting board out of just about any material that is soft enough to insert T-pins and strong enough to hold them in place. Try a slab of dense foam board from a craft store or corkboard from an office supply store. If you’d like to add a grid of measured squares to your board, you can draw one out on heavy paper or light paperboard (or print one from a computer) and attach it to the board with pins or thumbtacks. You can use the same anchoring methods with a homemade board as you can with a pre-made board.
One of the nice things about a homemade board is that you can make it any size. You’ll find that some projects are easier to complete on a smaller board than a larger one.
Using a Clipboard
If you’d rather not purchase a pre-made knotting board or bother with making one, try knotting on a simple clipboard. Double-over a length of scrap cord and tie an overhand knot near the ends to create a loop. Clip it down to the board, with the knot just behind the clip. Use the loop below the clip as your anchor cord. Anchor the other ends of your cords, as needed, using masking tape.

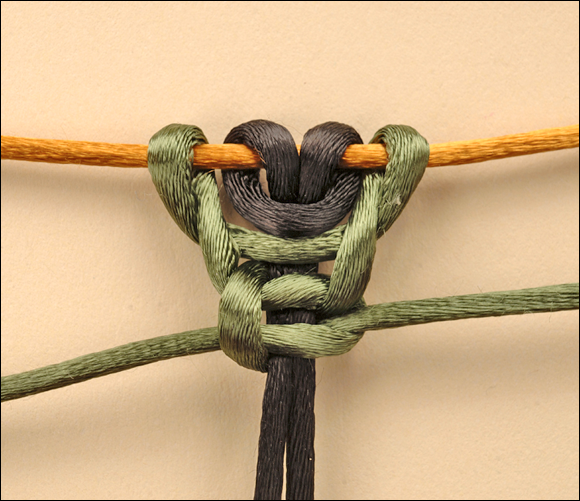
Learn the Basic Macramé Knots
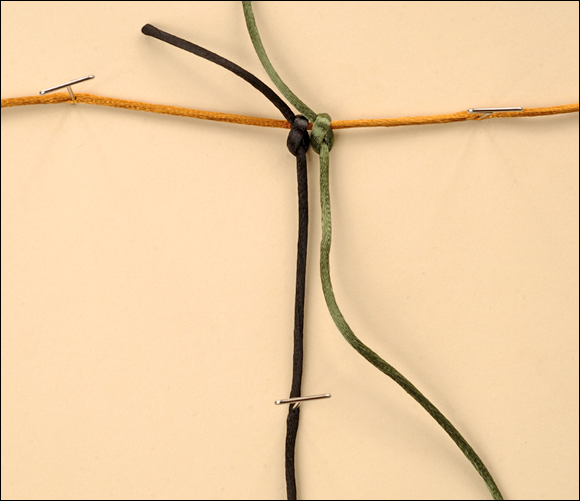
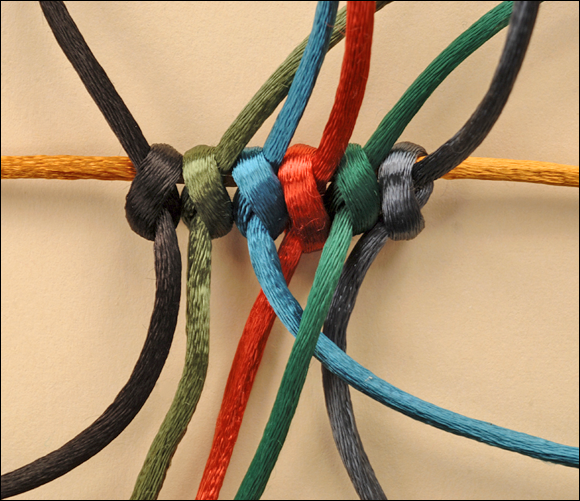
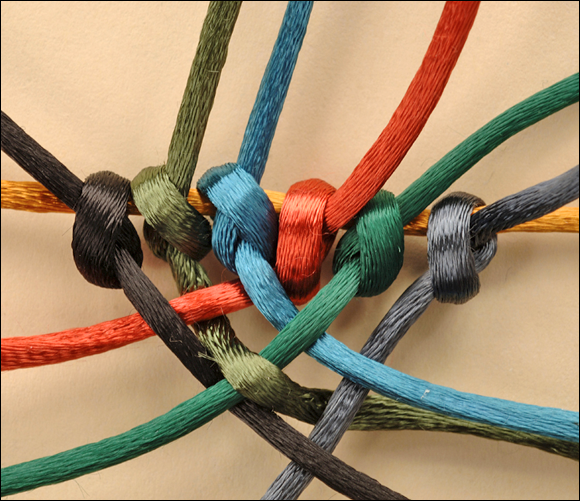
You can make all kinds of interesting knotted patterns using combinations of several basic knots. To practice them, set up an anchor cord a few inches long, and prepare two 2-foot lengths of 2mm-diameter cord. Begin by using lark’s head knots to secure the working cords to the anchor cord.

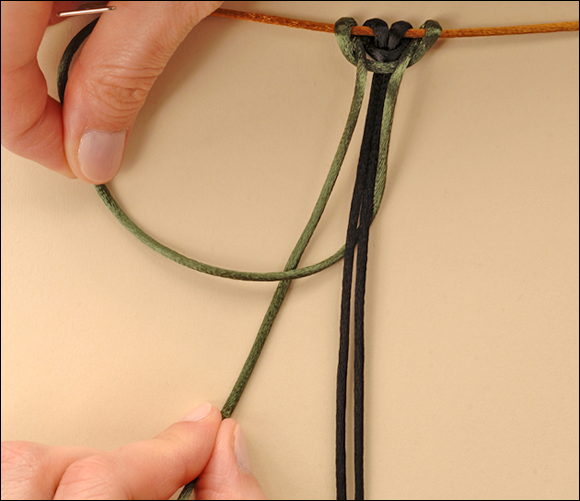
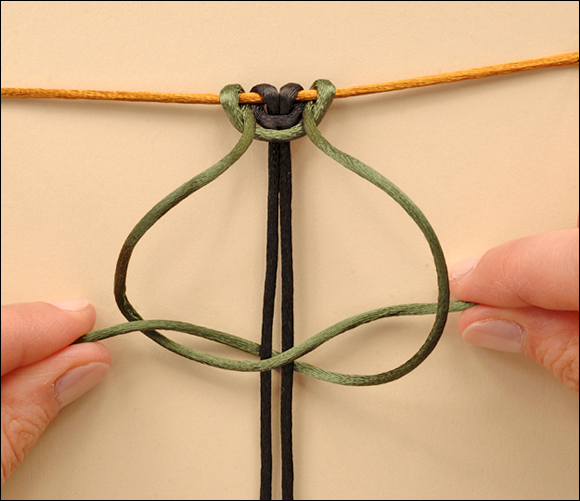
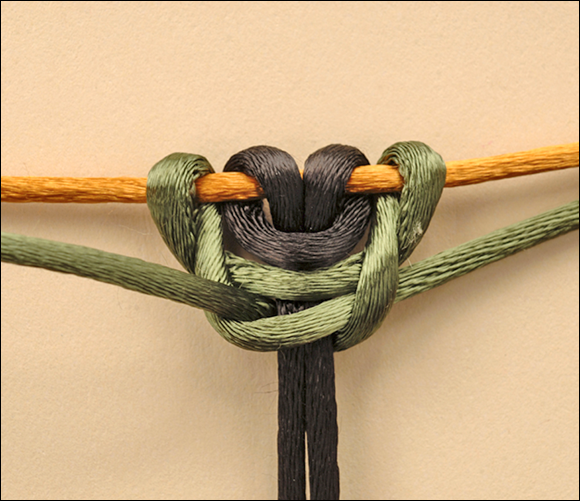
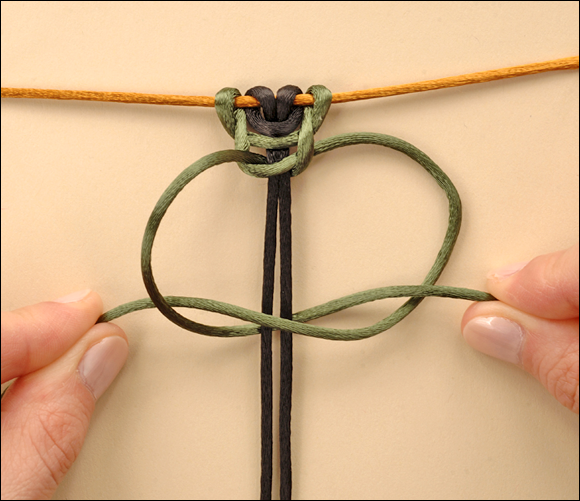
Lark’s Head Knot
The lark’s head knot folds over an anchor cord to create two strands of working cord.
1 Double-over the working cord and place the folded end on top of the anchor cord.
2 Tuck the folded end of the working cord downward beneath the anchor cord to create a downward loop.
Step 2
3 Insert both strands of the working cord into and through the folded portion.

Step 3
4 Holding the top of the working cord with your fingers, gently pull down on its two strands to tighten the knot.
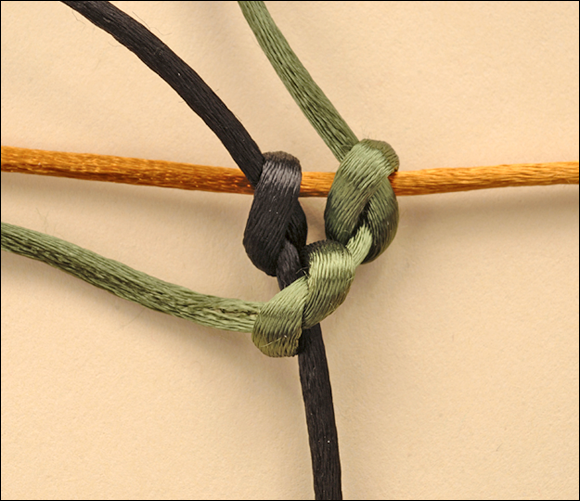
The completed lark’s head knot is shown here. (a)
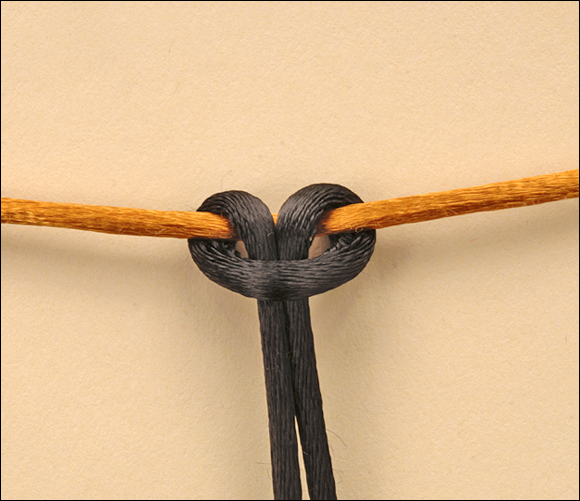
Step 4A
Macramé Overhand Knot
To make a macramé overhand knot, use a working cord to tie a simple overhand knot over a filler cord.
1 Tape or pin the end of one strand of working cord to your work surface. This will be the filler cord.
Step 1
2 Position the other cord (the knotting cord) over the filler cord.
3 Tuck the end of the knotting cord beneath the filler cord to create a small loop.
Step 3
4 Bring the knotting cord back to the other side of the filler cord, and thread it up through the loop.
Step 4
5 Use your fingers to tighten the knot while positioning it up against the anchor cord or the previous knot in your design.
The completed macramé overhand knot is shown here. (a)
Step 5A
Half Knot
The half knot uses two filler cords and two knotting cords. If you repeat half knots, you will create a twisted rope pattern.
1 Attach two working cords to an anchor cord using a lark’s head knot. Tie one knot over the other, as shown. You now have four strands of working cord.

Step 1
2 Anchor the two middle strands to your work surface. These are the left and right filler cords, and the loose cords are the left and right knotting cords.
3 Tuck the right knotting cord beneath both filler cords.
4 Position the right knotting cord over the left knotting cord.
Step 4
5 Bring the left knotting cord over both filler cords, and tuck it beneath the right knotting cord.
Step 5
6 Simultaneously pull both knotting cords to their respective sides to tighten the half knot. The completed half knot is shown here.
Step 6
7 Continue making half knots if you’d like to create a twisted rope.
Macramé Square Knot
The macramé square knot consists of two half knots tied in opposite directions.
1 Beginning with two filler cords and two knotting cords, tie a half knot.
2 Bring the left knotting cord under both filler cords.
3 Position the left knotting cord over the right knotting cord.
4 Pull the right knotting cord over both filler cords, and tuck it beneath the left knotting cord.
Step 4
5 Simultaneously pull both knotting cords to their respective sides to tighten the second half of the macramé square knot.
The completed macramé square knot is shown here.

Changing Macramé Square Knot Direction
On one side of the macramé square knot, the cord loops upward; on the other side, it loops downward. In the example above, the upward loop appears on the left side of the knot. You can make a macramé square knot facing the other direction—that is, with the upward loop on the right side—by beginning the half knot (see Step 1 under “Macramé Square Knot”) with the left knotting cord instead of the right one. Then, perform Step 2 beginning with the right knotting cord instead of the left one.

Square Knot Picot
A picot is a length of cord that has been left loose between two knots. You can use it to create looped fringe along the sides of your work.
1 Tie one square knot.
2 Insert two T-pins into your work surface at an equal short distance from the filler cords on either side of the cords.
Note: If you are not using a knotting board, skip this step and perform the next step as if there were T-pins in your work surface to help guide your knotting cords.
3 Position both knotting cords around the T-pins.
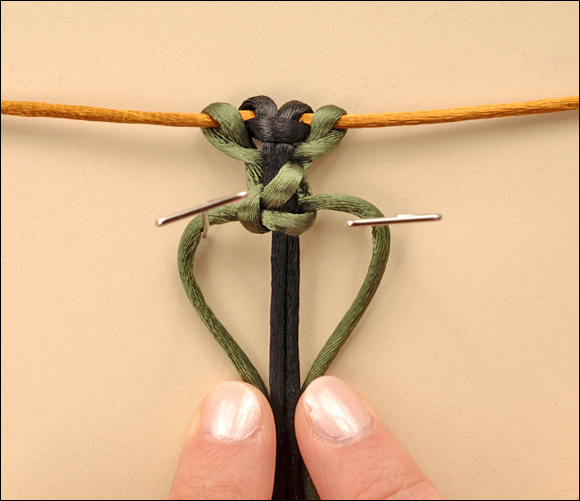
Step 3
4 Tie another square knot below the T-pins.

Step 4
5 Remove both T-pins.
6 Position the second square knot up against the first one.
The completed square knot picot is shown here. (a)
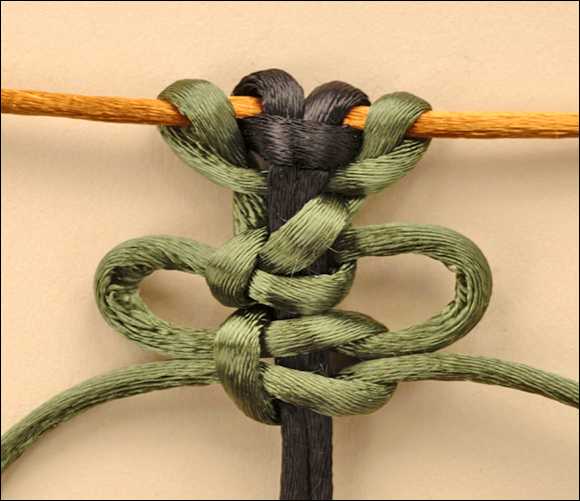
Step 6A
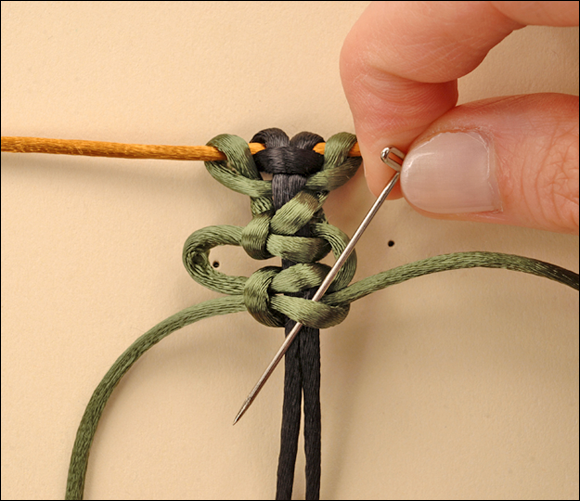
Correcting Mistakes
You may find that some knots that you attempt do not come out looking right, or you may occasionally lose your place in mid-knot and forget where you left off. When this happens, use a T-pin or awl to gently pull out each knot in reverse order until you reach a comfortable point to begin working again.
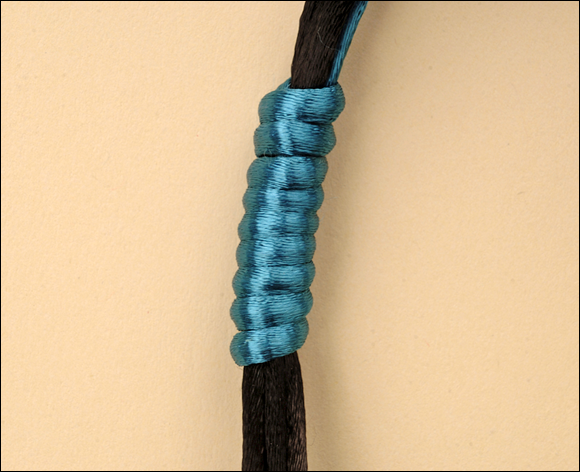
Wrap Knot
When you make a wrap knot (also called gathering cords), you wrap one cord (the wrapping cord) around a group of other cords to hold them neatly together. For practice, try wrapping one cord around a bundle of four cords.
1 Anchor the top ends of four working cords to your work surface. These are the filler cords for the wrap knot.
2 Cut another piece of cord about 17 inches in length. This is the wrapping cord.
3 Fold-over about 2 inches of the wrapping cord on one end to create a long loop.
4 Position the loop parallel to and against the filler cords.

Step 4
5 Hold the base of the wrapping cord loop closed and against the filler cords with the fingers of one hand.
6 With the other hand, wrap the other end of the wrapping cord around all of the filler cords at the base of the loop, leaving about 1⁄2 inch of unwrapped tail at the bottom of the loop.

Step 6
7 Continue wrapping around the filler cords, and the loop itself, in an upward direction until the wraps almost reach the top of the loop.
8 Insert the end of the wrapping cord into and through the loop, and pull it taut.

Step 8
9 Release the top end of the wrapping cord from your fingers.
10 Pull on the bottom tail of the wrapping cord until the top of the loop is positioned completely inside the wraps.
Step 10
11 Trim off the extra cord tails at both ends.
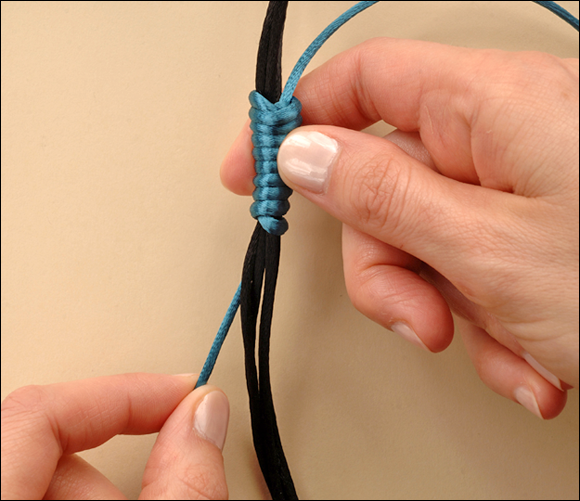
The completed wrap knot is shown here. (a)

Step 11A
Half Hitch Knot
To make a half hitch knot, you simply loop one cord around another cord. You can repeat half hitch knots to create a twisted rope effect.
1 Beginning with one knotting cord and one filler cord, bring the knotting cord under and then over the filler cord.

2 Tuck the end of the knotting cord back underneath itself.
3 Pull the knotting cord to tighten the knot.
The completed half hitch knot is shown here.
Alternating Half Hitch Knots
Alternating half hitch knots are repeated half hitch knots that switch direction with each knot. They result in a flat rope.
1 Make a half hitch knot.
2 Remove the T-pin or tape from the filler cord, and use it to anchor the knotting cord instead. The original filler cord is now the knotting cord, and the original knotting cord is now the filler cord.

Step 2
3 Using the new knotting cord, tie a half hitch knot around the new filler cord. This half hitch knot faces the opposite direction to the first knot.
4 Remove the anchor from the filler cord, and anchor the knotting cord. The filler cord and knotting cord have switched roles again.
5 Make another half hitch knot.
6 Continue switching the filler and knotting cords and making half hitch knots to the desired length of rope.
A length of completed alternating half hitch knots is shown here.

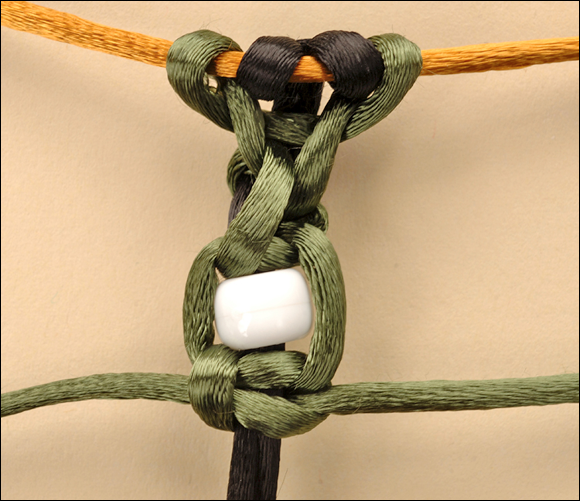
Add Beads Between Macramé Knots
It’s easy to string beads into macramé knotted designs. If you have beads with large enough holes, you can string them over all of the working cords just about anywhere in your design. If your beads’ holes are not that large, or if you’d like a more integrated look, try the following techniques instead.

String Beads Lengthwise
Use this method to string a bead so that its hole runs lengthwise with the design.
1 Beginning with four working cords (two filler cords and two knotting cords), tie a macramé knot of your choice. This example shows a square knot.
2 Remove the pins or tape that anchor your filler cords.
3 String a bead onto both filler cords.

Step 3
4 Re-anchor the filler cords.
5 Position the bead up against the knot that you made in Step 1.
6 Tie another knot at the bottom of the bead to continue the design.
The secured vertical bead is shown here.
Step 6
String Perpendicular Beads
Use this method to add a bead with its hole running perpendicular to the design.
1 Complete Steps 1–2 under “String Beads Lengthwise” on the previous page.
2 Holding the bead with its holes facing side-to-side (perpendicular to the cords), thread one filler cord sideways through the bead.

Step 2
3 Pull the filler cord taut.
4 Continue holding the bead in place, and thread the other filler cord through the bead from the opposite direction.
5 Pull the second filler cord taut.
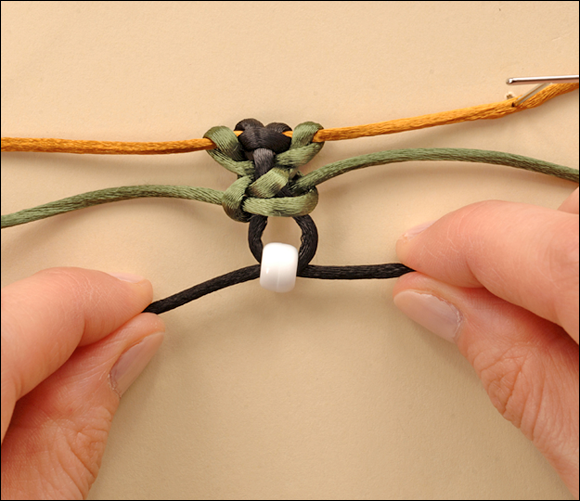
Step 5
6 Re-anchor the filler cords.
7 Securely tie another knot up against the bead to continue the design.
The secured perpendicular bead is shown here.

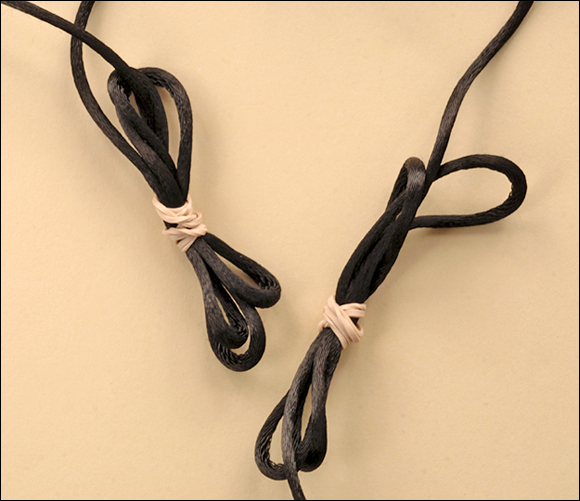
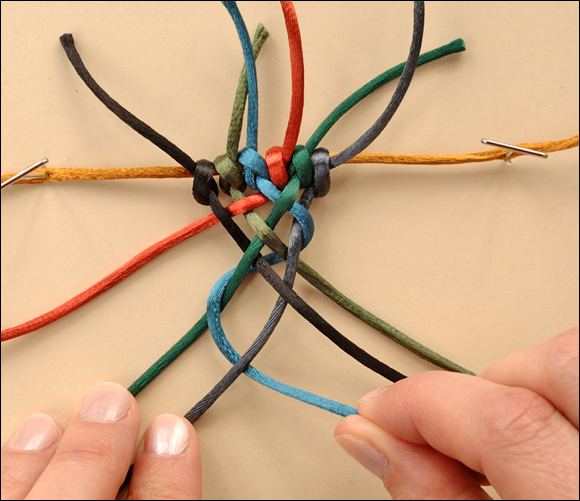
How can I keep longer lengths of cord from tangling?
Some jewelry designs require that you use and keep track of multiple long lengths of cord. Cords can easily become tangled or fall out of place, which can cause some confusion.
When you work with longer cords, try making butterfly bobbins to keep them neat and orderly. Beginning about a foot away from where you will begin knotting, wrap one cord in a figure-eight pattern repeatedly around your extended thumb and index finger. Bring your thumb and finger slightly toward each other to remove the cord. Slip a rubber band over the center of the figure-eight where the loops of cord cross. Repeat this process for all of your lengthy working cords. Pull cord out of these bundles as needed when you work your design.
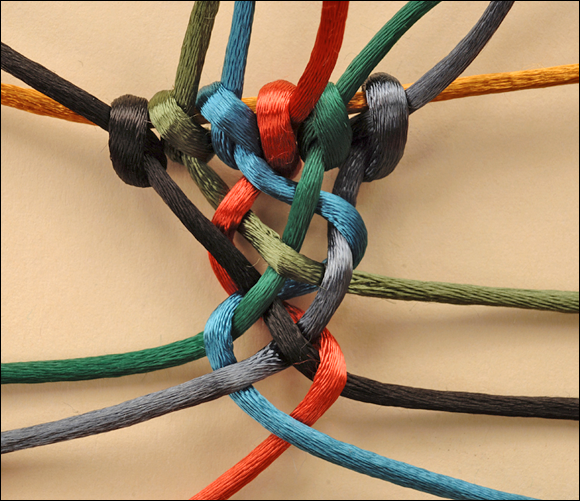
Braid Cords Together
You can braid together multiple strands of cord to create thicker and more decorative cording for your projects. You can also combine braids and knots in a single design. Here are the three most popular braids used in jewelry making.
Three-Strand Flat Braid
You are probably familiar with this simple braid, which is commonly used to braid hair. You can make it with three single cords or three groups of cords.
1 Beginning with three cords anchored at the top ends, pick up the left and middle cords with your left hand.
2 Using your right hand, bring the right cord over the middle cord and position it between the middle and left cords.

Step 2
3 Bring the left cord over the original right cord.
Step 3
4 Pull the cords gently to the sides to tighten the beginning of the braid.
5 Bring the cord that is now on the far right over the cord that is now in the middle.
6 Bring the left cord over the middle cord.
7 Continue bringing each side cord over the middle cord, tightening the braid as needed to keep it even.
A length of completed three-strand flat braid is shown here. (a)
Step 7A
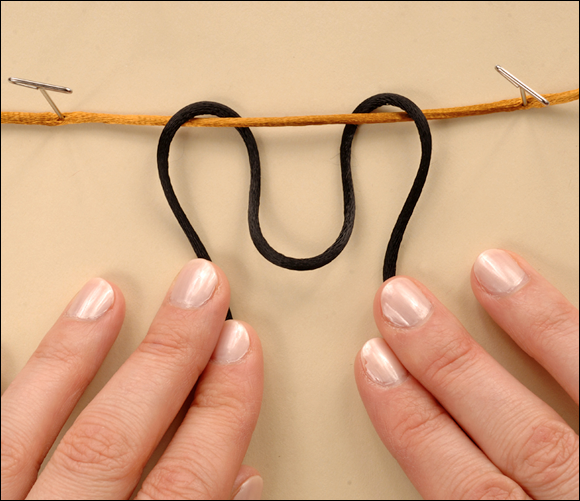
Four-Strand Round Braid
This braid is round with four even sides. First, set up the cords with an initial flat braid. Then make repeated round braids.
Beginnning the Braid
1 Beginning with four working cords anchored at their top ends, bring the second cord from the left over the second cord from the right, so that the two cords are crossed.


2 Cross the far-left cord under the second cord from the right.
3 Bring the far-right cord over and under the two cords that are closest to it, respectively.
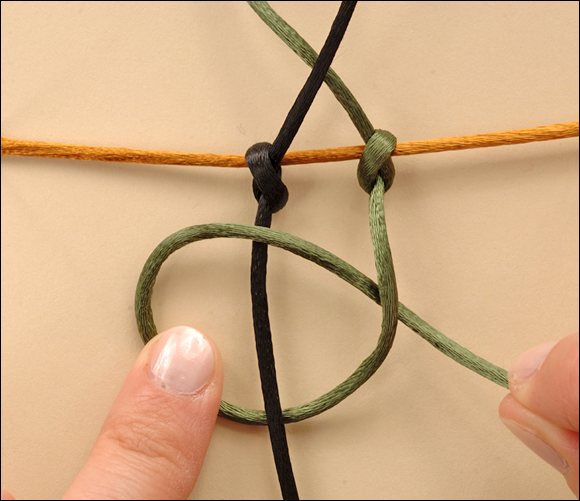
Round Braiding
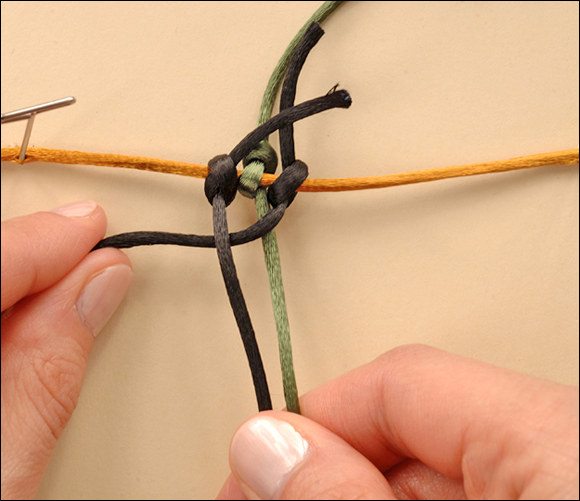
1 After beginning the braid, cross the cord that is now on the far left (green) beneath the next two cords to its right (at the point where they cross), and then back over the second cord it crossed under (orange).
Step 1
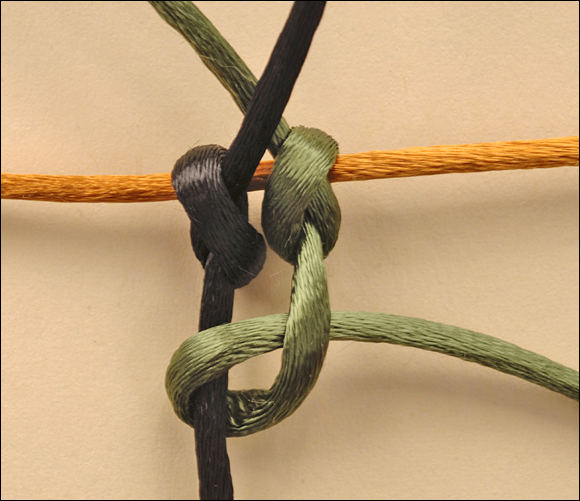
2 Repeat this process on the other side. Cross the cord that is now on the far right (blue) beneath the two cords next to it (where they cross) and then back over the second cord it crossed under.
3 Pull the cords to tighten the developing braid.
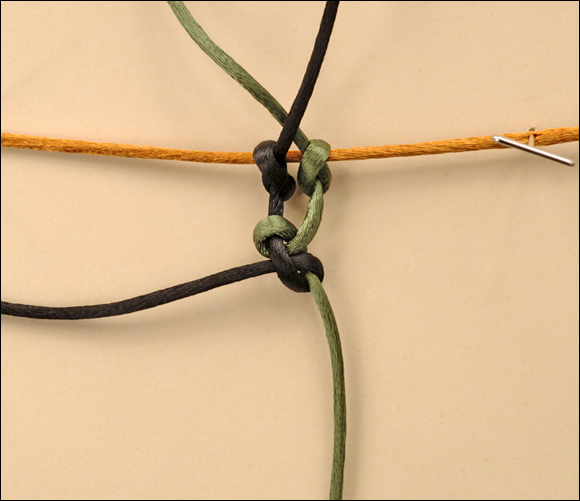
4 Continue crossing each side cord under the two adjacent cords and back over one cord, alternating sides from far left to far right, and tightening the braid as you go.
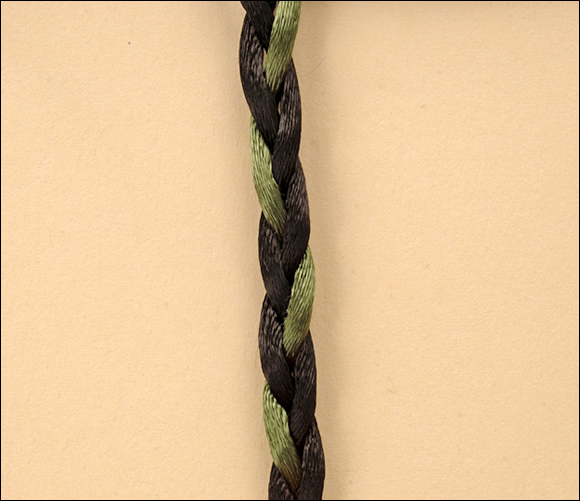
A length of completed four-strand round braid is shown here.
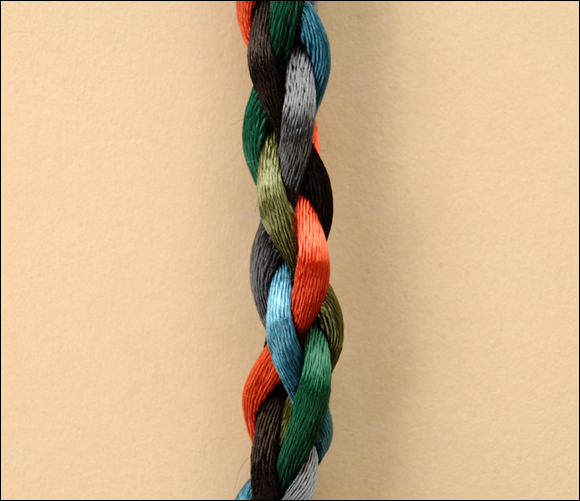
Six-Strand Round Braid
This braid is thicker and slightly more complex than the four-strand round braid. Again, begin with a flat woven braid, and then make the round braids.
Beginning the Braid
1 Beginning with six working cords anchored at their top ends, weave the third cord from the left (blue) over the cord to its right—under the next cord, and over the last cord.
2 Weave the second cord from the left (green) under the cord directly to its right, and over and under each subsequent cord to its right.
3 Finally, weave the first cord on the left over and under the cord directly to its right, and then over and under each subsequent cord to its right.
Step 3
The three cords on the left are now crossed over and facing the right, and the three cords on the right are now crossed over and facing the left.
Round Braiding
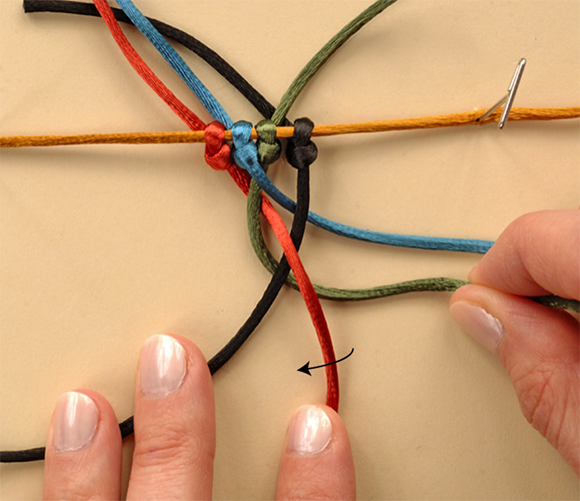
1 After beginning the braid, cross the cord that is now on the far right (blue) beneath the next four cords to its left, and then weave it over and under the two cords to its right.
2 Cross the cord that is now on the far left (orange) beneath the next four cords to its right, and then weave it over and under the two cords to its left.
3 Pull the cords to tighten the developing braid.
Step 3
4 Continue crossing each side cord under the four adjacent cords and weaving it back through the next two in the opposite direction, alternating sides from far right to far left, and tightening the braid as you go.
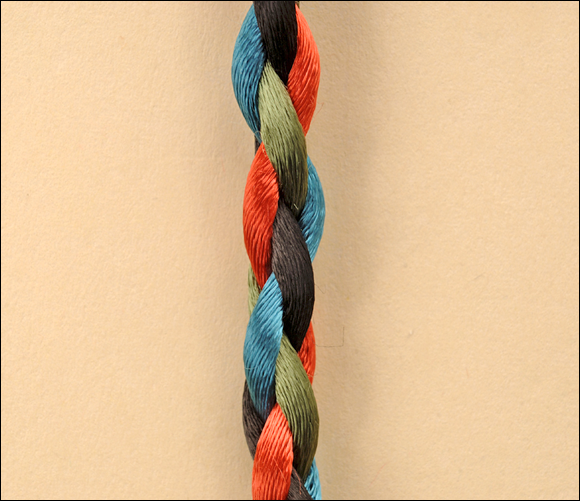
A length of completed six-strand round braid is shown here.
Finishing Knotted and Braided Cord Jewelry
You can use a variety of standard methods to finish your knotted and braided cord designs. (For a review of common finishing techniques, see Chapters 3 and 4.) Knot-and-loop closures are especially popular because of their earthy, casual style. (See the Four-Strand Braided Leather Bracelet project in Chapter 11.) You can also attach pre-made findings by tying your cord ends into jump rings, or by gluing cord bundles or wrapped cord ends into fold-over or coil ends. Always be sure to decide on a finishing method before you begin a new project, and plan for any extra cord length or special knotting that it may require. As always, never be afraid to experiment. You just might invent a new finishing method to define your signature style.
