13
Treatment of the Pelvis
As you will probably have guessed by now, this is the final chapter of the book and I hope you have enjoyed reading all of the other chapters leading up to it. I think it makes perfect sense to finish the book with a chapter that concentrates on one of the most important areas, namely the treatment of all the various types of pelvic girdle and lumbar spine dysfunctions that have been previously covered and discussed extensively throughout this text.
The focus of this particular chapter will therefore be on the application of specific realignment techniques for treating the three main areas of the pelvis: symphysis pubis, iliosacral, and sacroiliac types of dysfunction. These are the most common presentations typically found when assessing athletes and patients.
At the end of this chapter I will also include a treatment strategy for the area of the lumbar spine, because the lumbar spine is a naturally occurring connection to the pelvis. I always say the following to my students: if you have a primary pelvic girdle dysfunction, there must be some form of compensatory mechanism continuing on throughout the area of the lumbar spine, and even the thoracic spine and the cervical spine will be involved in the compensation process; these areas could be a potential site of pain and a natural concern for your patients. Once you have applied some of the realignment techniques that I am about to demonstrate for the pelvic girdle, it would be sensible to make absolutely sure that the lumbar spine is also in a relatively level position through the appropriate treatment protocols discussed at the end of this chapter.
In previous chapters I discussed in great detail how to thoroughly assess the three areas of the pelvic girdle in order to confirm or discount the existence of any presenting malalignment syndromes. We now need to put everything that has been taught into practice by applying the following techniques to correct and normalize the various musculoskeletal dysfunctions that you might find during your initial assessment/screening process.
Treatment Strategy
Other experts in this complex field of manual medicine start the treatment strategy by initially correcting the position of the lumbar spine. They then move on to dysfunctions that are found within the iliosacral area, followed by the region of the sacroiliac, and finishing off with a treatment of the symphysis pubis joint.
In DeStefano (2011), Greenman’s suggestion of the treatment sequence is: symphysis pubis, hipbone shear (upslip is considered a hipbone shear) dysfunction, sacroiliac dysfunction, and iliosacral dysfunction.
My personal preference is the following (and I like to think it is similar to Greenman’s approach, as I was taught his manual medicine principles early on in my osteopathy training). I would recommend starting the corrective treatment with the symphysis pubis joint, followed by treatment of iliosacral dysfunctions (upslip first), and then moving on to sacroiliac dysfunctions. I would finish the treatment, if I felt it was necessary, with any compensatory dysfunctions that are present within the region of the lumbar spine.
Greenman in DeStefano (2011) recommends treating the symphysis pubis joint early on during the assessment process. The reason for this is that SIJ dysfunctions are typically found in a patient in the prone position; if a symphysis pubis dysfunction is present at the front of the body, the patient is not symmetric in the prone position, resting on the tripod formed by the two ASISs and the symphysis pubis.
Greenman also suggests treating superior shear (upslip) after the symphysis pubis, as he found that the presence of shear restricts all other motions within that SIJ: therefore, he says shear deserves attention early on in the treatment process. He mentions that you need to have two symmetric hipbones available in order to assess the position of the sacrum between these two bones.
In terms of assessing and treating patients, I consider my concept/approach to be similar to Greenman’s. When I give lectures to my students about the pelvis and SIJ, I like to recommend Greenman’s Principles of Manual Medicine (DeStefano 2011), as I think it is a great book for assisting students in learning about this area. However, I also highly recommend other physical therapy books to my students (see Bibliography), such as those by the experts Lee, Vleeming, and Schamberger. I would like to think that in time, if students of physical therapy endeavor to read some, or indeed all of the books I have recommended (as well as this book), they will hopefully be able to competently assess, identify, and treat their own patients and athletes in their own clinical settings.
Note: The realignment techniques demonstrated in this chapter mainly consist of soft tissue techniques, specifically METs, as explained in Chapter 7. However, since I am an osteopath and have trained in the skill of spinal manipulation, the word “thrust” or the words “high-velocity thrust” (or abbreviation HVT) will be mentioned from time to time. These advanced techniques should only be incorporated into the treatment plan if one has the necessary training and qualifications to perform them.
Most of the techniques I will show you are very safe to perform in your own clinic. If you are unsure of which technique (depending on your skill level and qualifications) is best applied to your patient, I would follow the soft tissue MET approach initially, as generally these techniques will cause no harm but are very effective at correcting any malalignment presentations, especially when used properly. However, there will come a time when you will feel a thrust technique (HVT) is needed, so you have a choice: either you can train in the appropriate field of manual therapy, e.g. osteopathy or chiropractic, or it might be easier (in my opinion) to simply refer your patient to a suitably qualified practitioner who is skilled in the art of spinal manipulation.
Part 1: Treatment Protocol for Symphysis Pubis Dysfunctions
Symphysis pubis dysfunctions (SPDs) are very common but are generally neglected in terms of treatment by the physical therapist; I feel that this is probably because of the lack of symptomatic pain within the SPJ. The pubic bone tends to be either superior or inferior (although other types of potential dysfunction are discussed by some authors). For this text, we will focus on:
• Superior/inferior SPD
• Left superior SPD
• Right inferior SPD
Diagnosis: Superior/Inferior SPD
Treatment: MET/Thrust technique (shotgun technique)
Position: Supine
The patient adopts a supine position with the knees and hips bent and the feet flat. The therapist stands at the side of the couch and places their hands on the outsides of the patient’s knees.
The patient is asked to abduct their hips against a resistance for 10 seconds, as shown in Figure 13.1(a), which causes an RI effect in the adductors; this isometric contraction is repeated approximately three times. The therapist then places a clenched fist between the patient’s knees, and the patient is asked to squeeze the fist tightly (adduction), as shown in Figure 13.1(b). This motion of adduction is generally enough to cause a realignment of the symphysis pubis joint—it is very common for a noise (due to cavitation) to be heard from the joint, indicating a release. There is no direct thrust involved with this technique, so it is very safe to perform.
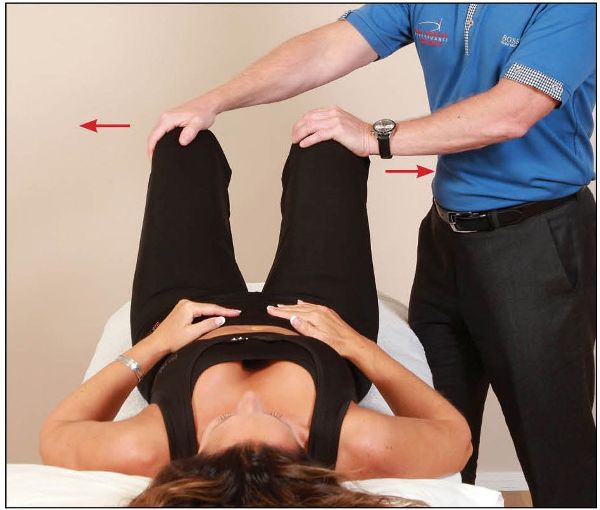
Figure 13.1. (a) The patient abducts their hips against a resistance applied by the therapist.
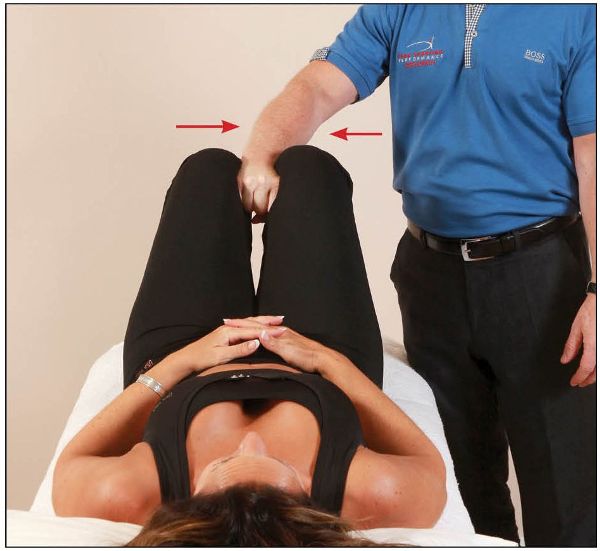
Figure 13.1. (b) The therapist places their clenched fist between the patient’s knees as they adduct firmly.
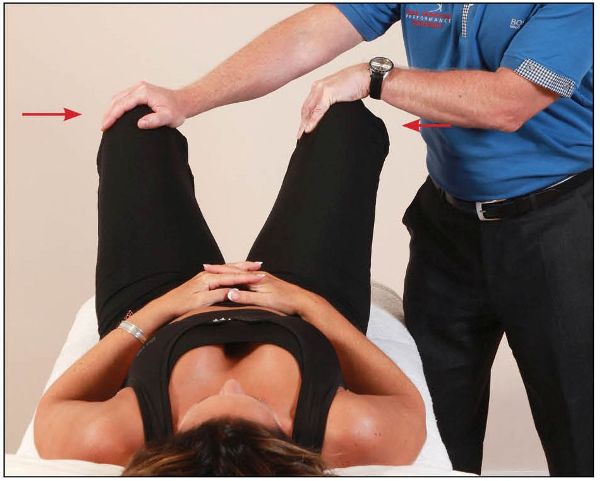
If there is no sign of cavitation using the above technique, and you still consider the joint to be dysfunctional, a thrust/HVT technique is appropriate. After the patient has abducted the hip three times, as in Figure 13.1(a), the therapist places their hands on the insides of the patient’s knees, as shown in Figure 13.2(a), or even their forearms (if easier), as shown in Figure 13.2(b). The patient is then asked to adduct quickly and strongly against the applied resistance. As the patient adducts, the therapist can apply a rapid abduction motion, as shown in Figure 13.3. If a dysfunction is present, this specific technique will cause a cavitation of the symphysis pubis joint; hence this technique is known as the shotgun.
Figure 13.2. (a) The therapist places their hands between the patient’s knees as they adduct firmly.
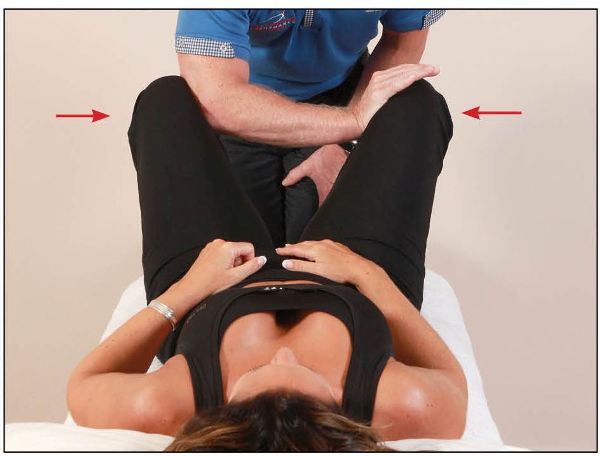
Figure 13.2. (b) The therapist places their forearms between the patient’s knees as they adduct firmly.
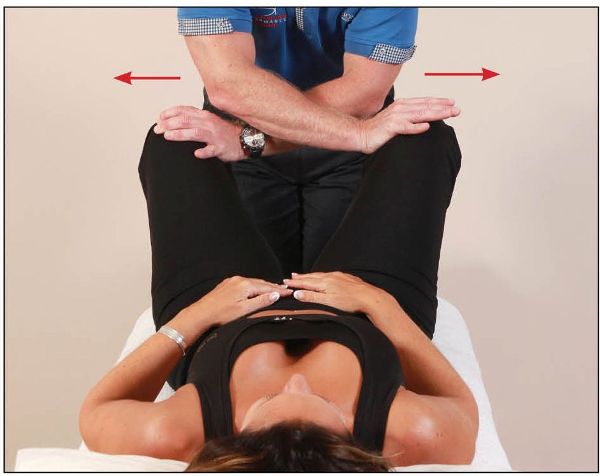
Figure 13.3. The therapist quickly separates the patient’s knees while they are still adducting. A noise is sometimes heard as the symphysis pubis joint undergoes cavitation.
Diagnosis: Left Superior SPD
Treatment: MET
Position: Supine
The patient adopts a supine position and lies at the edge of the couch with their arms placed across their body for extra support. The therapist stands on the same side as the dysfunction and places the patient’s left leg so that it hangs off the couch. The therapist stabilizes the right side of the patient’s pelvis with their left hand, and places their right hand above the left patella, to stabilize the patient’s left leg, as shown in Figure 13.4.
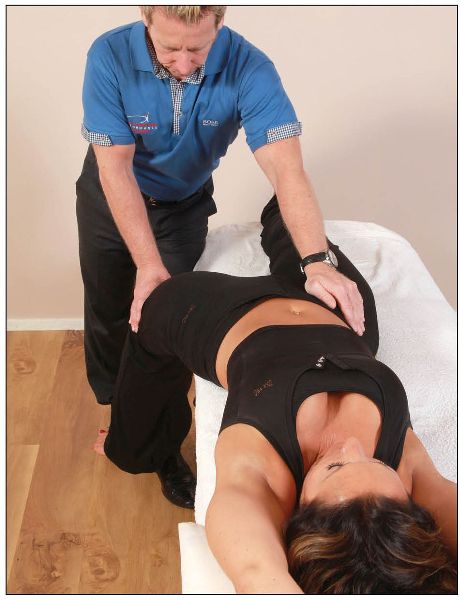
Figure 13.4. The therapist supports the patient, whose left leg hangs off the couch.
From this position, the patient is asked to flex their left hip against a resistance applied for 10 seconds by the therapist, as shown in Figure 13.5. On the relaxation phase, the therapist guides the patient’s left leg into further extension, as this will encourage the left side of the symphysis pubis joint to move inferiorly, as shown in Figure 13.6.
Figure 13.5. The patient lifts their left hip into flexion against a resistance applied by the therapist.
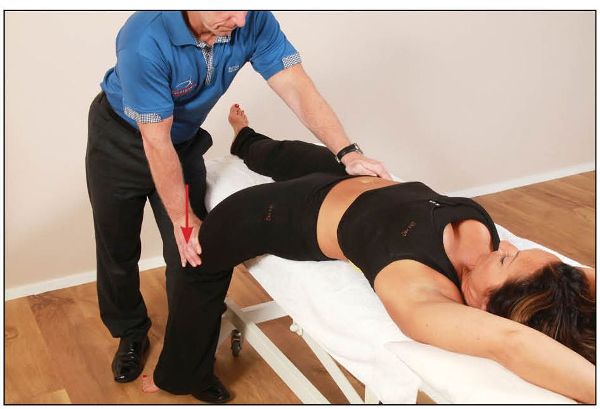
Figure 13.6. After the 10-second contraction, the therapist takes the leg into further extension, which encourages the left side of symphysis pubis to move inferiorly.
Diagnosis: Right Inferior SPD
Treatment: MET
Position: Supine
The patient adopts a supine position and lies at the edge of the couch with their arms placed across their body for extra support. The therapist stands on the side opposite to the dysfunction.
The therapist then flexes and adducts, with a slight internal rotation, the patient’s right leg; this motion will encourage superior motion of the right side of the symphysis pubis. Using the patient’s leg as a lever, the therapist lifts the right side of the patient’s pelvis off the couch, so that they can place their left hand on the patient’s right PSIS while putting the heel of the same hand onto the ischial tuberosity, as shown in Figure 13.7.
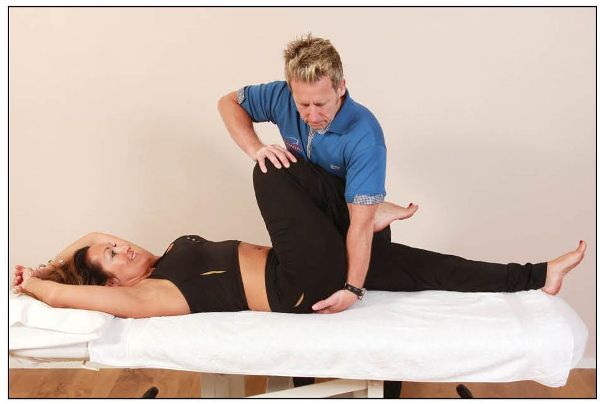
Figure 13.7. The patient’s right hip is guided into flexion, adduction, and internal rotation.
The therapist lowers the pelvis down onto their hand; from this position the patient is asked to extend their right hip against a resistance applied for 10 seconds by the therapist, as shown in Figure 13.8. On the relaxation phase, the therapist encourages the patient’s right leg into further flexion, while at the same time pressure is applied to the ischial tuberosity, as shown in Figure 13.9; this will encourage the right side of the symphysis pubis joint to move superiorly.
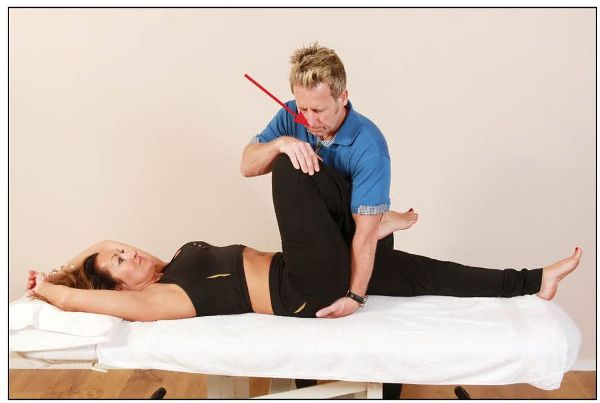
Figure 13.8. The patient extends their hip against a resistance applied by the therapist.
Figure 13.9. The therapist guides the patient’s leg into further flexion while applying pressure to the ischial tuberosity.
Part 2: Treatment Protocol for Iliosacral Dysfunctions
The following iliosacral dysfunctions are possible:
• Anteriorly rotated innominate
• Posteriorly rotated innominate
• Superior shear (cephalic)—upslip
• Inferior shear (caudal)—downslip
• Iliosacral out-flare (lateral rotation of innominate)
• Iliosacral in-flare (medial rotation of innominate)
Diagnosis: Right Anteriorly Rotated Innominate (Most Common)
Treatment: MET
Position: Side lying
Technique 1
The patient adopts a side-lying position and the therapist stands on the same side as the dysfunction. The patient’s hip and knee are flexed to approximately 90 degrees and brought over the edge of the couch. The therapist stabilizes the patient’s right innominate with their left hand and palpates the patient’s PSIS with their right hand, as shown in Figure 13.10(a).
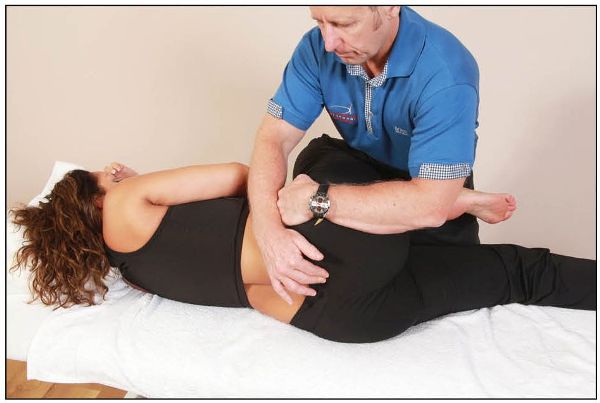
Figure 13.10. (a) The therapist cradles the patient’s knee and hip at 90 degrees while controlling the innominate bone.
The therapist fine-tunes this position by palpating the PSIS with their right hand as they flex the patient’s hip until a barrier (point of bind) is felt at the level of the PSIS. From this position and using approximately 20% effort, the patient is asked to extend their hip (Gmax and hamstrings) against a resistance applied by the therapist for 10 seconds, as shown in Figure 13.10(b).
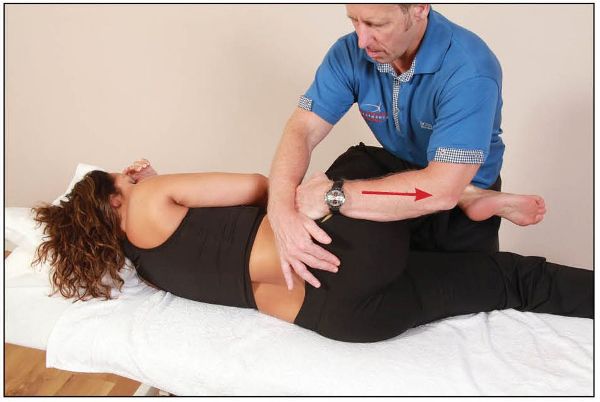
Figure 13.10. (b) The patient extends their hip against a resistance applied by the therapist.
After the contraction, and on complete relaxation, the right innominate bone is guided by the therapist’s left hand into a posteriorly rotated position, while at the same time the hip and knee are being flexed, as shown in Figure 13.10(c). This is repeated (normally three times) until a new barrier has been achieved.

Figure 13.10. (c) The therapist guides the patient’s innominate bone into a posteriorly rotated position as the knee and hip are being flexed.
Diagnosis: Left Anteriorly Rotated Innominate (Less Common)
Treatment: MET
Position: Side lying
Technique 2
(An alternative technique to correct a left anterior innominate rotation)
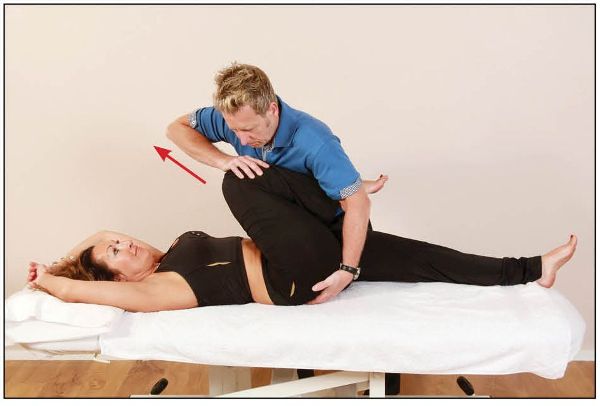
This is a similar technique to that explained above, with a few modifications: this time the dysfunction relates to a left anterior innominate rather than a right anterior innominate. The patient adopts a side-lying position and the therapist stands on the same side as the dysfunction. The patient’s upper torso is placed in a right rotation, as this induces tension down to the lumbosacral junction and prevents unnecessary motion of the lumbar spine. Next, the therapist places the patient’s left hip into flexion, and the patient’s posterior thigh is rested against the therapist’s hip (the patient hooks their left leg around the therapist), as shown in Figure 13.11(a). The patient’s right lower leg is placed in an extended position.
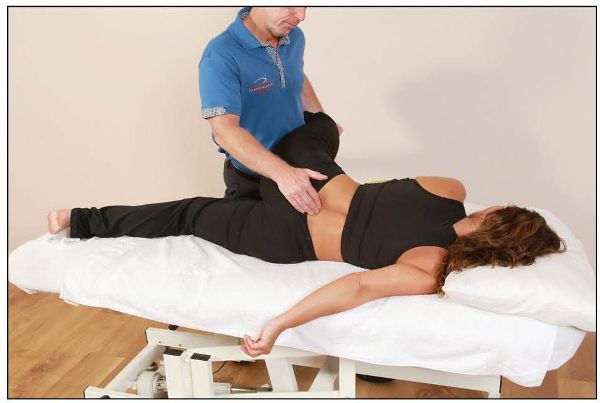
Figure 13.11. (a) The patient’s torso is placed in a right rotation. The therapist cradles the patient’s hip at 90 degrees while palpating the left PSIS.
The therapist palpates the PSIS and encourages flexion of the hip until a point of bind is felt. From this position and using approximately 20% effort, the patient is then asked to extend their hip (Gmax and hamstrings) against a resistance applied for 10 seconds by the therapist, as shown in Figure 13.11(b).
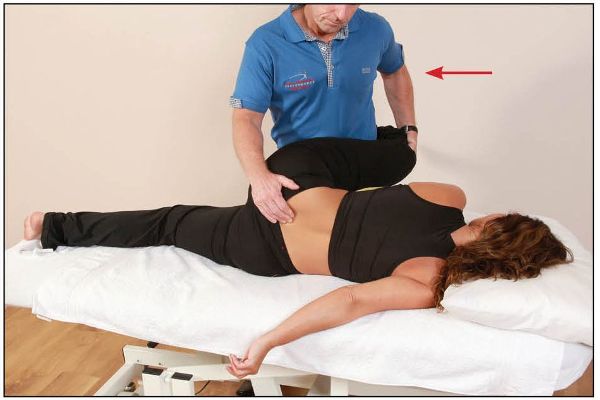
Figure 13.11. (b) The patient extends their hip for 10 seconds while the therapist palpates the left PSIS.
On complete relaxation, the left innominate bone is guided into a posteriorly rotated position by the therapist’s right hand, while at the same time the hip and knee are being flexed, as shown in Figure 13.11(c). This is repeated (normally three times) until a new barrier has been achieved.
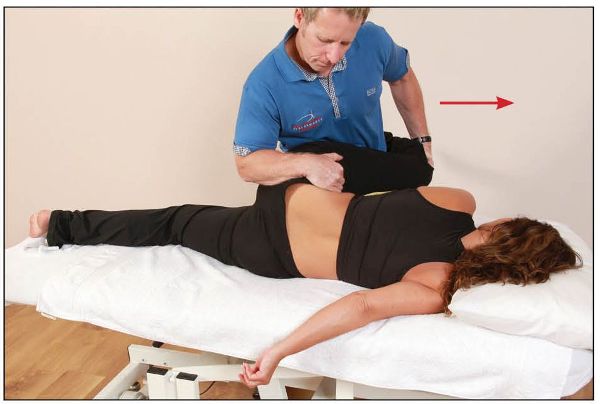
Figure 13.11. (c) The therapist guides the patient’s innominate bone into a posteriorly rotated position as the knee and hip are being flexed.
Diagnosis: Right Anteriorly Rotated Innominate (More Common)
Treatment: MET
Position: Side lying
Technique 3
(An alternative technique to correct a right anteriorly rotated innominate)
The following technique is another alternative method for correcting anterior innominate rotation, in this case on the right side. This time the therapist stands behind the patient and cradles the right innominate with both hands, as the patient holds onto their knees at 90 degrees.
From this position, the therapist fines-tunes the innominate bone in a posterior rotation direction, in order to isolate the position of bind. The patient is then asked to resist hip extension against pressure applied by their own hands for 10 seconds, as shown in Figure 13.12.
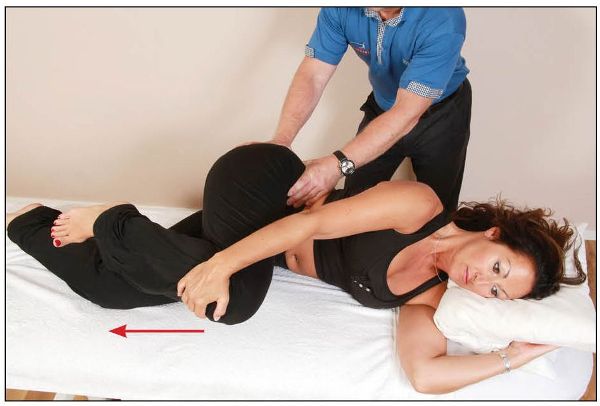
Figure 13.12. The therapist cradles the patient’s innominate bone, and the patient holds their knees at 90 degrees. The patient then extends their hip against a resistance applied by their own hands.
After the 10-second contraction, and on complete relaxation, the patient is asked to slowly pull their right hip into full flexion at the same time as their right innominate is being guided by the therapist into a posteriorly rotated position, as shown in Figure 13.13.
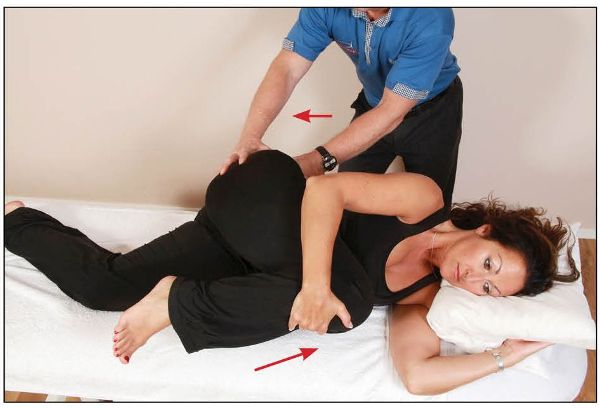
Figure 13.13. The therapist guides the patient’s innominate into a posteriorly rotated position, as the patient flexes their hip.
Diagnosis: Left Posteriorly Rotated Innominate (Common)
Treatment: MET
Position: Prone
Technique 1
The patient adopts a prone position and the therapist stands on the same side as the dysfunction. The patient is asked to lift their left leg a few inches, so that the therapist can place their right arm under the patient’s left thigh; the therapist interlocks their hands, so that their forearm rests on the patient’s left PSIS.
The therapist fine-tunes this position by slowly extending and adducting the patient’s hip joint until a barrier is felt. From this barrier, the patient is then asked to gently flex the hip of the affected side against a resistance for 10 seconds, as shown in Figure 13.14.
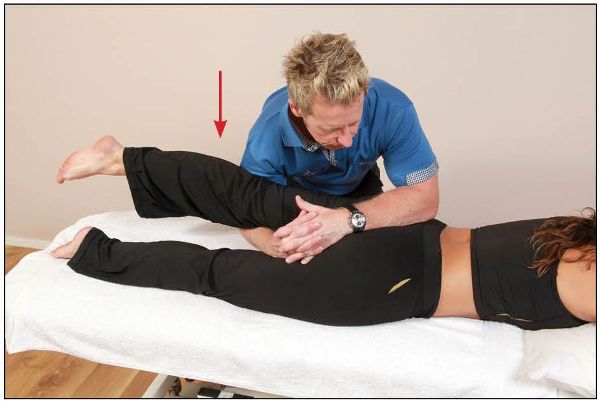
Figure 13.14. The therapist supports the patient’s leg while controlling the innominate bone with their forearm. The patient then flexes their hip against a resistance applied by the therapist.
On complete relaxation, the therapist takes the extended leg further into hip extension and adduction, while gently encouraging anterior innominate rotation with their forearm. This combined movement of the hip joint and pelvis induces an anterior rotation of the innominate bone, as shown in Figure 13.15. This is repeated (normally three times) until a new barrier has been achieved.
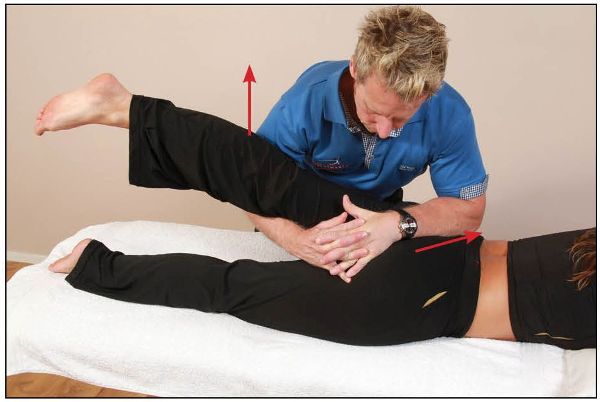
Figure 13.15. The therapist guides the patient’s innominate bone in an anterior rotation direction, as the hip is extended and adducted at the same time.
Diagnosis: Right Posteriorly Rotated Innominate (Less Common)
Treatment: MET
Position: Prone
Technique 2
(An alternative technique, for a less common right posterior innominate rotation)
Some patients’ legs can be extremely heavy; because of the increased weight of the leg in this case, I consider the following alternative technique a little easier to perform.
This time the therapist stands on the side (the left side) opposite to the dysfunction (the right side is fixed posteriorly). The patient is asked to lift their left leg a few inches, so that the therapist can place their right hand under the patient’s right knee, while the left hand rests just at the level of the patient’s right PSIS.
The therapist fine-tunes this position by slowly extending and adducting the right hip until a barrier is felt. From this barrier, the patient is asked to gently flex the right hip against a resistance applied by the therapist for 10 seconds, as shown in Figure 13.16.
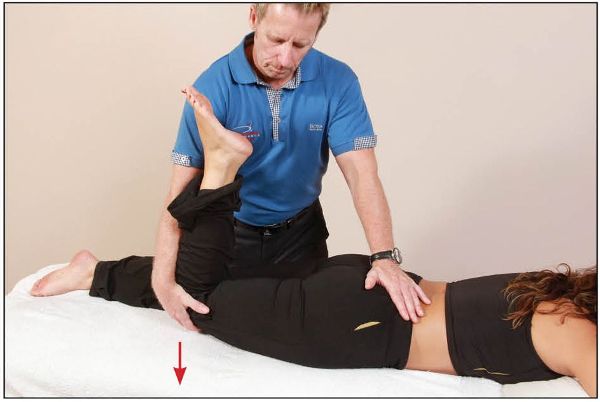
Figure 13.16. The therapist supports the patient’s leg, while controlling the innominate bone with their hand. The patient then flexes their hip against a resistance applied by the therapist.
On complete relaxation, the therapist takes the right leg further into hip extension and adduction, while applying pressure with their left hand to the patient’s right PSIS. This combined movement induces an anterior rotation of the right innominate bone, as shown in Figure 13.17. This is repeated (normally three times) until a new barrier has been achieved.
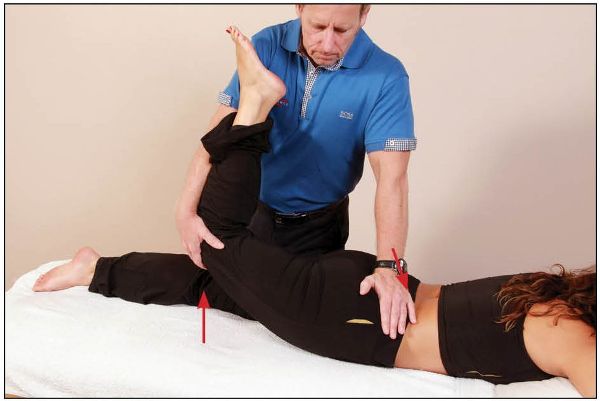
Figure 13.17. The therapist guides the patient’s innominate in an anterior rotation direction, as the hip is extended and adducted at the same time.
Diagnosis: Right Superior Shear (Cephalic)—Upslip
Treatment: MET/Mobilization/Thrust technique
Position: Prone
The patient adopts a prone position and the therapist stands on the same side as the dysfunction. The patient is asked to slide down the couch until their knees are just off the edge. The patient is then asked to look to one side (any) and not to hold on to anything. The therapist straddles the patient’s right leg and internally rotates the patient’s thigh to cause a close-packed position of the hip joint, as shown in Figure 13.18.
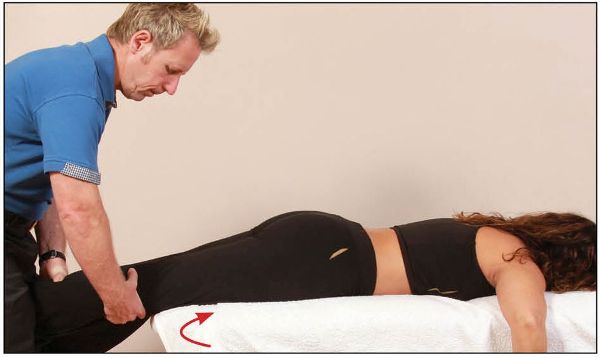
Figure 13.18. The therapist straddles the patient’s right leg and internally rotates their hip in order to establish a close-packed position of the hip joint.
The therapist’s right hand palpates the patient’s right PSIS as their left hand stabilizes either the sacrum or the left thigh. With their thigh, the therapist slowly starts to grip the patient’s right leg, while applying some traction to the leg by inducing a caudal pull to the right leg until the barrier is reached.
At the barrier, an MET is applied by asking the patient to hitch their pelvis up by activating their QL muscle for 10 seconds against a resistance applied by the straddling of the therapist’s legs, as shown in Figure 13.19.
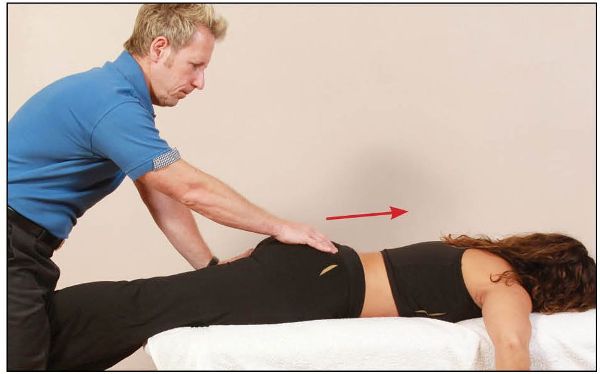
Figure 13.19. Using their QL muscle, the patient hitches the pelvis up in a cephalic/superior direction for 10 seconds.
After the contraction, and during the relaxation phase, a new barrier is found by gently applying a caudal/inferior traction to the leg, as shown in Figure 13.20. This technique is repeated three times. A mobilization or a manipulation (thrust) technique can also be performed from this position, to encourage a caudal/downward movement of the right innominate bone.
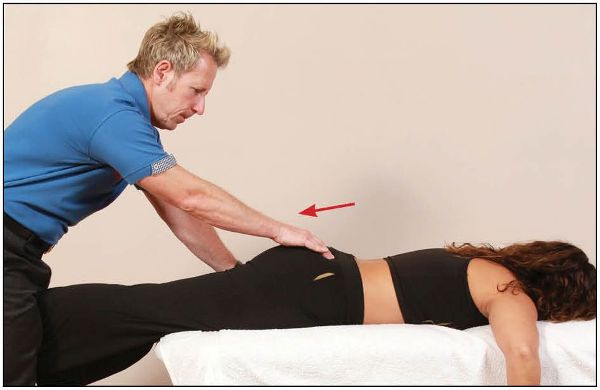
Figure 13.20. The therapist performs a traction/mobilization or a manipulation (thrust) technique to the leg in a caudal direction after the initial MET contraction/treatment.
Diagnosis: Left Superior Shear (Cephalic)—Upslip
Treatment: MET/Mobilization/Thrust technique
Position: Supine
The patient adopts a supine position, with their right knee bent at 90 degrees (this prevents unnecessary motion of the right innominate bone). The therapist stands on the same side as the dysfunction and internally rotates the patient’s thigh to introduce a close-packed position of the left hip joint.
The therapist gently grips the patient’s lower leg with their hands and starts to apply light traction to the left leg by inducing a caudal pull to engage the barrier. At the barrier, a mobilizing technique, MET, or high-velocity thrust (HVT) is performed to encourage a caudal/downward movement of the innominate bone, as shown in Figure 13.21.
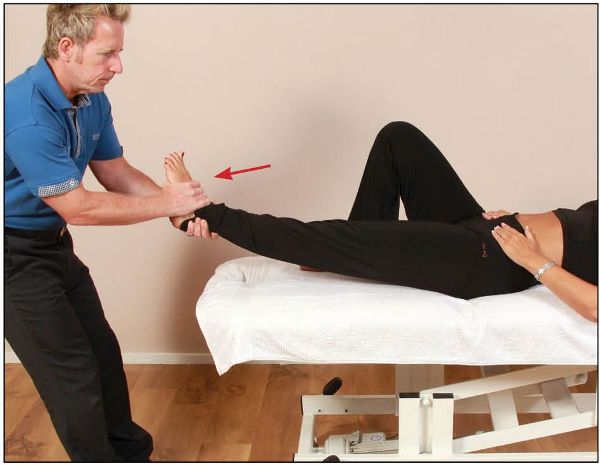
Figure 13.21. The therapist has the choice of performing an MET, a mobilization, or a manipulation technique from this specific position.
Diagnosis: Right Iliosacral Out-Flare (Lateral Rotation of Innominate)
Treatment: MET
Position: Supine
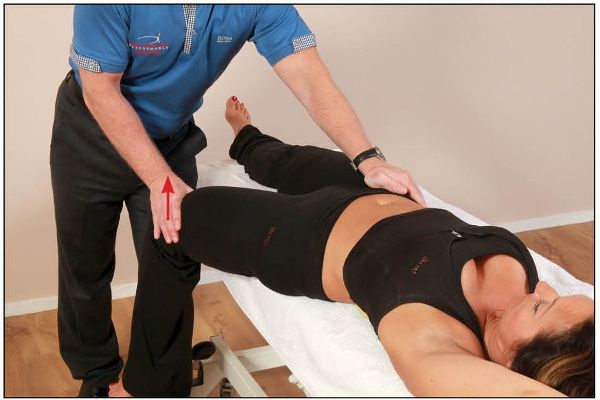
The patient adopts a supine position and the therapist stands on the same side as the dysfunction. The therapist flexes the patient’s right hip and knee, then lifts the pelvis to the left using the leg as a lever, so that they can place their hand on the patient’s right PSIS. The therapist lowers the patient’s pelvis down until it rests on their hand, and then adducts the patient’s hip with their right hand until a barrier is felt for the internal rotation of the innominate bone.
From this position of bind, the patient is asked to externally rotate and abduct their hip for 10 seconds, as shown in Figure 13.22.
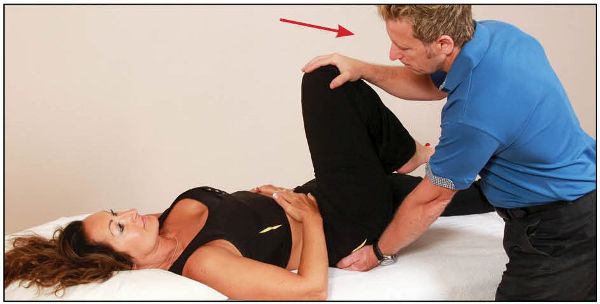
Figure 13.22. The therapist puts the patient’s right hip into flexion and places their hand on the patient’s PSIS. The patient then externally rotates against a resistance applied by the therapist.
On the relaxation phase, a new barrier of internal rotation is achieved, while at the same time the therapist is applying a traction technique to the patient’s right PSIS, as shown in Figure 13.23
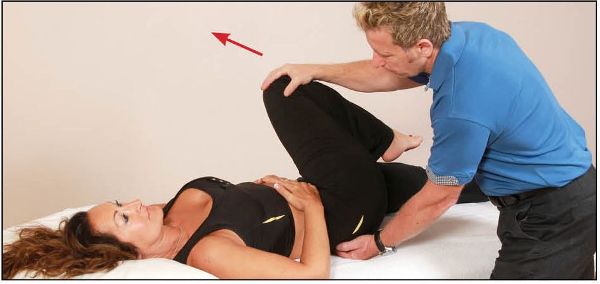
Figure 13.23. The therapist guides the patient’s right hip into internal rotation while applying traction to the PSIS to encourage a neutral position of the innominate.
Diagnosis: Left Iliosacral In-Flare (Medial Rotation of Innominate)
Treatment: MET
Position: Supine
The patient adopts a supine position and the therapist stands on the same side as the dysfunction. The therapist externally rotates and flexes the patient’s left hip; the patient’s left foot is placed just above their right knee. Stabilizing the right side of the patient’s pelvis with their right hand, and the patient’s left knee with their left hand, the therapist encourages external rotation until a barrier is felt.
From this position of bind, the patient is asked to internally rotate their hip for 10 seconds, as shown in Figure 13.24.

Figure 13.24. The therapist places the patient’s left hip into external rotation, and rests the patient’s left foot on the opposite knee. The patient then internally rotates against a resistance applied by the therapist.
On the relaxation phase, a new barrier of external rotation is achieved, as shown in Figure 13.25.
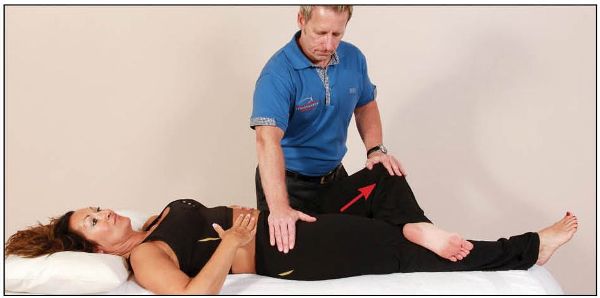
Figure 13.25. The therapist guides the hip into external rotation and encourages a neutral position of the innominate.
Part 3: Treatment Protocol for Sacroiliac Dysfunctions
The following sacroiliac dysfunctions are possible:
• L-on-L anterior (forward) sacral torsion
• R-on-R anterior (forward) sacral torsion
• L-on-R posterior (backward) sacral torsion
• R-on-L posterior (backward) sacral torsion
• Bilateral anterior sacrum (nutated)
• Bilateral posterior sacrum (counter-nutated)
Diagnosis: L-on-L Anterior (Forward) Sacral Torsion
Treatment: MET
Position: Sims
In this dysfunction the sacrum has rotated left (side bent right) on the left oblique axis, and the right sacral base has anteriorly nutated, as shown in Figure 13.26.
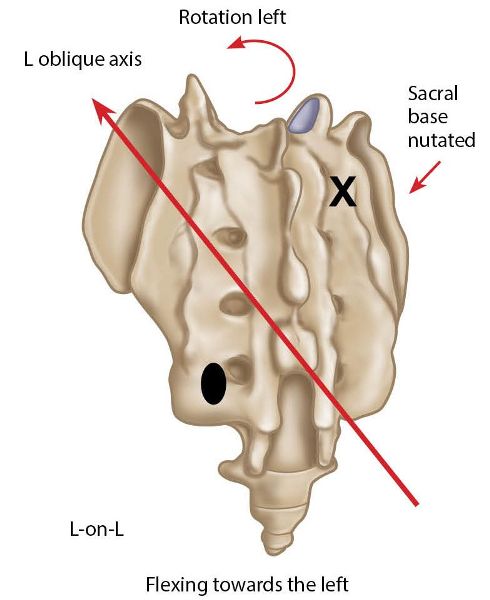
Figure 13.26. Left-on-left (L-on-L) sacral motion/torsion. X = Anterior or deep. ![]() = Posterior or shallow.
= Posterior or shallow.
The patient adopts a prone position on the couch, while the therapist stands on the right side of the couch and flexes the patient’s knees to 90 degrees. The therapist turns the patient onto their left hip to achieve what is known as the Sims position, as shown in Figure 13.27. Note that the patient’s left arm is held back and the right arm is held forward.
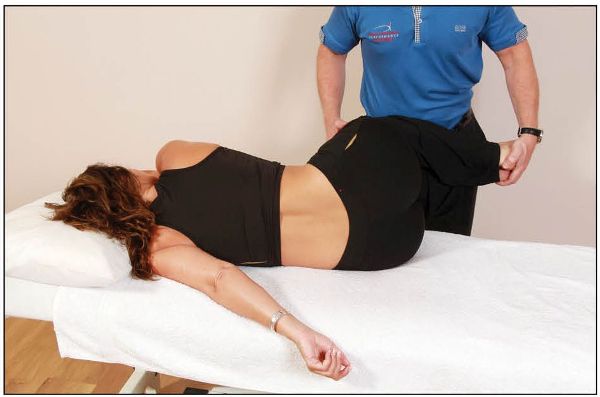
Figure 13.27. The therapist bends the patient’s knees to 90 degrees and places the patient in the Sims position.
With the patient’s knees placed on the therapist’s left thigh, the lumbosacral junction is palpated using the left hand, while a left rotation of the patient’s trunk is introduced until L5 is felt to rotate to the left, as shown in Figure 13.28.
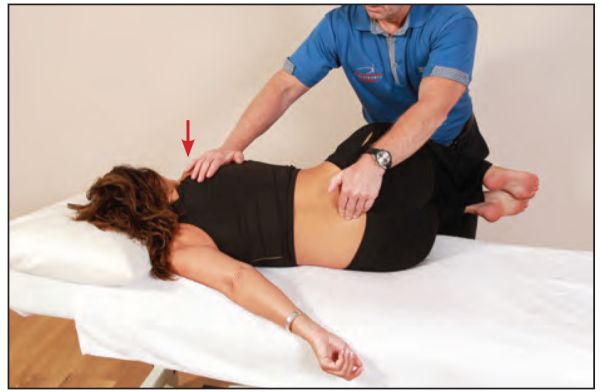
Figure 13.28. The therapist fine-tunes the position and introduces a rotation of L5 to the left.
From this position, the therapist palpates the lumbosacral junction and the right sacral base with their right hand, then, using the patient’s legs as a lever, introduces a flexion motion to the trunk until a barrier is felt, as shown in Figure 13.29.
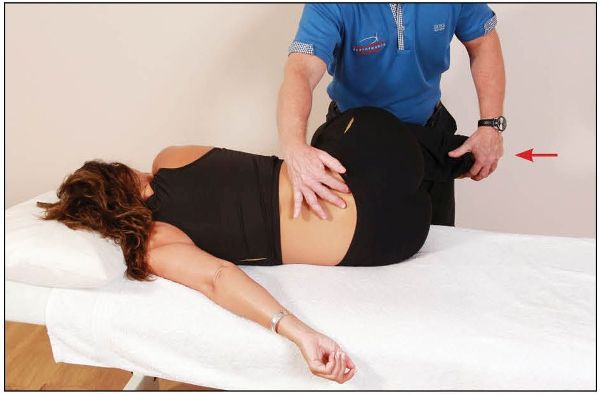
Figure 13.29. Using the patient’s legs as a lever, the therapist flexes the patient’s trunk until a barrier is felt at the lumbosacral junction.
The patient is asked to push their legs toward the ceiling against the therapist’s resistance for 10 seconds (which activates the right piriformis muscle), as shown in Figure 13.30.
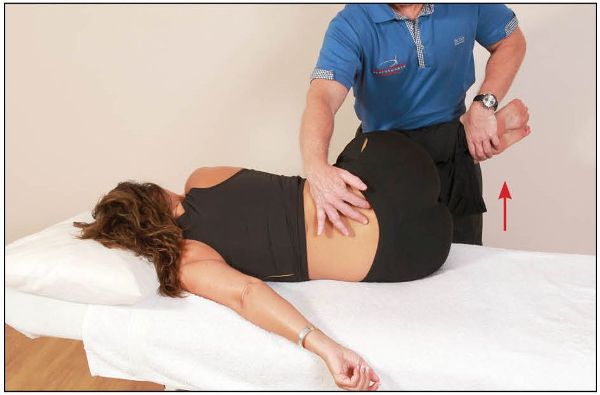
Figure 13.30. The patient pushes their legs toward the ceiling, as this motion activates the right piriformis muscle.
On the relaxation phase, the therapist takes the patient’s legs toward the floor until they feel movement posterior to the right sacral base, as shown in Figure 13.31.
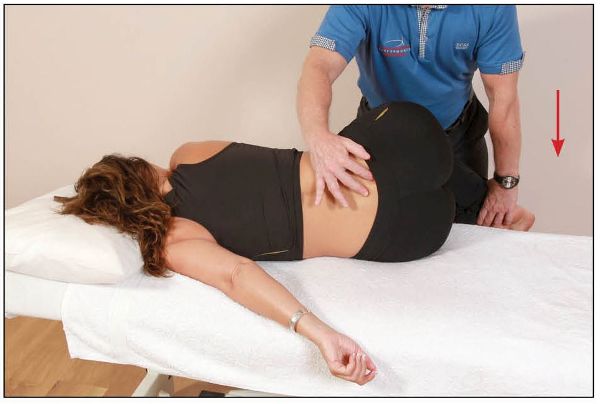
Figure 13.31. The therapist palpates the right sacral base and feels for posterior motion as the patient’s legs are directed toward the floor.
Note: The Sims technique works well, as it challenges the sacral position to correct itself by using the motion of the lumbar spine as well as the motion from the lower limbs to facilitate the correction. For example, with a L-on-L type of dysfunction, we know that the right sacral base has migrated forward into a fixed position of nutation, so the restriction is due to the right sacral base being unable to counter-nutate. The first process in the technique is flexion of the lumbar spine, which encourages an extension of the sacrum. Second, left rotation is introduced to the lumbar spine, which encourages right rotation of the sacrum (a movement it cannot perform). The third phase is the combination of the motion and MET of the legs; this introduces the right piriformis muscle, to assist in restoring the sacral position.
Diagnosis: R-on-R Anterior (Forward) Sacral Torsion
Treatment: MET
Position: Sims
In this dysfunction the sacrum has rotated right (side bent left) on the right oblique axis, and the left sacral base has anteriorly nutated, as shown in Figure 13.32.
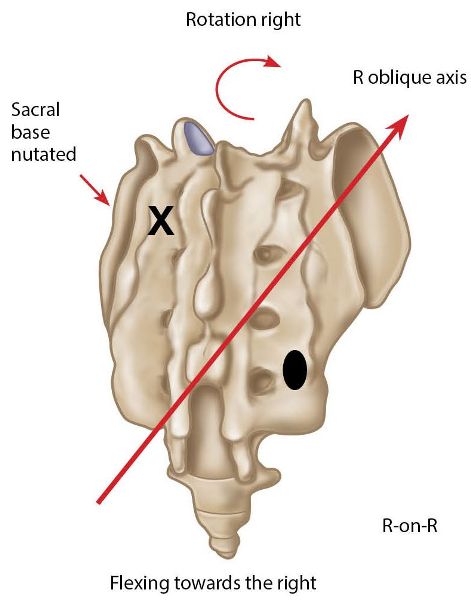
Figure 13.32. Right-on-right (R-on-R) sacral motion/torsion. X = Anterior or deep. ![]() = Posterior or shallow.
= Posterior or shallow.
The patient adopts a prone position on the couch, while the therapist stands on the left side of the couch and flexes the patient’s knees to 90 degrees. The therapist turns the patient onto their right hip into the Sims position (left arm forward, right arm back), as shown in Figure 13.33.
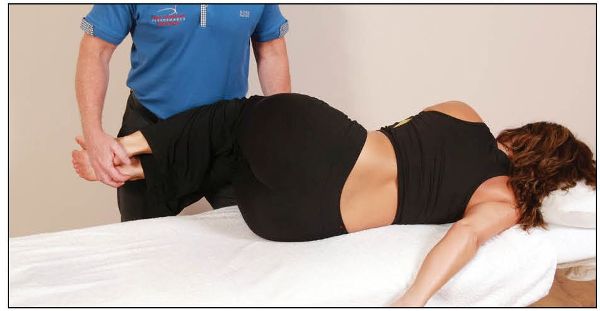
Figure 13.33. The therapist bends the patient’s knees to 90 degrees and places the patient in the Sims position.
With the patient’s knees placed on the therapist’s right thigh, the lumbosacral junction is palpated using the right hand, while a right rotation of the patient’s trunk is introduced until L5 is felt to rotate to the right, as shown in Figure 13.34.
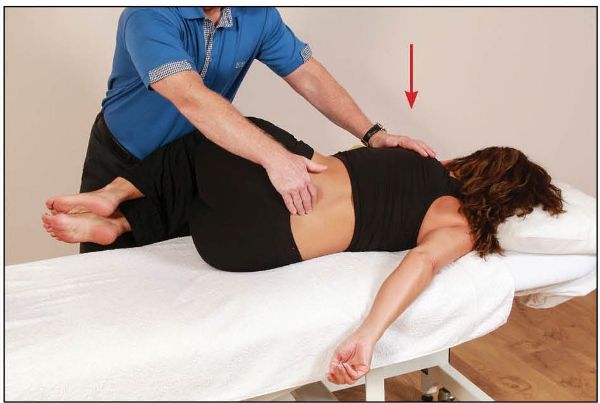
Figure 13.34. The therapist fine-tunes the position and introduces a rotation of L5 to the right.
From this position, the therapist palpates the lumbosacral junction and the left sacral base with their left hand, then, using the patient’s legs as a lever, introduces a flexion motion to the trunk until a barrier is felt, as shown in Figure 13.35.
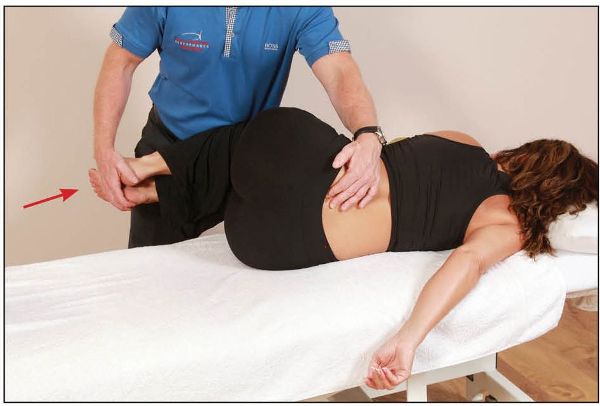
Figure 13.35. Using the patient’s legs as a lever, the therapist flexes the patient’s trunk until a barrier is felt at the lumbosacral junction.
The patient is asked to push their legs toward the ceiling against the therapist’s resistance for 10 seconds (which activates the left piriformis muscle), as shown in Figure 13.36.
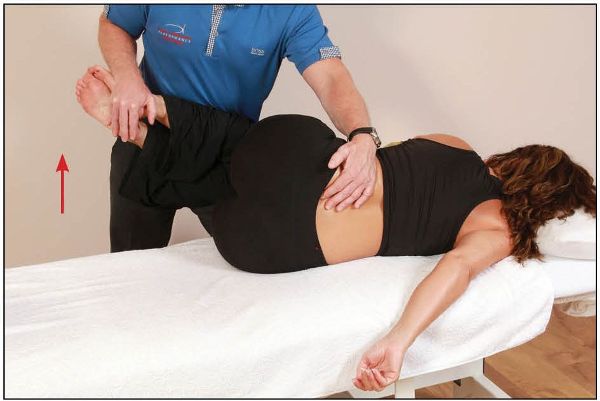
Figure 13.36. The patient pushes their legs toward the ceiling, as this activates the left piriformis muscle.
On the relaxation phase, the therapist takes the patient’s legs toward the floor until they feel movement posterior to the left sacral base, as shown in Figure 13.37.
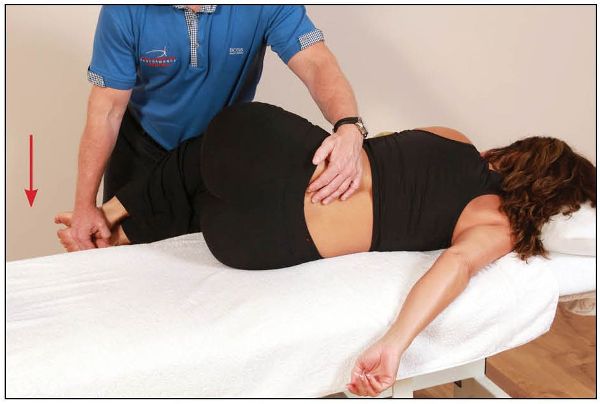
Figure 13.37. The therapist palpates the left sacral base and feels for posterior motion as the patient’s legs are directed toward the floor.
Note: The R-on-R sacral torsion is the same concept as the L-on-L sacral torsion. The Sims technique again works well, as it challenges the sacral position to correct itself by using the motion of the lumbar spine as well as the motion from the lower limbs to facilitate the correction. For example, with a R-on-R type of dysfunction, we know that this time the left sacral base is fixed forward in a position of nutation, so the restriction is due to the sacral base being unable to counter-nutate on the left side. The first process in the technique is to induce flexion of the lumbar spine, which encourages an extension of the sacrum. Second, right rotation is introduced to the lumbar spine, which encourages left rotation of the sacrum (remember, this is a movement it cannot perform). The third phase is the combined effect of the motion and the MET of the lower legs; this introduces the left piriformis muscle, to assist in restoring the sacral position.
Diagnosis: L-on-R Posterior (Backward) Sacral Torsion
Treatment: MET
Position: Side lying
In this dysfunction the sacrum has rotated left (side bent right) on the right oblique axis, and the left sacral base has posteriorly counter-nutated, as shown in Figure 13.38.
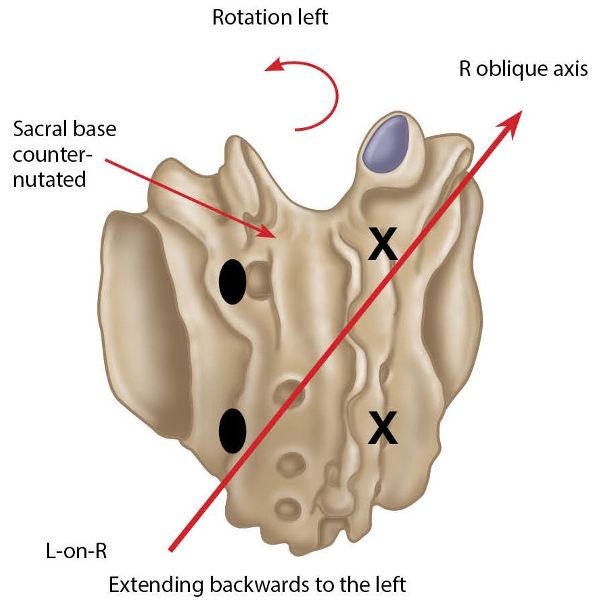
Figure 13.38. Left-on-right (L-on-R) sacral torsion. X = Anterior or deep. ![]() = Posterior or shallow.
= Posterior or shallow.
The patient adopts a side-lying position on their right side, with their knees initially flexed to approximately 45 degrees, while the therapist stands facing the patient. Palpating the lumbosacral junction with their right hand, the therapist gently pulls the patient’s right arm caudally (which introduces some extension to the lumbar spine, as well as right side bending and left rotation to the trunk) until L5 is felt to begin to rotate to the left, as shown in Figure 13.39.

Figure 13.39. The therapist palpates L5 and feels for left rotation, as the patient is guided into position.
From this position, the therapist places the patient’s right lower leg into extension with their right hand, while monitoring the left sacral base with their left hand until an anterior motion of the sacral base is felt, as shown in Figure 13.40.
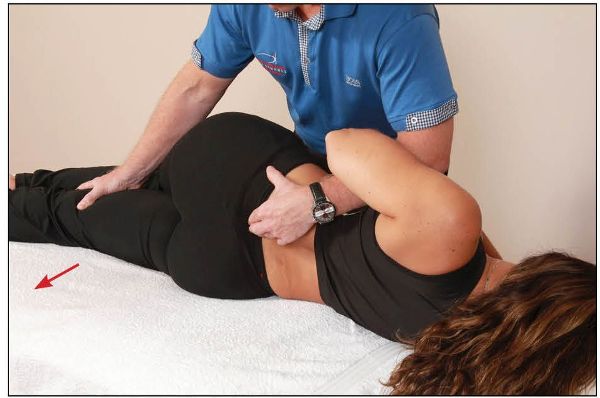
Figure 13.40. The therapist palpates the left sacral base for anterior (forward) motion, as the patient’s lower leg is guided into the extension position.
Next, the therapist maintains contact with L5 as they lower the patient’s left (top) leg off the side of the couch, so that it faces toward the floor, and applies pressure to the distal femur, as shown in Figure 13.41.
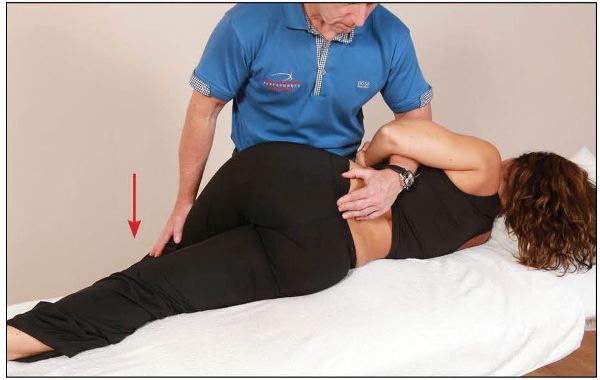
Figure 13.41. The therapist palpates L5 as the patient’s left leg is guided toward the floor.
The patient is then asked to push their left (top) leg toward the ceiling for 10 seconds against the therapist’s resistance, as shown in Figure 13.42. On the relaxation phase, two components are introduced: (1) the therapist continues to encourage the left leg toward the treatment couch / floor for a few seconds, and (2) while still monitoring the left sacral base, the therapist places the patient’s right (bottom) leg into further extension, as shown in Figure 13.43. This resistance/relaxation procedure is repeated three to five times until an anterior motion of the left sacral base is felt.
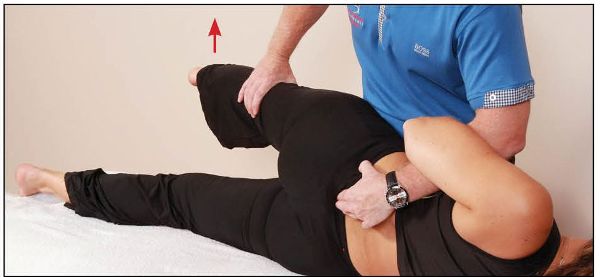
Figure 13.42. The patient lifts their left leg against the therapist’s resistance, as this now introduces the left piriformis muscle, which will assist in restoring the sacral position. On the relaxation phase the therapist applies a downward pressure.
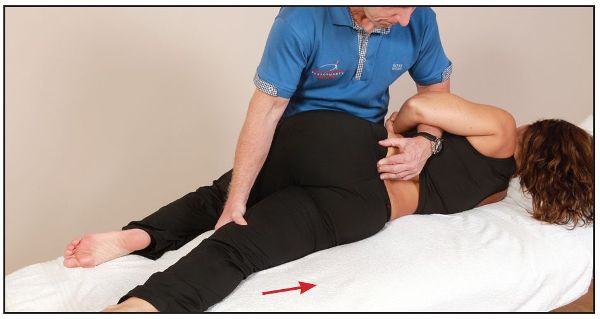
Figure 13.43. While monitoring the left sacral base, the therapist encourages further extension of the patient’s right (bottom) leg.
Note: This technique works well, as it challenges the sacral position to correct itself by using the motion of the lumbar spine as well as the motion from the lower limbs to facilitate the correction. For example, with a L-on-R type of dysfunction, we know that the left sacral base has moved posteriorly, i.e. it has counter-nutated, so the restriction is due to the left sacral base being unable to nutate forward. The first process in the technique is to promote extension of the lumbar spine, which encourages a forward nutation motion of the sacrum. Second, left rotation is introduced to the lumbar spine, which encourages right rotation of the sacrum (the movement it cannot perform). In the third phase, we add the motion and the specific MET of the top leg being lowered (after the initial 10-second contraction), because this now introduces the left piriformis muscle as well as increasing side bending of the lumbar spine to the right, which will assist in restoring the sacral position. In addition, the extension of the lower leg promotes further nutation of the left sacral base and subsequent correction of the dysfunction.
Diagnosis: R-on-L Posterior (Backward) Sacral Torsion
Treatment: MET
Position: Side lying
In this dysfunction the sacrum has rotated right (side bent left) on the left oblique axis, and the right sacral base has posteriorly counter-nutated, as shown in Figure 13.44.
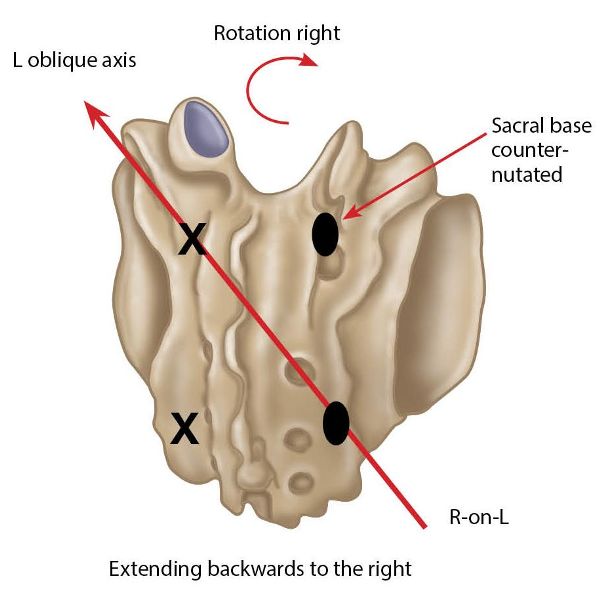
Figure 13.44. Right-on-left (R-on-L) sacral torsion. X = Anterior or deep. ![]() = Posterior or shallow.
= Posterior or shallow.
The patient adopts a side-lying position on their left side, with their knees initially flexed to approximately 45 degrees, while the therapist stands facing the patient. Palpating the lumbosacral junction with their left hand, the therapist gently pulls the patient’s left arm caudally (which introduces some extension to the lumbar spine, as well as left side bending and right rotation to the trunk) until L5 is felt to begin to rotate to the right, as shown in Figure 13.45.

Figure 13.45. The therapist palpates L5 and feels for right rotation, as the patient is guided into position.
From this position, the therapist places the patient’s left lower leg into extension with their left hand, while monitoring the right sacral base with their right hand until an anterior motion of the sacral base is felt, as shown in Figure 13.46.
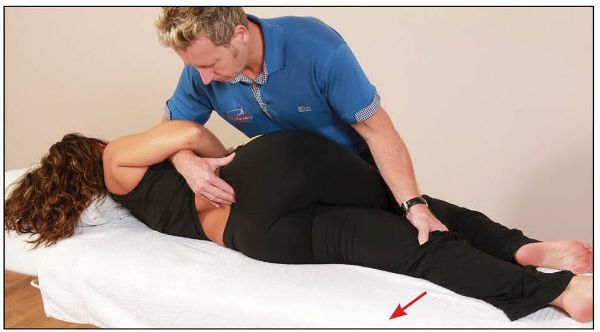
Figure 13.46. The therapist palpates the right sacral base for anterior (forward) motion, as the patient’s lower leg is guided into the extension position.
Next, the therapist maintains contact with L5 as they lower the patient’s right (top) leg off the side of the couch, so that it faces toward the floor, and applies pressure to the distal femur, as shown in Figure 13.47.

Figure 13.47. The therapist palpates L5 as the patient’s right leg is guided toward the floor.
The patient is then asked to push their right (top) leg toward the ceiling for 10 seconds against the therapist’s resistance, as shown in Figure 13.48. On the relaxation phase, two components are introduced: (1) the therapist continues to encourage the right leg toward the treatment couch / floor for a few seconds, and (2) while still monitoring the right sacral base, the therapist places the patient’s left (bottom) leg into further extension, as shown in Figure 13.49. This resistance/relaxation procedure is repeated three to five times until an anterior motion of the right sacral base is felt.
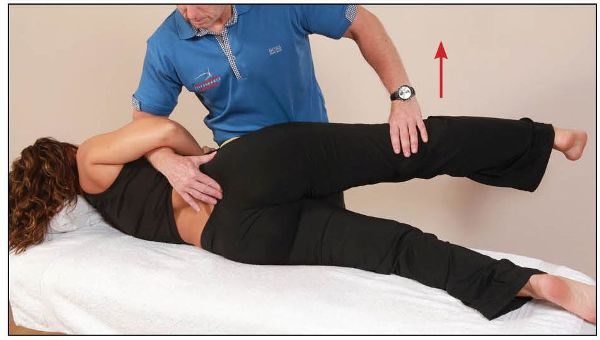
Figure 13.48. The patient lifts their right leg against the therapist’s resistance, as this now introduces the piriformis muscle, which will assist in restoring the sacral position. On the relaxation phase the therapist applies a downward pressure.
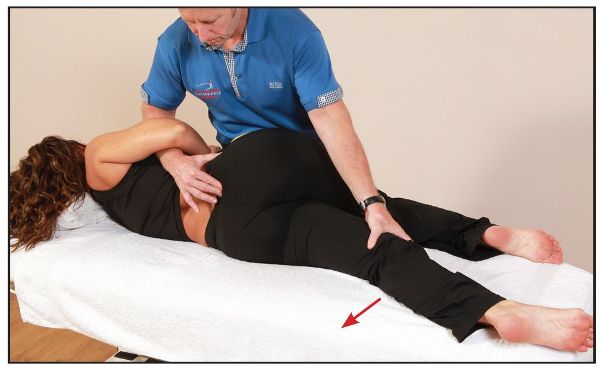
Figure 13.49. While monitoring the right sacral base, the therapist encourages further extension of the patient’s left (bottom) leg.
Note: This technique works well, as it challenges the sacral position to correct itself by using the motion of the lumbar spine as well as the motion from the lower limbs to facilitate the correction. For example, with a R-on-L type of dysfunction, we know that the right sacral base has moved posteriorly, i.e. it has counter-nutated, so the restriction is due to the right sacral base being unable to nutate forward. The first process in the technique is to promote extension of the lumbar spine, which encourages a forward nutation motion of the sacrum. Second, right rotation is introduced to the lumbar spine, which encourages left rotation of the sacrum (the movement it cannot perform). In the third phase, we add the motion and the specific MET of the top leg being lowered (after the initial 10-second contraction), because this now introduces the right piriformis muscle as well as increasing side bending of the lumbar spine to the left, which will assist in restoring the sacral position. In addition, the extension of the lower leg promotes further nutation to the right sacral base and subsequent correction of the dysfunction.
Diagnosis: Bilateral Anterior Sacrum (Nutated)
Treatment: MET
Position: Sitting
In this dysfunction the sacrum has bilaterally nutated, as shown in Figure 13.50.
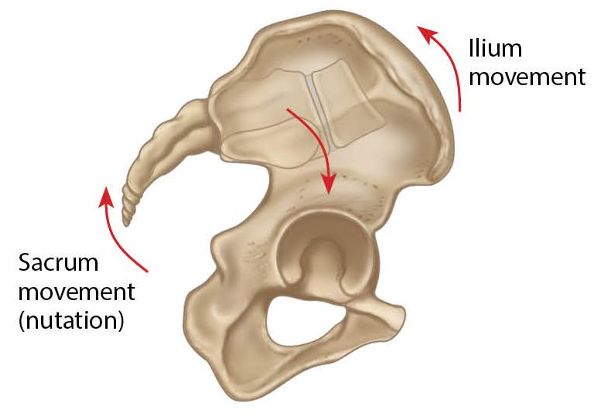
Figure 13.50. Bilateral nutation of the sacrum.
The patient adopts a sitting position on the couch, with their feet apart, while the therapist stands facing the patient’s back. Palpating the sacral apex with their right hand, the therapist introduces flexion to the patient’s trunk with their left hand until the sacrum is felt to begin to move, as shown in Figure 13.51.
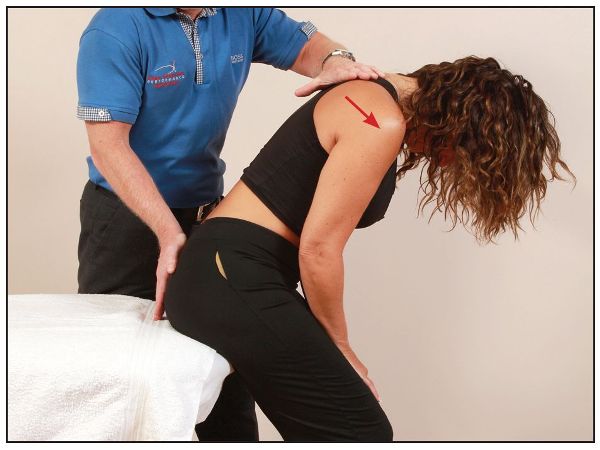
Figure 13.51. The therapist palpates the sacral apex and monitors motion, as the trunk of the patient is being flexed.
From this position, the patient is asked to lift their upper back toward the ceiling against a resistance applied by the therapist, as shown in Figure 13.52.
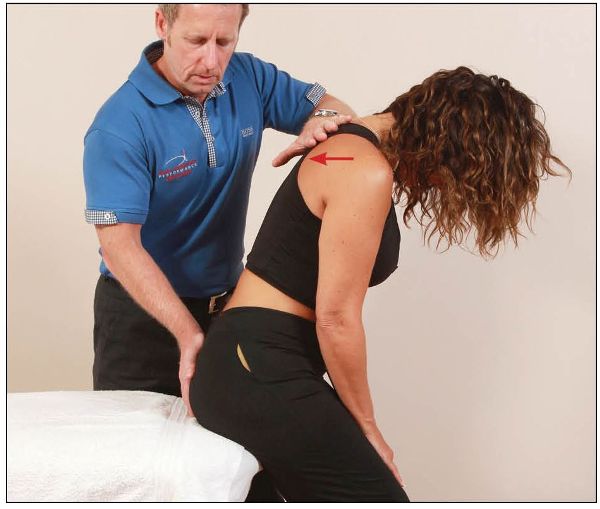
Figure 13.52. The patient performs trunk extension against a resistance applied by the therapist.
After 10 seconds, and during the relaxation phase, the therapist introduces further trunk flexion, while at the same time encouraging posterior sacral motion (counter-nutation) with their right hand, as shown in Figure 13.53.
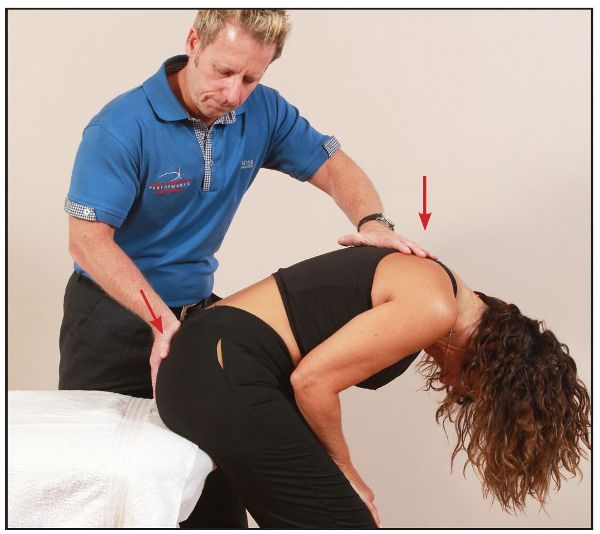
Figure 13.53. The therapist introduces further flexion and at the same time encourages the sacrum into counter-nutation.
Diagnosis: Bilateral Posterior Sacrum (Counter-Nutated)
Treatment: MET
Position: Sitting
In this dysfunction the sacrum has bilaterally counter-nutated, as shown in Figure 13.54.
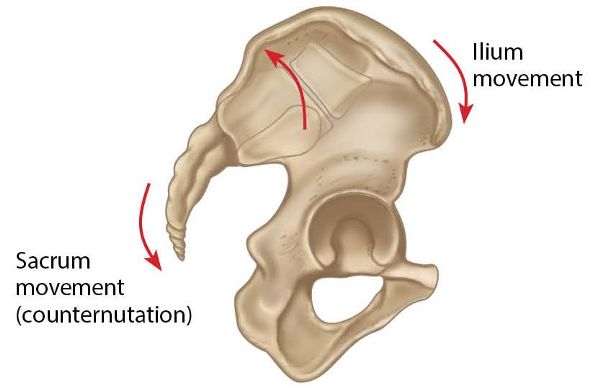
Figure 13.54. Bilateral counter-nutation of the sacrum.
The patient adopts a sitting position on the couch, with their feet apart, while the therapist stands facing the patient’s back. Palpating the sacral base with their right hand, the therapist introduces extension to the patient’s trunk with their left hand until the sacrum is felt to begin to move, as shown in Figure 13.55.
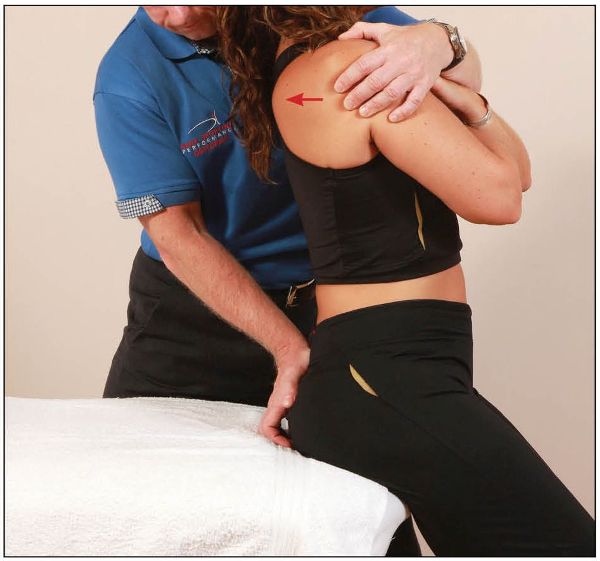
Figure 13.55. The therapist palpates the sacral base and monitors motion, as the trunk of the patient is being extended.
From this position, the patient is asked to flex their trunk against a resistance applied by the therapist, as shown in Figure 13.56.
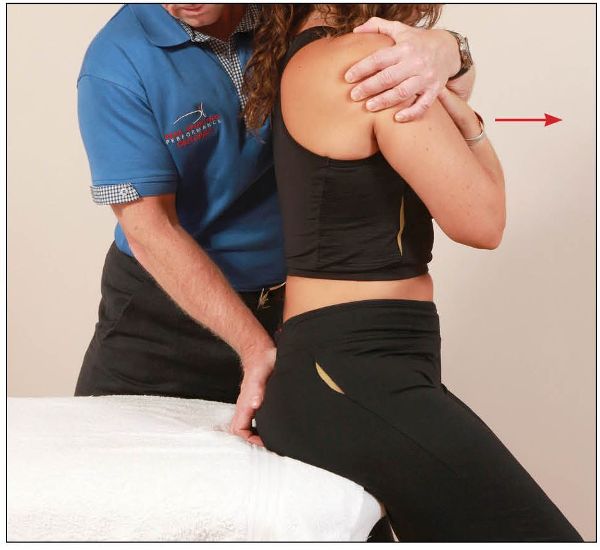
Figure 13.56. The patient performs trunk flexion against a resistance applied by the therapist.
After 10 seconds, and during the relaxation phase, the therapist introduces further trunk extension and at the same time encourages anterior sacral motion (nutation) with their right hand, as shown in Figure 13.57.
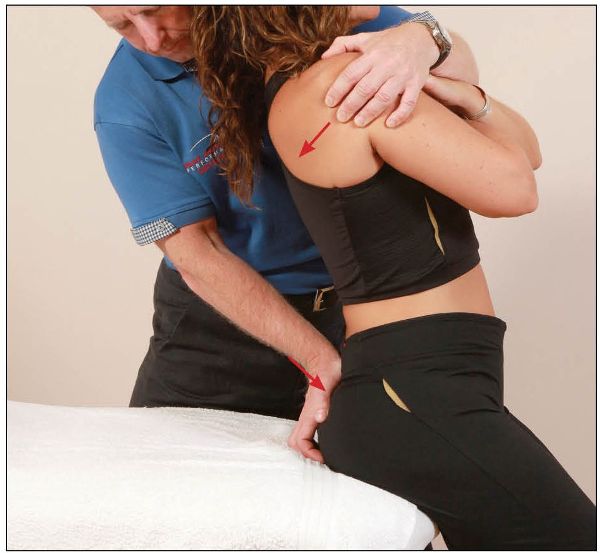
Figure 13.57. The therapist introduces further extension and at the same time encourages the sacrum into nutation.
Part 4: Treatment Protocol for Lumbar Spine Dysfunctions
I mentioned earlier that I consider lumbar spine dysfunctions to be caused by a compensatory mechanism associated with underlying malalignments of the pelvis. In my opinion, dysfunctions of the lumbar spine are a secondary type of dysfunction resulting from a primary dysfunction within the pelvic girdle complex; hence the main reason why I leave treating the lumbar spine till the end. There are exceptions to the rules, of course, where the lumbar spine is the primary cause rather than the compensatory secondary cause. Either way, the realignment techniques I will demonstrate shortly will be of value, as they will assist you in correcting the presentations that will commonly be found within the lumbar spine.
I would like to keep things simple to start with, even though this subject matter is by no means simple to understand. For the first example, when I say that the facet joint is fixed in a closed position, this relates to the specific position of the inferior facet joint being closed in extension, side bending, and rotation (normally to one side) on the superior facet of the vertebra immediately below. Think back to the discussion of spinal mechanics in Chapter 6. I referred to this situation as an ERS, which is a Type II dysfunction (non-neutral mechanics), because the rotation and side bending are coupled to the same side but in an extended position, either to the left (ERS(L)) or to the right (ERS(R)).
The opposite motion, and the second example, therefore has to be where the facet joint is now fixed in an open position; in this case the motion is related to the specific position of the inferior facet joint being open in flexion, side bending, and rotation (normally to one side) on the superior facet of the vertebra immediately below. This type of spinal dysfunction is referred to as an FRS, which is also a Type II dysfunction (non-neutral mechanics), because the rotation and side bending are coupled to the same side but this time in a flexed position, either to the left (FRS(L)) or to the right (FRS(R)).
Note: Regarding the position of a facet joint which is fixed in an open position, remember from earlier chapters that the joint will be open on the opposite side. For example, an FRS(L), i.e. flexion, rotation, and side bending left, indicates that the facet joint is fixed open on the right side.
The following lumbar spine dysfunctions are discussed:
• L5 ERS(L)
• L4 ERS(R)
• L5 FRS(L)
Diagnosis: L5 ERS(L)
Treatment: MET
Position: Side lying
This specific spinal dysfunction relates to the inferior facet joint of the L5 vertebra being fixed in a position of extension, rotation, and side bending to the left side on the superior facet of the S1 vertebra. This basically means that the left facet joint of L5/S1 is fixed in a closed position, as shown in Figure 13.58. The subsequent motion restriction will affect movements on the side opposite the fixation, namely flexion, right rotation, and right side bending.
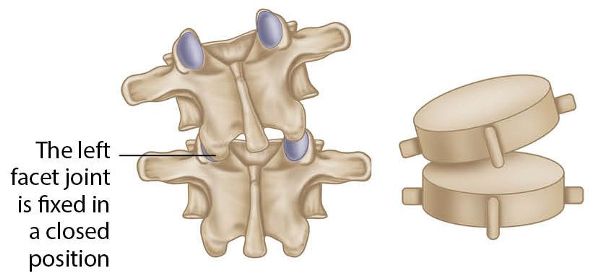
Figure 13.58. L5 ERS(L) on S1.
The patient adopts a side-lying position facing the therapist, with the posterior TP of the dysfunctional L5 toward the couch (i.e. dysfunction side down—in this case, left side down). While palpating the interspinous space of L4/5 with their left hand, the therapist cradles the patient’s left arm and introduces flexion and right rotation of the patient’s trunk down to the relevant lumbar level, as shown in Figure 13.59.
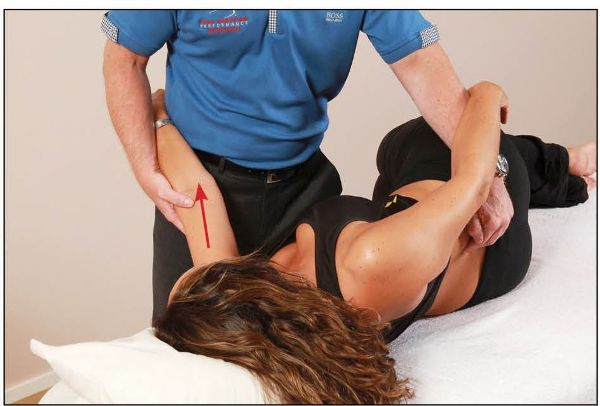
Figure 13.59. The therapist palpates the interspinous space of L4/L5 and introduces flexion and right rotation of the lumbar spine down to that level, to prevent over-locking of L5/S1.
The therapist cradles both of the patient’s legs and introduces the hips into flexion, while at the same time palpating with the left hand the L5/S1 interspinous space for motion, as shown in Figure 13.60.
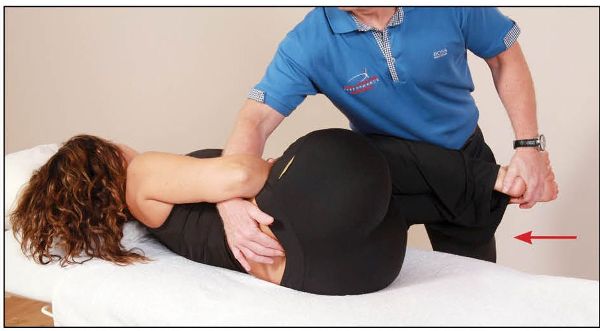
Figure 13.60. The therapist introduces hip flexion to both legs as they palpate the L5/S1 interspinous space for motion.
From this position, the patient is asked to push both their feet toward the floor (side bending left), as indicated by the arrow in Figure 13.61, for 10 seconds at a contraction of between 10 and 20% of maximum.
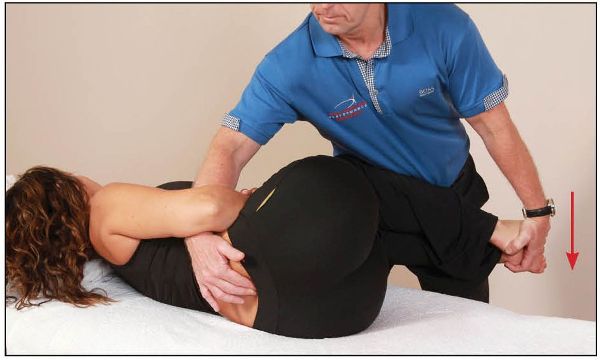
Figure 13.61. The patient pushes both feet toward the floor for 10 seconds.
After the contraction, and during the relaxation phase, the therapist encourages the patient’s legs toward the ceiling, as this motion introduces right side bending of the lumbar spine, as shown in Figure 13.62. This movement subsequently has the ability to open the left L5/S1 facet joint, which is fixed in a closed position.
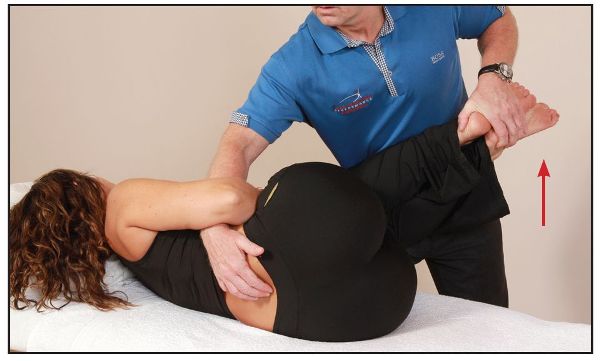
Figure 13.62. After the contraction the therapist introduces right side bending by using the motion from the legs toward the ceiling to open the left facet joint.
Diagnosis: L4 ERS(R)
Treatment: MET, Thrust technique (HVT)
Position: Side lying
This specific spinal dysfunction relates to the inferior facet joint of the L4 vertebra being fixed in a position of extension, right rotation, and right side bending on the superior facet of L5. This basically means that the right facet joint of L4/5 is fixed in a closed position, as shown in Figure 13.63. The subsequent motion restriction will affect movements on the side opposite the fixation, namely flexion, left rotation, and left side bending.
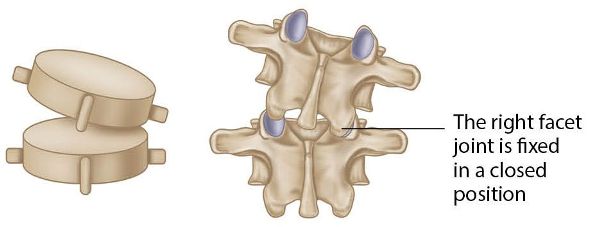
Figure 13.63. L4 ERS(R) on L5.
The patient adopts a side-lying position facing the therapist, with the posterior TP of L4 toward the ceiling (i.e. dysfunction side up—in this case, right side up). While palpating the interspinous space of L3/4 with their right hand, the therapist introduces flexion and right rotation of the lumbar spine down to L4 with their left hand, as shown in Figure 13.64.
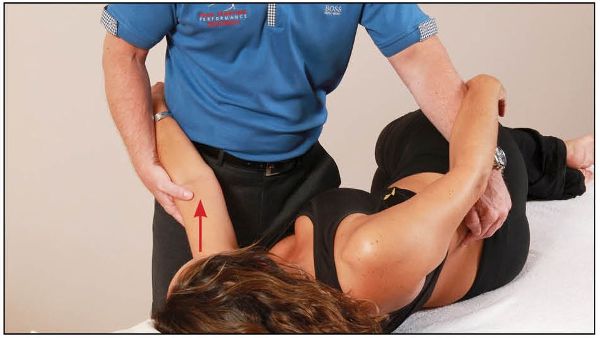
Figure 13.64. The therapist palpates the interspinous space of L3/L4 and introduces flexion and right rotation of the lumbar spine down to L4.
Next, the patient’s right hand is placed onto their right hip to stabilize the position. The therapist palpates the L4/5 interspinous space with their right hand and feels for specific motion as the patient’s bottom leg is taken into flexion.
The patient’s top leg is flexed and the foot is placed in the crease of the left knee. The therapist places their right hand through the natural gap formed by the patient’s hand on their hip and palpates the L4/5 interspinous space. The patient’s trunk is guided gently toward the floor by the therapist’s left hand, which is placed on the patient’s left knee and controls the motion, as shown in Figure 13.65.
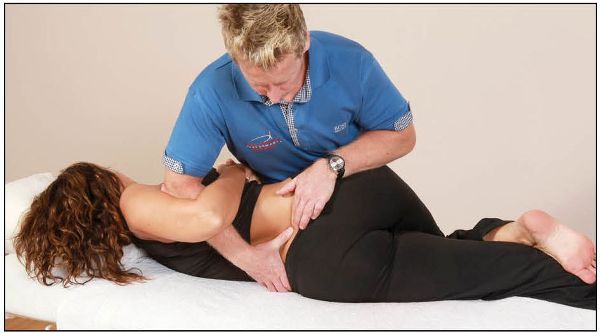
Figure 13.65. The therapist palpates L4 and fine-tunes the position by using the patient’s top leg.
Once the position has been finely tuned, the patient is asked to abduct their right hip against a resistance applied by the therapist for 10 seconds, as shown in Figure 13.66.
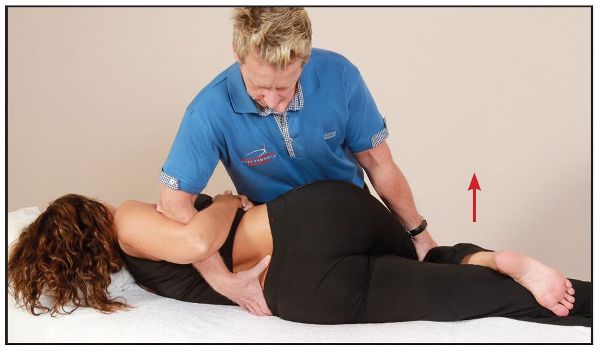
Figure 13.66. The patient abducts their right hip for 10 seconds.
After the contraction, and during the relaxation phase, the therapist encourages motion of the top leg toward the floor, as this type of movement introduces right side bending of the lumbar spine, as shown in Figure 13.67. This movement subsequently has the ability to open the right L4/5 facet joint, which is fixed in a closed position.
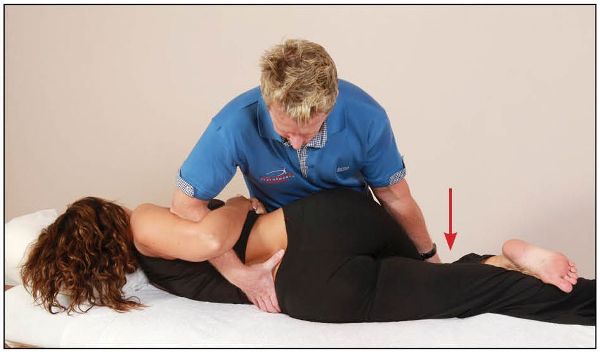
Figure 13.67. After the contraction the therapist introduces right side bending of the lumbar spine to open the right L4/5 facet joint.
If one is suitably qualified, then from the finely tuned position (as above) the therapist can apply a thrust technique (HVT) in the direction through the long lever of the femur toward the floor, as shown in Figure 13.68. This quick motion will cause a right side bending motion to L4/5, and a cavitation might be elicited from the joint.
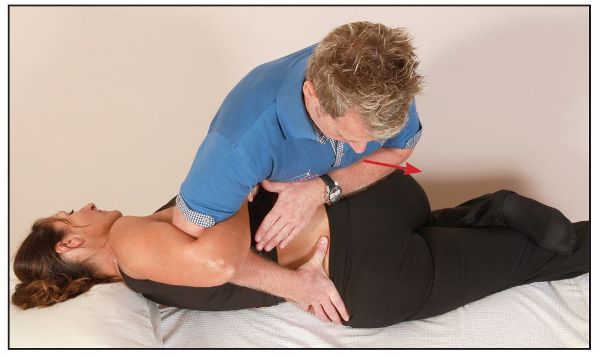
Figure 13.68. From the finely tuned position, the therapist applies a quick thrust technique to encourage right side bending of the lumbar spine, which may elicit a cavitation from the right L4/5 facet joint.
Diagnosis: L5 FRS(L)
Treatment: Soft tissue technique
Position: Prone
This specific spinal dysfunction relates to the inferior facet joint of the L5 vertebra having become fixed in a position of flexion, left rotation, and left side bending on the superior facet of S1. This basically means that the right facet joint of L5/S1 is fixed in an open position, as shown in Figure 13.69. The subsequent motion restriction will affect movements on the side opposite the fixation, namely extension, right rotation, and right side bending.
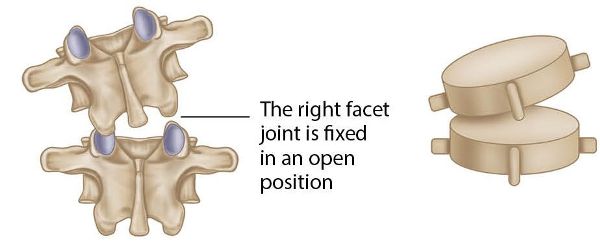
Figure 13.69. L5 FRS(L) on S1.
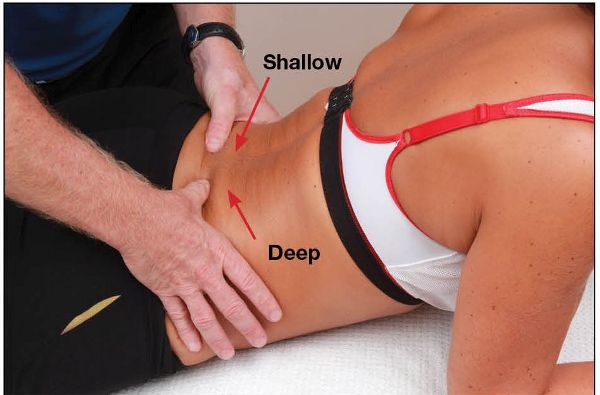
With the patient lying prone, the therapist confirms by the position of the thumbs that the left TP of L5 is shallow and the right TP is deep, thus indicating a left rotation. When the patient backward bends, the left TP appearing shallower and the right TP becoming deeper confirms the presence of an FRS(L), where the right facet joint is fixed in an open position, as shown in Figure 13.70.
Figure 13.70. With the patient in a backward-bent position, the left thumb palpates shallow and the right thumb palpates deep, indicating an FRS(L).
The correction of this spinal dysfunction is very simple in some respects, as it can be treated from the backward-bent position. The therapist applies between 5 and 10lbs (2–4kg) of direct pressure directly onto the right L5 TP, either with a reinforced thumb as shown in Figure 13.71, or with the elbow as shown in Figure 13.72. The therapist then waits for the tissues to soften, before retesting the position to see if there has been any change.
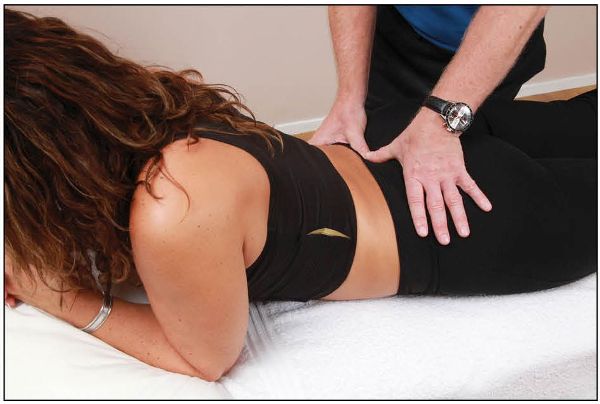
Figure 13.71. With the patient in a backward-bent position, the therapist applies pressure with a reinforced thumb directly onto the right L5 TP, to encourage a closure of the right facet joint.
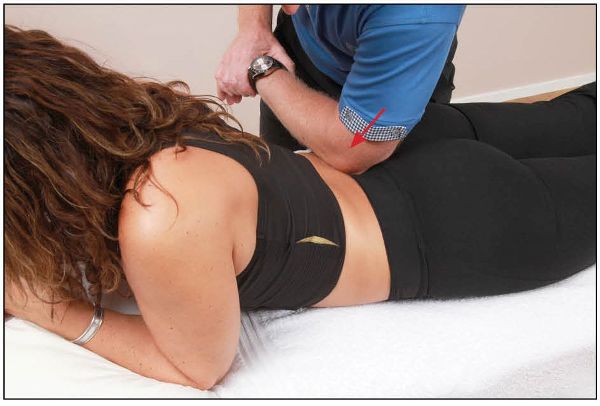
Figure 13.72. With the patient in a backward-bent position, the therapist applies pressure with their elbow directly onto the right L5 TP, to encourage a closure of the right facet joint.
In the case of an FRS(R), the opposite procedure would be performed.
_____________________
If you have truly enjoyed reading this book and wish to continue on your journey toward understanding the pelvic girdle, along with all the complexities that naturally go with it, then I recommend in particular the following books to get you started: Schamberger (2002; 2013); Vleeming, Mooney, and Stoeckart (2007); Lee (2004); and DeStefano (2011). I wish you every success in your studies and practice in this fascinating area.
