7
Muscle Energy Techniques and Their Relationship to the Pelvis
In later chapters you will read and learn about specific techniques that can be incorporated into a treatment plan to help correct pelvic and lumbar spine dysfunctions. I consider the techniques I will be demonstrating in this chapter to be some of the best soft tissue techniques that one can use to correct any soft tissue or spinal joint anomalies. You might have already guessed what these are—muscle energy techniques (METs).
Since I discuss in this book how to treat specific dysfunctions associated with the SIJ, pelvis, and lumbar spine, I need to explain the role of METs, so that you have a better understanding of when and why to employ this type of soft tissue treatment. Physical therapists have what I call a toolbox of various techniques at their disposal, to help release and relax muscles, which will then assist the patient’s body to promote the healing mechanisms. METs, first described by Fred Mitchell in 1948, are one such tool, which if used correctly can have a major influence on a patient’s well-being. (The reader is referred to Gibbons (2011) for a fuller account of METs.)
Definition: Muscle energy techniques (METs) are a form of osteopathic manipulative diagnosis and treatment in which the patient’s muscles are actively used on request, from a precisely controlled position, in a specific direction, and against a distantly applied counterforce.
METs are unique in their application, in that the patient provides the initial effort and the practitioner just facilitates the process. The primary force comes from the contraction of the patient’s soft tissues (muscles), which is then utilized to assist and correct the presenting musculoskeletal dysfunction. This treatment method is generally classified as a direct form of technique as opposed to indirect, since the use of muscular effort is from a controlled position, in a specific direction, and against a distant counterforce that is usually applied by the practitioner.
Some of the Benefits of METs
When teaching the concept of METs to my students, one of the benefits I emphasize is their use in normalizing joint range, rather than in improving flexibility. This might sound counterintuitive; what I am saying is if, for example, your patient cannot rotate their neck (cervical spine) to the right as far as they can to the left, they have a restriction of the cervical spine in right rotation. The normal rotational range of the cervical spine is 80 degrees, but let’s say the patient can only rotate 70 degrees to the right. This is where METs come in. After an MET has been employed on the tight restrictive muscles, hopefully the cervical spine will then be capable of rotating to 80 degrees—the patient has made all the effort and you, the practitioner, have encouraged the cervical spine into further right rotation. You have now improved the joint range to “normal.” This is not stretching in the strictest sense—even though the overall flexibility has been improved, it is only to the point of achieving what is considered to be a normal joint range.
Depending on the context and the type of MET employed, the objectives of this treatment can include:
• Restoring normal tone in hypertonic muscles
• Strengthening weak muscles
• Preparing muscles for subsequent stretching
• Increasing joint mobility
Restoring Normal Tone in Hypertonic Muscles
Through the simple process of METs, we as physical therapists try to achieve a relaxation in the hypertonic shortened muscles. If we think of a joint as being limited in its ROM, then through the initial identification of the hypertonic structures, we can employ the techniques to help achieve normality in the tissues. Certain types of massage therapy can also help us achieve this relaxation effect, and generally an MET is applied in conjunction with massage therapy. I personally feel that massage with motion is one of the best tools a physical therapist can use.
Strengthening Weak Muscles
METs can be used in the strengthening of weak or even flaccid muscles, as the patient is asked to contract the muscles prior to the lengthening process. The therapist should be able to modify the MET by asking the patient to contract the muscle that has been classified as weak, against a resistance applied by the therapist (isometric contraction), the timing of which can be varied. For example, the patient can be asked to resist the movement using approximately 20–30% of their maximum capability for 5–15 seconds. They are then asked to repeat the process five to eight times, resting for 10–15 seconds between repetitions. The patient’s performance can be noted and improved over time.
Preparing Muscles for Subsequent Stretching
In certain circumstances, what sport your patient participates in will be determined by what ROM they have at their joints. Everybody can improve their flexibility, and METs can be used to help achieve this goal. Remember, the focus of METs is to try to improve the normal ROM of a joint.
If you want to improve the patient’s flexibility past the point of normal, a more aggressive MET approach might be necessary. This could be in the form of asking the patient to contract a bit harder than the standard 10–20% of the muscle’s capability. For example, we can ask the patient to contract using, say, 40–70% of the muscle’s capability. This increased contraction will help stimulate more motor units to fire, in turn causing an increased stimulation of the Golgi tendon organ (GTO). This will then have the effect of relaxing more of the muscle, allowing it to be lengthened even further. Either way, once an MET has been incorporated into the treatment plan, a flexibility program can follow.
Increasing Joint Mobility
One of my favorite sayings when I teach muscle-testing courses is:
“A stiff joint can cause a tight muscle, and a tight muscle can cause a stiff joint.”
Does this not make perfect sense? When you use an MET correctly, it is one of the best ways to improve the mobility of the joint, even though you are initially relaxing the muscles. This is especially the case with the use of METs to correct any dysfunctions that you find in the pelvis, which is covered in Chapter 13. The focus of the MET is to get the patient to contract the muscles; this subsequently causes a relaxation period, allowing a greater ROM to be achieved within that specific joint.
Physiological Effects of METs
There are two main effects of METs and these are explained on the basis of two distinct physiological processes:
• Post-isometric relaxation (PIR)
• Reciprocal inhibition (RI)
When we use METs, certain neurological influences occur. Before we discuss the main process of PIR/RI, we need to consider the two types of receptor involved in the stretch reflex:
• Muscle spindles, which are sensitive to change, as well as speed of change, in length of muscle fibers
• GTOs, which detect prolonged change in tension
Stretching the muscle causes an increase in the impulses transmitted from the muscle spindle to the posterior horn cell (PHC) of the spinal cord. In turn, the anterior horn cell (AHC) transmits an increase in motor impulses to the muscle fibers, creating a protective tension to resist the stretch. However, increased tension after a few seconds is sensed within the GTOs, which transmit impulses to the PHC. These impulses have an inhibitory effect on the increased motor stimulus at the AHC; this inhibitory effect causes a reduction in motor impulses and consequent relaxation. This implies that the prolonged stretch of the muscles will increase the stretching capability, because the protective relaxation of the GTOs overrides the protective contraction due to the muscle spindles. A fast stretch of the muscle spindles, however, will cause immediate muscle contraction, and since it is not sustained, there will be no inhibitory action (Figure 7.1). This is known as the basic reflex arc.
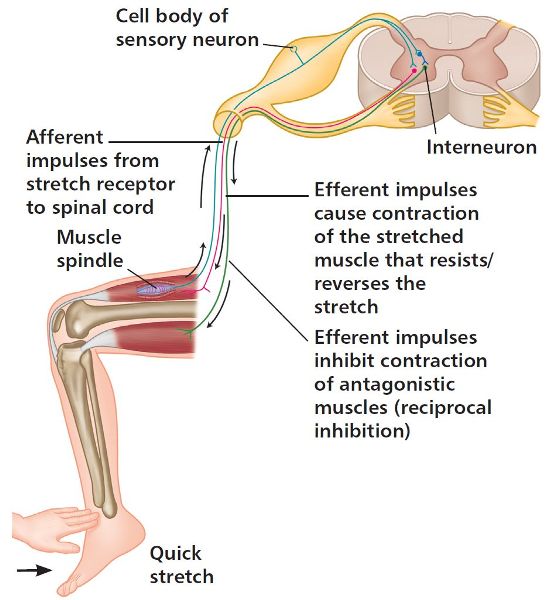
Figure 7.1. The stretch reflex arc. A quick “stretch by hand” to activate the muscle spindles.
PIR results from a neurological feedback through the spinal cord to the muscle itself when an isometric contraction is sustained, causing a reduction in tone of the muscle which has been contracted (Figure 7.2). This reduction in tone lasts for approximately 20–25 seconds, so you now have a perfect window of opportunity to improve the ROM, as during this relaxation period the tissues can be more easily moved to a new resting length.
When RI is employed, the reduction in tone relies on the physiological inhibiting effect of antagonists on the contraction of a muscle (Figure 7.2). When the motor neurons of the contracting agonist muscle receive excitatory impulses from the afferent pathway, the motor neurons of the opposing antagonist muscle receive inhibitory impulses at the same time, which prevent it contracting. It follows that contraction or extended stretch of the agonist muscle must elicit relaxation or inhibit the antagonist; however, a fast stretch of the agonist will facilitate a contraction of the agonist.

Figure 7.2. Post-isometric relaxation (PIR) and reciprocal inhibition (RI).
In most applications of METs, the point of bind, or just short of the point of bind, is the preferred position in which to perform an MET. Clearly, an MET is a fairly mild form of stretching compared with other techniques, so one can assume its use is therefore more appropriate in the rehabilitation process. It should be borne in mind that most problems with muscle shortening will occur in postural muscles. Since these muscles are composed predominantly of slow-twitch fibers, a milder form of stretching is perhaps more appropriate.
MET Procedure
• The patient’s limb is taken to the point where resistance is felt, i.e. the point of bind. It can be more comfortable for the patient if you ease off to a point slightly short of the point of bind in the affected area that you are going to treat, especially if these tissues are in the chronic stage.
• The patient is asked to isometrically contract the muscle to be treated (PIR) or the antagonist (RI), using approximately 10–20% of the muscle’s strength capability against a resistance that is applied by the therapist. The patient should be using the agonist if the method of approach is PIR; this will release the tight, shortened structures directly. (See the PIR example below.)
• If the RI method of MET is used, the patient is asked to contract the antagonist isometrically; this will induce a relaxation effect in the opposite muscle group (agonist), which would still be classified as the tight and shortened structures. (See the RI example below.)
• The patient is asked to slowly introduce an isometric contraction, lasting between 10 and 12 seconds, avoiding any jerking of the treated area. This contraction, as explained above, is the time necessary to load the GTOs, which allows them to become active and to influence the intrafusal fibers from the muscle spindles. This has the effect of overriding the influence from the muscle spindles, which inhibits muscle tone. The therapist then has the opportunity to take the affected area to a new position with minimal effort.
• The contraction by the patient should cause no discomfort or strain. The patient is told to relax fully by taking a deep breath in, and as they breathe out, the therapist passively takes the specific joint that lengthens the hypertonic muscle to a new position, which therefore normalizes joint range.
• After an isometric contraction, which induces a PIR, there is a relaxation period of 15–30 seconds; this period can be the perfect time to stretch the tissues to their new resting length.
• Repeat this process until no further progress is made (normally three to four times) and hold the final resting position for approximately 25–30 seconds.
• A period of 25–30 seconds is considered to be enough time for the neurological system to lock onto this new resting position.
• This type of technique is excellent for relaxing and releasing tone in tight, shortened soft tissues.
A refractory period (the brief period needed to restore the resting potential) of about 20 seconds occurs with RI; however, RI is thought to be less powerful than PIR. Therapists need to be able to use both approaches, because the use of the agonist may sometimes be inappropriate owing to pain or injury. Since the amount of force used with an MET is minimal, the risk of injury or tissue damage will be reduced.
MET Method of Application
“Point of Bind” (or “Restriction Barrier”)
In this chapter the word “bind” is mentioned many times. The point of bind, or restriction barrier, occurs when resistance is first felt by the palpating hand/fingers of the therapist. Through experience and continual practice, the therapist will be able to palpate a resistance of the soft tissues as the affected area is gently taken into the position of bind. This position of bind is not the position of stretch—it is the position just before the point of stretch. The therapist should be able to feel the difference and not wait for the patient to say when they feel a stretch has occurred.
Acute and Chronic Conditions
The soft tissue conditions that are treated using METs are generally classified as either acute or chronic, and this tends to relate to tissues that have had some form of strain or trauma. METs can be used for both acute and chronic conditions. Acute involves anything that is obviously acute in terms of symptoms, pain, or spasm, as well as anything that has emerged during the previous three to four weeks. Anything older and of a less obviously acute nature is regarded as chronic in determining which variation of MET is suitable.
If you feel the presenting condition is relatively acute (occurring within the last three weeks), the isometric contraction can be performed at the point of bind. After the patient has contracted the muscle isometrically for the duration of 10 seconds, the therapist then takes the affected area to the new point of bind.
In chronic conditions (persisting for more than three weeks), the isometric contraction starts from a position just before the point of bind. After the patient has contracted the muscle for 10 seconds, the therapist then goes through the point of bind and encourages the specific area into the new position.
PIR versus RI
How much pain the patient is presenting with is generally the deciding factor in determining which method to initially apply. The PIR method is usually the technique of choice for muscles that are classified as short and tight, as it is these muscles that are initially contracted in the process of releasing and relaxing.
On occasion, however, a patient may experience discomfort when the agonist, i.e. the shortened structure, is contracted; in this case it would seem more appropriate to contract the opposite muscle group (antagonist), as this would reduce the patient’s perception of pain, but still induce a relaxation in the painful tissues. Hence, the use of the RI method, using the antagonists, which are usually pain free, will generally be the first choice if there is increased sensitivity in the primary shortened tissues.
When the patient’s initial pain has been reduced by the appropriate treatment, PIR techniques can be incorporated (as explained earlier, PIR uses an isometric contraction of the tight shortened structures, in contrast to the antagonists being used in the RI method). To some extent, the main factor in deciding the best approach is whether the sensitive tissue is in the acute stage or in the chronic stage.
After having used PIR and RI on a regular basis, I have found that the best results for lengthening the hypertonic structures are achieved with PIR (provided the patient has no pain during this technique). However, once I have performed the PIR method, if I feel more ROM is needed in the shortened tight tissue, I bring into play the antagonists using the RI method for approximately two more repetitions, as explained in the RI example below. This personal approach for my patients has had the desired effect of improving the overall ROM.
PIR Example
To illustrate the PIR method of MET treatment, we are now going to apply the procedure to the adductor pollicis muscle (pollicis relates to the thumb, or pollex). You might consider it more appropriate to demonstrate how METs work by means of an example related to the pelvis; however, I wanted the therapist to be able to practice the technique on themselves first, so that they can better understand the MET concept. Once the technique has been understood and subsequently practiced using this simple example, the therapist will then be ready to tackle more complex METs with the aim of helping to restore function to the pelvis.
Place your left (or right) hand onto a blank piece of paper and, with the hand open as much as possible, draw around the fingers and the thumb (Figure 7.3).
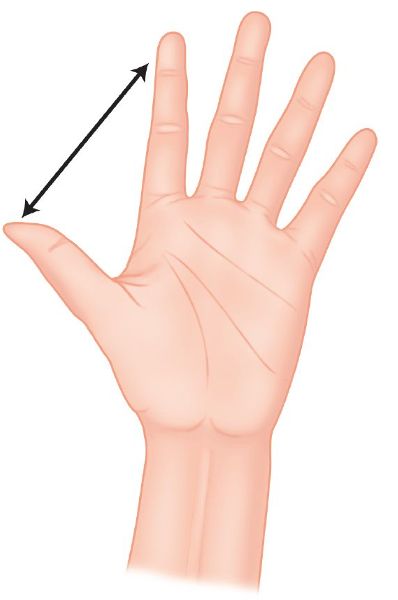
Figure 7.3. The distance between the thumb and finger is measured.
Remove the paper and actively abduct the thumb as far as you can, until a point of bind is felt. Next, place the fingers of your right hand on top of the left thumb and, using an isometric contraction, adduct your thumb against the downward pressure of the fingers, so that an isometric contraction is achieved (Figure 7.4). After applying this pressure for 10 seconds, breathe in, and on the exhalation passively take the thumb into further abduction (but do not force the thumb). Repeat this sequence two more times and on the last repetition, maintain the final resting position for at least 20–25 seconds.
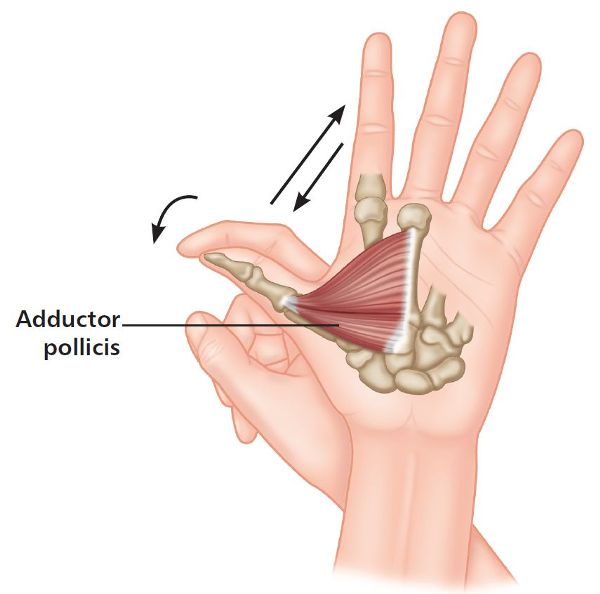
Figure 7.4. Adducting the thumb against a resistance applied by the opposite hand (PIR method).
Now place your hand back on the piece of paper and draw around it again (Figure 7.5); hopefully you will see that the thumb has abducted further than before.
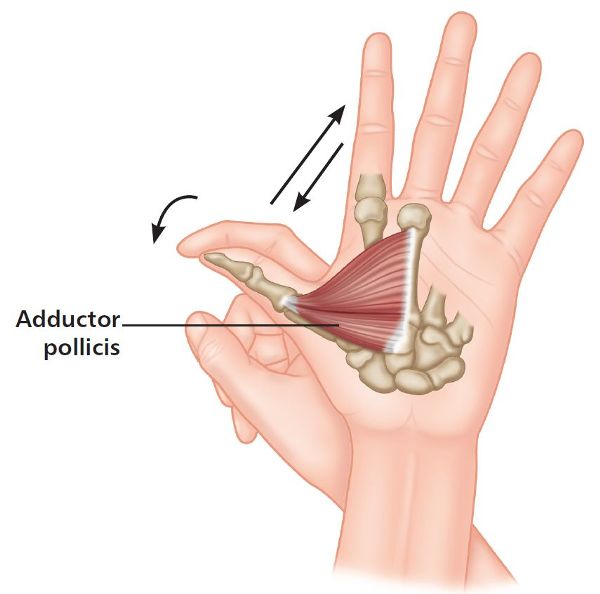
Figure 7.5. The hand redrawn after the MET treatment using PIR and RI.
RI Example
To apply the RI method, follow the same procedure as for the PIR method, i.e. go to the point of bind by still abducting the thumb. From this position of bind, instead of adducting the thumb (PIR) against a resistance, perform the opposite movement and abduct your thumb (using the abductor pollicis brevis/longus muscle) against a resistance (Figure 7.6). After applying this pressure for 10 seconds, breathe in, and on the exhalation passively take the thumb into further abduction (again, do not force the thumb). Repeat this sequence one or two more times and on the last repetition, maintain the final resting position for at least 20–25 seconds.
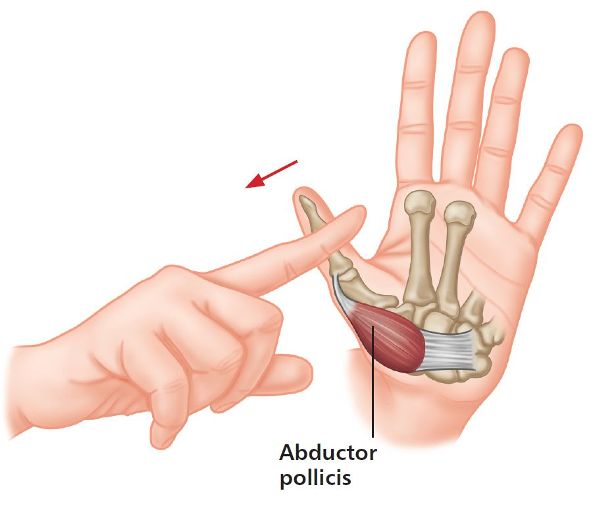
Figure 7.6. Abducting the thumb against a resistance applied by the opposite hand (RI method).
As before, place your hand back on the piece of paper and draw around it again (Figure 7.5); hopefully you will see that the thumb has abducted further than previously.
METs and the Muscles of the Pelvis
The muscles that I consider to be specifically related to the position of the pelvis and lumbar spine are:
• Iliopsoas
• Rectus femoris
• Adductors
• Hamstrings
• Tensor fasciae latae (TFL) and iliotibial band (ITB)
• Piriformis
• Quadratus lumborum (QL)
I am going to show you how to assess for each of these muscles, which have a natural tendency to shorten and subsequently become tight. After the testing procedure has been explained, I will demonstrate specific METs to encourage these short/tight muscles to lengthen, so that we can assist and hopefully normalize the dysfunctional position.
Iliopsoas
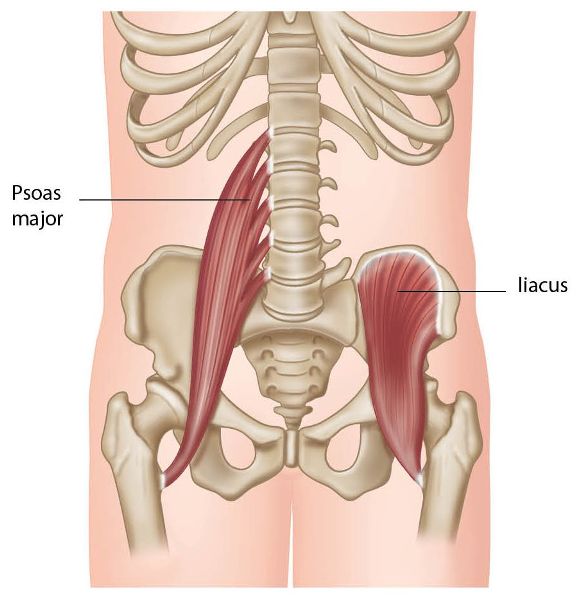
Figure 7.7. (a) Origin, insertion, action, and nerve innervation of the iliopsoas.
Assessment of the Iliopsoas
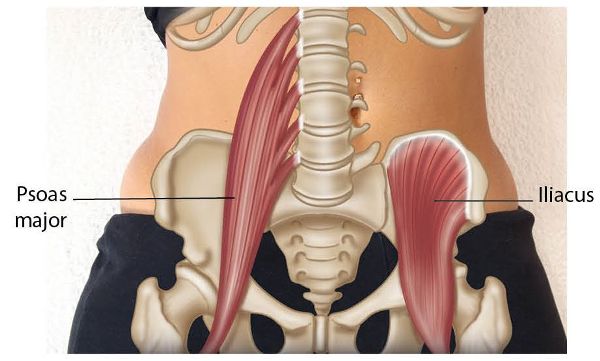
Figure 7.7. (b) The psoas major and iliacus superimposed on the abdomen.
It is important that we are able to assess for relative shortness within the hip flexor group, as Grieve (1983) says that an increased tension in the iliopsoas muscle is felt to be one of the main reasons for the recurrence of malalignment syndrome, even after the alignment of the pelvis has been corrected.
Schamberger (2013) points out that it is common to find more tension/tenderness in the left iliopsoas than in the right side. One reason for this might be that the left SIJ may actually become hypermobile as a result of the increased stress imposed if the right SIJ becomes “locked” (as a result of a right anterior innominate with a compensatory left rotated posterior innominate) or becomes hypomobile for other reasons. The left iliopsoas would contract in an attempt to stabilize the now hypermobile left SIJ.
Modified Thomas Test
To test the right hip, the patient is asked to lie back on the edge of a couch while holding onto their left knee. As they roll backward, the patient pulls their left knee as far as they can toward their chest, as shown in Figure 7.7(c). The full flexion of the hip encourages full posterior rotation of the innominate bone and helps to flatten the lordosis. From this position, the therapist looks at where the patient’s right knee lies, relative to the right hip. The position of the knee should be just below the level of the hip; Figure 7.7(c) demonstrates a normal length of the right iliopsoas.
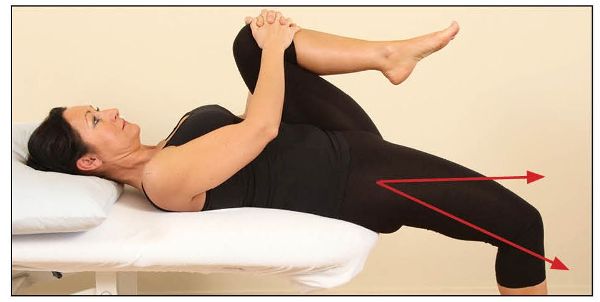
Figure 7.7. (c) The right knee is below the level of the hip, indicating a normal length of the iliopsoas.
In Figure 7.8 the therapist demonstrates with their arms the position of the right hip compared with the right knee. You can see that the hip is held in a flexed position, which confirms the tightness of the right iliopsoas in this case.

Figure 7.8. A tight right iliopsoas is confirmed. A tight rectus femoris can also be seen here.
With the patient in the modified Thomas test position, the therapist can apply an abduction of the hip (Figure 7.9), and an adduction of the hip (Figure 7.10). A ROM of 10–15 degrees for each of these is commonly accepted to be normal.
If the hip is restricted in abduction, i.e. a bind occurs at an angle of less than 10–15 degrees, the muscles of the adductor group are held in a shortened position; if the adduction movement is restricted, the TFL and the ITB are held in a shortened position.
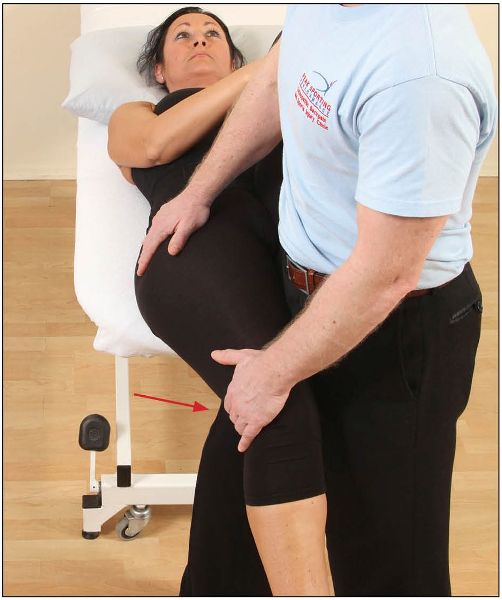
Figure 7.10. Restricted hip adduction, indicating a tight TFL/ITB.
MET Treatment of the Iliopsoas
To treat the right side, the patient adopts the same position as in the modified Thomas test above. The patient’s left foot is placed into the therapist’s right side and pressure is applied by the therapist to induce full flexion of the patient’s left hip. Stabilizing the patient’s right hip with their right hand, the therapist puts their left hand just above the patient’s right knee. The patient is asked to flex their right hip against the therapist’s resistance for 10 seconds, as shown in Figure 7.11; this specific contraction of the iliopsoas muscle will induce a PIR.
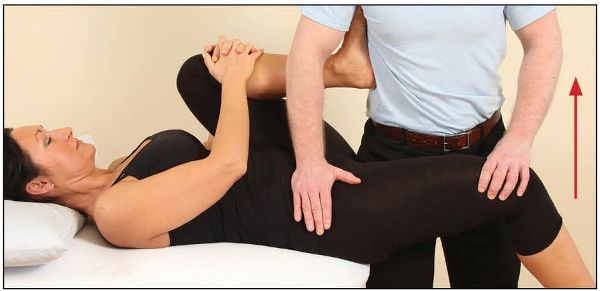
Figure 7.11. The patient flexes their right hip against resistance from the therapist’s left hand, while the hip is being stabilized by the therapist’s right hand.
Following the isometric contraction, and during the relaxation phase, the therapist slowly applies a downward pressure. This will cause the hip to passively go into extension and will induce a lengthening of the right iliopsoas, as shown in Figure 7.12. Gravity will also play a part in this technique, by assisting in the lengthening of the iliopsoas.
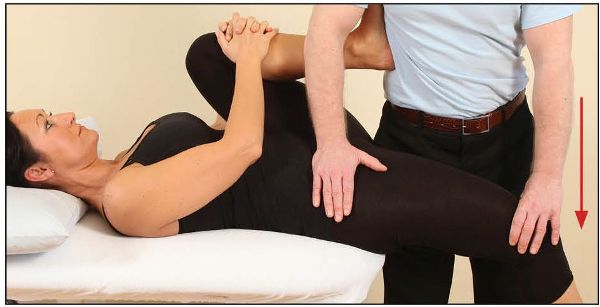
Figure 7.12. The therapist passively extends the hip to lengthen the iliopsoas, with the assistance of gravity.
Alternatively, it is possible to contract the iliopsoas from the flexed position, as shown in Figure 7.13. This is normally used if the original method of activating the iliopsoas causes discomfort to the patient. Allowing the hip to be in a more flexed position will slacken the iliopsoas, which will assist in its contraction and help reduce the discomfort.
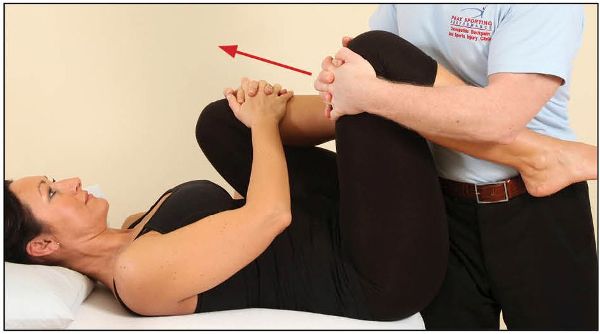
Figure 7.13. The patient resists hip flexion from a flexed position.
The patient is asked to flex their right hip against a resistance applied by the therapist’s left hand (Figure 7.13). After a 10-second contraction, and during the relaxation phase, the therapist lengthens the iliopsoas by taking the hip into an extended position, as demonstrated in Figure 7.14(a).
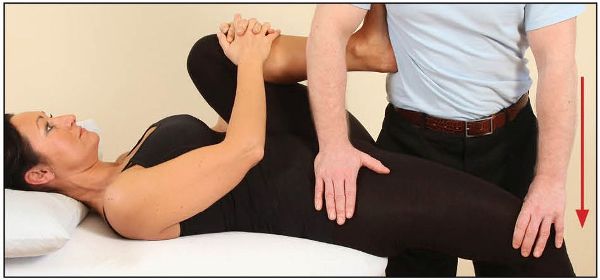
Figure 7.14. (a) Lengthening of the right iliopsoas.
Tip: The psoas major is also known as filet mignon, which is a piece of beef taken from the tenderloin. A bilateral shortness of the psoas major can cause the pelvis to anteriorly tilt, in turn causing the lumbar spine to adopt a position of hyperlordosis and drawing the sacrum into a position of increased nutation. This can result in compression of the facet joints, leading to lower back pain.
Note: If full sit-ups are performed on a regular basis (not recommended), the iliopsoas is predominantly the muscle being used. Repeated sit-ups will make the iliopsoas stronger and tighter, and result in weakness of the abdominals; this can maintain a patient’s lower back pain.
To prove the involvement of the iliopsoas (during the sit-up motion), have your patient lie on their back with their knees bent. Hold the patient’s ankles and ask them to dorsiflex their ankles while you resist the movement. This will stimulate the anterior chain musculature, including the iliopsoas, which is part of this chain. The patient then performs the full sit-up movement as shown in Figure 7.14(b) (most fit individuals will be able to do many sit-ups).
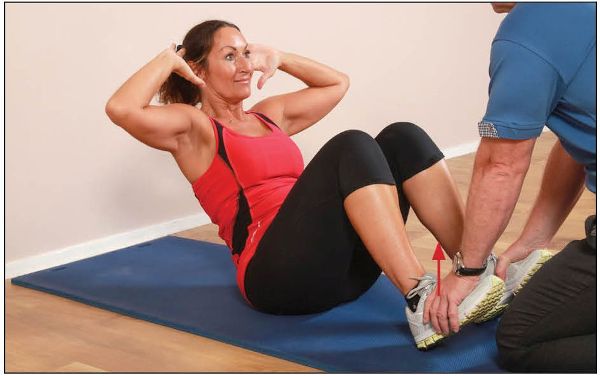
Figure 7.14. (b) Dorsiflexion assists the activation for the contraction of the iliopsoas (switch on).
To deactivate or switch off the iliopsoas, the patient is asked to plantar flex their ankles (instead of dorsiflexing them), or to squeeze their glutes. Either of these actions stimulates the posterior chain musculature, causing the iliopsoas to switch off, as activation of the gluteal muscles results in a relaxation of the iliopsoas through RI. When the patient is now asked to perform the sit-up, the movement will prove to be impossible, confirming that the iliopsoas is generally the prime mover in a full sit-up, as shown in Figure 7.14(c).
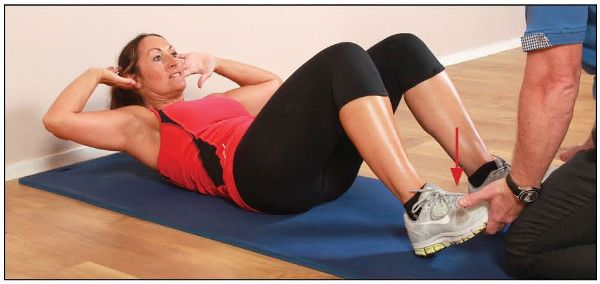
Figure 7.14. (c) Plantar flexion or activating the glutes assists the deactivation for the contraction of the iliopsoas (switch off).
Rectus Femoris
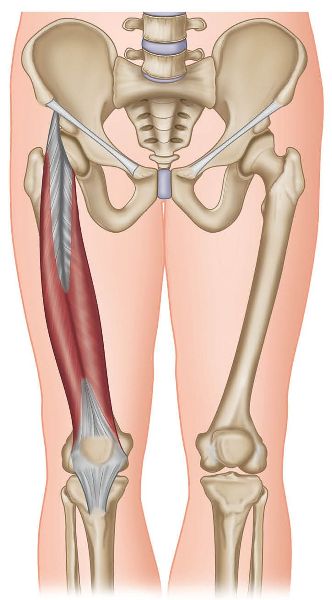
Figure 7.15. Origin, insertion, action, and nerve innervation of the rectus femoris.
Assessment of the Rectus Femoris
Modified Thomas Test
This test is an excellent way of identifying shortness not only in the rectus femoris but also in the iliopsoas as explained earlier. To test the right rectus femoris, the patient adopts the position in Figure 7.16, in which they are holding onto their left leg. The patient is asked to pull their left knee toward their chest, as this will posteriorly rotate the innominate bone on that side; this will be the test position. From this position, the therapist looks at the position of the patient’s right knee and right ankle. The angular position of the knee to the ankle should be about 90 degrees; a normal length of the right rectus femoris is shown below.
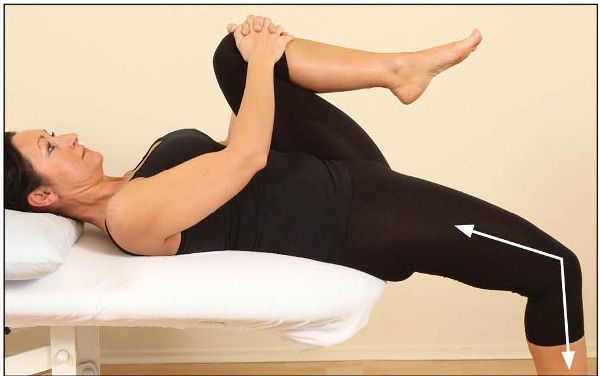
Figure 7.16. To test the right rectus femoris, the patient lies on the couch and holds onto their left leg. A normal length of the rectus femoris is shown.
In Figure 7.17 the therapist demonstrates the position of the right knee compared with the right ankle. Here, the lower leg is seen to be held in a position of extension, which confirms the tightness of the right rectus femoris. You will also notice the position of the hip—it is held in a flexed position. This indicates a tightness of the iliopsoas and was discussed earlier.
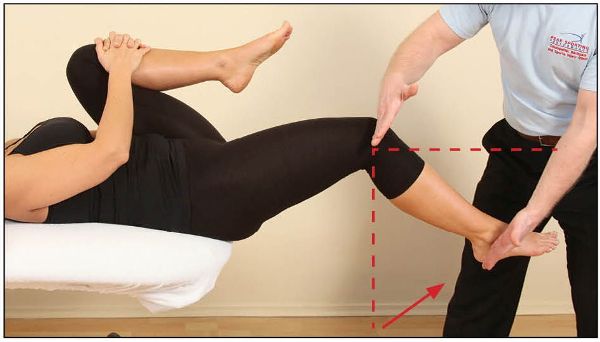
Figure 7.17. The knee is held in extension, indicating a tight rectus femoris.
MET Treatment of the Rectus Femoris
The patient is asked to adopt a prone position, and the therapist passively flexes the patient’s right knee until a bind is felt. At the same time, the therapist stabilizes the sacrum with their right hand, which will prevent the pelvis from rotating anteriorly and stressing the lower lumbar spine facet joints.
Note: If you consider the patient to have an increased lumbar lordosis, a pillow can be placed under their stomach. This will help flatten the lordosis and can reduce any potential discomfort.
From the position of bind, the patient is asked to extend their knee against a resistance applied by the therapist (Figure 7.18), as this contraction will induce a PIR in the rectus femoris muscle.
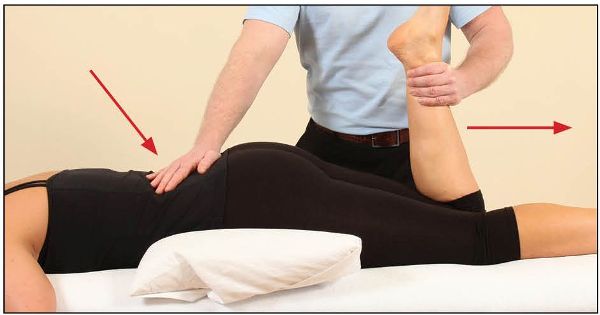
Figure 7.18. The patient extends their knee while the therapist applies resistance.
After a 10-second contraction, and during the relaxation phase, the therapist encourages the knee into further flexion, which will lengthen the rectus femoris, as shown in Figure 7.19.
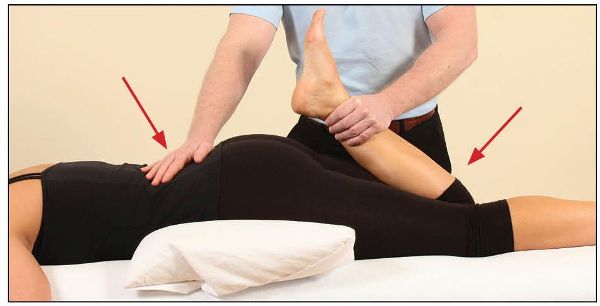
Figure 7.19. The therapist passively flexes the patient’s knee to lengthen the rectus femoris while stabilizing the lumbar spine.
Alternative MET Treatment of the Rectus Femoris
Some patients may find that the previous MET for the rectus femoris puts a strain on their lower back. An alternative and possibly a more effective MET for the rectus femoris is based on the modified Thomas test position.
The patient adopts the position of the modified Thomas test as described earlier. The therapist controls the position of the patient’s right thigh, and slowly and passively flexes the patient’s right knee toward their bottom. A bind will be reached very quickly in this position, so take extra care when performing this technique for the first time.
From the position of bind, the patient is asked to extend their knee against a resistance applied by the therapist (Figure 7.20). After the 10-second contraction, and during the relaxation phase, the therapist passively takes the knee into further flexion (Figure 7.21). This is a very effective way to lengthen a tight rectus femoris.
Tip: Bilateral hypertonicity of the rectus femoris will cause the pelvis to adopt an anterior tilt, resulting in lower back pain due to the 5th lumbar vertebra facet joints being forced into a lordotic (extended) position.
If one side (typically the right side) of the rectus femoris muscle is held in a shortened position, this will have the effect of pulling the innominate bone into an anteriorly rotated position, with relative counter-nutation of the sacrum to the same side.
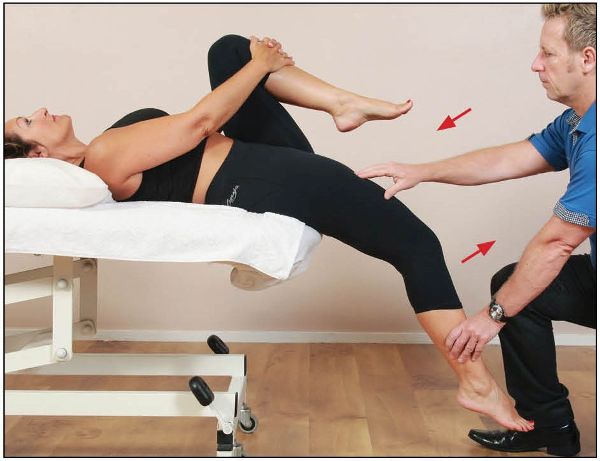
Figure 7.20. The therapist palpates the rectus femoris, and the patient extends their knee against a resistance.
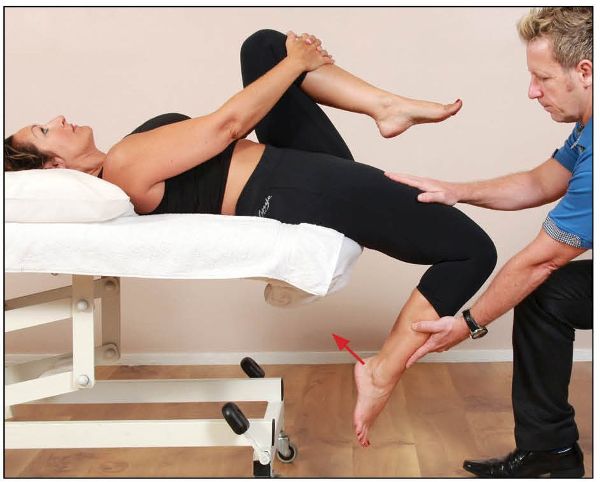
Figure 7.21. The therapist passively flexes the patient’s knee to lengthen the rectus femoris.
Adductors
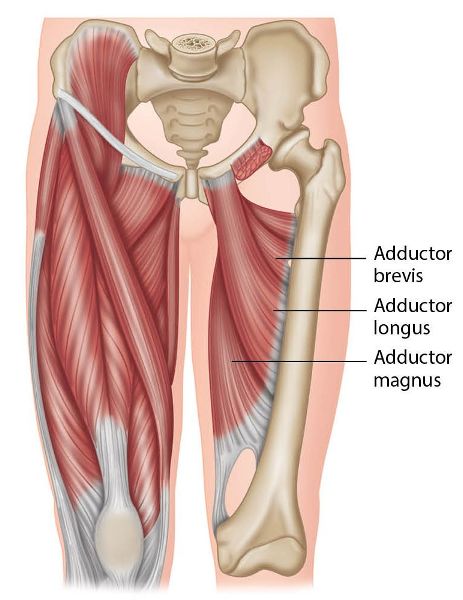
Figure 7.22. Origin, insertion, action, and nerve innervation of the adductors.
Assessment of the Adductors
Hip Abduction Test
To test the left side, the patient adopts a supine position on the couch. The therapist takes hold of the patient’s left leg and passively abducts the hip while palpating the adductors with their right hand (Figure 7.23). When they feel a bind, the position is noted. The normal ROM for passive abduction is 45 degrees; if the range is less than this, a tight left adductor group is indicated.

Figure 7.23. The therapist abducts and palpates the adductors for bind.
However, there is an exception to the rule. If the ROM is less than 45 degrees, it could be that the medial hamstrings are restricting the movement of passive abduction. To differentiate between the short adductors and the medial hamstrings, the knee is flexed to 90 degrees (Figure 7.24); if the range now increases, this indicates shortness in the medial hamstrings.
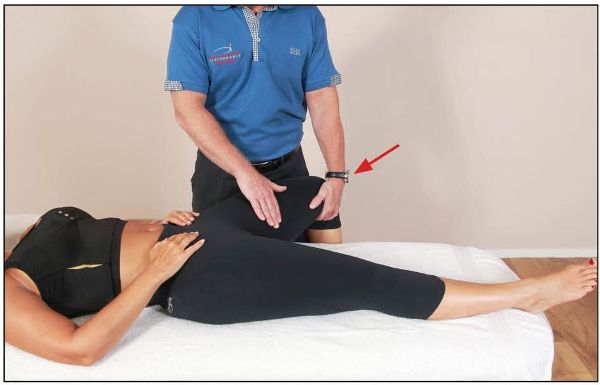
Figure 7.24. The knee is bent to isolate the short adductors.
In summary, to identify if the hamstrings are the restrictive factor, the therapist passively flexes the knee and then continues with the passive abduction. If the ROM improves, the hamstrings are the restrictive tissues and not the short adductors.
Note: The term short adductor refers to all of the adductor muscles that attach to the femur, the exception being the gracilis. This particular muscle attaches to a point below the knee, on the pes anserinus (goose foot) area of the medial knee, and acts on the knee as well as on the hip.
MET Treatment of the Adductors
One of the most effective ways of lengthening the adductors (short) is to utilize an MET from the position, shown in Figure 7.25(a–b). The patient adopts a supine position with their knees bent and heels together; the hips are slowly and passively taken into abduction by the therapist until a bind is felt in the adductors.
From the position of bind, the patient is asked to adduct their hips against a resistance applied by the therapist, to contract the short adductors.
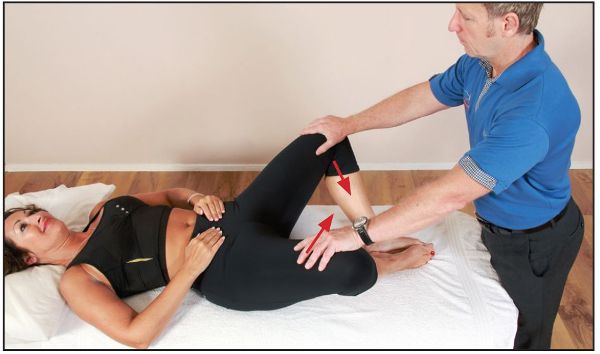
Figure 7.25. (a) The patient adducts their legs against resistance from the therapist.
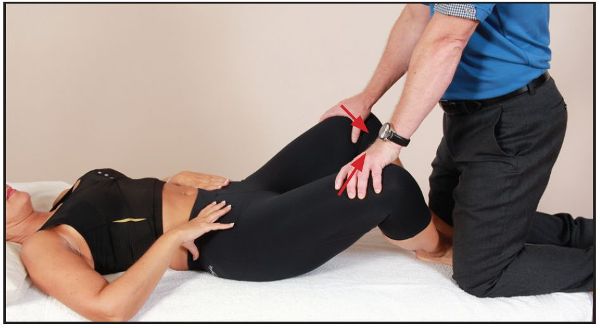
Figure 7.25. (b) Alternative position—the therapist kneels on the couch as the patient adducts their legs against resistance from the therapist.
After a 10-second contraction, and during the relaxation phase, the hips are passively taken into further abduction by the therapist, as shown in Figure 7.26(a–b).
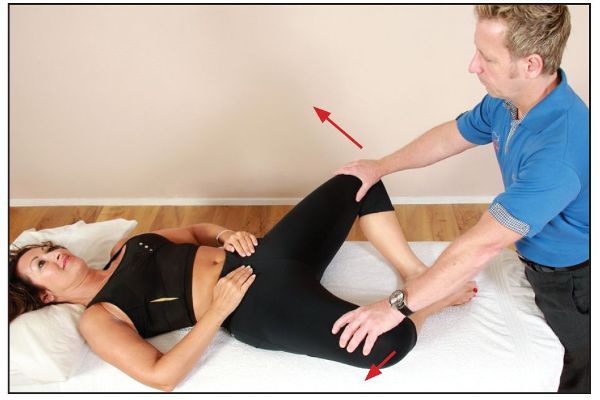
Figure 7.26. (a) The therapist lengthens the adductors.
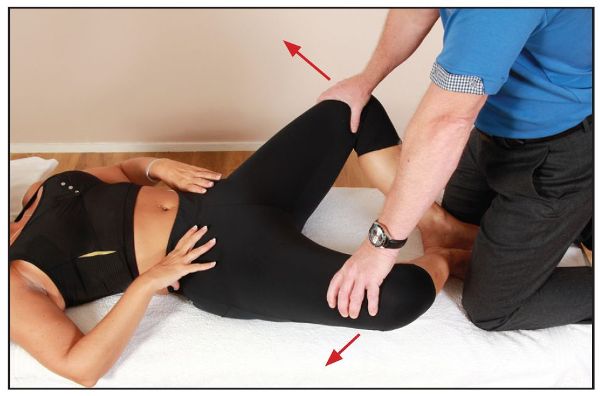
Figure 7.26. (b) Alternative position—the therapist lengthens the adductors.
Tip: Overactivity of the adductors will potentially result in a weakness inhibition of the abductor muscles, in particular the Gmed. This can result in a Trendelenburg pattern of gait, as explained in Chapter 5.
Hamstrings
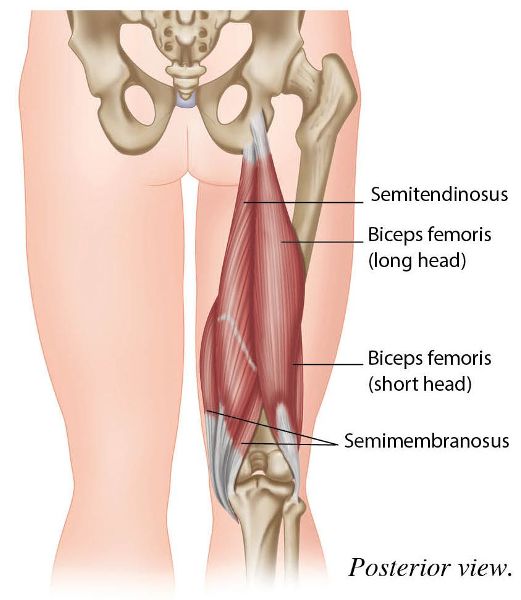
Figure 7.27. Origin, insertion, action, and nerve innervation of the hamstrings.
General Assessment of the Hamstrings
Hip Flexion Test
This test helps to provide the practitioner with an overall impression of the general length of the hamstring muscles. The patient lies in a supine position with both legs extended. The therapist passively guides the patient’s left hip into flexion until a point of bind is felt. The normal ROM is anywhere between 80 and 90 degrees; less than 80 degrees indicates that the hamstrings are held in a shortened position. However, “neural tension” of the sciatic nerve and a specific hamstring injury can also restrict the ROM (flexion) of the hip joint.
As you can see in Figure 7.28(a), the patient has a normal ROM in their hamstrings. Anything less than 80–90 degrees would be classified as short, as shown in Figure 7.28(b).
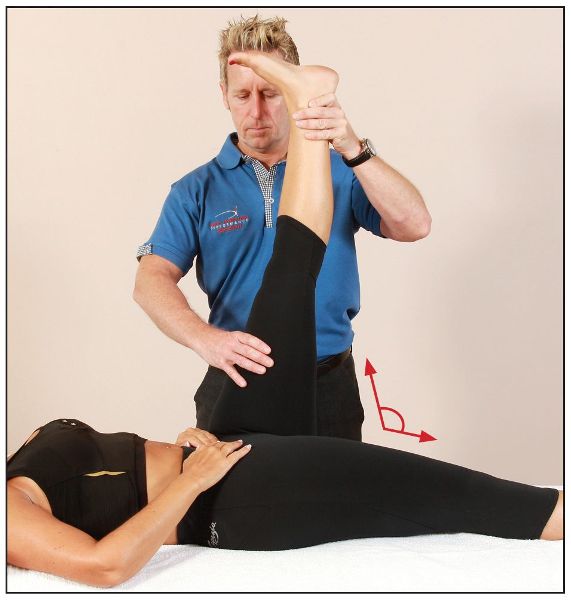
Figure 7.28. (a) Hip flexion test. A ROM of 80–90 degrees is normal.
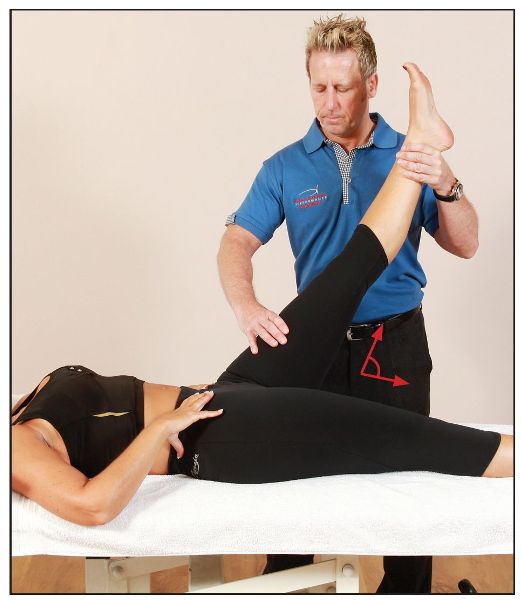
Figure 7.28. (b) Hip flexion test. A ROM of 45 degrees is demonstrated here, indicating short hamstrings.
MET Treatment of the Hamstrings (Non-Specific)
The following technique is very good for lengthening the hamstrings as a group; later in this chapter we will see how to specifically target the medial and lateral hamstrings.
The therapist adopts a standing posture and passively controls the patient’s right leg into hip flexion until a bind is felt in the hamstrings. From this position, the patient’s lower leg is placed on the therapist’s right shoulder, as shown in Figure 7.29.
The patient is asked to push down against the therapist’s shoulder for 10 seconds. After the contraction of the hamstrings, and during the relaxation phase, the therapist passively takes the right leg into further flexion, as seen in Figure 7.30.
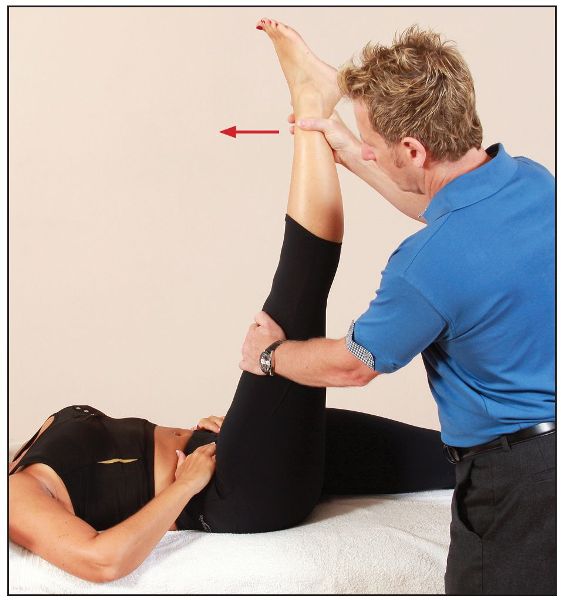
Figure 7.30. The therapist passively takes the hip into further flexion.
Alternative MET for the Insertion of the Hamstrings
This technique is very good for lengthening the insertion component of the hamstrings. The patient’s hip is now flexed to 90 degrees and the lower leg is placed over the shoulder of the therapist, as shown in Figure 7.31.
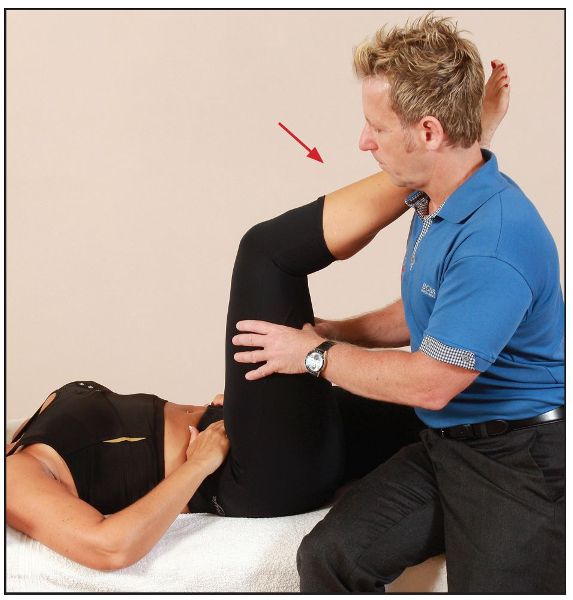
Figure 7.31. With the hip flexed to 90 degrees, the patient places their lower leg over the therapist’s shoulder.
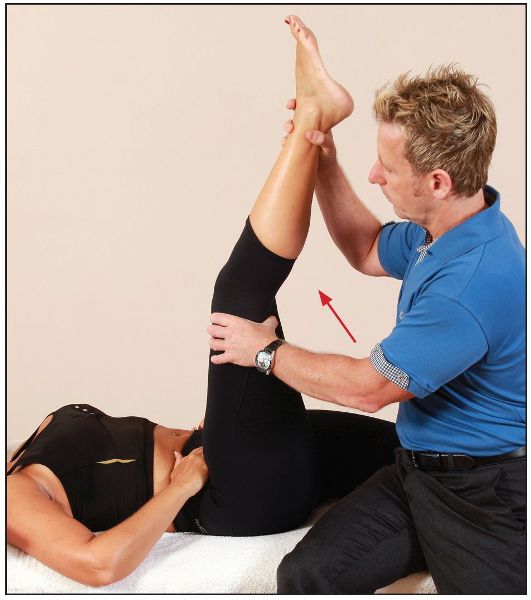
From this position, the patient is asked to pull their heel toward their gluteal muscles, as this will activate the contraction of the hamstrings. After a 10-second contraction, and during the relaxation phase, the therapist passively encourages knee extension until a new point of bind is felt, as shown in Figure 7.32.
RI Method
The patient is asked to contact the hamstrings as described above; however, after the 10-second contraction, and during the relaxation phase, the patient is asked to slowly straighten their knee (which was flexed to start with) as the therapist passively takes the knee into further extension. The patient will be contracting their quadriceps as they straighten the knee actively; this will induce an RI effect in the hamstrings, allowing a more effective and safe lengthening to occur.
Assessment of the Medial Hamstrings (Semitendinosus and Semimembranosus)
After conducting a general assessment of the hamstrings, if the ROM is less than 80 degrees, we can conclude that there is a soft tissue restriction present within the hamstring muscle group. However, the assessment does not tell us which aspect of the hamstrings is the tighter structure.
With specific testing it is possible to identify the individual components of the hamstring muscles that are responsible. The following tests can be incorporated into the assessment to help differentiate muscle length anomalies in the medial hamstrings from those in the lateral hamstrings.
In order to investigate whether the semi-tendinosus/semimembranosus is the restrictive tissue, the medial hamstrings are isolated as follows. The patient’s leg is controlled by the therapist, who applies an external rotation and abduction, while at the same time the hip is passively flexed (Figure 7.33(a–b)). The point of bind is noted; if the ROM is less than that in the original test, the medial hamstrings can be assumed to be the shortened muscles.
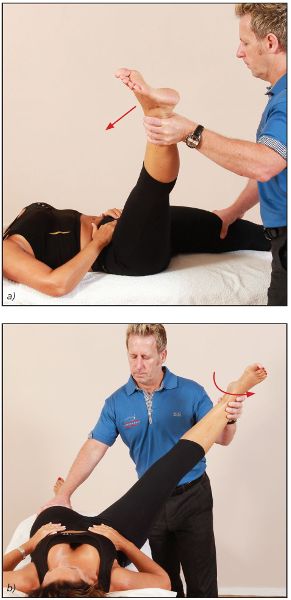
Figure 7.33. (a) To specifically identify the medial hamstrings as the restrictive tissue, the patient’s leg is externally rotated and abducted while the hip is passively flexed. (b) Alternative view of the test position.
Assessment of the Lateral Hamstrings (Biceps Femoris)
This specific test will isolate the biceps femoris. The therapist applies an internal rotation and adduction, while the patient’s leg is taken into passive flexion (Figure 7.34(a–b)). If the motion feels restrictive, the therapist needs to determine whether the ROM is less than that in the original hip flexion test; if it is, the lateral hamstring of the biceps femoris can be identified as the short tissue.
Tip: Remember, the medial and lateral hamstrings might need treating individually rather than together.
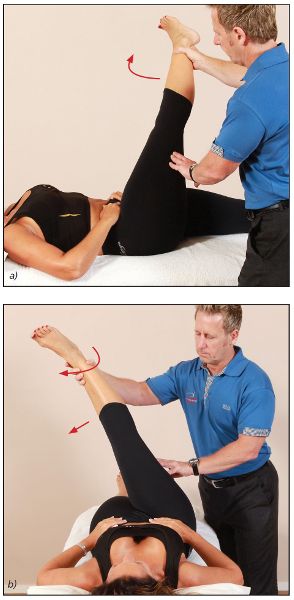
Figure 7.34. (a) To test the biceps femoris, the therapist applies an internal rotation and adduction while the leg is taken into passive flexion. (b) Alternative view of the test position.
Tensor Fasciae Latae (TFL) and Iliotibial Band (ITB)
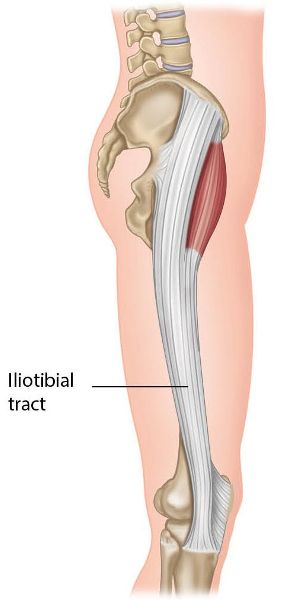
Figure 7.35: Origin, insertion, action, and nerve innervation of the TFL/ITB.
Assessment of the TFL and ITB
Ober’s Test
An orthopedic surgeon by the name of Frank Ober wrote an article called “Back strain and sciatica” (Ober 1935a) and first described this test in 1937. He discussed the relationship of a contracted TFL muscle and the ITB to lower back pain and sciatica.
The patient is asked to adopt a side-lying position, and the therapist (with the assistance of the patient) places the patient’s shoulder, hip, and knee in alignment as shown in Figure 7.36(a).
When the therapist feels that the patient has sufficiently relaxed, they slowly bend their own knees (as in a half squat) while maintaining control of the patient’s left knee as it is lowered to the couch. If the knee is seen to drop below the level of parallel, the TFL/ITB is classified as normal, as shown in Figure 7.36(b); if the thigh remains (or drops only slightly below) parallel, the TFL/ITB is classified as short, as shown in Figure 7.36(c).
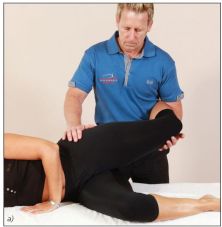
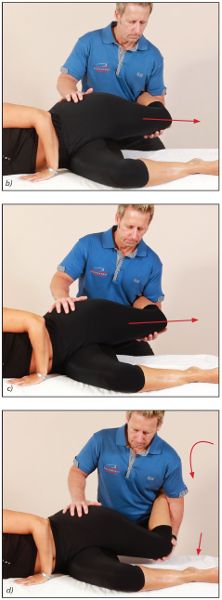
Figure 7.36. Ober’s test: (a) The therapist controls the patient’s left knee and asks the patient to relax fully before the knee is lowered toward the couch; (b) a normal length of the TFL/ITB, indicated by the knee dropping down; (c) a tight TFL/ITB, indicated by the knee remaining where it is; (d) allowing the hip to “fall” into hip flexion and internal rotation can lead to the incorrect conclusion of a normal ITB/TFL.
Note: If there is perceived shortness within the TFL and ITB, the leg will remain relatively abducted, but the hip will naturally want to “fall” into hip flexion with internal rotation as the therapist lowers the leg (see Figure 7.36(d)). If this is allowed to happen as the leg approximates the couch, one could mistakenly assume the length of the TFL and ITB to be normal, but a tight TFL/ITB will take the hip into this dysfunctional position. It is therefore important to be very diligent when controlling the patient’s leg during the test and not allow the hip to flex and internally rotate.
Please bear in mind the following: when Ober’s test is positive, we naturally assume that the TFL and ITB are short and subsequently tight, and that the treatment protocol is to “stretch” and/or perform manual therapy techniques to encourage lengthening of the ITB. However, research has now shown that altering the length of the ITB through manual therapy is next to impossible: according to Chaudhry et al. (2008), a change in length of the ITB by only 1% will require approximately 1 ton (925kg) of pressure. Hence, there is little chance of actually causing any significant deformation to the ITB and making it less tight through manual therapy and stretching techniques.
A study by Tenney et al. (2013), however, demonstrated that the activation of the abdominals and hamstring muscles in subjects who experience lumbopelvic pain (with a positive Ober’s test) led to an improvement in the position of the pelvis, and subsequently to an overall improvement in the results of Ober’s test.
MET Treatment of the TFL and ITB
I consider the following MET an appropriate procedure to be included within a treatment plan, as I feel that it will assist in some way to alter the “tone” of the TFL muscle, rather than altering the length of the connective tissue component, i.e. the ITB. It makes a lot more sense to me to use the PIR effect of METs on the TFL muscle, as I personally believe that this technique helps relax the TFL and hopefully will induce some reduction in tone in the ITB. This is my preferred way of treating these structures, rather than spending a great deal of time performing deep massage techniques (generally called stripping the ITB), or advocating the use of a foam roller, to help lengthen the ITB. Techniques of this type (foam roller in particular) may not actually be doing what they have supposedly been designed for in the past, because the soft tissue structure of the ITB (as already discussed) has been shown through research not to change in length by even 1% using almost one ton of pressure.
Let me give you an example to illustrate the above. When the weather is particularly warm at my clinic in Oxford, and especially when I am lecturing, I tend to look out of the window and across the running track to a small area of grass. Almost every day (only when the weather is good), I see a young man spending anywhere between two and three hours rolling his legs using a foam roller. He has been given the nickname “Roller Dave” for obvious reasons, and I have even questioned him on why he does this to his legs. He simply says to me that his therapist recommends doing that every day to release his ITBs … I will leave that thought process with you! I am sure some of the students who have attended my courses in Oxford will be smiling when they read about Roller Dave, as they too have undoubtedly seen him rolling his legs many times!
Anyway, back to the treatment protocol. The patient adopts a supine position, and the therapist crosses the patient’s flexed left leg over the right leg. The therapist controls the patient’s left knee with their right hand and holds onto the patient’s right ankle with their left hand. The patient’s right leg is then placed into an adducted position until a bind is felt. From the position of bind, the patient is asked to abduct their right leg against a resistance applied by the therapist, as shown in Figure 7.37.
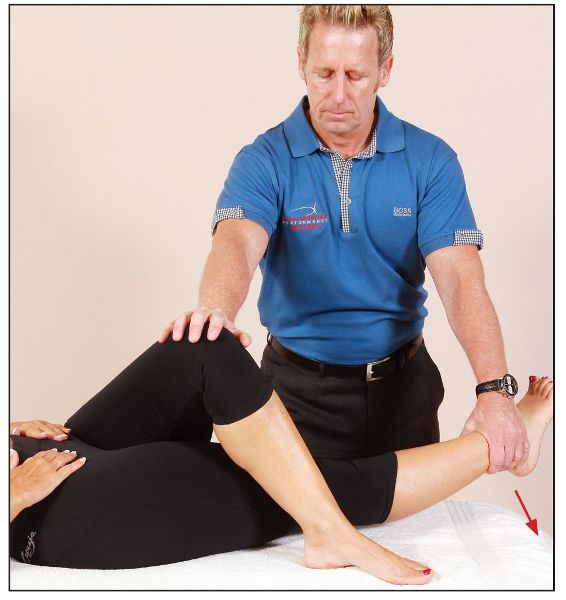
Figure 7.37. The patient abducts their right leg against a resistance.
After a 10-second contraction, and during the relaxation phase, the therapist passively takes the patient’s right leg into further adduction (Figure 7.38(a)). This will encourage a lengthening of the right TFL and may possibly have an effect on the ITB as well (albeit small).
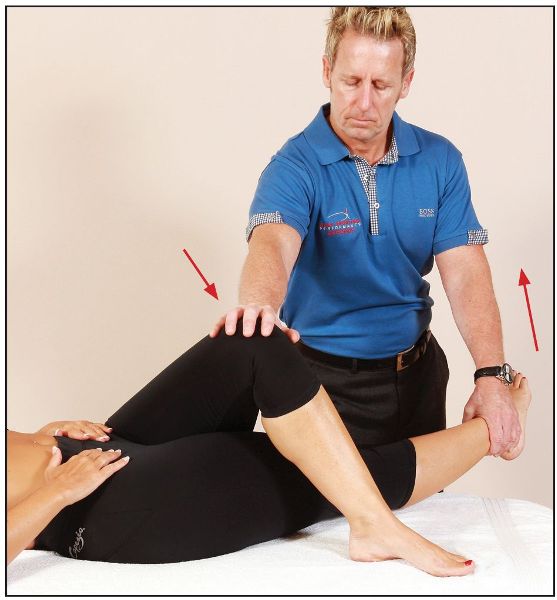
Figure 7.38. (a) The patient’s left knee is stabilized, while the therapist adducts the right leg, lengthening the TFL muscle.
If you look at Figure 7.38(b), the patient has adopted a side-bent position to the left; this will encourage a lengthening of the right QL muscle as well as a lengthening of the TFL and ITB.
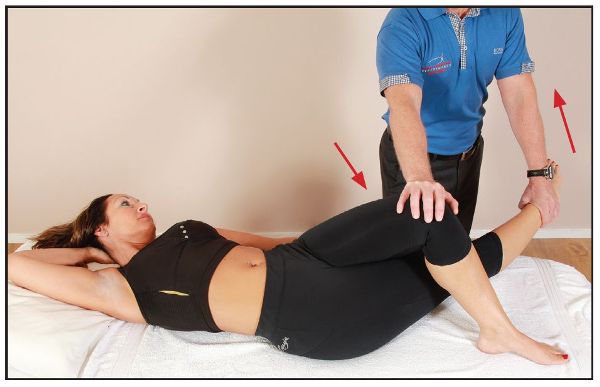
Figure 7.38. (b) The patient side bends to the left, while the therapist adducts the right leg, lengthening the QL and TFL muscles.
Piriformis
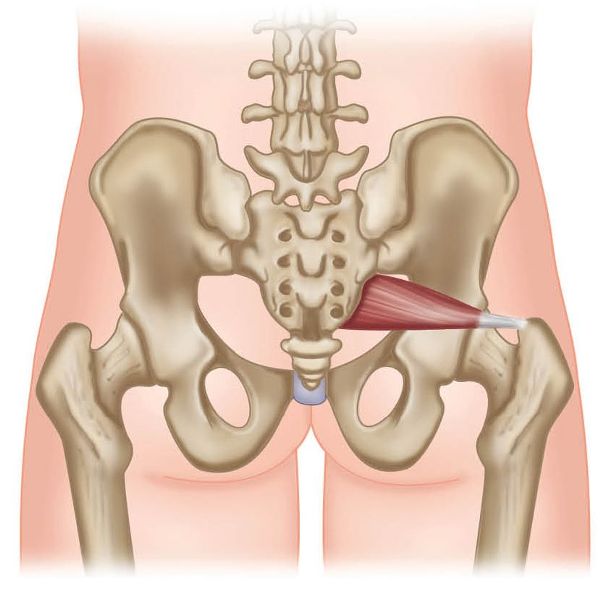
Figure 7.39. Origin, insertion, action, and nerve innervation of the piriformis.
Observation Assessment of the Position of the Hip
The initial assessment for the relative length of the piriformis muscle is by observation. The patient is asked to adopt the supine position, and the patient’s lower limbs are observed from the cephalic end of the couch. The focus of attention will be on the relative position of the foot.
As you can see in Figure 7.40, the patient’s left foot appears to be further away from the midline than the right foot. The actual movement has come from the hip, which is in a position of external rotation. This possibly relates to a shortened piriformis on the left side.
The piriformis is a very important muscle regarding sacral torsions, because of its attachment onto the anterior surface of the sacrum. Since its pull is in a diagonal direction, the muscle can rotate the sacral base posteriorly and downward relative to the innominate bone. This motion can then cause a wedging against the innominate, resulting in a loss of mobility of the SIJ, and consequently hypomobility of the joint.
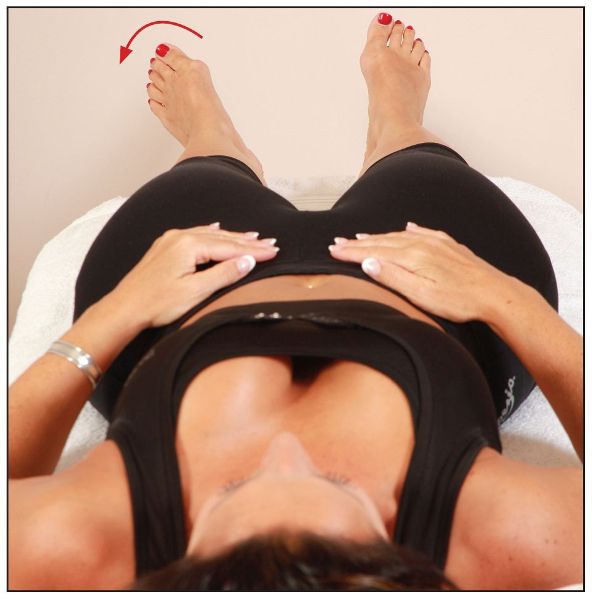
Figure 7.40. The left leg is held in an externally rotated position.
Passive Assessment of the Piriformis
In order to look at the position of the hip to help us decide whether the piriformis is held in a shortened position, we ask the patient to adopt a prone position. One of the patient’s knees is flexed to 90 degrees, and the hip is passively controlled by the therapist and allowed to internally rotate. This is repeated with the other knee flexed to 90 degrees. The side that has the least ROM possibly indicates relative shortness of the corresponding piriformis (Figure 7.41).
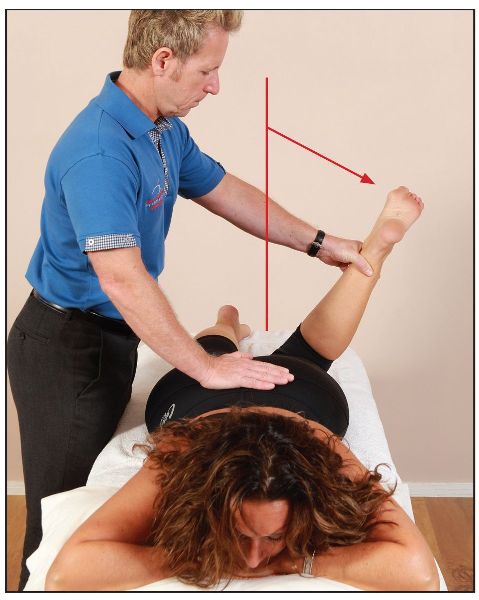
Figure 7.41. The left hip is passively taken into internal rotation to assess for shortness of the piriformis.
Another way of assessing the relative length of the piriformis is as follows. The patient is asked to adopt a prone position with both of their knees bent, and then let their legs “flop out”; this will induce internal rotation of the hip joints.
From the cephalic position of the patient, the therapist observes the position of the lower limb. As you can see in Figure 7.42, the lower limb appears to be asymmetric on one side. One can assume that the patient’s left side is the dysfunctional side, as the hip is in a position of external rotation. In this case, internal rotation of the hip is restricted, which means that the piriformis on that side is held in a shortened position.
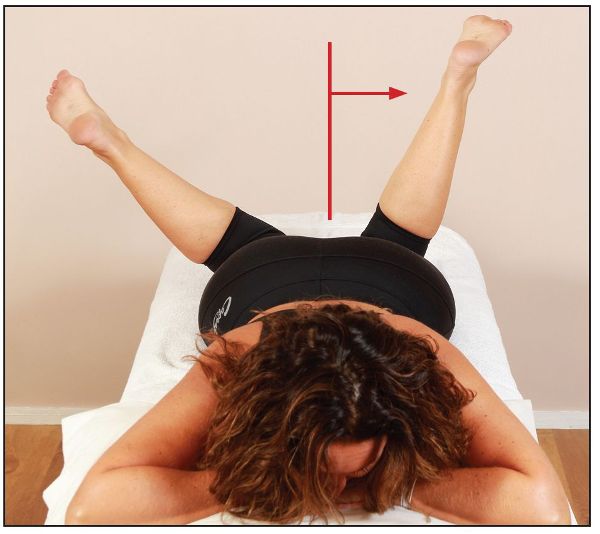
Figure 7.42. A decreased ROM of the left hip, indicating a short left piriformis.
MET Treatment of the Piriformis
The patient adopts the position of the test as described above, but with the right leg straight and the left knee bent. The therapist makes sure that the pelvis/sacrum is stabilized with their right hand, while controlling the patient’s left leg with their left hand. The patient’s left leg is passively taken into internal rotation until the position of bind is felt, and the patient is asked to contract the piriformis by pulling their leg against resistance applied by the therapist’s left hand. This will induce an external rotation of the hip joint (Figure 7.43).
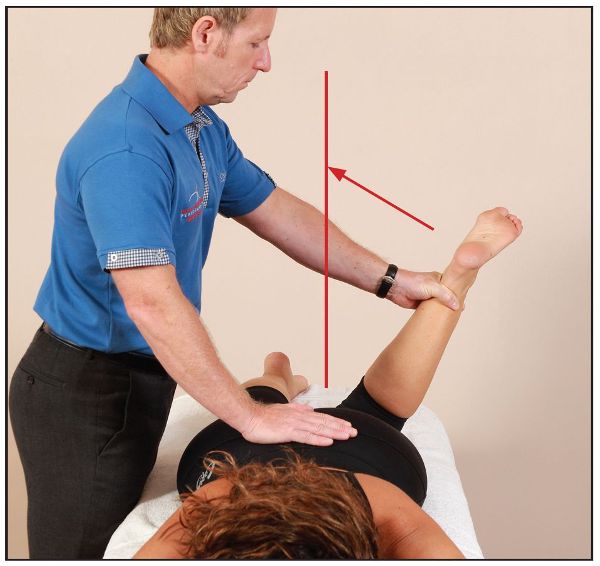
Figure 7.43. The patient is asked to pull their left leg across their body against a resistance. The therapist stabilizes the lumbar spine with the right hand.
After a 10-second contraction of the piriformis, and during the relaxation phase, the therapist takes the patient’s left hip into further internal rotation. This will lengthen the piriformis, as shown in Figure 7.44.

Figure 7.44. The therapist lengthens the piriformis while stabilizing the lumbar spine.
Alternative MET Technique for the Piriformis
Technique 1
This time the patient is asked to adopt a supine position, and the therapist passively takes the patient’s left leg and crosses it over the right leg. Controlling the movement of the patient’s left innominate with their right hand, the therapist applies pressure to the patient’s left knee, passively inducing adduction of the hip to the point of bind.
The patient is asked to abduct their left leg (the piriformis is an abductor), while the therapist resists the movement, as shown in Figure 7.45.
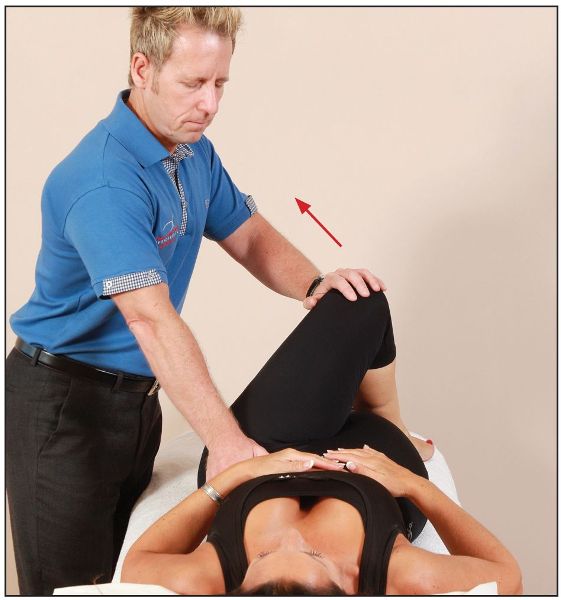
Figure 7.45. Technique 1: from the point of bind, the patient abducts against the pressure applied by the therapist in the direction of the arrow.
After a 10-second contraction, and during the relaxation phase, the therapist passively takes the patient’s left leg into further adduction, as shown in Figure 7.46.
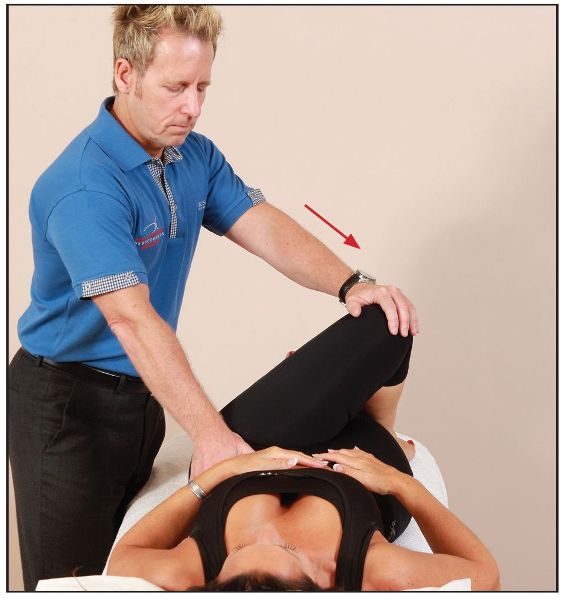
Figure 7.46. Technique 1: the therapist takes the patient’s left leg into further adduction and stabilizes the innominate/lumbar spine with the right hand.
Technique 2
This is my preferred way of lengthening the piriformis muscle.
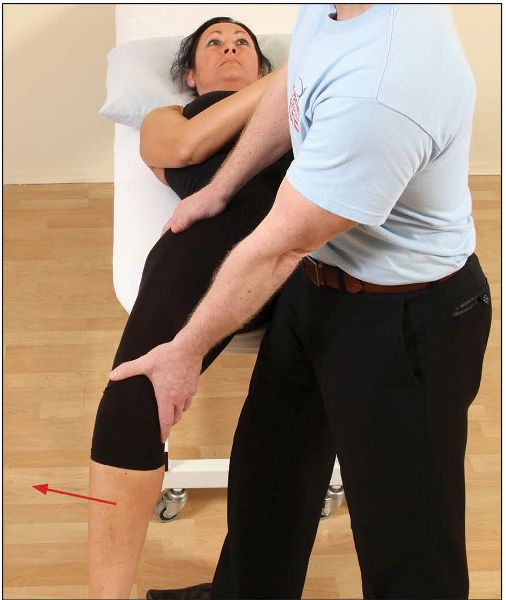
Controlling the patient’s left leg, the therapist tries to encourage flexion of the hip, while at the same time externally rotating the hip with some adduction. This technique will place the piriformis into a position of relative bind, but will need fine-tuning by the therapist and feedback from the patient to finally achieve the optimum position. From this finely tuned position of bind, the patient is asked to push their knee away, into the abdomen of the therapist. This will induce a contraction of the piriformis, as shown in Figure 7.47.
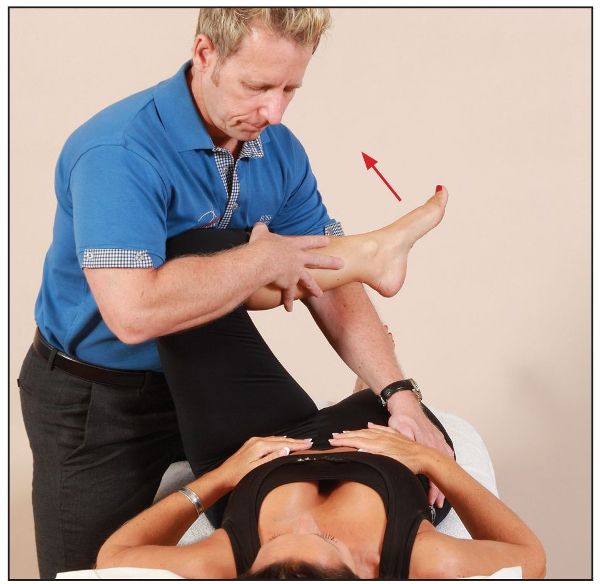
Figure 7.47. Technique 2: this technique will need fine-tuning to get to the optimum position. From the position of bind the patient is asked to push their knee away.
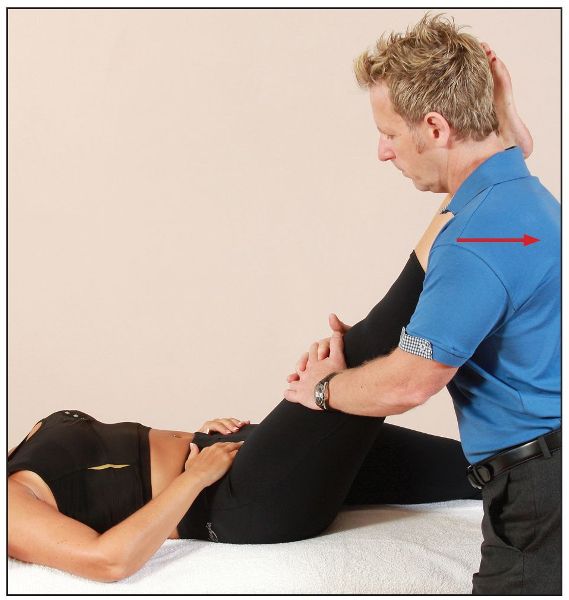
After a 10-second contraction, and during the relaxation phase, the therapist passively encourages the hip into further external rotation while applying some hip flexion/adduction as shown in Figure 7.48.
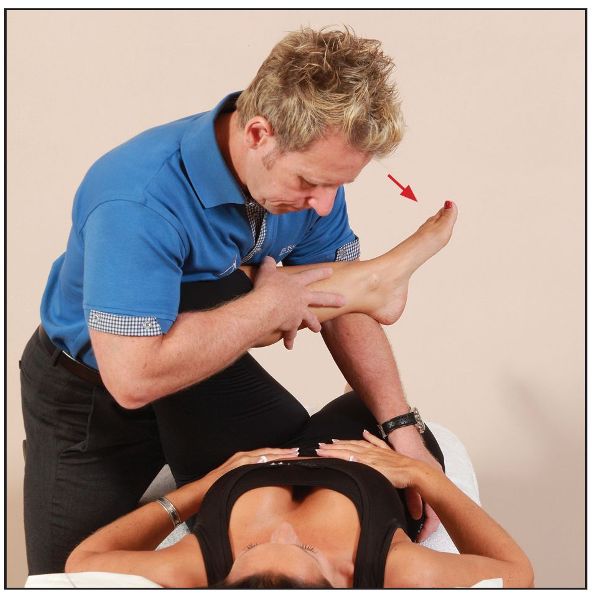
Figure 7.48. Technique 2: using their chest and hand, the therapist encourages further external rotation and adduction of the patient’s left hip.
Tip: The sciatic nerve of one in five of the population (20%) passes through the piriformis muscle. This can result in buttock and leg pain, but generally no back pain is present, so make sure you eliminate disc/lumbar spine pathology from your hypothesis.
Note: It is considered that after 60 degrees of hip flexion, the piriformis changes from an external rotator to an internal rotator—this is because of its anatomical attachments. If you look closely at Figure 7.48, this is the reason why the patient’s left hip is placed in an externally rotated position. This will now lengthen the piriformis, as the left hip has exceeded 60 degrees of flexion.
Quadratus Lumborum (QL)
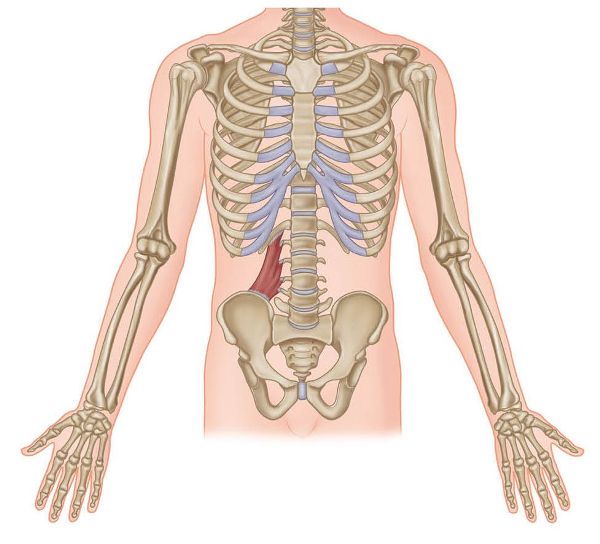
Figure 7.49. Origin, insertion, action, and nerve innervation of the QL.
Assessment of the QL
In my experience I find that the standing side flexion test is relatively good for indicating tightness of the QL.
The patient stands upright and maintains a neutral position of the lumbar spine. From the standing position, the patient is asked to side bend to the left, and at the same time slide their left hand down the outside of their left leg, as shown in Figure 7.50. When the position of bind is reached (this is felt by the therapist palpating the right side of the QL as the patient side bends to the left), the patient’s left middle finger should be in contact with the head of the fibula on the left side.
If the middle finger is close or touches the fibula head on the left side, the QL on the right (contralateral) side is classified as normal; if there is a restriction, the QL on the right is classified as tight.
Note: This test is not conclusive for determining shortness of the QL, as many other lumbar spine factors will affect the overall result. For example, any intervertebral lumbar disc pathology or facet joint restriction/pain will be affected during this test and will give the therapist a false-positive result.
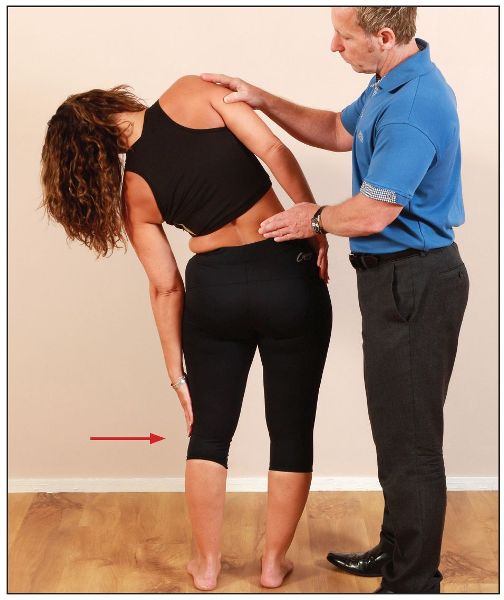
Figure 7.50. The left hand approximates the head of the fibula if the right QL is of normal length.
MET Treatment of the QL
PIR Method
The patient is asked to adopt the shape of a banana on the couch: this is achieved by the patient assuming a side-lying supine position, with their right hand placed underneath their head, and their right leg over their left leg. The left leg overlies the edge of the couch, as shown in Figure 7.51.

Figure 7.51. The patient’s right QL is taken to the point of bind by assuming the “banana” position.
Once the patient has adopted this position, the therapist places their right hand under the head of the patient and cradles the right axilla. The left hand of the therapist stabilizes the patient’s left pelvis.
From this position, the patient is asked to side bend to the right against the resistance applied to their axilla by the therapist’s right hand (Figure 7.52). This will induce a PIR method of contraction in their right QL.
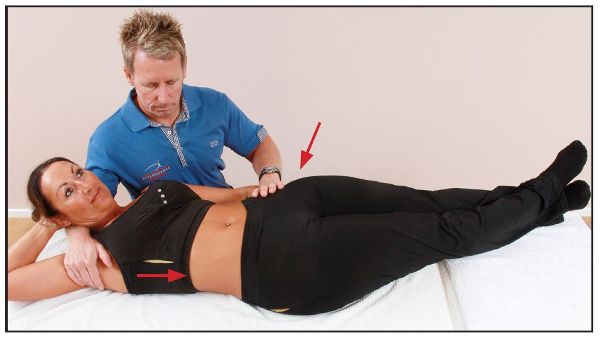
Figure 7.52. The patient side bends to the right while the therapist’s left hand stabilizes the patient’s left pelvis.
After a 10-second contraction, and during the relaxation phase, the therapist induces further side bending to the left, which will lengthen the QL on the right side.
Reciprocal Inhibition (RI) Method
The position of the patient and the procedure are similar to those explained for the PIR method, the only difference being that when the therapist encourages the new position of bind, the patient is asked to reach their left hand toward their left leg (Figure 7.53). This will induce a contraction of the left QL and cause the right QL to relax through RI, allowing a lengthening to occur.
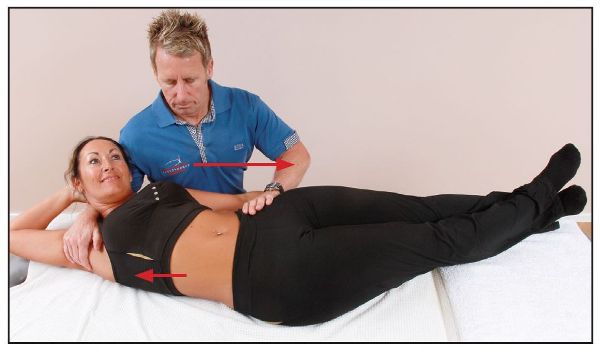
Figure 7.53. The patient is asked to slowly side bend to the left as the therapist guides the motion. This induces an RI effect in the right QL.
Alternative MET for the QL
For an alternative MET for the QL, the patient is placed in a side-lying position, with their left leg off the side of the couch, as shown in Figure 7.54. The therapist stabilizes the lower ribs (attachment of the QL) with their right hand and controls the patient’s left leg with their left hand. The patient is asked to abduct their left leg against the resistance applied by the therapist’s left hand; this will induce a PIR contraction of the left QL muscle.
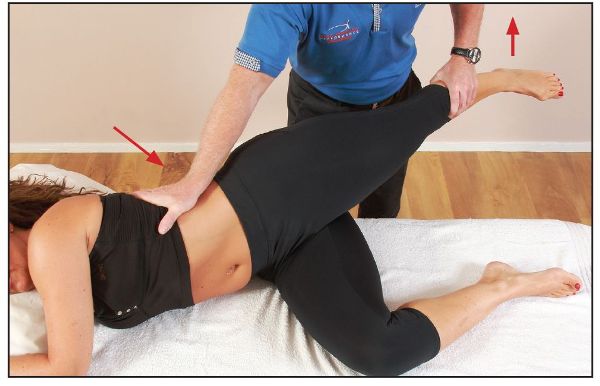
Figure 7.54. The patient abducts their left leg, while the therapist’s right hand stabilizes the lower ribs.
After a 10-second contraction, and during the relaxation phase, the therapist slowly and passively takes the patient’s left leg into further adduction while stabilizing the patient’s lower back (Figure 7.55). This will lengthen the QL on the left side.
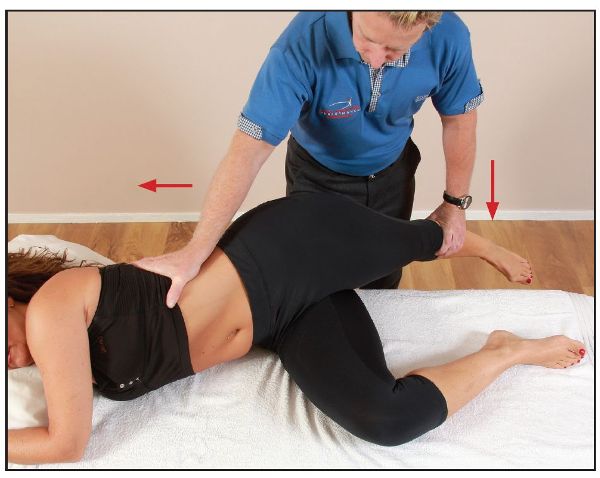
Figure 7.55. The therapist stabilizes the lower back and gently applies cephalic pressure to the 12th rib with their right hand while encouraging adduction of the left leg.
Tip: The QL can become overactive and subsequently shorten if the contralateral (opposite) Gmed is weak. It can also be strained by overreaching to one side, for example to the right; in this case, the strain sustained to the left side will result in a protective spasm of the left QL. If the left QL becomes shortened, it will appear as if an iliosacral upslip (see Chapter 12) has occurred on the left side of the innominate bone.
