12
Assessment of the Pelvis
Once you have screened the SIJ by following the five provocation tests as recommended in Chapter 11, you will at least be able to confirm or discount the presence of pain and possible dysfunction directly located within the SIJ. The next step will be to carry out an assessment of the pelvis.
The assessment procedure I will present in this chapter is very similar to the examination protocol that I personally follow with my own patients at my clinic in Oxford; however, you are not expected to initially follow every single process, especially during the first consultation. It could take a lot of time for you to gather all the information from the individual tests; moreover, once that has been done, you would need to assimilate all that necessary information in order to come up with a plan of action.
I am sure that there are numerous therapists out there who can help patients with only one session, and I believe that is the same for me. That said, I think it still takes a few physical therapy sessions to truly have a good understanding of the patient’s individual musculoskeletal biomechanical framework. That is why I might not include all the tests I demonstrate in this chapter during my initial consultation, as some of the specific testing criteria might be more relevant in the second, or even third or fourth, follow-on session.
I hope that you will use this text, and specifically this chapter, time and time again as a reference point, especially when you are faced with a patient for the first time who presents with pelvis and lumbar spine pathology. I would love to think that this book will assist you greatly in trying to understand this fascinating area as well as in correcting any presenting pelvic malalignments.
Assessment Procedure: Part 1
The following assessment tests will be covered in this section:
• Pelvic balance
• Mens active straight leg raise
• Standing forward flexion
• Backward bending
• Seated forward flexion
• Stork
• Hip extension
• Lumbar side bending
• Pelvic rotation
Table A1.3 in Appendix 1 will be useful for noting down the relevant positional landmarks for your patient in the standing position. Similarly, Table A1.4 can be used to record the clinical findings for any type of pelvic dysfunction that exists.
Pelvic Balance Test
With the patient standing, the comparative levels of the following are noted:
• Pelvic crest (posterior view)
• Posterior superior iliac spine (PSIS)
• Greater trochanter
• Lumbar spine
• Gluteal folds
• Popliteal folds
• Leg, foot, and ankle position (anterior/posterior view)
• Pelvic crest (anterior view)
• Anterior superior iliac spine (ASIS)
• Pubic tubercle
Posterior View
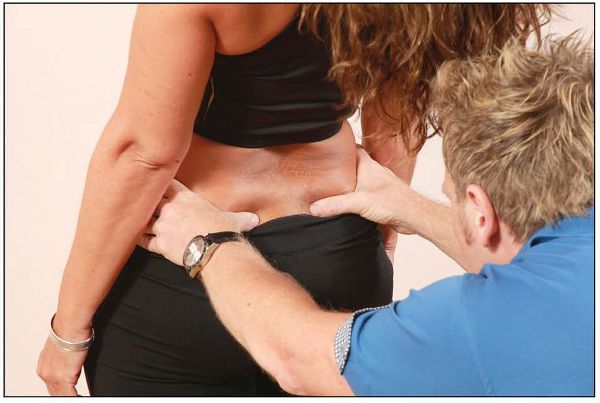
The patient is asked to stand with their weight equally distributed on both legs. The therapist sits or kneels behind the patient, and places their hands on the top of the iliac crest to ascertain the level, as shown in Figure 12.1(a–b).
It is very common to find the right innominate slightly higher if there is a presentation of a right-sided anterior rotation (the most common finding) or an iliosacral upslip. Be careful, however—the right-side innominate could actually appear lower, even though it is still in an anterior rotation: this could be because of an anatomically longer left leg (true LLD). In the sitting and the lying prone positions, on the other hand, the iliac crest might actually be higher on the right side that is fixed in an anteriorly rotated position, because the effect of the LLD has now been removed from the equation.
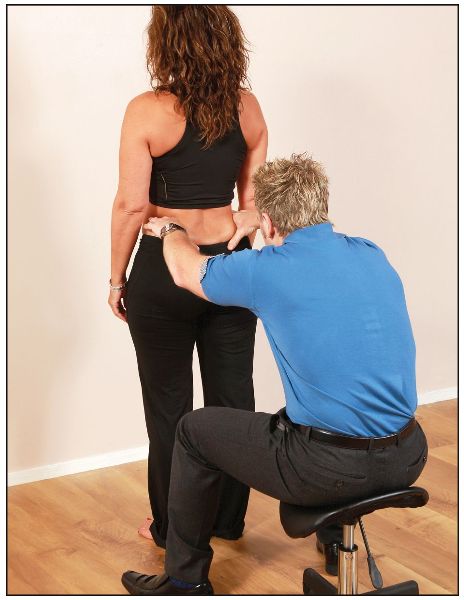
Figure 12.1. Pelvic balance test: (a) Posterior view of the pelvic crest—hand position for ascertaining the level.
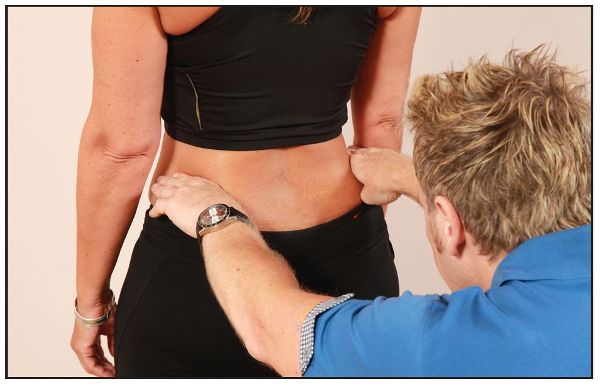
Figure 12.1. (b) Close-up view of the hand position.
The therapist then places the pads of their thumbs under the PSIS and compares the levels, as shown in Figure 12.1(c).
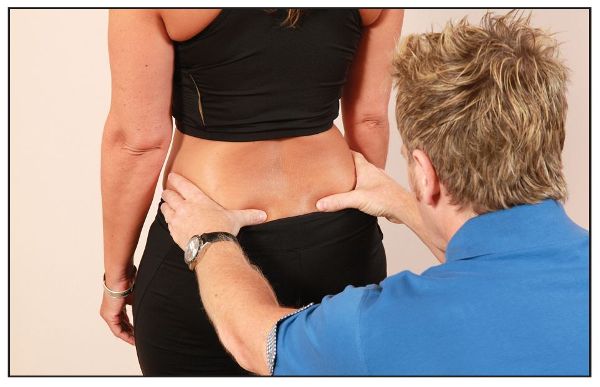
Figure 12.1. (c) Hand position for comparing the height of the PSIS on the left and right sides.
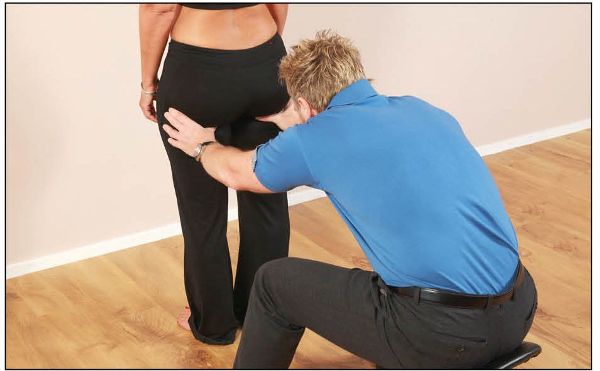
Next, the therapist places their hands (fingertips) on top of the greater trochanters, again to determine the height, as shown in Figure 12.1(d). The therapist then palpates the gluteal folds and the ischial tuberosities, as shown in Figure 12.1(e).
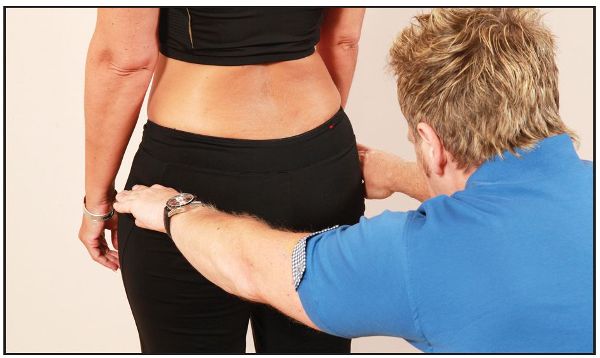
Figure 12.1. (d) Hand position for ascertaining the height of the greater trochanter.
Figure 12.1. (e) Hand position for ascertaining the level of the gluteal fold and the position of the ischial tuberosity.
The therapist observes the position of the lumbar spine, gluteal folds, and popliteal (knee) folds for asymmetry, then observes the relative position of the leg, foot, and ankle, as shown in Figure 12.1(f), looking in particular for an external rotation of the lower leg and for over-pronation (pes planus), supination (pes cavus), or a neutral position (pes rectus). (Think back to Chapter 5 on LLD.)
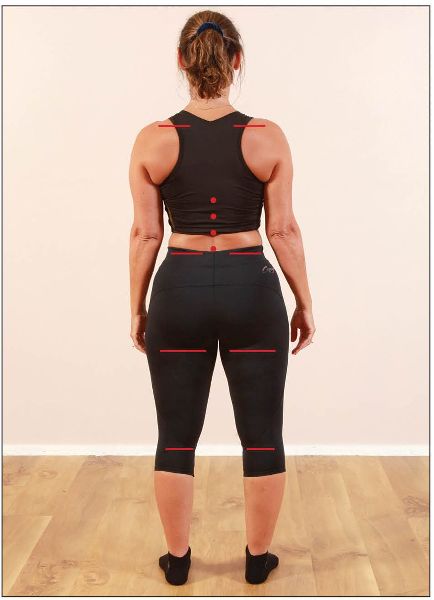
Figure 12.1. (f) Observation of the lumbar spine, gluteal fold, and popliteal fold, as well as the relative position of the leg, foot, and ankle.
Anterior View
The patient is asked to stand with their weight equally distributed on both legs. The therapist sits or kneels in front of the patient, and places their hands on the top of the iliac crest to ascertain the level, as shown in Figure 12.1(g).
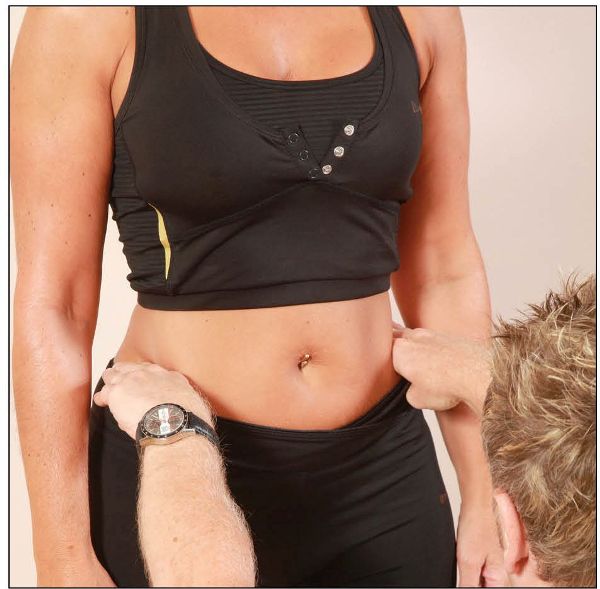
Figure 12.1. (g) Anterior view of the pelvic crest—hand position for ascertaining the level.
The therapist then places the pads of their thumbs under the ASIS and compares the levels, as shown in Figure 12.1(h).
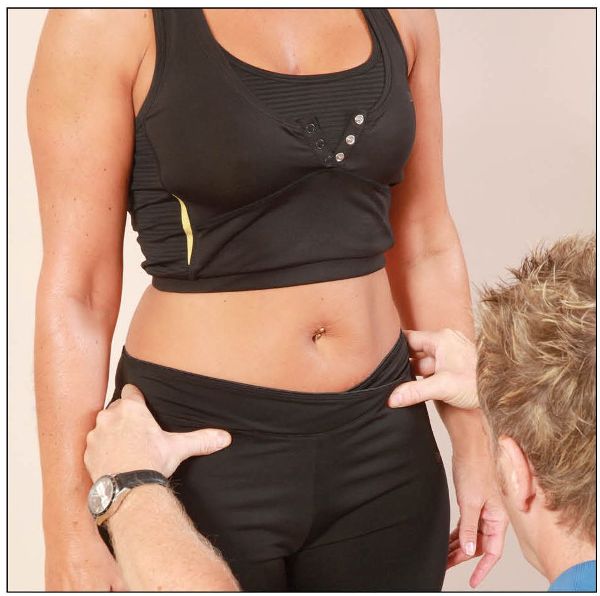
Figure 12.1. (h) Hand position for comparing the height of the ASIS on the left and right sides.
The therapist can also palpate the height/level of the pubic tubercles to ascertain their position, as shown in Figure 12.1(i).
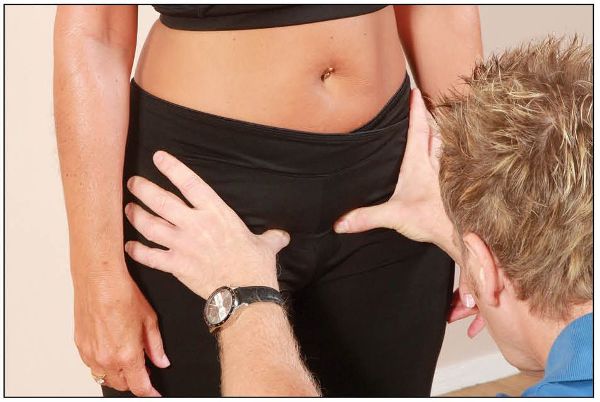
Figure 12.1. (i) Hand position for ascertaining the height of the pubic tubercle.
Note: The most common finding in terms of initial observation is the right leg in a slight position of external rotation and the right foot in a relative position of pronation, compared with the left side (relative supination). If these observations are made, it is possible that a rotational malalignment dysfunction of a right anterior innominate rotation, with a compensatory left posterior innominate rotation is present. If you obtain similar findings on the opposite (left) side, a left anterior innominate rotation with a right posterior innominate rotation dysfunction possibly exists (less common).
If either the iliac crest or the greater trochanter is lower on one side, this means an anatomically shorter leg; if the greater trochanters are level but the iliac crest is asymmetric, this can equate to a pelvic dysfunction.

Figure 12.2. Mens ASLR: the patient alternately lifts each leg and indicates which feels heavier.
Mens Active Straight Leg Raise Test
Mens et al. (1999, 2001, 2002) have developed a diagnostic test for SIJ dysfunction. They studied the relationship between the active straight leg raise (ASLR) test and mobility of the pelvic joints with and without the application of a pelvic belt. The sensitivity and specificity of the test proved to be high for patients with pelvic girdle pain (PGP). They also found that the test was suitable for discriminating between patients with PGP and healthy individuals.
Test Procedure
The patient is asked to adopt a supine position; when they are relaxed, they are asked to lift one of their legs an inch (2.5cm) or so off the couch. This is repeated on the contralateral side (opposite side) and then back on the ipsilateral side (same side) approximately three or four times, as shown in Figure 12.2. The patient is then requested to say whether or not the movement of the individual leg lift increases their SIJ symptoms. The patient is also asked which leg feels heavier or simply harder to lift off the couch.
The starting movement of the leg lift is performed by the contraction of the iliacus and rectus femoris muscles, which initially induces an anterior rotation of the innominate; this movement reduces the tension in the corresponding sacrotuberous ligament and hence decreases form closure. The anterior rotation could also indicate decreased activation of the dynamic stabilizers (force closure).
Mens et al. (1997) described how a decreased ability to actively perform a straight leg raise while lying supine seemed to correlate with an abnormally increased mobility of the pelvic girdle.
To continue with the assessment process, I will add six components to assist in the form and force closure. However, before I demonstrate these, I need to go through an example to help you understand the following process. Imagine that when you initially observed the patient lifting their leg, the left leg was deemed to be the heavier leg; that simply means the contralateral side will now be the right leg (lighter leg) and the ipsilateral side will obviously be the left leg (heavier leg) in this particular case.
Snijders et al. (1993a) made the following observation. Provided the local and global systems (inner and outer cores) are functioning normally, the overall effect of carrying out a right-sided ASLR is a stabilization of both the lumbosacral junction and the right SIJ, which in turn allows a more effective load transfer from the spine to the leg on that side.
The six additional components are:
1. Contralateral (opposite side) con-traction of the right latissimus dorsi of the posterior oblique sling increases force closure, as shown in Figure 12.3. With simultaneous contraction of the right latissimus muscle, the left leg should now feel lighter when lifted.
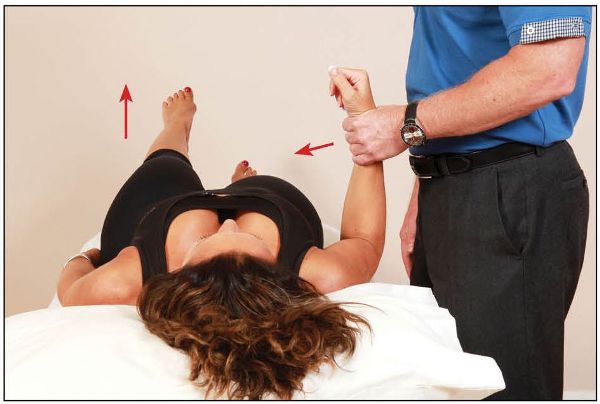
Figure 12.3. Posterior oblique sling activation while lifting the left leg.
2. Contralateral (opposite side) con-traction of the right anterior oblique sling increases force closure, as shown in Figure 12.4. With simultaneous contraction of the right oblique muscles, the left leg should now feel lighter when lifted.
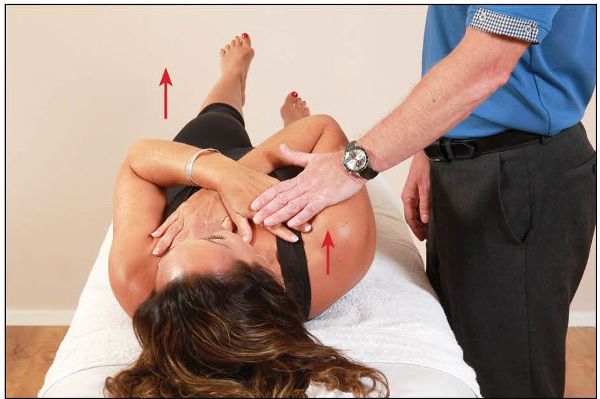
Figure 12.4. Anterior oblique sling activation while lifting the left leg.
3. Activation of the inner core muscles, TVA, increases force closure, as shown in Figure 12.5. With simultaneous contraction of the TVA, the left leg should now feel lighter when lifted.
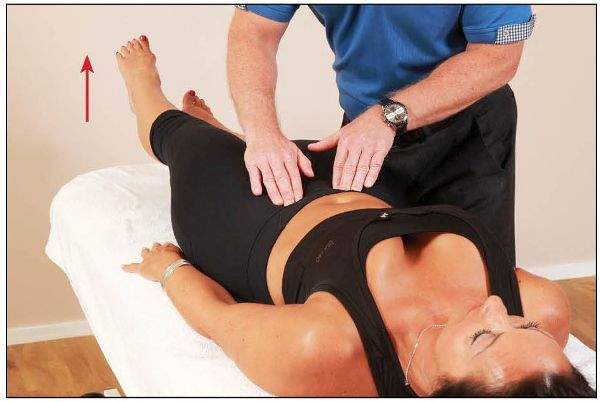
Figure 12.5. Inner core activation while lifting the left leg.
4. Contralateral (opposite side) posterior rotation of the right innominate bone (opposite side) decreases force closure, as shown in Figure 12.6. The left leg should now feel heavier to lift.
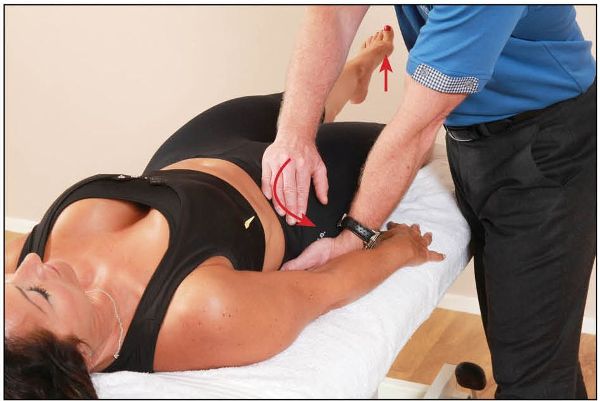
Figure 12.6. Posterior innominate rotation (opposite side) while lifting the left leg.
5. Ipsilateral (same side) posterior rotation of the left innominate bone (same side) increases force closure, as shown in Figure 12.7. The left leg should now feel lighter when lifted.
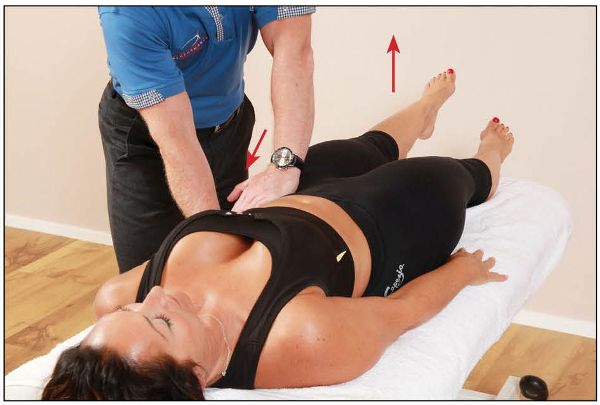
Figure 12.7. Posterior innominate rotation (same side) while lifting the left leg.
6. Bilateral compression of the innominate bones will increase form closure, as shown in Figure 12.8. The left leg should now feel lighter when lifted.
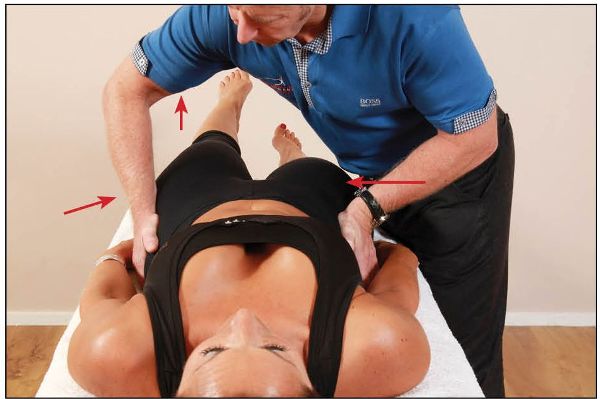
Figure 12.8. Bilateral compression of the innominate while lifting the left leg.
Without appropriate bracing of the deep abdominal muscles, the hip flexor muscles (such as the iliacus) can pull the ilium anteriorly, creating a counter-nutated position of the SIJ. Counter-nutation is typical for unloaded situations such as when lying supine, as demonstrated by Mens et al. (1999).
Shadmehr (2012) suggested there is reduced tonicity in the erector spinae, Gmax, biceps femoris, and external oblique muscles during ASLR testing of patients with SIJ pain.
Standing Forward Flexion Test (Iliosacral Dysfunction)
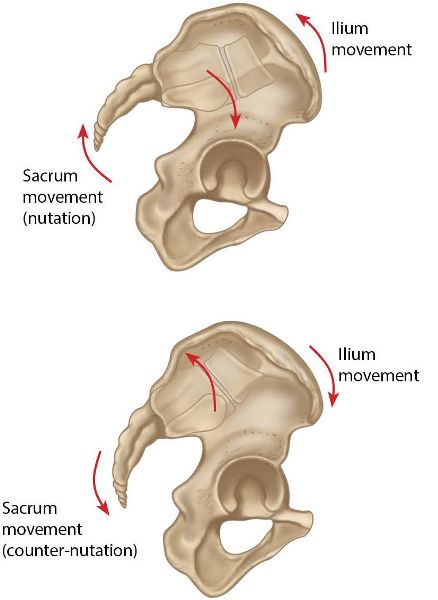
During forward bending of the trunk, the left and right innominate bones and the pelvic girdle rotate as a whole in an anterior direction on the femur, as I explained in Chapter 2. Initially, the innominate bones rotate anteriorly to roughly 60 degrees as the sacrum goes through nutation. This ROM is normal and occurs because the posterior structures (posterior oblique muscles, sacrotuberous ligament, thoracolumbar fascia, and hamstrings) become taut and will naturally limit sacral nutation. The sacrum is now held in what is known as relative counter-nutation, which causes an unstable position of the SIJ. The common reason for excessive counter-nutation, and the subsequent instability of the SIJ, is generally shortened and tight hamstrings.
Test Procedure
The patient is asked to stand with equal weight on both legs. The therapist places their hands onto the patient’s innominate bones, with the pads of the thumbs lightly placed just inferior to the level of the PSIS, as shown in Figure 12.9.
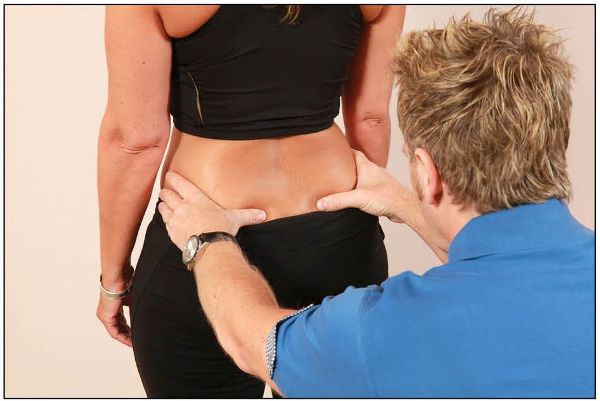
Figure 12.9. Standing forward flexion test: the therapist places their thumbs inferior to the PSIS.
The patient is then asked to fully flex the trunk slowly toward the floor, as far as they can without bending the knees, while the therapist’s contact to the PSIS is maintained. The therapist observes the motion of the innominate bones, but pays extra attention to the motion of each PSIS, as shown in Figure 12.10.
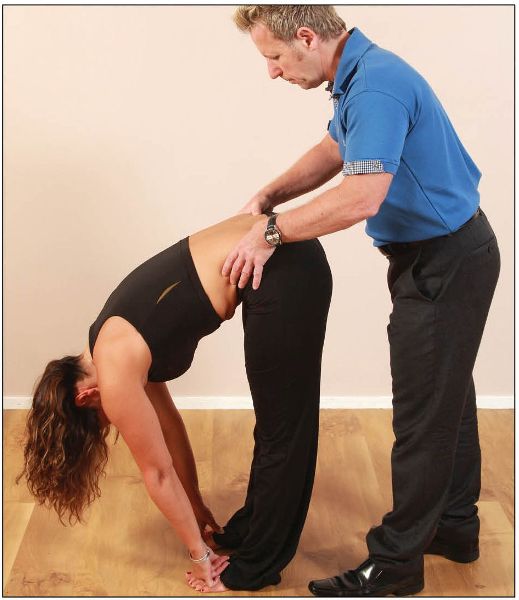
Figure 12.10. The therapist observes their thumbs as the patient forward bends.
Flexion of the spine carries the base of the sacrum anteriorly, and motion is then introduced to the SIJs. There is a natural pause before the sacrum takes the innominate into anterior rotation; this is why you should feel the left and right PSISs rise equally in a cephalic (superior) direction, as shown in Figure 12.11.
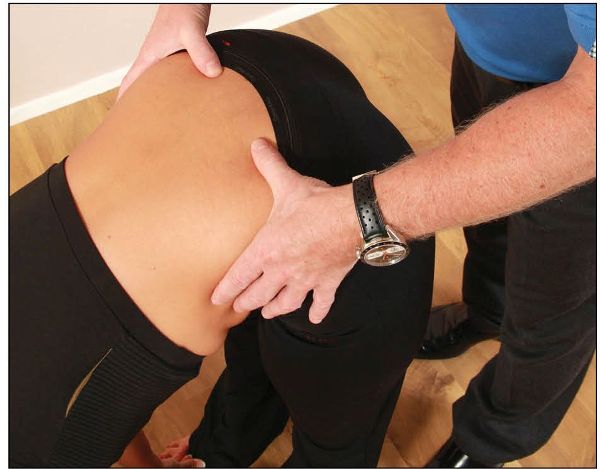
Figure 12.11. Close-up view of the therapist’s thumbs as the patient adopts a forward-bent position.
If one thumb is seen to move more superiorly (cephalically) during flexion, this could be an indication that the innominate bone is fixed to the sacrum on that side, as shown in Figure 12.12; this is known as an iliosacral dysfunction. Another way that this has been described is that the iliosacral joint has locked too early on that side, causing the PSIS to rise sooner than normal, compared with the other side.
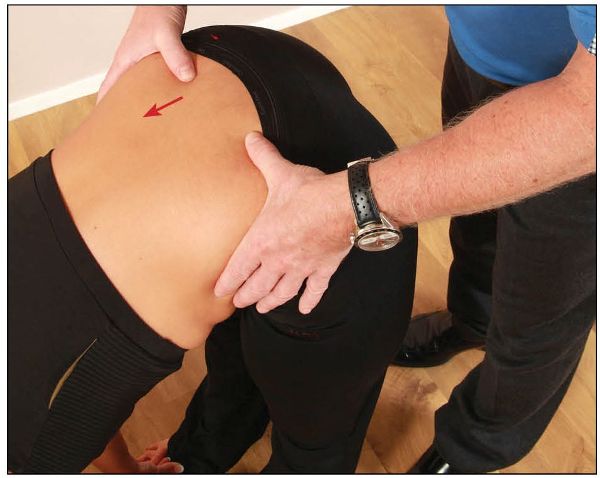
Figure 12.12. The right thumb is seen to be in a higher (cephalic) position, compared with the opposite side, indicating an iliosacral dysfunction on the right side.
False-Positive Result
A false-positive result might be noted if the contralateral (opposite side) hamstring is held in a shortened and subsequently tight position, thus limiting the motion of the opposite innominate bone. For example, the right-side PSIS traveling further than that on the left during the standing forward flexion test could be caused by the left hamstrings being held in a shortened and tight position; in other words, the left innominate bone is being held back (fixed) by the short hamstring muscles.
Moreover, if the ipsilateral (same side) QL muscle is held in a shortened and tight position, this too will also give a false-positive result, but on the same side. For example, if the right-side PSIS was seen to travel further, the QL on the right side might be held in a shortened position; as a result, this muscle will be pulling the innominate bone forward sooner rather than later, as shown in Figure 12.13.
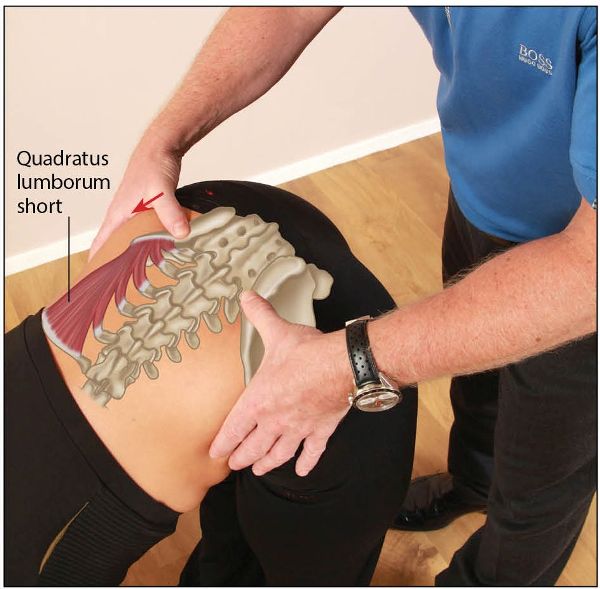
Figure 12.13. The position of the right thumb is higher than that on the opposite side, possibly indicating a tightness of the right QL muscle.
Note: The standing forward flexion test does not tell you the actual nature of the dysfunction, i.e. whether it is a rotation, flare, or slip; it only guides the examiner as to the side on which the innominate bone is fixed in relation to the sacrum. We will decide later on in this chapter, through further testing and palpation, what type of iliosacral dysfunction exists. Chapter 13 will then show you how to correct all these iliosacral dysfunctions that are commonly found in patients. For now, I would simply get used to practicing the standing forward flexion test, as I consider this to be one of the main tests to use in your own clinic setting.
Backward Bending Test
The patient is asked to stand with equal weight on both legs. The therapist places their hands on the patient’s innominate bones, with the pads of the left and right thumbs lightly placed just inferior to the level of the PSIS. The patient is then asked to fully extend their trunk backward, while the therapist’s contact to the PSIS is maintained. The therapist observes the motion of the innominate bones, but pays extra attention to the motion of each PSIS. Normally, the PSIS is seen to move very slightly caudally (inferiorly), as shown in Figure 12.14(a–b).

Figure 12.14. Backward bending test: (a) The therapist places their thumbs inferior to the PSIS and asks the patient to backward bend.
During backward bending, the innominate bones and sacrum remain in the same position, and so there should be no relative change felt in the position of the thumbs; however, the sacrum should be seen and felt to nutate slightly in order to maintain stability of the SIJ during the backward bending motion.
Seated Forward Flexion Test (Sacroiliac Dysfunction)
Before one performs the seated forward flexion test, it is very important to ascertain the position of the iliac crest, as shown in Figure 12.15(a). Schamberger (2013) mentions that sitting is likely to present problems, as the ischial tuberosities are at different levels, raised on the side of the anterior rotation and/or an upslip, and lower on the side of the posterior rotation and/or a downslip. It has been suggested that, with a right anterior rotation or an upslip, the right ischial tuberosity can easily end up 0.4” (1cm) off the seating surface, the weight now being borne primarily by the left tuberosity.
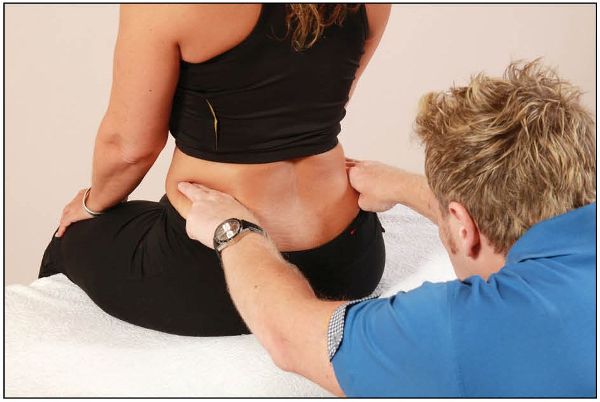
Figure 12.15. Seated forward flexion test: (a) The therapist places their fingers on top of the iliac crest to ascertain the position.
Position 1
The patient is asked to sit on the edge of a couch, with their feet flat on the floor, or in a comfortable position on the couch. The therapist places their hands on the patient’s innominate bones, with the pads of the thumbs lightly placed just below the level of the left and right PSIS, as shown in Figure 12.15(b).
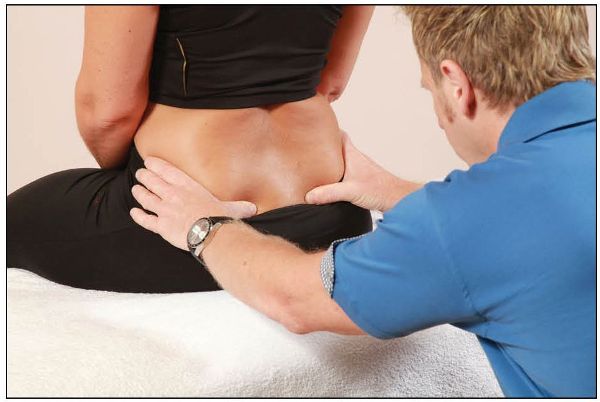
Figure 12.15. (b) The therapist places their thumbs inferior to the left and right PSIS.
The patient is then asked to slowly fully flex their trunk, by rolling their chin to their chest, and continue as far as they can, with their hands on their knees for support, as shown in Figure 12.15(c).
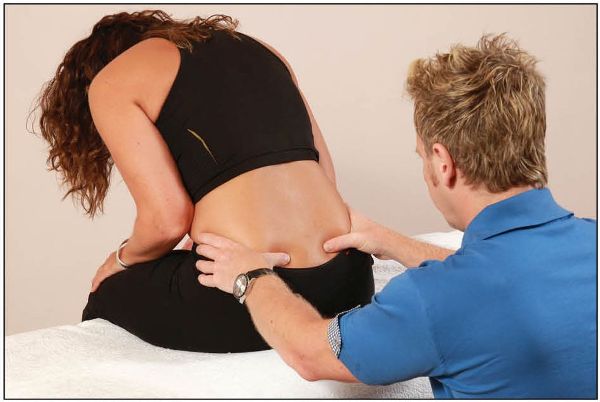
Figure 12.15. (c) The therapist observes their thumbs as the patient forward bends in the seated position.
The therapist observes the motion of the innominate bones, as well as focusing on the specific motion of the PSIS. If one of the thumbs, which is located inferior to the PSIS, is seen to move more superiorly (cephalically) during flexion, this could mean that the sacrum is fixed to the innominate bone on that side, as shown in Figure 12.15(d); this is known as a unilateral sacroiliac dysfunction.
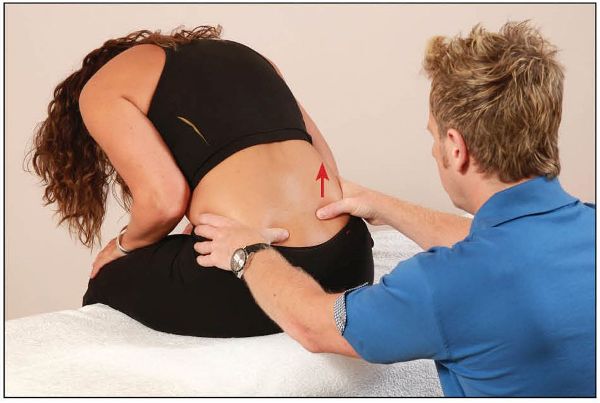
Figure 12.15. (d) The therapist observes that their right thumb travels more cephalically than their left thumb, indicating an SIJ dysfunction on the right side.
Position 2
With the patient in the neutral position, the therapist moves the pads of their thumbs from the original position (inferior to the PSIS) to the posterior aspect of the sacral apex, and in particular to the ILA, in order to ascertain the level/position, as shown in Figure 12.16(a).
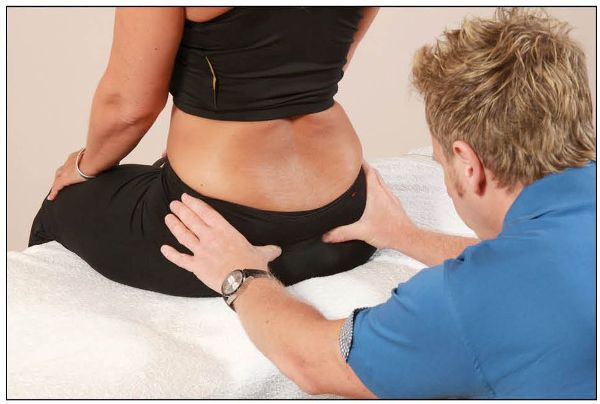
Figure 12.16. (a) The therapist places their thumbs on the sacral apex and observes the relative position of the ILA.
Note if one side of the ILA is asymmetric compared with the opposite ILA; this information will be used as part of the process of assessing for sacroiliac dysfunction. The patient is then asked to forward bend and the motion/position of the ILA is observed, as shown in Figure 12.16(b).
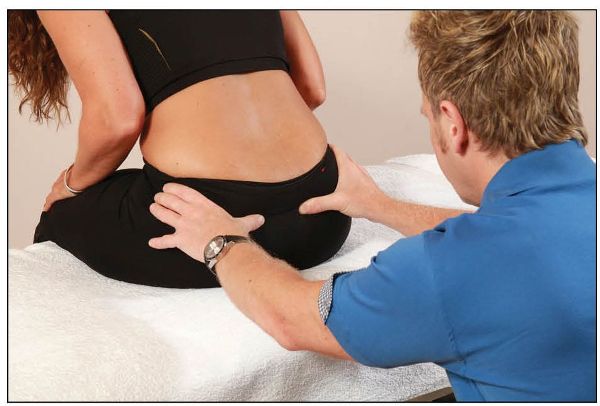
Figure 12.16. (b) The therapist observes the relative position of the ILA as the patient forward bends.
Note: The seated forward flexion test does not tell you what type of SIJ dysfunction is present: it only guides you as to which side the sacrum is fixed (in relation to the innominate bone). The test removes the influence of the legs and pelvis on the sacrum (because of the sitting position), and allows you to decide if an actual SIJ fixation is present. (Please be aware that the QL muscle, if held in a shortened position, is still capable of giving a false-positive result for the same side.)
Iliosacral or Sacroiliac
Suppose your right thumb, which is located inferior to the PSIS, travels further (cephalically) than the left thumb in both the standing forward flexion test and the seated forward flexion test; in other words, the left thumb remains lower than the right thumb. This means you have found both an iliosacral and a sacroiliac dysfunction on the right side at the same time. If the right thumb is seen to move only during the standing forward flexion test, however, this indicates the presence of an iliosacral dysfunction on the right side. On the other hand, if the right thumb is seen to move only during the seated forward flexion test, then a sacroiliac dysfunction on the right side is present.
Stork Test (One-Legged)
The stork test (also known as the Gillet test) consists of two elements: the upper pole and the lower pole.
Test 1: Upper Pole
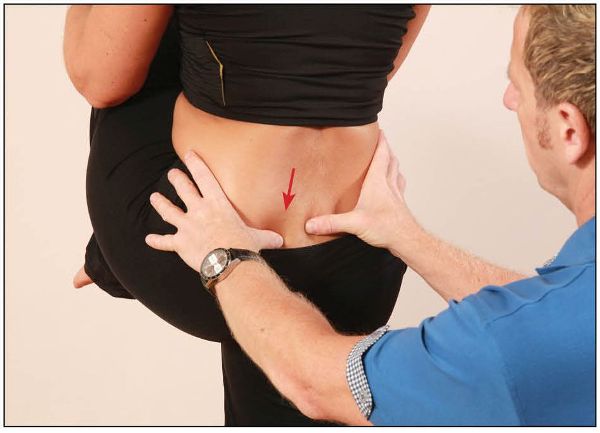
With the patient standing, the therapist sits or kneels behind the patient. The therapist places their left hand on top of the patient’s left innominate bone, and the pad of their left thumb under the inferior part of the PSIS. The therapist’s right hand is positioned on the right innominate bone, while the pad of the right thumb is in contact with the level of S2 (this is in line with the corresponding PSIS), as shown in Figure 12.17.
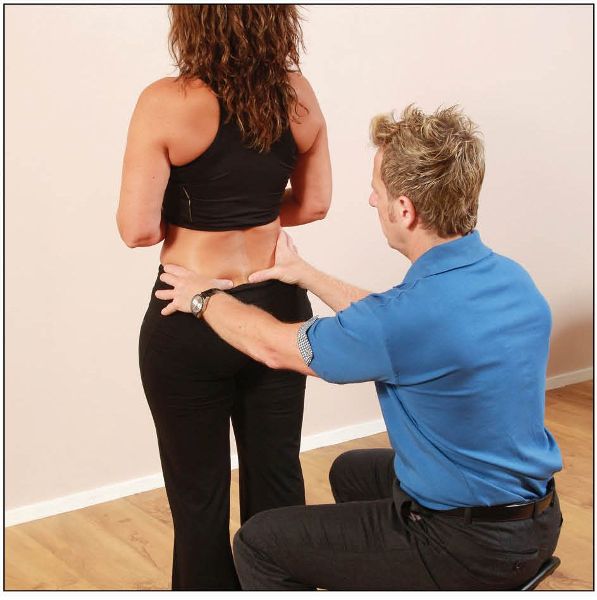
Figure 12.17. Stork test—upper pole: the therapist places their left thumb inferior to the PSIS, and their right thumb on S2.
The patient is asked to lift their left hip into full flexion, to at least above the level of the hip joint. The therapist’s left hand remains in contact with the left innominate and monitors the movement: the left thumb on the PSIS should be seen to rotate posteriorly, medially, and inferiorly (caudally), with respect to the right thumb, which still maintains contact with S2, as shown in Figure 12.18(a–b).
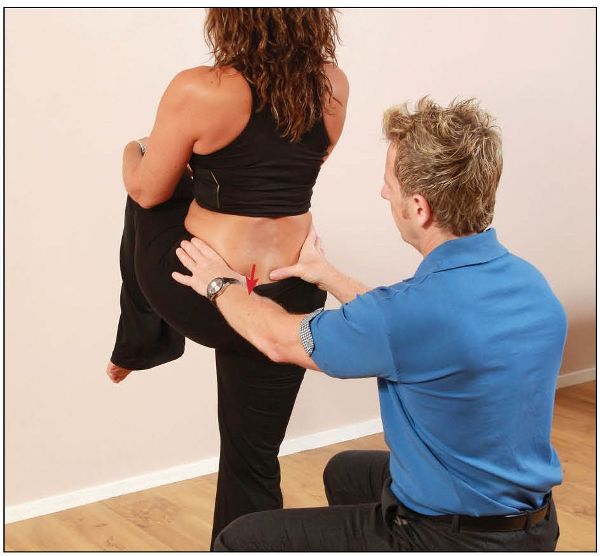
Figure 12.18. (a) The therapist observes for normal inferior motion of the innominate bone while the patient flexes their hip.
Note: I consider that the specific movement of the stork test indicates the ability of the innominate bone to posteriorly rotate on the sacrum, even though research does not actually confirm this hypothesis. Most therapists I have talked to in the past say that when they perform the stork test, they simply look for the movement described earlier (inferior motion of the thumb), and if the movement is restricted in any way, then an iliosacral dysfunction is present. Again, this test does not tell you the type of the iliosacral dysfunction; it only signals that one is present and that it is located on the side that tests positive in the stork test.
If the standing forward flexion test and also the stork test are positive on the same side, you know that there is an iliosacral dysfunction present; the following tests in this chapter will help you determine the type of this dysfunction. The contralateral (opposite) side is then tested for comparison.
A test is positive when the thumb located on the PSIS is not seen to move medially and inferiorly, or is seen to move in a cephalic direction, as shown in Figure 12.19(a–b).
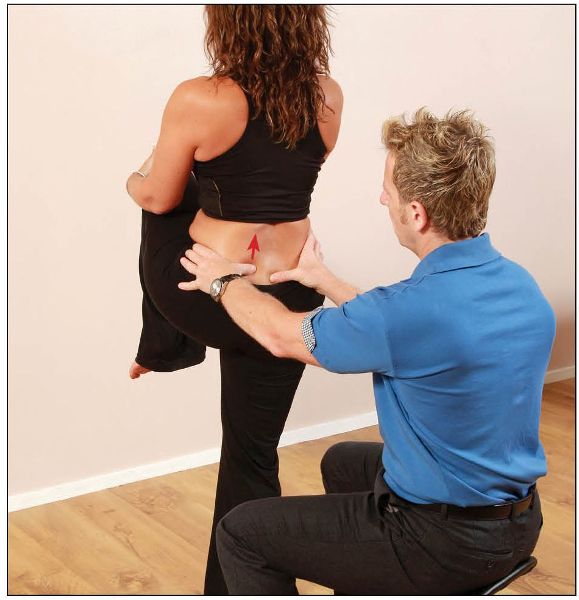
Figure 12.19. (a) The altered motion of the innominate bone shows a dysfunction is present.
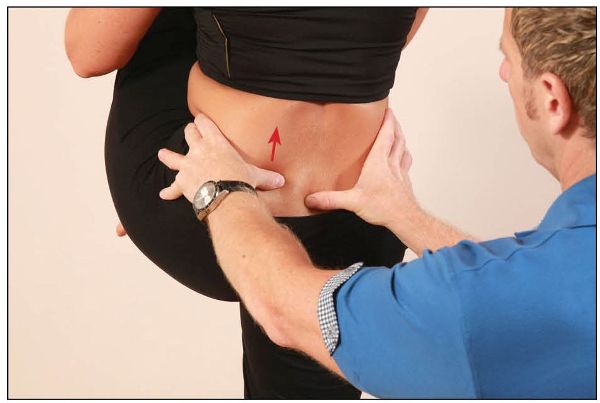
Figure 12.19. (b) Close-up view of the altered motion of the left innominate bone.
Test 2: Lower Pole
With the patient standing, the therapist sits or kneels behind the patient. The therapist places their left hand on top of the patient’s left innominate bone, while placing the pad of their left thumb under the inferior part of the posterior inferior iliac spine (PIIS). The therapist’s right hand is positioned on the right innominate bone, while the pad of the right thumb is in contact with the level of the S4 (near to the sacral hiatus), as shown in Figure 12.20.
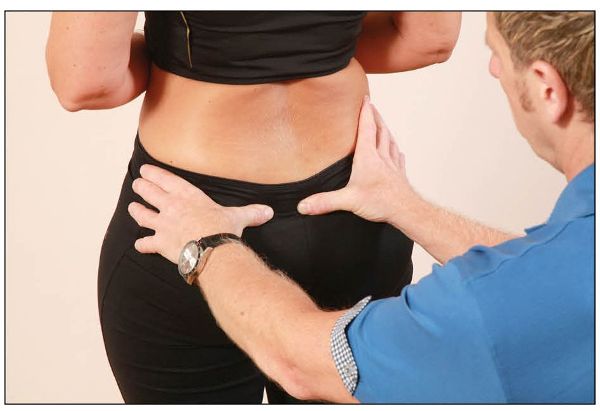
Figure 12.20. Stork test—lower pole: the therapist places their left thumb inferior to the PIIS, and their right thumb on S4.
The patient is asked to lift the left hip into full flexion, to at least above the level of the hip joint. The therapist’s left hand remains in contact with the left innominate and monitors the movement: the left thumb on the PIIS should be seen to rotate anteriorly and laterally, with respect to the right thumb, which is palpating the level of the S4, as shown in Figure 12.21.
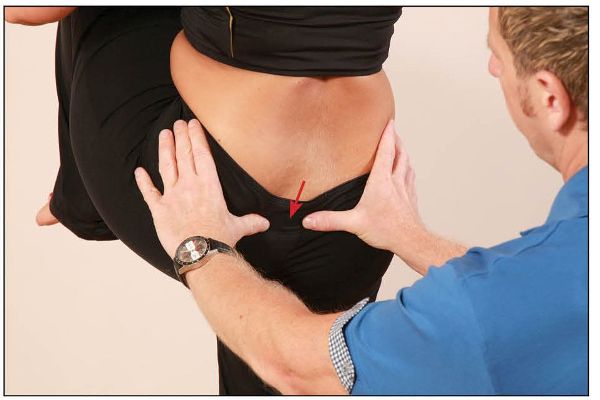
Figure 12.21. The therapist observes for normal anterior and lateral motion of the innominate bone while the patient flexes their hip.
A test is positive when the thumb located on the PIIS is not seen to move, or is seen to move in a cephalic direction, as shown in Figure 12.22.
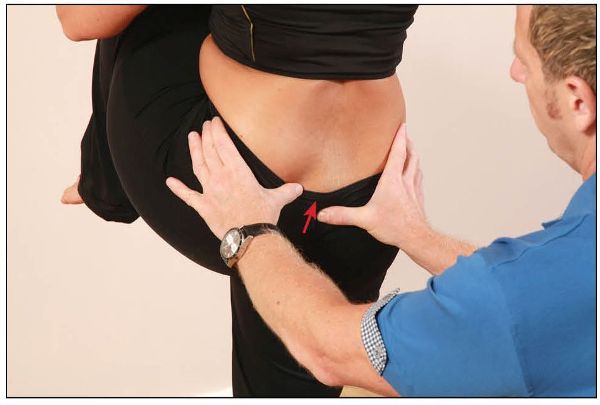
Figure 12.22. The altered motion of the innominate bone shows a dysfunction is present.
Note: These specific tests for the upper and lower poles are sensitive to the motion of the SIJ as well as to the motion of the iliosacral joint (as mentioned earlier). Other authors consider that if the upper pole tests positive, a posterior (backward) torsion of the SIJ dysfunction is present, and if the lower pole tests positive, an anterior (forward) torsion of the sacroiliac dysfunction exists. However, it is very difficult to prove with these tests that an SIJ dysfunction is actually present, as the research regarding their validity is currently limited. Even so, I think that these tests will give the therapist some important palpatory feedback that might be useful in making an overall diagnosis and developing a subsequent treatment plan.
Hip Extension Test
With the patient standing, the therapist sits or kneels behind the patient. The therapist places their right hand on top of the patient’s right innominate, while placing the pad of their right thumb under the inferior part of the right PSIS. The therapist’s left hand is positioned on the left innominate, while the pad of the left thumb is in contact with the level of S2 (this is in line with the corresponding PSIS), as shown earlier in Figure 12.17.
The patient is asked to lift their right hip into full extension, as far as comfortable. The therapist’s hand remains in contact with the right innominate bone and monitors the movement: the right thumb on the PSIS should be seen to rotate superiorly and laterally (cephalically), with respect to the left thumb, which is palpating the level of S2, as shown in Figure 12.23. This indicates the ability of the innominate bone to anteriorly rotate with respect to the sacrum. The contralateral (opposite) side is then tested for comparison.
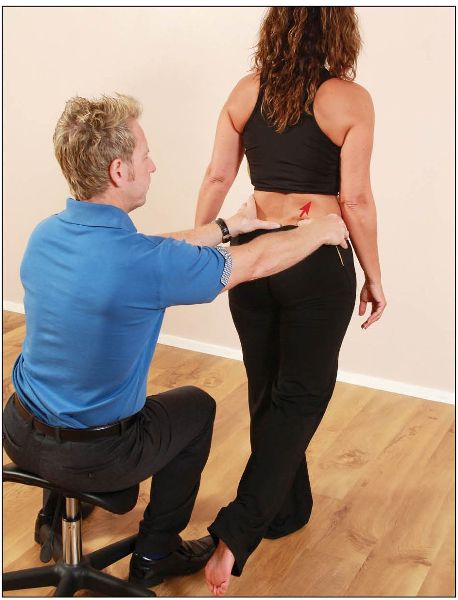
Figure 12.23. Hip extension test: with their right thumb inferior to the PSIS, the therapist observes for normal superior and lateral motion of the innominate bone while the patient extends their hip.
A test is positive when the thumb located on the PSIS is not seen to move superiorly and laterally, or is seen to move in a caudal direction, as shown in Figure 12.24.

Figure 12.24. The altered motion of the innominate bone shows a dysfunction is present.
Lumbar Side Bending Test
The patient is asked to stand with their feet shoulder-width apart. The therapist sits or kneels behind the patient, and places their hands on top of the patient’s iliac crests, with the pads of the thumbs on the posterior part of the PSIS.
The patient is asked to side bend to the left (without forward flexing their spine) as far as comfortable. The therapist observes the lumbar spine and looks for a smooth “C” curve with a fullness of the erector spinae on the side of the convexity (right side in this case); this fullness is seen on the side opposite to the induced side bending, because of Type I, or neutral, spinal mechanics, as shown in Figure 12.25(a).
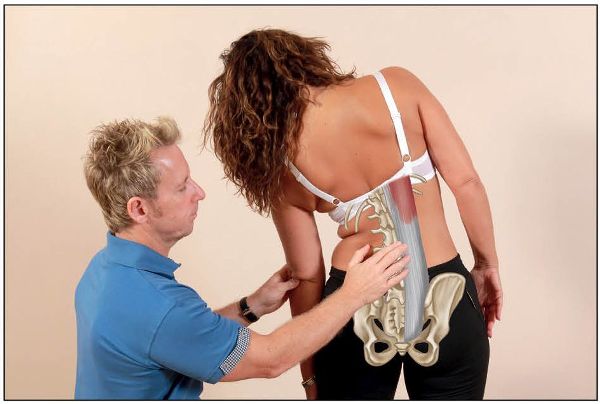
Figure 12.25. Lumbar side bending test: (a) A normal motion is seen by a fullness of the erector spinae on the right side as the patient side bends to the left.
A positive finding during the observation is either fullness on the side of the concavity (same side as the side bending), as shown in Figure 12.25(b), or a possible straightening of the lumbar curve. These positive findings tend to indicate a non-neutral spinal mechanics type of dysfunction (Type II).
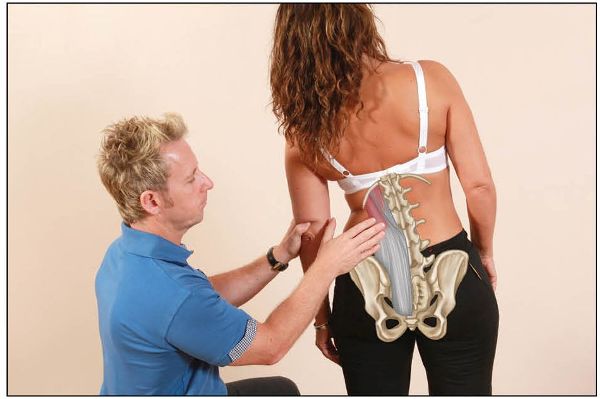
Figure 12.25. (b) An altered motion is seen by a fullness of the erector spinae on the left side (same side) as the patient side bends to the left.
Note: When looking at the lumbar curvature, the therapist should also be aware of the palpatory findings for the PSIS. The normal motion of trunk side bending to the right will induce a lumbar rotation to the left, and this in turn will induce (through the normal Type I neutral spinal mechanics) a rotation of the sacrum to the opposite (right) side.
In simple terms, if the patient has normal lumbosacral motion, when they side bend their lumbar spine to the right side, a coupled rotation to the left side (Type I mechanics/neutral) is induced. As a result of the lumbar spine side bending right and rotating left, the sacrum should also be felt to go through the opposite motion, i.e. a side bending to the left, which will induce a rotation this time to the right. This movement of the sacrum can be palpated through the light contact of your right thumb, which is positioned on the right-side PSIS. This is all because of the fact that the lumbar spine will have rotated to the left (opposite side to the bending, because of Type I mechanics).
Pelvic Rotation Test
When you assess the patient in the standing-erect position, it is very common to consider the pelvis to be in an asymmetrical position. If the patient presents with a typical rotational malalignment syndrome, you may notice the pelvis to have rotated in an anticlockwise (left) direction, especially if they present with the most common finding of a right anteriorly rotated innominate and a left posteriorly rotated innominate, as shown in Figure 12.26(a); it is usual for this increased rotation to be anywhere between 5 and 10 degrees. If you now ask your patient to rotate their trunk to the right, as shown in Figure 12.26(b), you will notice further right rotation (approximately 45 degrees), compared with a left rotation of around 35 degrees when the trunk is rotated to the left, as shown in Figure 12.26(c).
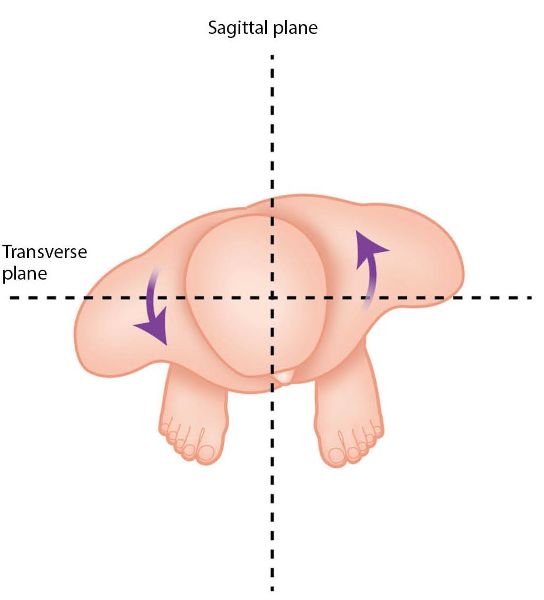
Figure 12.26. Pelvic rotation test: (a) The most common malalignment type of syndrome—right anterior innominate rotation with a compensatory left posterior innominate rotation.
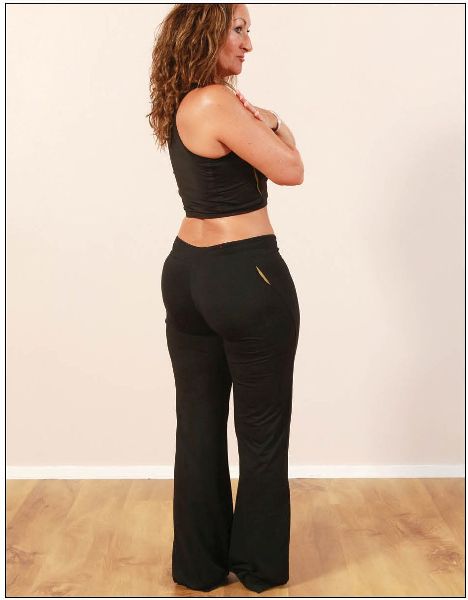
Figure 12.26. (b) The patient is asked to rotate to the right side (clockwise) and approximately 45 degrees is seen.
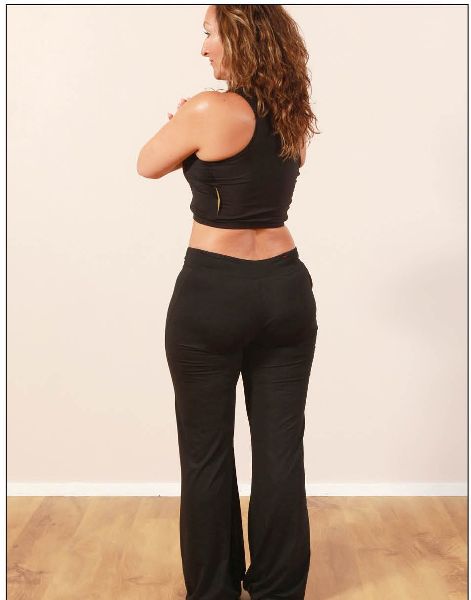
Figure 12.26. (c) The patient is asked to rotate to the left side (anticlockwise) and approximately 35 degrees is seen.
In the above example, the reason why rotation of the trunk to the right side (clockwise) is greater than to the left (even though the pelvis has rotated slightly to the left side because of the presenting dysfunction) is that the left innominate bone already starts out in a posteriorly rotated position (because of the dysfunctional pattern). This basically means that the left-side innominate is capable of rotating further in an anterior direction, to its available end ROM, than it would if it actually started out in a normal position. The same is true for the right-side innominate, which has already anteriorly rotated; the right side is now capable of traveling through a greater ROM in a posterior direction, giving the appearance of further rotation to the right side (clockwise).
Schamberger (2013) also says that on account of the wedging of the sacrum, the left innominate already flares slightly inward, and the right slightly outward. Overall, this translates into more degrees of clockwise rotation.
Note: If the pelvis position appeared to be neutral, with no obvious asymmetry/rotation present (contrary to the example above), one would expect pelvic rotation of the trunk to the left side (anticlockwise) to equal the available rotation of the trunk to the right side (clockwise).
Assessment Procedure: Part 2
Palpatory Assessment—Patient Prone
In this part of the assessment criteria we will be looking for asymmetry of the anatomical landmarks, as outlined below. The patient is asked to adopt a prone position on the couch. The therapist stands next to the patient and observes for the levels of the following areas using their dominant eye:
• Gluteal fold
• Ischial tuberosity
• Sacrotuberous ligament
• Inferior lateral angle (ILA) of the sacrum
• Posterior superior iliac spine (PSIS)
• Sacral sulcus
• Lumbar spine (L5)
• Iliac crest
• Greater trochanter
Table A1.5 in Appendix 1 can be of value to the therapist for noting down any asymmetries found during the prone palpatory assessment.
Gluteal Fold and Ischial Tuberosity
First observe the level of the gluteal fold and then lightly palpate this area to ascertain the position. From the gluteal fold, move your thumbs in a cephalic direction until contact with the ischial tuberosity is made. Place your thumbs in a horizontal plane against the inferior aspect of the ischial tuberosity, and note the level, as shown in Figure 12.27.
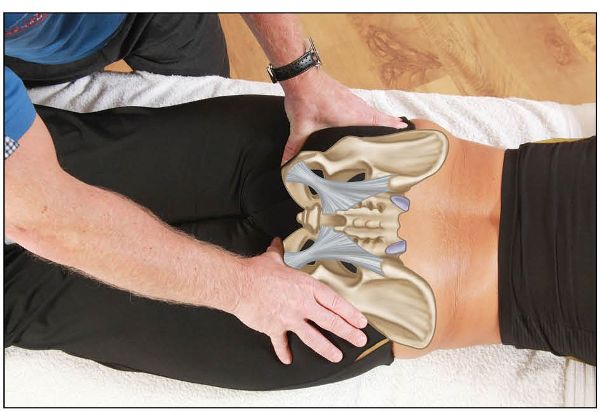
Figure 12.27. Palpation of the gluteal fold and ischial tuberosity for symmetry.
Sacrotuberous Ligament
After the ischial tuberosity has been palpated, the thumbs are now directed medially and cephalically until the sacrotuberous ligament is found, as shown in Figure 12.28. Gently palpate the ligament, feeling for increased tension or laxity as well as increased tenderness, as these can be associated with sacroiliac or iliosacral dysfunction.
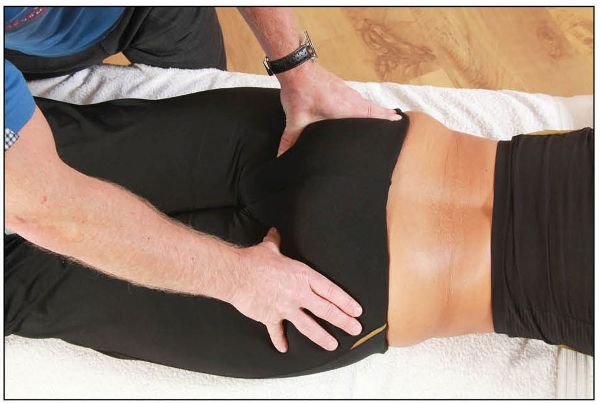
Figure 12.28. Palpation of the sacrotuberous ligament.
ILA of the Sacrum
Next, if you lightly palpate the ischial tuberosity and follow it toward the proximal component of the sacrotuberous ligament, it will naturally take you to the ILA. Another way of finding it is to locate the sacral hiatus and palpate approximately 0.8” (2cm) lateral to this area—this will be the ILA landmark. Place the pads of your thumbs over the posterior area of the ILA to check for asymmetry, as shown in Figure 12.29.
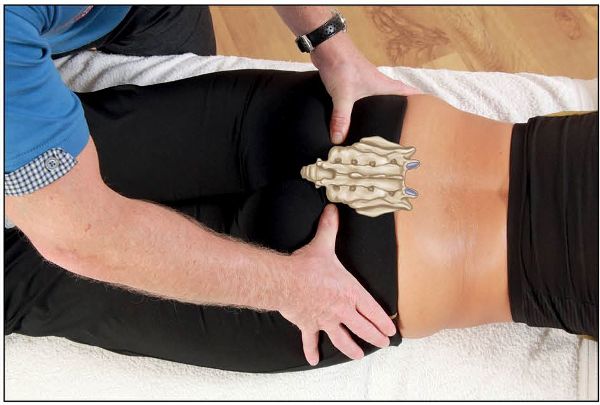
Figure 12.29. Palpation of the inferior lateral angle (ILA) for symmetry.
PSIS
From the landmark of the ILA, now place your thumbs in a cephalic direction until they make contact with the bony landmarks on either side—i.e. the PSIS, as shown in Figure 12.30(a). From this position, look at each of the contact thumbs on the PSIS and note down any asymmetry that is found.
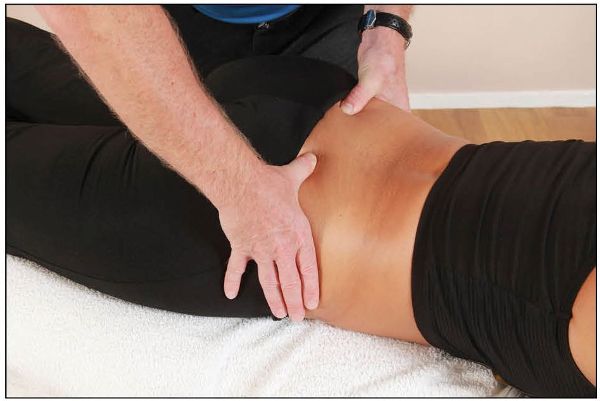
Figure 12.30. (a) Palpation of the PSIS for symmetry.
Iliac Crest
From the PSIS, it is advisable to ascertain the position of the iliac crest to check the level by lightly placing the fingers on top of the crest, as shown in Figure 12.30(b).
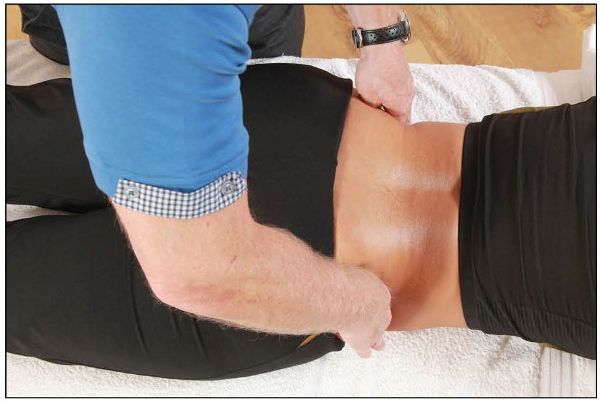
Figure 12.30. (b) Palpation of the iliac crest for symmetry.
Sacral Sulcus
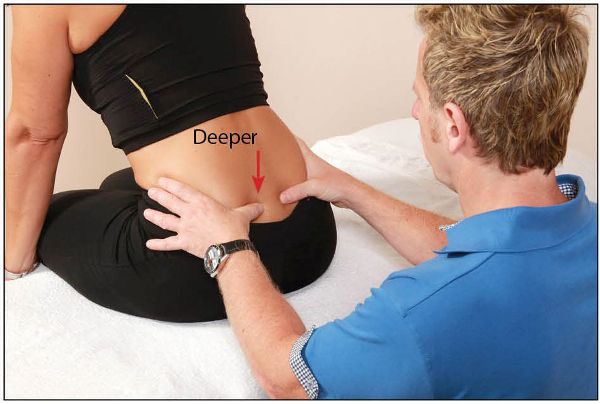
The sacral sulcus is the area that is naturally formed by the junction of the sacral base with the corresponding ilium on either side. You might notice an overlying dimple that will correspond to the sacral sulcus: these left and right dimples are known as the dimples of Venus. From the position of the PSIS, the thumbs are now directed (gently) at an angle of 45 degrees medially toward the junction of L5/S1, until the sacral base is contacted. It is best to wait a moment for the tissues to settle down before deciding on the appropriate position. You are trying to determine what is termed the depth of the sacral sulcus (located between the sacral base and the PSIS); the normal depth is approximately 0.4–0.6” (1.0–1.5cm), but it is usually less, because of the soft tissues overlying the sulcus. Normal findings are that the thumbs palpate as equal, or level, within the sacral sulcus/base, as shown in Figure 12.31.
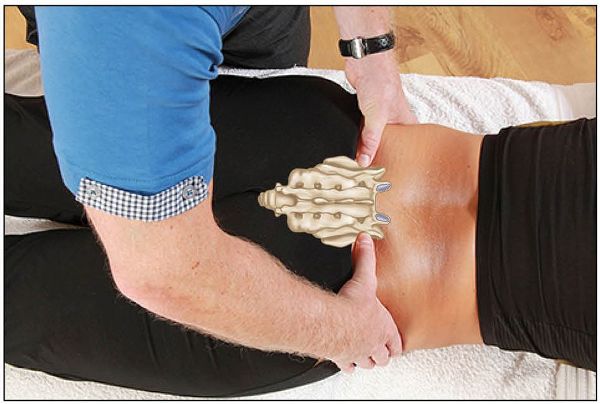
Figure 12.31. Palpation of the sacral sulcus for symmetry/depth.
Sacral Rotation
Imagine for a moment that when you palpate the sacral sulcus you convince yourself that your thumbs look asymmetric: for example, the right thumb seems to sink (palpate) deeper and the left thumb palpates shallow within the sacral base. This finding might possibly indicate either an anterior (or forward) sacral base (nutated) on the deeper right side, or a posterior (or backward) sacral base (counter-nutated) on the shallower left side. Either way, the sacrum in this case would still be “rotated” to the left, as shown in Figure 12.32.
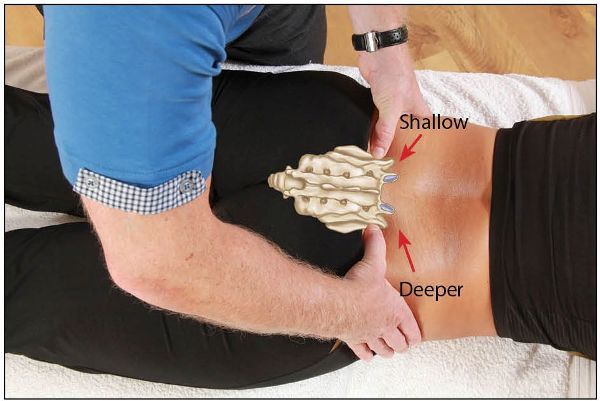
Figure 12.32. Palpation of the sacral sulcus for symmetry—the right thumb (in this case) appears deeper and the left thumb appears shallower.
In the article “Sacroiliac joint mechanics revisited” by Jordan (2006), I was very interested to read in particular about the area of palpation for identifying the depth of the sacral sulcus. The clinician mentioned that when one palpates into the sacral sulci and checks for the relative sacral sulcus depth, the relative depth does not reflect the sacral position, but rather the multifidus muscle thickness, even in petite patients. In addition, overlying the multifidus is the lumbosacral fascia, a very thick layer of collagenous connective tissue, which can feel quite solid and be mistaken for bone. If one side of the multifidus muscle is more contracted than the other, a greater cross-sectional area is produced, and consequently the sacral sulcus will naturally appear shallower.
True though this may be, please remember that palpation of the sacral sulcus is only one component of the assessment process. You can think of the assessment process as a jigsaw puzzle, and palpation of this sulcus will only be one piece of the puzzle. As I have said before, there are lots of other pieces in the puzzle, so try not to rely on just one piece.
While I am on the subject of the relative depth of the sacral sulci, one also has to consider the position of the innominate bone. For example, if the right sacral sulcus palpated as shallow, this could indicate an anteriorly rotated innominate on the right (iliosacral dysfunction, and a common finding). A different type of rotational malalignment can also relate to the opposite finding: if the sacral sulcus palpated as deeper on the right side, this could correspond to a posteriorly rotated innominate bone on the right (a less common finding).
Remember from earlier that the most common malalignment condition found is rotational, and typically this will be a right anterior rotation, along with a compensatory left posterior innominate rotation. In terms of palpation for the depth of the sacral sulci with this common finding, the right thumb would palpate shallow and the left thumb would palpate deep, even though the sacrum is in a relatively neutral position by comparison. In this case it is the innominate bone that is the dysfunctional (iliosacral) structure, but the impression of a right rotated sacrum is given (even though it is not right rotated), mainly because the left side of the sacral sulcus palpates as deeper as a result of the posteriorly rotated left innominate bone.
I have already discussed in Chapters 2 and 4 that we know the sacrum is capable of side bending with a coupled motion of rotation, since this is what your sacrum undergoes during the walking cycle, as you shift your weight from one leg to the other. The sacral motion follows Type I motion, and side bending and rotation are coupled to the opposite side: we call this type of movement torsion. So, for example, if the left sacral base is posterior, the sacrum will be left rotated, or left torsioned, and side bent to the right. If, when we palpate the sacral base as well as the position of the ILA in a neutral position (patient prone), we find asymmetry of the sacral base and also of the ILA, then we can safely say a dysfunction occurs and there is some SIJ fixation.
The question I ask you is this: how do you determine which is the fixed side? Well, you have already partly answered this question without actually realizing it. Why? Because you have already performed the seated forward flexion test, and this particular SIJ test will indicate the side of the body on which the dysfunction is located. Suppose, for example, the left side tests positive (left thumb travels cephalically, compared with the right thumb) during the seated forward flexion test; in addition, when you palpate the left sacral sulcus, the left thumb sinks further into the sulcus than the right thumb (i.e. it palpates deeper on the left side). You then know that the sacrum has to be in a position of anterior/forward nutation on the left side, because it has rotated to the right and side bent to the left, as in what we call a R-on-R sacral torsion (see Figure 12.33).
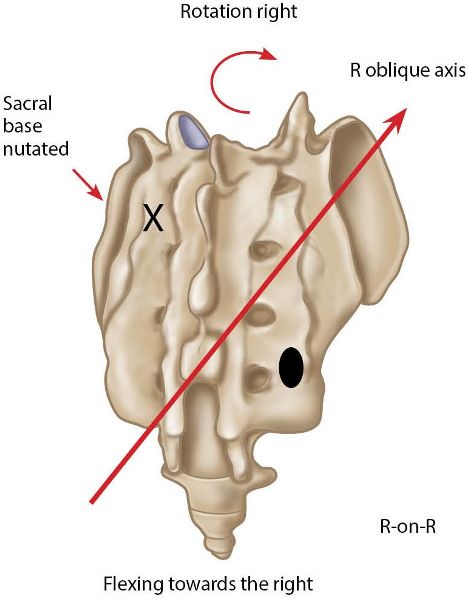
Figure 12.33. Anterior/forward (nutated) sacral torsion R-on-R. X = Anterior or deep. ![]() = Posterior or shallow.
= Posterior or shallow.
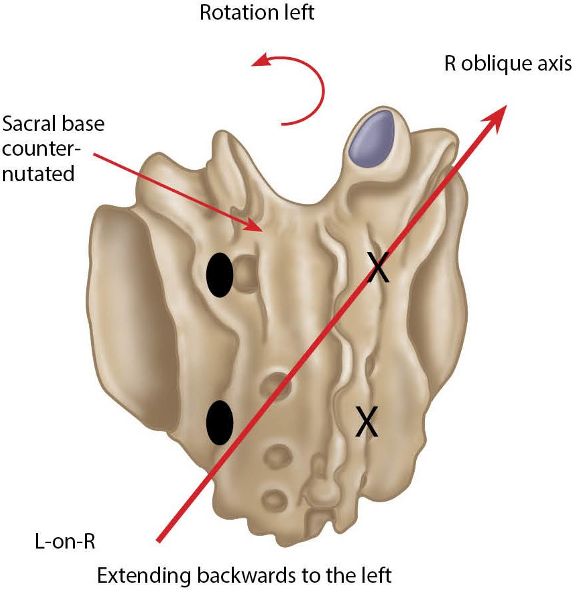
Let’s look at another scenario: the seated forward flexion test still gives a positive result on the left side, but this time the left sacral sulcus now palpates as shallow instead of deep. Hopefully, you now know that the left side of the sacrum is in a position of counter-nutation: the sacrum has rotated to the left and side bent to the right, as in a L-on-R sacral torsion (posterior/backward sacral torsion on the left), as shown in Figure 12.34 overleaf.
Figure 12.34. Posterior/backward (counter-nutated) sacral torsion L-on-R. X = Anterior or deep. ![]() = Posterior or shallow.
= Posterior or shallow.
Posterior/Backward (Counter-Nutated) Fixed Sacral Torsion
Let’s move on to the next part of the assessment, which will continue on the theme of sacral torsion. We will now be looking at confirming or discounting the actual presence of a sacral dysfunction/torsion by asking the patient to simply backward and forward bend their trunk, to ascertain what happens to the depth of the sacral sulci.
Let’s continue with the concept of the above example, where the left sacral base is posterior in neutral. From this position, you now ask your patient to forward bend their trunk, and the sacral dysfunction appears to disappear (your thumbs become level). When you ask your patient to perform a backward-bending motion (sphinx test—explained later) the rotation seems to increase: the position of the sacral base becomes worse—i.e. the left thumb appears shallower on the left side (or the sacral sulcus palpates as deeper on the right side). This will confirm that the left sacral base is fixed posteriorly, which is what we call a L-on-R sacral torsion. Why? Think about it for a minute. As you ask the patient to extend their lumbar spine, the sacrum should bilaterally anteriorly nutate (think “opposite motion to that of the lumbar spine”). If the left side is fixed in a backward/posterior position, this means that the left side will be unable to anteriorly nutate (to go forward), so it must be fixed in a counter-nutated position (posterior or backward sacral torsion). Another way of looking at it is that in backward bending, the left sacral base stays where it is—in a posterior fixed position; however, the right sacral base moves further into an anterior position as the patient backward bends, thereby making the rotation appear to worsen (increase).
When you ask the patient to perform a forward bending motion, the left sacral base will stay fixed posteriorly (counter-nutated on the left), as the right side of the sacrum is able to continue its motion and rotate back posteriorly (counter-nutate on the right); the sacral sulcus will now appear to become level, so that the rotation seems to disappear.
Sphinx Test/Trunk Extension
One maneuver I particularly like to ask my patients to perform, as a guide to ascertaining the presence of a posterior torsion of the sacrum, is the sphinx test. The patient is asked to adopt a prone position on the couch. Standing next to the patient, place the pads of your thumbs or index fingers directly over the left and right sacral bases, with your dominant eye facing the pelvis.
The test is rather simple: ask the patient to raise themselves onto their elbows (i.e. a sphinx position), as in reading a book. If a posterior sacral torsion exists, the sacral sulcus will be asymmetrical (posterior sacrum on the shallow side). The sacral torsion will be a L-on-R if the sacral sulcus is shallow on the left side (or the right sacral sulcus is deeper), as shown in Figure 12.35; likewise, the sacral torsion will be a R-on-L if the sacral sulcus is shallow on the right side (or the left sacral sulcus is deeper).
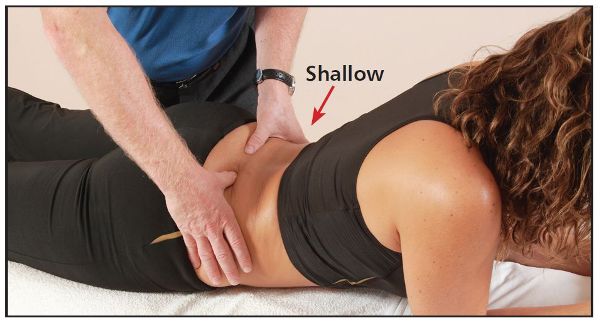
Figure 12.35. Sphinx test: a L-on-R (posterior/backward) sacral torsion is indicated (the left thumb becomes shallower in this case).
Lumbar Flexion Test
Let’s continue with the case of a L-on-R sacral torsion (left side of the sulcus is fixed in counter-nutation). After the patient has adopted the sphinx position and the level of the sacral sulcus has been noted, you ask the patient to perform a forward bending motion of the trunk (lumbar flexion). Because the left sacral base in this example is fixed posteriorly, the right side of the sacrum is able to rotate back normally in a posterior direction (counter-nutation); this will make the sulci appear to become level, so that the rotation seems to disappear, as shown in Figure 12.36(a).
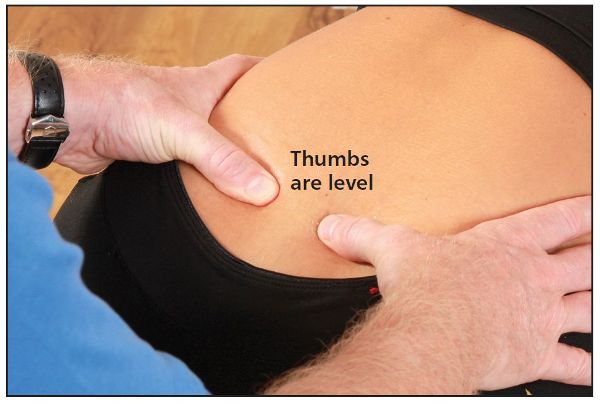
Figure 12.36. (a) Forward flexion test for the lumbar spine: a L-on-R (posterior/backward) sacral torsion is indicated (both thumbs now become level).
If you prefer the patient to flex their lumbar spine from a prone position rather than a sitting position, you can ask them to sit back onto their heels with their arms stretched forward, as shown in Figure 12.36(b).
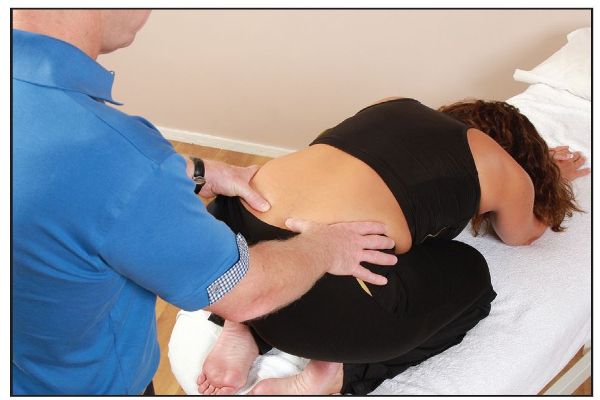
Figure 12.36. (b) Alternative lumbar flexion test: a L-on-R (posterior/backward) sacral torsion is indicated (both thumbs now become level).
Anterior/Forward (Nutated) Fixed Sacral Dysfunction
Let’s look at another example of a forward sacral torsion. This time, when we palpate the left sacral sulcus in a neutral position (patient prone), the thumb appears to sink deeper on that side; in addition, the seated forward flexion test is positive on the left side. Because of these two findings, we can almost conclude that a R-on-R forward sacral torsion is present. We will now confirm this by asking the patient to forward bend, with your thumbs in light contact with the patient’s sacral sulci. The left sacral base appears to get worse (deeper) in this position, as shown in Figure 12.37, and becomes level in a backward-bent (sphinx) position, as shown in Figure 12.38.
This means that the opposite of what I said at the beginning is present: we have an anteriorly nutated fixation on the left side (R-on-R). Why? When your patient forward bends, their left sacral base stays fixed in an anteriorly nutated position, but their right sacral base moves further into posterior nutation (counter-nutation), which will thus make the rotation appear to worsen (left thumb appears to sink even deeper). When the patient is asked to backward bend, the left sacral base is still fixed in an anteriorly nutated position; however, the right sacral base is able to move into its normal anteriorly nutated position. This now shows that the dysfunctional rotation of the sacrum seems to disappear, and palpation of the sacral sulcus on each side now indicates they are level.
Figure 12.37. Forward flexion test, indicating a R-on-R (anterior/forward) sacral torsion (left thumb becomes deeper).
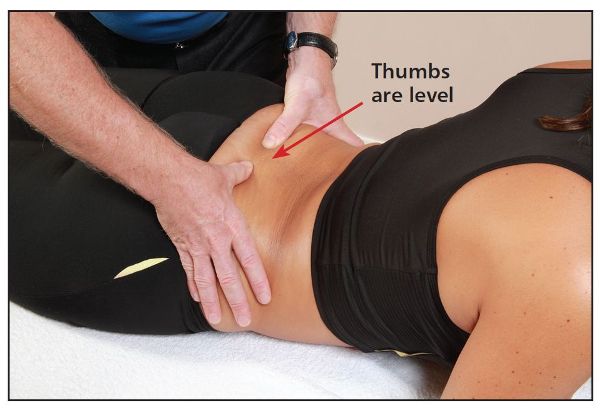
Figure 12.38. Sphinx test, indicating a R-on-R (anterior/forward) sacral torsion (both thumbs become level).
Lumbar Spine (L5)
Spring Test
The patient is asked to adopt a prone position on the couch, and the therapist stands facing the patient. The therapist observes the lumbar spine for the following positions: flat back (flexed), increased lordosis (extended), or neutral. If the patient has a relatively flat back, this indicates the lumbar spine is in a position of flexion, and the sacrum will be in a position of relative counter-nutation. If the patient has a lordotic posture, this means the lumbar spine is now in a position of extension, and the sacrum will be in a position of relative nutation. After observing the positions of the lumbar and sacral spines, the therapist places the heel of their dominant hand directly over the spinous process of L5 and exerts a gentle but firm pressure toward the couch, as shown in Figure 12.39.
A positive test is where there is firm resistance to the applied pressure to L5, with no obvious movement in the underlying tissues; a firm resistance indicates a locking of the L5 facets into a flexed position. This finding demonstrates that either the sacrum has bilaterally (on both sides) counter-nutated, or a unilateral (one-sided) posterior/backward sacral torsion (L-on-R or R-on-L) is present.
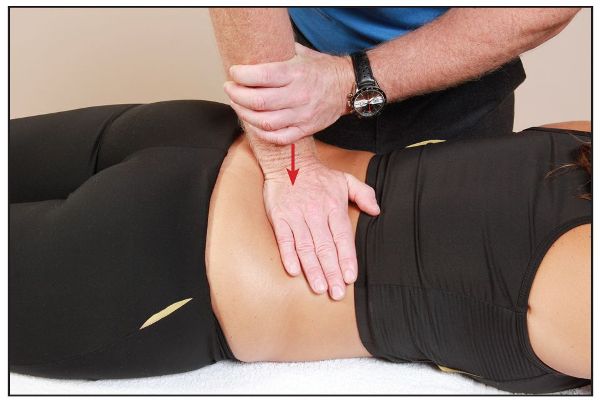
Figure 12.39. Lumbar (L5) spring test: either a posterior or an anterior sacral torsion is indicated.
If the spring test is negative (there is some available motion, i.e. spring) and the lumbar spine appears to have an increased lordosis (curvature increased), then either the sacrum has bilaterally nutated, or a unilateral anterior/forward sacral torsion (L-on-L or R-on-R) is present.
Note: The spring test will also be negative if the patient is in a neutral position, as there is some natural lordosis of the lumbar spine in this case.
L5 Position—Neutral
Once you have decided on the relevant position of the sacral base for ascertaining any underlying sacral torsions, position your thumbs and direct them to the level of the L5 spinous process. From the spinous process of the L5 vertebra, direct the pads of the thumbs and place them equally and lateral (approximately 1–1.4”, or 2.5–3cm) to the L5 spinous process; this placement should be in line with the corresponding left and right TPs, so that the relevant position of L5 is identified. If a shallow side is palpated, let’s say on the right side, then in this particular case we know that the L5 vertebra has rotated to that side (right), as shown in Figure 12.40(a–b).
However, think back to Chapter 6: just because L5 has rotated to the right, we don’t know whether the right-side facet joint of L5/S1 is fixed in a closed position, or whether the left-side facet joint of L5/S1 is fixed in an open position. As I have already explained in Chapter 6, we would need to ascertain the position of the L5/S1 facet joint by the use of specific motions, whereby the patient is asked to perform extension and flexion movements of the trunk.
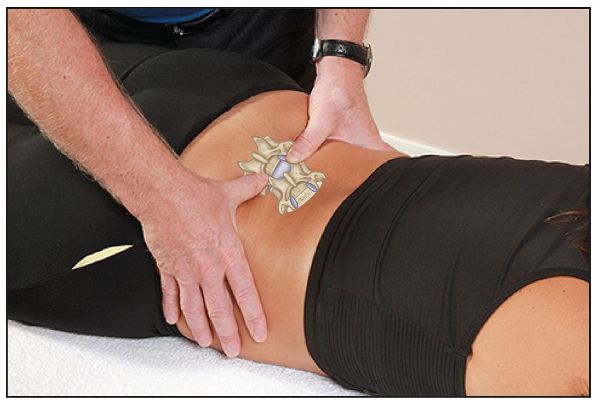
Figure 12.40. (a) Palpation for the position of L5: the shallow side is seen on the right, indicating a right rotation of the L5 vertebra.
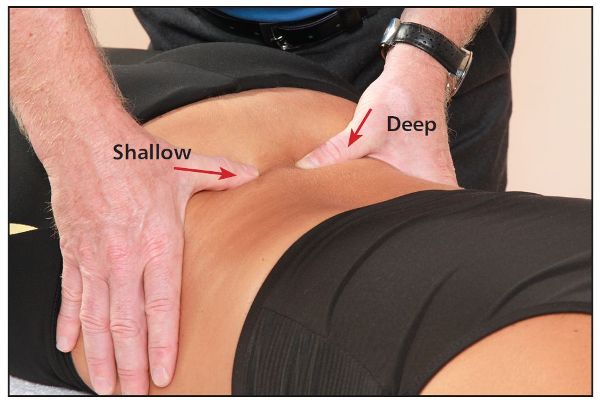
Figure 12.40. (b) Close-up view of the position of L5, with the shallow side on the right.
Note: Generally speaking, the position of L5 is particularly dependent on the position of the sacral base. The L5 vertebra will be in a different position for each of the four sacral torsion positions discussed in earlier chapters.
Remember from earlier that L-on-L and R-on-R sacral motions are classified as normal physiological motions of the sacrum, which will elicit typical Type I spinal mechanics (side bending and rotation are coupled to the opposite side) of the lumbar spine during the gait cycle. However, my own thought process tells me that if the sacrum is fixed in a forward/nutated (Examples 1–2 below) or backward/counter-nutated (Examples 3–4 below) torsional position for a significant period of time, then through the natural compensatory processes the lumbar spine in some way has to alter its position and possibly adopt Type II spinal mechanics; in this case the side bending and rotation are now coupled to the same side (either in flexion or in extension), as explained by the following examples.
Example 1
A L-on-L sacral torsion typically causes the L5 vertebra to adopt neutral Type I spinal mechanics of right rotation with left side bending. If the sacral dysfunction has become chronic, however, the altered position of the sacrum can potentially change the position of the L5 vertebra: this is known as an ERS(R)—the L5/S1 facet joint is closed on the right side.
Why? The motion of the L5 vertebra will be opposite (right) to the nutated motion of the sacrum (left), which means the L5 vertebra will be in a position of extension, side bending, and rotation to the right side, i.e. an ERS(R). Put simply, the sacrum is rotating in an anterior (nutated) direction to the left, so L5 will rotate in a posterior direction to the right. This right rotation of the lumbar spine is in part classified as normal Type I mechanics because of the induced left rotation of the sacrum; however, if the lumbar spine increases its lordotic curvature as a result of the forward (nutated) sacral torsion, the L5 vertebra will be forced into Type II mechanics and subsequently develop the position of an ERS(R).
Example 2
A R-on-R sacral torsion potentially causes the L5 vertebra to adopt a position known as an ERS(L)—the L5/S1 facet joint is closed on the left side.
The motion of L5 will be opposite to that of the sacrum, so the vertebra will be in an ERS(L) position. Why? Put simply, the sacrum is rotating in an anterior direction to the right side, which means L5 will rotate in a posterior direction to the left side.
Example 3
A L-on-R sacral torsion sacral torsion potentially causes the L5 vertebra to adopt a position known as an FRS(R)—the L5/S1 facet joint is open on the left side (remember, it is the side opposite to the side of rotation).
The motion of the L5 vertebra will be opposite to that of the sacrum, so the vertebra will be in an FRS(R) position. Why? Put simply, the sacrum is rotating in a posterior (counter-nutated) direction to the left side, which means the L5 vertebra will rotate in an anterior direction to the right side.
Example 4
A R-on-L sacral torsion sacral torsion potentially causes the L5 vertebra to adopt a position known as an FRS(L)—the L5/S1 facet joint is open on the right side (remember, it is side opposite to the side of rotation).
The motion of the L5 vertebra will be opposite to that of the sacrum, so the vertebra will be in an FRS(L) position. Why? Put simply, the sacrum is rotating in a posterior (counter-nutated) direction to the right side, which means the L5 vertebra will rotate in an anterior direction to the left side.
Exceptions to the Above Rule
Please bear in mind, from the discussion of spinal mechanics in Chapter 6, that in exceptional circumstances the motion of the L5 vertebra can also be to the same side as the sacral torsion. For instance, it is common with very chronic lumbar spine/pelvic dysfunctions to find the sacrum rotated to the right side and the L5 vertebra rotated to the same side; likewise, it is possible for a left rotation of the sacrum to cause the L5 vertebra to rotate to the same side. An example (explained in Chapter 10) of the above is where you have a primary lumbar spine dysfunction that causes the sacrum to rotate to the same side as the vertebral rotation; in this case the lumbar spine dysfunction will need to be treated first.
Iliac Crest—Posterior View
Place your hands on top of each of the patient’s iliac crests and note the relevant positions. A higher side might indicate a shortness of the QL, a pelvic rotation, or even an iliosacral upslip, as shown in Figure 12.41.
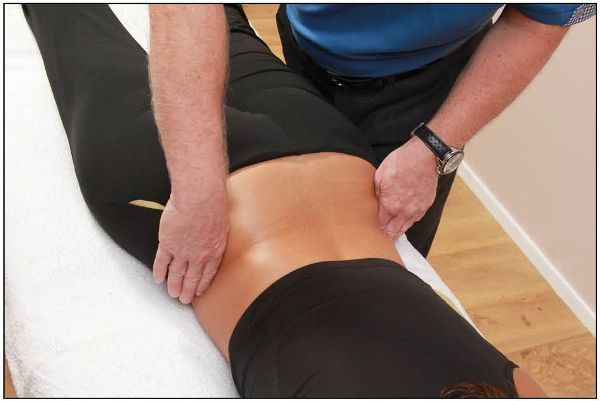
Figure 12.41. Palpation for the position of the iliac crest: a higher side is indicated on the right.
Greater Trochanter
From palpating the iliac crests, next direct your hands to the greater trochanter, to check for relevant levels, as shown in Figure 12.42.
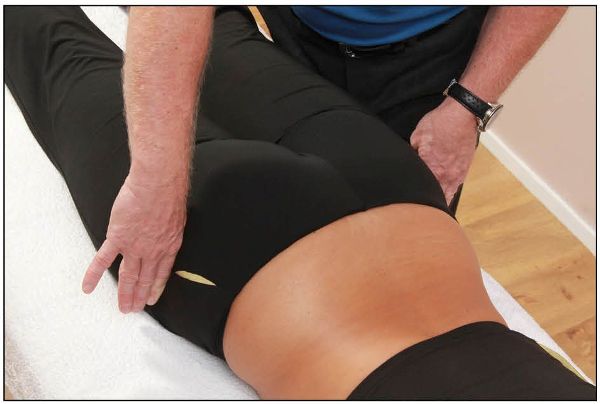
Figure 12.42. Palpation for the position of the greater trochanter.
Palpatory Assessment—Patient Supine
The patient is asked to adopt a supine position on the couch, and the therapist stands next to the patient and observes, using their dominant eye, for the levels in the following areas:
• Anterior superior iliac spine (ASIS)
• Iliac crest
• Pubic tubercle
• Inguinal ligament
• Medial malleolus
Table A1.6 in Appendix 1 can be used to note down any asymmetries found during the supine palpatory assessment.
ASIS
After initially observing the level of the ASIS, palpate the inferior aspect of the ASIS to ascertain the position, as shown in Figure 12.43.
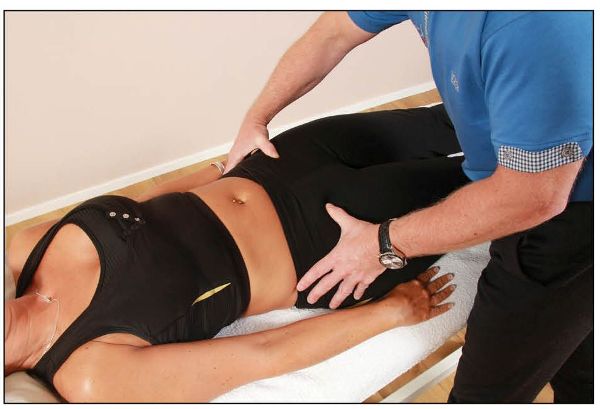
Figure 12.43. Palpation for the position of the ASIS.
Iliac Crest—Anterior View
From the ASIS, place your hands on top of the iliac crests to check for the position, as shown in Figure 12.44.
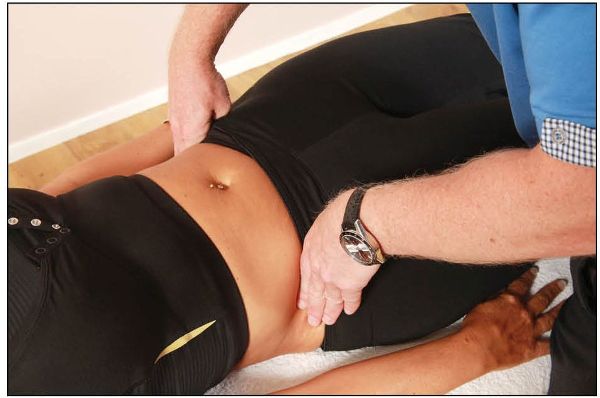
Figure 12.44. Palpation for the position of the iliac crest.
Pubic Tubercle and Inguinal Ligament
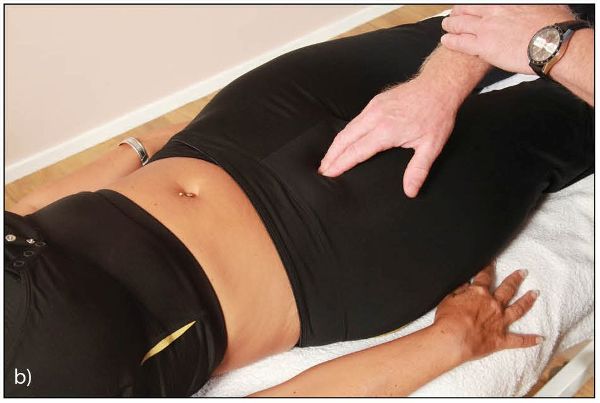
Ask the patient to relax and inform them (also requesting their consent) about what is about to happen in this procedure. Using the heel of your hand, and starting with light contact from the abdominal area, gently move caudally down until the pubic tubercle is felt beneath the hand. Place the pads of the thumbs or index fingers on top of each of the pubic tubercles (symphysis pubis joint) and check for the position, as shown in Figure 12.45(a). A positive finding is if one of the pubic tubercles appears in either a superior or an inferior position, when comparing them with each other.
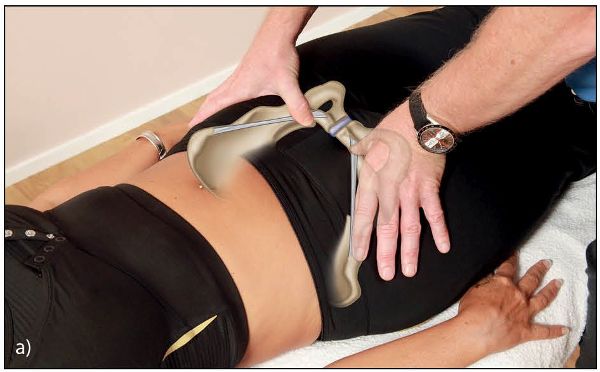
Figure 12.45. Palpation for the position of (a) the pubic tubercle.
Once you have palpated the left and right pubic tubercles, let your thumbs drift laterally and superiorly, to contact the inguinal ligament, which attaches from the pubic tubercle to the ASIS. Another positive finding for a dysfunction is if the soft tissue structure of the inguinal ligament is tender on palpation, as shown in Figure 12.45(b) overleaf.
Medial Malleolus (Leg Length)
Before the position of the medial malleoli (leg length) is ascertained, grasp the patient’s legs above the ankles and ask the patient to bend both knees to 90 degrees. Next ask them to lift their pelvis off the couch two or three times, as shown in Figure 12.46(a), and then to straighten their legs (this has the effect of encouraging the pelvis to become level). After this, take hold of the patient’s ankles and place your thumbs under their medial malleoli, to identify which leg appears longer, shorter, or level, as shown in Figure 12.46(b).
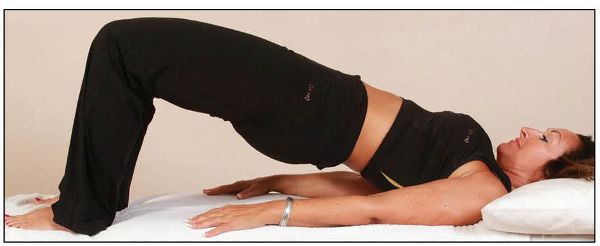
Figure 12.46. (a) Patient lifts their pelvis off the couch two or three times, to encourage leveling of the pelvis.
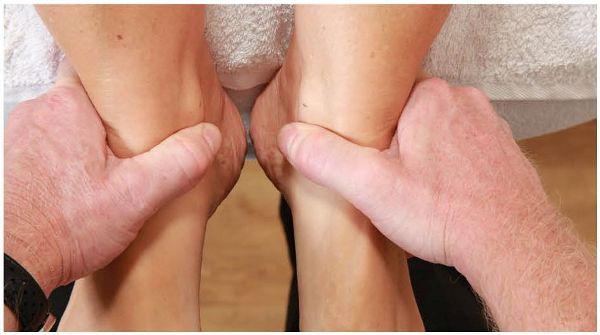
Figure 12.46. (b) Palpation for the position of the medial malleoli (leg length).
Supine to Long Sitting Test (Back to Supine)
The aim of this test is to determine the relevance of the SIJ to an apparent or true LLD. The patient lies in a supine position and the therapist compares the two medial malleoli, to see if there is any difference in position. Let’s say, for instance, when the patient is in a supine lying position you notice that the left medial malleolus appears to be shorter and that the right medial malleolus appears to be longer, as shown in Figure 12.46(c).

Figure 12.46. (c) With the patient in the supine position the left medial malleolus appears shorter and the right medial malleolus appears longer.
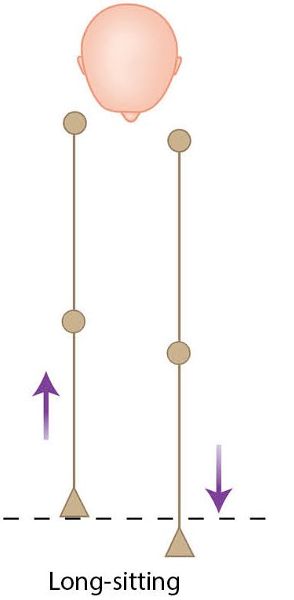
Ask the patient to sit up, while keeping their legs extended. Compare the position of the medial malleoli again, to see if there is any change, as shown in Figure 12.46(d). If there is a posterior innominate present on the left side, the leg that appeared shorter will now lengthen as the patient sits up. If there is an anterior innominate present on the right, the leg that appeared longer will now shorten during the sitting-up motion.
Figure 12.46. (d) Observation of the positions of the medial malleoli (leg length) after the supine to long sitting test. The right leg appears shorter and the left leg appears longer, confirming right anterior and left posterior innominate rotations.
From the long sitting position, it would make sense to ask the patient to lie back down, so that they adopt the starting supine position, and to observe what happens to the medial malleoli during this maneuver. If you notice that the right leg in the long sitting position appears to be shorter than the left, and that the right leg appears to be longer than the left in the supine lying position, then you have probably confirmed a right anterior innominate rotation with a left posterior innominate rotation.
Schamberger (2013) has a general rule for remembering this process—the rule of the five Ls, which relates to the side of the anteriorly rotated innominate:
“Leg Lengthens Lying, Landmarks Lower”
So let’s recap on that thought process just for a moment. Schamberger (2013) calls the test the sitting–lying test rather than what I call it, the supine to long sitting test. What Schamberger says is basically the same, but in reverse. He looks at the patient’s medial malleoli in a long sitting position to start with, noting the position, and observes if one malleolus appears to get “longer” when the patient lies back to adopt a supine position. If, for instance, it is found that the right-side malleolus appears to get longer (compared with the left side), as shown in Figure 12.46(e), then the right side is more than likely to be locked in an anteriorly rotated position (think back to the rule of the five Ls), with a compensatory left posteriorly rotated innominate.
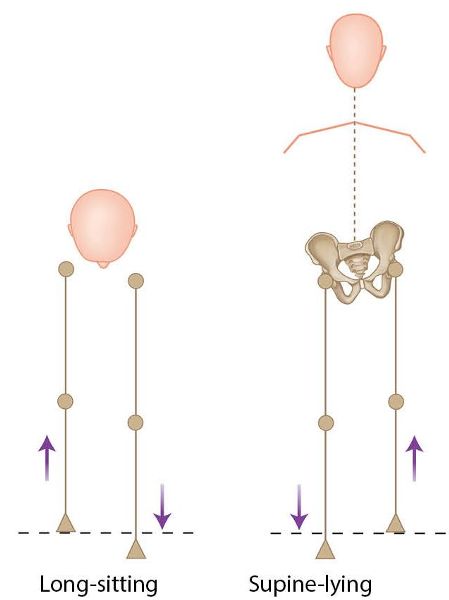
Figure 12.46. (e) Observation of the positions of the medial malleoli. The right leg appears shorter in long sitting, and appears longer in supine lying, indicating a right anterior rotation.
True LLD
If a true LLD exists, the right leg will appear longer both in the supine position and in the long sitting position, as shown in Figure 12.46(f). Remember that all the pelvic landmarks are higher on the side of the longer leg, but only in a standing posture; the bony pelvic landmarks will be level when sitting and lying, as shown in the figure.
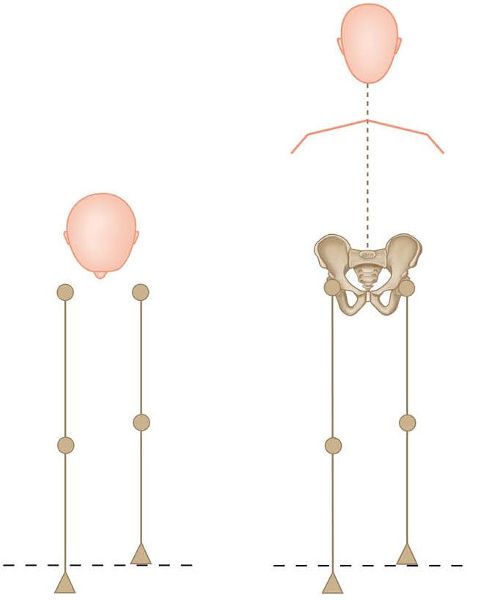
Figure 12.46. (f) Observation of the positions of the medial malleoli. The right leg appears longer both in long sitting and in supine lying, indicating a true LLD of the right leg.
Upslip
An upslip on the right side, for example, means that the right leg will appear shorter in the supine lying position, and subsequently shorter in the long sitting position, as shown in Figure 12.46(g). You will notice that the pelvic landmarks are all cephalic on the right side compared with the left side, indicating a possible right iliosacral upslip.

Figure 12.46. (g) Observation of the position of the medial malleolus for a right upslip. The right leg appears shorter in both the supine and long sitting position.
Out-Flare/In-Flare
When a patient presents with an out-flare or an in-flare iliosacral dysfunction, there will be no difference between the medial malleoli in the supine or long sitting positions.
The tests demonstrated above can help in differentiating between a true LLD and a sacroiliac/iliosacral dysfunction. The reason why the supine to long sitting and back to supine test is of value is that in a supine position the acetabulum lies in an anterior position relative to the ischial tuberosity, and that on moving from the supine to the long sitting position, the pelvis tilts forward and eventually pivots over the ischial tuberosity. As a result of this motion, the legs appear to lengthen equally if there is no dysfunction present. If a rotational dysfunction is present, however, the pelvis moves independently on each side rather than as a single unit, and hence the leg length appears to either shorten or lengthen.
Schamberger (2013) mentions that a shift in leg length demonstrated in the long sitting to supine lying test serves as a probable indicator of the presence of a “rotational malalignment” and is useful for differentiating it from an anatomical (true) LLD and an upslip; nevertheless, a coexisting anatomical LLD, an upslip, or both cannot be ruled out. The test also provides the person doing the assessment with an easy way of determining which side has rotated anteriorly or posteriorly.
Just to confuse the picture a little, as in reality it is never as straightforward as it seems (and I apologize for that), Schamberger (2013) also says: “A knowledge of which iliac crest is higher when standing is not helpful for predicting which leg will be longer in long sitting or supine lying. Nor does it help us to determine the side of an ‘anterior rotation’ or ‘upslip’.”
The fact of the matter is that differences as much as 0.8–1.6” (2–4cm) may be observed to reverse completely when changing from the long sitting position to the supine position; yet, with realignment, most of the people affected will turn out to have legs of equal length!
Remember that only 6–12% of us actually have evidence of an anatomical (true) LLD of 0.2” (5mm) or more, once in alignment, as demonstrated by Armour and Scott (1981) and by Schamberger (2002).
Pelvic Girdle Dysfunctions
According to some authors (myself included), at least 14 potential different dysfunctions can occur within the pelvic girdle complex. It is also common to find musculoskeletal dysfunctions coexisting between all of the three areas—iliosacral, sacroiliac, and symphysis pubis joints—and possibly all occurring at the same time.
Iliosacral Dysfunction (Fixation)
The following six iliosacral dysfunctions or fixations are possible:
• Anteriorly rotated innominate
• Posteriorly rotated innominate
• Superior shear (cephalic)—upslip
• Inferior shear (caudal)—downslip
• Innominate out-flare
• Innominate in-flare
Tables 12.1 and 12.2 overleaf summarize all of the specific testing and palpatory findings for each of the six types of iliosacral dysfunction.
Table 12.1. Iliosacral dysfunctions—left side.
| Dysfunction | Right side | Standing flexion test | Medial malleolus | ASIS | PSIS | Sacral sulcus | Ischial tuberosity | Sacrotuberous ligament |
|---|---|---|---|---|---|---|---|---|
|
Anterior rotation |
Right |
Right |
Long right |
Inferior |
Superior |
Shallow right |
Superior |
Lax right |
|
Posterior rotation |
Right |
Right |
Short right |
Superior |
Inferior |
Deep right |
Inferior |
Taut right |
|
Out-flare |
Right |
Right |
No change |
Lateral right |
Medial right |
Narrow right |
No change |
No change |
|
In-flare |
Right |
Right |
No change |
Medial right |
Lateral right |
Wide right |
No change |
No change |
|
Upslip |
Right |
Right |
Short right |
Superior right |
Superior right |
No change |
Superior |
Lax right |
|
Downslip |
Right |
Right |
Long right |
Inferior right |
Inferior right |
No change |
Inferior |
Taut right |
Table 12.2. Iliosacral dysfunctions—right side.
Anteriorly/Posteriorly Rotated Innominate
Whenever I am giving lectures for my courses around the world, the terminology of anterior and posterior rotational components of the pelvis always crops up; we can therefore almost take it for granted that these rotations are a common dysfunctional pattern scenario for the innominate bone to follow. Hopefully, by now you will know that the rotation is classified as an iliosacral (and not sacroiliac) dysfunction, as it is the innominate bone that has rotated with respect to the sacrum.
If you look at Tables 12.1 and 12.2, you will notice that the indicated anterior and posterior rotations alter the positions of the ASIS, PSIS, and medial malleoli (leg length). These types of iliosacral dysfunction are initially found (as well as by observation and other testing procedures) by the key test known as the standing forward flexion test. For example, if the standing forward flexion test is positive on the left side, and on palpation, when compared with the opposite side, the left ASIS is superior, the left PSIS is inferior, and the left medial malleolus (leg length) is shorter, then you have now found a left posterior rotation of the innominate. This dysfunction would be classified as a left iliosacral posterior rotation, as shown in Figure 12.47. On the other hand, if the standing forward flexion test is positive on the right side, but this time the right ASIS is inferior, the right PSIS is superior, and the right medial malleolus (leg length) appears longer, then one can assume a right iliosacral anterior rotation (the most common) is present, as shown in Figure 12.48.

Figure 12.48. Anterior rotation of the innominate bone.
Let’s go through a thought process for just a moment and assume that the patient has the most common presentation: a right anterior innominate rotation and a left compensatory posterior innominate rotation, so that the right SIJ is considered to be locked, as shown in Figure 12.49(a). In this Figure you can see three things: (1) the right pubic bone has displaced inferiorly (caudally) compared with the right side; (2) the sacrum has compensated for the rotational malalignment by rotating left on the left oblique axis (L-on-L); and (3) the lumbar spine has also compensated by rotating into the convexity to the left side.
With the most common presentation of a right anterior innominate rotation and a compensatory left posterior rotation, you will see in Figure 12.49(b) that a patient demonstrating a reaching motion toward their toes on the right side is able to do this with no restriction; however, on the left side, as shown in Figure 12.49(c), the patient is clearly prevented from touching their toes.
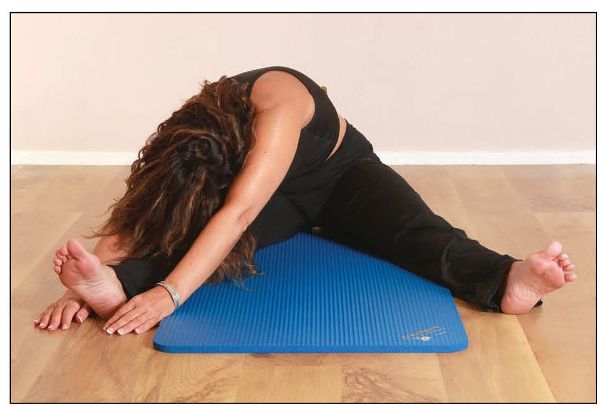
Figure 12.49. (a) Presentation of the most common rotational malalignment syndrome—right anterior and left posterior rotation. The compensations are shown by both the symphysis pubis joint and the sacrum having rotated left on the left oblique axis (L-on-L), and by the lumbar spine also having rotated left into the spinal convexity.
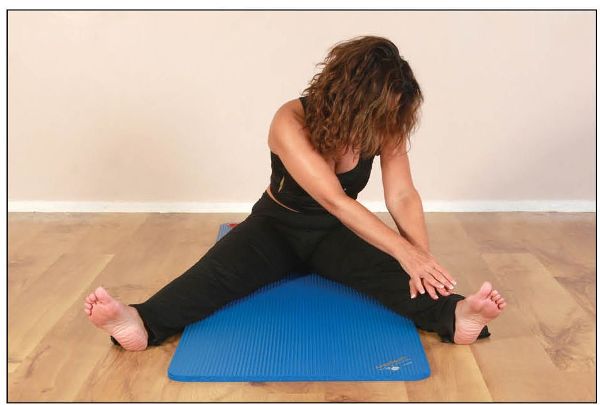
Figure 12.49. (b) The patient’s reach to the right is normal.
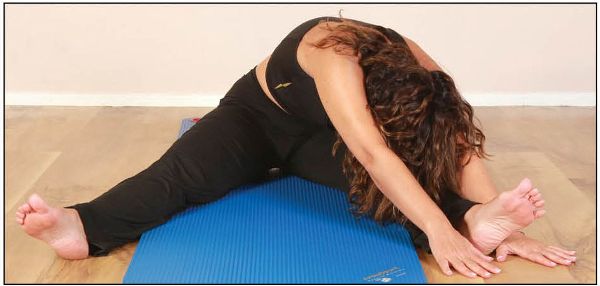
Figure 12.49. (c) The patient’s reach to the left is impaired.
Figure 12.49. (d) After realignment treatment of the rotation of the right innominate bone, the patient can now reach to the left.
Figure 12.49(d) demonstrates an improvement after a realignment technique has been performed (Chapter 13). The reason why the patient had a restriction to the left side is that the left innominate is locked into a posterior rotation, and that the reaching forward type of motion (as shown in the figures) demands an anterior motion of the innominate bone. The treatment technique (as discussed in Chapter 13) is to correct the right anterior innominate rotation and not the left posterior innominate rotation; this will then encourage the compensatory left side (posteriorly rotated) to come back to a neutral position.
Case Study
On looking at the excellent book by Schamberger (2013) on malalignment syndrome, I was interested to read that the author was a very fit marathon runner, but he himself had suffered from right heel pain that had lasted many years. His ankle and foot were in a position of over-pronation, especially the right foot; he had tried orthoses but they failed to correct the position. Every time he ran, the pain impaired his heel-strike and push-off, and he began to notice wasting in all of his right leg muscles; moreover, his right thigh muscles—especially the quadriceps—would ache. He had an injection of local anesthetic into the area of the heel pain, but this did not even give him any short-term relief.
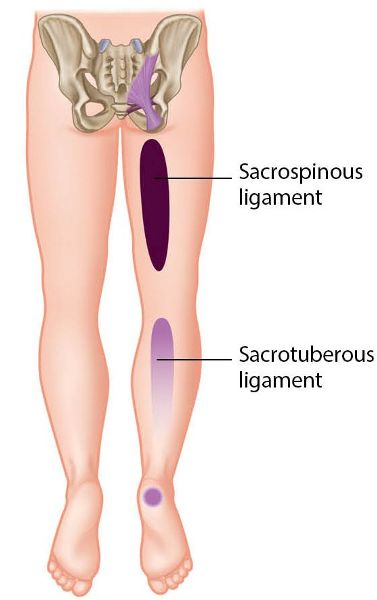
As time passed, the heel pain persisted. At some point he went to a medical conference, where one of the speakers talked about the sacrotuberous and sacrospinous ligaments referring pain to the leg, and especially to the heel, as shown in Figure 12.49(e). That same afternoon, Schamberger was checked out by an osteopath, who noticed that he was out of alignment and said that his right innominate was rotated anteriorly; the osteopath proceeded to perform a corrective MET technique (Chapter 13) to correct the right anterior rotation. The applied technique was very simple and miraculously made the heel pain disappear completely, because of the fact that Schamberger was now realigned. The best part was to come, as later that day he ran for 12 miles (20km) and, for the first time in years, finished the run without an ache in his right thigh muscles or any pain in his heel.
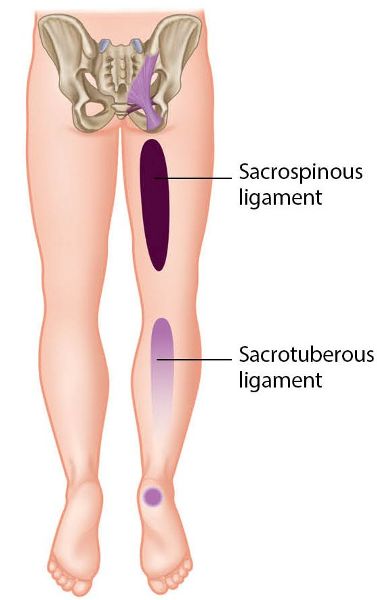
Figure 12.49 (e). Referral pattern for the sacrotuberous and sacrospinous ligaments, specific in particular to the area of the heel bone.
Superior/Inferior Shear—Upslip/Downslip
An iliosacral upslip (superior shear, also known as hipbone shear) dysfunction normally relates to some type of trauma or accident: perhaps the person in question has had a motor accident, tumbled down some stairs from a height and landed on one side of their ischial tuberosity, fallen from a height (such as from a horse), or even simply missed a step when running or walking. It has even been considered that a strain of the QL muscle sustained while picking up a heavy load from the floor could be responsible for an upslip.
Williams and Warwick (1980) found that the degrees of freedom of the SIJ normally permit approximately 2 degrees of upward (cephalic) and downward (caudal) translation of the innominate relative to the sacrum. These dysfunctions tend to be less common (approximately 10–20%, compared with around 80% for innominate rotations) in patients who present with chronic back and pelvic pain. This type of dysfunction needs to be corrected by treatment, as it is very difficult for the patient to self-correct it (a very effective treatment protocol for this will be demonstrated in Chapter 13).
The initial diagnosis is indicated by the standing forward flexion test. In addition, on the side that tested positive in this test, the anatomical landmarks of the ASIS, PSIS, iliac crest, and pubic bone (potentially a 0.08–0.12”, or 2–3mm, step deformity could be palpated at the symphysis pubis joint), as well as the ischial tuberosity, will all appear to be cephalic or superior (compared with the opposite side), as shown in Figure 12.50(a). On the higher (dysfunctional) side, the sacrotuberous ligament will be lax and the medial malleolus (leg length) will appear to be shorter.

Figure 12.50. (a) Upslip (superior shear) of the innominate bone.
An upslip can coexist with a rotation (anterior) and/or an out-flare/in-flare of the innominate bone, which means that some of the palpatory landmarks can be “hidden”; it will therefore be less obvious that an upslip is present, as shown in Figure 12.50(b). This type of dysfunction is possible, especially if the corresponding knee joint is straight but the hip is not in a neutral position when the trauma is sustained, as this might cause a rotational force to the innominate, as well as producing an upslip.

Figure 12.50. (b) Upslip is “hidden” as a result of the anterior rotation of the innominate bone.
Through his experiences, Schamberger (2013) discovered that the high side of the pelvis in standing or sitting does not always correspond with the side of the upslip. For example, the iliac crest is high on the right side in standing, sitting, and lying prone; in those with a left upslip present, with the left iliac crest high in lying, it is usually the right iliac crest that is high in standing and sitting. These findings suggest that the upslip may be associated with some rotation of the pelvis. In other words, if someone presents in this case with a right upslip, in combination with a right anterior and left posterior rotation, then some of the landmarks may alter: the step deformity of the symphysis pubis joint disappears, the ASIS becomes level compared with the opposite side, and the PSIS on the right becomes accentuated compared with the left side. Schamberger says that a correction of the rotational malalignment will reveal the underlying right upslip, with all the landmarks on the right side of the pelvis now in a superior position relative to those on the left.
If you suspect that your patient has an iliosacral downslip (inferior shear), the initial diagnosis is carried out through a standing forward flexion test: on the side that tests positive, the anatomical landmarks of the ASIS, PSIS, iliac crest, and ischial tuberosity will all appear to be caudal or inferior (compared with the opposite side). On the low (dysfunctional) side, the sacrotuberous ligament will be taut and the medial malleolus (leg length) will appear to be longer, as shown in Figure 12.51 overleaf.
Dysfunctions of this type tend to be self-correcting when you walk. If you think about it logically, if a downslip is suspected on the right side, when the weight is placed onto the right leg, the right-side back of the pelvis is naturally pushed to a neutral position; in general, therefore, no treatment is actually required.
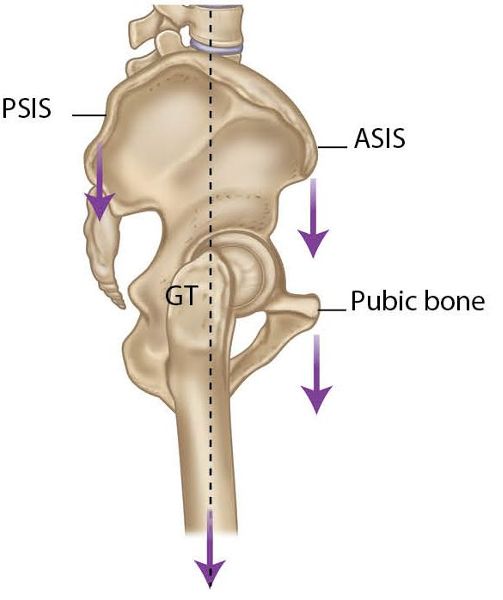
Figure 12.51. Downslip (inferior shear) of the innominate bone.
Innominate Out-Flare/In-Flare
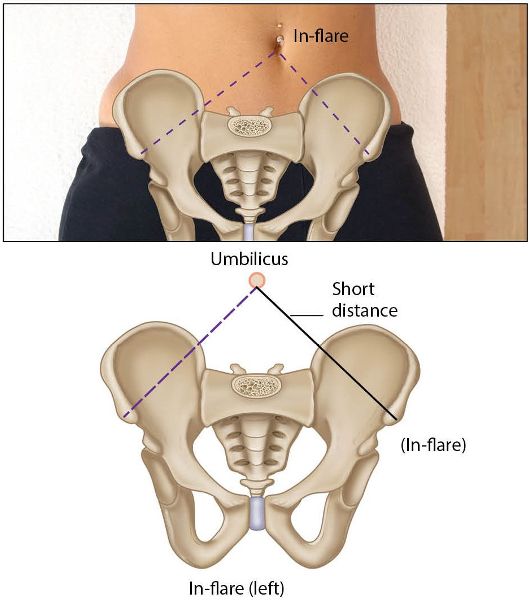
Out-flare and in-flare refer to the movement of the innominate bones in outward and inward directions respectively. An out-flare motion is considered to be combined with the anterior rotation of the innominate bone, while an in-flare motion is considered to be combined with a posterior rotation of the innominate bone; this is because the innominates need to perform this specific type of rotary motion during the gait cycle, as well as during forward bending of the trunk.
DonTigny (2007) stated that SIJ dysfunction is essentially caused by an anterior rotation of the innominate bones and an out-flare relative to the sacrum. In-flare occurs with a posterior rotation of the innominate bone relative to the sacrum and with sacral nutation. According to Kapandji (1974), during the initial 50–60 degrees forward flexion of the trunk when standing up, the sacrum nutates and the ilia rotate anteriorly and flare outward.
Think back to earlier when you were palpating the ASIS: I mentioned that it is important to look at your thumbs for equal symmetry of the two bony landmarks of the innominate bones, and to note down if you found any asymmetry. If you notice a difference between the two sides, you now need to imagine a straight line down the center of the body, which typically passes through the area of the umbilical (belly button). Now compare how far each thumb is from the centerline of the umbilicus. If you observe that your left thumb on the patient’s right ASIS seems further away from the umbilicus than the opposite side, you have probably discovered an in-flare or an out-flare, as shown in Figure 12.52(a).
How do you decide what type of dysfunction is present? Yes, you have guessed correctly—the good old standing forward flexion test and also the stork test. If these two tests are positive, for example on the patient’s right side, you have now found an iliosacral out-flare, as shown in Figure 12.52(b). Conversely, if the standing forward flexion test and the stork test were positive on the left side, you would conclude that an iliosacral in-flare is present, as shown in Figure 12.52(c).
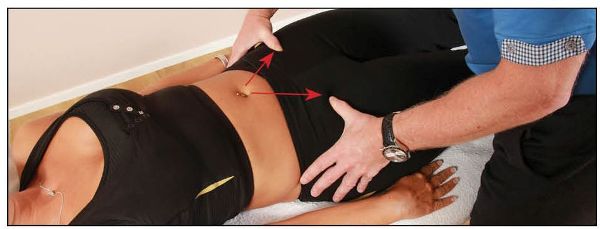
Figure 12.52. (a) Palpation assessment from the ASIS to the umbilicus, looking for an out-flare/in-flare.
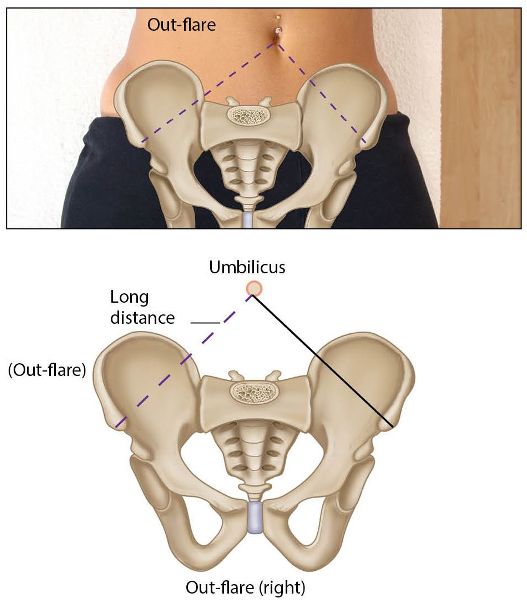
Figure 12.52. (b) Iliosacral out-flare of the innominate bone.
DeStefano (2011) is a particularly interesting read, and includes the following abstract:
“The two dysfunctions out-flare and in-flare are quite rare and they are only found in those SIJs that have altered convex-to-concave relationships to S2 with convexity on the sacral side and concavity on the ilia side. They can only be diagnosed after the correction of any hipbone rotational dysfunction that is present.”
Sacroiliac Dysfunction
The following sacroiliac dysfunctions are possible:
• L-on-L anterior sacral torsion
• R-on-R anterior sacral torsion
• L-on-R posterior sacral torsion
• R-on-L posterior sacral torsion
• Bilaterally nutated sacrum
• Bilaterally counter-nutated sacrum
Tables 12.3, 12.4 and 12.5 summarize all of the specific testing and palpatory findings for all of the sacral torsions and sacral dysfunctions.
| L-on-L sacral torsion (forward/nutation) | R-on-R sacral torsion (forward/nutation) | |
|---|---|---|
|
Deep sacral sulcus |
Right |
Left |
|
Shallow sacral sulcus |
Left |
Right |
|
ILA posterior |
Left |
Right |
|
L5 rotation |
Right—ERS(R) |
Left—ERS(L) |
|
Seated flexion test |
Right |
Left |
|
Lumbar spring |
Negative |
Negative |
|
Sphinx (extension) test |
Sulci level |
Sulci level |
|
Lumbar flexion test |
Right sacral sulcus deep |
Left sacral sulcus deep |
|
Lumbar lordosis |
Increased |
Increased |
|
Medial malleolus (leg length) |
Short left |
Short right |
Table 12.3. Anterior/forward sacral torsions (normal physiological motion).
Table 12.4. Posterior/backward sacral torsion (non-physiological motion).
| Bilaterally nutated sacrum (forward) | Bilaterally counter-nutated sacrum (backward) | |
|---|---|---|
|
Standing flexion test |
Negative |
Negative |
|
Seated flexion test |
Positive bilateral |
Positive bilateral |
|
Stork (Gillet) test |
Positive on both sides |
Positive on both sides |
|
Sacral base |
Left and right anterior |
Left and right posterior |
|
ILA |
Left and right posterior |
Left and right anterior |
|
Lumbar spring test |
Negative |
Positive |
|
Lumbar lordosis |
Increased |
Decreased |
|
Medial malleolus (leg length) |
Equal |
Equal |
Table 12.5. Bilaterally nutated and counter-nutated sacrum.
I would like to recap just for a moment. By the time you have got to this stage of the book you should know that a dysfunction of the SIJ can result from how the pelvis (innominates) impacts on the sacrum, and, vice versa, from how the sacrum impacts on the pelvis (innominates). If the pelvis is fixed on the SIJ, then (as explained in previous chapters) we call it an iliosacral dysfunction; if the sacrum is fixed on the pelvis, then we call it a sacroiliac joint dysfunction.
Let’s look at trying to find sacral torsions in a way that is different from (but hopefully simpler than) the one I have already explained. Your patient is lying in a prone position, and hopefully in a position of neutral; your thumbs are sitting nicely within the left and right sacral sulci. In this position, you feel that your right thumb is shallow and your left thumb is deeper. What does this mean? Think about it before reading on—yes, either the right side of the sacral base is posterior and also right rotated, or the left side is anterior but again right rotated. If the sacral base is rotated in neutral, it therefore has to be dysfunctional: either the right side is fixed posteriorly (counter-nutation) or the left (deeper) side is fixed anteriorly (nutation).
How to Decide on the Fixation?
With the patient still prone and our thumbs sitting on the left and right sacral sulci, we can ask the patient to backward bend (come up onto the elbows, as in reading a book), and forward bend (ask the patient to tilt their pelvis posteriorly or to perform the lumbar flexion test, as shown previously) from the position they are in. If the rotation increases (gets worse) in a backward-bent position (right thumb becomes shallower and left thumb becomes deeper), and then the rotation is seen to disappear in a forward-bent position, you know that the right side has to be fixed in a posterior position and rotated to the right, as in a R-on-L sacral torsion. This is because when you ask your patient to backward bend, the sacrum has to be able to go in an anterior direction, which it cannot do. The right fixed sacrum therefore now becomes a fixed pivot point, and so is unable to perform this forward motion because of the fact that the right sacral base is fixed posteriorly; hence the rotation looks worse.
With these types of posterior fixation you will notice a reduction in lumbar lordosis (back flattens), and the L5 spring test will feel firm to palpation when pressure is applied (positive test).
Let’s look at the other scenario whereby the left sacral base is fixed in an anterior position (nutation). We again ask the patient to perform backward bending and forward bending motions. This time, however, the forward-bent position gives the appearance of the rotation increasing, and the backward-bent position seems to make the sacral base become level. This is because during the forward bending motion, the left sacral base stays fixed anteriorly, so it cannot move in a posterior direction; it therefore becomes a pivot point, but the patient’s right sacral base moves further in a posterior direction and subsequently makes the rotation appear to become worse. This type of dysfunction is called a R-on-R sacral torsion.
With these types of anterior fixation, you will notice an increase in lumbar lordosis, and the L5 spring test will indicate some spring when pressure is applied (negative test).
Tip: A simple rule of thumb for determining which side is fixed is as follows. If the sacral rotation increases when the patient backward bends, then the side that the sacrum has rotated to (the shallow side) will be the side that is fixed posteriorly. This dysfunction is a counter-nutated sacral torsion as in a L-on-R sacral torsion or a R-on-L sacral torsion.
If, however, with your patient still in the backward-bent position, the sacral rotation becomes level (it seems to disappear), then the side opposite to the side of rotation (think back to the neutral test of sacral sulcus) is the side that is fixed anteriorly. This is a nutated sacral torsion as in a R-on-R sacral torsion or a L-on-L sacral torsion.
I like the way this is interpreted in DeStefano (2011), which contains the following statement (overleaf) regarding sacral torsions:
“Forward torsions become asymmetric in forward bending and become symmetric in backward bending. The posterior torsions are the reverse, they get more asymmetric in backward bending and symmetric in forward bending.”
Bilaterally Nutated/Counter-Nutated Sacrum
I have left bilateral sacral nutation (forward) and bilateral sacral counter-nutation (backward) till the end of the discussion, since they only occur very rarely and are also often missed by an examiner. Most of the initial tests (such as the standing forward flexion test) will turn out to be negative, and also the levels of the sacral base and the ILA will be level; however, the stork test will demonstrate a bilateral restriction and is of value to the overall diagnosis. These sacral dysfunctions are generally related to the 5th lumbar vertebra (L5); for instance, if the sacrum is bilaterally nutated, it will cause an extension position of L5, whereas if the sacrum is bilaterally counter-nutated, L5 will be held in a flexed position. The consequences will be the change in lordosis curvature and the positive or negative result from the lumbar spring test.
Symphysis Pubis Dysfunction
The pubic bone tends to be either superior or inferior, although some authors discuss other types of potential symphysis pubis dysfunction (SPD). Here we will focus on:
• Superior pubis
• Inferior pubis
Tables 12.6 and 12.7 summarize all of the specific testing and palpatory findings for SPDs.
| Superior pubis | Inferior pubis | |
|---|---|---|
|
Standing forward flexion test |
Left |
Left |
|
Pubic tubercle |
Superior |
Inferior |
|
Inguinal ligament |
Tender on palpation |
Tender on palpation |
Table 12.6. Symphysis pubis dysfunctions—left side.
| Superior pubis | Inferior pubis | |
|---|---|---|
|
Standing forward flexion test |
Right |
Right |
|
Pubic tubercle |
Superior |
Inferior |
|
Inguinal ligament |
Tender on palpation |
Tender on palpation |
Table 12.7. Symphysis pubis dysfunctions—right side.
To be honest, I feel that this area of the pelvic girdle (the symphysis pubis) is probably the least assessed and consequently the least treated, and this also applies to me, especially when I am with my own patients. I would say that some therapists more than likely tend to focus on the area of the pain, without realizing that part of the problem potentially lies in a different area. Recall the wise words of Dr. Ida Rolf: “Where the pain is, the problem is not.” This could not be any truer than when looking for dysfunction within the SPJ.
Case Study
When an excellent physiotherapist and a personal friend of mine called Gordon Bosworth was mentoring me in my early osteopathy studies, I remember him assessing a young male who was part of the Olympic bobsleigh team; he had what had been diagnosed as a typical groin strain of the adductor longus muscle and the team doctor had recommended treatment through the use of a steroid injection.
The patient decided not to have the injection but to see the team’s physiotherapist (Gordon) instead. I remember actually watching the patient being assessed (in a similar way to that mentioned in this chapter); Gordon came to the decision that this patient had an iliosacral dysfunction on the right side and corrected that dysfunction using the techniques I will be demonstrating in Chapter 13. I then watched Gordon assess the SPJ and once again he said a dysfunction was present and then proceeded to correct the underling issue by using a specific MET for the SPJ (also explained in Chapter 13). After performing the realignment techniques, he retested the area of the pain by doing a resisted adductor test; to my surprise, the pain had completely disappeared. From that moment on, I knew that this joint demanded a bit more love and attention, as it could just be the key to solving the overall problem.
When trying to decide on the side that is dysfunctional, the first thing that is relevant is the standing forward flexion test. So if, let’s say, the standing forward flexion test is positive on the left side, you know that a dysfunction is present and that it is located specifically on the left side. The second thing to consider is palpation of the bony landmarks: if you palpate the area of the pubic tubercle and you determine the level to be cephalic/superior compared with the opposite side, you know that a superior pubis condition exists (only if the standing forward flexion test is positive on that side). The third thing that also confirms the diagnosis is tenderness of the inguinal ligament on palpation.
How to Decide Which Dysfunction Exists
Out of all the tests I have shown you, I consider the key ones to be the standing and seated forward flexion. I say that because these tests specifically indicate the side of the body on which the dysfunction is present. If your patient bends forward in the standing position, and the left side of the PSIS travels further than the right side, the conclusion is that they have either an iliosacral dysfunction or a SPD on the left side. However, if the standing flexion test is negative (i.e. the thumbs move symmetrically when the patient forward bends), but you notice that your left thumb moves more cephalically than your right thumb during the seated forward flexion test, the indications are that a sacroiliac dysfunction is present on the left side.
The standing and seated forward flexion tests do not actually tell you what is wrong, in terms of the actual dysfunction that is present: they only give you some of the necessary information regarding the side on which the dysfunction exists. It therefore makes sense, especially as a starting point, to treat the side that tests positive in the standing/seated forward flexion tests. During the examination process, you may notice that what you consider to be the side of the fixation might not actually be the painful side for the patient’s presenting symptoms. The side that is presenting with pain could be the side that is doing all the motion (hypermobile) and is compensating for the side that is fixed (hypomobile).
As a sort of recap (which I hope will help you to understand exactly what I am trying to put across), let’s think about what I said in the previous paragraph. In general, if the standing flexion test is positive for the left side, then the dysfunction is present on that same side, possibly indicating an iliosacral or even an SPD. This test will be part of the process that will help you ascertain what the dysfunction is and formulate a treatment plan. If, however, the seated flexion test is positive, this indicates a sacroiliac dysfunction on the tested side and not an iliosacral dysfunction or SPD. Just to complicate matters somewhat, you can have a standing forward flexion test indicating positive on the left side (iliosacral/pubic dysfunction), and a seated forward flexion test indicating positive on the right (SIJ dysfunction), both at the same time.
Unfortunately, it is never as easy as it might seem. Remember what Schamberger (2013) says: an iliosacral upslip (in isolation) and a true LLD have no correlation to the standing forward flexion test. With a right upslip, for example, the right PSIS remains higher than the left to an equal extent throughout the full range of flexion carried out in either a standing or a sitting position. Basically, it would appear to be a false positive because of the motion of the right PSIS; however, the left PSIS traveled an equal distance, making the test negative. Please bear these things in mind when you are reading other texts about the lumbopelvic complex, and try to be a little open-minded, especially when you are assessing your own patients and athletes.
The Next Step
I hope that now you have reached this stage of the book, the jigsaw puzzle pieces are forming a recognizable picture. Perhaps the picture is not absolutely clear yet, but if you have understood what I am trying to say, then some image should at least have developed in your mind. Be honest with yourself: if you do not quite understand the content of each of the chapters, then I suggest you read them again, or at least certain parts, before continuing to Chapter 13 and beginning to actually treat common pelvic dysfunctions.
I say that because if you truly do not understand the concepts and the underlying biomechanics of the pelvic girdle, then how will you be able to treat patients effectively? That said, the techniques I demonstrate in the next chapter are very safe to perform, as the majority of them are soft tissue techniques, specifically METs. It would therefore be acceptable if you wanted to practice them on a colleague first, before actually using them on real patients with real symptoms. I would still recommend that you have a good understanding of all the potential dysfunctions that your patient could present with to your clinic, before you unreservedly say that you are an effective therapist and that what you plan to do in terms of treatment will be of value to your patient.
