ONE NICE THING ABOUT CROCHET is that you need only two things: a hook and yarn. Of course, there are many other useful tools and accessories that can make your crocheting life more enjoyable. Let’s explore some of the many options on the market, beginning with the hook.

Q What are the differences among hooks?
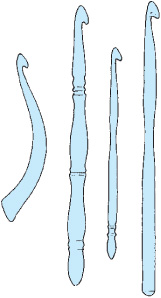
A Hooks are made of plastic, metal, wood, nylon, or bone. Some have a thumb rest; others have a straight shank with no thumb rest. The handle may be cushioned or shaped. Some have an inline head while others have a tapered head with a tapered throat. When you crochet with thread, you use a steel hook that may be so tiny that you can barely see the shape of the head.

hook variations
And those are just the regular hooks! There are also specialty hooks. Hooks used for Tunisian crochet have a long straight shank that resembles a knitting needle. Double-ended hooks have a hook at each end of a long straight shank.

double-ended hook

afghan hook
Q With all the choices available, how do I know which hook is best?
A Choose the style hook that is most comfortable for your hand. It should be of good quality, with no rough spots. Some people prefer to work with a certain brand of hook or with hooks made from a certain material. And, of course, the size of the hook should be appropriate for the yarn or thread you are using. No matter what type of hook you have, the shank is the major determining factor in the size of the stitch.
You may find that you prefer different types of hooks for different yarns and stitch patterns. Slippery yarns like rayon might be easier to manage with a “sticky” wooden hook, while fuzzy yarns might work up faster when you use a slick aluminum hook.
Q How are hooks sized?
A Hook sizes can be described in US or metric terms. Often US terms include both letters and numbers. Standard crochet hooks range from US size B/1 (2.25 mm) through jumbo size S (19 mm). But beware! Hook sizes may vary from manufacturer to manufacturer. There is no guarantee that one company’s size H (5 mm) hook is the same size as another company’s, even when both are described in metric terms. In addition, numbering systems have changed over time, even with hooks from the same manufacturer. It is always best to use a hook gauge to determine the size of your hook in metric terms.
SEE ALSO: Page 21 for description of hook gauge.
Q What size hook do I need?
A When you follow a published pattern, the instructions suggest a size, but this is only a starting point. You still need to work a swatch to check your gauge. If you need to change from the suggested hook size in order to get correct gauge then by all means do so. Having the correct gauge is always more important than using the suggested hook size.
This chart is a compilation of hook and size ranges from various sources. Keep in mind that the great variation of numbering systems over the years can greatly confuse things. For example, a comparison of hook charts from a number of sources lists a 4.0 mm hookas either a G/6 or an F/5.

Note: The steel hooks used for thread crochet have their own numbering system ranging from a tiny US size 14 (.75 mm) through a still smallish US size E/4 (3.5 mm).
If you aren’t following a published pattern, you need to match the hook to the yarn or thread you are using: Larger yarns require larger hooks. Most yarn labels suggest an appropriate-sized hook for that yarn.
SEE ALSO: See pages 124–25, for working a swatch; and pages 34–35, Yarn Weights with Recommended Hook Sizes and Gauges.
Q How do I hold the hook?
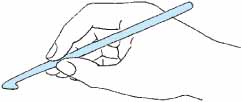
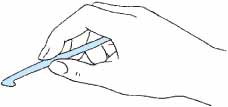
A Hold the hook in your dominant hand in the way that is most comfortable for you. The most common ways to hold a hook are shown below. If you hold the hook a different way from those shown, and it works for you, then don’t feel you must change your technique.

pencil hold

knife hold
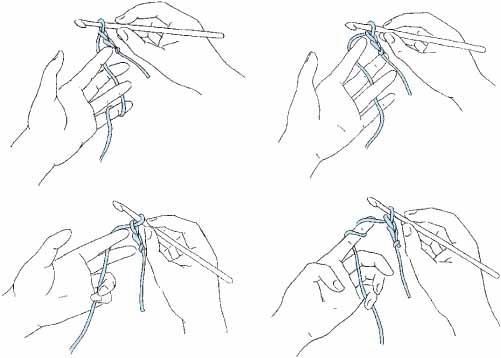
A The yarn from the ball needs to be tensioned through the fingers of the hand not holding the hook. The end of the yarn attached to the hook goes over your forefinger. The yarn should move freely through your fingers, while still being within your control. You may want to wrap it under and over other fingers in addition to your forefinger, or wrap it twice around your forefinger or pinkie. Experiment with ways to tension the yarn so that it is comfortable for you. Don’t worry if it feels awkward at first — with practice it will feel more natural.

various ways to hold yarn
Note: In these illustrations, the hand holding the yarn is shown palm up so that you can see the path of the yarn. When you are stitching, you should close your hand over the yarn so that you hold it with your palm down.
Some people choose to hold both the yarn and the hook in their dominant hand, and throw the yarn over the hook as if they are knitting. If you do this and you are comfortable with it, that’s fine, but if you are just starting out it’s worth learning to tension the yarn through the fingers of your other hand.
Q My mother and my friend hold the hook and yarn differently. Which way is correct?
A Neither is the only correct technique. It’s okay to hold the hook and the yarn in any way that is comfortable to you, even if it’s not one of the ways illustrated here. As long as you are happy with the consistency of the stitches and are comfortable while you are crocheting, you are correct.
Q When I crochet for more than an hour, my hands start to ache. Is there anything I can do to keep them from hurting?
A There are a number of precautions you can take to prevent injuries from cutting into your crocheting time:
Start with a hook that is comfortable for you. You may enjoy using a hook with a cushioned handle or a specially shaped grip. Hold the hook and yarn gently, and try varying the way you hold them. If you normally use the pencil hold, try the knife hold at least some of the time.
Support your shoulders and back — don’t slouch! Allow your work to rest on your lap so that you aren’t holding its weight with your hands. Support your arms and elbows while you stitch.
Some yarns are harder on the hands than others; stay away from inelastic cotton, silk, and linen if they cause problems.
Take frequent breaks to rest and stretch. Stretch your fingers out as far as possible for a count of ten, and then make a clenched fist for a count of ten. Repeat this several times. Rotate your wrists clockwise, then counter-clockwise. Shrug your shoulders up and down, and in circles.
Therapeutic gloves may help. You can find these at craft stores and yarn shops.
Most important, if you experience tingling or numbness in your hands, or if you have persistent discomfort, stop and consult a health-care professional. Crocheting should never hurt.
A Certainly! Hold the hook in your left hand and the yarn in your right hand, and stitch from left to right, instead of right to left.
If you are learning from a right-handed crocheter, or following a published pattern, you may have to make some adjustments, as most instructions are written for a predominantly right-handed world. If a right-hander is teaching you to crochet, sit opposite her and mimic her actions; you’ll be crocheting left-handed. Some books contain illustrations for both right- and left-handed stitchers. You can follow illustrations for right-handed crochet by holding a mirror to the side of the illustration, or by scanning the illustration into your computer and flipping it horizontally on a graphics program. (Note: To avoid copyright infringement, make copies for your own use only.) Because you are working from left to right, the shaping of some pieces will take place on the “other” side of the garment. In other words, if you follow cardigan instructions for the Right Front, you’ll be making the Left Front.
You may find that you can work just fine holding the hook in your right hand as right-handers do. If you can, just stitch “right-handed.”
Q What other tools do I need?
A Although a crochet hook and scissors are really the only tools you must have, a number of others are useful. You may want to keep a little tool bag handy, filled with some or all of these other practical tools:
Small, sharp scissors. These come in many styles. Keeping them at hand saves time and frustration.
Tapestry needles. Also called yarn needles, these blunt-tipped sewing needles have large eyes. They come in several sizes; you’ll want at least two sizes to correspond to the size of the yarns and threads you use most often.
Measuring tools. You’ll be less tempted to cheat on measurements if you keep a tape measure and a ruler at hand. A tape measure is good for measuring bodies; a ruler is best for measuring flat fabrics.
Hook gauge. Use a metal hook gauge to determine the size of unmarked hooks. The hook gauge contains a series of holes in graduated sizes. The holes are numbered in both metric and US terms. Slide the shank of your hook into the smallest hole it fits, then read the corresponding number to determine the size of the hook.
Plastic stitch markers. Available in a variety of styles, markers work better than pieces of yarn to mark stitches, as yarn can leave unwanted bits of fuzz in your fabric. Avoid the round markers meant only for knitting; you need a type that can be opened so you can hang it on a stitch.
Coilfree safety pins. Similar to safety pins, but without the yarn-grabbing circle at the far end, these little beauties are useful for marking stitches, holding pieces together for seaming, or keeping track of increases and decreases.
stitch marker with opening
coilfree pin
“Personal discomfort fixers.” Hand lotion, lip balm, and a nail file can prevent annoying interruptions to your stitching sessions.
A calculator. This is an important tool if you are doing your own designing, or adapting another’s design. If you are always a strict pattern-follower, you may leave this one out of your bag.
Note-taking tools. Keep a pen or pencil and paper handy to remind yourself where you are and what you have done. Get into the habit of making notes to yourself as you work. You may need to repeat something (or avoid it) later.
A row counter. This comes in handy when row counts are important and you are working a stitch pattern that is difficult to keep track of, or when you are using a fuzzy yarn that just defies counting. You may also want to use it when working sleeve shaping, or to ensure you have the same number of rows on the left and right fronts of a cardigan.
A variety of crochet hooks in different sizes. If you have alternatives near at hand, you are more likely to keep swatching until you get the right gauge.
SEE ALSO: Pages 124–25, for swatching.
A latch hook. Use this great little tool for weaving in ends too short or too bulky to fit into a yarn needle.
latch hook
Q I’m really into crochet. Are there any other tools that make the work easier and even more fun?
A There’s always something more! Ask for these great tools for your next birthday:
Magnifying glasses/reading glasses. If you are a certain age, and haven’t yet discovered the joy of reading glasses for close work and small print, give these a try. Yarn and craft stores also carry magnifying glasses on a stand, or ones that hang around your neck and rest against your chest.
A ball winder and yarn swift. These tools, used together or separately, are wonderful time savers for winding hanks of yarn into flat, center-pull balls. You can also use the ball winder to rewind your yarn if you have to rip out a large expanse of stitching.
ball winder and yarn swift
Daylight lamp. This is a special light bulb that emits full spectrum light. These bulbs can help you choose colors and make it easier to see dark stitches in the evening. Some companies make a combination lamp and magnifying glass.
Hook cases. Use these to corral and organize your hooks. Unfortunately, it’s still up to you to put them away when you are finished!
Pompom maker. Pompom makers are an inexpensive luxury. You can certainly make pompoms using cardboard circles, but if you are going to make a lot of them, pompom makers are a treat.