CHAPTER 7
A Whole Cloth
IT’S TIME Now TO EXPLORE THE FEATURES of crocheted fabrics and the techniques used to make them.
Search for the Perfect Fabric
Q Is fabric really the right word to use when talking about crochet?
A Like weaving or knitting, crocheting is a method of creating a fabric. It may be lightweight or heavy, lacy or dense, smooth or textured. It may drape fluidly over the hand, or stand stiffly at attention. These fabric characteristics are a function of stitch pattern, fiber, and gauge. While there is no one perfect crocheted fabric for every use, there are features that make various ones ideal for different purposes.
Q What is drape?
A The drape of a fabric is an expression of how the fabric hangs — how stiff or how supple it is. Several things influence the fabric’s drape:
 The gauge of the stitching in relation to the size of the yarn. A tight gauge creates a stiff fabric.
 The yarn itself. Some yarn is naturally stiff, but it may feel less so after washing. Linen softens up considerably after washing, as do some wools. Wash and block your swatch and see how you like it then. Some less expensive synthetic yarns have a plastic-like feel that makes them more suited to craft projects than to crocheted or knitted garments.
SEE ALSO: Pages 237–45, for blocking.
 The stitch pattern. Single crochet fabric is stiffer than double crochet fabric. If you are having trouble getting a fabric you like with the basic stitches, try working an extended stitch to see if that loosens things up, but be aware that it may change your gauge.
SEE ALSO: Page 76, for extended stitches.
 Your technique. Relax! If your goal is a fabric with a nice, soft drape, be sure you are holding the hook gently and allowing the yarn to flow through your fingers.
If the fabric is still too stiff despite your best efforts, switch to a different yarn.
Q Is there a right side to my fabric?
A Probably. If you are doing a highly textured stitch like cables or bobbles, the “interesting” side is the right side. When working in rounds, the smoother side is the right side. Ultimately, however, the right side is whichever side you want it to be.
Q How do I tell which is the right side when I’m working back and forth?
A Unless your pattern says otherwise, the first row worked after the foundation chain is usually the right side. You may want to hang a stitch marker on the front of the fabric, so you’ll be able to recognize the right side from the wrong side on later rows.
Q Why are my edges uneven?
A You may not be keeping a consistent number of stitches on each row. Review the concept of using a turning chain as a stitch, and count your stitches after every row until you are confident that you are maintaining the same number.
SEE ALSO: Page 88, for turning chains.
A I can achieve straight edges with most patterns, but I have difficulty when working ripple stitch. Is there anything I can do about this?
A You may not be working enough stitches into the beginning and ending of each row. Ripple stitch rows usually begin and end with several stitches worked into the same base stitch. Reread your pattern instructions to see if you are following them correctly.
Q Why is my fabric getting wider?
A There are several things that may cause this:
 Your foundation chain may be too tight in relation to your stitch pattern. Rip out your work and start over with a looser foundation chain.
 You may be increasing unintentionally. If you are using a turning chain as a stitch, you may be putting your hook into the base of the chain in every row, which creates an increase.
 You may have relaxed your gauge as you became comfortable with the stitching. Measure the newest part of the fabric to determine if you need to change to a smaller hook.
 You may have picked up the wrong hook and started using a larger hook size or a different brand of hook. Have you borrowed the hook from this project to use in a different project? Check your notes to make sure you are using the same hook you started with.
Q Why is my fabric getting narrower?
A This is a common problem. Here are possible causes, with some easy solutions:
 You may be decreasing unintentionally. At the end of each row, make sure you are inserting your hook into the top of the turning chain of the previous row if the turning chain is counted as a stitch. Count your stitches after every row until you are confident that you are maintaining the correct number of stitches.
SEE ALSO: Pages 87–90, for turning chains.
 You may have tightened your gauge as you worked. Check to see if you need to change to a larger hook.
 You may have picked up the wrong hook and started using a smaller hook size or a different brand of hook. Check your notes to make sure you are using the same hook you started with.
Q Why is there a hole where I’ve been stitching?
A Here are several things to look for:
 You may have unintentionally skipped a stitch.
 If the hole is at the edge of the fabric, it could be caused by the turning chain. Try making the turning chain one chain shorter and see if that helps.
SEE ALSO: Pages 87–90, for turning chains.
 If the hole occurs where you’ve skipped a stitch in order to decrease, use a different type of decrease.
SEE ALSO: Pages 102–3, for decreases.
 If the hole occurs where you’ve worked many stitches into one, as in a shell stitch, that’s just a part of the stitch pattern and is hard to avoid.
 If the hole occurs where you started a new yarn, fix the hole when you weave in the tail.
Q Why doesn’t my piece look the same when I work in rounds as when I work back and forth?
A When you work back and forth, the two different sides of a stitch pattern show on alternating rows. When working in rounds, only one side of the stitch pattern shows.
Q Is it possible to make both back-and-forth and round-and-round stitching look the same?
A Yes, it is. Here are some suggestions:
 To make rounds look like back-and-forth fabric, join the rounds at the end of each row, then turn, work a turning chain, and continue in the other direction. Doing this at the end of each round creates a fabric in which the front and the back of the stitch pattern show on alternating rounds.
 To make back-and-forth fabric look like in-the-round fabric, break the yarn at the end of every row and work from right to left only on each row (left to right for Lefties). This is more awkward than the first method, so plan ahead. If you are making a sweater in the round, it is easier to work the rounds below the armholes as described above. You can then work the sections above the armholes back and forth, maintaining the same visual appearance to the stitch pattern.
Q Why is my rectangle skewed?
A A non-square fabric can stem from a number of sources:
 Not using turning chains properly. Be sure that all turning chains are the right height for the stitch you are using. If appropriate, treat the turning chains as stitches and work into them. If they are not treated as a stitch, do not work into them at the end of a row.
SEE ALSO: Pages 87–90, for turning stitches.
 A stitch pattern that biases the fabric. See if you can you work into the stitch pattern more loosely to alleviate the bias.
 A yarn that biases the fabric. A poorly spun, unbalanced yarn may cause problems. Try a different yarn to see if the swatch is still skewed. If your pattern allows, and it is the stitch pattern or yarn that is causing the bias, you might try working back and forth in the round to see if the opposite pull of the stitches straightens the fabric.
SEE ALSO: Page 150, for working back and forth in the round.
Q How can I make a ribbed fabric?
A Alternating stitches of front-post double crochet and back-post double crochet over several rows creates a ribbed fabric. Keep in mind that this type of ribbing does not have the same characteristic stretch as a knit ribbed fabric.
SEE ALSO: Page 96, for front- and back-post double crochet.
Working with Color
Q How do I change colors within a row or round?
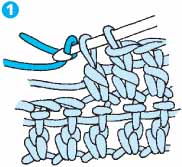
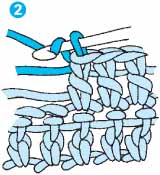
A Follow this procedure on the last stitch before you want the new color to start:
1. Work until there are two loops on the hook. Leaving a tail of about 6″ (15 cm) of the new color, yarn over hook with the new color.
2. Pull through both remaining loops on hook. Now continue on in the new color.


changing colors
Q Why do my color changes look messy?
A Make sure you are starting the new color soon enough; that is, when there are still two loops of the old color left on the hook. Do this even at the end of a row/round, when the first stitch of the next row/round will be in a new color.
If you have been securing the tail of the old color by working over it in the new color stitches, you may be getting some telltale color showing through. Wait until the piece is finished to worry about those ends, then work the tails into the back of the same-color stitches.
You could be having problems with the tension on the old and new stitches; if so, just adjust the size of the stitches when you weave in the ends.
Q How do I incorporate two or more colors on the same row or round?
A You work with only one color per stitch. The challenge is what to do with the other color. The solution depends on how far the other yarn has to travel to its next stitch. You may carry the unused yarn loosely across the back of the work (called stranding), catch it behind the stitches you are working, or drop it and start a new length of yarn for each section of color (called intarsia).
Q How do I strand colors?
A When you reach the color change, simply drop the color you just used (color A), pick up the new color (color B), and work a section in color B. When you pick up color A again, be sure to leave a bit of slack in the “float” behind color B so that the fabric is not distorted. You can carry both yarns across a row or throughout a round in this manner. If the floats are more than a few stitches wide, hold the unused yarn at the top of the previous row and work around this strand every few stitches when you are working with the other yarn.
If you have to carry the yarn a bit further, another option is to catch the unused color behind the base of every stitch you work, as you do when securing tails.
SEE ALSO: Page 55, for securing tails.
Q How do I work intarsia?
A Intarsia uses separate lengths of yarn for each section of color. Start by determining how many different color sections you will be working across the row, and cut a corresponding number of yarn lengths in the appropriate color. Each separate length of yarn should be about 2-3 yards (2-2.5 m) long. Work in the first color (Color A) as indicated, then drop Color A and begin the next color (Color B), allowing Color A to hang on the wrong side. When you have completed the B section, start with a new, separate length of Color A (or the next color), and continue across the row, using a separate piece of yarn for each color section. On the following row, the color of yarn you need should be waiting there for you to pick up as you come to each color change.
Q How do I decide which method to use?
A Sometimes this decision is a matter of personal preference. Stranding usually works well for two or three colors that alternate across a row. Hiding the unused yarn behind each of the contrasting color stitches allows you to switch back and forth easily between the two colors. However, because it creates a thicker fabric than intarsia, it is usually unsuitable for more than two colors at a time. It may also be difficult to hide a highly contrasting color within the stitches.
When you have large blocks of color, or units of color that are isolated, intarsia is usually the most appropriate method. Use intarsia when the length between colors makes it difficult to do stranding or when the number of colors used in a row would make stranding impractical.
As always, it’s a good idea to practice your color technique on a swatch before beginning your project.
Q My yarn gets tangled on the wrong side when I work with colors. Am I doing something wrong?
A You aren’t doing anything wrong; it’s just a feature of some types of color work. Some crocheters wind lengths of yarn onto yarn bobbins to make the yarns more manageable. Others prefer to cut long lengths of yarn and allow them to hang out and look messy on the wrong side of the work, pulling each strand free of its brothers as they work (my favorite). Still others prefer to use one of several types of commercially made yarn holders.
If you alternate the way you turn the work at the end of each row (clockwise one time, counter-clockwise the next) the colors will untwist themselves every other row. This only works, however, if you don’t twist the colors when you pick up a new color; just drop the old color and hold it to the right (Lefties: to the left) when you pick up the new color.
Q Why does my fabric pucker when I’m working with different colors?
A You are pulling the yarn floats too tightly across the back of the fabric. Take care to allow plenty of slack as the unused yarn travels across the back of the stitches. You may want to use one of the other color methods instead.
Q Can I carry unused yarns up the side of the fabric?
A If the yarn doesn’t have to travel very far (no more than a few rows), it’s fine to carry an unused yarn up the side of a piece. Make sure you keep it loose, and catch it once or twice around a turning chain. However, cut the yarn and start it again if you are using lots of different colors. If carried vertically, several yarns together create too much seam bulk.
Q How do I read a color graph?

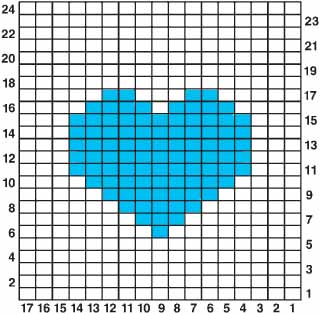
graph for pattern worked in rows
A Each square in a color graph indicates one stitch as it appears from the right side of the fabric. Each row of the graph indicates a row or round of stitching. Starting at the lower right-hand corner of the graph (Lefties: lower left-hand corner), read each square from right to left (Lefties: left to right) for a right-side row. Turn the work, then read each square on the second row from left to right (Lefties: right to left).
If you are working in rounds, read every row from right to left (Lefties: left to right) since the right side of the fabric faces you at all times. If you are working back and forth in rounds to look like back-and-forth stitching, treat it as you do row-by-row stitching.
A graph often has lines indicating a pattern repeat. Work the area between the lines as many times as necessary, always working in the same direction.
Q I’d like to try a pattern with a picture. Can you advise me on how to manage the colors?
A Graphs indicate where to put the colors. When it’s time to change colors, use the same method as for adding a new yarn: Work until the last two loops are remaining on the last stitch of the old color, then yarn over with the new color and continue working.
SEE ALSO: Page 174, for stranding; pages 174–75, for intarsia.
Better Shaping
Q Can I avoid stair-step shaping on the neck and arm-holes of a piece?
A Many published patterns give shaping instructions that leave a stair-step edge at the neck and armholes. It can be difficult to work with these jagged edges; a smooth curved edge is much easier to seam or finish with a border.
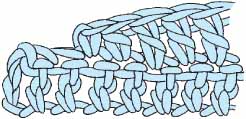
To refine the shaping of a curved edge, take advantage of what you know about stitch heights: decrease the height of the last stitch or two of a shaped edge. For example, on shoulder shaping your pattern might read: “Ch 3, dc to last 3 sts. End off.” This creates a shorter row by omitting the last 3 stitches, but leaves an abrupt angle where the double crochet ends. Instead, you could work, “Ch 3, dc to last 5 sts, hdc in next st, sc in next st. End off.” This creates a more gradual slope.

gradual shaping
SEE ALSO: Page 76, for stitch heights.
 The gauge of the stitching in relation to the size of the yarn. A tight gauge creates a stiff fabric.
 The yarn itself. Some yarn is naturally stiff, but it may feel less so after washing. Linen softens up considerably after washing, as do some wools. Wash and block your swatch and see how you like it then. Some less expensive synthetic yarns have a plastic-like feel that makes them more suited to craft projects than to crocheted or knitted garments.


