In Chapter 1, you learned that EV3 robots consist of motors, sensors, and the EV3 brick. To make it easy for you to understand how each of these work, you’ll begin with only some of them.
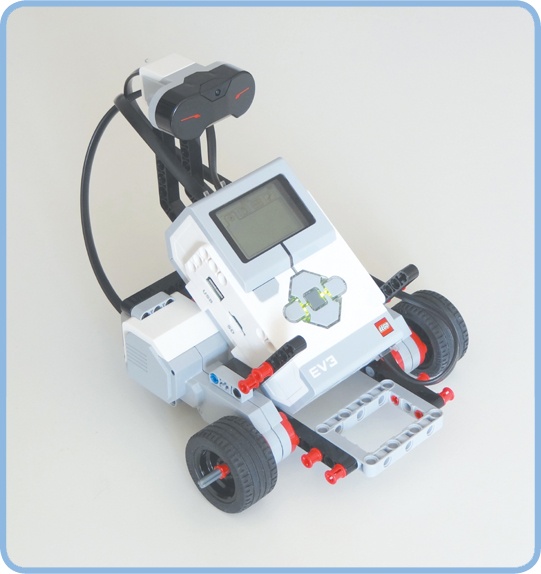
In this chapter, you’ll use the EV3 brick and two Large Motors to build a wheeled vehicle called the EXPLOR3R, as shown in Figure 2-1. You’ll also add a receiver for the remote control. After you finish building the robot, you’ll learn how to navigate the EV3 by using its buttons and how to control your robot remotely.
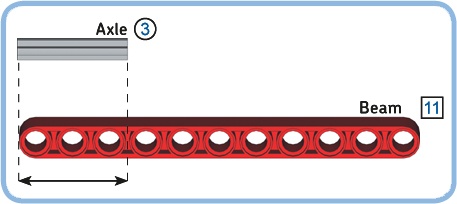
The LEGO MINDSTORMS EV3 set contains many beams and axles, which come in a variety of lengths. To help you find the correct element, their lengths are indicated in the building instruction steps, as shown in Figure 2-2.
To find the length of a beam, simply count the number of holes (in the figure, the beam’s length is denoted by the box with the “11”). To find the length of an axle, put it next to a beam and count the number of holes it covers (in the figure, the axle’s length is indicated by the circle with “3”).
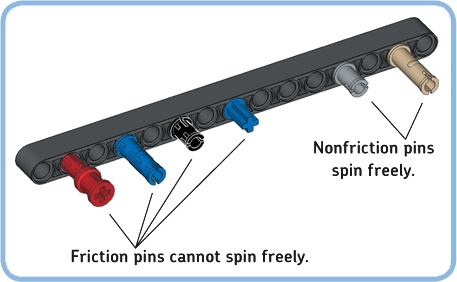
When connecting beams or other elements using pins, be sure to select the correct pin based on its color, as shown in Figure 2-3. This is important because nonfriction pins spin freely (and are useful for smooth hinges) while friction pins resist rotation (and are more useful for rigid constructions).
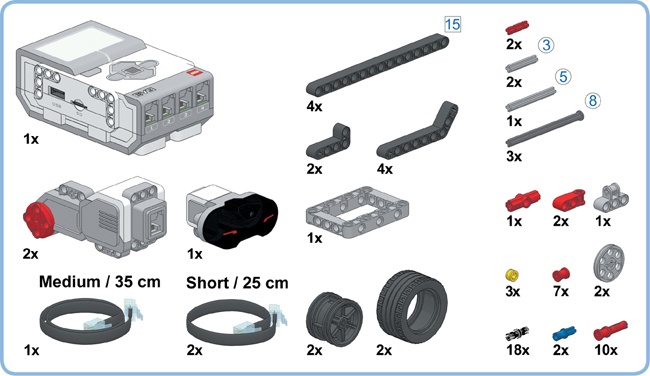
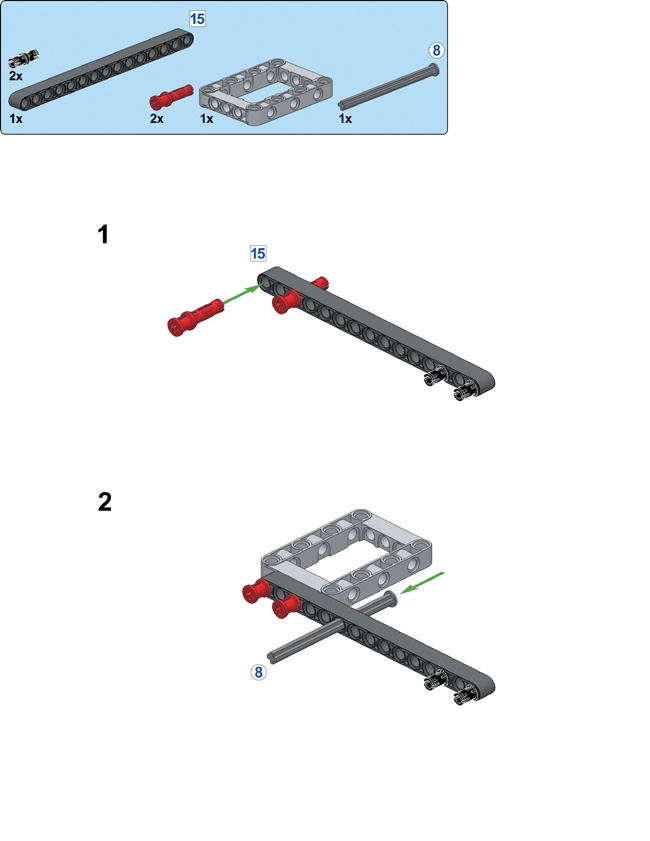
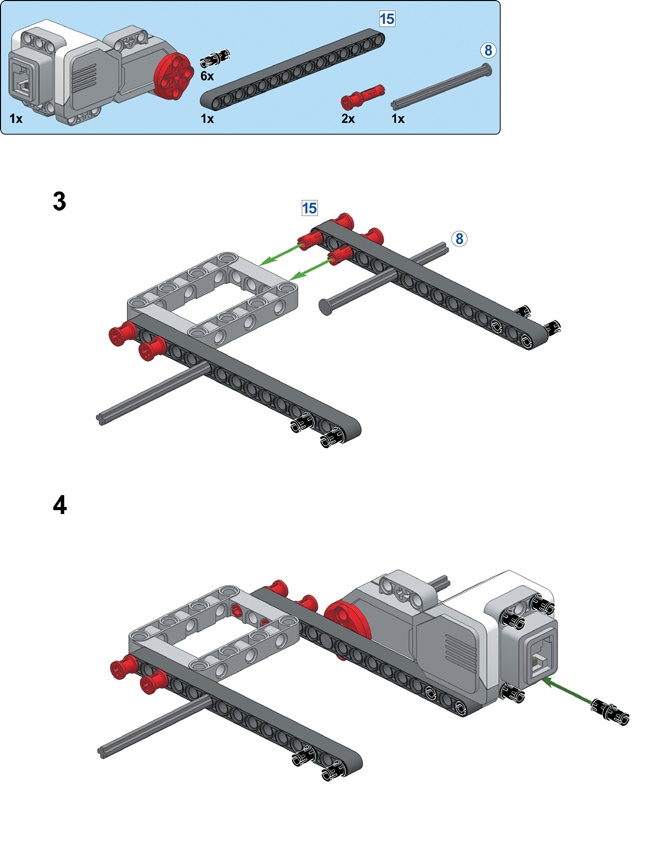
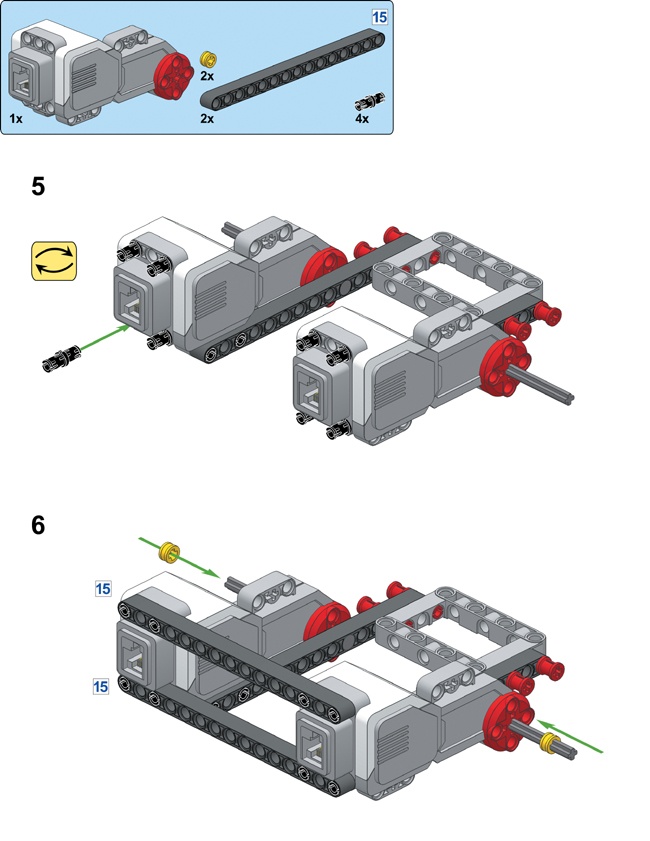
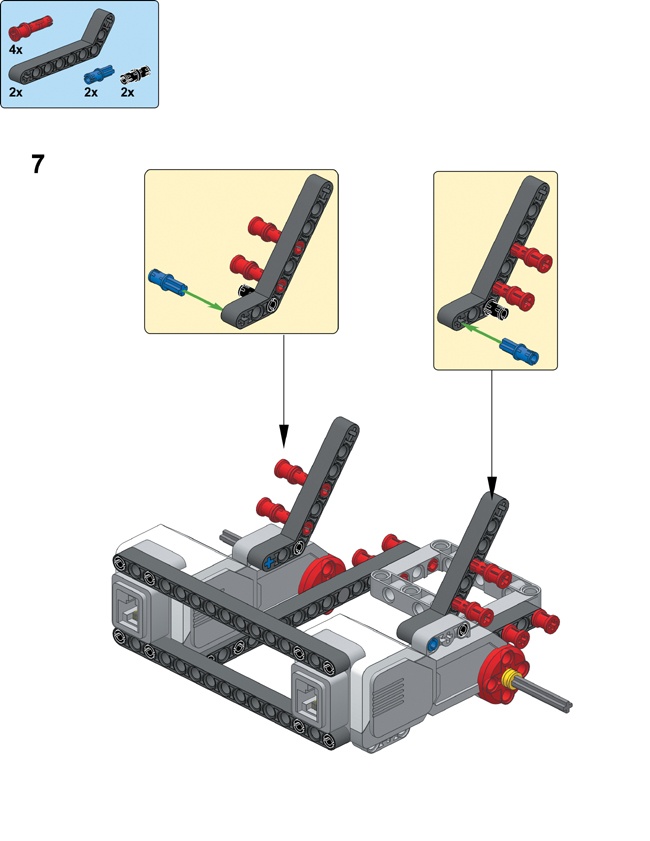
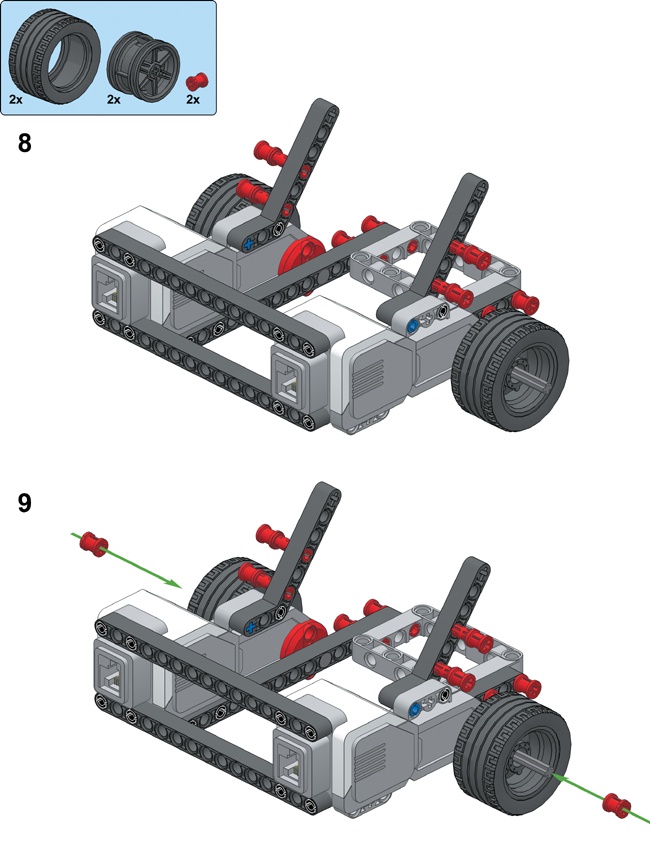
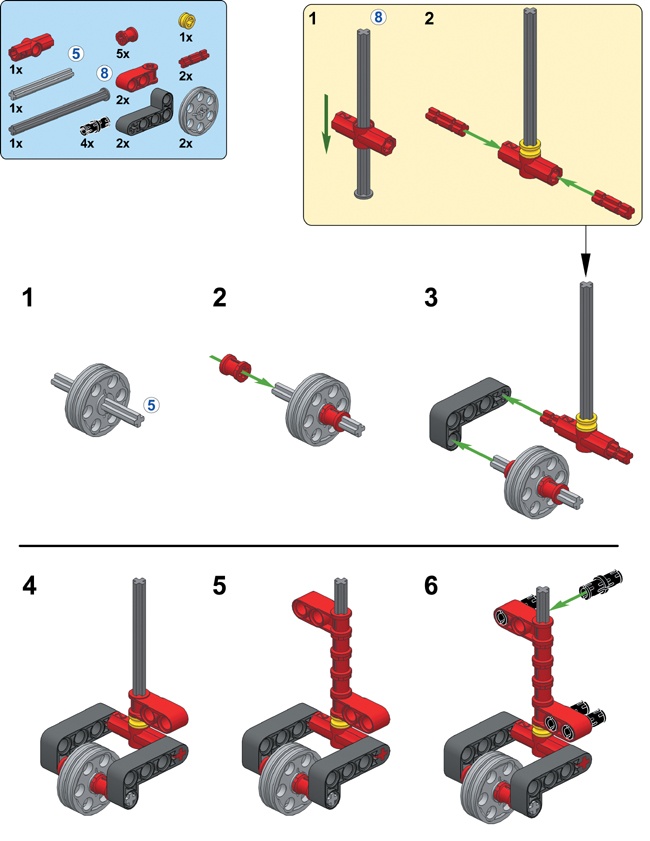
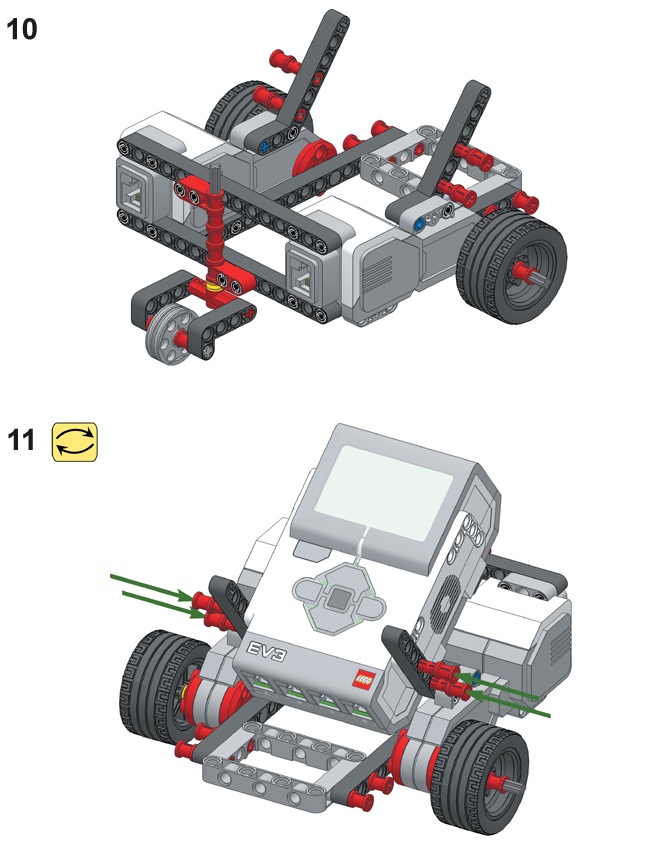
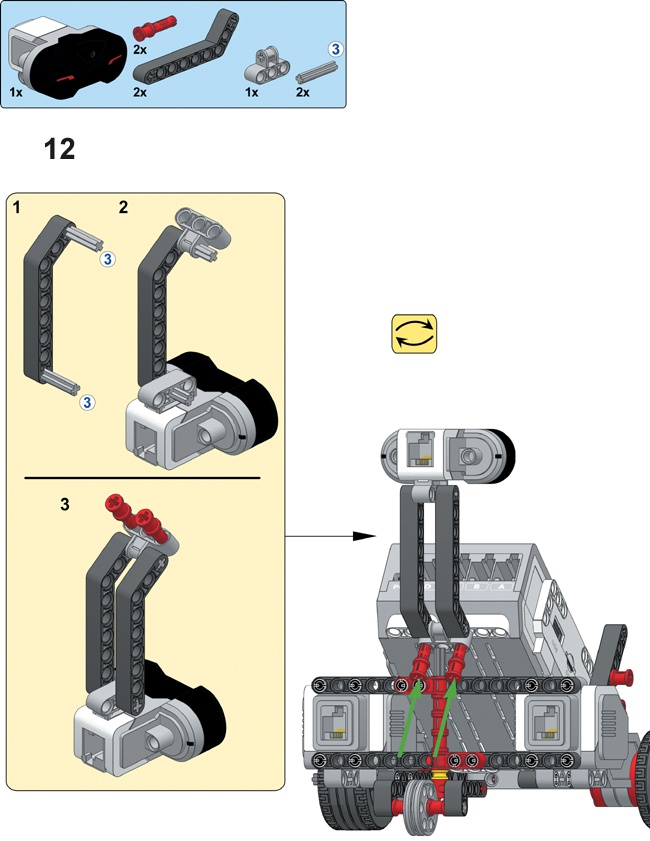
To begin building, select the pieces you’ll need by referencing the bill of materials, shown in Figure 2-4. Next, assemble the robot as shown in the steps on the pages that follow.
Congratulations—you’ve finished building the EXPLOR3R!
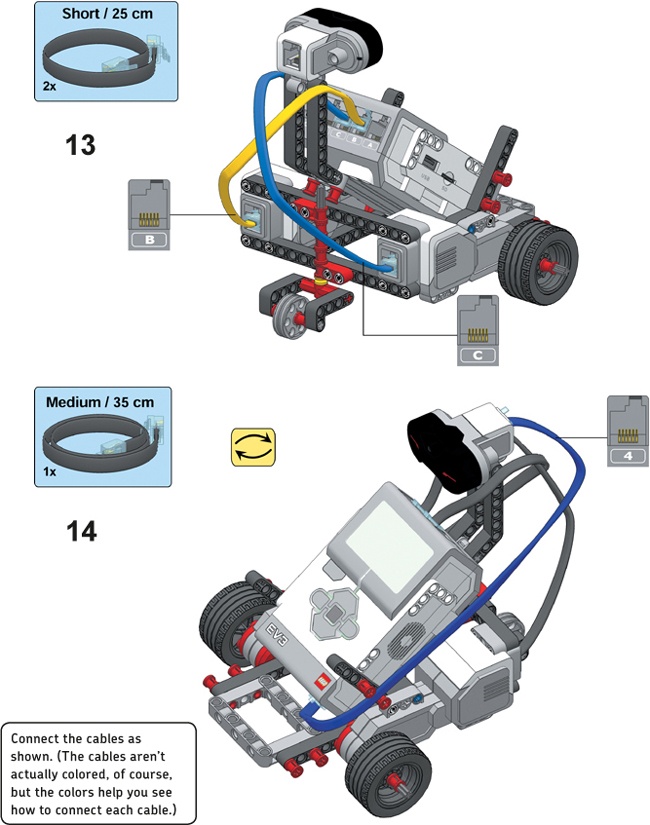
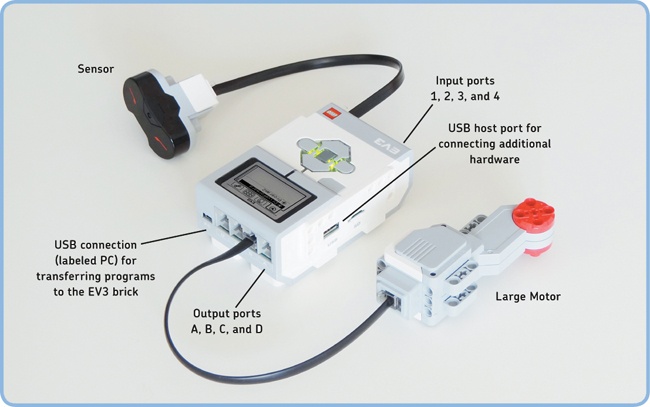
Now let’s talk about the wires you just connected to the EV3 brick. You connected the two Large Motors to output ports on the EV3, labeled B and C. Both Large and Medium Motors should always be connected to output ports—to port A, B, C, or D—as shown in Figure 2-5. Sensors should be connected to the input ports 1, 2, 3, or 4. (I’ll discuss sensors in detail in Part II of this book.)
Your EV3 set has three types of cables: four short cables (25 cm, or 10 inches), two medium-sized ones (35 cm, or 14 inches), and one long cable (50 cm, or 20 inches). Always string the cables around your robot so as not to interfere with any rotating elements (like wheels), and make sure they don’t drag on the floor when the robot moves around.
The EV3 brick has two USB connections. The one labeled PC at the top of the EV3 (see Figure 2-5) is used to transfer programs from your computer to your robot. The USB host on the side of the EV3 is used to connect external devices, such as a Wi-Fi Dongle, to the EV3. A microSD card slot next to the USB host port allows you to add to the 4MB of free space on the EV3’s built-in storage. (The built-in storage will be enough for everything we do in this book.)
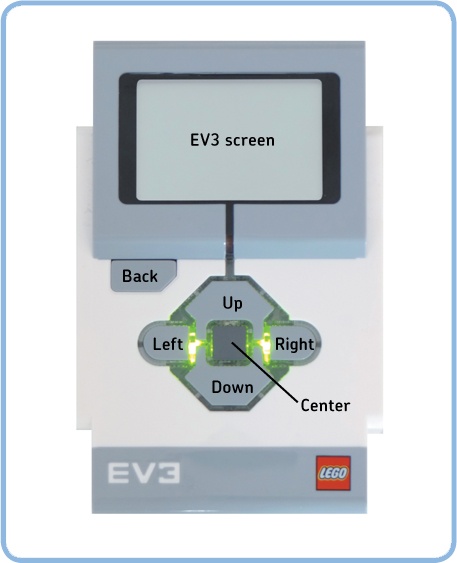
Before you move on to programming in Chapter 3, let’s try using the buttons on the EV3 brick (shown in Figure 2-6) to navigate around the menus and to run stored programs.
Figure 2-5. You connect motors to output ports and sensors to input ports. The USB connection labeled PC is used to transfer programs to the EV3.
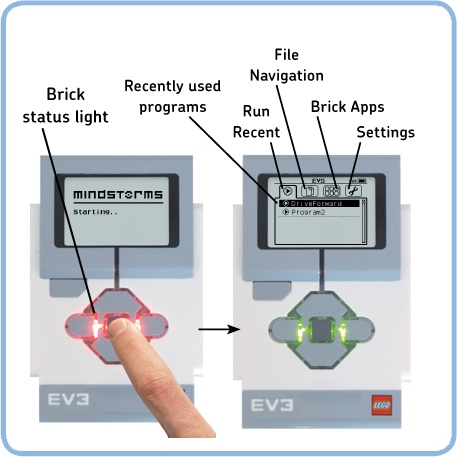
To turn on the EV3, press the Center button, as shown in Figure 2-7. The brick status light should turn red while the EV3 starts up. Once startup is complete (in about 30 seconds), the status light should turn green and you should see a menu with four tabs on the screen. You’ll learn to use each of these menus in later chapters. Each tab contains a specific set of files or functions, listed here from left to right:
Run Recent: This tab contains recently run programs.
File Navigation: This tab contains a folder for each programming project you’ve transferred to the EV3. Inside each folder, you’ll find programs and related files, such as sounds.
Brick Apps: This tab contains applications for viewing sensors and controlling motors manually or remotely.
Settings: This tab lets you set user preferences, like Bluetooth visibility and sound volume.
Figure 2-7. Turning on the EV3 brick with the Center button opens up a menu with four tabs. The Run Recent tab shown on the right contains recently used programs.
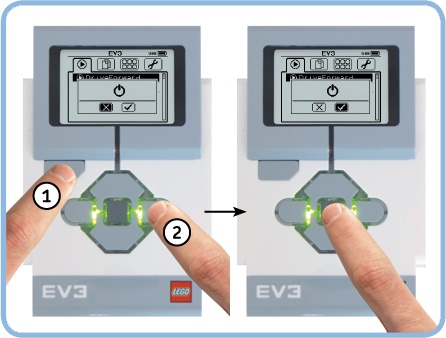
To turn off the EV3, return to the Run Recent menu and press the Back button. When you see the power off icon, either select the check mark to turn the EV3 off or select the X to cancel (see Figure 2-8). If you’re turning off the EV3 in order to replace the batteries, be sure to wait until the red status light is off, or you’ll lose all programs that you sent to the EV3 since you turned it on.
You can switch to any of the four tabs with the Left and Right buttons. Pressing the Back button takes you back to the Run Recent tab. You can select any item on a tab using the Up and Down buttons. To choose a selected item, press the Center button.
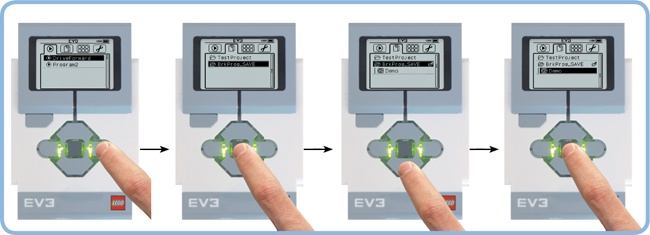
EV3 robots begin performing their actions when you select and run a program that has been transferred to the EV3. Although you haven’t transferred a program to the EV3 yet, you can try running a sample program that is already on the EV3 brick, called Demo. To test your EXPLOR3R, run this program by navigating to the File Navigation tab and selecting the Demo program, as shown in Figure 2-9.
If you’ve built everything properly, your robot should make some sounds, move forward, turn left twice, and display a pair of eyes on the screen. The green status light should blink while the program runs. To abort the running program, press the Back button. (Now that you’ve run the program once, it should appear on the Run Recent tab.)
Note
The Demo program is made using On Brick Programming, but you’ll run programs that you make on your computer in just the same way.
Figure 2-9. To run the Demo program, go to the File Navigation tab, select the BrkProg_Save folder, open it with the Center button, select the Demo program with the Down button, and press the Center button. You’ll find your own programs on the File Navigation tab as well. (In the figure, you can see a project I made called TestProject.)
Once you’ve finished building a robot, it’s important to test its mechanical functions before you start programming in order to identify problems like missing cables or gears.
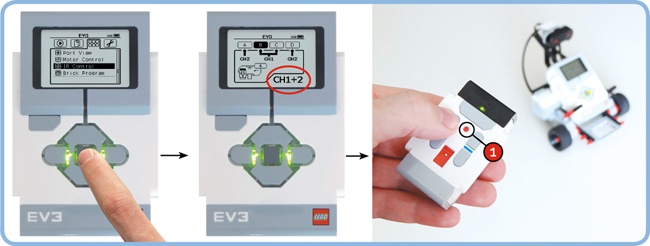
You can manually control your robot’s motors with the Motor Control and IR Control apps, as shown in Figure 2-10. Motor Control lets you run each of the motors using the EV3 buttons. IR (Infrared) Control allows you to control the robot with a remote. Select IR Control on the Brick Apps tab, and use the infrared remote control to make your robot move (see Figure 2-10). Not only is this a simple way to test your robot remotely, but it’s also a lot of fun!
Note
The Infrared Sensor acts as the receiver for the infrared remote. You can’t use the remote without the sensor. The IR Control app requires the sensor to be connected to input port 4, which is how the EXPLOR3R is set up.
Figure 2-10. To activate Remote Control mode, navigate to the Brick Apps tab and select IR Control. If the screen doesn’t show Ch1 + 2 in the lower-right corner, press the Center button again. In this configuration, you control the motors connected to ports B and C with the remote set to channel 1. (The red slider is all the way at the top.)
In this chapter, you learned to work with two essential robot components: the EV3 brick and motors. When you ran the Demo program, the EV3 switched on the motors, which made the robot move. In Chapter 3 and Chapter 4, you’ll learn how these programs work, as well as how to make your own programs with the EV3 software. The Infrared Sensor and infrared remote control will return in Part II of this book.
