Chapter 3 taught you the basics of how to create a new program and transfer it to the EXPLOR3R robot. In this chapter, you’ll learn how to use programming blocks to create working programs and how to make the EXPLOR3R move.
You’ll also learn how to make your robot play sounds and display text or images on the EV3 screen, and you’ll learn how to control the EV3 brick’s colored light. After you’ve had a chance to practice a bit with the sample programs in this chapter, you’ll be challenged to solve some programming puzzles by yourself!
EV3 programs consist of a series of programming blocks, each of which makes the robot do one particular thing, such as move forward for one second. Programs run the blocks one by one, beginning with the first block on the left. Once the first block finishes running, the program continues with the second block, and so on. Once the last block finishes running, the program ends.
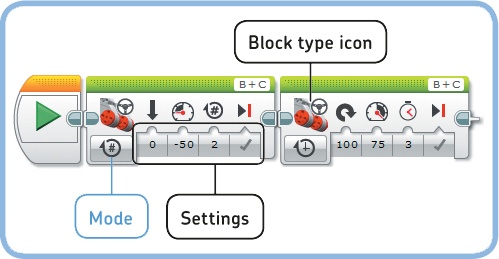
Each programming block has one or more modes and several settings for each mode. You can modify a block’s actions by changing its mode and settings. For example, in Figure 4-1, both blocks are Move Steering blocks, but they’re in different modes. Because the blocks use different modes and different settings, they make the robot perform two different actions.
There are many types of programming blocks, each with its own name and unique icon so you can tell them apart. Different types of blocks are meant for different purposes, with similar blocks grouped together by color in the Programming Palette. In this chapter I’ll focus on using Action blocks (the green blocks in the Programming Palette).
The Move Steering block controls the movement of a robot’s motors. By using it in your program, you can make the EXPLOR3R move forward or backward and steer left or right. We used a Move Steering block in Chapter 3 to make the EXPLOR3R move forward for a short while.
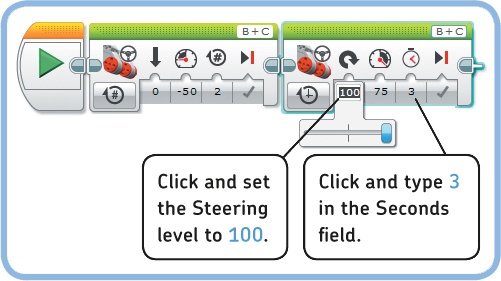
Before we get into how the Move Steering block works, let’s make a small program to see it in action. This program will make the EXPLOR3R drive backward until the wheels make two full rotations and then spin quickly to the right for three seconds. Because these are two different actions, you’ll use two Move Steering blocks.
Create a new project named EXPLOR3R-4. You’ll use this project for all of the programs you make in this chapter. Change the name of the first program to Move.
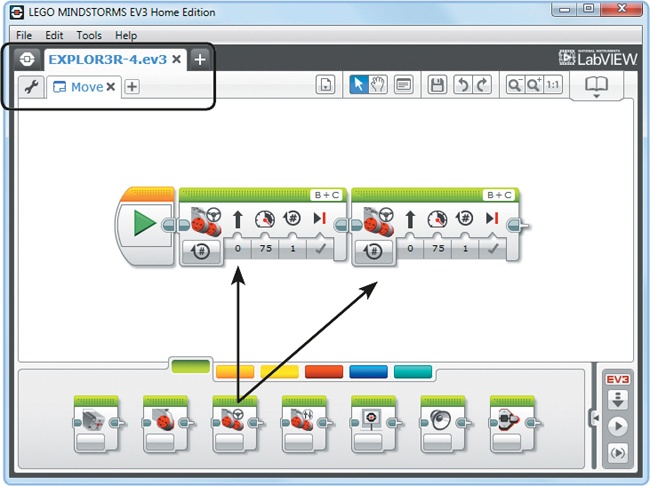
Pick two Move Steering blocks from the Programming Palette and place them on the Programming Canvas, as shown in Figure 4-2.
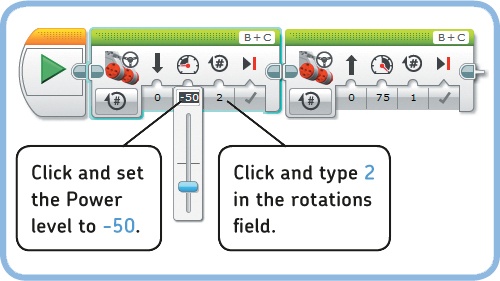
By default, the blocks you’ve just placed are configured to make the robot go forward for a little while, but we want to change the first Move Steering block so that it makes the robot drive backward for two wheel rotations. To accomplish this, change the settings on the first block, as shown in Figure 4-3.
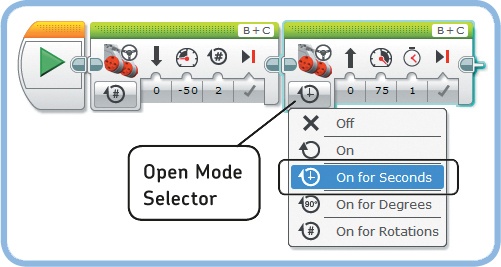
Now you want to modify the settings on the second block. This block will make the EXPLOR3R spin quickly to the right for three seconds. First, change its mode to On for Seconds, as shown in Figure 4-4.
To make the robot spin quickly to the right for three seconds, change the settings on the second block, as shown in Figure 4-5.
Once you’ve configured both Move Steering blocks, you can download the program to your robot and run it. You’ll know it’s working if the EXPLOR3R goes backward until both wheels make two rotations and then turns around quickly for three seconds.
Note
If your robot turns left rather than right, it’s possible that you’ve connected the motors to the wrong ports on the EV3 brick. Review the steps in output ports, input ports, and cables to check the cables on your robot.
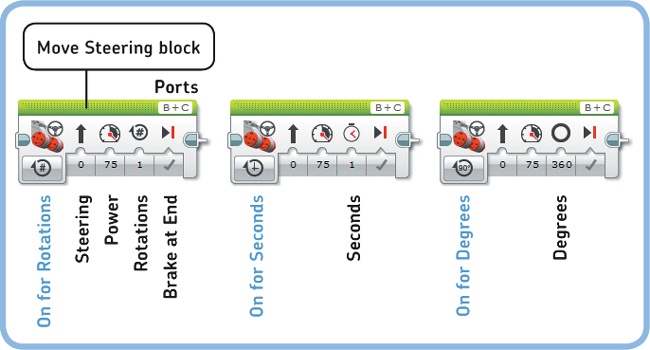
Let’s look more closely at the settings on the blocks to better understand how that sample program really worked. Each block’s action is determined by its mode and settings. Figure 4-6 shows several ways to configure the Move Steering block, besides the ones we’ve already used.
The Move Steering block has several modes, each of which can be selected by clicking the Mode Selector and each of which makes the block do something slightly different. For example, the first block in our program was in On for Rotations mode, which allows you to choose the number of motor rotations the robot will move for, while the second was in On for Seconds mode, which allows you to specify how long the motors will move in seconds.
The modes in the Move Steering block are as follows:
On: Switch on motors.
Off: Stop the motors.
On for Rotations: Turn on motors for a specified number of complete rotations; then stop.
On for Seconds: Turn on motors for a specified number of seconds; then stop.
On for Degrees: Turn on motors for a specified number of degrees of rotation; then stop.
You’ll learn to use the On and Off modes in the on and off modes in move blocks.
In the Ports setting at the top right of the block, you can choose which output ports of the EV3 brick you’ve connected the driving motors to so that the program knows which motors it should switch on. The EXPLOR3R’s motors are connected to ports B and C, so in our sample program, we left the block at its default setting of B+C.
As you saw with the Move program, you can also make the robot steer. To adjust your robot’s steering, click the Steering setting and drag the slider to the left (to make the robot steer to the left) or right.
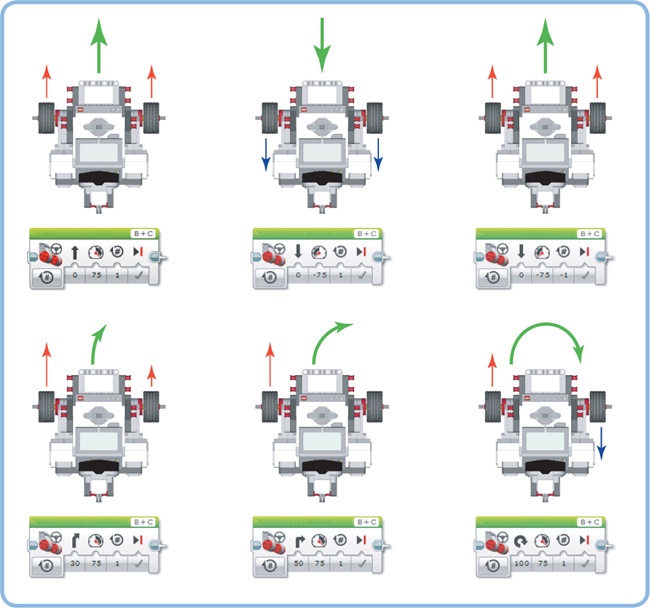
How does the vehicle turn without a steering wheel? This block can control the robot’s steering by controlling the two wheels independently. For the robot to move straight, both wheels will turn in the same direction at the same speed. To make a turn, one wheel will spin faster than the other, or the wheels can turn in opposite directions to make the robot turn in place. Figure 4-7 shows how different combinations of Power and Steering configurations make the EXPLOR3R turn.
The Power setting controls the speed of the motors. Zero power means that the wheels don’t move at all, while 100 sets the motors to maximum speed. Negative values, such as –100 or –30, make the robot move backward, as you saw with the Move example program.
Depending on which mode you select, the third setting on the Move Steering block lets you specify how long the motors should move. For instance, entering 3 in the Seconds setting in On for Seconds mode makes the EXPLOR3R move for three seconds.
On for Degrees mode allows you to specify the number of degrees the motors—and as a result, the wheels—should turn. Turning 360 degrees is the same as one full rotation of the wheels, while 180 degrees would be half a rotation. You can set the wheels to turn a number of full rotations when the block is in On for Rotations mode as you saw in the first block of the sample program.
Figure 4-7. To make the robot turn, adjust the Steering setting; the block will control the speed and direction of both motors to make the robot turn. The red arrows indicate that a wheel rolls forward, and the blue ones mean that it rolls backward. The green arrow shows the direction in which the robot moves as a result.
Note
Entering a negative power value, such as –75, and a positive rotation value, such as 1 rotation or 360 degrees, makes the robot go backward. The same holds for positive power and a negative rotation, such as 75 power and –1 rotation. However, if you enter a negative power value and a negative rotation, such as –75 power and –1 rotation, the robot goes forward! Refer to Figure 4-7 when you’re unsure how a certain Power and Steering combination will affect your robot.
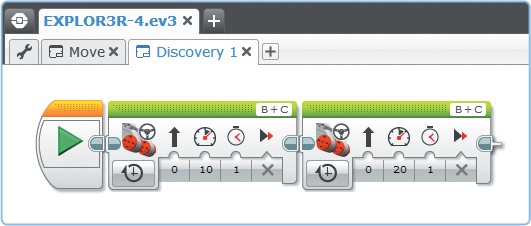
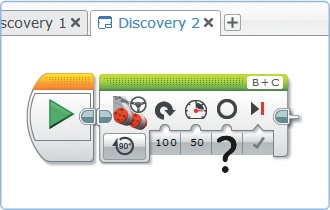
When you use a Move Steering block to make the robot turn 90 degrees, you might think you need to set the Degrees setting to 90, but this is not true. In fact, the Degrees setting specifies only how many degrees the motors—and, as a result, the wheels—turn. The actual number of degrees the motors should turn so the robot makes a 90-degree turn is different for every robot. Discovery #2 gets you started finding the appropriate number of degrees for your robot.
It’s fun to make programs that make the EXPLOR3R move, but things get even more fun when you program the EV3 to make sounds using the Sound block. Your robot can play two types of sounds: a simple tone, like a beep, or a prerecorded sound, such as applause or a spoken word like “hello.” When you use a Sound block in your programs, the robot will seem more interactive and lifelike because it can “talk.”
Even though every programming block allows the robot to do something different, all blocks are used in the same way. In other words, you can simply pick a Sound block from the Programming Palette and place it on the Programming Canvas as you did with the Move Steering block. Once the block is in place, select the mode and then adjust the settings to specify what sound you want to hear.
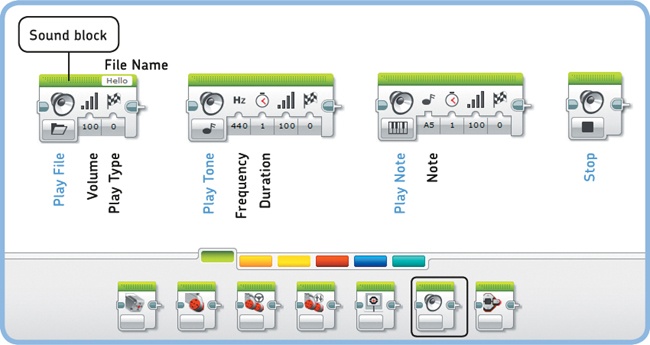
But before we create a program with Sound blocks, let’s briefly explore the different modes and settings for this block, as shown in Figure 4-10. The four modes of the Sound block are as follows:
Play File: Play a prerecorded sound, like “hello.”
Play Tone: Play a tone at a certain frequency (pitch) for a specified amount of time.
Play Note: Play a note from a piano for a specified amount of time.
Stop: Stop any sound that’s currently playing.
In Play File mode, you can choose a sound by clicking the File Name field and picking a file from a menu that appears. You can select a sound from categories like animals, colors, communication, and numbers. You can also record and add your own sounds using Tools > Sound Editor. (See Help > Tools > Sound Editor for instructions.)
Enter a number between 0 (soft) and 100 (loud) to set the volume of the sound you want to play.
Use the Play Type setting to control what happens when the sound starts playing. Choose Wait for Completion (0) to pause the program until the sound stops playing. Choose Play Once (1) to let the program continue running the next block while the sound is still playing. If you select Repeat (2), the sound keeps repeating while the program runs the remaining blocks in your program. For most programs, you will select Wait for Completion (0).
Depending on the mode you’ve selected, you can choose a Note from a piano keyboard or a Tone (a pitch) in hertz (Hz). A tone of 440 Hz (the default Frequency value) is clearly audible to the human ear, making it a useful sound for testing programs. For example, you could play the sound to indicate that a specific programming block has finished running.
Now let’s create a program called SoundCheck that makes the robot move and play sounds so you can see how the Sound block works.
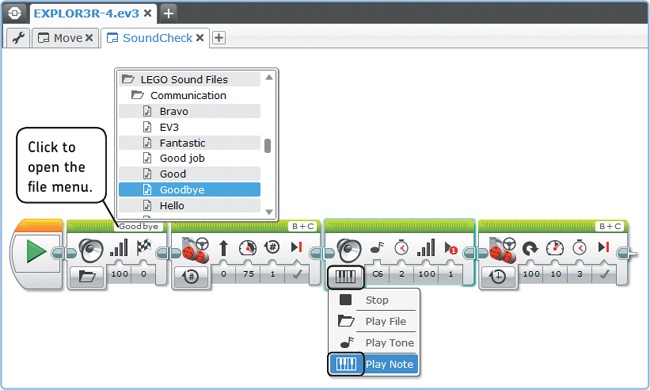
To begin, create the new program shown in Figure 4-11. To create this program and the other examples throughout this book, follow these steps for each block in the program:
Locate the block on the Programming Palette using its color and icon and then place it on the canvas. For example, the Sound block is green, and its icon resembles a speaker.
Select the correct mode by looking at the icon shown in the Mode Selector. For example, the piano icon on the third block indicates that you should select Play Note.
Finally, enter the remaining settings in the block. For example, configure the Steering and Power settings in the Move Steering blocks. Your block should now look exactly the same as the one in the example program.
Once you’ve finished creating your program, download it to your robot and run it.
Figure 4-11. The SoundCheck program. To select a block’s mode, open the Mode Selector and choose the icon from the list that matches the icon shown in the figure.
Now that you’ve run the program, let’s go over how it works. The first Sound block makes the EXPLOR3R say “Goodbye.” The Play Type is Wait for Completion, so the robot waits until the robot finishes saying “Goodbye” before moving to the next block. Next, a Move Steering block makes the robot drive forward for one rotation, and then another Sound block causes the EV3 to play a note. This block doesn’t wait for the note to complete, so while the sound is playing, the second Move Steering block gets the robot to steer to the right for three seconds. Finally, the robot stops moving.
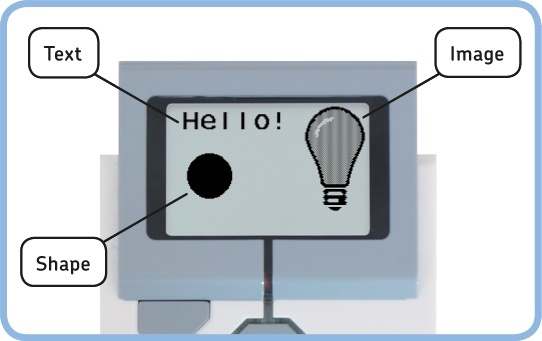
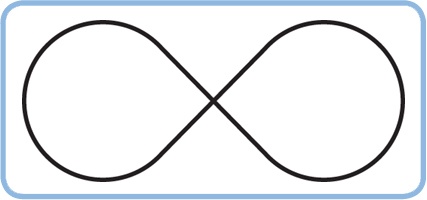
In addition to moving the robot around and playing sounds, an EV3 program can control the EV3’s display. For example, you could create a program that makes the EV3 screen look like Figure 4-12. The screen is 178 pixels wide and 128 pixels tall. (Pixels are small dots that make up what you see on a screen.)
It’s fun to play with the Display block, but perhaps more importantly, it’s an effective way to test your programs. For example, you can display a sensor measurement on the screen to see whether the sensor is working properly, as you’ll see in Part V of this book.
You can use the Display block to display an image (like a light bulb), text (like “Hello!”), or a shape (like a solid circle) on the EV3 screen. A single Display block can’t put multiple images or text lines on the screen at once, so you would need to use a series of blocks to create the display shown in Figure 4-12.
Once a Display block has put something on the EV3 screen, the program moves on to the next block—let’s say a Move block. The EV3 screen keeps showing the image until another Display block is used to display something else. So, in this example, the image would remain on the screen while the robot moves.
When a program ends, the EV3 returns to the menu immediately, which means that if the last block in your program is a Display block, you won’t have time to see what’s on the display because the program will have finished. To see what’s on the display, add a block—such as a Move block—to keep the program from ending instantly.
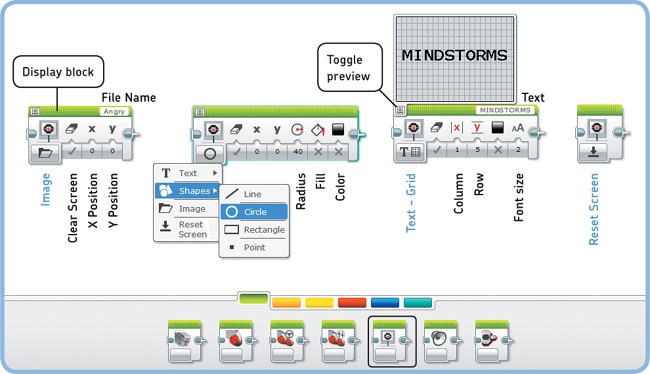
Figure 4-13 shows the four main modes of the Display block:
Image: Display a selected image, such as a happy face, on the screen.
Shapes: Display a line, circle, rectangle, or dot on the screen.
Text: Show a text line on the screen.
Reset Screen: Erase the screen and show the MINDSTORMS logo that you normally see when you run a program without Display blocks.
Some modes have sub modes. When selecting Shapes mode in the Display block, for example, you’ll have to choose among four sub modes—Line, Circle, Rectangle, and Point—as shown in Figure 4-13. Choosing Shapes – Circle mode makes the Display block show a circle shape on the EV3 screen, and you use the settings on the block to configure the circle’s position, radius, fill, and color.
When in Image mode, you can click the File Name field to choose an image from categories like eyes, expressions, objects, and LEGO. You can also create or load your own images by going to Tools > Image Editor. (See Help > Tools > Image Editor for instructions.)
The Clear Screen setting lets you choose whether to empty the screen before showing something new (when set to true) or to add something new to what’s already on the screen (when set to false). You’ll need a series of Display blocks to show more than one object on the screen. The first block should clear the screen before displaying something new, and the other blocks should simply add something to the screen. To accomplish this, set the Clear Screen setting to true on the first block and set it to false on the blocks that follow. You’ll see how this works in the DisplayTest example.
Some settings are specific to different modes of the Display block. For example, the Radius setting specifies the size of a circle, and Fill allows you to make a solid circle (true) or draw only the outline (false).
Usually, you’ll want to set the Color setting to black (false), but if you’ve previously filled an area with, say, a black circle, you can still add text on top by setting its Color to white (true).
In Text mode, enter a line of text that you want to display, such as MINDSTORMS, in the Text field, as shown in Figure 4-13. The text line may include numbers, and you can adjust the size of the text by setting the Font Size value to 0 (small), 1 (bold), or 2 (big).
Whether you display an image, text (Text – Pixels mode), or shape, you can choose its position with the X (position relative to left end of the screen) and Y (position relative to the top) settings. If you preview the screen (see Figure 4-13), you should be able to easily adjust the values of X and Y.
In Text – Grid mode, you can specify a Column (0–20) and Row (0 –11) instead, making it easier to align multiple lines of text.
Let’s test the functionality of the Display block by creating a program that puts things on the EV3 screen while the robot moves. Create a program called DisplayTest, and place three Display blocks and two Move Steering blocks on the Programming Canvas, as shown in Figure 4-14. Then, configure each block as shown. Once you’ve configured all the blocks, transfer the program to your robot and run it.
Figure 4-14. The DisplayTest program makes your robot move while displaying things on the screen. The screen previews are shown here for convenience, but you can hide them if you like.
In the DisplayTest program, the Display blocks put several things on screen, and the Move Steering blocks make the EXPLOR3R drive around. The first Display block clears the screen before it displays an image (the angry eyes). The robot then starts to move, and the image stays on the screen while the first Move Steering block is running. The next Display block (the solid circle) also clears the screen, removing the image with the angry eyes before displaying a circle.
The program moves on to another Display block, which puts white text in the circle. This block doesn’t clear the screen in advance, so you’ll see both the circle and the text on the screen. Finally, a Move block makes the robot turn right, and the program ends.
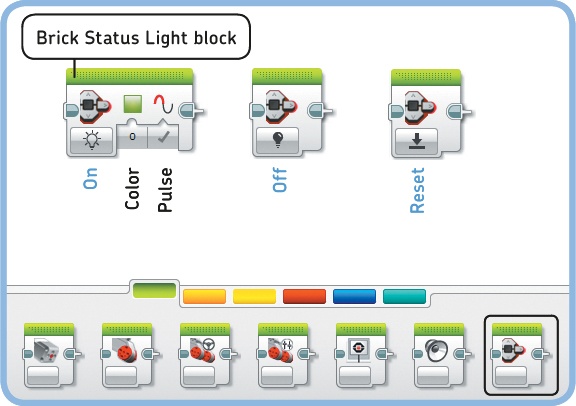
The brick status light surrounding the EV3 buttons is normally green. It blinks while a program is running. With the Brick Status Light block, you can override this behavior and choose what this light does. Its three modes, shown in Figure 4-16, are as follows:
On: Switch on the light and choose a Color: Green (0), Orange (1), or Red (2). The Pulse setting lets you choose whether the light should blink (true) or just stay on (false).
Off: Switch off the light.
Reset: Show the blinking green light that you normally see when a program runs.
Now make the ButtonLight program to test this functionality, as shown in Figure 4-17. The buttons should light up red when the robot says “Red” and green when it says “Green.”
Now that you have the hang of programming with some Action blocks, you’re ready to examine the On and Off modes found in the Move Steering block and several other blocks. A block in On mode will switch on the motors and then instantly move to the next block. As the program continues, the motors keep running until the program reaches a block that tells them to stop or do something else. The Off mode turns the motors off.
To see why this is useful, create the OnOff program shown in Figure 4-18.
When you run the program, the robot should begin to move and say “LEGO MINDSTORMS” at the same time. When it’s done speaking, it should stop moving and play a tone. The motors stop moving exactly when the robot finishes saying “LEGO MINDSTORMS,” even though you didn’t say beforehand how long they should stay on. This allows you to make the robot move until you stop it with the Off mode, regardless of what happens in between.
If you were to create a program with just one Move block in On mode, you might think that the robot would go forward indefinitely. In fact, this block switches on the motors, but then the program ends because it finishes running all of its blocks; when the program ends, the motors stop.
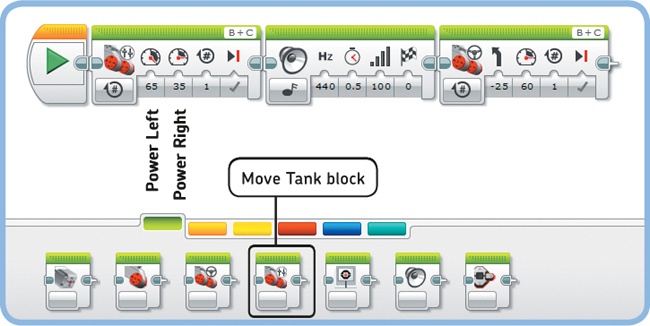
Besides the Move Steering blocks, there are three more blocks that you can use to make motors move. The first is the Move Tank block, which you can use to control a vehicle with two tank treads or two wheels, such as the EXPLOR3R, much as you did before. But instead of choosing steering and power for the whole robot, you can now choose the power of each motor independently. By using different combinations of power for the left and right wheels, you can drive EXPLOR3R in different directions (see Figure 4-7).
The Tank program demonstrates how the Move Tank block works (see Figure 4-19). This block has essentially the same functionality as the Move Steering block, but you control the settings differently. Use whichever block you prefer when making your programs for these types of vehicles.
Figure 4-19. The Tank program: The robot makes a gentle turn to the right with a Move Tank block. Then it stops, plays a sound, and moves again, now using a Move Steering block.
If one of the motors is programmed to turn faster than the other (as in the Tank program), the block ends as soon as the fastest motor reaches the indicated number of rotations or degrees. (The same holds true for the Move Steering block.)
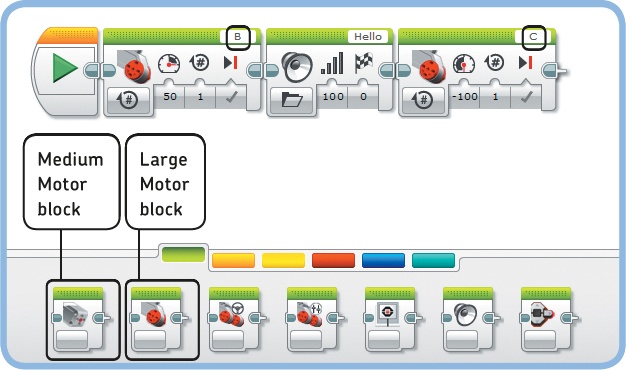
You use the Large Motor block to control individual Large Motors. This is useful for mechanisms that use only one motor, such as a claw that grabs an object. The modes and settings are the same as they are for the Move Tank block, but now they apply only to the selected motor.
The program in Figure 4-20 uses two Large Motor blocks to drive the left (B) and right (C) motors respectively, one at a time.
The Medium Motor block is the same as the Large Motor block, except you use it to control the single Medium Motor that comes with your EV3 set. (You’ll see it in action in Chapter 12.)
You’ve learned the basics of LEGO MINDSTORMS EV3 programming. Congratulations! You should now know how to program robots to make them move, play sounds, blink a light, and display text and images on the EV3 screen. Chapter 5 will teach you more about using programming blocks, including how to use blocks to pause a program and repeat a set of blocks.
But before you move on, try solving some of the Discoveries that follow to further fuel your programming skills.
