The previous chapter taught you how to program your robot to perform a variety of actions, such as moving. In this chapter, you’ll learn several programming techniques that give you more control over the order and flow of the blocks in your EV3 programs. You’ll learn how to pause a program with Wait blocks, how to repeat a set of actions with Loop blocks, how to run multiple blocks simultaneously, and even how to make your own custom My Blocks.
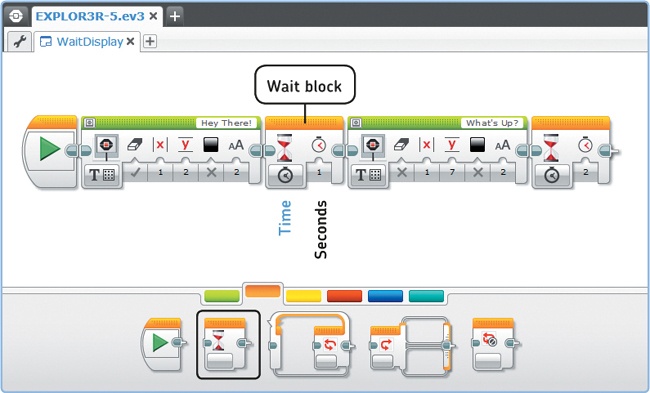
So far you’ve been using programming blocks that make the robot move, play sounds, or display something on the screen. Now you’ll meet a block that does nothing more than pause the program for a set amount of time. This block, the Wait block, is shown in Figure 5-1.
Figure 5-1. The WaitDisplay program contains two Wait blocks in Time mode to pause the program after displaying text on the EV3 screen.
You use the Wait block like any other programming block: Place it on the Programming Canvas and then configure its mode and settings. For this chapter, you’ll use only the Time mode.
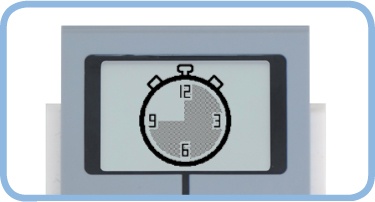
In Time mode, the Wait block simply pauses the program for a certain amount time, such as five seconds. Once the time has elapsed, the program continues with the next programming block. The number of seconds you enter in the Seconds box can be either an integer, such as 14, or a number with a decimal, such as 1.5. To pause the program for 50 milliseconds (0.05 seconds), for example, you would enter 0.05.
Why would you want to use a block that doesn’t do anything but wait? Here’s an example of the Wait block in action. Create a new project, save it as EXPLOR3R-5, and create a program called WaitDisplay, according to the instructions shown in Figure 5-1.
When you run the program, the text “Hey There!” should appear on the EV3 screen, and “What’s Up?” should follow after one second. The second Wait block gives you time to read what is displayed on the EV3 screen. Without it, the program would end immediately after the text was displayed, making it impossible to read the message. Wait blocks are also useful for a robot with sensors, as you’ll see in the next chapter.
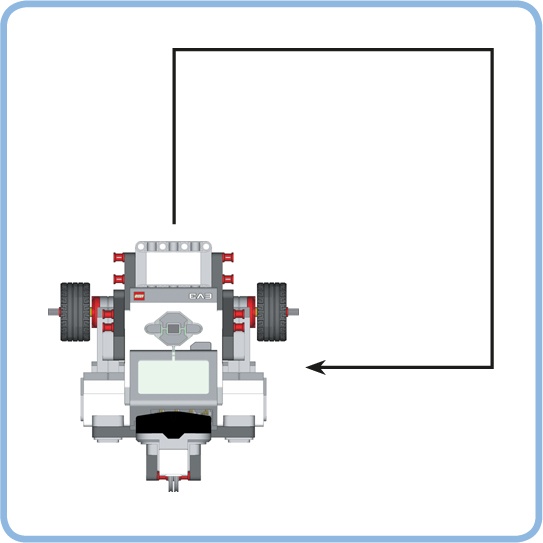
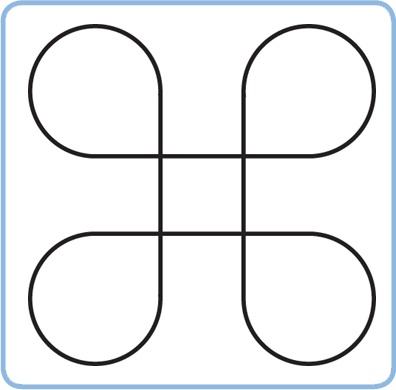
Imagine you’re walking along a square-shaped path, like the one shown in Figure 5-3. As you walk, you follow a certain pattern over and over again: Go straight, then turn right, go straight, turn right, and so on.
To create this sort of behavior with your robot, you could use one Move Steering block to make it go straight and another block to make it turn right. To make your robot trace one complete square and return to the starting position, you would have to use each of these two blocks four times for a total of eight blocks.
Rather than use eight Move Steering blocks to create this program, it’s much easier to use the Loop block, which lets you repeat sequences of blocks that are placed within it. Loop blocks are especially useful when you want to repeat certain actions many times.
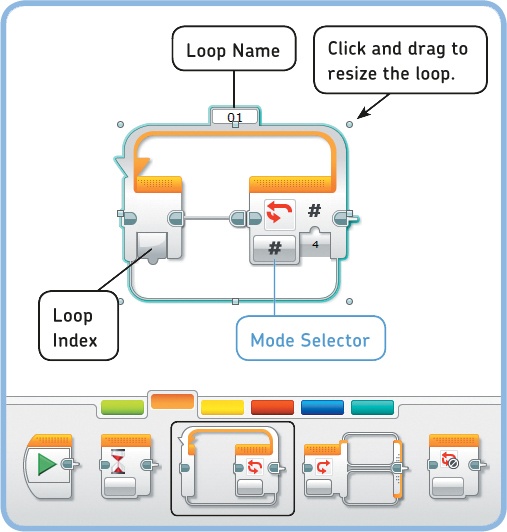
The Loop block (see Figure 5-4) repeatedly runs the blocks you place within it. Depending on which mode you choose, it runs these blocks either for a specified number of times (Count) or for a specified number of seconds (Time), or it repeats the blocks indefinitely until you abort the program on the EV3 brick (Unlimited). (You’ll learn to use many of the remaining modes in subsequent chapters.)
At the top of each loop, you can enter a Loop Name to describe the functionality of the blocks you place within it. You can resize the block manually if necessary, as shown in Figure 5-4. (There is also a Loop Index feature, which you’ll learn about in Chapter 14, but you can ignore it for now.)
Figure 5-4. The Loop block in Count mode. In this configuration, the program will run any blocks placed within the loop four times. In the other modes, you can have the blocks in the loop repeat for a certain number of seconds or for an unlimited amount of time.
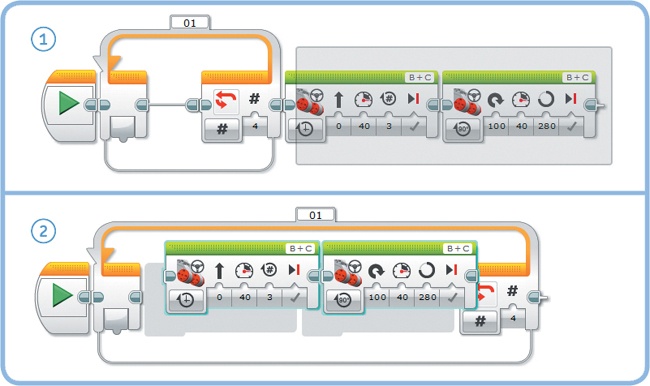
You place blocks in a Loop block by simply dragging one or more blocks into it, as shown in Figure 5-5.
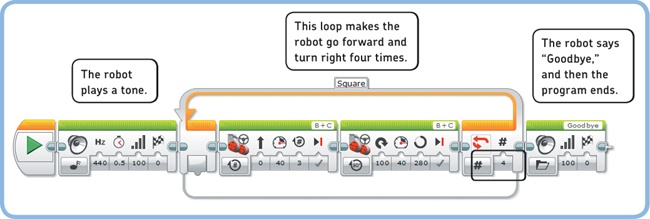
To see the Loop block in action, complete the OneSquare program shown in Figure 5-6. When you run the program, the robot should play a tone, drive in a square-shaped pattern, play another sound, and then stop. If your robot doesn’t make 90-degree turns when steering, try adjusting the number of degrees in the second Move Steering block, similar to what you did in Discovery #2 in Discovery #3: Move That Bot!.
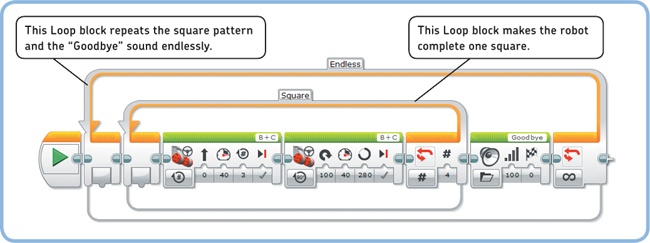
The OneSquare program (see Figure 5-6) makes the EXPLOR3R drive in a square once. You can use another Loop block to repeat the square pattern so that the robot completes multiple squares. In Unlimited mode, the robot would keep driving in squares endlessly.
Try this out with the InfiniteSquare program shown in Figure 5-7. To create it, expand the program you’ve just made by picking a second Loop block from the palette and setting its mode to Unlimited. Drag the “Square” loop you already made and the second Sound block into the new loop. Now the robot will keep driving in a square, saying “Goodbye” after each round, until you quit the program with the back button on the EV3.
Figure 5-5. To place blocks inside a Loop block, first place all required blocks on the Programming Canvas (1). Next, select the blocks you want to move and drag them into the loop (2). The Loop block should resize automatically to create space for the blocks as you drag them in. When you drag a Loop block around, its contents remain inside it.
Figure 5-6. The OneSquare program contains a loop that runs four times. Once the two blocks inside the loop have run four times (resulting in a square), the program continues with the next block, a Sound block in this case. You can enter Square in the Loop Name field, as shown, to describe the function of the loop.
In addition to using ready-made blocks, you can make your own blocks, called My Blocks. Each My Block lets you combine multiple programming blocks into one. My Blocks are especially useful when you want to use a specific set of blocks in your program more than once. For example, you could create a My Block to make the robot say “Hello! Good morning!” and to change the status light color to red whenever you use that block.
Normally, it takes five programming blocks to make the robot do this. If you wanted this to happen multiple times, instead of inserting all five blocks each time, it would be much easier to make a My Block that combines all those blocks into one block that you can reuse. Also, using My Blocks can help you keep your programs looking organized because you’ll see fewer blocks on the screen.
To demonstrate the My Block functionality, let’s write a program that makes the EXPLOR3R say “Hello! Good morning!”, move forward, and then say the same thing again. Because the robot will greet you twice, you’ll create a My Block called Talk to make it easier to repeat this action, as shown in Figure 5-9 to Figure 5-11. Once you’ve created your My Block, you can place it in a program whenever you want the EXPLOR3R to tell you “Good morning!”
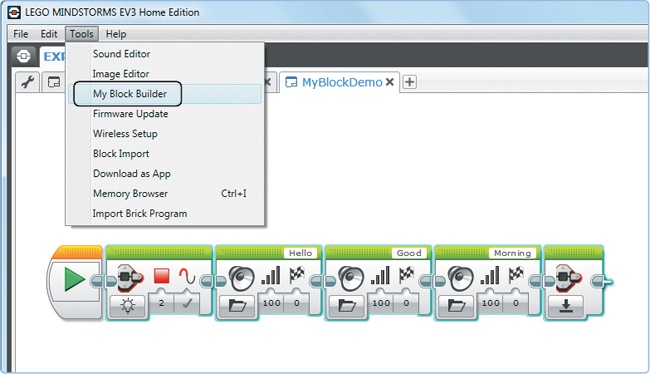
Create a new program called MyBlockDemo, and place and configure the five blocks for your robotic greeting on the canvas, as shown in Figure 5-9. Then, select these five blocks (selected blocks are outlined in blue) and click Tools > My Block Builder.
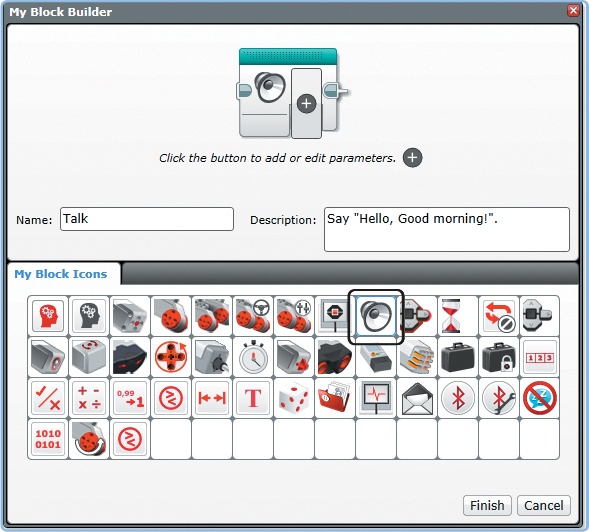
The My Block builder now appears, as shown in Figure 5-10. Enter a name for your My Block, such as Talk, in the Name box. Use the Description area to describe your block so that you’ll remember what it does if you want to reuse it later. Finally, choose an icon, such as the speaker, to help you remember that this My Block is used to make sounds. Click Finish.
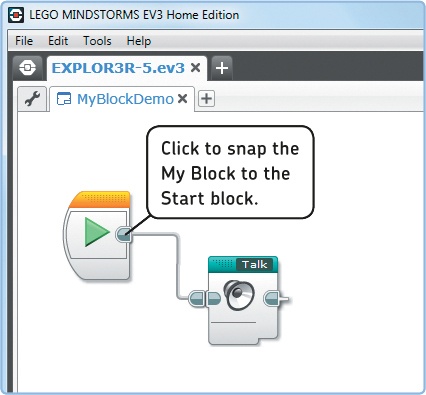
Once you’ve finished creating your My Block, it should appear on the Programming Canvas, replacing the blocks that were originally there, as shown in Figure 5-11. Rearrange the blocks if necessary.
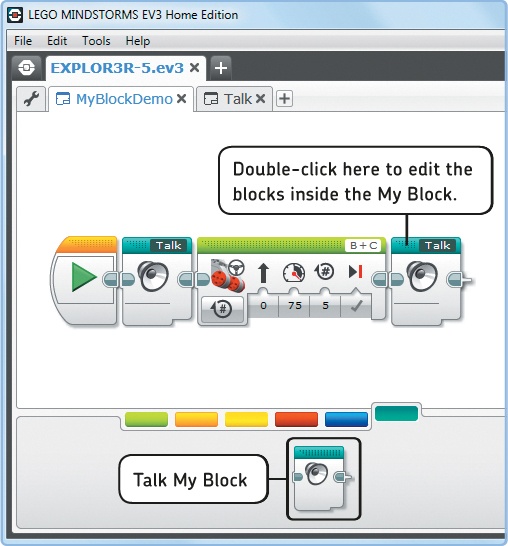
Now that the My Block is ready, you can find it on the light blue tab of the Programming Palette, as shown in Figure 5-12. Add a Move Steering block, as well as another copy of the My Block, to complete the MyBlockDemo program. When you run the program, the robot should say “Hello! Good morning!”, drive forward, and greet you again. The status light should be red while the sound plays and green while the robot is driving.
Notice how these My Blocks make this program much easier to understand or to explain to a friend. For this reason, it is sometimes useful to break your program into several My Blocks, even if you use some of them only once.
You can edit the blocks inside My Blocks after you create them. To do so, double-click the My Block on the Programming Canvas to reveal its contents and then edit it as if it were a normal program. When you’re finished, click Save and return to the program that uses the My Block.
To rename a My Block, double-click its name tab and enter a new name (just as you do for normal programs, as shown in Figure 3-11).
You can use the My Blocks you create in any program within the same project. For example, you can use the Talk My Block in any program in the EXPLOR3R-5 project file. But sometimes you’ll want to use a My Block in other projects as well.
Figure 5-9. Place and configure the blocks as shown. Then draw a selection around all of them (except the orange Start block) and click My Block Builder in the menu.
Figure 5-10. The My Block Builder. Choose a name, a description, and an icon for your My Block. Then click Finish to complete your block.
Figure 5-11. The completed My Block on the canvas. If your block is not correctly lined up with the Start block after its creation, click the left end of the Sequence Wire to snap the blocks back together.
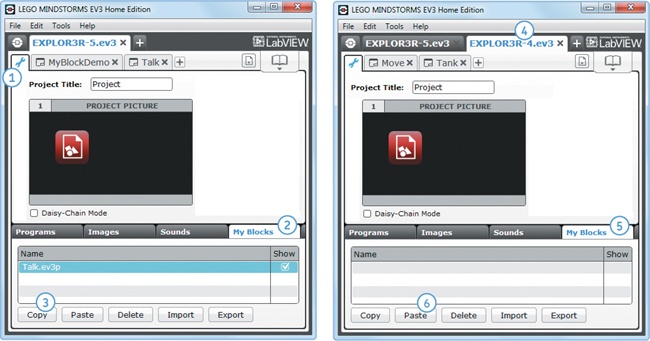
To copy the My Block you just made to another project (as shown in Figure 5-13), go to the Project Properties page (1), select Talk.ev3p on the My Block tab (2), and click Copy (3). Then, without closing the project, open the project you made before: EXPLOR3R-4 (4). Go to its My Blocks on the Properties page (5) and click Paste (6). You should now be able to use the Talk My Block in the EXPLOR3R-4 project.
Instead of using Copy, you can also click Export, which allows you to save a My Block to a file. You can email that saved file to a friend, who can then add it to a project using the Import button. To delete a My Block from a project, select the file and click Delete.
All the blocks that you’ve used so far are executed one at a time in the order in which they are lined up on the Programming Canvas. However, the EV3 can multitask by executing multiple blocks at the same time, using either multiple Start blocks or a split Sequence Wire. The methods are very similar, as you’ll see.
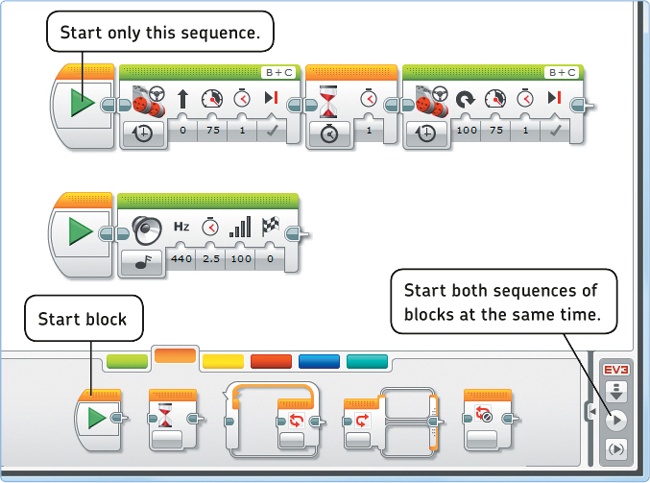
An easy way to have two sequences of blocks run in parallel (at the same time) is to add a second Start block, as shown in Figure 5-14. When you press Download and Run, both sequences start running simultaneously. The program ends once both sequences of blocks have finished running. To test one sequence individually, click the green arrow on its Start block.
When you run this program, the robot will move and play a sound at the same time.
Another way to have a robot multitask is to split the Sequence Wire, as shown in Figure 5-15. This is useful when you want two parallel sequences but you don’t want them to start right at the beginning of the program. In the MultiSequence program shown, the robot plays a tone and then two actions occur in parallel: The robot drives forward while saying “Hello! Good morning!”, using the Talk My Block that you made previously.
Figure 5-14. Multitasking with two Start blocks in the MultiStart program. You’ll find the Start block with the Flow blocks (under the orange tab).
Figure 5-15. Multitasking with a split Sequence Wire in the MultiSequence program. To create it, first place all required blocks on the canvas and then connect a Sequence Wire to each series of blocks. (This works even if the Sound block and the Move block are snapped together; the blocks will be separated automatically as you try to connect the Talk My Block.)
Just as you can’t walk forward and backward at the same time, you can’t program your robot to drive forward in one sequence while programming it to drive backward in another sequence. There is a resource conflict when two sequences of blocks try to control a single motor or sensor at the same time.
Unfortunately, the EV3 software won’t tell you whether there’s a resource conflict in your program; your program will probably still run, but the result will be unpredictable. For example, the robot might not drive in the expected direction. To avoid this potential problem, don’t use the same motor or sensor in more than one sequence.
It’s a good idea to avoid multitasking if possible because resource conflicts may arise unexpectedly. Sometimes you can accomplish the same functionality using just one sequence of blocks. For example, rather than moving and playing sounds using two parallel sequences, you can control both actions from a single sequence, as you’ll see in Discovery #21.
Having completed the first part of this book, you now have a solid foundation of several essential programming techniques. In this chapter, you learned how to use Wait and Loop blocks, how to create and edit My Blocks, and how to make your robots multitask.
In the next part of this book, you’ll create robots that can interact with their environment with sensors. But before you do, practice a bit with what you’ve learned in this chapter by solving the following Discoveries.
