After you build your robot, the next thing the robot needs is a program. For example, a program can make the EXPLOR3R drive forward and then steer left or right.
In this chapter, you’ll learn how to create and edit programs using the EV3 software. While you can create programs for your robots without a computer using On Brick Programming, such programs are limited and won’t let you access many of the features of the EV3 brick. (You’ll find an introduction to On Brick Programming in Appendix B.)
First, you’ll create and download a small program to your robot. To create the program, take the following steps:
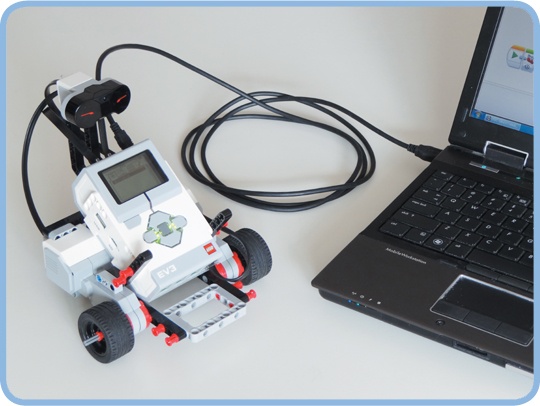
Connect the robot to the computer using the USB cable that came with your set (see Figure 3-1) and make sure the EV3 brick is turned on. (You’ll have to connect the robot to the computer each time you want to download a program to it.)
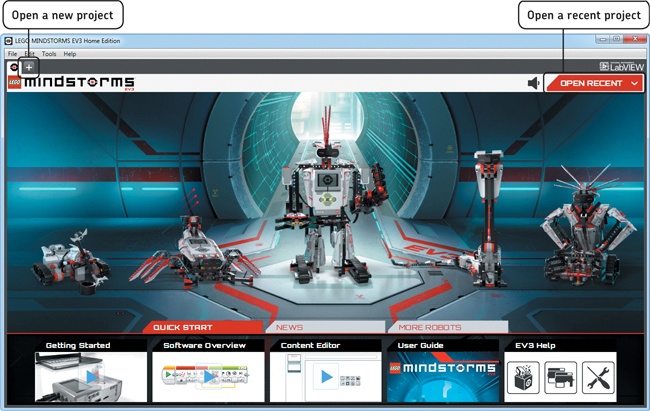
Launch the EV3 software by double-clicking the LEGO MINDSTORMS EV3 Home Edition shortcut on your desktop. Once the software loads, you should see the lobby, where you’ll create new programs and open existing ones.
Open a new programming project by clicking the + symbol, as shown in Figure 3-2.
Note
If you see a pop-up that says Please update the programmable brick’s firmware version, follow the steps in updating the EV3 firmware.
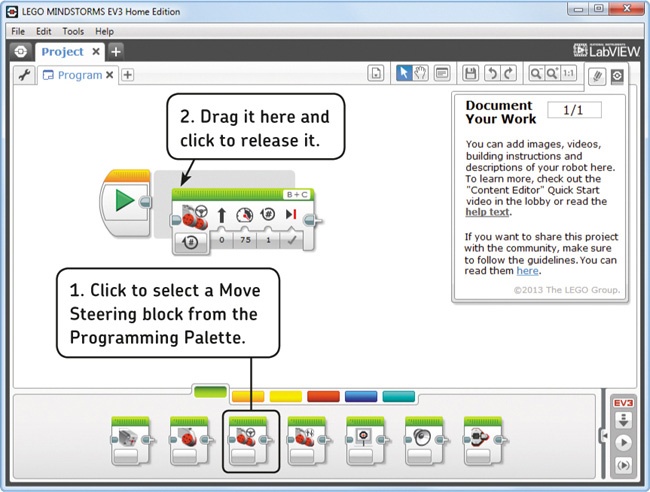
Choose a Move Steering block and place it as shown in Figure 3-3. Remember that a program is basically a list of instructions for actions that the robot should perform. This block is an instruction that makes the robot move forward.
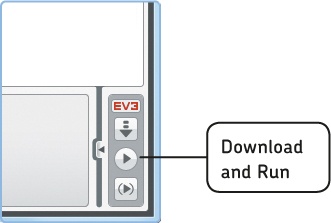
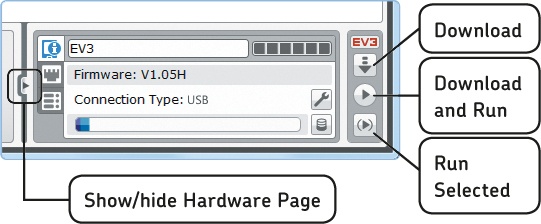
Now click the Download and Run button (see Figure 3-4). Your computer should download this simple program to your robot, and your robot should start moving forward. To download and run this program again, simply click this button again.
If your robot moves forward a short distance, you’ve created your first program. Congratulations!
Note
If you can’t download your program to the EV3 and the EV3 symbol on your computer screen is greyed out ( ) rather than red (
 ), something may be wrong with the USB connection. Try removing the USB cable and plugging it back in again. If that doesn’t help, turn your EV3 off and on again. You can find more help in Appendix A.
Okay, your robot moved, but how did you do that? In the following sections, I’ll explore various parts of the EV3 software to help you better understand how to create and edit basic programs before you move on to create more complex ones.
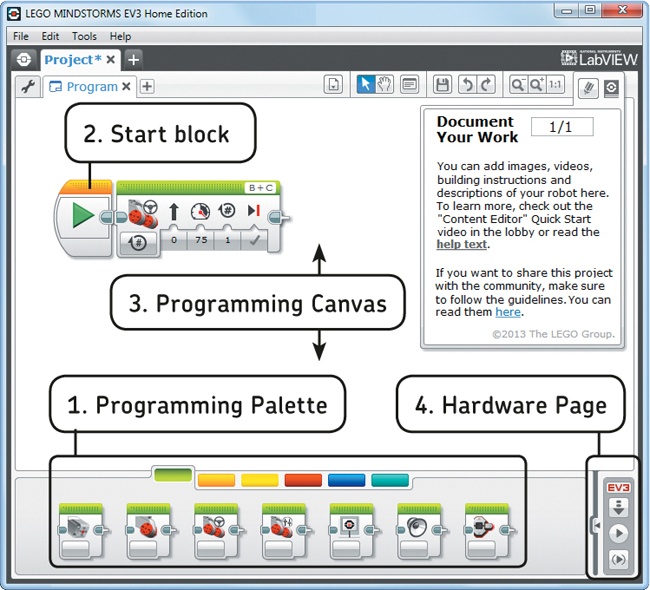
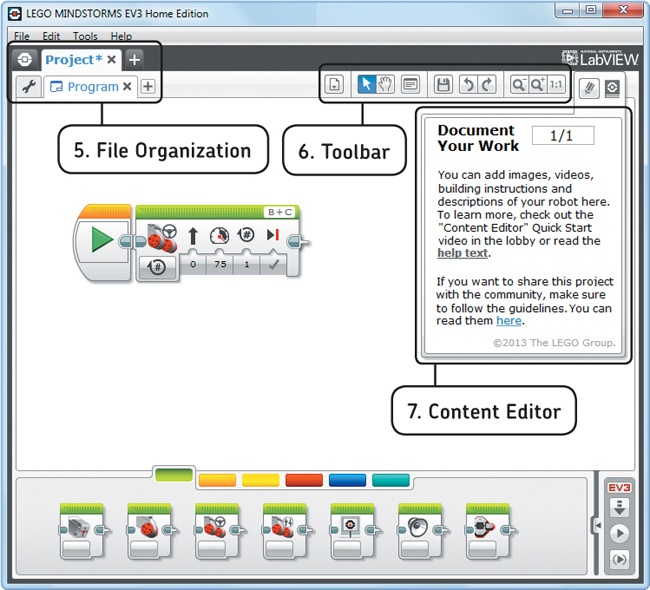
Your screen should look like Figure 3-5 after running your program. I’ll discuss each of the marked sections in turn.
Figure 3-5. The EV3 software window has several sections. You used each of the labeled ones when you created your first program.
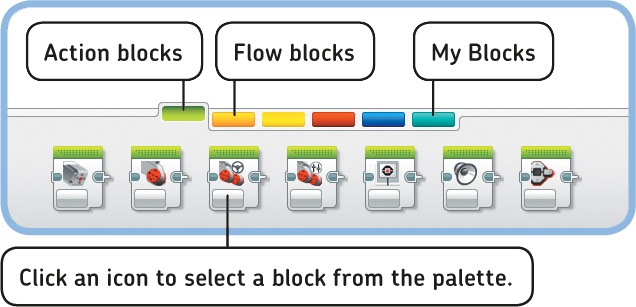
Your EV3 programs consist of programming blocks. Each block instructs the robot to do something different, such as move forward or make a sound. You find blocks on the Programming Palette (see Figure 3-6).
There are several categories of blocks, each of which is found behind one of the colored tabs. You’ll learn to use Action blocks (green), Flow blocks (orange), and My Blocks (light blue) in Chapter 4 and Chapter 5. You’ll learn to use Flow blocks to control sensors in Part II of this book.
Sensor blocks (yellow) and Data Operations blocks (red) are discussed in Part V, and you’ll meet some of the Advanced blocks (dark blue) throughout this book.
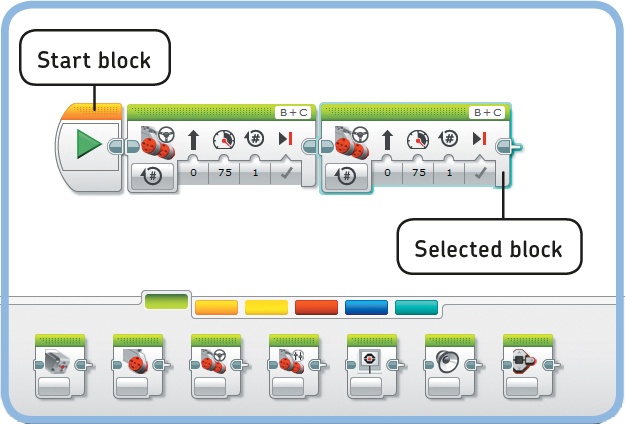
Your programs always begin with the Start block. When you pick up the first block from the Programming Palette, you attach it to the Start block, as shown in Figure 3-7. The robot runs the blocks in your program one by one, from left to right, beginning with the block that’s attached to the Start block.
If you accidentally delete the Start block, get a new copy from the orange tab of the Programming Palette.
You’ll create your programs on the Programming Canvas. Once you’ve placed a block, you can move it with the left mouse button. (Click the block with the left mouse button, hold the button down, and drag the block.) If you drag a selection around multiple blocks, you can move all of the selected blocks with your mouse at once. To delete a block from the canvas, click to select it and then press the DEL key on your keyboard.
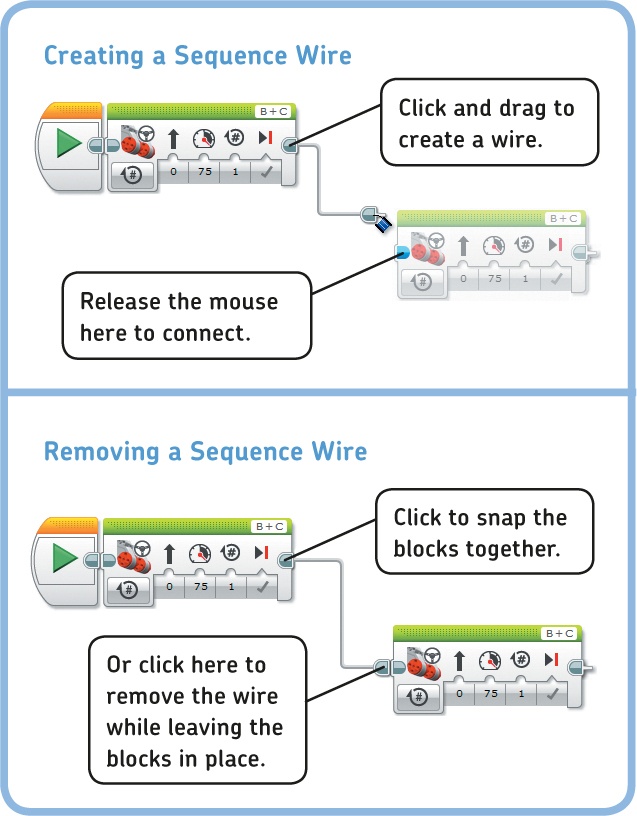
Normally, you’ll place your programming blocks in a straight line, as shown in Figure 3-7, but sometimes it makes sense to arrange blocks differently to avoid clutter on the canvas. When you arrange blocks differently, you should connect the blocks with a Sequence Wire, as shown in Figure 3-8. A block that isn’t snapped to another block or connected via a Sequence Wire will appear greyed out in your program, and it won’t have any effect on your robot.
Figure 3-8. Programming blocks are usually placed in a straight line, but you can place them anywhere as long as you connect them with a Sequence Wire (top). You can remove a wire by clicking either end (bottom). Clicking the left end removes the wire and snaps the blocks together in a straight line; clicking the right end removes the wire and leaves the blocks in place.
Use the Hardware Page to transfer your programs to the EV3 brick, to view the status of the EV3 and any connected devices, and to configure the connection between the EV3 and your computer. Click the toggle on the left to expand the Hardware Page, as shown in Figure 3-9. (I’ll introduce you to many of its features throughout this book.)
To transfer a program to the EV3 brick, make sure that the EV3 is connected to the computer and then click the Download and Run button on the Hardware Page. The robot should make a sound to indicate that the program has been transferred successfully, and the program should begin running automatically. The program will stop when it finishes running each of its blocks.
Once a program has been sent to the EV3 brick, the robot should be able to run that program even when you unplug the USB cable. Your programs remain in the EV3’s memory when you turn off the EV3, allowing you to run them whenever you want.
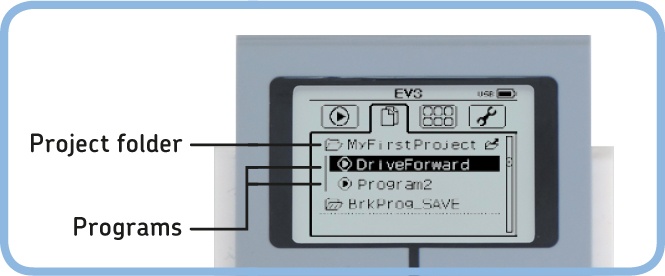
When a program ends or you stop it by pressing the Back button on the EV3 brick, you should be able to restart it manually using the EV3’s buttons, as discussed in Chapter 2. You’ll find all of the programs that you’ve downloaded to your robot in the File Navigation tab of the EV3 brick. Programs you’ve just run should appear on the Run Recent tab.
It’s not always a good idea to have a program run automatically once you’ve finished downloading it to your robot. For example, if your robot is sitting on your desk and you program it to move, it might just drive off the desk. To transfer a program to the EV3 without having it run automatically, click the Download button on the Hardware Page. Once the program finishes downloading (as indicated by the sound), disconnect the USB cable and then start the program using the buttons on the EV3 brick.
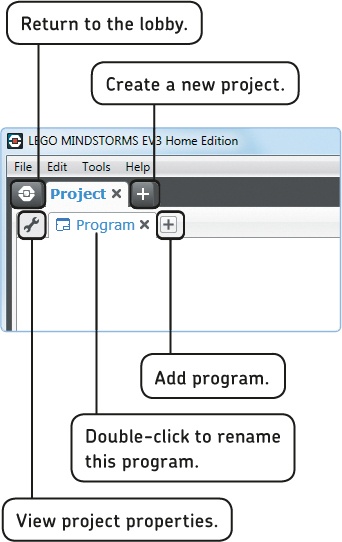
When you build a robot, you’ll often want to create more than one program for it. While each program makes your robot behave differently, it makes sense to keep related programs together in a project. You’ll now see how to manage a project file and the programs contained in it using the sections marked in Figure 3-10.
When you made your first program earlier, you actually created a new project file with one empty program in it, as shown in Figure 3-11. To add another empty program to the current project, click the + sign labeled Add program, as shown in the figure.
It’s important to save your programs often while programming so you don’t lose your hard work. To save all programs in your project at once, click Save on the toolbar or press CTRL-S. If you’re saving a project for the first time, you should be prompted to choose a name for your project. In this case, enter MyFirstProject and then click Save.
To open a project you saved earlier, click File > Open Project or use the Open Recent button in the lobby (see Figure 3-2), and locate your project file (usually in Documents\LEGO Creations\MINDSTORMS EV3 Projects).
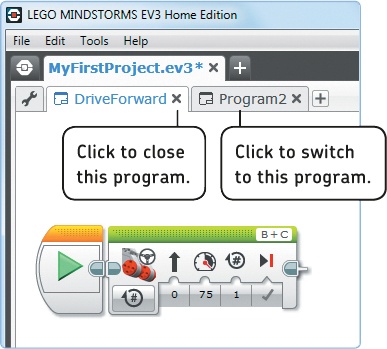
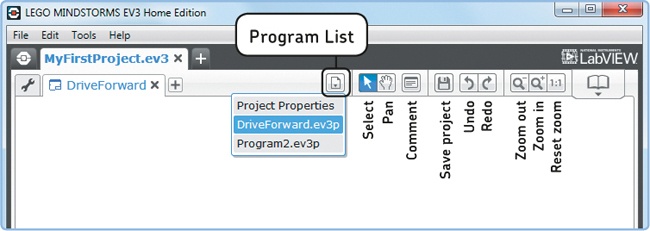
To close a program or project, click the x on its tab, as shown in Figure 3-12. To switch to another open program in the current project, just click its tab. To reopen a closed program, use the Program List button on the toolbar (see 6. toolbar).
To change the name of a program, double-click its tab and enter a new name. (For example, I renamed the first program in Figure 3-12 DriveForward.) To change the name of a project, you have to create a new project based on the current one by clicking File > Save Project As and choosing a new name.
Be sure to choose descriptive names for your projects and programs so you can easily find them on the EV3 brick.
When you click Download or Download and Run, the complete project should be transferred to the EV3 brick, as shown in Figure 3-13. In the File Navigation tab on the EV3 brick, you should find one folder for each project, containing all of its programs as well as any files used in the project, such as images or sounds. You start a program by selecting it and clicking the Center button.
(If you inserted a microSD card into the EV3 brick, you should see a folder called SD_Card on the File Navigation tab, and you should find the MyFirstProject folder inside it.)
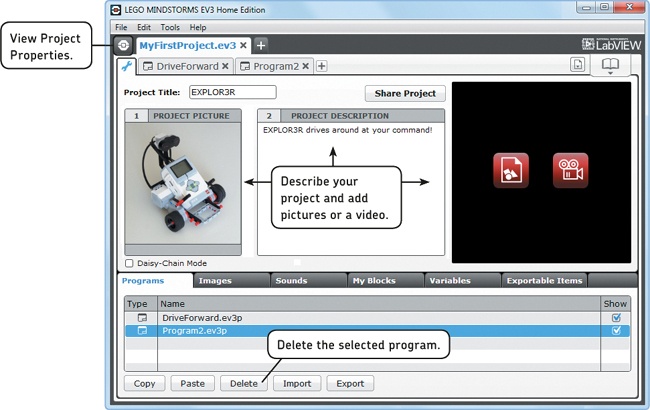
Clicking the tool icon to the left of the program tabs in the EV3 software opens the Project Properties page (see Figure 3-14). Here you can add information about your project (give it a description, a representative photo, or even a video) and share it with others.
The Project Properties page lists all of the files in your project, including programs and sounds. To reopen a closed program in your project, just double-click its name. To delete a program from your project, select it and click Delete.
Use the toolbar (see Figure 3-15) to open and save programs from your project, undo or redo changes to your program, and navigate around your program.
When the Select tool button on the toolbar is blue, as shown in Figure 3-15, you should be able to use your mouse to place, move, and configure programming blocks on the Programming Canvas. You move around the Canvas using the arrow keys on your keyboard. You’ll use the Select tool most of the time.
If you select the Pan tool, the mouse should move the Canvas. This is especially useful when you make large programs that don’t fit on your computer screen. To navigate to a specific part of a program, select the Pan tool, click in the Programming Canvas, and drag the Canvas around by moving the mouse while holding the left mouse button. (Holding ALT while the Select tool is activated has the same effect.)
To get a better overview of a large program, Zoom out to fit more blocks on your screen. Click Zoom in or Zoom reset to return to normal view.
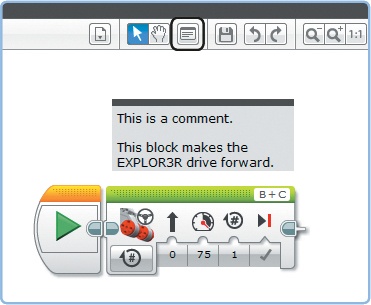
Use the Comment tool to place comments on the Programming Canvas. These comments won’t change the actions of your program, but they can help you remember what each part of a program is for. When you click Comment on the toolbar, a comment box should appear on the Canvas. Enlarge and move the box with your mouse, and double-click to enter a comment, as shown in Figure 3-16. To delete a comment, click the comment box and press DEL on your keyboard.
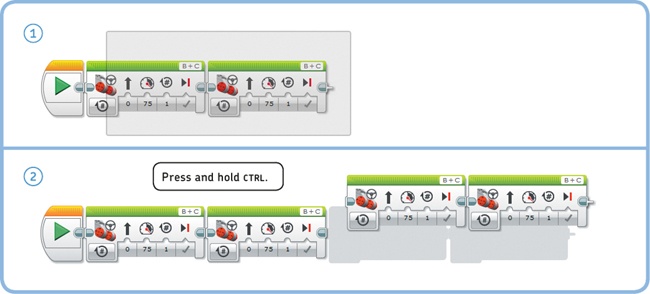
When programming, you’ll sometimes want to duplicate a set of blocks rather than take new ones from the Palette one by one. To duplicate a set of selected blocks, drag them to a new position while holding CTRL, as shown in Figure 3-17. (You can do the same thing by clicking Edit > Copy and Edit > Paste, but you won’t be able to control where the new blocks end up on the canvas.)
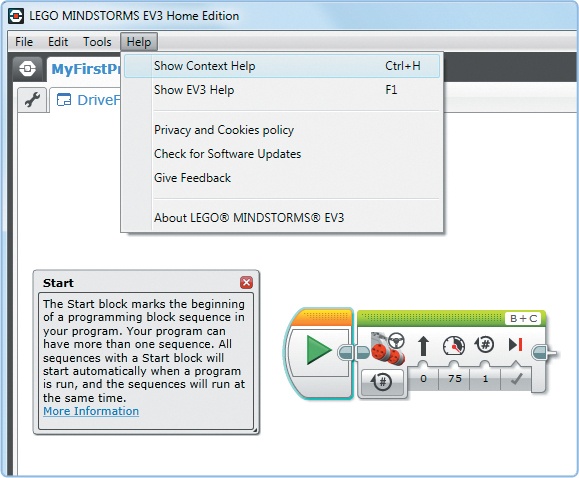
For detailed overviews of all of the programming blocks (beyond the introductory information in this book), choose Help > Show EV3 Help, as shown in Figure 3-18. For details about the Move Steering block, for example, open the help documentation and choose Programming Blocks > Action Blocks > Move Steering.
Figure 3-17. Duplicating a series of blocks: (1) Keep the left mouse button pressed while you drag a selection around the blocks you want to duplicate. (2) While holding down CTRL, drag the blocks next to the ones that were already there. (On a Mac, use the  key.)
key.)
If you activate Context Help, a small dialog will give you information about a selected block or button, as shown in Figure 3-18. Click More Information to view the related page in the help documentation.
You’ll find an additional user guide, which describes the EV3 brick and other hardware in more detail, in the lobby.
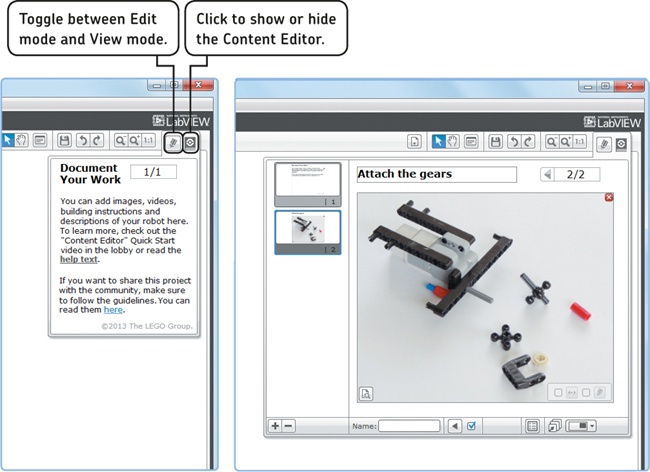
The Content Editor on the right side of the screen (see Figure 3-19) is where you can add further information about your project, such as descriptions of how your program works or of how to build your robot, whether for your own use or to make it easy for others to rebuild a shared robot. You can add text and images to present your project to others much as you would in a slide presentation editor.
Usually, you’ll want to hide the Content Editor to free up space on your screen.
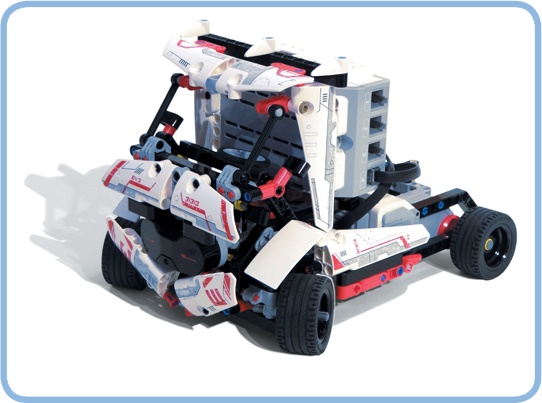
Once you’ve gained some experience in building and programming EV3 robots, you can build the 5 robots, such as EV3RSTORM, that you’ll find in the lobby. You can also try some of the 12 bonus models found on the More Robots tab. I designed the RAC3 TRUCK, shown in Figure 3-20.
In this chapter, you’ve learned the basics of working with the EV3 programming software. You should now know how to create, edit, and save projects and programs, as well as how to transfer programs to the EV3 brick.
In Chapter 4, we’ll take on some serious programming challenges!
