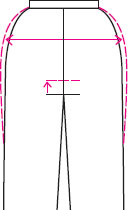
If you have a pattern that you’ve altered to fit and then your weight changes, can you still sew from the same pattern? Can you adjust pants you’ve already made? Yes and yes! You can adjust most pants within the seam allowances for 10 to 15 pounds of weight change.

If you gain weight, your body expands. As you fill out the pants the crotch gets shorter. If you lose weight, you “deflate” in width and the crotch hangs lower.
Take waistband off and side seams out. Try pants on with elastic tied around your waist to hold them up. Pin sides to fit. Adjust crotch depth until comfortable by pulling pants down under elastic. Mark new side and waist seams.
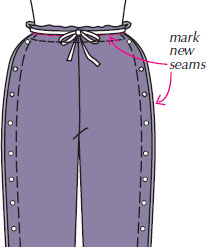
NOTE: This may not work if the pants have side-seam pockets.
If you don’t have enough waist seam allowance to make the crotch comfortable, deepen the crotch. Sew it lower, trim seam to ¼”. Now you have a longer crotch.
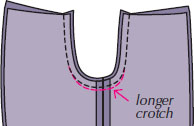
Take the waistband off. Sew side seams deeper. Lower the waistband by pulling pants up under elastic until crotch is comfortable. Mark bottom of elastic and sew waistband back on. Lowering the waistline seam will shorten the pant so hopefully you will have enough hem allowance to adjust the length.
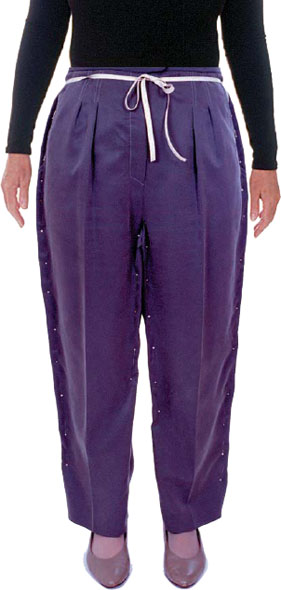
After Pati had a significant weight loss, she decided these trousers were worth saving, so she’s pinned them to her new figure.
You can alter ready-made clothes, but some alterations are just not worth the time. The following are in order of how easy the alteration is:
1. Length—See page 146 for invisible hems.
2. Width—if pants are a little too tight but don’t have wide seam allowances, buy the next size larger and take in the side seams. You may need to remove the waistband first. Too loose? Take in the side seams.
3. Crotch too short—sew crotch deeper (page 153). Check hem allowance.
4. Crotch too long—remove waistband and sew it lower all the way around. This will definitely shorten legs. Check hem allowance.
5. Smiles in the crotch—let out inseams as much as possible. Extreme smiles? Definitely don’t buy them, or toss if you own them.
6. Baggy in the back—remove waistband from side seam to side seam and sew it lower at the center back. Still baggy? Take in inseams.
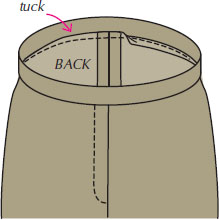
Marta’s quickie method—just take a tuck right at waistband edge at center back tapering to nothing at side seams. Press toward band.
Gail Brown, maternity expert and author, has these pant suggestions for mothers-to-be.
• Since pregnancy is many different sizes, adjustable pants are a must. Pull-on pants with elastic tied at the side seam can grow with you.
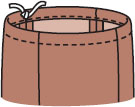
Sew pull-on pants (page 112). To convert to a maternity pant, add tissue as shown when cutting. (This is very similar to a large tummy alteration on page 30.)
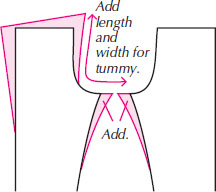
• Stretch panels are best for when you are biggest, or for converting conventional pants into maternity pants. Some patterns allow for a stretch panel but the panel may not be where you are the largest. Hold the pant front pattern piece up to you and mark around your tummy. Stitch the panel to that marking. Remember, the lower the panel, the longer your tops must be to cover it.
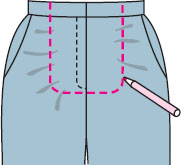
To convert conventional pants to maternity pants, try on pants, chalk mark around your tummy. Stitch the panel to that marking. Again, remember, the lower the panel, the longer your tops must be to cover it.
If the stretch panel is too large in the early stages of pregnancy, take tucks at the top or tighten the elastic.

“Be gorgeous,” says Gail, who sewed a wool gabardine pant with a stretch panel front! “I got so tired of the stretch pajama look that I craved crisp fabrics for a change. They made me feel terrific!”