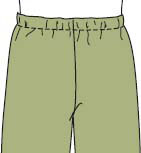
For pull-on pants, the waistline needs to be large enough to fit over your hips. If you are straight up and down, pull-on pants work great. There will be hardly any gathering at your waistline.

If you have a small waist and large hips, however, you will have a lot of gathers at the waistline. The extra bulk won’t be flattering unless the fabric is very soft.
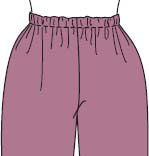
If you are converting a pant with darts, eliminate darts and cut the side seams straight up. For 1″ elastic you will need 2 5/8″ extra fabric above WAISTLINE seam for casing.
1. Sew crotch seams to within 1½” of inseams.
2. Pin side seams and inseams WRONG SIDES TOGETHER. Try on with ¼” elastic around your waist.
3. Pin-fit deeper or shallower side seams. Pull pants up or down evenly all the way around until the crotch is comfortable. Mark new waistline seam.
| NOTE: Ease may depend on fabric. | ||
| Hip Ease | Crotch Depth Ease | |
| Knits or lightweight, soft fabrics | 1″-3″ | ¼”-½” |
| Wovens or heavier, stiffer fabrics | 2″-4″ | ½”-3/4″ |

If you want a smooth fit instead of a more gathered appearance, try to fit as close to the body as possible, but remember the pants must “pull on and off.” Get rid of extra bulk at the waistline by pinning side seams deeper at the top and then try to pull pants down over your hips. The amount of fullness you can eliminate depends on your shape and the give of the fabric. The less waist indentation on your body, the more excess fullness you will be able to eliminate and still get pants on and off.
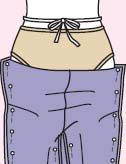
4. Take pants off and mark where pins are on wrong side. Unpin, place right sides together, and sew side seams and inseams. Trim seams to an even 5/8″. Press open. Or, for lightweight fabrics, serge seam allowances together.
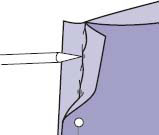
5. Turn one leg inside out and put the other leg inside. Finish sewing crotch seam. Finish crotch as in fitted pant, page 40.
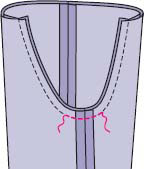
6. Trim seams in casing area to ¼” and fuse down with a strip of fusible web so the seams won’t get in the way when threading elastic through casing.

7. Zigzag or serge top edge, or turn under ¼”.
8. Fold casing to inside and topstitch 11/8″ from top, leaving a 1″ opening at center back, through which elastic may be threaded.
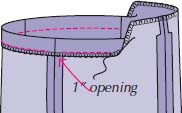
9. Wrap elastic around your waist until snugly comfortable. Allow an extra inch for lapping ends of elastic.
10. Thread elastic through casing and finish ends by overlapping 1″ and stitching them together in an “X” as shown.

TIP: Sew a loop of seam tape at center back. Pin it in place before stitching opening closed. Then you can always tell the front from the back.

11. Sew remainder of casing seam.
This method works best if you have a very “wavy” or uneven waistline. To turn under a casing unevenly all the way around would be difficult. This casing also gives the pull-on pants the look of a waistband.
1. Cut waistband to fit top of pants and twice as wide as the elastic, plus two seam allowances. Measure the top of the pant to determine the length.
2. Pin the waistband to the pant, RIGHT SIDES TOGETHER, lapping ends at center back. Snip waistband ends where they cross the center back seam at the top and bottom edges.
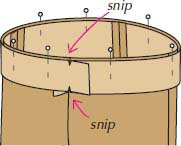
3. Match snips and sew center back seam RIGHT SIDES TOGETHER. Trim seam to ¼” and press open.

4. Sew band to pants.
5. If necessary, finish the inside edge of the waistband casing, leaving a 3/8″-½” seam allowance.
6. Cut a piece of elastic the same length as the waistband plus 4″. Pin one end on waistband seam allowance at center back with lower edge on seamline.
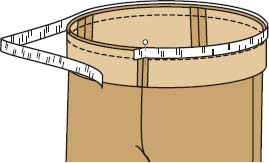
TIP: If you start with a very long piece of elastic and cut it to fit after you have stitched most of the casing, you won’t have so many gathers to contend with. Cut off excess after fitting.
7. About 2″ from the pin, wrap waistband tightly over the elastic and pin in place to hold. Pin all the way around or until you run out of elastic (if you didn’t cut an extra-long piece). If your elastic is shorter, you will need to sew partway and then pull on the elastic to have enough more to fold the casing over.
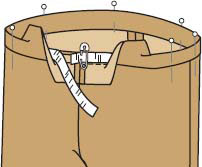
8. From the right side of the pant, stitch in the well of the seam, catching the underside of the band. Start and stop 2″ on each side of the center back.
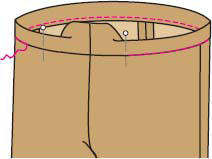
9. Try on pants and pull loose end of elastic until comfortable.
10. Lap 1″ of elastic over the end pinned at center back. Pin. Stitch lapped ends as shown (or use honeycomb stitch).
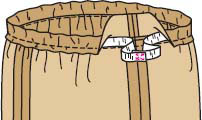

11. Wrap band over center back and finish stitching casing.
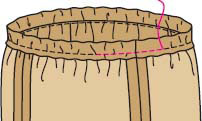
TIP: To keep elastic from rolling, stitch in the well of the seams at center back and sides.
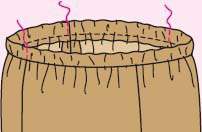
This is the quickest method and works well with a serger, but three seam allowances stitched together would be too bulky in heavy fabrics.
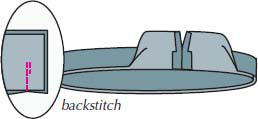
1. Make a waistband to exactly fit the the top of the pants. Stitch center back seam, back-stitching just past fold, to leave an opening. Press open and fold band lengthwise wrong sides together.
2. Pin folded band to outside of pants.
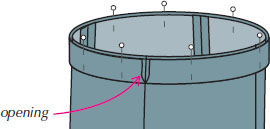
3. Stitch waistband to pant and serge seam allowances together, trimming to a narrow width. Or trim the seam allowances and then zigzag them together to make them neater and flat.
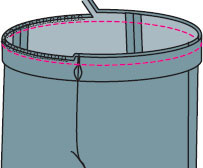
4. Thread elastic through opening. Pin ends together and try on to fit. Finish ends as previously shown. (Or leave ends of elastic safety-pinned for adjustability!)
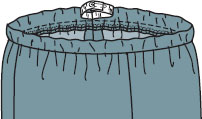
For pleated pull-on pants, smooth out fullness in casing over front and topstitch through all layers vertically at side seam or front pleat closest to side seam.
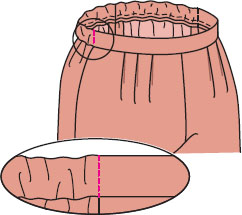
Then distribute fullness evenly in the casing in the back by pulling on elastic.
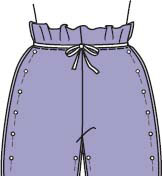
This is a casual look with a comfortable adjustable drawstring. Usually, a purchased cord is used as the drawstring. However, it can be bulky and won’t match your fabric. Sue Neall from Australia uses a self-fabric cord made like a belt loop (page 109). It is is flat, firm so it won’t roll, and of matching fabric.
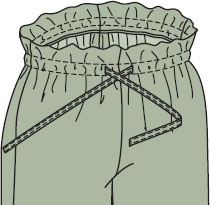
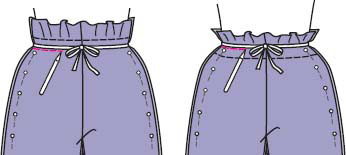
Sue likes the “ruffled” look at the top edge of the pant, so she makes her casing wider than what is needed for the drawstring. There is a row of stitching at the waistline and another above it, leaving a ruffled top edge. The inside is nonbulky because the ¼” seam allowance at the bottom edge is left flat, being serged or zigzagged.
1. Add 3″ above the waistline for a casing.
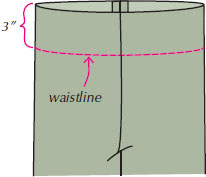
2. Sew a 5/8″-long vertical buttonhole 3/8″ from each side of the center front seam, beginning 1/8″ above the waistline.
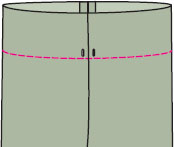
TIP: If you make the upper center front seam allowance 3/4″ wide, the buttonhole will be sturdier because it will go through two layers of fabric.
3. Trim seam allowances in casing area to ¼” to reduce bulk, and fuse them down with a strip of fusible web so they don’t stop the drawstring when you thread it through. (See page 113.)
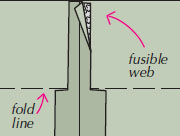
4. Finish top raw edge with serging or other method.
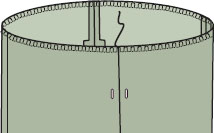
5. Fold 1 5/8″ to inside of pants and press. Pin close to raw edge of casing.
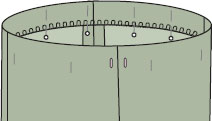
6. Stitch ½” from fold.
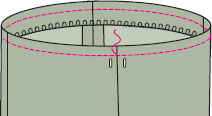
7. Stitch again 7/8″ below first line of stitching.
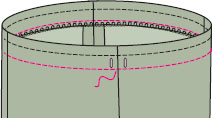
8. Make your cord, belt-loop style. Cut a 2″-wide strip of fabric the length of your waist measurement plus about 30″ more to tie into a bow.
9. Press ends under ½”. Press long edges to the middle and then press in half again. Edgestitch along all edges.
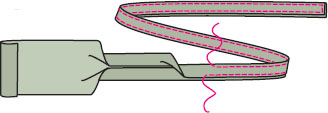
For an easy alternative, see page 109.
TIP: For comfort, you could insert ½” elastic in the middle of the cord for give.

10. Thread your self-fabric cord through one buttonhole and around the pant through the casing and bring it out the other buttonhole.
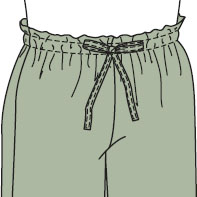
11. After centering your drawstring, stitch in the well of the center back seam through all layers to keep the drawstring from pulling out.
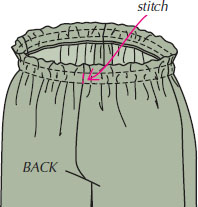
This product is an elastic with a stretchy cord encased in the center that acts like a drawstring. It allows you to tighten up a sport garment at the waist. It is used in expensive ready-to-wear.
We like the 1″ width, but you may find it in other widths.

1. Cut a 2″ casing above the waistline of a pull-on pant. (Cut a 3/4″-wide center front seam. See tip page 115.)
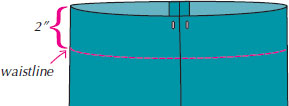
2. Sew a ¼”-long buttonhole 3/8″ from top edge and 3/8″ from each side of the center front.
3. Pull the drawcord out of the elastic for about 5″ from one end. The honeycomb tube elongates easily.

4. Determine the length of elastic you need by wrapping it comfortably around your waist. Mark other end of elastic for cutting. With a pin, lift a loop of cord out of elastic at the mark and cut elastic and cord. Pull about 5″ of cord out of that end as well.

5. About ½” from each end, pull a little loop of drawcord out of the mesh, and then pull the cord entirely out of the mesh for ½” at each end.
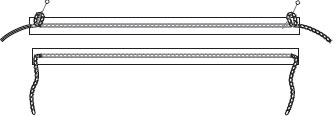
6. Lap ends of elastic and zigzag together, keeping drawcords free from stitching.
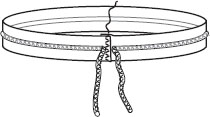
7. Pants will be larger than elastic. Pin elastic to pants with drawcords at center front. Pull cords through buttonholes. Fold elastic in half crosswise and pin this halfway point to center back. Evenly pin remainder to pants.
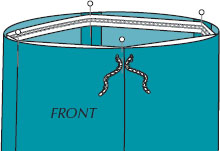
8. Zigzag or serge elastic to pant, stretching elastic to fit pants.
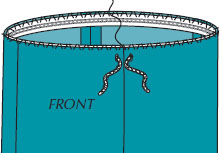
9. Turn to inside and stitch casing to pan along lower edge.
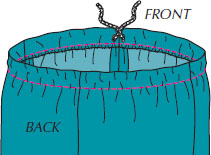
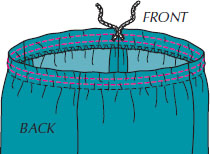
10. Stitch again ¼” from folded edge and again ¼” above casing stitching line, being sure not to stitch through cord.
This pant is great out of slinky knits or silky wovens for evening or summer casual wear. Look for a pattern for a no-side-seam pant. Since you will have no side seams to let out or take in, use the finished hip measurement printed on the tissue as your guide. For wovens, use the size that is 2″ larger than your hips. For a stretchy soft knit, you can use the size that is your hip measurement, since knits don’t need as much ease.

Tape the front and back crotch (see page 24). If the pattern has a side dart, pin the dart. Pin the inseam and try on the tissue.
If you are flat in the derriere, the side dart will possibly be forward on your body. You can easily move it toward the back.
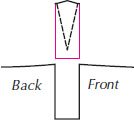
Draw a box around the dart. Cut out the box.

Slide the dart toward the back and tape in place. Fill in the gap with tissue.
If the center front and back of the pattern don’t meet your center front and back, straighten the crotch seams and/or leave out darts or make them narrower.
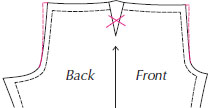
If the pattern has a side dart and a waistband, you can use elastic in the waistband. Just make sure you can get the pants over your hips without a zipper. Or, if not using the dart, you can add a cut-on casing.
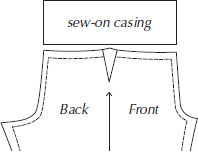
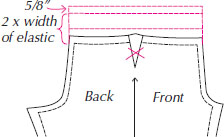
If you can’t find a no-side-seam pant pattern, use your altered basic pant pattern. Lap the side seamlines of the front and back tissue at the hips. Then make sure the grainlines on the front and back are parallel. Leave out the front and back darts and add a cut- on casing (page 112). For more shape, you can add a side dart, but you’ll then need to do a sew-on casing. You can change leg width by taking in the inseams.
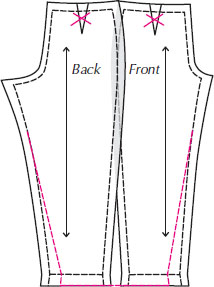
1. Sew inseams. Press open.

TIP: For lightweight fabrics, serge the inseams together.
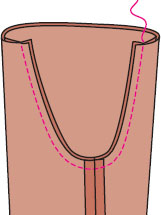
2. Turn one leg inside out and put other leg in it. Stitch crotch seam and finish it like you would in any pant.
3. Finish a cut-on casing and add elastic as on page 112.