We always sew pants in our underwear—then we are ready to try them on as many times as necessary (at least three times) without the dress/undress hassle.
The Palmer/Pletsch Fit-As-You-Sew system will be one of the most important steps to a good fit, even if you are sewing with an already altered pattern. Why do we need to bother? Our weight fluctuates (for some on a daily basis!); we use fabrics of varying weights and drapability; and we don’t always cut perfectly accurately. Fitting-as-you-sew allows you to deal with these variables and sew perfectly fitted pants.

We always sew pants in our underwear—then we are ready to try them on as many times as necessary (at least three times) without the dress/undress hassle.
Complete these four steps and you’re ready to begin fitting.

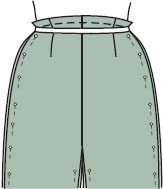
Place pants on table and pin inseams and outside seams WRONG SIDES TOGETHER with pins in stitching lines, about 2″ apart, and pointing down. There will be about a 1″ hole in the crotch, which won’t matter at this time.
Try on pants right side out because your left and right sides may be different. Pin 1″ elastic around your waist with the bottom of the elastic on the waistline seam.
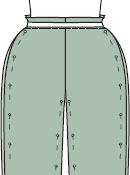
NOTE: For clarity, art shows narrower elastic.
FIRST, is the elastic AT YOUR WAIST? That means if you are wearing pantyhose, they need to be at your waist also.
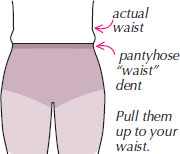
SECOND, is the bottom of the elastic on the waist stitching line all the way around? Get the elastic right before moving on.
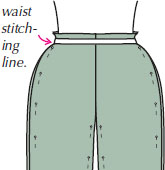
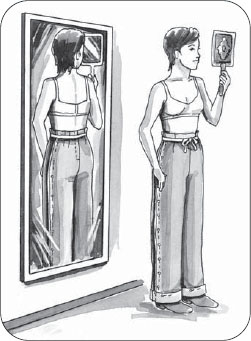
NOTE: You CAN fit yourself above fingertip level. You simply need two mirrors—a full length and a rear view—so you don’t distort the fit by twisting to see your back.
This means the pants are tight in that area. Pin shallower side seams until wrinkles disappear.

This means the pants are too loose in that area. Pin deeper side seams until the wrinkles disappear.

If one side is fuller and higher, pull down on the high side or up on the low side, depending on your crotch comfort.
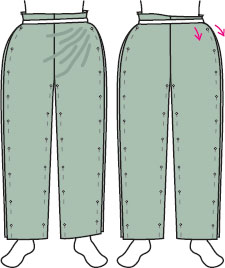
The lower side will generally be flatter as well. If you see vertical wrinkles, pin a deeper seam on that side. (See Connie, page 55.)
Often you will see excess fullness in the thigh area because the crotch in fabric is bias and can stretch. Remove this by pinning both front and back inseams deeper. One may need to be deeper than the other. For example, the back crotch is longer than the front and may need to be taken in. more.
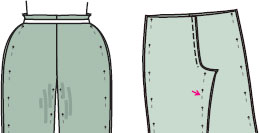
If you see smile wrinkles in the front and/or back, let out the inseam where you see the smiles.
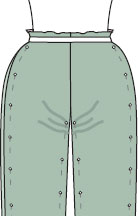
You fitted the tissue so the crotch stitching line touched your body. In fabric, it usually will hang lower. However, only YOU know how comfortable the crotch feels. You can make it as tight or loose as you want.
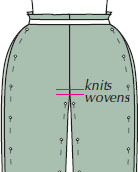
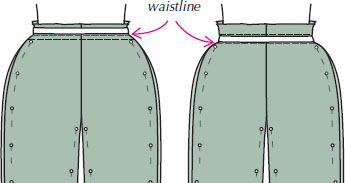
If too short, pull pants down EVENLY all the way around. (This is why we suggest a 1″ waistline seam allowance.)
If too long, pull pants up EVENLY all the way around.
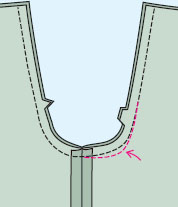
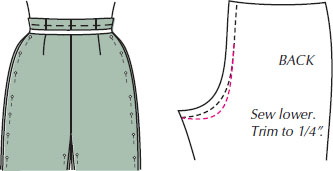
NOTE: If only back crotch is tight, you are higher in the front with a low derriere. Sew back crotch lower, trim to ¼” and try on. Repeat this process until the crotch is comfortable. (This adjustment can be done later, AFTER final sewing of crotch seam.)
If pants are baggy in the back, pull up at center back until wrinkles disappear. This often creates smiles in the front. If it does, let out front inseams.

OUCH! Now you can’t sit down. The pants have become too tight in the back crotch. If the front crotch seems long enough and only the back feels tight, sew back crotch seam lower by ¼” at a time. Trim seam allowance to ¼” and try on. (See page 40.) The easiest way is to turn one leg inside out and put the other leg inside it; then stitch.

Sometimes, pulling pants up in the back to eliminate bagginess causes both front AND back to be tight. In that case, pull the pants down evenly all the way around until comfortable.
The fabric is more sensitive than tissue so you may now see wrinkles pointing to the tummy. Pull pants down at center front until wrinkles disappear.
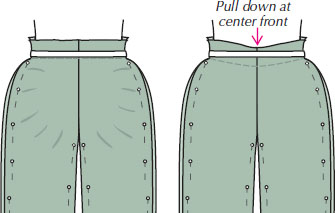
NOTE: You CAN have a full tummy and be low in the front. See Jean, page 82.
If the side seams pull toward the front, let out the front side seam only.
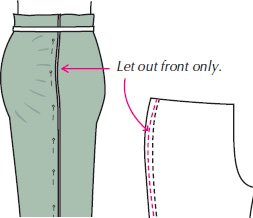
If darts pucker in front, make them narrower or eliminate them if your shape is straight in the front instead of curving in at the waist.
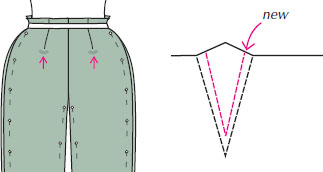
Back darts may need lengthening if you have a low derriere.
If there is a puddle of fabric below the front darts, or where the darts would have been, pull pants up in that area until puddle disappears. Mark your new stitching line at the bottom of the elastic. This is called “tweaking” the fit!
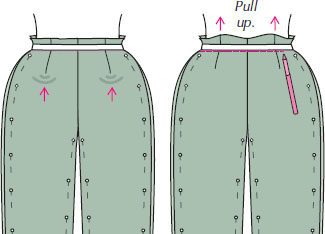
See pages 42–43 for “crotch oddities” that can be corrected in a finished garment.
See Chapter 12 for more dart fitting and fine-tuning tips.
After you have the pants fitting well and all wrinkles gone, make sure you have pinned the side seams to your curves. The seams should come together gently along your body, not too tight or loose. As you pin, you can FEEL the body, so put pins next to it. Try to make your side seams smooth so they flow over lumps and bumps smoothly rather than pinning into your dimples.
Use a chalk wheel and mark just under the elastic. This chalk brushes off easily, so go to the sewing machine and baste along the chalk marks immediately after taking the pants off.

Take pants off, open seams at pins, and rub with hard chalk where pins go through the fabric. Now you will know where to sew.

Remove pins.
Before you started pin-fitting, you sewed the darts, sewed all but the bottom portion of the crotch seam, and inserted the zipper (if you were using one). Now it’s time to finish sewing.
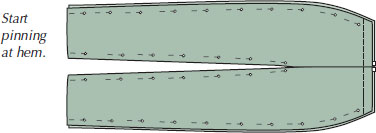
1. Working on a large flat surface, repin seams right sides together so they are ready to sew. Pin inseams beginning at hem. If they are uneven at top, check to see if:
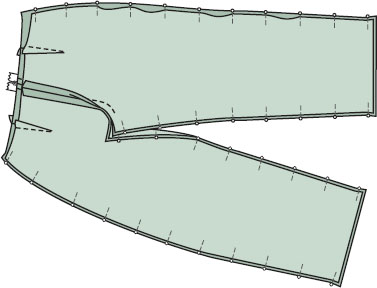

Keep a record of your changes for future sewing. Put your pattern back onto fabric and mark final stitching lines. Note the type of fabric used. Do this each time you sew this pant in different fabrics. This will teach you how to judge the way different fabrics fit.
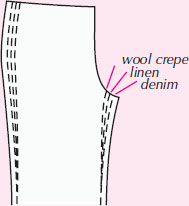
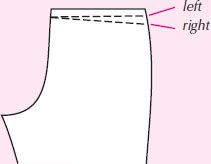
If you have uneven hips, be sure to mark left and right waist stitching lines on your tissue with different color pens.

Use “taut sewing” to avoid puckering in long seams. Hold the fabric taut as if it were in an embroidery hoop while you sew. If one side of a leg seam is puckered, it was “eased” into the other layer. Taut sewing will help prevent this. Or use a dual feed foot.

3. If seam allowances are too wide or uneven in width, trim or serge them until narrower and even. Press open. Finish seam allowance edges if needed.
1. Pin inseams so they are matched at seamlines.
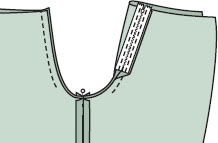
2. Sew the unsewn portion of the crotch seam.
Reinforce curve by sewing again ¼” from first row. Trim close to second row of stitching.
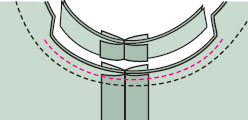
NOTE: Never clip or snip the lower crotch curve. It isn’t necessary and will weaken it.
NOTE: Finish crotch so it will never rip out. Use a double overlock stitch if your machine has one.
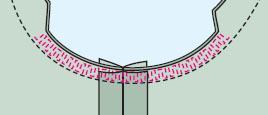
Sew, trim to an even width, and press seams open. Finish seam allowances.
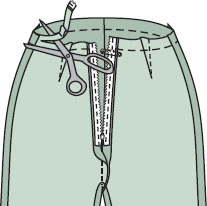
Trim waistline seam to an even 1″ if using 1″ waistband interfacing so you can match interfacing to top edge of fabric.
“Sanity” Tip: If you used a zipper longer than necessary in order to make topstitching easier, you will be cutting off the top stopper. Put a safety pin over the teeth to prevent the slider from coming off the top when you try on the pants.
Try on the pants and check to see if you need any “tweaking.” If not, fit the waistband. (See page 105.)
Sew on waistband.
Before finishing waistband, try on the pants.
Wrinkles below band mean pants are too tight in the high hip area.
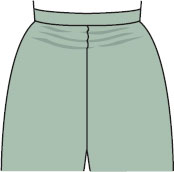
Let side seams out in this area on both sides.
These wrinkles mean you need to “unstitch” band ONLY in these areas and sew the band lower in these areas.
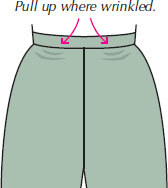
If you really want perfect fitting pants, try them on 5-10 times while you sew to “fine-tune” the fit. Even letting out a seam 1/8-¼” can make a major difference in fit…and that means ripping!!!
For example, letting out side seams only 1/8″ can camouflage lumpy thighs, because you’ll get an extra ¼” in width on each side.

Cut stitches with a seam ripper every inch on one side of seam and pull thread on the other side. Pull out or brush off clipped threads.

OR
Pull seam apart and then carefully cut stitches. Don’t use this method on fine silks or knits.
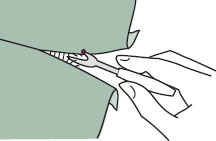
OR
Marta pulls bobbin thread until it breaks. Then she pulls the needle thread and then the bobbin thread again. Then there is no need to pick out short, loose threads.
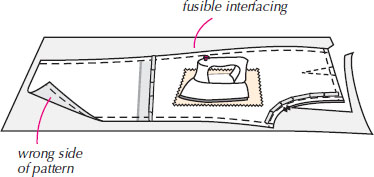
We don’t recommend making a permanent pattern because you can’t see through the tissue for refitting a year from now and you can’t pull the pattern off of pins when marking fabric. However, some people want an indestructible pattern after they have done all of this fitting.
We would rather see you fuse to the tissue than to trace the pattern onto another paper. You won’t be able to see how you vary from a standard size—unless you don’t WANT to remember!!
To create a permanent pattern, adhere fusible interfacing to the back of the tissue. To do this:
A new phrase? Yes! In the years we have been fitting people, we have seen it all and TRIED to find solutions. These things don’t happen often, but rare doesn’t mean nonexistent.
This means you need a straighter front seam. Pin a 1/8″ deeper crotch seam in that area until the bubble disappears.

Two ways to get the same results:
Sew the seam deeper where you pinned. In essence you are straightening the crotch seam.
OR, if the seam is slightly slanted, let out the upper part of the seam, which also straightens it.

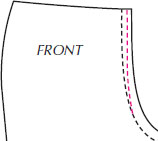
If the pants are tight across your lower front, you may have an angular pelvic bone. Make the front seam more angular…allowing more room in front crotch length. Measure both stitching lines. The deeper one is longer.
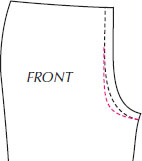
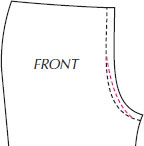
If you are slanted in the pelvic area, shorten the seam by letting it out and making it less angular. Who would have guessed?? An oddity?? Yes!
If you are very flat in the back, the pants might still have fullness in the back. Straighten the center back seam. You can also take in the back inseams to remove fullness below the crotch. (Also, see page 90.)
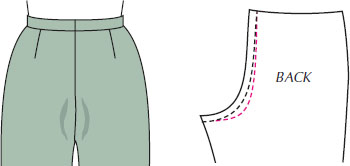
For a flat back and full tummy, but small waist, your front crotch seam will curve in at the top or you can add curved darts. (See page 99 and Alicia, page 62-66.
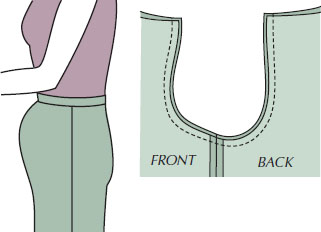
If you are very high in the front and low in the back, this is what your crotch shape will look like.
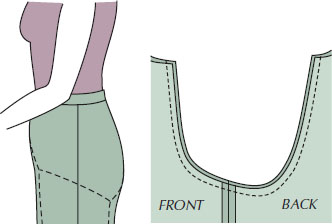
These changes usually work:

NOTE: If you add a lot to the front or back inseam when making these various fit adjustments, your crotch seam may become “peaked.” Sew straight across and trim the peak away. An oddity? No comment.

By deepening or lowering the back crotch curve, you add length to it.
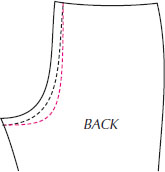
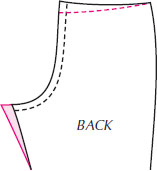
If you lower waist at top but let out the inseam, the crotch length may end up the same length as the original.
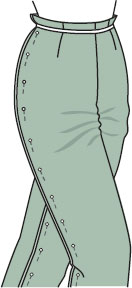
If your pants pull uncomfortably when walking and yet fit when standing, the solution is not easy. We teachers know!! First, make sure the crotch isn’t too long. The pulling may be caused by your having full front thighs, a protruding tummy, a high front crotch, or full inner thighs (see Marta page 52 for that one).
Pull up the center front only, which moves the drape of the pants forward.
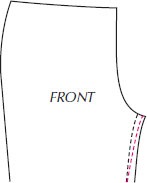
Or, let out the front inseam for full front thighs.
Or pull up pants evenly all the way around for more movement. Lower the back crotch curve if necessary until comfortable. (See page 38.)
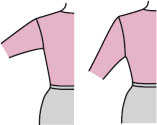
The oddity? Look at a set-in sleeve in a fitted garment. If the armhole is cut high, you can move your arm full circle. You are restricted in a low-cut armhole.
Similarly, a close-fitting crotch can give your legs more movement.
