
FIGURE 20.1. The Page Layout tab allows you to specify the page margins, orientation, paper size, and scaling and sheet options along with other settings.
| Chapter 20 | PRINTING AND SENDING EMAIL FROM EXCEL |
After you set up your worksheet, you will want people to see it. Excel provides easy-to-use commands and buttons for printing and emailing your workbooks. In addition, programmers can control these tasks with VBA code.
Printing has been vastly redesigned to provide easier access to all print features. From the user standpoint, all printing options can be accessed in the Backstage View by selecting File | Print. When the Print command is selected, the left side of the Backstage View shows all available options for printing as well as the Print button to execute printing. You automatically see the print preview of your worksheet in the right column of this window. In this chapter you will work with printing features as a developer. You will learn about methods of accessing and setting printing options and displaying print preview using VBA statements. These statements will allow you to display the Print dialog box and Print Preview window as they were present in Excel 2007. You will use these statements to automatically set printers and printing options in your VBA programs. Similar to the Ribbon, the printing features displayed in the Backstage View cannot be modified with VBA. (See Chapter 19 for more information on Ribbon and Backstage View customizations.)
In addition to printing, this chapter also demonstrates how you can automate Excel’s emailing features (including sending bulk emails) with VBA. To get the most out of this chapter, you should have a network or local printer connected to your computer.
You can control the look of your printed worksheet pages via the Page Layout tab on the Ribbon. The Page Layout tab, shown in Figure 20.1, is divided into groups that include settings related to page setup (margins, orientation, and size), scaling, and sheet options.
FIGURE 20.1. The Page Layout tab allows you to specify the page margins, orientation, paper size, and scaling and sheet options along with other settings.
You may programmatically access these settings via the Page Setup dialog box, using the properties of the PageSetup object. To display the Page Setup dialog box, type the following statement in the Immediate window and press Enter:
Application.Dialogs(xlDialogPageSetup).Show
The previous statement uses the Show method of the Dialogs object to display the built-in Page Setup dialog box. You can include a list of arguments after the Show method. To set initial values in the Page Setup dialog box, use the arguments in Table 20.1.
TABLE 20.1. Show method arguments for the Dialogs object |
|
Argument Number |
Argument Name |
|
Head |
|
Foot |
|
Left |
|
Right |
|
Top |
|
Bot |
|
Hdng |
|
Grid |
|
h_cntr |
|
v_cntr |
|
Orient |
|
paper_size |
|
Scale |
|
pg_num |
|
pg_order |
|
bw_cells |
|
Quality |
|
head_margin |
|
foot_margin |
|
Notes |
|
Draft |
If you don’t specify the initial settings, the Page Setup dialog box appears with its default settings. But how should you use the above arguments? If you want to display the Page Setup dialog box with the page orientation set to landscape, use the following statement:
Application.Dialogs(xlDialogPageSetup).Show Arg11:=2
Excel uses 1 for portrait and 2 for landscape orientation.
The following statement displays the Page Setup dialog box in which the Center on page Horizontally setting is selected on the Margins tab (Arg9:=1), and the Page tab has the Orientation option set to Portrait (Arg11:=1):
Application.Dialogs(xlDialogPageSetup).Show Arg9:=1, Arg11:=1
You can also set the initial values in the Page Setup dialog box by using the PageSetup object with its appropriate properties. For example, to set the page orientation as landscape, type the following statements on one line in the Immediate window and press Enter:
ActiveSheet.PageSetup.Orientation = 2 :
Application.Dialogs(xlDialogPageSetup).Show
These two statements are executed one after another. The colon indicates the end of the first statement and the beginning of another. This is a handy shortcut that can be used in the Immediate window to run a block of code.
The following sections describe various page settings (and the corresponding properties of the PageSetup object) you may want to specify prior to printing your worksheets.
The settings on the Page Layout tab in Figure 20.1 are grouped into five main areas: Themes, Page Setup, Scale to Fit, Sheet Options, and Arrange. The Orientation settings in the Page Setup group indicate whether the page will be printed in portrait or landscape view (Orientation property). The Size setting lets you select one of the common paper sizes such as Letter, Legal, Executive, A4, and so on (PaperSize property). The options in the Scale to Fit group make it possible to adjust the printout according to your needs. You can reduce or enlarge the worksheet by using the Scale setting in the Scale to Fit group of the Page Layout tab. Excel can automatically scale a printout to fit a specified number of pages with the Width and Height settings.
To render this into VBA: |
Use this statement: |
Set Sheet1 to be printed in landscape orientation. |
|
Scale Sheet1 for printing by 200%. |
|
Scale the worksheet so it prints exactly one page tall and wide. |
|
Set the paper size to legal for Sheet1. |
|
Return current setting for the horizontal and vertical print quality. |
|
The settings available on the Margins tab of the Page Setup dialog box shown in Figure 20.2 allow you to specify the width of the top, bottom, left, and right margins (TopMargin, BottomMargin, LeftMargin, and RightMargin properties). The Header and Footer settings allow you to determine how far you’d like the header or footer to be printed from the top or bottom of the page (HeaderMargin and FooterMargin properties). The print area can be centered on the page horizontally and vertically (CenterHorizontally and CenterVertically properties).

FIGURE 20.2. The settings on the Margins tab of the Page Setup dialog box determine the margins around the print area and the manner in which the print area should be centered on the printed page.
Figure 20.3 shows the settings on the Header/Footer tab that allow you to add built-in or custom headers and footers to your printed worksheets. You can use the Custom Header and Custom Footer buttons to design your own format for headers and footers.
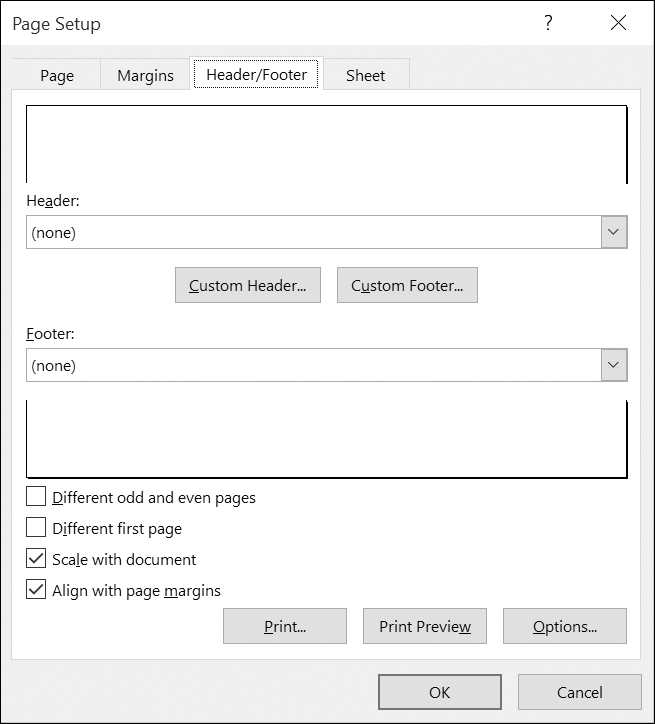
FIGURE 20.3. The Header/Footer tab of the Page Setup dialog box allows you to select one of the built-in headers or footers or create your own custom header and footer formats.
The PageSetup object has the following properties for setting up and controlling the creation of headers and footers: RightHeader, LeftHeader, RightFooter, LeftFooter, CenterHeader, CenterFooter, RightHeaderPicture, RightFooterPicture, LeftHeaderPicture, LeftFooterPicture, CenterHeaderPicture, and CenterFooterPicture.
The following settings are available on the Header/Footer tab of the Page Setup dialog box:
• Different odd and even pages—Use the PageSetup.OddAndEvenPages-HeaderFooter property. This property returns True if the specified PageSetup object has different headers and footers for odd-numbered and even-numbered pages.
• Different first page—Use the PageSetup.DifferentFirstPageHeaderFooter property. This property returns True if a different header or footer is used on the first page.
• Scale with document—Use the PageSetup.ScaleWithDocHeaderFooter property. This property returns True if the header and footer should use the same font size and scaling as the worksheet.
• Align with page margins—Use the PageSetup.AlignMarginsHeaderFooter property. This property returns True for Excel to align the header and the footer with the margins set in the page setup options.
Special formatting codes can be used in the header and footer text, as shown in Table 20.2.
TABLE 20.2. Formatting codes for headers and footers |
|
Format Code |
Description |
|
Left-aligns the characters that follow. |
|
Centers the characters that follow. |
|
Right-aligns the characters that follow. |
|
Turns double-underline printing on or off. |
|
Turns superscript printing on or off. |
|
Turns subscript printing on or off. |
|
Turns bold printing on or off. |
|
Turns italic printing on or off. |
|
Turns underline printing on or off. |
|
Turns strikethrough printing on or off. |
|
Prints the current date. |
|
Prints the current time. |
|
Prints the name of the document. |
|
Prints the name of the workbook tab. |
|
Prints the page number. |
|
Prints the page number plus the specified number. |
|
Prints the page number minus the specified number. |
|
Prints a single ampersand. |
|
Prints the characters that follow in the specified font. Be sure to include the double quotation marks. |
|
Prints the characters that follow in the specified font size. Use a two-digit number to specify a size in points. |
|
Prints the total number of pages in the document. |
|
Enables the image to show up in the header or footer. |
To get some practice using the above codes, try the following statements:
1. Print the full path of the workbook in the upper-right corner of every page when Sheet1 is printed:
Worksheets("Sheet1").PageSetup.RightHeader = ActiveWorkbook.FullName
2. Print the date, page number, and total number of pages on the left at the bottom of each page when Sheet1 is printed:
Worksheets("Sheet1").PageSetup.LeftFooter = "&D Page &P of &N"
3. Display a watermark in the center section of the header on Sheet1:
Sub ShowWaterMark()
With Worksheets("Sheet1").PageSetup.CenterHeaderPicture
.Filename = "C:\Excel2013_HandsOn\cd.bmp"
.Height = 75
.Width = 75
.Brightness = 0.25
.ColorType = msoPictureWatermark
.Contrast = 0.45
End With
' Display the picture in the center header.
ActiveSheet.PageSetup.CenterHeader = "&G"
End Sub
The settings available on the Sheet tab of the Page Setup dialog box (shown in Figure 20.4) determine what types of data you would like to include in the printout and the order in which Excel should proceed to print data ranges if the printout will span multiple pages.

FIGURE 20.4. The Sheet tab of the Page Setup dialog box allows you to specify headings and ranges of data to appear on your printout and adjust the appearance of each page.
The print area is a special range that defines the cells you want to print. You can decide how much of the worksheet data you’d like to print. Excel prints the entire worksheet by default. You can print only what you actually want by defining a print area. You can specify the range address to print in the Print Area setting. If you do not specify a print area, Excel will print all the data in the current worksheet. If you specify the range of cells to print in the Print Area setting and then choose the Selection option in the Print dialog box, Excel will print the current selection of cells in the worksheet instead of the range of cells specified in the Print Area setting of the Print Setup dialog box. Use the PrintArea property of the PageSetup object to programmatically return or set the range of cells to be printed. Setting the PrintArea property to False or to an empty string ("") will set the print area to the entire sheet.
The Print titles area on the Sheet tab allows you to specify workbook rows that should be printed at the top of every page or workbook columns that should be printed on the left side of every page. These settings are especially useful for printing very large worksheets. By default, Excel prints your row and column titles only on the first page, making it very difficult to understand data on subsequent pages. To fix this problem, you can tell Excel to print the specified row and column headings on every page. Specify the rows that contain the cells to be repeated at the top of each page in the Rows to repeat at top setting (PrintTitleRows property), and specify the columns that contain cells to be repeated on the left side of each page in the Columns to repeat at left setting (PrintTitleColumns property). You should specify both of these settings for extremely large worksheets. To turn off the title rows or title columns, you may want to set the corresponding property (PrintTitleRows or PrintTitleColumns) to False or to an empty string ("").
The Print settings control the look of your printed pages. To print the worksheet with gridlines, check the Gridlines box (PrintGridlines property). To print colors as shades of gray, select the Black and white box (BlackandWhite property). Draft quality printing will be faster since Excel does not print gridlines and suppresses some graphics in this mode. To show row and column headings on the printed pages, check the Row and column headings box (PrintHeadings property). Excel will identify the rows with numbers and worksheet columns with letters or numbers, depending on the style setting in the Excel Options dialog box (choose File | Excel Options | Formulas, and see the R1C1 Reference style box). If your worksheet contains comments, you can indicate the position on the printed page where you would like to have them printed by choosing an option from the Comments drop-down box (PrintComments property). If the worksheet contains errors, you can suppress the display of error values when printing a worksheet by making a selection from the Cell errors as drop-down box (PrintErrors property). When using the PrintErrors property, specify how you would like errors to be displayed with one of the following constants:
• xlPrintErrorsBlank
• xlPrintErrorsDash
• xlPrintErrorsNA
The settings in the Page order area of the Sheet tab allow you to specify how Excel should print and number pages when printing large spreadsheets. The default printing order is from top to bottom. You may request this order to be changed to left to right, which is a convenient way to print wide tables. Use the OrderProperty of the PageSetup object to set or return the print order. The page order can be one of the following constants: xlDownThenOver or xlOverThenDown.
Again, here are some examples of actual statements:
1. Set the print area as cells A2:D10 on Sheet1:
Worksheets("Sheet1").PageSetup.PrintArea = "$A$2:$D$10"
2. Specify row 1 as the title row and columns A and B as title columns:
ActiveSheet.PageSetup.PrintTitleRows = ActiveSheet.Rows(1).Address
ActiveSheet.PageSetup.PrintTitleColumns = ActiveSheet.Columns("A:B").Address
3. Print gridlines and column headings on Sheet1:
With Worksheets("Sheet1").PageSetup
.PrintHeadings = True
.PrintGridlines = True
End With
4. Number and print the worksheet starting from the first page to the pages to the right, and then move down and continue printing across the sheet:
Worksheets("Sheet1").PageSetup.Order = xlOverThenDown
Now that you are familiar with the many settings available in the Page Setup dialog box and know the names of the corresponding properties that can be used in VBA to write code that sets up your worksheets for printing, it’s time for a complete procedure. The following procedure prints some page setup settings to the Immediate window.
|
Please note files for the “Hands-On” project may be found on the companion CD-ROM. |
|
Hands-On 20.1. Printing Page Setup Settings to the Immediate Window |
1. Open a new workbook and save it as C:\VBAExcel2016_ByExample\Chap20_VBAExcel2016.xlsm.
2. On Sheet1 of Chap20_VBAExcel2016.xlsm, enter the data shown in Figure 20.5. The bonus values are calculated using the following formula: Months Employed * 3. Enter =C2*3 in cell D2, =C3*3 in cell D3, and so on.
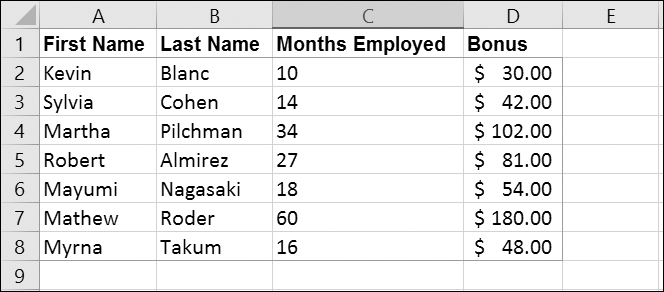
FIGURE 20.5. Sample worksheet data.
3. Press Alt+F11 to switch to the Visual Basic Editor. Select VBAProject (Chap20_VBAExcel2016.xlsm) in the Project Explorer window and choose Insert | Module.
4. In the Module1 Code window, enter the ShowPageSettings procedure as shown below.
Sub ShowPageSettings()
With ActiveSheet.PageSetup
Debug.Print "Orientation = "; .Orientation
Debug.Print "Paper Size = "; .PaperSize
Debug.Print "Print Gridlines = "; .PrintGridlines
Debug.Print "Horizontal Print Quality = "; .PrintQuality(1)
Debug.Print "Print Area = "; .PrintArea
End With
End Sub
5. Run the ShowPageSettings procedure.
The results of the procedure are printed to the Immediate window. Because we have not changed any settings in the Page Setup dialog box, the values you see after the equal signs are the default values.
6.Modify the ShowPageSettings procedure as follows:
Sub ShowPageSettings2()
With ActiveSheet.PageSetup
Debug.Print "Orientation = "; .Orientation
Debug.Print "Paper Size = "; .PaperSize
Debug.Print "Print Gridlines = "; .PrintGridlines
Debug.Print "Horizontal Print Quality = "; .PrintQuality(1)
Cells(1, 1).Select
.PrintArea = ActiveCell.CurrentRegion.Address
Debug.Print "Print Area = "; .PrintArea;
.CenterHeader = Chr(10) & "Bonus Information Sheet"
End With
Application.Dialogs(xlDialogPrintPreview).Show
End Sub
7. Run the modified ShowPageSettings2 procedure.
Now, in addition to writing selected settings to the Immediate window, the test worksheet is formatted and displayed in the Print Preview window.
When printing worksheets that contain a large number of rows, it is a good idea to separately set the print titles and print area so that each page is printed with the column titles. The following procedure demonstrates this particular scenario. Notice how the CurrentRegion property of the Range collection is used together with the Offset and Resize properties to resize the print area so that it does not include the header row (Row 1). The procedure sets the header row using the PrintTitleRows property of the PageSetup object.
Sub FormatSheet()
Dim curReg As Range
Set curReg = ActiveCell.CurrentRegion
With ActiveSheet.PageSetup
.PrintTitleRows = "$1:$1"
Cells(1, 1).Select
.PrintArea = curReg.Offset(1, 0).Resize(curReg.Rows.Count - 1, curReg.Columns.Count).Address
Debug.Print "Print Area = "; .PrintArea;
.CenterHeader = Chr(10) & "Bonus Information Sheet"
.PrintGridlines = True
End With
Application.Dialogs(xlDialogPrintPreview).Show
End Sub
As you can see in Figure 20.6, the Page Layout view (View | Page Layout) makes it easy to see how the worksheet will print, and add headers and footers.

FIGURE 20.6. To view the worksheet as it would look when printed, choose View | Page Layout.
To add a header, simply click the top area of the worksheet and type your text or click the appropriate buttons in the Design tab of the Header & Footer Tools on the Ribbon. For example, to add today’s date, click the Current Date button. To add the footer, click the Go to Footer button in the Navigation group of the Header & Footer Tools Design tab.
Use the following VBA statement to activate the Page Layout view:
ActiveWindow.View =xlPageLayoutView
You can also display your worksheet in the Print Preview window by typing either one of the following statements in the Immediate window or in your VBA procedure:
Application.Dialogs(xlDialogPrintPreview).Show
or
Worksheets("Sheet1").PrintPreview
The above statements will not work if the worksheet has no data.
As you can see in Figure 20.7, there are buttons at the top of the Print Preview window that allow you to move between individual pages of your printout, make adjustments to the page setup and margins, get a closer look at the data or any part of the printout (Zoom button), and print your worksheet. If the worksheet has more than one page, you can display other pages in the Print Preview by clicking on the Next and Previous buttons or by using the keyboard (down arrow, up arrow, End, and Home keys). You can use the Zoom button in the Print Preview window to change the Print Preview magnification, and you can adjust your page margins and column widths visually by using the mouse (to do this, select the Show Margins checkbox on the Preview area of the Ribbon). You can also print using the Print button and can easily access the Page Setup dialog box to make changes in the desired layout of your printout.

FIGURE 20.7. This Print Preview window displays a scaled-down version of the worksheet pages. Notice that this is an entirely different window from the one opened via the File | Print command or the Print Preview and Print button, which is available in the Quick Access Toolbar.
Sometimes you may want to prevent users from modifying the page setup or printing from the Print Preview window. This can be accomplished programmatically. You can disable the Show Margins and Page Setup buttons in the Print Preview window in one of the following ways:
Application.Dialogs(xlDialogPrintPreview).Show False
or
Worksheets("Sheet1").PrintPreview EnableChanges:=False
or
Worksheets("Sheet1").PrintPreview False
Figure 20.8 shows the Print Preview window with the Show Margins option and Page Setup button disabled.

FIGURE 20.8. The Print Preview window with the disabled Page Setup and Show Margins options.
Before printing, you may want to display a list of printers for the users to select from or force a print job to go to a specific printer. The Printer Setup dialog box is shown in Figure 20.9. This dialog box can be displayed with this statement:
Application.Dialogs(xlDialogPrinterSetup).Show
To find out the name of the active printer, use the ActivePrinter property of the Application object:
MsgBox Application.ActivePrinter
To change the active printer, use the following statement, replacing the printer name and port with your own:
Application.ActivePrinter = " Brother HL-5370DW series Printer on Ne04:"
You can tell Excel to set your default printer on opening a specific workbook by writing a simple Auto_Open macro.
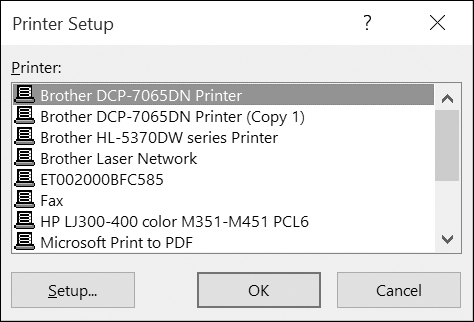
FIGURE 20.9. The Printer Setup dialog box.
|
Hands-On 20.2. Setting a Default Printer When Opening a Specific Workbook |
1. In the Chap20_VBAExcel2016.xlsm workbook, switch to the Visual Basic Editor screen and choose Insert | Module.
2. In the module Code window, enter the Auto_Open procedure as shown below, replacing the printer name with the name of your own printer:
Sub Auto_Open()
Application.ActivePrinter = "Brother HL-5370DW series Printer on Ne04:"
MsgBox Application.ActivePrinter
End Sub
NOTE |
3. Save the Chap20_VBAExcel2016.xlsm workbook and close it. Do not exit Excel.
4. Reopen the Chap20_VBAExcel2016.xlsm workbook.
Excel will run the Auto_Open macro and display the active printer name in the message box.
Prior to printing a worksheet you may want to set print options such as print ranges, collation, or the number of copies to print. This is easily done by setting appropriate options in the Print dialog box (Figure 20.10).

FIGURE 20.10. The Print dialog box allows you to specify various print options.
To display the Print dialog box programmatically, use the following statement:
Application.Dialogs(xlDialogPrint).Show
You can include a list of arguments after the Show method. To set initial values in the Print dialog box, use the arguments shown in Table 20.3.
TABLE 20.3. Show method arguments for the Print dialog |
|
Argument Number |
Argument Description |
|
range_num |
|
From |
|
To |
|
Copies |
|
Draft |
|
Preview |
|
print_what |
|
Color |
|
Feed |
|
Quality |
|
y_resolution |
|
Selection |
|
printer_text |
|
print_to_file |
|
Collate |
For example, the following statement will print pages 1 to 2 of the active worksheet (assuming that the worksheet consists of two or more pages):
Application.Dialogs(xlDialogPrint).Show Arg1:=2, Arg2:=1, Arg3:=2
The first argument specifies the Page(s) option button in the Print range area of the Print dialog box. To select the All option button in the Print range area, set Arg1 to 1.
The second and third arguments specify the pages you want to print (the beginning page number and the last page number to print should be specified).
To send your worksheet directly to the printer (without going through the Print dialog box), use the following statement:
ActiveSheet.PrintOut
The PrintOut method can take the following arguments:
At times you may not want to allow printing or print previewing the worksheet. You can remove these features by customizing the File tab. To disable the Print Preview window, write the Workbook_BeforePrint event procedure (see Figure 20.11 in the next section).
Before the workbook is printed (and before the Print dialog box appears), Excel triggers the Workbook_BeforePrint event. You can use this event to perform certain formatting or calculating tasks prior to printing or to cancel printing and print previewing entirely when these features are requested. The code for the Workbook_BeforePrint event procedure must be placed in the ThisWorkbook Code window (Figure 20.11).

FIGURE 20.11. Writing the Workbook_BeforePrint event procedure in the ThisWorkbook Code window.
The ThisWorkbook Code window can be accessed by double-clicking the appropriate workbook name in the Project Explorer window of the Visual Basic Editor screen and double-clicking the ThisWorkbook object. Next, at the top of the ThisWorkbook Code window, select Workbook from the Object drop-down list on the left. The Procedure drop-down list on the right will display the names of the events that the Workbook object can respond to. Select the BeforePrint event name; Excel will place the skeleton of this procedure in the Code window. Type your VBA code between the Sub and End Sub lines. The next time you print, Excel will run your code first and then proceed to print the worksheet. The Workbook_BeforePrint event code is triggered whether you have requested printing via Excel’s built-in tools or have written your own VBA procedure to control printing.
The following tasks can be performed via the VBA code placed in the Workbook_BeforePrint event procedure:
• Disabling printing and print previewing
Private Sub Workbook_BeforePrint(Cancel As Boolean)
If Weekday(Date, vbSunday) = 7 Then Cancel = True
End Sub
When you set the Cancel argument to True, the worksheet isn’t printed when the procedure ends. The above procedure disallows printing on Saturdays (the seventh day of the week). The Weekday function specifies that Sunday is the first day of the week.
• Placing the full workbook’s name in the page footer
• Changing worksheet formatting prior to printing
• Validating data upon printing
Private Sub Workbook_BeforePrint(Cancel As Boolean)
If Worksheets("Sheet1").Range("A1") <> "Monthly Report" Then
MsgBox "Please enter correct data in cell A1."
Cancel = True
End If
End Sub
• Calculating all worksheets in the active workbook
Private Sub Workbook_BeforePrint(Cancel As Boolean)
Dim sh as Variant
For Each sh in Worksheets
sh.Calculate
Next
End Sub
If you need to perform certain formatting tasks for all your workbooks prior to printing, you need to create the WorkbookBeforePrint event procedure for the Application object. You’ve already worked with Excel’s application-level events in Chapter 15. The following example demonstrates how to have Excel automatically print in the footer the full path and filename of all existing and new workbooks.
|
Hands-On 20.3. Automatically Adding a Footer to Each Workbook |
You will begin this Hands-On by creating the Personal.xlsb file. Macros and VBA procedures stored in this file are available each time you work with Excel. Personal Macro Workbook (Personal.xlsb) is located in the XLStart folder. If this workbook does not already exist, Excel creates it when you record a macro and select the option to store it in the Personal Macro Workbook.
1.In the Excel Application window, choose Developer | Record Macro.
2. In the Record Macro dialog box, choose Personal Macro Workbook in the Store macro in drop-down list.
The Personal macro workbook loads automatically in the background each time you start Excel.
3. Click OK to start recording.
In this HandsOn you will not record anything.
4. Click the Stop Recording button to stop the Macro Recorder.
5. Switch to the Visual Basic Editor screen. In the Project Explorer window, select VBAProject (Personal.xlsb).
6. With the project selected, using the Properties window, rename the VBA Project Personal.
7. Double-click the Personal (Personal.xlsb) workbook.
8. In the Modules folder, right-click the Module1 and choose Remove Module1. Click No when asked to export the module.
9. Choose Insert | Class Module.
Excel inserts a module named Class1 in the Class Modules folder in the Personal (Personal.xlsb) workbook.
10. In the Properties window, rename Class1 clsFooter.
11. Enter the following declaration line and event procedure code in the clsFooter Code window:
Public WithEvents objApp As Application
Private Sub objApp_WorkbookBeforePrint(ByVal Wb As Workbook, Cancel As Boolean)
With Wb.ActiveSheet
.PageSetup.RightFooter = Wb.FullName
End With
End Sub
Recall from Chapter 15 that the WithEvents keyword is used in a class module to declare an object variable that points to the Application object. In this procedure, objApp is the variable name for the Application object. The Public statement before the WithEvents keyword allows the objApp variable to be accessed by all modules in the VBA project.
Once you’ve declared the object variable, you can select objApp in the Object drop-down list in the clsFooter module’s Code window, and select the WorkbookBeforePrint event in the Procedure drop-down list in the top-right corner of the Code window. When you start writing your event procedures using this technique (by choosing options from the Object and Procedure drop-down lists), Excel always inserts the procedure skeleton (the start and end of the procedure) in the Code window. This way you can be sure that you always start with the correct procedure structure and the definition of the parameters that the particular event can utilize. All that’s left to do is write some VBA code to specify tasks that should be performed. The above procedure simply tells Excel to place the full path and filename in the right footer of the workbook’s active sheet.
After writing the event procedure code in the class module, we need to write some code in the ThisWorkbook class module.
12. In the Project Explorer window, double-click the ThisWorkbook object located in the Microsoft Excel Objects folder under the Personal (Personal.xlsb) project.
13. Type the following declaration and event code in the ThisWorkbook Code window:
Dim clsFullPath As New clsFooter
Private Sub Workbook_Open()
Set clsFullPath.objApp = Application
End Sub
The first line above declares a variable named clsFullPath, which points to the object (objApp) in the clsFooter class module. The New keyword indicates that a new instance of the object should be created the first time the object is referenced. We do this in the Workbook_Open event procedure by using the Set keyword. This statement connects the object located in the clsFooter class module with the object variable objApp representing the Application object.
The code placed in the Workbook_Open event procedure is run whenever a workbook is opened. Therefore, when a workbook (an existing one or a new one) is opened, Excel will know that it must listen to the Application events; in particular, it must track events for the objApp object and execute the code of the WorkbookBeforePrint event procedure when a request for print or print preview is made through the Excel user interface or via the VBA code that is placed inside a custom printing procedure.
Before Excel can perform the programmed tasks, you must save the changes to the Personal.xlsb file and exit Excel.
14. Choose Debug | Compile Personal to ensure that Excel will be able to execute the VBA code you’ve added to the Personal.xlsb workbook. If Excel finds any errors, it will highlight the statement that you need to examine. Make any appropriate corrections and repeat the Debug | Compile Personal command. When there are no errors in the Personal.xlsb project, the Compile Personal command on the Debug menu is grayed out.
15. Close the Chap20_VBAExcel2016.xlsm workbook file and any other workbooks that you may have opened.
16. Exit Microsoft Excel. When Excel asks whether you’d like to save changes to the Personal.xlsb file, click Yes.
17. Restart Microsoft Excel. Open a new workbook and type anything in any cell on any sheet of this new workbook, then save the file as TestFooter.xlsx.
18. Click File | Print, select your printer, and click the Print button. When you click the Print button, Excel will execute the WorkbookBeforePrint event procedure and your printout should include the file path in the right footer.
19. Close the TestFooter.xlsx workbook.
20. Open any existing workbook that did not have footers set up. Choose File | Print. When you print out the file, the hardcopy now includes a complete filename in the right footer.
21. Close the workbook you have opened.
NOTE |
You can modify the WorkbookBeforePrint event procedure to automatically perform other tasks as needed prior to printing. Save yourself time by delegating as many tasks as possible to Excel. |
You can share your Excel workbooks with others by emailing them. To send email from Excel, you need one of the following programs:
• Microsoft Outlook
• Microsoft Live Mail
• Microsoft Exchange Client
• Any MAPI-compatible email program (MAPI stands for Messaging Application Programming Interface)
Excel workbooks can be sent as attachments in PDF/XPS format or as faxes; or you can send a link to the file stored in a shared location. When you send an email with a workbook attachment, the file is larger but the recipient can open and edit the workbook in Excel. Excel offers the Email command in the File | Share menu, as shown in Figure 20.12.

FIGURE 20.12. Share options allow you to send emails from Excel.
When you select the Email option and click the Send as Attachment button located in the right column of the Backstage View, Excel displays an email message window as shown in Figure 20.13.

FIGURE 20.13. Sending a workbook as an email attachment from Excel.
NOTE |
When you use the Attachment Option, you may be notified that you need to create a Microsoft Outlook profile. Follow the instructions in the message to add a profile to Outlook. |
You can invoke the email message window programmatically with the following statement:
Application.Dialogs(xlDialogSendMail).Show
You can include the arguments shown in Table 20.5 after the Show method.
TABLE 20.5. Show method arguments for the email message window |
|
Argument Number |
Argument Description |
Arg1 |
Recipients |
Arg2 |
Subject |
Arg3 |
return_receipt |
For example, the following statement displays the email message window with the recipient’s email address filled in and the specified text in the subject line:
Application.Dialogs(xlDialogSendMail).Show
Arg1:="SendToName@SendToProvider.com",
Arg2:="New workbook file"
To check out the above statement, you can type the text on one line in the Immediate window and press Enter, or you can place it inside a VBA procedure.
Before you begin sending emails from your VBA procedures, it’s a good idea to determine what email system is installed on your computer. You can do this with the MailSystem property of the Application object. This is a read-only property that uses the xlMAPI, xlPowerTalk, and xlNoMailSystem constants to determine the installed mail system. MAPI is used for interfacing with email systems. PowerTalk is a Macintosh email system.
The following Discover_EmailSystem procedure demonstrates how to use the MailSystem property.
Sub Discover_EmailSystem()
Select Case Application.MailSystem
Case xlMAPI
MsgBox "You have Microsoft Mail installed."
Case xlNoMailSystem
MsgBox "No mail system installed on this computer."
Case xlPowerTalk
MsgBox "Your mail system is PowerTalk"
End Select
End Sub
The easiest way to send an email from Excel is by using the SendMail method of the Application object. This method allows you to specify the email address of the recipient, the subject of your email, and whether you’d like a return receipt. Let’s create an email and send it to ourselves.
|
This Hands-On requires that you have a Microsoft Outlook account set up on your computer.
1. Open the Chap20_VBAExcel2016.xlsm workbook, switch to the Visual Basic Editor screen, and insert a new module in VBAProject (Chap20_VBAExcel2016.xlsm).
2. In the module’s Code window, enter the following procedure:
Sub SendMailNow()
Dim strEAddress As String
strEAddress = InputBox("Enter e-mail address", "Recipient's E-mail Address ")
If IsNull(Application.MailSession) Then
Application.MailLogon
End If
ActiveWorkbook.SendMail Recipients:=strEAddress, Subject:="Test Mail"
Application.MailLogoff
Exit Sub
ErrorHandler:
MsgBox "Some error occurred while sending e-mail."
End Sub
If Microsoft Mail isn’t already running, you must use the MailSession property of the Application object to establish a mail session in Excel before sending emails. The MailSession property returns the MAPI mail session number as a hexadecimal string or Null if the mail session hasn’t been established yet. The MailSession property isn’t used on PowerTalk mail systems. To establish a mail session, use the MailLogon method of the Application object. To close a MAPI email session established by Microsoft Excel, use the MailLogoff method.
3. Run the SendMailNow procedure to email the active workbook. Type your email address when prompted and click OK.
When you see the message shown in Figure 20.14, click the Allow button to allow sending the email.

FIGURE 20.14. You will get a warning message when you try to send email from Excel.
4. Open your email program and check the received email.
When the recipient receives an email with an attached workbook, he or she will need Excel to open the file.
You can send emails directly from Microsoft Excel and other Microsoft Office applications via the MsoEnvelope object, which is included with the Microsoft Office 16.0 object library. To return an MsoEnvelope object, use the MailEnvelope property of the Worksheet object. You also need to set up a reference to the MailItem object in the Microsoft Outlook 16.0 object library to access its properties and methods that format the email message. The following procedure demonstrates sending email from Excel using the MsoEnvelope object. Instead of attaching the entire workbook, we will embed the data shown in Sheet1 (Figure 20.5 earlier in this chapter).
|
1. Activate Sheet1 in the Chap20_VBAExcel2016.xlsm workbook file. This sheet contains the data shown earlier in Figure 20.5.
2. Press Alt+F11 to switch to the Visual Basic Editor screen.
3. Set up a reference to the Microsoft Outlook 16.0 and Microsoft Office 16.0 object libraries using the Tools | References dialog box.
4. In the Visual Basic Editor screen, insert a new module in VBAProject (Chap20_VBAExcel2016.xlsm).
5. In the module’s Code window, enter the following procedure:
Sub SendMsoMail(ByVal strRecipient As String)
' use MailEnvelope property of the Worksheet
' to return the msoEnvelope object
ActiveWorkbook.EnvelopeVisible = True
With ActiveSheet.MailEnvelope
.Introduction = "Please see the list of " & "employees who are to receive a bonus."
With .Item
' Make sure the e-mail format is HTML
.BodyFormat = olFormatHTML
' Add the recipient name
.Recipients.Add strRecipient
' Add the subject
.Subject = "Employee Bonuses"
' Send Mail
.Send
End With
End With
End Sub
6. Run the SendMsoMail procedure by typing the following statement in the Immediate window (be sure to replace the email address with your own):
SendMsoMail("YourName@YourProvider.com")
When you press Enter, Excel calls the SendMsoMail procedure, passing to it the recipient’s email address. The embedded worksheet is shown in Outlook in Figure 20.15.

FIGURE 20.15. An email with an embedded worksheet generated by the VBA procedure in Hands-On 20.5.
At times you may need to send individualized email messages to people whose email addresses and the information you want to send have been entered in a worksheet. The following procedure demonstrates how to process this kind of request from Excel via objects, properties, and methods provided by the Microsoft Outlook 16.0 Object Library.
|
1. Prepare the worksheet shown in Figure 20.16. Enter the valid email addresses of your own contacts in Column D. Type the names of your contacts in the Employee Name column.

FIGURE 20.16. Sample worksheet for bulk emailing demo.
2. Switch to the Visual Basic Editor screen and choose Tools | References. Ensure that there is a check mark next to Microsoft Outlook 16.0 Object Library. If the library is not yet selected, click the box next to its name. Click OK to close the References dialog box.
3. Choose Insert | Module to add a new module to VBAProject (Chap20_VBAExcel2016.xlsm).
4. In the module Code window, enter the code of the SendBulkMail procedure as shown below:
Sub SendBulkMail(EmailCol, BeginRow, EndRow, SubjCol, NameCol, AmountCol)
Dim objOut As Outlook.Application
Dim objMail As Outlook.MailItem
Dim strEmail As String
Dim strSubject As String
Dim strBody As String
Dim r As Integer
On Error Resume Next
Application.DisplayAlerts = False
Set objOut = New Outlook.Application
For r = BeginRow To EndRow
Set objMail = objOut.CreateItem(olMailItem)
strEmail = Cells(r, EmailCol)
strSubject = Cells(r, SubjCol) & " reimbursement"
strBody = "Dear " & Cells(r, NameCol).Text & ":" & vbCrLf & vbCrLf
strBody = strBody & "We have approved your request for " & LCase(strSubject)
strBody = strBody & " in the amount of " & Cells(r, AmountCol).Text & "."
strBody = strBody & vbCrLf & "Please allow 3 business " & "days for this"
strBody = strBody & " amount to appear on your bank statement."
strBody = strBody & vbCrLf & vbCrLf & " Employee Services"
With objMail
.To = strEmail
.Body = strBody
.Subject = strSubject
.Send
End With
Next
Set objOut = Nothing
Application.DisplayAlerts = True
End Sub
The above procedure requires the following parameters: EmailCol, BeginRow, EndRow, SubjCol, NameCol, and AmountCol. The EmailCol parameter is the number of the column on the worksheet where the email address has been entered. In this example, it’s the fourth column. The BeginRow and EndRow parameters specify the first and last rows of your data range. In this example, the first row we want to process is 2 and the last row is 5. SubjCol is the column number where the email subject is entered. In this example, it’s the second column (Expense Type). NameCol contains the employee name and is the first column here. AmountCol is the column number where the expense amount has been entered. In this example, it’s the third column.
The statement Application.DisplayAlerts = False will cause Excel to stop displaying alert messages; however, this will not prevent Outlook’s messages from appearing. Prior to specifying the details of the email, we must set up a reference to the Outlook application with the following statement:
Set objOut = New Outlook.Application
Next, we need to get data for each person to whom we need to send email. The procedure uses the For…Next loop to iterate through the worksheet data starting at row 2 and ending at row 5. Each time in the loop we set a reference to an Outlook MailItem and place the data we need for our email message in various variables. Once the procedure knows where the data is in the worksheet, we can go ahead and set the required properties of Microsoft Outlook:
With objMail
.To = strEmail
.Subject = strSubject
.Send
End With
The To property returns or sets a semicolon-delimited string list of display names for the To recipients for the Outlook item. In this example, we use one recipient for each email we send. The Body property returns or sets a string representing the text message we want to send in the email. The Subject property is used to specify the email subject. Finally, the Send method sends the email message. If you’d rather not send the email, you can view it by replacing the Send method with the Display method:
With objMail
.To = strEmail
.Body = strBody
.Subject = strSubject
.Display
End With
5. Enter Call_SendBulkMail in the same module where you entered the code of the SendBulkMail procedure:
Sub Call_SendBulkMail()
SendBulkMail EmailCol:=4, BeginRow:=2, EndRow:=5, SubjCol:=2, NameCol:=1, AmountCol:=3
End Sub
The above procedure calls the SendBulkMail procedure and passes it the parameters indicating the column number of the recipient’s address (4), the beginning and ending rows of the data (2, 5), the column where the email subject is located (2), the column containing the employee name (1), and the column number with the amount of reimbursement (3).
6. Run the Call_SendBulkMail procedure.
Excel VBA begins to execute the specified procedure. The first recipient listed in the worksheet should receive an email similar to the one shown in Figure 20.17.

FIGURE 20.17. Sample email message viewed in Microsoft Outlook and sent by a VBA procedure in Hands-On 20.6.
This chapter has shown you how to print and use various emailing techniques for the presentation and distribution of Excel workbooks. You learned how to programmatically set page and print options, set up printers, and use printing events to perform formatting or data calculation tasks prior to printing. You also practiced various methods of sending your workbooks through electronic email as attachments or embedded as the body of a message.
The next chapter focuses on using and programming Excel tables.