I’ll bet one of the first things that crossed your mind after deciding you wanted chickens was “What about a coop?” (And by “coop” you’re probably also thinking of what I call “hen habitat,” which includes the fenced run attached to the coop and all the other features that go with chicken-keeping: a waterer, a feeder, feed storage, etc.) So, yes, what about the coop? What is it really doing for you? What does it need to accomplish? What are the cost-effective and low-maintenance ways to accomplish those goals?
Why Even Have a Coop?
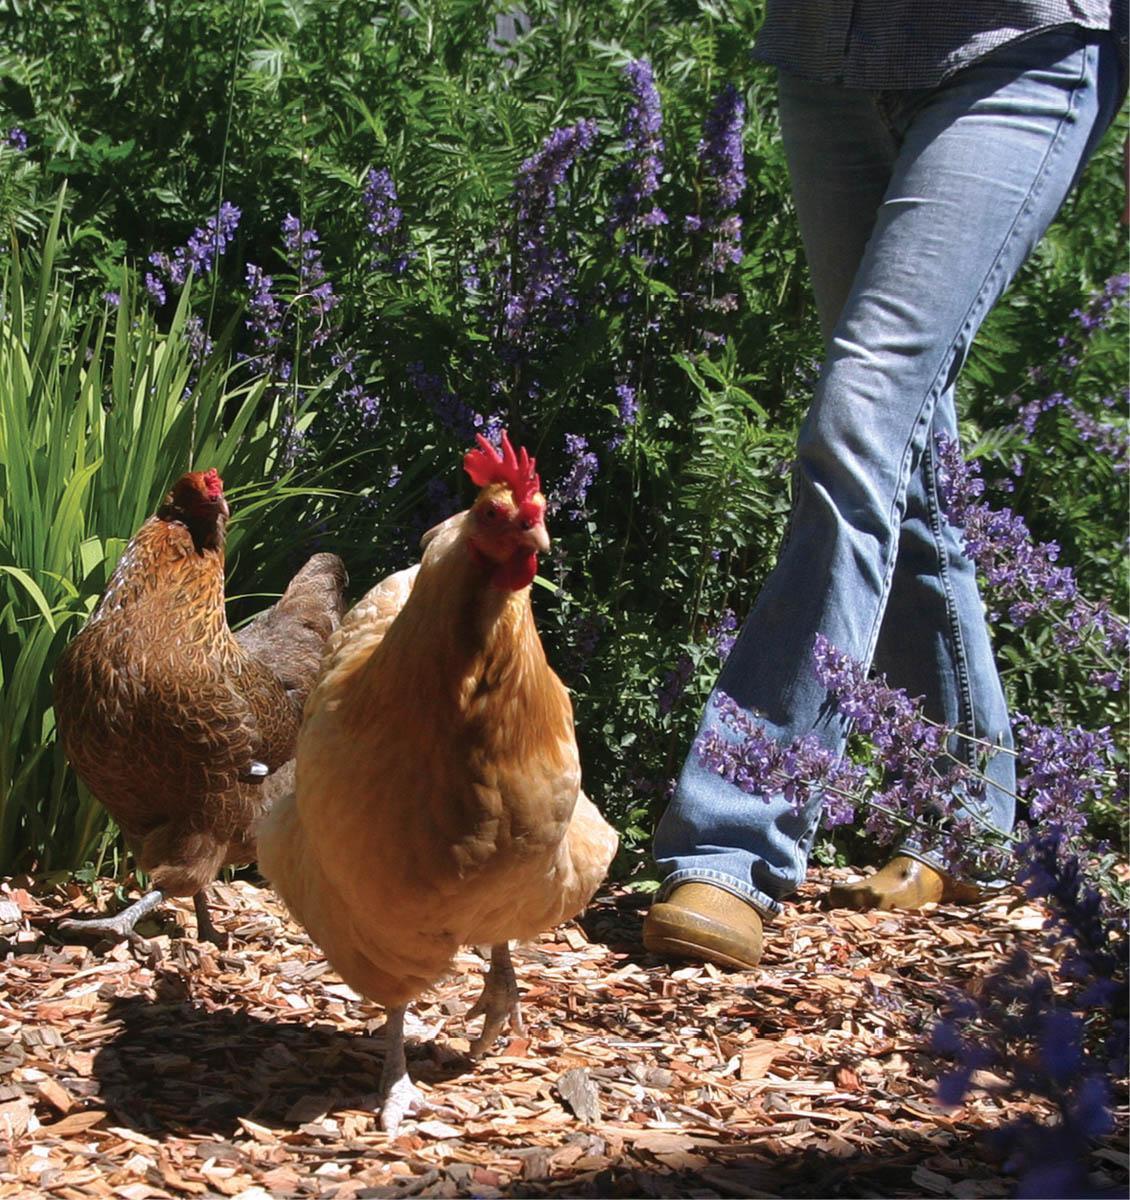
People in many countries around the world keep chickens without a coop or run. But for the urban hipster, the suburban homesteader, the rural hobby farmer, and everyone in between, going coopless means at least four unsatisfying outcomes:
1.Without a coop’s nest box, hens will lay eggs nearly anywhere. For hens, dark, secluded corners and crannies look like the beginnings of a nest. For you, that means a time-consuming, daily Easter egg hunt. Cheer up! Any eggs you miss won’t go to waste — they’ll feed your local snakes and vermin, boosting their population. You’ll be missing out on some eggy breakfasts and frittatas, but you’ll be supporting the local wildlife.
2.Without some containment, not only will your foraging and scratching hens damage or even destroy your gardens and lawn, but their habit of continuous pooping will organically decorate your walkways, patio, porch, and deck.
3.During the day, your foraging hens will make tempting targets for raptors like hawks and eagles.
4.At night, the hens will follow their ancestral calling to roost on some low-hanging branches of your trees or shrubs. That will get them high enough to be safe from nocturnal and earthbound stray dogs, but they won’t be safe from creatures that can climb, such as stray housecats, native gray foxes, raccoons, weasels, minks, and possums.
See what I mean about the limits of chickens’ domestication? That’s where we henkeepers come in, with our coops.
Construction Overview
Before we get into the nitty-gritty of building your coop, I want to share some big-picture thoughts about coop building.
Get Floored
The first step is to raise the coop up off the ground. Any raw wood touching the soil will rot away. Get the wood at least 1 foot above ground so that splashing rain can’t keep it damp enough to rot; you only want to build your coop once.
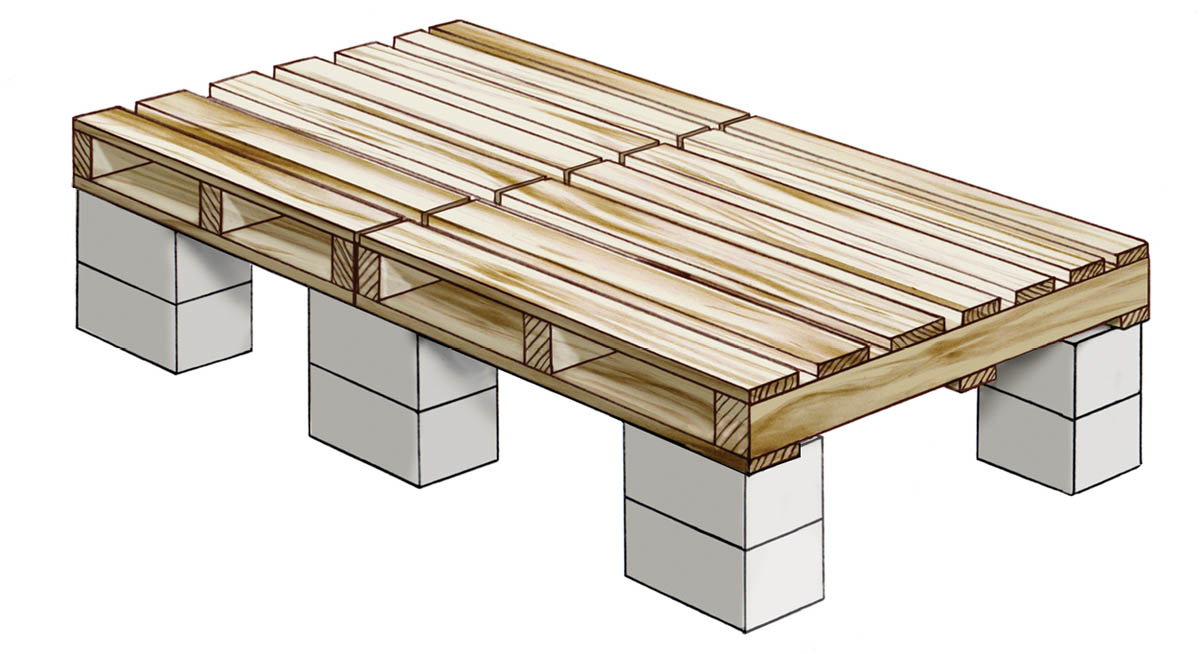
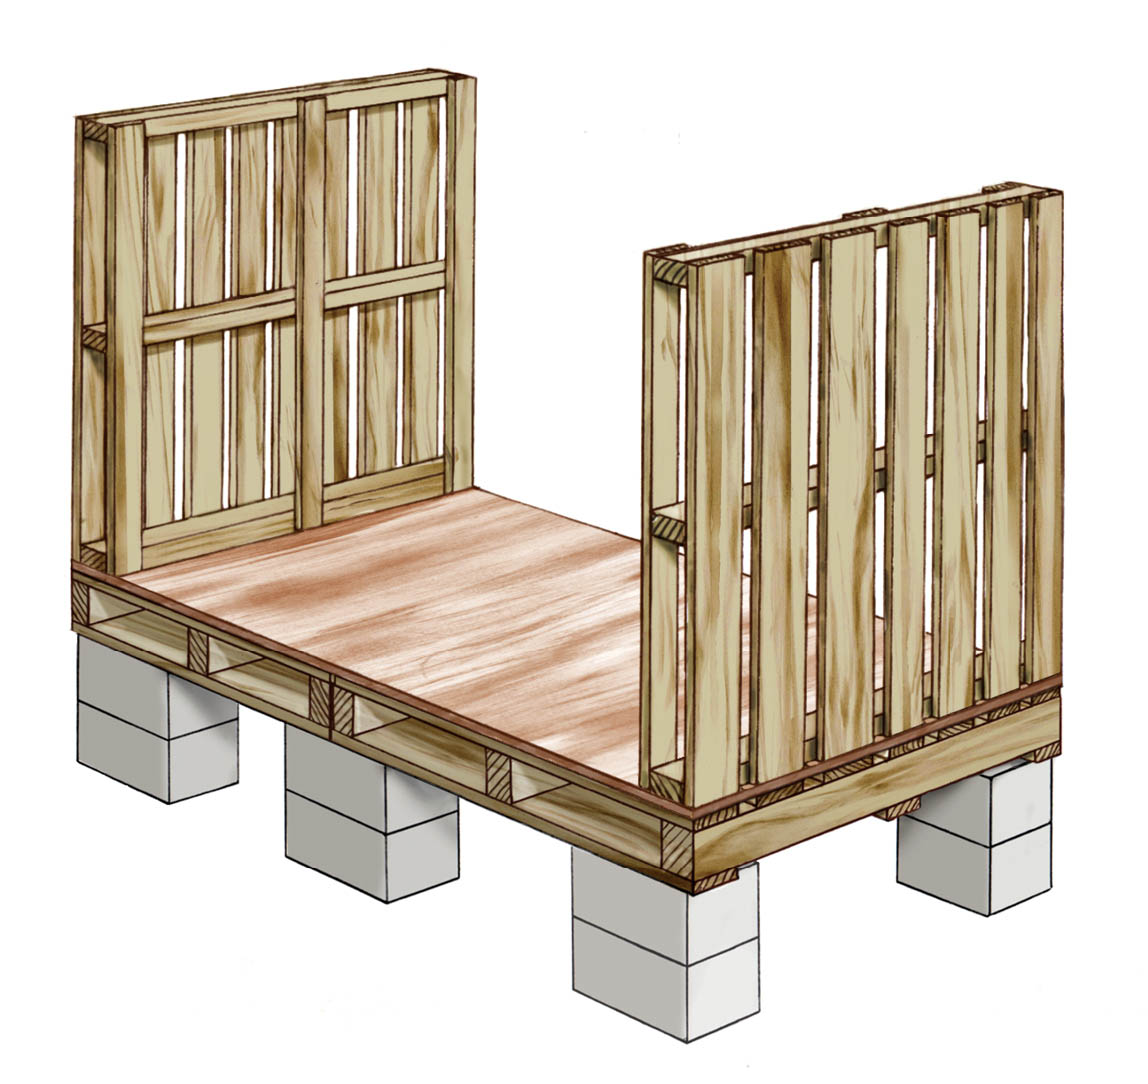
The cheapest foundation for a coop is a pair of cinder blocks stacked to support each corner of the wooden pallets (see here). Cinder blocks are 8 inches high, so a pair raises the pallets 16 inches above the ground. This height also essentially creates a moat (see below).
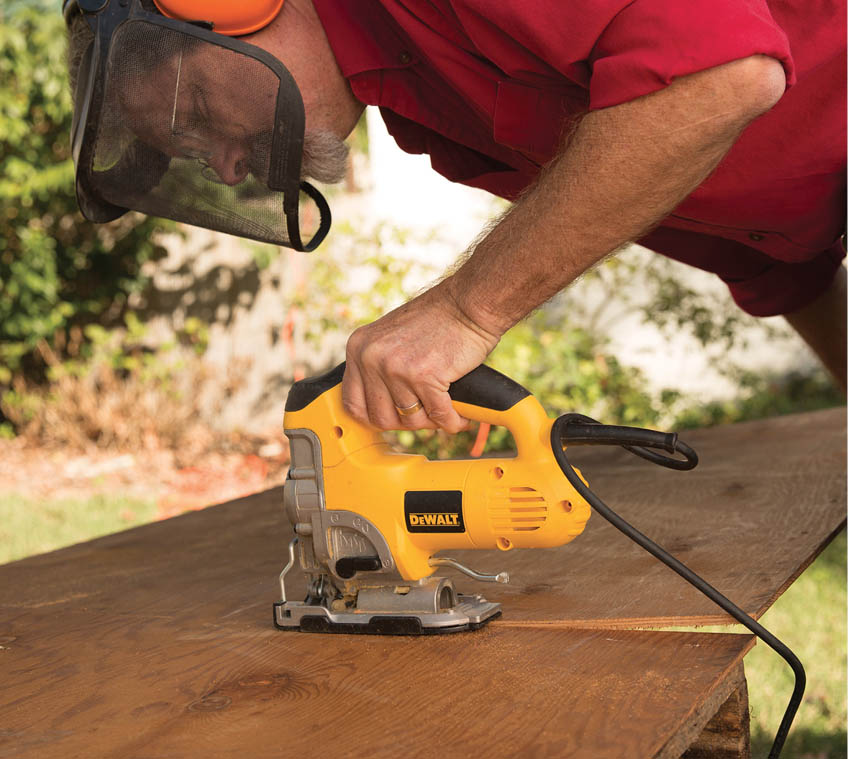
Given the small size and weight of a backyard coop, it’s not necessary to dig footings below the frost line. The movement of the soil during freeze-thaw and drought-monsoon cycles won’t damage the coop. The worst that could happen is that a coop door may become sticky. It’s easier to adjust a door with a jigsaw or drill than to dig a foundation.
Every Castle Needs a Moat
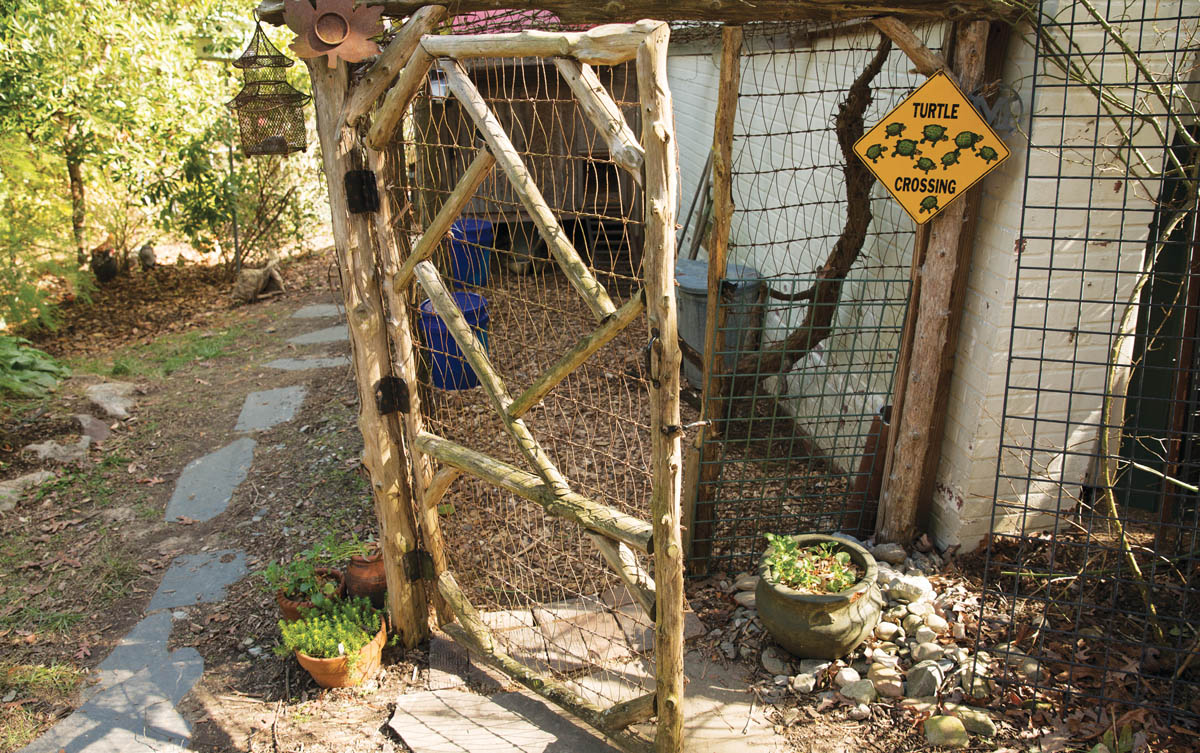
Lots of critters would love to snuggle up with your hens and their eggs — just once, of course. And it’s not like they have jobs to go to. They’ve got all night to work their way into a coop. There’s no point making it easy for them. Since your flock is counting on you to keep them safe, you’ll stuff fence wire scraps into all the gaps in the coop walls and put latches on the hatches. You’ll make your coop into a regular fortress to defend your fair ladies from pirates, bandits, and Vandals and Visigoths. But will your castle have a moat?
Our coop, like many others, is raised up off the ground on posts. Without being able to stand on the ground, rats will have a harder time gnawing their way through the wood or wriggling around a door, and raccoons will find it tougher to pry off a loose board or pick your combination lock.
Beyond deterring vermin, I find there are four other advantages to building our coop perched above a “moat”:
Cost. Suspending the coop floor 16 to 32 inches above the ground means we don’t have to buy expensive rot-resistant wood for the floor. Of course, the four posts in the ground should be cinder blocks or a rot-resistant wood such as cedar, redwood, or pressure-treated wood. The floor joists and the floor deck can be any old pine, spruce, fir, or even whole pallets.
Cover. We left our pen open to the sky so the rain would help the chicken poop and mulch decompose and draw earthworms and other small edible creatures into the pen. When it rains our queens of the castle can choose between a refreshing rinse or staying dry under the coop.
Dust bath space. After many days of rain, the ground in an open pen will be too wet for a good rejuvenating dust bath. But the area under the coop will be dry (and more private for bathing!). That’s why I don’t put mulch under the coop — so the bare, dry dirt will be accessible.
Food preservation. Our gravity-fed feeder has an open top, so we keep it under the coop. This means it stays dry during rains. Just as important, there isn’t enough room for the hens to roost on it and “fowl up” their food supply.
Back preservation. The henkeeper should be the primary client and the hens should be secondary (although it often doesn’t feel that way). When the time comes to clean out the coop, the ceiling should be at a comfortable working height for the primary client. That way your ladies-in-waiting won’t have to wait too long for the servant to clean up their chambers.
Construction Diary: Staging a Coop
Here’s how I helped a young first-grade teacher named Katie Ford and her stepfather, Johnny Ford, build a bigger coop so she could keep more birds on a limited budget. She wanted to keep two types of chickens in the coop for breeding — Lavender Orpingtons and Copper Marans — so she would need to keep them separate. I joked that the coop would be like a duplex and christened the project Katie’s Kooplex.
The next day Katie and Johnny gathered about two dozen pallets. I picked up some lumber and cinder blocks, and we got started.
How We Did It
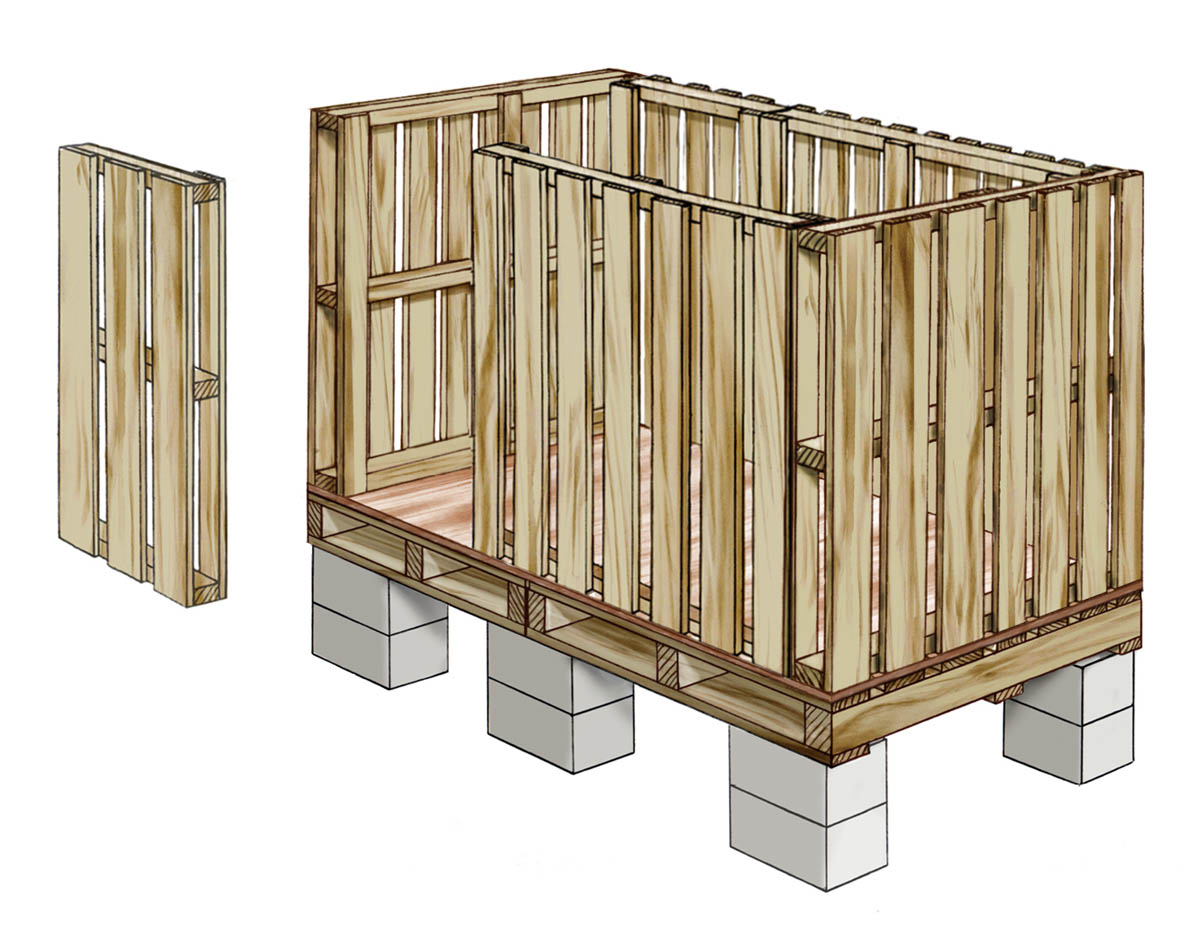
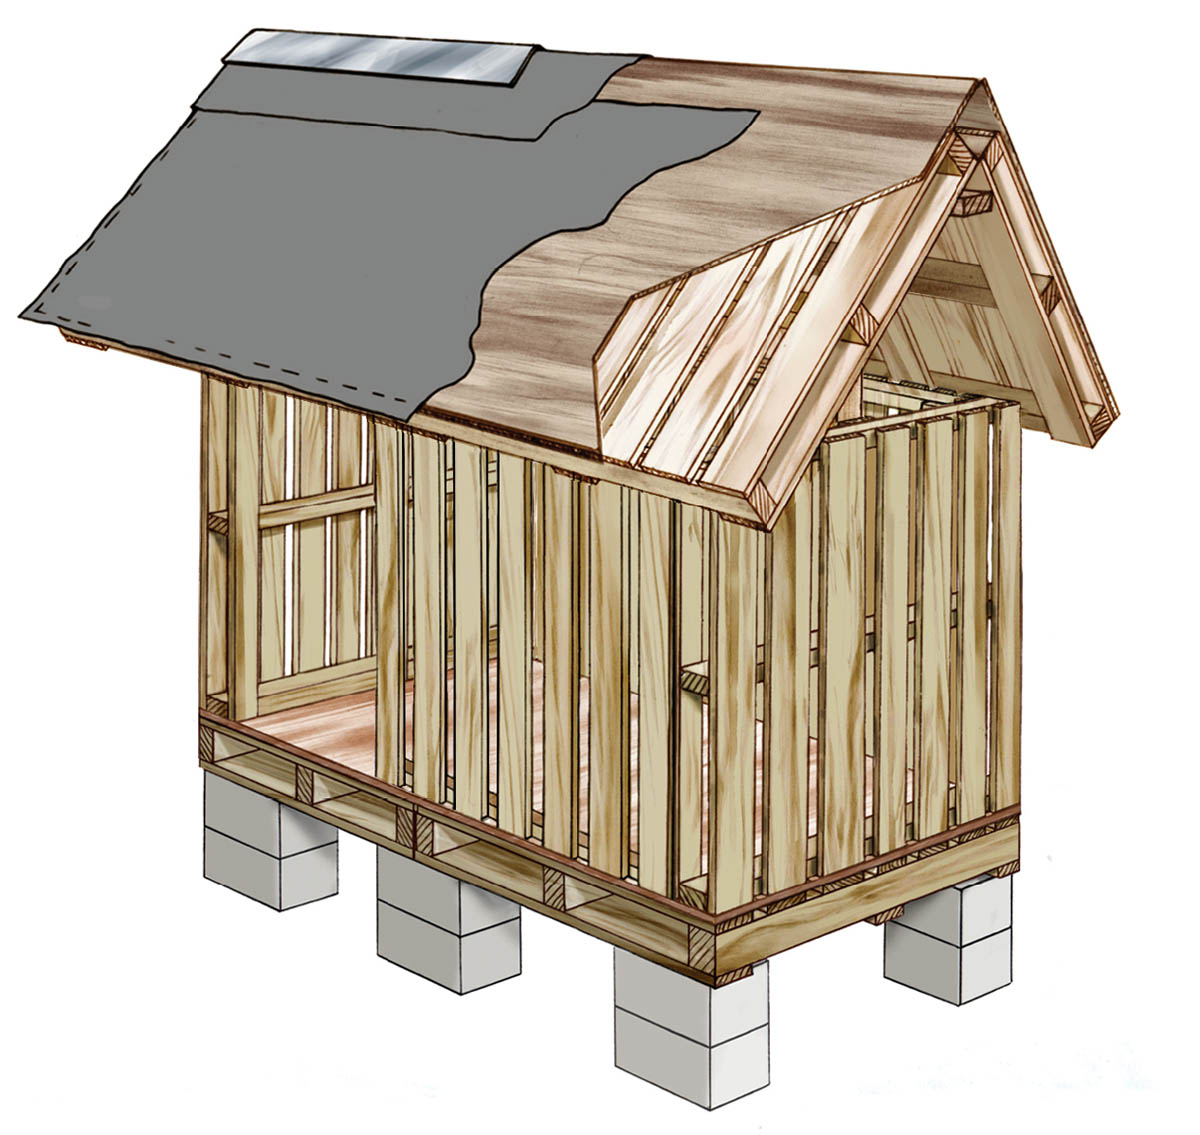
1. I laid out a footprint on the ground based on the dimensions of the pallets. Six pallets gave us a floor of 12 feet wide by 7 feet long, or 84 square feet. Chickens require about 3 square feet apiece in a coop, so this would be more than enough room for the two dozen chickens Katie envisioned. Most backyard coops only need to be big enough for 5 to 10 hens.
2. We placed cinder blocks to support every corner of the six pallets that would make up the floor framing. Every floor pallet was attached to every other floor pallet it touched with a trio of 3" exterior screws (one in each end and one in the middle). We covered the pallets with two and a half sheets of 1⁄4" plywood, screwed to the pallets with 2" screws, and cut off any excess plywood. That made for a smooth floor that would be easy to clean out.
3. We stood some more pallets on their sides to form 40"-tall walls, turning the pallets so that their 2" thick planks would contact the floor and the roof. We screwed them in place with a trio of 3" screws at every point of contact. The 1" thick planks of the pallets, now vertical, would function as studs for support and for attaching exterior siding.
4. Using a jigsaw, we cut openings in the wall pallets for the nest box and for chickens and people doorways.
5. We framed a 6/12-pitch (45 degree angle)gabled roof using new lumber and screws, covering it with salvaged metal roofing panels of different colors.
6. To cover the gaps in the walls, we screwed on planks liberated from pallets by cutting their nails with a reciprocating saw and metal-cutting blade (see here).
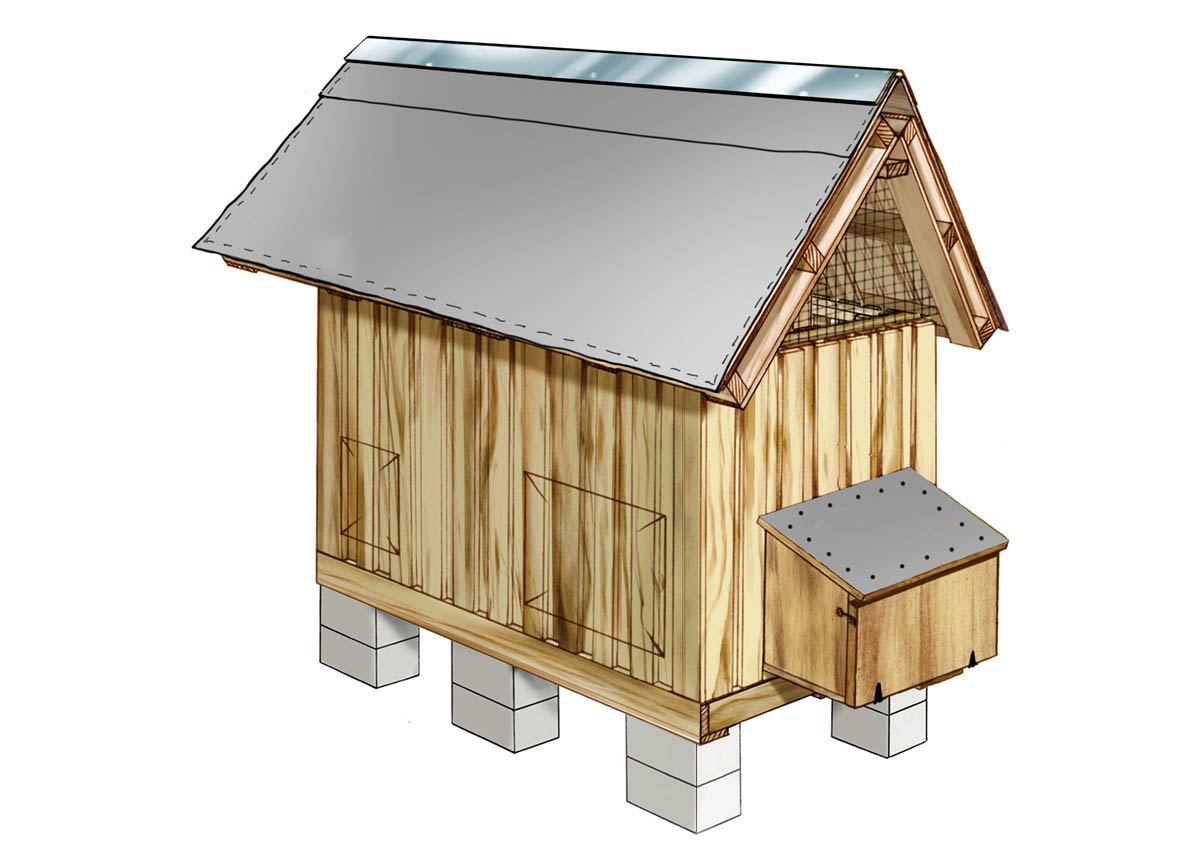
With some hardware cloth covering the ventilated gables, nest box and doors installed, feeder and waterer in place, and a walk-up plank attached, Katie’s Kooplex was ready for business.
Building a Coop from Free Pallets
There’s no need to spend lots of money on materials for a coop. Many tens of thousands of wooden pallets are sent to the landfill each year. With a drill, screws, and jigsaw you can put up the framing for a coop in a day or two.
Tools and Materials
A backyard coop for five to eight hens requires only about fourteen pallets: two for the floor, five for the wall framing, three for the exterior siding of the walls and four for the roof framing.
Most experts recommend 2 to 3 square feet of floor space per hen. A floor composed of two standard pallets (see below) makes enough space for five to eight hens. If you want to house more hens, lengthening the coop with a third floor pallet (and a commensurate increase in other components) would allow you to add another three to four birds.
For best results, use pallets that are all of the same dimensions. The most common size is 5 inches thick, 40 inches wide, and 44 inches long. A few wall pallets will have to be cut to fit the length of the floor. Where the pallets meet each other, you’ll have to drive the 3" screws in some creative diagonal angles, but that will work fine.
How to Make It
A Pallet Floor
What You Need
2 pallets (5" × 40" × 44")
Stick or marking paint
12 cinder blocks (8" × 8" × 16")
Level
Wooden shims (optional)
Jigsaw
Corded drill
3" exterior decking screws (see above)
One 1⁄4" × 4' × 8' sheet of plywood
2" screws
Construction tip: In your chosen coop location, lay out two pallets to mock up the coop floor on the ground (allow 2 to 3 square feet per bird). The sides that touch at the center of the coop should be the 44" sides, so that a 2×4 side of one pallet is touching the 2×4 side of the other pallet. Mark the locations of the corners of each pallet on the ground with a stick or marking paint.
What to Do
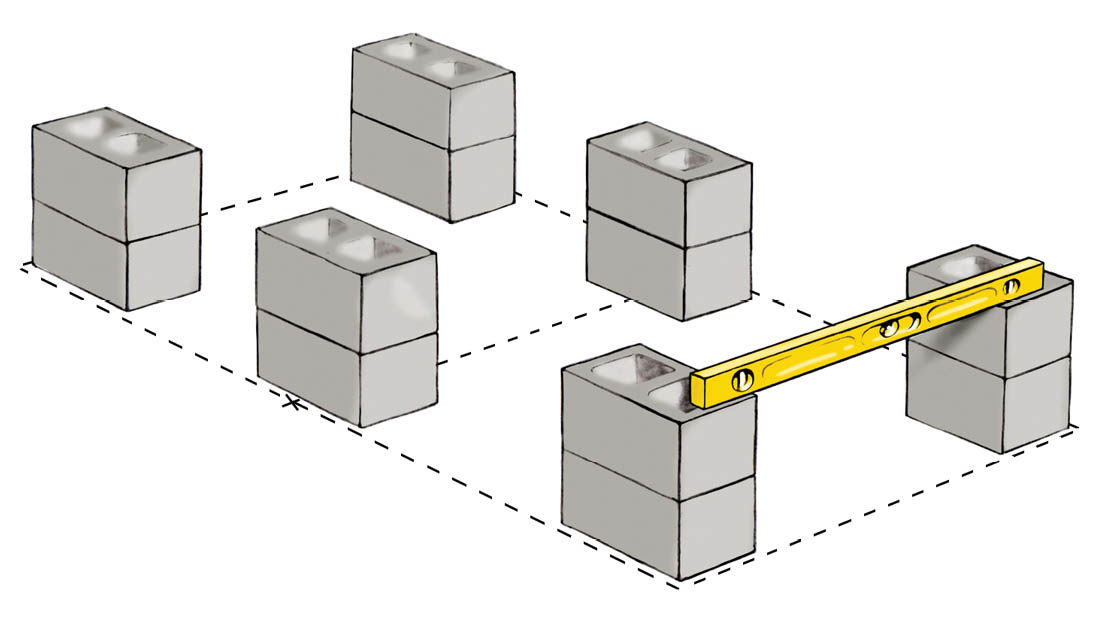
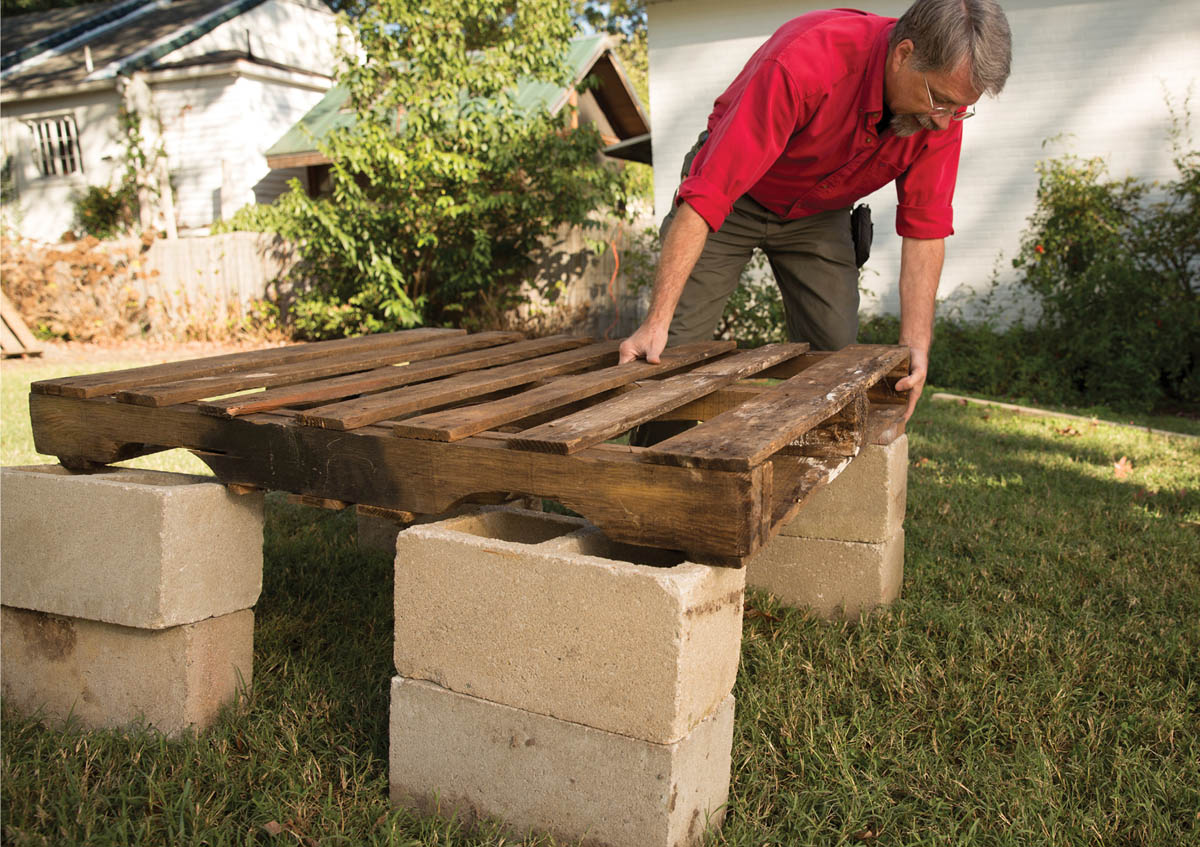
Set the cinder blocks.
1.Remove the pallets and stack the cinder block pairs about 1" inside the corner marks so the pallets will hang over the blocks by an inch. This will keep rainwater from seeping in between the cinder blocks and pallets and causing the pallets to rot.
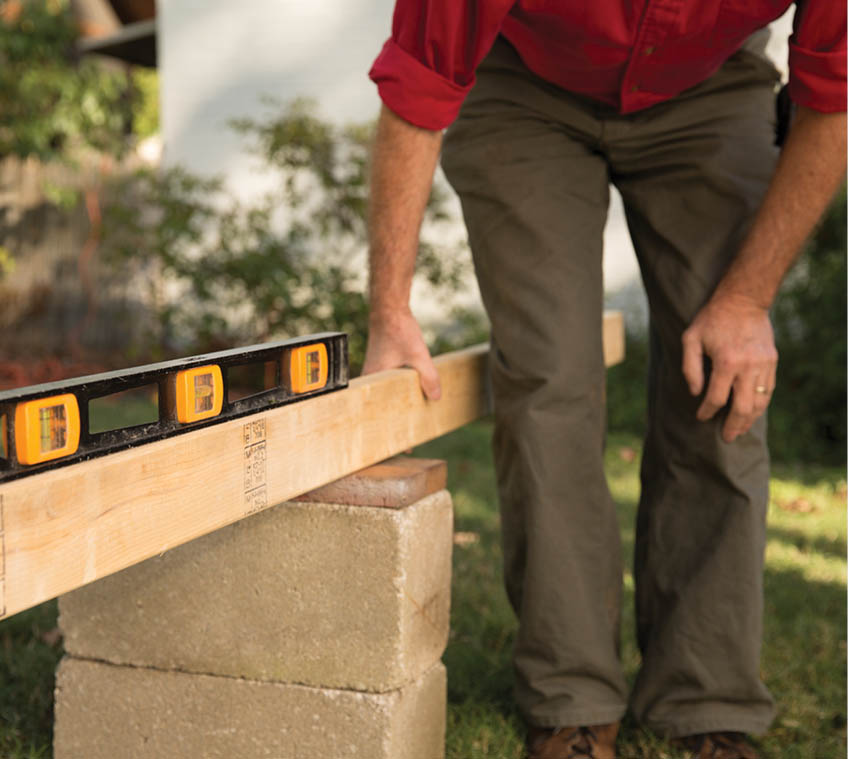
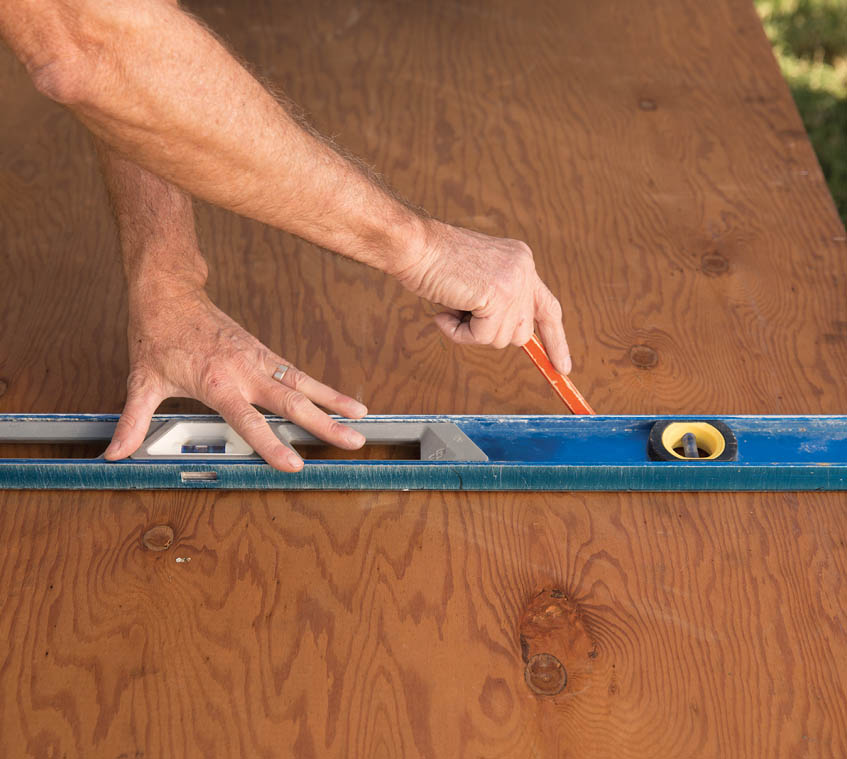
2.Use a level and a straight plank to check that the tops of the cinder blocks are all at the same height.
Place the pallets on the cinder blocks and screw them together.
3.Using the drill, put a trio of 3" screws through each edge of a floor pallet where it meets its neighboring pallet: one screw at each end and one in the middle. Double-check to make sure every edge is secured before moving on. (There’s no need to fasten the pallets to the cinder blocks. Short of a hurricane or an earthquake, the coop’s weight will keep it in place.)
Lay a sheet of plywood for a floor.
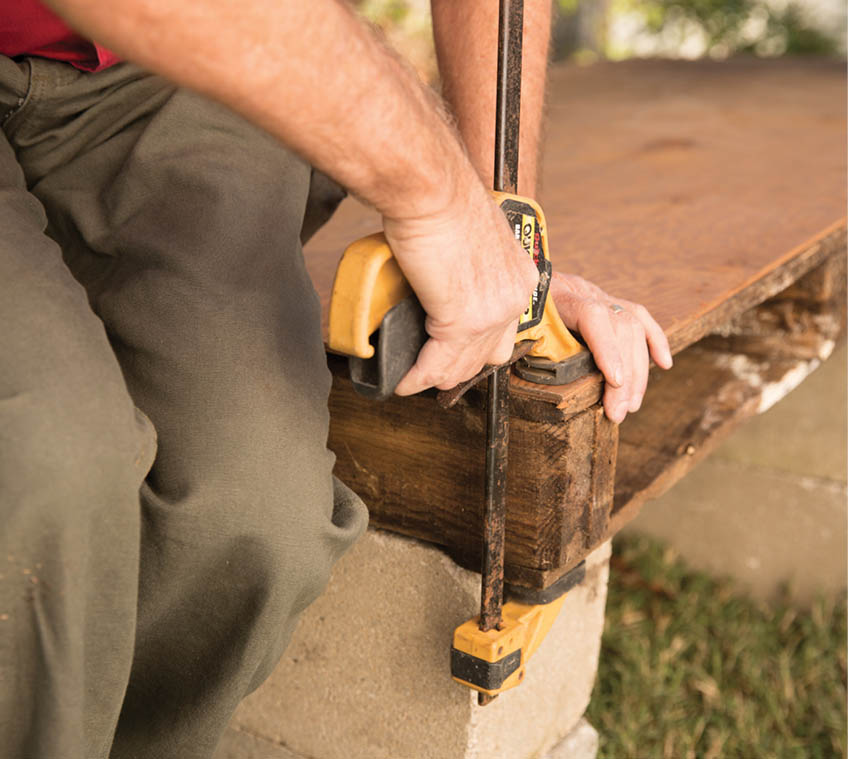
4.Hold the plywood sheet in place with a couple of clamps.
5.A 2" screw or nail every foot or so will be long enough to hold the plywood down securely. That smooth surface will make the floor much easier to clean out.
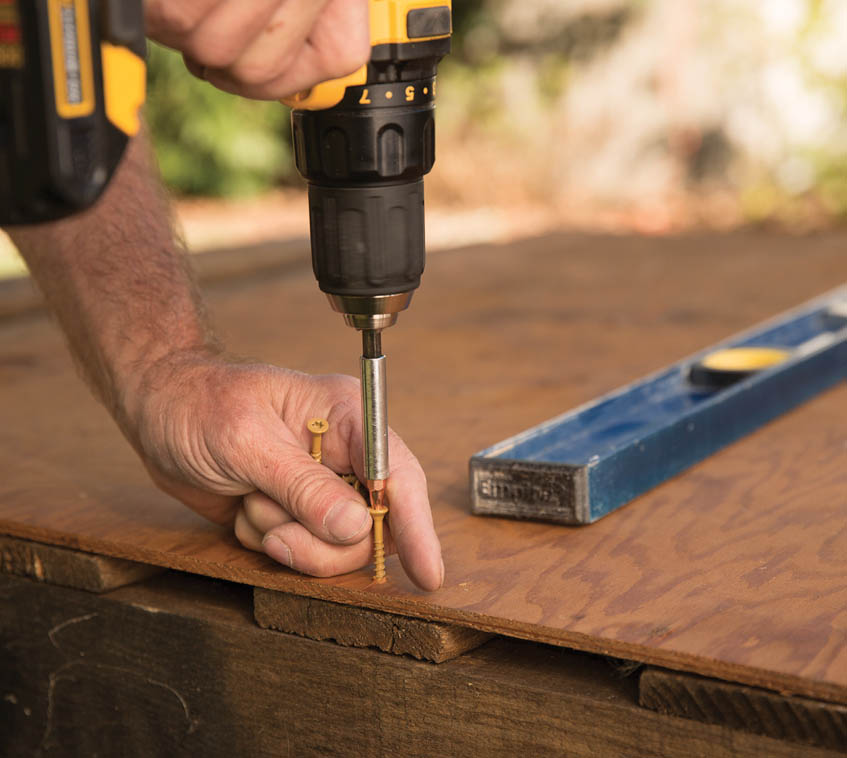
6.With a pencil and level, mark where the plywood hangs past the edge of the pallets.
7.With a jigsaw, carefully cut off excess plywood without cutting into the pallets.
Wall It In
Your coop walls don’t have to be tall enough for a person to enter the coop often if you’re using an exterior nest box. A single row of pallets and screwed to the floor makes a wall tall enough for your hens.
Project Notes
Before you begin, examine your pallets closely. Each one has two long sides defined by solid 2×4 planks (with a third one in the center) and two short sides that are open. Turn the pallet so that the long, solid sides form the top and bottom of the walls. That way you can drive 3" screws through the bottom 2×4s, then through the plywood and into the pallet floor.
When you build the roof, you can screw pallets or rafters to the 2×4 on the top of the pallet wall.
With the framing up, use a jigsaw to cut out openings for chicken doors, cleanout doors, and exterior nest boxes.
Temporarily leave one wall pallet out, so that you can get inside the coop to frame the roof before installing the siding. Then, with the money you saved on lumber, go shopping for chicks.
Core Tools
Here are the basic tools you will need for the remaining building steps. Most steps require a few unique items of their own; those are listed at the start of each step.
Corded drill and assorted drill and screwdriver bits
1.Stand a pallet at one end of the coop with the 2×4 side down. The wall pallet’s width should match the floor’s, and the planks of the wall pallet should be flush with the floor edge. Use three 3" screws to secure the wall pallet to the floor, one screw at each end and one through the middle of the 2×4. Do the same at the other end of the coop.
Attach side walls to the floor and one end wall.
2.Lay another pallet on its 2×4 side so that its planks are flush with the floor edge. The edges of each wall pallet should meet nicely and both walls should be plumb or very close to it. Use three more 3" screws to secure the side wall pallet to the end wall pallet, and another three 3" screws to attach the side wall to the floor. Repeat this step on the other side of the coop.
Prepare two narrow wall sections, and install one.
3.On both sides you’ll have a gap remaining that is narrower than a pallet. Measure the distance carefully on each side and cut two pieces (possibly from one pallet) to fit in those gaps. Make sure that each piece has a 2×4 side that will rest on the floor. Install one of these pieces with three screws on each side that meets another wall or the floor. Set the other cut-down piece aside so that you can easily get inside the coop for the next steps, like roofing and screening as shown here.
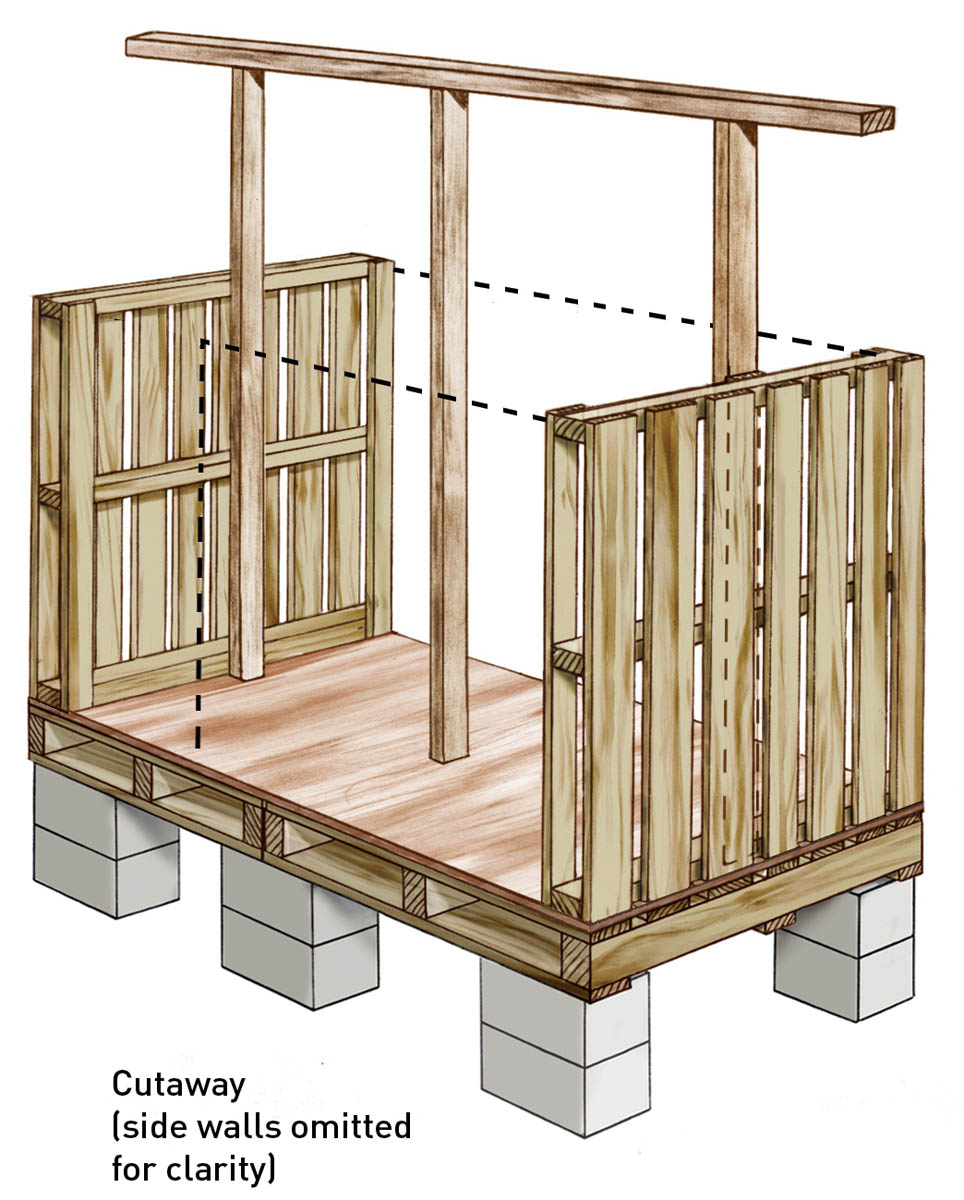
Cut ridge poles for roof.
4.If the pallet walls are the standard 40" high, cut three 2×4s (called “studs” at the lumberyard or big-box store) so they are 56" long (or 16" higher than the walls if your pallets are a different height). These are the ridge poles and will support a 2" × 4" × 8' stud, the ridge beam that holds up the center of the roof.
Install ridge poles to support the ridge beam.
5.Find and mark the center point of the top of the two end walls. Place one pole against an end wall, with one of the pole’s wide faces against the wall and centered on the mark. Use the level to check the pole for plumb. Use three 3" screws to secure the pole to the three 2×4’s in the end wall. Repeat on the other end wall.
Install a ridge beam and a center pole to support the roof pallets.
6.Lay the 2" × 4" × 8' ridge beam on top of these two poles with the wide side against the tops of the poles. Make sure that 9" of the beam extends past each of the poles. Drive two 3" screws through the ridge beam and into the top of each ridge pole. Double-check that each end extends past the pole by 9".
7.Find and mark the midpoint between the two poles on both the floor and the underside of the beam. Line up the third pole on these two center points and make sure it’s plumb. The pole doesn’t have to line up precisely on the center points, but it does need to be plumb to keep the beam from sagging in the middle. Drive two 3" screws through the beam and into the top of this middle pole. Drive two 3" screws diagonally through the base of the pole and into the floor.
Dry-fit the remaining section of wall.
8.Insert the last narrow piece of wall without screwing it into place — that’s called “dry fitting” — to make sure everything fits together and is sturdy. Don’t attach this wall piece permanently until you install the roof pallets and screens.
Put a Lid on It
With the roof supports and roost bar in place you can install the four roof pallets, the plywood roof, and waterproof roofing. A helper, a ladder and some patience will be very valuable here. Working above ground can be challenging and the pallets will be resting at an angle, so go slow and have help.
A strong person on the ground outside the coop and another person inside the coop with the power drill and screws
6' stepladder
Four pallets
Drill, bits
Two 4' × 8' sheets of 1⁄4" plywood (not pressure-treated)
Four quick clamps
3' wide × 33' long roll of mineral surface roofing (you will use at least 24' of roofing)
Retractable razor knife
Hammer
1-pound box of 1" roofing nails
10' length of galvanized ridge cap
Two dozen 2" metal roofing screws
Matching roofing screw bit
Metal snips
Automatic door (or one 8" × 12" piece of 3⁄4" plywood, and two hinges)
Three plywood sheets 3⁄4" thick and up to 2' × 2' (not pressure-treated) for the two cleanout doors and the chicken-keeper door (doors can be purchased in those dimensions or cut to size from a full 4' × 8' sheet at a big box store).
1.Find the midpoint of the length of the ridge beam (it should be right over the middle ridge pole) and mark it. Also mark the center of the width of the beam at that point. Find the midpoint of the length of the top of each side wall and mark it.
2.With one person standing outside the coop and holding the low side of a roof pallet, place the pallet so that an end with a closed edge (with a 2 × 4) rests on the ridge beam and the rest of the pallet rests on a side wall.
3.The person inside the coop should position that first roof pallet so that one open edge lines up with the midpoints you marked on the beam and the sidewall. The other open edge of the roof pallet should meet the end of the ridge beam and extend 4" beyond the end wall.
4.Make sure the closed edge lines up with the centerline of the beam, so there will be room for the roof pallet on the other side to also rest on the beam, with the roof pallets just touching.
5.Double-check that the first roof pallet is lined up with all its marks. The roof pallet should extend beyond the end wall by about 4" and beyond the sidewall by about 8". Most important is that it lines up on the center marks and the high side rests on the ridge beam, so the other three pallets will fit together nicely. Clamp the pallet into place.
6.Drive three 3" screws up through the ridge beam into the roof pallet. Double-check that it’s still lined up on the three center marks; move it and reattach it if necessary.
7.From inside the coop, drive three 3" screws up through the 2 × 4s of the side wall and into the roof pallet to secure it.
8.Install a second roof pallet so it touches the first roof pallet on top of the beam and attach it as in steps 2 through 7.
9.Using the same process install a third and fourth roof pallet.
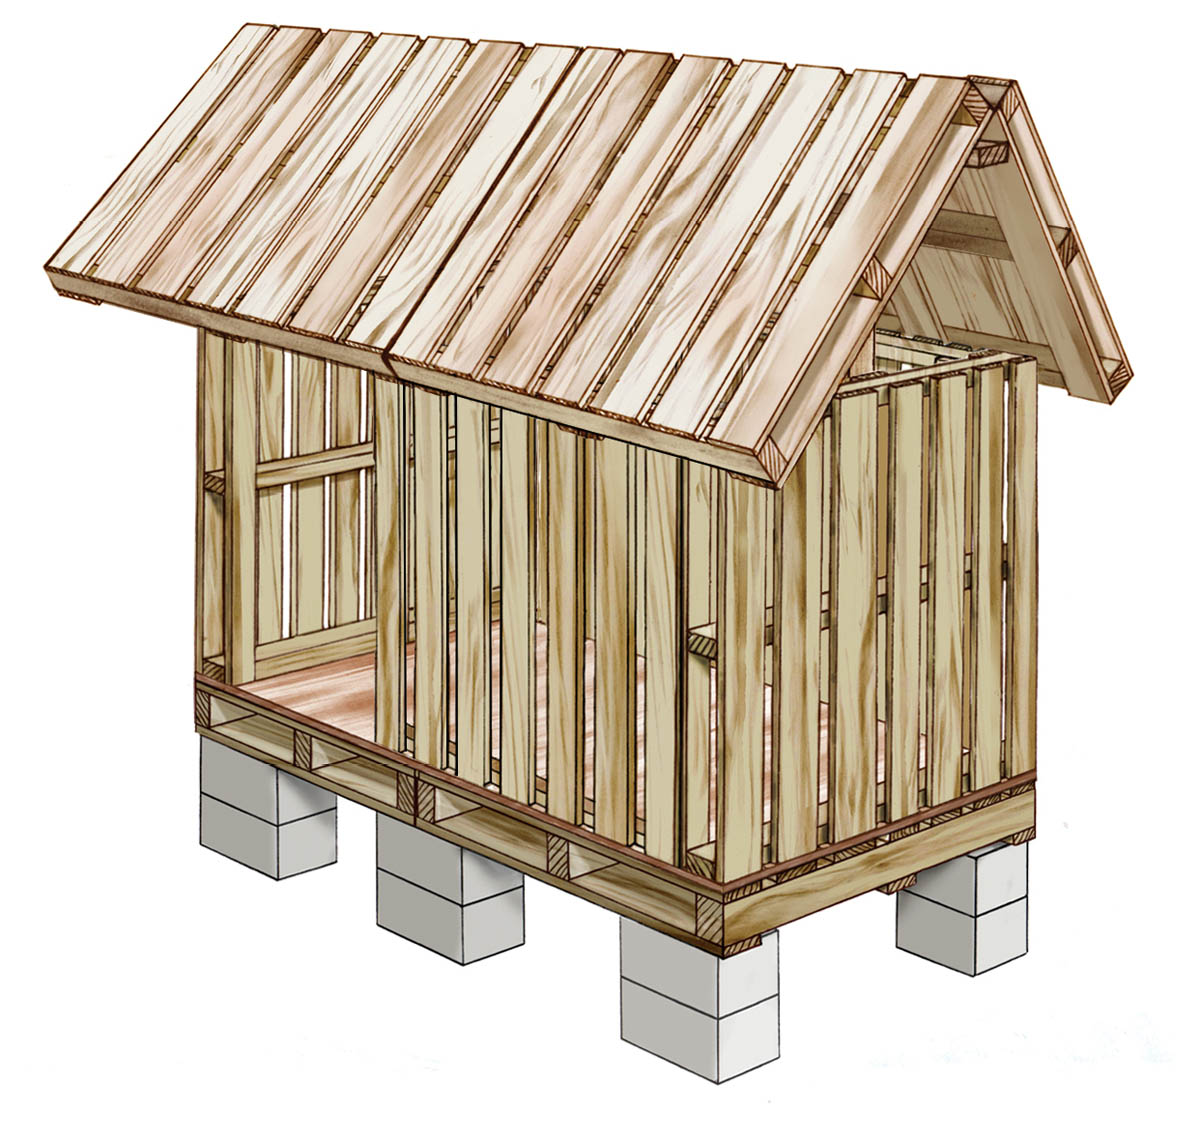
Install plywood over the pallet roof.
10.Lay one plywood sheet on one side of the roof so that each end (on your right and left) hangs over the pallets by the same distance. Clamp the plywood to the roof pallets. Do the same with the other sheet of plywood.
11.Adjust the two sheets of plywood so that they just touch over the centerline of the ridge beam and re-clamp them. If your pallet dimensions are different, make sure that the plywood either meets the bottom and sides of the pallets or can be cut to just 2" beyond the edge of the pallets.
12.Screw the right and left ends of the plywood to the roof pallets with 2" screws, spaced 8" to 12" apart. Remove the clamps.
13.If the plywood extends beyond the pallets, use the level and pencil to mark on the plywood the location of the sides, lower edge, and upper edge of the roof pallets. With the jigsaw, following your marks, trim off anything more than 2" beyond the pallet bottom and sides (but not the top). Screw in the sides and lower edges every 8" to 12".
14.Below the line you made near the top of each sheet of plywood, drive screws every 8" to 12" through the plywood and into the roof pallets.
15.Put in another dozen 2" screws scattered evenly across each sheet of plywood to pin it down to the pallets. Note: At the very top where the two sheets of plywood meet there is nothing to screw them to, but they will be fine for now.
16.Install the final short piece of the sidewall.
With the plywood in place for the roof, you’re ready to “dry in” the coop by making the roof watertight.
Install waterproof roofing atop the plywood sheet.
17.Unroll about 10' of the 3'-wide roofing material on the ground. Use the marker, tape measure, Speed Square, level, and retractable razor to mark and cut three lengths of roofing that are 2" longer than the plywood so it will overhang by 1" on each side. Roll two up and set aside.
18.Roll out one section horizontally onto one side of the plywood roof. Adjust the roofing material so that it extends 1" beyond the bottom edge and both sides; this way the rainwater will flow off without wetting the wooden part of the roof. Clamp into place.
19.Nail the roofing material in place with roofing nails spaced every 8" to 12" along the sides and bottom and into the edges of the roof pallets. Don’t put nails along the top edge of the rolled roofing. Spare your fingers by holding the nails with a pair of pliers.
20.Repeat steps 18 and 19 on the other side of the roof.
21.Use the third piece of roofing material to cover the peak of the roof. Center the piece over the line where the sheets of plywood meet, and gently bend it over the ridge so it extends as evenly as possible down each side of the roof. The center piece of rolled roofing should overlap the lower strips of rolled roofing by about a foot or so depending on the dimensions of your pallets. The left and right sides should extend 1" beyond the plywood to match the other strips of rolled roofing. Nail the center piece of roofing into the pallets along both sides and the bottom edge.
22.Bending the center piece of roofing over the roof peak can crimp and crack the material and lead to leaks over time, so lay the 10' of galvanized ridge cap over the peak and center it by eye. Bring one end even with the edge of the roofing material.
23.Drive the 2" metal roofing screws along both edges of the ridge cap about 1" from the edge and 8"–12" apart.
24.Using metal snips, trim off the end of the ridge cap that is extending beyond the roof.
Congratulations! You now have a watertight roof over your coop!
Ins and Outs: Doorways
Cut openings for doors and nest box.
1.Determine which walls will have which openings. The opening for the automatic door will be in the wall that will be inside the fenced pen. The chicken-keeper access door can be inside or outside the pen. The two cleanout doors and the nest box should be outside the pen. The cleanout doors should be in a wall with room outside for installing a couple of compost bins, or with easy access for a wheelbarrow.
2.Using tape, level (for marking straight lines), Speed Square (for marking perpendicular lines), and pencil, mark all five openings. The dimensions of the automatic door opening will depend on the brand you buy. If you forgo an automatic door, cut that opening to roughly 8" wide by 12" tall.
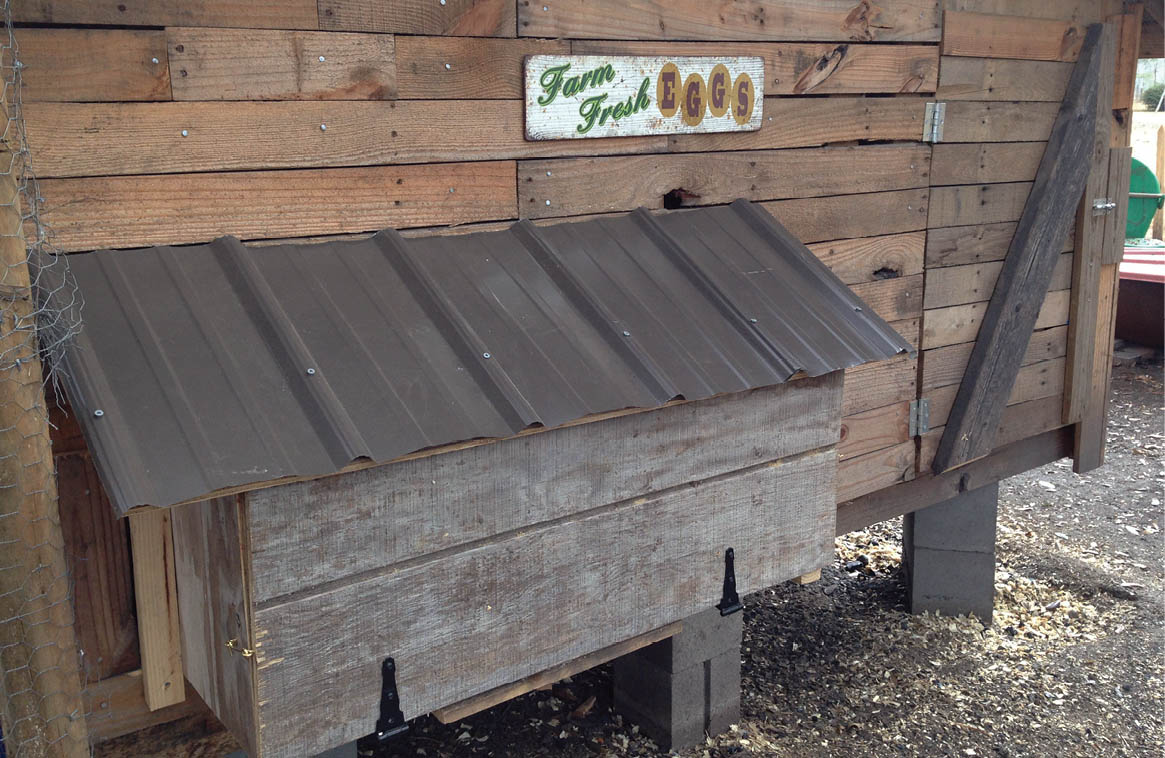
3.Mark the opening for the Best Nest Box to be 24" wide and 12" high. Measure and position the opening so that the flange of the nest box floor will rest on the horizontal 2×4 at the bottom of the wall pallet.
4.With the five openings marked, cut them out with a jigsaw.
5.Transfer the dimensions of your door openings to the piece of 3⁄4" plywood and cut the doors out with the jigsaw. Dry-fit the pieces to double-check your work.
6.While a helper holds the doors in place, position the hinges and with the pencil mark the spots on the doors for the screws. Predrill holes with a bit that matches the diameter of the shafts of the screws. Attach the hinges to the doors.
7.Have your helper hold each door in place on the coop and mark where the hinge openings fall on the wall. Predrill and then attach, as above.
8.Attach a latch (as discussed here) to secure each door.
With the doors installed it’s time to button up the walls of the coop. Scrap lumber can be cut to fit for this purpose, but if you have just three more pallets, their slats can be removed and will fit perfectly over the openings in your coop. Use fence wire in gables for ventilation. A helper will make this project go faster.
Something to lean the pallets against, like a tree or a post
Sawzall with metal-cutting blades
Pair of sawhorses or a table, to stack the slats on
Metal snips
Chicken wire, fence wire, or hardware cloth
3⁄4" fence staples
Pliers
Hammer
What to Do
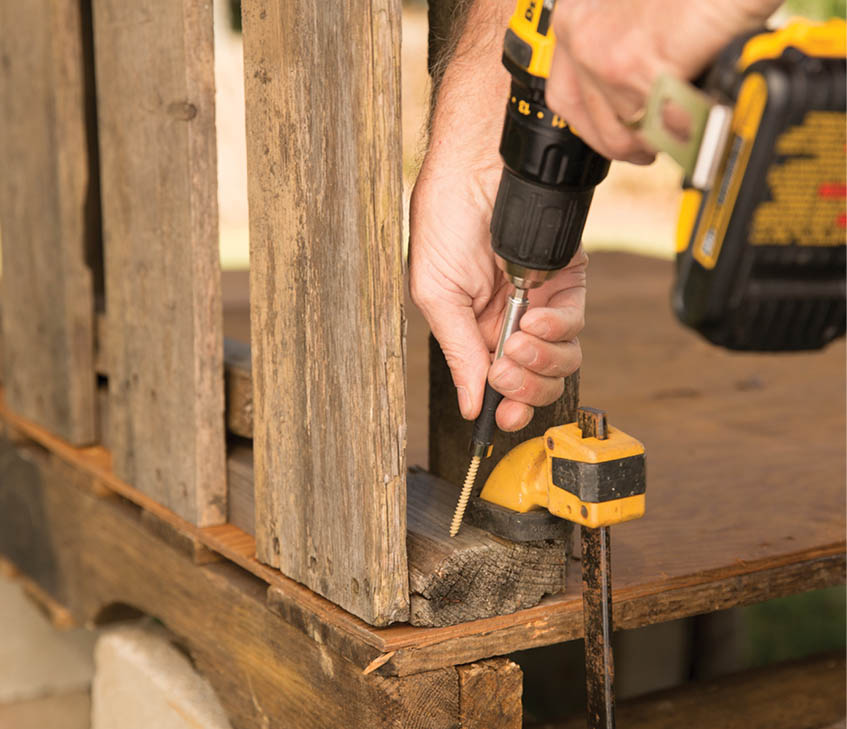
1.One at a time, lean the three pallets against a post, building, or sturdy tree. With the Sawzall and metal-cutting blades, take the pallets apart, as described here. When all three are dismantled, you should have enough slats to cover all the gaps in the walls of the coop. Stack the slats near the coop.
2.Have a helper hold the first slat vertically over a gap in the wall. Mark the three places on the slat where it aligns with the three 2×4s of the wall pallet.
3.Neatly stack about six slats on the saw-horses, with the marked slat on top. Using a drill bit slightly greater than the diameter of the threads of the 3" screws, drill down through the three marks as deep through the stack of slats as the bit will go. Using one of these predrilled slats on top of another neat stack, repeat this process until all the slats have been predrilled.
4.Hold a slat evenly over a gap in the wall (or it may fit just inside the gap) and drive three screws through the predrilled holes and into the 2×4s. Continue around the coop.
5.Cut some slats to match the wall height above the doors and nest box and install as described above.
6.To cover the triangular gable openings, cut fence wire to extend 2” on all sides of each opening. Hold the wire in place on the inside of the gables (a helper can do this from the outside the coop by hand or with some pliers) and nail the excess wire into place from inside the coop.
7.To fill the gaps in the open ends of the four roof pallets, use the metal snips to cut the fence wire to dimensions that roughly match the openings. While a helper holds the wire in place, hold staples with a set of pliers and drive into place with the hammer, Set staples about 4" to 8" apart. Alternatively, the open ends of the four roof pallets can be covered by slats or scraps of wood.
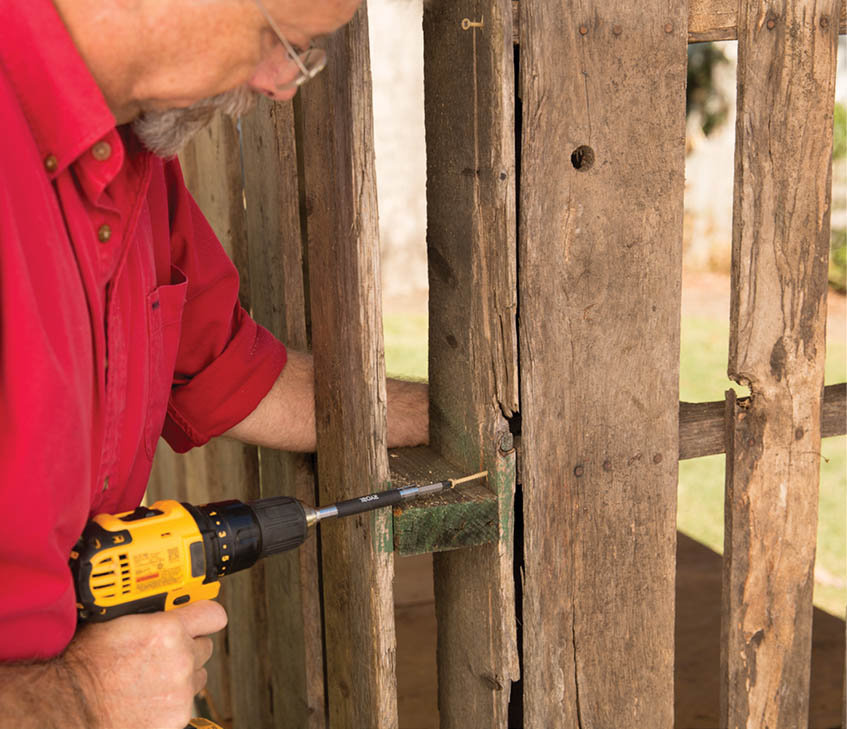
8.Final step: Think like a predator and look for any small gaps into the coop that a snake or rat may be able to get through. If you find any, roll up some chicken wire into a ball or a roll that can be pushed into the gaps as shown in the photo. Drive one or more screws through the wad of wire and into some wood to pin it in place.
Henkeepers I’ve Known
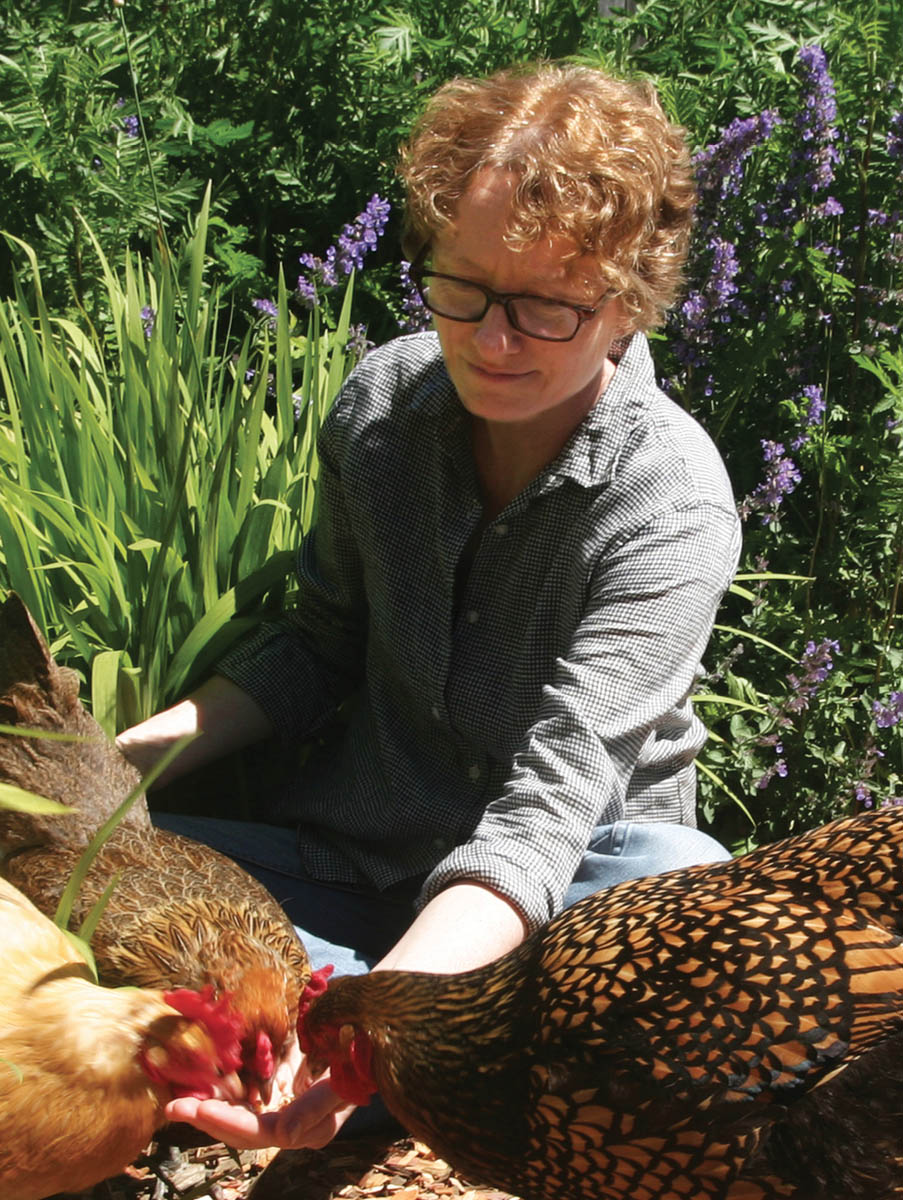
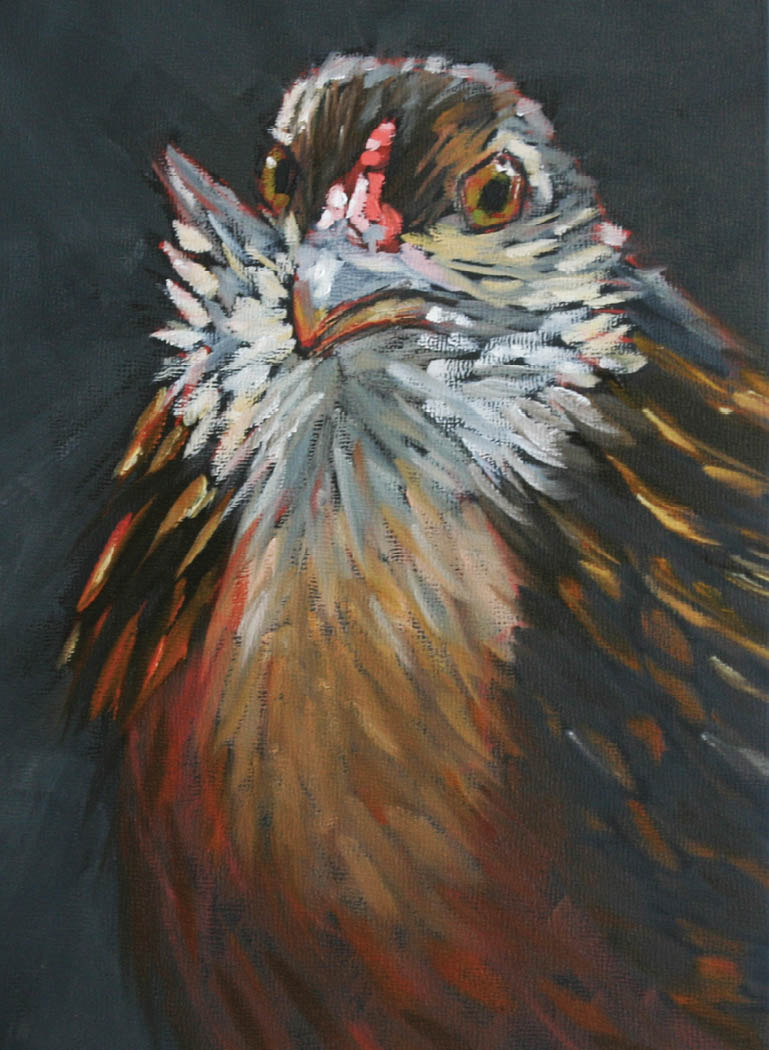
Author Amy Stewart’s First-Lady Chickens
Amy Stewart raises hens for entertainment, affection, and eggs. She also paints their portraits, which she sells online and at a local gallery. Amy is better known for her best-selling nonfiction books The Drunken Botanist, Wicked Bugs, Wicked Plants, Flower Confidential, The Earth Moved, and From the Ground Up, and, most recently, for her novel, Girl Waits with Gun. She answered my questions about her birds (in two dimensions as well as three) over the course of a sunny afternoon spent in her 1⁄6-acre backyard garden and upstairs in her painter’s garret in a historic bungalow in downtown Eureka, California.
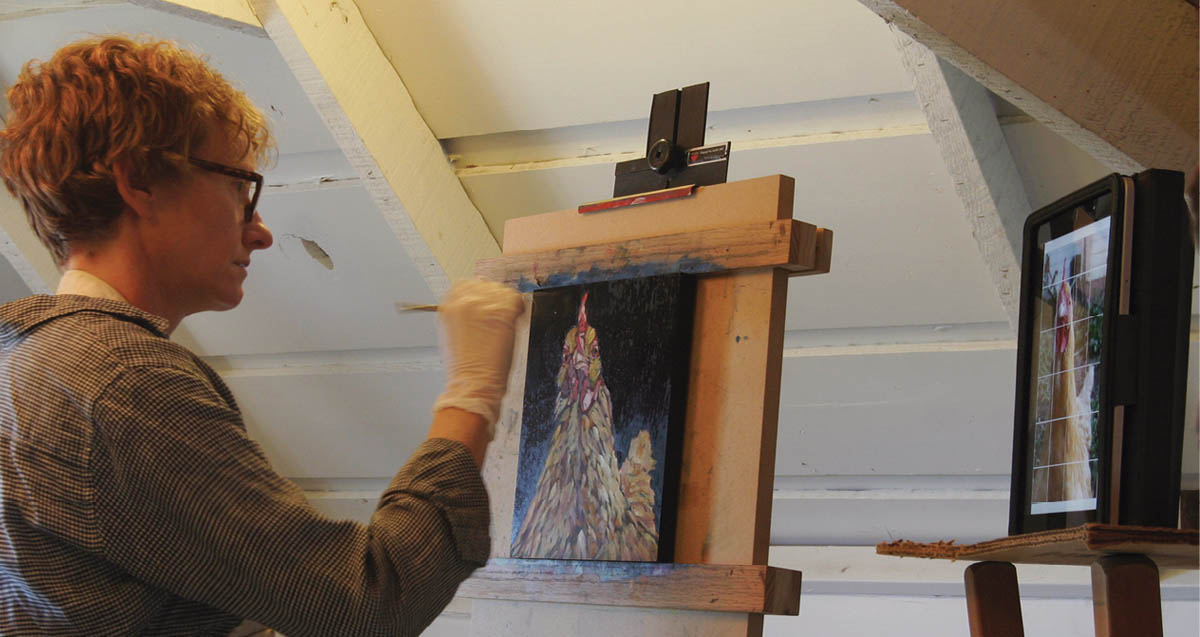
FH: What does it take to paint a chicken’s portrait from a photo?
AS: The trick is holding the camera and tossing some chicken scratch and getting them to look up all of a sudden. You have to have your camera set on that sports setting so you can get lots of shots real fast. You have to draw them out into the light. But they want to mill about in the shade.
I like to get them head-on with both eyes, but they’re not really looking at you when they’re looking straight ahead. Their eyes are on either side of their heads. The pose they want to be in is with their butts in the air and their heads on the ground, so I have to take hundreds of pictures to get one good one. To get them doing that in nice light is an even bigger struggle.
I have spent endless hours out there photographing them only to get three good images that I can use. It’s kind of a two-person job. If I can I get [my husband] Scott out there, he’ll be keeping them in position and trying to get them to keep their heads up with some scratch.
The pose they want to be in is with their butts in the air and their heads on the ground.
FH: Are any of the chickens more cooperative than the others?
AS: They’re all equally uncooperative. It’s not part of their normal thing that they do. It’s nice to get them isolated, up on a table or on a chair. Of course you get one chicken up there and the other chickens want to know what’s going on, so they jump up and knock that chicken off and battles ensue, and then they’re focused on each other. It’s complicated. That’s the struggle with chicken painting.
FH: Is there an easier way?
AS: It’s kind of sad to say, but the easiest place to get good pictures of chickens to paint is at a poultry show. They’re in a cage and they tend to just stand there and look because there’s not that much to do.
FH: Do your chickens’ personalities show at all in their facial expressions?
AS: I think so, because I know them. I’ve painted other peoples’ chickens, too — they all have their little personalities. That’s the problem with chickens: their face is fixed. The reason we love dogs so much is that they can wrinkle their brows and they can smile — things that read as human. But chickens have this little permanent frown, which is not their fault, and their beaks curve down. They can’t have expression with their eyes because there are no features around their eyes.
Chicken portraiture is tricky in that way, but I really like getting them photographed like people, where they’re looking at the camera and it’s head and shoulders. My idea was to make the paintings look like serious portraits, like family pictures. You know, you go up the stairs to a portrait studio and you get your picture taken. I wanted them to be like that. Like head shots. You try to get their personalities a little bit that way.
FH: What kind of personalities do your birds have?
AS: I wanted visual variety [with my chickens], but you realize with any pet it’s all about personality — what are they like to live with. How they look is secondary.
Abigail [a Golden Laced Wyandotte] is the shy one, very suspicious. She does look a little suspicious in that painting. She’s the one, you bring out food and she looks like, “Well you’re trying to poison us, I know you are. I know that today is the day you’re going to kill us.” She’s very conspiracy-minded.
Lady Bird [a Buff Orpington] is the sweetest one. I think she looks like she wants a hug in that picture. She follows you around like a little puppy dog and wants to be picked up and be your friend. If she were a cat she’d be the one rubbing up against your legs everywhere you go. Dolley was great, was my favorite chicken. It was so sad when she died. Really smart. Top of the pecking order. First one to figure something out. An Ameraucana. Smart crafty little birds, more birdlike in every way.
My idea was to make the paintings look like serious portraits, like family pictures.
FH: How long have you had chickens? And how many do you have?
AS: Eight years. Abigail is the only one from the original batch; the other three have all died. Tumors. We have a bird vet we take them to — I’m not about to kill them with my bare hands. What I think is happening is that hatcheries are not breeding for longevity, of course. Like dogs . . . some breeds, their hips go. It’s not like a parrot getting sick, as pets go. It’s really a different thing dealing with long-term health issues [of chickens], because that’s not what farming is about.
In addition to Abigail (Adams), there’s now Lady Bird (Johnson) and Ida (McKinley, an Ameraucana). They’re all named after First Ladies. No longer with us — Eleanor [a Rhode Island Red] died at five years, Dolley [an Ameraucana] at six, Bess [also an Ameraucana] at seven. You’re gonna get 15 years out of a cat. Out of six chickens, three have died. Three animal funerals in five years. That’s too many.
They’ve also had many gynecological issues. They will get a prolapsed uterus, which involves latex gloves and poking it back in there. It’s happened when I’m gone and my poor husband is here. Scott said, “This is not a job for a man,” as I was guiding him on the phone. I felt so sorry for him.
FH: Do your chickens free-range here?
AS: They free-range all day unless we’re away. The plants back here are survival of the fittest. It’s what the chickens don’t destroy. There used to be a lot of self-sowers, but they’re all gone since they eat the seeds. The chickens eat the annual weeds, too. Just Himalayan blackberry, bindweed, and dock are [weed] problems. As you can see, nothing gets cut down around here. It’s a forest.
The nice thing about this garden is that the chickens love it. This thicket of plants — they can get up under there. They have probably laid eggs up under there. It’s nice for chickens to have shrubs and cover like this. There are plenty of bugs for them to find. I have a ton of raspberries — no idea what variety. [To one chicken:] Ida, want to jump for it? Lady Bird would jump for it. It’s a berry. You know you want it. You’re a good little jumper.
Got apple trees here: Honey Crisp, Liberty. Only problem with the apple trees, chickens jump up in the tree and take a bite out of every apple to see if it’s ripe.
FH: Do you clip their wings?
AS: No. Before we built the higher fence, they did fly over to the neighbors once or twice by accident. Chickens are homebodies. They don’t want to go anywhere, so I’m not at all worried about them flying away. [To the chickens:] We call you “chicken” for a reason.
FH: What’s their coop like?
AS: This was just a shed that was here when we bought the house. I just got this [a chicken waterer that screws onto a water cooler] — pretty excited about it — so the water stays clean. With my husband and my dad, we added the run with hardware cloth on top and a cement floor. But mice can get in. We have a mice problem. Door is rotting. Neither of us is handy.
FH: How did you get started painting?
AS: I started painting when I moved up here [to Eureka from Santa Cruz] 10 years ago. I wanted to take a little drawing class so I could sketch the garden, but I couldn’t find a good ongoing class I could take. An oil painting class, by a painter I really liked, Linda Mitchell, fit my schedule.
Turns out I really liked oil painting. I thought it was going to be too hard, too much work, a real hassle. But oil painting is a lot like writing. It’s about revisions and editing. You rework it, over and over. All oil painting is repainting. You do one on top of the other. As a writer, I know how that goes. My teacher would say, “Wipe that whole thing off and start over,” and I’d say, “Okay.” That doesn’t bother me. I really liked it for all those reasons.
I paint small because I don’t have a lot of time. I can finish a small painting — 5 by 7 inches — at one go.
[We move up to her home’s attic. It’s a painter’s garret with an easel, a small woodstove, love seat, and low bookshelves. The knee walls and exposed roof rafters are painted vanilla white. North-facing windows feature a view of Eureka harbor. A 15-year-old cat named Kitty follows us.]
FH: Wow.
AS: It’s all old-growth redwood cut 2 inches thick. [The floors, walls, and rafters were cut from 2,000-year-old trees and built by the carpenter who also worked on the biggest mansion in town.]
I paint on black gesso, so the background starts off black. Some of these paints are $25 a tube. They’ve gone up because of the cost of minerals. An expensive hobby, but it’s nice to do something that’s not for money or career or in front of a computer. I don’t have to do it any particular way. I don’t have to be good at any particular thing. My friends who are artists have to do all this career crap. I don’t need to win awards or add to my résumé or any of that crap.
I sell them, but just to get rid of them. They pile up. I’ve probably sold 100 to 115. It depends on how much I’m home and how much I’m doing. I just need them to go somewhere. I don’t want to look at my own art on the wall. My painting teacher has some gallery space so some are over there, but the rest of them I sell on the Internet. The chicken paintings . . . people actually love them and they’re fun to do.
FH: What’s next?
AS: Our latest challenge is figuring out an easier way for our elderly and flight-challenged birds to get down from the high roost they’ve chosen for themselves. Up is easy, but gravity makes down particularly hard on their weird old feet. A ladder? Straw bales? Ah, the challenges of chicken-keeping.