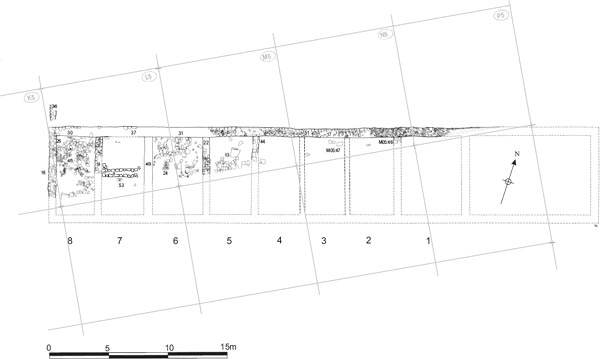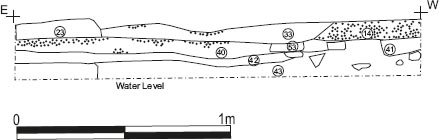
Figure 14.01: Building 1, Phase 2 stable at 1:200.
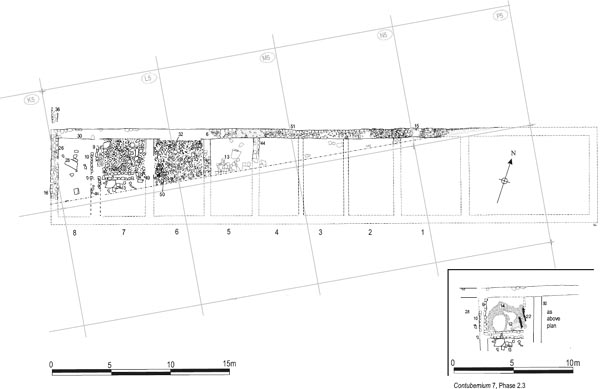
The six Period 2 stone barrack blocks in the northern part of the fort all under underwent either substantial remodelling or complete demolition and replacement, probably at some point during the earlier part of the third century. The resultant, remodelled layout of the praetentura cannot be fully restored, in some measure because part of the area lay beneath Buddle Street and was therefore left unexcavated, but principally because of the poor preservation of the third-century and later remains in this part of the fort. This was particularly true of the western half of the praetentura, where the devastation wrought by post-Roman ploughing and colliery period activity had left only small, isolated pockets of stratigraphy and occasional fragmentary structures. Nevertheless the broad outlines of the scheme can be established. The pattern of rebuilding and occupation set out below differs significantly from that presented by Daniels. It amalgamates some parts of his Fort Phase 2 (specifically in the northeast area) with Fort Phases 3 and 4, this combined structural period covering a much shorter timespan than Daniels had envisaged, and, with the benefit of much clearer understanding of the extent of post-Roman destruction than he possessed, reinterprets the whole in a more coherent form.
As envisaged by Daniels and set out on his overall plan of Fort Phase 2, the praetentura contained five barracks (Buildings 2–6) in the early third-century, whilst Building 1 was rebuilt as a narrower block (Daniels’ Building 1 Phase 2), interpreted as a stable. It was thought that the contubernia were still separated by timber partitions in most of the barracks (Phase 2 of Buildings 3–6), but in Building 2 these were replaced by stone walls, the latter’s extra width resulting in a slight reduction in the number of contubernia from nine to no more than eight. Along the southern edge of the praetentura the long narrow workshop, Building 16, was believed to have remained in use, with a number of internal modifications, until the end of the Roman period, its counterpart on the west side (Building 15) having already been demolished during the second century (see Chapters 10–11).
This set of arrangements was thought to have persisted until the end of the third century or beginning of the fourth when it was largely swept away to make way for a new and much less intensive pattern of occupation (Daniels’ Fort Phase 3). The stable in the north-east corner (1) was demolished and not built over, whilst Barracks 2 and 4–6 were replaced by rows of small, flimsily constructed buildings, labelled ‘shacks’ – B, K and M in the eastern praetentura and C, D, E, F, G, H, J and L in the western. Building 3, however, continued in use until the end of the Roman period, receiving stone partition walls like the third-century Barrack 2 (Building 3 Phases 3–4). Its western end was presumed to have been truncated to bring it in line with Shack B.
The shacks were square or rectangular and of varying size. Most were stone-built, but J appeared to represent a rectangular post hole building whilst the very small E employed wooden sill-beams set in stone-lined slots. B, K and M formed a single conjoined row and all fell within the northern half of Building 2, largely conforming to pre-existing contubernium plots and the reusing some of the walls of the former barrack block. In contrast, the structures in the western praetentura did not fully respect the footprint of the three earlier barrack blocks (4–6) there, although some sections of the barrack walling did appear to have been reused. These structures were organised in two rows, laid out on either side of a newly constructed east-west aligned street, with F, C, D and E to the south and J, G and H to the north. However only one, partially excavated building (L), located to the north-west of posthole Building J, was identified as overlying the interior of Building 4, which otherwise was assumed to have been completely demolished, and its site left vacant for the remainder of the Roman period like that of Building 1. This pattern of occupation continued until the end of the fourth century, although the shacks were much reduced in number by its later stages, with only B and M and C, D, E and possibly L being shown on plans of Fort Phase 4, c. 370.
Daniels interpretation was underpinned by his belief that the full span of Roman activity was represented by the surviving remains and that the structures exposed when the overburden was removed were, to a large extent, all that been constructed. Although aware that the site had been damaged by post-Roman disturbance he still underestimated its impact on the later Roman levels, the fourth-century remains having been almost entirely removed, whilst the third-century structures in the western praetentura, in particular, were also badly damaged. Re-excavation of the fort in 1997–8, particularly the successive phases of cavalry barracks in the retentura, coupled with analysis of the pottery assemblages from the Daniels excavations, have made it apparent that only a portion of the Roman sequence was preserved, essentially corresponding to the second- and thirdcentury phases of occupation. With this in mind it is possible to interpret the later buildings in the praetentura as the fragmentary remains of a more extensive, coherent third-century rebuilding, rather than as evidence for a series of fairly ephemeral structures in the essentially minimalist restoration of their form adopted by Daniels.
The layout is clearest in the eastern half of the praetentura. Here much of Daniels’ third-century plan – Fort Phase 2 – can be accepted as it stands, including the remodelling of Building 1 as a narrower structure, presumed to be a stable, and the substitution of stone partition walls for timber in Building 2, with resultant reduction in the number of contubernia. However, with respect to Building 3, it is Daniels’ Phase 3, which was likewise marked by the introduction of stone partitions, rather than the building’s insubstantial Phase 2, that should be attributed to this period. Furthermore, rather than representing distinct overlying structures or even later reuse of the parts of Building 2, the three ‘shacks’, B, K and M, associated with daniels’ Fort Phases 3 and 4, simply represent the secondary floor levels and other third-century occupation features preserved within the remodelled Building 2. It is noteworthy that all three respected the footprint of Building 2 and its constituent contubernia, for the most part employing walls already attributed to that building. However, unlike the remains of Building 1, for example, these walls and internal floor surfaces were not entirely obscured by spreads of rubble when this part of the fort was first exposed in 1975–6, leading to their interpretation as distinct buildings, which could in turn be assigned to Wall Periods 3 and 4, as demanded by the then dominant interpretive paradigm in Hadrian’s Wall studies.
In the western half of the praetentura the picture differs somewhat. The shacks (C, D, E, F, G, H, J, L) cannot be fully integrated into the three pre-existing barrack blocks (4–6) in the same way that B, K and M can be seen to relate to Building 2. Although there was some reuse of earlier wall footings there was also considerable new construction, plus the creation of a new street (Alley 10). It would appear that the life of the timber-partitioned barracks, 4, 5 and 6, did not extend beyond the earlier part of the third-century when they were demolished and replaced by two new barrack blocks, Buildings 17 and 18, which occupied different footprints from their predecessors and were furnished with stone partition walls separating their contubernia. They were also probably somewhat wider than the second-century barracks. The stone-built shacks, C, D, F, G, H and L, represent the fragmentary remains of these two blocks laid out to the north and south of Alley 10. Of these the southern barrack, 18, can be restored with the most confidence, although the southern and easternmost parts of the building lay beneath Buddle Street and were consequently unavailable for excavation. It is represented by Daniels’ Buildings F, C and D and was erected immediately to the south of Building 5, its north wall running alongside the line of the former barrack’s south wall, and overlay the earlier street, Alley 4, and the northern part of Building 6. Only the north-west corner (F), northern half of Contubernium 1 (C) and north-east corner of Contubernium 4 (D) were preserved, with evidence for multiple phases of occupation in the contubernia. The fragmentary nature of the surviving remains reflects the degree of post-Roman disturbance, with particularly severe damage caused by three broad, parallel furrows aligned roughly north-south, probably the result of medieval or early modern ploughing, as well as the fact that much of the building was not actually exposed. The eastern part of the block, beyond Contubernium 4, may have been demolished later in the century, perhaps replaced by timber structures of which the tiny sillbeamed Building E was the sole example uncovered. This indicates that Daniels’ shacks may represent a palimpsest of more than one phase in this half of the praetentura.
The evidence relating to the northern barrack, Building 17, was even more fragmentary and difficult to interpret. Based on the position of shacks L, G and H, the barrack appears to have overlain the northern half of Building 5, Alley 3 and the southern part of Building 4, with a stretch of new walling running lengthwise through the latter marking the probable north wall of 17. It is possible, however, that the sequence with regard to the northern barrack could be more complex. An enlarged Building 4, incorporating the area of the former Alley 3, with the north wall of Building 5 forming the new south wall of the block, and featuring a stone medial wall running the length of the contubernia range, would have dimensions equivalent to those of the two blocks, 17 and 18, described above. This would not incorporate the side walls of Buildings G and H, but might form part of an initial phase of the remodelled barrack layout on this side of the fort, which would help to explain why there was a broad expanse of cobbling extending well to the north of the main strip of Alley 10 street metalling, as far as the north wall of Building 5, in what would otherwise be the interior of Building 17.
Other elements certainly suggest there were subsequent alterations to Building 17, most notably the post hole structure, J, which could either form part of a secondary rebuilding of 17, featuring greater use of timber, or simply represent a later rectangular timber building overlying 17 and constituting an entirely separate phase.
It is worth emphasising that in neither half of the praetentura is there any definite indication that the third-century rebuilding gave rise to chalet-barrack ranges. Instead, it appears to have involved the construction or remodelling of conventional stone barrack blocks. Admittedly the evidence in the western praetentura is so fragmentary that the possibility of a chalet-range layout cannot be decisively ruled out, but it is clear in the case of the two eastern praetentura barracks, which are markedly different from the chalet-barracks used to house the cavalry in the retentura. With the possible exception of post hole building J, evidence for a later, potentially fourthcentury rebuilding was found only in the north-east corner, overlying the demolished remains of the stable block. These traces, which are discussed at the end of this chapter, were too fragmentary to be able to make any determination of the type of structure involved, however.
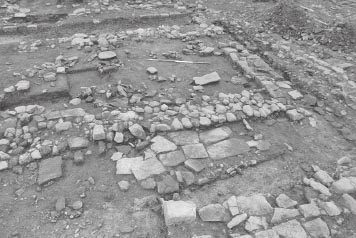
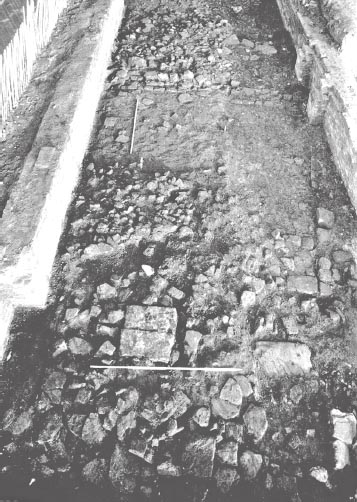
The second, main, stone-built phase in Building 1 involved the demolition of the former barrack block and the erection of a narrower building over the site. The new building appears to have formed one, long, open building or hall, with no obvious partitions or dividing walls (Fig. 14.01). A new flagged floor replaced that of Sub-Phase 2, in some areas directly overlying the former slots of the dividing partitions. A drain ran along the south side of the interior for the complete length of the building, probably using the former flagged floor as the drain bottom. To the north of the building a timber supported verandah was constructed over the demolition deposits of the barracks. The combination of stone flooring, internal drain and an absence of internal partitions suggested the building may have functioned as a stable.
Sections of the barrack’s east and west walls were retained, but where the west wall was simply shortened and the new north and south walls butted onto the existing structure, the east wall had been altered and capped at the northern end (Q05:19) to allow for an entrance at the east end of the building. From the west wall 19.00m of the south wall was rebuilt, including the corner with the west wall, but only the foundation (L05:18, M05:07) remained. This measured 1.00m wide and lay on the line of the former foundation. It was composed of well packed large river cobbles and fragments of sandstone, on average 0.20m × 0.10m, in a matrix of grey clay. In the best surviving examples it stood to a depth of 0.17m. As the new foundation was in an elevated position, lying directly on the old, it met the retained west wall at the level of the first course. The same probably applied where the new foundation met the stretch of south wall masonry that was retained from the previous phase.
The north wall of the barrack block was demolished and at least partially robbed out (e.g. M04:05), providing material for a new north wall, which was constructed 1.25m south of the line of the earlier one to give a narrower building 6.00m wide. Three sections of this north wall survived. The best example occurred towards the west end of the building. It consisted of a single course of well-finished, faced sandstone blocks, bonded with grey clay and angular stone chippings. This sat on a foundation (L04:18a, M04:17), 0.40m deep, of two layers of closely packed boulders and fragments of sandstone up to 0.25m in size, with the lower layer in a trench and the upper one almost on the ground surface. The foundation was traced for the length of the building (N05:09, P05:09, Q05:09) apart from 3.70m which was removed by the later clay-puddling pit. The upper layer of the foundation butted against the east face of the first course of the west wall (Fig. 14.02). Another fragment of north wall, consisting of two stones from the north face, was uncovered over the line of the wall which formerly divided the officer’s quarters from the rest of the building. The third section (Q05:19) formed the new junction with the east wall, but no new foundation had been constructed here, it merely sat on the first course of the east wall and the daub from the demolition of the previous building.
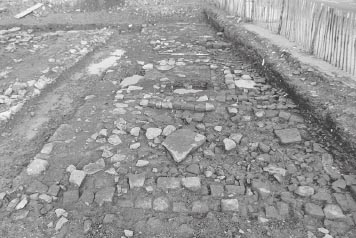
There were traces of several entrances through the north wall of the building. The most definite occurred at the east end where the new foundation (Q05:09) abruptly ended 1.00m short of the east wall. The west side of the new section of north wall (Q05:19) had been damaged or robbed so the width of the doorway could only be estimated. Another could be seen 11.00m from the west end of the building, immediately east of the section of north wall (M04:13) which had survived. The east end of the wall had been squared off at this point and several large flags, a continuation of the floor (M04:14) over the interior, extended across the cobble foundation east of this, giving a doorway 1.30m wide. A possible pivot hole visible in surface of the largest slab (Fig. 14.03) might, however, imply a doorway no more than 0.60m wide, but the slab may have been recycled from an earlier contubernium doorway. A third entrance was suggested immediately west of the former dividing wall where a 0.90m gap had been left between the foundation and the fragment of new north wall.
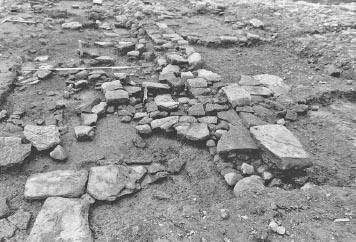
Figure 14.03: The north wall of the third-century stable, looking west with successive levels of flagged flooring evident, including an earlier barrack floor (Stone Phase 1) in the foreground. A threshold stone with pivot hole, belonging to a doorway in the stable wall is visible in the right foreground.
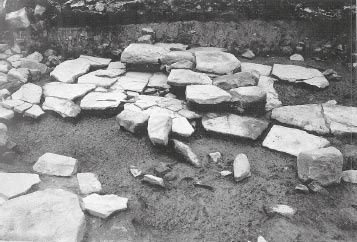
Figure 14.04: Phase 2 stable flagging (M05:02) overlying the Phase 1.2 flagged floor (M05:08) in the south room of contubernium 6, from the east
The former timber partitions and perhaps similarly constructed of upper works of the Phase 1 building were demolished and in the process the daub infilling of the wattle sections had covered the floor of the building. This was a similar material to that found under the Phase 1 Sub-Phase 2 floors from the demolition of the original partitions, consisting of reddish-brown, charcoal flecked, iron-stained clay. In some areas, especially under the verandah and road north of the building, the deposit (Q05:25, P05:12, 13, N04:12, N05:18, M04:29) lay 0.17m deep. It covered much of the area of the former contubernia (N05:12, 21, M05:03, 9, 15, 17, L04–25) and was clearly cut by the foundation of the new north wall, but was noticeably absent from much of the area contained by the previous officer’s quarters.
Fragments of a flagged floor were uncovered over various parts of the interior (L04:30, L05:47, M04:14, M05:02, N05:05, 39, P05:04, 40, Q05:07). The most substantial surface survived over the southern part of the former officer’s quarters. It consisted of well laid flagstones (P05:40, Q05:07) measuring on average 0.40m square × 0.08m thick, which were more regular and slightly smaller than the flags of the earlier floor. The floor sat directly on the earlier flags with no visible evidence of the demolition material which occurred under some of the other fragments of the Phase 2 floor (N05:05, M05:02) further west (Figs 14.04, 14.05). The remains of the former west wall of the officer’s quarters (P05:10) were probably incorporated in the flagged floor. The wall was not completely robbed away, but it does seem to have been cut through by the drain running along the south side of the interior and was probably demolished down to its bottom course, which was all that survived on excavation.
A small area of fairly worn flagging located towards the west of the building extended across the doorway through the north wall. The flags that lay directly over the entrance were slightly larger than those over the interior, but were unmistakably part of the same surface (M04:14).
Figure 14.05: Building 1 looking west in 1975. The Phase 2 stable flagging is exposed in the SE corner with the Phase 1.2 flagging of the centurion’s quarters visible to the right, cut by the cobble foundation of the Phase 2 building’s north wall.
Along the south side of the interior fragments of a drain were found which probably ran along the whole length of the building. It consisted of a channel 0.50m wide with a north side of small flags (N05:40, P05:36, 42, Q05:41, 55, 56) set on edge, measuring between 0.12m to 0.20m high. The north face of the south wall functioned as the south side of the channel. The channel was not investigated, but it is likely that the southern parts of the flagged floors of the earlier contubernia provided the drain bottom. Although none of the structure had survived at the west end of the building, the location of the channel was clearly marked by a narrow band of yellowish-brown loam (L05:06, M05:24) against the south wall foundation.
The relationship between the new drain and the former latrine channel (Q05:46) in the south-east corner of the building was obscured by later blocking and alterations to the east wall at this point. However, the northern part of the latrine seems to have been backfilled with loam (Q05:36) while the southern end continued in use with the Phase 2 channel, reusing the unlined outlet (Q05:43) which ran under the east wall, into the road drain east of the building.
Three narrower stone-lined channels (N05:35, N05:36, M04:18), aligned north-south, were found in the centre of the building. The most easterly of the three (N05:35) survived over a length of 2.00m. Its sides consisted mainly of a single course of small flags laid on edge, on average 0.25m long and 0.20m deep and the southern limit had either never been lined or had subsequently been robbed away. The bottom appeared to be made of flags also, although only several had survived. some 3.60 to the west, the second drain (N05:36) was also constructed of small flags on edge and irregular sandstone blocks. It measured 2.20m long, 0.35m wide and was on average 0.25m deep. some 10.50m further west, one surviving side wall of a third drain may be represented by a line of upright slabs (M04:18) initially interpreted as a partition of Phase 1 Sub Phase 2.
These three stone-lined drains were assigned by the excavators to Sub-Phase 1 or 2 of the Phase 1 barrack, because of the depth at which they sat, in which case the first two would have been centrally positioned within the south (rear) rooms of Contubernia 2 and 3. However it is difficult to determine what function they would have performed in the second-century infantry barracks. They do not appear to have been designed to remove troublesome ground water from the interior of the contubernia since they did extend far enough to exit the building either to the north or south. They bear some resemblance to the drains or latrine pits invariably located in the front rooms (arma) of cavalry barrack contubernia identified in the south part of the fort in 1997–8 (Buildings 9–12 – see Chapter 15 and Hodgson 2003, 37–90). The drains and latrine pits were associated with the stabling of horses in the front rooms and this suggests that, in functional terms, the drains in Building 1 would more appropriately relate to the Phase 2 stable block. The drains appear to be set below the flagged floor of the stable, with a couple of the slabs belonging to that floor extending over the channels. They probably cut through the flagging of the underlying Phase 1 barrack – certainly no flagging belonging to either of the barrack sub-phases extended over the line of the channels. The fact that parts of the channels were covered by stable floor slabs does not necessarily mean they could not be associated since the same was often true of the drains/urine pits and flagged floors in the cavalry barracks.
Fragments of a paved verandah (L04:19, 20, M04:30, P05:31), 2.00m wide, were uncovered to the north of the building. This lay over a thick deposit of demolition material up to 0.17m deep in places. At the northern limit of the flags a series of post-holes were indicated by groups of upright chocking stones (L04:24, 31, 36, 37, M04:37). The best surviving example (L04:24) was composed of three vertically placed slabs at right angles to one another forming a rectangular slot 0.20m × 0.23m. The post-holes were spaced between 1.50m and 3.00m apart and probably represent a timber colonnade supporting an overhanging roof along the front of the building.
During the life of the building the east wall (Q05:06) was dismantled above the outlet (Q05:43) from the internal drain, the drain and outlet blocked (Q05:30, 35) and the wall above it rebuilt, possibly as a result of subsidence in this area. A section of wall and foundation 2.20m long was removed, then the east end of the drain and the outlet channel were blocked with small angular pieces of sandstone in a matrix of grey clay. A new foundation, 0.30m deep was laid on top of this. It consisted of fragments of stone up to 0.15m × 0.10m in size roughly packed in grey clay. The top of this was level with the first course of the sections of east wall which had not been altered. A course of clay bonded facing stones, some of which were slightly smaller and rougher than those of the original wall, stood on the new foundation.
Probably at the same time, the street drain (L04:27, L05:52) to the west of Building 1 went out of use, suggesting with the blocking at the east end of the drain, that the internal drain along the south side of the building had been abandoned. The street drain to the west had been partially dismantled and the channel blocked by fragments of stone (L04:35) packed into position.
Fragments of two courses of a blocking wall (L05:36), 0.50m wide, were uncovered across the west end of the alleyway between Buildings 1 and 2. The southern end had been robbed away, but the north end abutted the Phase 2 boulder foundation (L05:18) of the south wall of Building 1. It was composed of a mixture of stones, including fragments of flagstones, rough pieces of sandstone, and well dressed facers up to 0.25m long and 0.12m high. These were bonded with a dirty grey clay to form two faces without any obvious core. The wall sat on a layer of buff-grey clay (L05:35), possibly from the dismantling of the west end of the south wall at the beginning of Phase 2, which also abutted the foundation of Building 1 and partially extended over the lip of the offset and into the crevices of the first course of the north wall of Building 2.
On construction of the Phase 2 building the former north drain was dismantled and backfilled with loam and rubble (P05:18, Q05:24), and the new surface of the intervallum road extended over the top.
The drain east of the building (Q05:03) continued in use. A deposit of thick pink puddled clay (Q05:05) up to 0.30m deep was added to the top of the west side of the drain probably to elevate the drain to the same height as the new road (Q05:27) and also to increase its depth.
To the west of the building the drain (L04:27, L05:52) continued in use, presumably to function with the internal drain.
The distinction between the various surfaces or levels in the alley was really one of relative depths rather than different characteristics. The upper level of clay (L05:29, M05:12, N05:07, P05:16) above the level of the bottom of the new boulder foundation of the south wall of Building 1, was attributed to Phase 2. It consisted of light-brown clay, roughly 0.16m deep and contained fragments of stone including facers, probably from the alterations to the south wall at the beginning of Phase 2. At one point on the south side of the alleyway there was a deposit of slightly burnt daub and charcoal (N05:23, 24), possibly from the alterations to Building 1 in Phase 1, or even from the demolition at the end of Phase 2.
The Phase 2 road surface was uncovered in a number of areas. It consisted of an extensively worn, single layer of cobbles (N04:07, P04:08), which were 0.04m to 0.08m in diameter, well packed and formed a definite horizon below the patches of rubble and stone scatter representing the re-surfacing of Phase 3. It was difficult to define the southern edge of the road as the north edge of the verandah occurred on much the same line as the north edge of the foundation of the Phase 1 north wall. Nevertheless there was evidence in the area to the north of the west entrance to the building, of the new road extending over the line of the former east-west street drain, 2.40m north of the Phase 2 north wall. This would increase the width of the road to 5.50m, from the verandah to the kerb of the rampart. Another area attributable to this phase occurred immediately south of the north-east interval tower, where the road surface (N04:11, P04:09) ran under the kerb which blocked off the tower at the beginning of Phase 3.
A surface of large river cobbles (Q05:27) was laid over the earlier intervallum road (Q05:26) with a layer of soil 0.03–0.04m deep separating them. This was a single layer of stone up to 0.20m deep. A kerb of flagstones (probably re-used drain covers) and large boulders, up to 0.30m in length, formed the western edge to the new road surface. This was set back 0.25m from the inner face of the drain (Q05:03) immediately east of Building 1, and lay on top of a thin layer of silt which covered the upper surface of the drain’s east side. The height of the kerb corresponded roughly to the height of the clay pack (Q05:05) added to the west side of the drain and would have increased the overall depth of the drain to 0.80m.
No surfaces of this road contemporary with Building 1 Phase 2 were exposed in the area immediately west of the building.
FINDS
Samian stamp: 125–145 (no. S37, P05:08)
Coin: Trajan, 98–117 (no. 39, M05:15), Herennia
Etruscilla, 249–51 (no. 138, L04:25)
Copper alloy: buckle (no. 153, M05:09)
Iron: stud (no. 59, L04:25), stud (no. 55, P05:08)
Decorated samian: 125–140 (no. D140, Q05:25)
Copper alloy: rod (no. 131, P05:13), button-and-loop fastener (no. 192, M04:29)
Iron: slide key (no. 32, N05:18)
Bone: knife handle (no. 11, Q05:25), loop (no. 59, N05:18)
Coin: Hadrian, 119 (no. 69, Q05:05)
Mortarium stamp: 140–170 (no. 30, L04:20)
Glass: jug (no. 9, L04:20), window (no. 42, L04:20)
Graffiti: (no. 65, L04:20)
Stone: throwing stone (no. 102, L04:20)
Decorated samian: 125–150 (no. D139, Q05:17)
Stone: whetstone (no. 14, Q05:17)
Copper alloy: junction loop (no. 181, N05:12)
Iron: spearhead (no. 1, N05:05)
Samian stamp: (no. S48, M05:25)
Graffiti: (no. 14, M05:25)
Coin: Hadrian (no. 67, M05:28)
Copper alloy: bowl (no. 87, M05:28), loop (no. 352, M05:28)
Decorated samian: 125–140 (no. D122), 130–155 (no. D123)
Samian stamp: 135–50 (no. S76), early to mid Antonine (no. S90)
Mortarium stamp: 120–60 (no. 4), 120–60 (nos 9–10)
Graffiti: nos 1, 35, 55
Glass: beaker/bowl (no. 3)
Stone: throwing stone (lost)
Decorated samian: 150–80 (no. D111, M05:12)
Samian stamp: 135–50 (no. S76, N05:07), Antonine (no. S126, N05:07)
Mortarium stamp: 120–60 (no. 9, N05:07)
Coin: Trajan, 114–7 (no. 62, P05:16)
Iron: stud with copper alloy plate (nos 47, 48 (M05:12)
Lead: strip (no. 15, M05:12)
Stone: throwing stone (no. 120, P05:16)
Mortarium stamp: 140–180 (no. 27, N04:11)
Coin: Vespasian, 67–79 (no. 9, N04:07)
Stone: throwing stone (lost, N04:07)
Phase 1 demolition/make-up for Phase 2
Two large groups from the interior, deriving from layers associated with the demolition of the barrack partitions and upper works, included a high proportion of BB2 and allied fabrics (up to two thirds of the coarse ware), Nene Valley ware and BB1 with obtuse-angle lattice (L04:25, M05:03). The presence of black sand amphora suggests a date after the middle of the third century (there was also a slightly worn coin of 249–51). Contexts identified as demolition and/ or make-up contained samian of the late second or early third century, Horningsea and BB2 and allied fabrics, but also a sherd from a BB1 cooking pot with a groove above obtuse angle lattice, a few sherds of late gritty grey ware and at least three calcite-gritted ware vessels, providing a late third-century date (M05:09, P05:14).
The foundations of the north wall produced a body sherd of Lower Nene Valley mortarium (third century or later), Nene Valley fine ware, BB2 and allied fabrics and a sherd from a BB1 cooking pot with a groove above obtuse angle lattice, providing a date in the second half of the third century (P05:09, Q05:09). Pottery from the south wall foundations consisted of a sherd of BB1 and a sherd of Hadrianic samian, while from the wall itself there were 11 sherds dating to the late second century (M05:07, N05:08).
The pottery from the silt/cobble bedding level in the north-east corner of the former officer’s quarters was made up of almost 85% BB2 and allied fabrics (Q05:17). This high proportion, and a Nene Valley ware sherd, indicate a third-century date. The large group from the verandah flagging (L04:20) produced a stamped mortarium of 140–70, and nine sherds of samian, including a burnt Form 37 dated 160–95 and an Argonne bowl or dish dated 150–200. There was a high proportion of BB2 and allied fabrics and a wide-mouthed bowl, possibly from Norton (which would indicate a third-century date). The pottery from the flagged floors in the interior was later in date, including a Lower Nene Valley incomplete mortarium rim dating after 230, a BB1 cooking pot with a groove above obtuse angle lattice, and a small quantity of late third-century material, including a sherd of Crambeck reduced ware, a sherd of calcitegritted ware, and a flanged bowl in an unidentified reduced ware (M04:14, P05:04, N05:12).
This produced only nine sherds of pottery, of the late second century or later.
The upper layers of the alley fill (M05:12, N05:07 and P05:16) produced a large quantity of pottery (21.672kg excluding samian), much of it secondcentury in date. The locally produced wares make up 23.5% of the coarse wares. Out of 33 samian vessels, there were eight Antonine, two mid to late Antonine and only two of the late second or first half of the third century. BB2 makes up approximately 16% and south-east reduced ware 10% of the coarse wares. Other pottery of the third century include a Lower Nene Valley mortarium rim of the first half of the third century, Nene Valley ware and BB1 with obtuse angle lattice but no groove, and black sand amphora of the second half of the third century or later. All three contexts did include small quantities of late third- or fourth-century material; N05:07 in particular contained a number of calcite-gritted ware sherds, which included a Huntcliff-type rim. As the proportion of late third- and fourth-century material is so low, the late fourth-century Huntcliff-type rim almost certainly indicates contamination from the dereliction material that covered the alley. The other late third- or fourth-century material may therefore also belong to the late fourth-century assemblage.
Only two contexts associated with the Phase 2 north intervallum road surface had more than 15 sherds of pottery. Both had little BB2, suggesting a late secondcentury date, but N04:11 did have a few sherds of a third-century Nene Valley ware vessel.
The interpretation of the Phase 2 Building 1 as a stable provides a sharp contrast to the ‘stable-barracks’ recently identified in the retentura and presumed to represent the accommodation for the cavalry component of an equitate cohort. Yet the evidence from Building 1 is unambiguous. The combination of a flagged floor to provide a hard-standing, a drain running the full length of the building and the lack of internal partitions would seem to suit no other function. The backfilling of the latrine at the east end of the building would suggest that area was no longer providing accommodation for an officer. Indeed, in all likelihood the area of former officer’s quarters was not even partitioned off from the remainder of the interior. The internal drain along the south wall seems to have continued through without interruption and the partition wall (P05:10), which survived only a single course high when excavated, had probably been reduced down to its footings to form part of the building’s flagged floor.
In any case, the existence of stable-barracks does not preclude the possibility that the Roman army also erected other types of stable buildings dedicated to that function alone. Not only was the space in the Wallsend stable-barracks strictly limited, with no room to accommodate remounts, but, perhaps more relevant in this context given the location of the building, infantry also needed stables to house baggage animals – doubtless oxen, mules and donkeys as much as horses – of which there must have been a large and varying population in all Roman forts. Officer’s horses might also have required accommodation, if these were not stabled in the centurions’ houses. Building 1 was probably intended to perform such a role. A useful comparison is provided by the stable identified at Housesteads, Building XV Phase 3 (also a third-century building), which was located in a fort housing a peditate infantry cohort (though reinforced by a unit of Frisians which may have included cavalry). This was a broadly similar structure – a rectangular, undivided hall with a flagged floor, but featuring two parallel, capped drains running along its full length (Fig. 14.06). Building XV was double the width of Wallsend Building 1 and could probably accommodate two facing rows of animals. Another building furnished with a lateral drain which has been interpreted as a possible stable was located in the east rampart space at Vindolanda (Bidwell 1985, 72–4). It took the form of a rectangular building, 4.15m wide internally and in excess of 11.7m in length, set against the inner face of the curtain wall and this too was probably intended as general provision for pack animals rather than specifically for the cavalry mounts of the equitate cohort stationed there (Hodgson and Bidwell 2004, 128).
Figure 14.06: Stables at 1. Housesteads Building XV Phase 3, 2. Vindolanda, 3. Wallsend Building 1 Stone Phase 2. Scale 1:400
A substantial remodelling, evident right across the interior of Barrack 2, represented Stone Phase 2 in that building. This involved the demolition of the wooden partitions between the contubernia and the construction of stone walls instead, which probably separated one fewer contubernia than previously, whilst the floors were covered with a further level of stone flagging. The spacing of the walls was not very regular, varying between 3.30m and 4.30m. Considering the extra space taken up by the stone walls, by comparison with timber partitions, and even using the minimum contubernium width as an average for those contubernia which were not uncovered, the maximum possible number of contubernia that could be fitted into the estimated space in Phase 2 would be eight. The lack of a cross-wall in the most westerly contubernium might imply that this performed a specialised function – equipment storage for instance – which would further reduce the potential size of the centuria occupying the Phase 2 barrack block.
Figure 14.08: Building 2, looking from the west end of the block showing the third-century barrack levels.
The four westerly contubernia were investigated in most detail, the wider area available for excavation there enabling a structural sequence to be established which could also be applied to the eastern contubernia, where fewer features were recorded. No part of the centurion’s house, which lay beneath Buddle Street, could be exposed so the extent of any contemporary changes there is unknown.
The very north end of the partition wall (M05:46) separating Contubernia 1 and 2 was revealed. The wall was 0.70m wide and composed of sandstone facing stones bonded with clay, but lacking any obvious core material.
Fragments of a stone flagged floor (M05:47) attributable to this phase were found over the area corresponding to Contubernium 3, overlying an earlier phase of flags (M05:48).
Two courses of the dividing wall (M05:21) between Contubernia 5 and 6 survived intact. This was 0.65m wide and composed of keyed sandstone facing stones, on average 0.20m wide × 0.15m deep, bonded with grey clay and with a rubble core. Over 2.50m of the wall was exposed. The northern end of the wall was indicated by a rubble-filled robber trench (M05:22). Fragments of a stone-flagged floor (M05:13), 0.10m deep, were found over some of the room. The levels of flagging in this area were complex and never fully disentangled, but this context probably embraced at least two and possibly three sub-phases of flagging. The lowest layer, designated M05:45, was overlain by the stone partition wall (M05:44) which separated Contubernia 4 and 5. The higher flags were, in part at least, contemporary with the partition wall, as some of the flags appeared to respect it, whilst others were, less certainly, recorded as extending over the wall line and may represent a later modification.
Partition wall M05:44 was somewhat irregularly constructed and some uncertainty was expressed in the excavation and post-excavation records as to whether it belonged to the initial Phase 2 reconstruction of Building 2 or a later modification (‘Building K’). A 2.00m length of the wall was recorded, which varied in width between c. 0.60m at its north end, where it comprised two faces of keyed sandstone blocks with a clay and rubble core, narrowing to 0.45m further south, where it was constructed solely of large facing blocks, 0.15m to 0.35m wide and 0.15m deep, one stretching right through the wall. The partition has been assigned to Phase 2 here, as its spacing would give Contubernium 5 a width (3.50m) in the same range as Contubernia 7 and 8 (3.60m and 3.20m), whilst its construction was not that dissimilar to stone partition M05:46 further east. Moreover, the analogy with neighbouring Building 1, where flagged floors were clearly present in Sub-Phase 2 of the Phase 1 stone barrack, demonstrates that the underlying flagged floor M05:45 need not belong to Phase 2 as was initially assumed.
A robber trench (L05:49), 0.60m wide and 4.30m from the east wall (M05:21) of the room, indicated the dividing wall between Contubernia 6 and 7. This trench and the internal wall (M05:21) were respected by the flagged floor of the room (L05:24). The floor was mostly worn small fragments of stone interspersed with large complete flags on average 0.08m deep.
The wall (L05:09) dividing Contubernia 7 and 8 survived for 3.00m from the robber trench of the north wall of the building. It took the same form of construction as M05:21. Two courses, including the offset, were uncovered at the north end. It was situated 3.60m from the robber trench (L05:49) marking the line of the east wall of the contubernium. Several small fragments of flagging (L05:53), representing the floor of the Phase 2 contubernium, could be seen underlying the later clay makeup or floor (L05:33) in the section (S47) across the north part of the room. The flags were bedded on and interspersed with a layer of grey-brown loam (L05:40), on average 0.08m deep. Lenses of coal were intermixed in the surface of this loam where the flagging was absent and presumably also reflect occupational activity associated with this phase of the contubernium.
A cross wall (L05:08), located some 2.80m from the north wall, may have been erected in this phase, dividing the contubernium into two rooms in the manner typical of Roman barracks. The wall was constructed with regular dressed blocks, on average 0.30m wide × 0.16m deep, and bonded with grey clay. Apart from a solitary block of the second course, the wall survived as a single course of masonry. The west end of the wall butted up against the east face of wall L05:09, whilst a gap, 1.00m wide, at the east end of the cross wall probably represented a doorway between the north and south rooms. This construction of this wall was considered by the excavators to have belonged to the subsequent structural phase (‘Building B Phase 1’ – see below). However, the cross wall’s relationship to the initial flagged floor in the Phase 2 contubernium (L05:53) is not recorded in site notebook and there are no definite stratigraphic grounds for allocating it to the next sub-phase, rather than the initial stages of the Phase 2 building, as suggested here, though either is possible. These arrangements are not paralleled in any of the other contubernia of Building 2 Phase 2, but, given the area that was available for study, clear evidence would only be anticipated in Contubernia 8 and 6.
This contubernium measured 3.20m wide from the west wall (K05:16, L05:26) of the building to the east wall (L05:09) of the room. A substantial flagged floor (L05:45) covered most of the room, forming a flat, uniform surface, respecting the west edge of the partition wall. It consisted of fairly regular small flagstones, well laid, slightly worn and on average 0.08m deep. There was no trace of a cross wall associated with flagged floor or overlying it, and it does not therefore appear that this contubernium was divided into front and back rooms in the normal manner. This pattern is repeated in barrack plans elsewhere and may imply that Contubernium 8 was used for storage or some kind of specialised accommodation, rather than housing a squad of soldiers.
Figure 14.09: The latest surviving levels in the rear room of third-century Barrack 2 contubernium 7 (Daniels Building
The reconstructed barrack subsequently underwent a series of modifications during the course of the third century comprising the laying of new floors and alterations to the internal partition walls. These modifications can be traced most clearly in the western half of the block, where a greater area was available for investigation, particularly in Contubernia 5–7 and, to a lesser extent, in Contubernium 8 (Figs 14.09, 14.10).
The excavators in 1975–6 had interpreted these alterations in a very different fashion, as constituting a distinct phase involving the demolition of most of Building 2 and the erection of three small, irregular ‘shack’-like buildings over the site (See Chapter 1: Figs 1.07, 1.08). These ‘shacks’, labelled ‘Buildings B, K and M’, were thought to re-use the north wall and the former contubernia dividing walls of Building 2, whilst the west wall of Building 2 was demolished to the level of the lowest course and incorporated into the new road surface. Three phases in the occupation of these structures were defined by the excavators on the basis of floor types, which in turn were attributed to Periods 3 and 4 of the fort, corresponding to the early and mid–late fourth century respectively.
However, analysis of the datable material evidence from the floors and features associated with B, K and M (see below) indicates that these structures probably did not outlast the third century – and in fact probably had no greater lifespan than Building 1 to the north – and in turn necessitates a re-examination of the structural evidence regarding north-eastern shacks. Daniels’ own interpretation makes it clear that B, K and M were not freestanding structures but formed part of a single range, reusing the north wall of Building 2. Moreover, it was also recognised that there were probably more structures related to this group to the east of Building M, as evinced by the ‘fragments of late walls and floors’ uncovered there (actually the partitions and floors of Contubernia 1–3 in Building 2 Phase 2 – see above). Although Daniels suggested that the south wall of Building 2 might have been demolished, there was no direct evidence as the wall lay to the south of the limit of excavation, underneath Buddle Street. The evidence with regard to the west end and south-west corner of Building 2 was less clear-cut and is analysed in detail below, but it may be as readily interpreted to indicate continuing occupation of this end of the range as to suggest abandonment. In effect all the structural activity recorded under the heading of Buildings B, K and M may simply represent the latest phases of the western contubernia of building 2, with b, K and M corresponding, respectively, to Contubernia 7, 6 and 5, and need imply no truncation of the range whatsoever, either to the east, west or south.
The initial perception of these structures as late-Roman buildings may be blamed on the rigid framework imposed by the four-period Wall chronology prevailing at the time of excavation (1975–6), which conditioned the excavators to expect Diocletianic and Theodosian construction phases and interpret the surviving remains in that light. Consequently, it was considered highly significant that, following the removal of the post-Roman overburden, the western contubernia of Building 2, and ‘Building B’ in particular, were apparently not covered by the demolition rubble which overlay Building 1 and much of the rest of Building 2 (but note rubble L05:07 over much of ‘b’ as well as Contubernium 8 to the west). Rather than this simply being treated as the reflection of depositional survival, it was regarded as evidence that ‘B, K and M’ belonged to a later period after the dismantling of the Phase 1/2 barracks and stables in the praetentura. Moreover, their apparent irregularity and flimsy character, as surviving, seemed appropriate to the peasant militia of farmer-soldiers, which the late Roman limitanei were then thought to represent.
Three sub-phases were defined within the rooms on the basis of floor types, labelled ‘Building B, K and M, Sub-Phases 1A, 1B and 1C’. These multiple sub-phases can be reformulated as Stone Phase 2, Sub-Phase 2 of Building 2.
The excavators did not consider Contubernium 8, the westernmost component of Building 2, as one of the Period 3 and 4 structures, like B, K and M immediately to the east. It was thought that the west end of the range had been truncated as a result of the widening of the via praetoria. However there is clear evidence for a further phase in this westernmost contubernium which possessed the same characteristics as those encountered in the neighbouring contubernia and attributed to Periods 3 and 4 by Daniels. The original Stone Phase 2 flagged floor (L05:45) was covered by a dirty loam layer (L05:44), perhaps a combination of occupation trample and makeup material. This layer was in turn was overlain by a flagged surface (L05:28), which survived only sporadically. All these features and deposits were covered by rubble probably deriving from the demolition of the building (L05:25). Flagging L05:28 and makeup L05:44 were recorded as abutting the secondary west face of the rebuilt dividing wall between Contubernia 8 and 7 (L05:10), which clearly overlaid the earlier flagging, L05:45, and reduced the internal width of 8 to c. 2.70m. Again no evidence was found for a cross wall sub-dividing the contubernium into front and back rooms in this phase.
The west wall of Contubernium 7 was rebuilt using the west face of the previous dividing wall (L05:09) to form the new east face, while a new west face (L05:10) was constructed over the earlier flagged floor of Contubernium 8 of Phase 2. Very little of the new west face had survived whilst the north and south ends of the wall had also been completely robbed away. The dividing wall between Contubernia 6 and 7 remained in use in this sub-phase. Only the robber trench (L05:49) remained to mark this line. This was 4.00m from the altered west wall. The cross wall (L05:08) separating Contubernium 7 into front and back rooms also remained in use in this phase, if indeed it was not actually built new at this time. It was interpreted by the excavators as the south wall of Building B, but is much more likely to represent the base of a partition wall of the kind commonly found sub-dividing barrack contubernia. The southeast corner of the north room had been damaged by post-Roman activity and robbing, removing the junction of the south and east walls. Later robbing (L05:37, M05:31) had also removed the junction of the north and west walls of Contubernium 7.
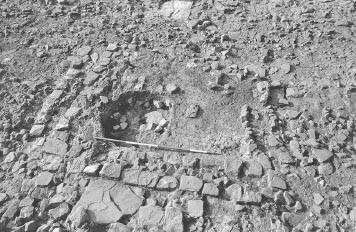
Modern pits (L05:05, 27) had damaged the interior of the contubernium, but a layer of grey-buff clay (L05:33), on average 0.08m deep, was uncovered over most of the room (Fig. 14.11). Lenses of coal were found in the upper surface of the clay (L05:14). The clay respected the edges of the south and west walls and extended across the entrance in the south east corner of the room. It overlay the earlier flagging (L05:53) and loam floors (L05:40) of Building 2 and also the former east face of the dividing wall (L05:09). This was interpreted as a floor surface in its own right but may simply represent make up for the flagged floor laid on top (L05:23). Fragmentary remains of this flagging (L05:23) were found over the clay layer and extended over the south-east entrance into the room. One large shattered flagstone on the east side of the room may have been used as a hearth as the upper surface appeared to be coal blackened. Three small circular pits (L05:39a, b, c) had been dug into the clay layer below. They varied from 0.10m to 0.25m in diameter and had probably all contained pots originally, as one still retained the entire lower part of a BB2 cooking pot (L05:38). The upper portions of this had been burnt by a hearth (L05:12) from the subsequent phase. Several large flags (L05:13) occurred in the area immediately south of the cross wall. These were interpreted as part of a street resurfacing south of the range. However it is more likely that these flags represent the floor in the southern half of the contubernium, the front room or arma.
Figure 14.11: Section (S47) across the south face of modern pit L05:27 in Building 2, contubernium 7, Scale 1:20.
A north-south partition, indicated by a 1.50m long line of small upright flags and stones (L05:22), was erected 3.00m east of the west wall of the contubernium. This was interpreted as a further alteration to this part of the building, involving the dismantling of the previous east wall of the contubernium and its replacement by the new partition. However it is also possible that the partition simply defined a 0.90m wide passageway running along the east side of the north room, screening off that room, and might therefore belong to same overall phase as secondary floor. Access into the room may have been at the north end of the partition where there is a gap between the end of the upright stones and the north wall of the building. A layer of coal and ash (L05:14) 0.03m deep lay over the flagged floor of the interior (L05:23). This respected the west and south walls of the north room (papilio) and was limited to the east by the line of partition uprights (L05:22). A small hearth of burnt clay (L05:12) was uncovered towards the south-east corner of the room on the edge of the coal spread. No equivalent changes were recorded the other contubernia.
The previous flagged floor of Contubernium 6 (L05:24) was covered with the same kind of dirty buff-grey clay (L05:34, M05:33), that overlay the interiors of Contubernia 7 (L05:33) and 5 (M05:11). This lay over the whole floor and respected the edge of the east wall of the room (M05:21) and was cut by the robber trench (L05:49) of the west wall. There was no evidence for an east-west partition dividing Contubernium 6 into front and rear rooms, as the clay layer extended beyond the line of partition wall L05:08 in the adjacent Contubernium 7 and continued right up to southern limit of the excavation trench. The clay was interpreted by the excavators as a distinct floor surface (‘Building K Phase 1A’), as was the case with regard to the neighbouring contubernia. However it is probably better understood as a makeup layer for another flagged floor (L05:50, M05:32) which survived only in small patches in this contubernium, apart from an area of very small shattered pieces over the southwest side of the room (Daniels’ Building K Phase 1B).
The north-west corner of the room was covered with a clay layer (M05:11) similar to those in Contubernia 6, 7 and 8. It respected the party wall (M05:21) and was cut by the robber trench of the north wall (M05:31).
The roughly constructed north-south wall (M05:44), found 3.50m east of the party wall (M05:21) between Contubernia 5 and 6, was initially assigned to this phase and interpreted as the east wall of Building M. However, as discussed above, this wall could more readily be attributed to the initial layout of Stone Phase 2 of Building 2. Subsequently the wall may have been dismantled to the level of the first course and a flagged floor (M05:13) extended over the top. As noted previously, the context number M05:13 seems to have been applied to perhaps as many as three distinct layers of flagging superimposed one over the other, forming an area of substantial flooring 0.10m deep across the northern part of the room. Whilst the intermediate layer respected M05:44 and can therefore be assigned to the beginning of Phase 2, the uppermost layer (to which the context number M05:14 could also possibly be applied) appeared to extend over the contubernium wall, although this is not altogether certain. A new east wall which should be associated with this upper flagging was not located.
In the area east of Contubernium 5, where a progressively smaller slice of the building was investigated, no levels attributable to this phase were identified.
None of the drains which functioned with Building 2 were uncovered. The only area of roadway available for examination near Building 2 was the via praetoria. Unfortunately, due to insufficient time the road surface could not be investigated below the surfaces related to the period following the demolition of Building 2.
FINDS
Copper alloy: stud (no. 259, M05:13)
Coin: Caracalla, 198–211 (no. 124)
Copper alloy: brooch (no. 27), nail (no. 137), stud (no. 286), loop (no. 368)
Iron: spearhead (no. 6), loop (no. 68)
Glass: bead (no. 26)
Pottery: south-east reduced ware perforated disc (no. 14)
Lead: pierced disc (no. 23, L05:34)
Stone: palette (no. 4, L05:54)
Copper alloy: belt plate (no. 147)
Iron: hobnails (no. 76)
Samian stamp: 140–170 (no. S22)
Copper alloy: rod (no. 135), bell-shaped stud (no. 273)
Pottery: grey ware counter (no. 71)
Flint: flake (no. 5, N05:16)
Iron: spear (no. 3, N05:16), ferrule (no. 14, N05:16)
Copper alloy: fitting (no. 173, N05:16)
The flagged flooring in Contubernium 5 (M05:13) produced only seven sherds of pottery, including a few sherds of BB2, providing an Antonine terminus post quem. Some of this material may have been contemporary with the building’s Phase 2 reconstruction, but this could not be confirmed as context M05:13 was found to consist of up to three layers of flagging. The lowest of these (renumbered M05:45) probably related to the Stone Phase 1 barrack, whilst the intermediate layer was associated with the Phase 2 reconstruction and the uppermost layer may have represented a later alteration to the contubernium.
Much of the pottery associated with the later modifications to Building 2 was of a similar date to that connected with the beginning of Phase 2. A single sherd from a south-east reduced ware cooking pot (L05:54) was found in the core of the rebuilt wall between Contubernia 7 and 8. A layer of floor-makeup in Contubernium 6 (K) contained an Antonine Form 33, local grey wares and a single BB2 bowl/ dish (L05:34). Later pottery came from the soil makeup layer (L05:44) which overlay the earlier Phase 2 flagging in Contubernium 8 (L05:45) and produced a large group of pottery (1.386kg, excluding samian). As well as material dating from after the mid-third century, such as black sand amphora, it also included a number of sherds of Crambeck reduced ware and calcite-gritted ware of late third-century date (L05:44). The floor L05:33 in Contubernium 7 had had a BB2 cooking pot set into it (L05:38), although only the lower half of the vessel has survived.
The presence of the later third-century wares in the makeup layer for Contubernium 8 (L05:44) may be significant. The layer was certainly not completely sealed beneath the very patchy flagging above (L05:28), so the later third-century material it yielded could conceivably be intrusive. However a small quantity of similar material was found in association with the Phase 2 flagged floor in Building 1 and it is therefore quite possible that the life of the Phase 2 barrack continued into the late third century or very early fourth century, when Crambeck reduced ware and calcite-gritted ware was first appearing on the northern frontier.
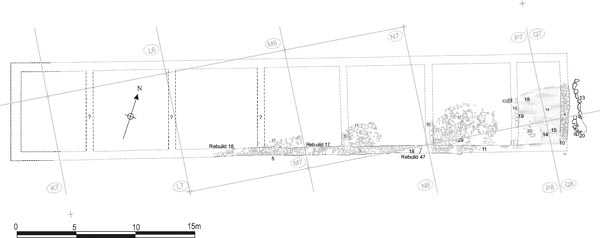
The most southerly barrack block in the praetentura, Building 3, was also rebuilt with stone partition walls like Building 2. This period of activity equated to Daniels’ Building 3 Phases 3 and 4, which were assigned dates of c. 300 and 370 respectively. Phase 4 was differentiated from Phase 3 by a replacement stone floor and rebuilt partition wall, for example, but does not appear to have represented a radical alteration to the layout of the Phase 3 building. Four partition walls attributed to Phase 3 were identified along the 29m exposed length of the building. The excavators interpreted these as dividing that part of the building into four rooms, labelled, from west to east, BE, BF, BG and BH (see Chapter 1: Figs 1.07–1.08), with the easternmost BH being significantly narrower than BF and BG (too little remained of BE for any reliable judgement of its extent). These rooms were initially termed chalets by the 1983/84 excavation team, apparently because they were the latest structures evident in this area and it was accepted that fourth-century frontier troops were accommodated in chalets. It is clear, however, that BE-BH did not represent chalets – they lacked the separate side walls with intervening alleys, which form the distinguishing feature of chalet contubernia, and were never restored as having such features by the excavators. The rooms were only ever shown as separated by common party walls and forming a single conjoined rectangular block. Indeed, during the later stages of the Daniels post-excavation programme, the interpretation of these rooms as a range of chalets was abandoned and the building codes BE-BH were not used to categorise contexts in the final database, for example.
Instead of a range of chalets what was actually revealed were two rooms of the rebuilt centurion’s house (BG and BH), plus a narrow tapering slice at the rear of several contubernia (BE and BF), all forming part of a conjoined barrack block (Fig.14.12). Only one partition wall was identified in the exposed area of the contubernia. Others may have been removed by later robbing. This, together with the very limited area uncovered, made it more difficult to understand the layout of the stone contubernia. The surviving partition wall was located c. 6.30m from the west wall of the officer’s quarters. This would appear abnormally wide for a single contubernium, by comparison with those recorded in the better preserved of the thirdcentury praetentura barracks such as Building 2 and parts of Building 18, although this is how it was interpreted in the final stage of Daniels post-excavation work, with BF being relabelled Contubernium 1 and BE Contubernium 2. Based on that spacing, five of these enlarged contubernia would fit into the available length of the barrack, allowing for a little minor variation. Alternatively it is possible that an intervening partition wall had been removed leaving no trace. ‘Building BF’ would then equate to the two easternmost contubernia. However these would be uncharacteristically narrow with internal widths of perhaps 2.85m each. If that spacing was replicated in the rest of the block a total of ten contubernia could have been squeezed into the available length, one more than in the preceding Phase 1/2 stone barrack, whereas the arrangements exhibited in the better preserved of the rebuilt stone barracks generally seem to imply a reduction in the number of contubernia to no more than eight. This contradiction might be resolved if there were smaller rooms at either end of the range which performed functions other than accommodating troops, such as storage or a service area for the officer’s house. The Daniels scheme would thus certainly fit the available evidence, but, in view of its anomalous nature, the presence of a second partition wall at the same spacing would be required to provide confirmation of its validity. The alternative layout would conform better to the arrangement of contubernia found in other barracks, but requires more extensive restoration of lost structural elements and again definitive proof is lacking.
The south wall of the building may have been partially rebuilt as part of this remodelling (Fig. 14.13). Certainly there is clear evidence that the wall underwent at least partial reconstruction at some stage. At four points the wall had been demolished down to its foundations or lowest course and then rebuilt using cobbles and boulders set in yellow clay (M07:18, N07:17, N08:47 and see unnumbered stretch on P421). These sections were respectively at least 2.25–3.00m, 3.50m, 1.00m and 1.25m in length and appeared too wide and too ragged to represent doorways, created and then later blocked up, which in any case would only have given access to the narrow alley between the barrack block and Workshop Building 16. The character of the rebuild admittedly does appear rather crude by comparison with the new partition walls (see Fig. 14.14) so might represent a later repair, unless the surviving repair fabric was only the equivalent of a foundation level – perhaps similar to the cobble footing of the rebuilt south wall of Building 1 – with better quality masonry erected above which has not survived.
The partition wall separating the officer’s house from the range of contubernia was rebuilt slightly to the west of its predecessor. Only the east face of this wall remained (P07:15), 0.30m west of the equivalent face of earlier wall P07:23. It was composed of oblong blocks up to 0.50m in length, laid along the line of the wall.
The house was now divided into two rooms by a north-south oriented partition wall (P07:14, P08:23.1). A 2.40m long section of that wall’s east face survived and at one point the full width of the partition could be measured at 0.55m. A further stub of masonry, only 0.50m wide, remained at the wall’s junction with the south wall and clearly butted up against the south wall of the building rather than being bonded into it like the primary west wall of the centurion’s quarters (Fig. 14.15).
The east room was the smaller of the two rooms measuring 3.50m wide internally, from east-west. Its north-south internal dimensions are likely to have been c. 6.70m. In the south-west corner of the room, a floor horizon of dark silty clay and carbon (P07:19, P08:30) was exposed and was found to contain bronze working debris. This was the lowest level examined in this part of the officer’s quarters. To the north and east a mid-brown earth floor (P07:18, P08:14, Q07:14, Q08:15) was present across the remainder of the room’s interior. The precise relationship between these two levels was unclear, with the mid-brown soil layer being variously recorded as abutting, overlying and/or containing P07:19/P08:30. Comparison of site plans P415 and P421 implies that P07:18/P08:14/ Q07:14/Q08:15 did indeed originally extend over P07:19/P08:30 in the south-west corner before further excavation revealed the latter. However it is uncertain whether P07:19/P08:30 was a distinct floor present across the whole room or simply formed part of the same overall floor level as the mid-brown soil, since the remainder of that soil, further north and east, was not removed.
A large, roughly rectangular, flagged hearth (P07:12, Q07:11), measuring c. 1.20m (E–W) by 1.80m (N–S), was constructed towards the centre of the east room, set on the mid-brown earth floor, P07:18/P08:14/Q07:14/Q08:15. Overlying the flags, a small, oval patch of burnt clay (P07:06), 0.55m by 0.35m, was presumably associated. This hearth was attributed to a separate phase (Phase 4) in the original post-excavation records, but it could easily be associated with the earth floor and form part of the same structural episode.
The larger west room measured c. 6.35m internally, from east to west. A stone layer, composed of a mixture of flags and smaller rubble (P07:17, P08:29), covered the interior of the room, becoming sparser to the east, next to partition wall P07:14/P08:23.1, and was interpreted as a possible floor level. A post setting (P07:13), perhaps for a door post, was set against the west face of the internal partition wall (P07:14) and took the form of a roughly square arrangement of packing stones measuring c. 0.40–0.50m on each side.
The internal partition wall dividing the house into east and west rooms was rebuilt slightly further to the west (P08:23.2). As excavated this was c.0.75m wide and composed of small narrow dressed rubble facing stones, but it the stones appeared to have been displaced and spread, presumably as a result of post-Roman disturbance, so the wall’s original width cannot be accurately estimated. The relocated wall appeared to fall in line with post-setting P07:13.
A second stone level composed of large flagstones and rubble was laid in the west room (P07:11, P08:26). The largest of the flagstones were c. 0.65–0.85m long and 0.35–0.60m wide.
A layer of light yellow clayey soil incorporating a few dispersed flags (P07:10, P08:13, 28, Q07:08, 12, Q08:09) was present right across the interior of the east room and extended over the line of wall P08;23.2 into the west room. This was tentatively interpreted as a proper floor level by the excavators, but subsequently more cautiously appraised during post-excavation as perhaps associated with the abandonment of the building, presumably in view of the deposit’s wide extent which did not appear bounded by the limits of any one room. To the west, there was a mixture of flags and rubble in a dark soil matrix (P07:08, P08:12), again not forming any kind of proper surface, and, like the light clayey soil, partially overlain by a further spread of disturbed rubble (P07:07), representing post-Roman disturbance.
Figure 14.14: Elevation showing the north face of the blocking N07:17 in the south wall of Building 3 (N7:03). Scale 1:40.
Figure 14.15: The south-east corner of Building 3, the area of the centurion’s quarters, looking east.
Only one of the stone partition walls separating the contubernia survived (N07:06), the remainder probably having been robbed out. A 0.90m length of the wall was exposed some 3.20m west of the officer’s quarters. This butted up against the south wall of the building and was 0.60m wide, with stretches of both faces and the rubble core being preserved.
Areas of flagged flooring survived in two parts of the contubernia range. The better preserved (N07:11) was found on the east side of wall N07:06, an area corresponding to the south-east corner of Contubernium 1 (BF) under the Daniels schema and the southern end of the first full-size contubernium under the alternative interpretation. Further west, in Daniels Contubernium 2 (BE), a more disturbed stone level was recorded which probably represented the fragmentary remains of a flagged surface intermixed with post-Roman rubble disturbance (M07:17).
To the east of flagging N07:11, extending towards the west wall of the centurion’s quarters, only a dark soil layer (N07:13) was noted, which may reflect later disturbance rather than constituting a discrete, stratified Roman level. Overlying this soil and flagging N07:11 was a rubble spread in a dark soil matrix (N07:08), extending west of wall N07:06 (as N07:07) where it incorporated flags like M07:17, but in this case there was no suggestion that any remains of a distinct surface survived, however fragmentary.
The narrow alley between Buildings 3 and 16 was only investigated to a limited degree. The lowest level exposed comprised was a rubble and earth deposit (M07:16, N07:12/16, N08:44) filling the alley which included loose pitched stones and appeared to represent the tumbled remains of the south wall of Building 3. This was overlain by an extensive spread of disturbed rubble and flags (M07:07, M08:09/13, N07:09, N08:15/17, P08:21, Q08:17) which covered much of Building 16, including the robber trench for its north wall (L07:08, 23, M07:13, N08:41, P08:27), as well as Alley 2 itself (see Chapter 11: Workshop Building 16).
A layer of soil (Q07:10, Q08:17.1) extended over the remains of the original intervallum drain (Q07:15, Q08:18) alongside the east wall of the barrack. This was interpreted as the possible remains of a midden. An irregular drain channel (Q07:13, Q08:20) was cut into this soil replacing the earlier drain. The northern half of this drain used the end wall of the barrack as its west side whilst a single line of large blocks of rubble and oblong boulders formed the east side wall (Q07:13), with some of the stones being set on edge. The channel gradually widened from 0.20m at its narrowest point to the north to as much as 0.85m to the south where it then either abruptly narrowed again to 0.25–0.45m if stone alignment Q08:20 still formed the east side wall or perhaps diverged away from the end of the barrack (if Q08:20 formed the west side with the east side having been robbed out). The surviving evidence is ambiguous, but it is possible that this drain was realigned at some stage in its history.
On the east side of the drain, some 2.80m from the end wall of the barrack, a line of three large stones was preserved (Q08:08). These totalled 1.60m in length, forming a straight edge on their west side, and may represent the fragmentary remains of a late kerb for road.
Finally, covering most of the remains of the intervallum road and extending over part of the rampart area, was a rubble spread in a dark soil matrix (Q07:07, Q08:11) which probably reflected the impact of post-Roman plough disturbance on the latest levels of the street.
FINDS
Copper alloy: stud (no. 293, N07:06)
Coin: Hadrian, 119 (no. 70, Q08:15)
Lead: disc (no. 31, P08:14)
Glass: counter (no. 7, P08:14)
Graffiti: (no. 19, Q07:10)
Copper alloy: brooch (no. 38, Q07:10)
Pottery: statuette (no. 1, Q07:10)
Stone: mould (no. 50, Q07:10)
Coin: Vespasian, 70–3 (no. 13, P07:10), Trajan (no. 31, P07:07), Lucilla (no. 112, P07:07)
Copper alloy: brooches (nos 13, P07:07; 19, P07:10), key handle (no. 95, P07:08), stud (no. 250, P07:10), loop (no. 334, N07:08)
Iron: strip (no. 74, P07:07)
Stone: palette (no. 3, P07:07)
Flint: gaming counter? (no. 19, P08:13)
Quern: lava (no. 40, P07:08)
Samian stamp: 130–40 (no. S60, N08:44)
Amphora stamp: 120–160 (no. 3, Q07:07)
Coin: illegible (no. 247, Q07:07)
Copper alloy: rod (no. 329, Q07:07)
Pottery: spindlewhorl (no. 15, Q07:07)
Decorated samian: 130–60 (no. D143, Q08:11)
Samian stamps: 160–200 (no. S47, Q08:11), 100–20 (no. S62, Q08:11)
Very little securely stratified datable material was recovered from the later phases of Building 3, but such as there was, notably sherds of BB2 from the dividing wall between Contubernia 1 and 2 (N07:06), is compatible with a third-century date, however this context was also contaminated with modern pottery.
The soil/midden deposit (Q07:10) over the drain contained 1.293kg of pottery (excluding samian), made up of approximately 56% BB2 and allied fabrics. There was also a Mancetter-Hartshill multi-reeded rimmed hammerhead mortarium dated 230–340.
The pottery was not catalogued in detail, but the rubble over the officer’s room produced a BB1 flanged bowl and a Crambeck reduced ware beaker of the late third century or later, a calcite-gritted ware proto-Huntcliff rim and a fourth-century l’éponge bowl (P07:07, P07:08; Fig. 22.16, no. 112). A genuine huntcliff-type rim was found in the rubble over Contubernium 2 and possibly also in the rubble over the officer’s quarters (N07:07, P07:07, P07:08). The rubble also contained a sherd of seventeenth-century English Red ware and another of possible early Black ware of late sixteenth/ early seventeenth-century date (P07:08).
The rubble in the alley (M07:16, N07:12, N08:44) contained a sherd of Nene Valley ware (in M07:16), but much of the other material could be secondcentury in date.
It is reasonable to suppose that the reconstruction of the Building 2 as a barrack block with stone-walled internal partitions, instead of timber/wattle-and-daub panelled ones, was broadly contemporary with the very similar rebuilding of Building 3, and perhaps with the transformation of Building 1 from a barrack to a stable. This overall remodelling of the north east part of the fort, labelled Stone Phase 2 in Buildings 1 and 2, would in turn probably correspond to the Period 4 identified by the 1997–8 excavations undertaken by Tyne and Wear Museums (Hodgson 2003, 15–16), which was considered to extend from c. 225–35 to the late third or early fourth century.
In the north-east praetentura, the most substantial assemblage of dateable material relating to the Stone Phase 2 remodelling derived from the clay/daub layers associated with the demolition of the Stone Phase 1 partitions in Building 1 and the possible make-up for the Phase 2 flagged floor. The pottery and coinage contained within these layers provides an ostensible terminus post quem for the construction of the Phase 2 building. As described above, the latest material in these layers comprised black sand amphora suggesting a date after the middle of the third century (M05:03), a slightly worn coin of 249–51 (L04:25), a sherd from a BB1 cooking pot with a groove above obtuse angle lattice, a few sherds of late gritty grey ware and at least three calcite-gritted ware vessels, providing a late third-century date (M05:09, P05:14). This is quite a significant quantity of mid- to late third century material, although the bulk of the assemblage from the demolition/makeup levels was comprised of BB2 and allied fabrics (2/3 of the total).
There is nothing inherently implausible about such rebuilding work being undertaken during the midto late third century. An inscription from Caerleon (RIB 334) records the restoration of barracks from ground level around 255–60 (cohorti VII centurias a solo restituerunt), showing that the army was undertaking this kind of rebuilding during this period and the epigraphic evidence relating to construction work on the northern frontier during the Tetrarchy is of course well-known. However, it is significantly later than the date of 225–35 proposed as marking the beginning of Period 4 on the basis of the 1997–8 work in the southern part of the fort. More specifically, it poses a problem in that the pottery associated with the occupation of the building extends no later than that which provides the putative terminus post quem for its construction, implying that the period of occupation was relatively was relatively short if all the dating evidence is accepted at face value. Thus only a small quantity of late third-century material was found in association with the flagged floors in the interior of Building 1 (M04:14, P05:04, N05:12). The same is also true of the occupation layers in Phase 2 of Building 2, which included a number of sherds of Crambeck reduced ware and calcite-gritted ware of late third-century date (L05:44), and the equivalent levels of Building 3, which yielded no late thirdcentury coarseware whatsoever. Given the degree of internal modifications relating to this phase evident in Building 2, for example, such a short period of occupation seems inherently unlikely. Furthermore, and most crucially, there is a significant questionmark over the integrity of these deposits. None of the Phase 1 demolition levels, which yielded dateable material in Building 1, was fully sealed. The preservation of the Phase 2 flagged flooring in Building 1 was very patchy and, as a result, extensive areas of the underlying Phase 1 demolition/Phase 2 makeup deposits actually lay directly below the demolition rubble associated with the end of these buildings. The same is for that matter also true of the makeup layer (L05:44) for the secondary flagged floor (L05:28) in Building 2, Contubernium 8. On the other hand it is noteworthy that there was no material later in date than the mid-third century in the deposits filling the ‘clay puddling pit’ in Building 1, which is associated with the demolition of the Phase 2 structure (see below). These fills represent one group of deposits, the stratigraphic integrity of which is relatively assured.
In these circumstances the date of the Stone Phase 2 remodelling remains uncertain. Material associated with the internal occupation of the Phase 1 barrack extended into the third century and this, together with the size of the BB2 assemblage in the Phase 1 demolition layers (which cannot all be intrusive), demonstrates that the remodelling can have occurred no earlier than the early third century. Otherwise if the late third-century material is treated as potentially intrusive and excluded from the analysis, the coin of Herennia Etruscilla would provide the next terminus post quem of 249, but if the late third-century pottery can be rejected so, it might be argued, can the relatively small assemblage of mid-third century dating evidence. On this basis, the remodelling may have been initiated as early as the first third of the of the third century, perhaps in the 230s in line with the date proposed for Period 4, but could conceivably have occurred as late as the late third century. It seems clear, however, that these buildings did not long outlast the third century.
Building 1 was demolished at the end of Period 4 of the fort. The material from the demolition was spread over the area of the building (L04:14, N05:04, P05:03, Q05:16), the verandah (L04:15, 17, M04:03, 06, Q05:15) and the alleyway between Buildings 1 and 2 (L05:29). It was also used to backfill the claypuddling pit (N05:13, 14, 15) and probably provided the material used to resurface the adjacent road surfaces. It was composed of fragments of sandstone, with some boulders, cobbles, pieces of flagging and the occasional facing stone, in a matrix of mainly grey, charcoal-flecked clay. Fragments of the walls, the foundations, and the flagged floors survived in places as part of the surface. The rubble was noticeably denser over the area of the verandah, but was not consistent enough to indicate a widening of the north intervallum road at this time. The edges of the clay-puddling pit could also clearly be seen at the level of this surface.
During the demolition of the Phase 2 building, a large, roughly oval-shaped pit (M04:33, M05:39, N04:22, N05:13) was dug 17.20m from the west end. It cut through the floors, the north wall and the verandah. It measured 4.20m long (north-south) × 3.25m wide × 1.05m deep. The sides were steep, especially the south, and the bottom slightly dished. The fill was composed mainly of orangey-pink, puddled clay, 0.85m deep, with small pockets of grey silty soil (N05:14) and the occasional flagstone fragment. Above this, and around the pit, was the general spread of stone (N05:15) from the demolition. Evidently the backfilling of the pit was not given sufficient time to settle as the later surface had subsided into the centre of the pit where it was overlain by a gravel deposit (N05:13).
The size and shape of the pit, and the quantity of clay uncovered in the fill, suggest that it was probably used as a clay puddling pit. This was an unlined tank into which clay was thrown and mixed to obtain material of the correct consistency. If this interpretation is correct, the pit’s usage must follow the end of Building 1, since it cuts through the building’s north wall, but must predate the erection of any subsequent structures on this site, as the upper fills contained demolition debris probably associated with the end of Period 4 in the northern part of the fort.