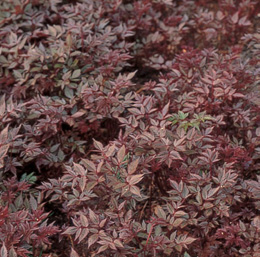
Sooner or later, everything comes down to the ground: the place where the shoots meet the roots. This spot is known as the crown, and there are many ways to make more plants at this part of a plant. Division, which mostly involves cutting through the crown and down through the roots, is the most frequently used method for reproducing perennials in the garden.
Certain shrubs can be divided through their crowns, as can multistemmed houseplants when they have grown too large for their pots, but for the most part, crown division remains the province of hardy herbaceous perennials.
Many herbaceous flowering perennials must be divided from time to time. This rejuvenation results in healthier plants, more foliage, and, of course, many more flowers. And one thrill with division comes when a perennial brought home from the garden center in spring is large enough to divide right then and there —before it is even planted in the garden. Depending upon the species, these divisions may grow to be as large as the original plant by season’s end: more plants for free. Soon, dividing perennials in your garden becomes an annual task, and as one clump becomes a cluster, a drift, or a river of color, you’ll find division to be about the most satisfying rite of spring.
There are ways besides division to propagate plants at the crown. Many plants increase in size by continuously forming new plantlets around the circumference of their crowns. These plants produce concentric circles of plantlets each season, and these plantlets can be removed and immediately transplanted individually to grow to maturity.
If the growth around the crown does not form individual plantlets, stem cuttings may be taken instead. Small stems with leaves can be stripped off the outer edge of the crown. These basal cuttings will be placed in the sweatbox until roots grow.
A hosta crown ready for division.
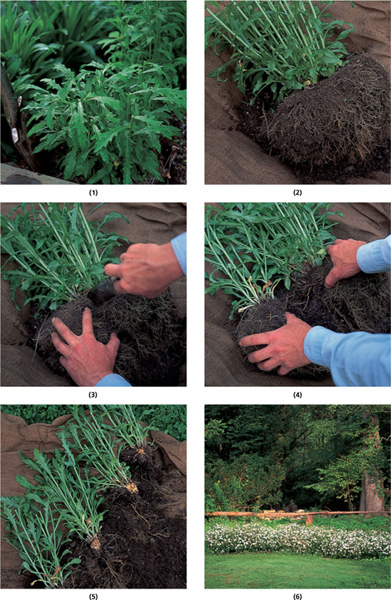
The most frequent act of propagation in a garden dependent on herbaceous perennials is division. In spring, plants are renewed by having their crowns cut into sections. The dead centers are discarded and fresh divisions are either replanted or transplanted.
Hardy herbaceous perennials, such as this astilbe, are most often propagated by division in early spring by plunging a spade straight through the crown’s crowded growth at ground level, lifting and transplanting sections.
Offsets that appear at crown level, such as on this hen-and-chicks plant, can be pulled free for more plants.

The colloquial term for a plant’s mass of roots is root ball. When you unpot a plant, the roots and medium often retain the shape of the container. The spherical term derives from when a plant is unearthed from the garden for transplantation, or when a tree or shrub is dug. The conglomeration of the woody plant’s roots and soil is often wrapped up in burlap and tied. That’s called “balled and burlapped,” or “B&B.”
Herbaceous perennials with multiple stems arising from the crown and a fibrous root system composed of wiry thin roots can be cut from top to bottom in line with the stem growth, so that pie-wedge sections are removed and replanted. This is done in very early to mid-spring, when new growth is just showing.
Perennials that bloom in early spring can be divided when they start to enter their dormant period, which in the case of spring ephemerals could be summer to autumn, when the active growing period has ended.
The tools for division are pruning sheets, a knife, a small-toothed saw, a spade, a trowel, and a watering can. If the soil is dry, water the day before division. Some sources recommend plunging a sharp spade into the ground through the crown to divide an established perennial. There are also suggestions for using two garden forks, back to back. Both of these methods crush and tear the perennial, causing quite a bit of damage. If a perennial is dug out of the ground, there will be less damage and many more divisions can be made. Since it is also a good idea to recondition the soil before setting a section of a perennial back in its original location, lifting the entire plant provides an opportunity to do so.
In late winter to early spring, spring-blooming fibrous-rooted perennials that have not begun their growing season will have little pink buds at the top of the crown. Later, plants that bloom in summer and may have pushed new growth can also be divided; however, cut the growth on these back by half, so that the crown is clearly in view. Reducing the top growth will also compensate for any loss of roots during division. Consider the arrangement of the eyes on the crown or spread the emerged growth with your hands to find spots where a knife can be threaded between the stems. Use the knife to cut the clump in half and then continue to cut the sections. If you want to see flowers, or want the plants to reestablish quickly, limit the number of divisions so that each new clump includes five or more eyes or stems. Plant the divisions before their roots can dry; if that is not possible because there are too many, wrap or roll them up in moist paper towels or burlap and keep them out of direct sun.
When you are ready to replant the divisions, dig a new hole for each one. Hold each plant in one hand as you fill in with soil around the roots, setting the crown just a bit higher than it was when originally growing. Push in more soil, and when it is all around the roots, push it hard. Make sure that the crown is now even with the soil surface or at the depth at which it was growing before and that the soil comes in close contact with the roots and there are no air spaces. Water well. When the water has drained away, add a bit more soil to reestablish the surface level if necessary. Smooth the soil surface and water again. In the following weeks, keep an eye on the divisions; active growth should begin soon after transplantation.
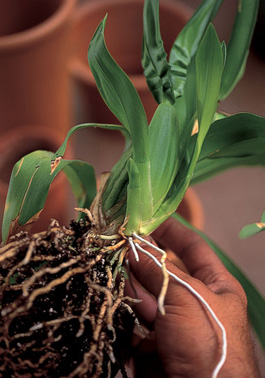
Plants with slender roots like spaghetti can often be treated similarly to the ones described above. Hostas, for example, can be lifted and carefully cut apart. The eyes of the hosta are prominent, and in early to midspring, they are very easy to see as points, somewhat like upside-down canine teeth. A hosta plant can be divided into any number of pieces as long as each section has at least one eye, but again, for faster results, include more eyes.
Every third or fourth year, most fibrous-rooted perennials should be divided in earliest spring when new growth is just beginning; but it may not be too late a month later for many plants, such as Kalimeris mongolica, as long as flower buds have not formed and the new growth is cut back by at least half (1). The root ball is completely lifted (2). Then it is cut into sections by plunging a serrated knife through the crown (3). As they are cut, each segment is pulled apart and realigned for cutting again (4). Many pieces, even very small ones, can be made, but ones that include a bit of the thick core will recover faster (5). Cutting back the plants delayed flowering and produced more compact growth from these vigorous Kalimeris— made from two root balls (6).
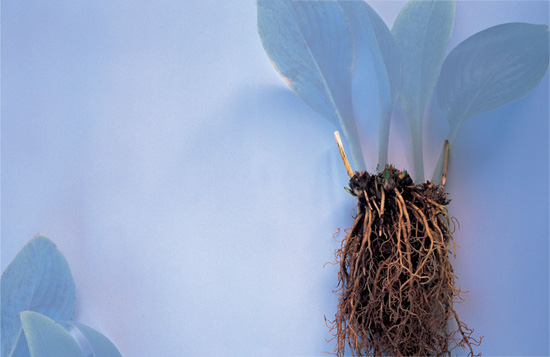
A specimen hosta, ‘Krossa Gold’, shown in its second summer from one fleshy-root division.

A young hosta is dug up and washed clean to clearly reveal the spaces between the shoots. Spread the roots and carefully thread a knife between them and cut through the crown. Pry the sections apart slowly to untangle the roots without breaking them. The pieces can be cut as small as one eye, but larger ones prevent the loss of too many roots and deliver bigger plants. To accelerate multiplication, hostas can be “topped” in spring. When shoots are 1 or 2 inches tall, the soil is cleared away to expose the crown, which is wiped clean with a moist paper towel. A snap-blade knife is inserted through the base of the shoot and into the dense crown. The wound is dusted with hormone and kept open with a toothpick before the soil is replaced.

Although many books recommend inserting two garden forks back to back, such an operation would turn a hosta to pulp. The forks can be used for the initial bisection of a large fibrous-rooted perennial, but excavating the entire plant first will prevent crushing it against the sides of its hole. (The burlap tarp makes for neat cleanup.)
Many herbaceous perennials grow into clumps but have neither fibrous roots nor stringy ones. Daylilies, with their thick, fingerlike roots, are easy to divide. Dig up a clump of the plants, and separate those individual plants with promising eyes or shoots simply by shaking them while pulling slowly apart. They are so easy to work with that if you bounce the root ball on a garden fork held parallel to the ground, the clump virtually falls into separate plants. The oldest sections should be discarded, along with any dead, hollow, papery remains.
If a clump is very old and thickly matted, some surgery may be necessary to prune away dead material and reveal the healthy young growth. If the plant is still difficult to pry apart, cut down through the crown between groups of eyes, as described for hostas. Divisions of the resilient daylily will recover quickly when replanted.
Back-to-back garden forks could be used as the first step for dividing very old and congested clumps. Lift the entire clump first, if possible, and then plunge the two garden forks into the center of the crown and pry the clump in half.
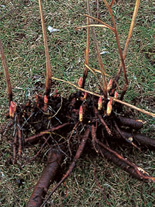
There are fleshy-rooted herbaceous perennials that have roots so thick and woody that they will never fall apart like a daylily’s. The peony, for instance, can live for a century or longer, and division sets it back quite a bit. But a peony might be divided if it has to be moved, or to have more plants to make a herbaceous hedge perhaps, or to plant above a retaining wall where double peony flowers could flop over and be enjoyed at eye level.
Dig up the large peony root after the foliage has died back in autumn. Split the root with a sharp spade, or saw it into sections with at least three eyes in each. Replant each division with the crown no less than 1 inch and no more than 2 inches deep. Although it is best to replant the divisions as soon as possible, the roots can be covered with damp burlap and placed in a cool, shaded spot for a week or so.
Dividing a plant with thick roots is more akin to surgery than simple division. A single Gaura lindheimeri is shown after the procedure

and then again during its second summer in the garden when it is covered for months with pinkish white butterfly flowers (above recently divided curly chive, Allium senescens montanum var. glaucum).

A single Gaura plant is lifted in spring.

Its horseradish-like roots are separated by slowly breaking the point of contact at the crown.

Producing three divisions.

The woodlike crown and root of long-lived perennials, such as a peony, may never need dividing, but the process works to reproduce a special variety. A hand saw or sharp spade can be used to split or cut through the crown, taking care not to damage buds. A basal rosette is a flat disk of foliage emanating from a common crown. Just as the period of active growth is beginning in spring, basal side shoots of Primula × bulleesiana are carefully pried from their parent to include some roots and quickly transplanted.


Many herbaceous plants produce a ground-hugging disk or rosette of semievergreen leaves that persist during their resting months of dormancy. These dense growths between the roots and the stems are like the foundation of a building, forming a solid transition between what is below the earth and what is to come above it. When the plants awake in the spring, shoots push up from the rosettes, which increase in size during the year.
Biennials often produce basal growth in their first year from seed. The following spring, a flower spike bolts toward the sky. After they are finished flowering and producing seed, plants such as foxglove and verbascum may form tiny secondary rosettes around the parent plant. The original plant will eventually die, but the offspring may be large enough to be removed in late summer or early autumn, replanted, and watered well. In cold climates, mulch the autumn divisions when the ground freezes. They will often grow large enough to blossom the following spring.
Many herbaceous perennials produce little side shoots from their crowns that are less self-sufficient than secondary rosettes and require some coddling. Aster, Gentiana, Achillea, and Campanula produce shoots that can be removed in early spring or autumn, but they are treated like stem cuttings.
If the spring-taken shoots have roots, they can be planted in the garden or potted to grow larger in a shaded cold frame or nursery area. If the side shoots do not have roots, set them in rooting medium in the sweatbox in spring. In a cool greenhouse, shoots can be grown in perlite in the humid environment with a bit of bottom heat. Here, they develop quickly. Once they have rooted, pot them up and harden-off the plants in the cold frame and then move them to a nursery area, or if they are large enough, to a permanent spot in the garden.
If taken in autumn, the basal cuttings can be set in a flat of medium in the cold frame. If you have a cool greenhouse, the flat can be brought there in midwinter, as described above.
Small perennials and alpines, such as Campanula garganica, produce multiple crowns and roots, which must be divided with precision. Lift a tiny plant in spring or autumn and wash it clean.

Then carefully tease apart separate crowns and roots with a tool.

In spring, the plantlets can be set in a nursery bed; in autumn, rooting medium is recommended.

Unlike the garden varieties, alpine or woodland strawberries, also called Fraise des bois, do not make runners but produce offsets in the same way as Siberian irises. Dividing a three-year-old white-fruited variety is an easy task in spring that begins by digging up the plant and shaking off the soil.
Then the offsets are peeled apart and placed on moist paper towel.

Any dead or dried-up plantlets are discarded. The paper towel is rolled up and brought to the site for transplanting. The plants are going to become the edging for the front of a border: thirty-six new strawberry plants were divided from this single original plant.

A visit with master propagator Kelly Grummons at his Colorado nursery is an education. Every so often, I come upon a magician such as he, who seems to nearly be able to stick a pencil in the ground and grow an oak tree. Kelly plays bee to a succulent figwort by pinching pollen from one plant to bring to another, or pinches the center of a chrysanthemum to produce a dozen more in a few months. Kelly doesn’t think there is anything special about these feats. What is his secret? Is it inborn talent, or is he privy to scientific systems known only to the horticultural elite? Maybe, his ability comes from experience, and his ease comes with a willingness to take risks.
This man performs his acts of propagation in what some might consider a less-than-perfect climate. After all, the mountains of Colorado are not known for warmth or high humidity. Undaunted, Kelly just goes about the business of making more plants. His first job in the area was for the retail nursery Paulino’s. When he arrived there, the pots of perennial varieties were arranged alphabetically in a 10-foot-deep, 20-foot-long section of the nursery. When he left to start his own business, the A to Z perennial offering was more than 100 feet long.
It is a rather unusual notion that a retailer could lead, and perhaps initiate, a trend rather than following along —trying to keep up with demand. But gardeners from all over the area made the trip to Paulino’s and bought perennials as fast as Kelly could propagate them. And this master’s supplies never faltered.
Many of the plants Kelly propagates come from his friend Panayoti Kelaidis, the curator of the rock garden at the Denver Botanic Gardens. Some of the plants started from seeds there turned out to be perfect for the conditions of the Mile High City.
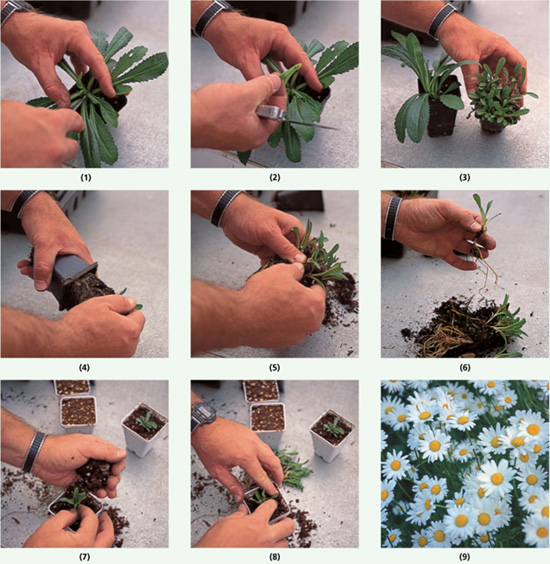
I went to see Kelly demonstrate “gouging,” a rather unpleasant but descriptive name for the removal of the growing center, or eye, of a perennial. After the operation, the plant sends up many small shoots around the crown. For the demonstration, Kelly chose a single, young chrysanthemum.
In this procedure, which could be compared to coppicing a woody plant (see here), the growing point at the center of the plant is cut out with a sharp knife. Gouging can be performed on a plant in the garden or on one still in a pot, and it is a useful technique to use on a well-established young potted perennial in the early spring.
Shortly after the eye has been removed, little plants begin to emerge all around the parent plant. In a few months, these side shoots can be removed and potted individually. Depending on the time of year and the hardiness of the plant, the offspring can be hardened off and planted in the garden or, in fall, left in their pots and wintered over in the cold frame.

Kelly Grummons demonstrates cutting the growing point of a small potted chrysanthemum with a knife (1) and removing it (2). Soon the gouged plant produces many offsets around the base (3). The plant is slipped out of its pot (4) and the plantlets are pulled apart (5). The side shoot with roots (6) is ready to be potted up (7) as any rooted cutting (8). This economical method has vivid results (9).
Some plants produce miniature rosettes around larger basal ones. Some produce ever-widening circles of plantlets at their crowns. Other plants give rise to similarly spontaneous generations from extensions that either arch up above the crown, hug the ground, or run just below the surface of the soil. Some of these fortuitous miniatures nestle tightly to their parents, but they all are completely ready to take their places. The horticultural term for these adventitious plants is offsets.
The spider plant and the garden strawberry are familiar examples. Aloe vera likewise generates young plants on its main stem as the plant ages. The Boston fern (Nephrolepis exaltata) produces long fuzzy strings that can be used for propagation. Some orchids bear offspring called “keikis.” Ground covers, such as bugle (Ajuga), spread by “runners” or “stolons” —traveling stems. Siberian iris produces row upon row of plantlets around the circumference of an ever-widening crown. Even woody plants, such as lilacs, may produce new shoots, or “suckers,” from underground stolons. This behavior is often described in a plant’s name —such as Cornus stolonifera, the botanical name of a shrubby dogwood that grows into a thicket.
Bromeliads grow small plantlets, “pups,” around the central, parent plant. Hen-and-chicks (Sempervivum) is a hardy succulent that begins as a flat disk with leaves arranged in concentric rings; as it matures, small plants grow around the original rosette. Bromeliads and hen-and-chicks are monocarpic —the parent flowers once and dies —so they rely on the new plantlets to quickly fill the void.
Removing offsets is much like dividing crowns, but this method of propagation takes advantage of the plants’ readiness to subdivide. One of my favorite plants, the wonderful alpine or woodland strawberry (Fragaria), commonly known by its French name, Fraise des bois, is propagated by offset division. This strawberry bears tiny, aromatic fruits that are usually red —there is also a white-fruited variety that has a fragrance and taste reminiscent of pineapple. Although garden strawberries produce wiry stolons with new plants forming along the lengths of the runners (here), wild strawberries create plantlets that cluster around the crown of the mother plant. To remain productive, crops of both types of strawberries should be renewed frequently with young plants.
To divide the Fraise des bois, start in early spring before new growth commences in earnest. Dig up a three- or four-year-old clump and shake off the soil. Carefully tear off the plantlets and plant them as soon as possible. If you must keep the plantlets for a while before planting, roll their roots in a moist paper towel, leaving the top growth above the paper. Slip the whole bundle into a plastic bag, root end first, and leave the bag open in a cool shaded spot, or close the bag and store it in the refrigerator for up to a week.
Another plant suitable for this type of division is the Siberian iris. Unlike bearded irises, Siberian irises do not grow from ground-hugging rhizomes but from a massive clump, which can become a congested, woody mat. (For rhizome division, see here.) If the iris is not lifted and divided every five years or so, the center will die out and the clump will become a doughnut of grassy iris foliage with few flowers.
Spread a tarp next to a mature plant that has finished blooming so you can keep track of all the iris divisions. A helper may be needed to lift and roll the plant out of its hole and onto the tarp. Snip back the foliage and slice around the clump by plunging a spade into the soil in a circle to its full depth.
You may have to saw old clumps of Siberian iris into wedges. In the most difficult cases, you may need to start while the iris is still in the ground, in order to even be able to lift sections at all. Once the root ball and crown have been excavated, the little individual plantlets around the clump can easily be pulled away and transplanted, using the method discussed for the woodland strawberry above. Discard the woody center. In as little as two years, the offsets will be blooming and making plantlets of their own.
Dividing offsets is necessary as older, crowded plants decline. After several years, the center of a Siberian iris dies out, bearing fewer flowers and presenting a doughnut of floppy foliage. If the clump is too large and dense to excavate, saw through the center in the ground and lift sections.

After the sections are pulled apart, a serrated knife may be necessary to cut through the crown’s woody tissue. Pry off divisions with one to three “fans”.

The transplants will bloom in two years, and square in number every season.

Plants such as Sempervivum grow into rosettes of petal-like leaves. After the original plant flowers and sets seed, it dies. However, by that time, it has become ringed by plantlets, giving rise to the common name hen-and-chicks. The youngsters can be removed and transplanted. Gently pull off one of the offsets with as much stem as possible.

Surround the stem with a wad of moistened sandy soil, and squeeze the soil into an existing crevice or pile up rocks to include the stem and soil.

In time, the plant will grow chicks of its own and blossom.

Harvesting a chunk of a suckering shrub is about the quickest way to acquire a full-size plant from a cutting. Suckers are straight shoots that arise from underground stolons or slender rhizomes. A number of woody plants produce suckers such as shrub dogwoods. A common lilac, Syringa vulgaris, with many stems may have a good-size piece on the outside of the clump that can be propagated for a new place in the garden.
Professionals try to prepare large sections of plants such as the lilac by pruning the roots a year in advance of harvest to encourage the formation of new roots. In that case, a spade is plunged into the ground in a circle around a group of suckers in late winter, cutting some of their roots and causing them to branch. But moving a single suckering stem without this preparation seems to work if the timing is right.
When the lilac is dormant in late winter, as soon as the ground has thawed, select a shoot. Bring a sharp spade, some newspaper or burlap, a plastic bag or tarp, twine, and a watering can. Find the underground stem that leads in a straight line from the center of the clump to the sucker.
Plunge the spade into the ground close to the parent to cut the stolon. Dig up the new plant with as many roots as possible, and lift it onto some newspaper set on a tarp or in a plastic bag with the edges rolled open. Don’t worry if a lot of the soil falls away as the sucker is lifted. Lilacs are typically shipped “bare-root” from mail-order suppliers and will not be killed by a lack of soil at this time of year, because they have no leafy top growth. Moisten the newspaper, pull the bag up tight to hold the roots in place, and close it by tying twine around the base of the woody stem. Keep the newspaper wet and the plant cold until it can be transplanted.
At the site of the lilac’s new home, dig a large enough hole for the roots, set them comfortably in the hole, add garden soil and tamp it down so that it comes in contact with all the fibrous roots, and water well. New roots will begin to grow immediately, but if you want to compensate for possible root loss, cut back the top growth after the new plant starts to grow, or simply pick off some of the leaves as they emerge. The lilac may begin to flower the first season, since the buds for those blossoms were produced the year before the move. Cut away the emerging flower stems to redirect the plant’s energy toward root growth. Keep the plant well watered for the first year. The lilac may not flower the second spring after planting, but once the offspring is established, it will produce more blooms every spring.
Offsets are produced at the ends of short rhizomes in some members of the lily family such as agave.

The new plant can be cut off, as with this Sansevieria cylindrica, with its young roots if possible.

This is the method used to produce a clone of a cultivar.

Sympodial orchids, such as this Oncidium, are ones that produce swollen offsets from the base of older plants, called “pseudobulbs.” In order to grow and bloom again, the pseudo-bulbs must be removed and repotted. The shriveled old plants will not bloom again and should be discarded. (The result in the winter following this summer division can be seen here.)
Stoloniferous plants, such as gray dogwood (Cornus racemosa) create thickets of suckers.

Herbaceous stoloniferous plants include many of the members of the mint family (Labiatae), such as bee balm (Monarda), spearmint and peppermint (Mentha), and mountain mint (Pycnanthemum). The stolons lie below the surface of the soil, and, as anyone who has grown mint knows, this is a very successful way for a plant to get around. The plantlets that sprout from these runners can be cut off and dug up with their roots, ready for transplanting. You can propagate many non-clump-forming grasses, such as big bluestem (Andropogon gerardii), by cutting and digging a section of the stolon with top growth and roots that appear from nodes along the way.
Some special subshrubs and ground covers, such as pachy-sandra, have fleshy blanched-white stems beneath the ground. Pachysandra can be encouraged to cover an area if you remove a hank of pale rootlike stem with a slim little root and a leaf bud attached. Dr. Richard Lighty of Mt. Cuba Center for the Study of the Piedmont Flora in Delaware showed me how to propagate the notoriously difficult native Allegheny spurge (Pachysandra procumbens). In early spring, he grabs a stem of one of the leafy shoots, giving it a very hard yank. The stem breaks off with one little root and then can be replanted, with most of the blanched stem and rootlet laid a few inches underground. The following spring, an entire new and vigorous plant sprouts from the bud near the cut end.
As with so many methods of vegetative propagation, timing is critical, even for species that are less fussy than this spurge. In most gardens, the evergreen ground cover European wild ginger (Asarum europaeum) spreads very slowly unless the gardener intervenes. Plants divided in midspring, however, just after flowering, as new growth is beginning, spread quickly.
To propagate this shade lover, knock a new plant out of its pot or dig up a thick clump. The individual plant stems and roots will practically fall apart. Replant the stems a few inches apart —in a few years, one plant of wild ginger will become a carpet.
New lilac plants can be created from suckers removed from the outer edge of a mature stand. This procedure takes place in late winter when the shrub is dormant. Work a spade or shovel about a foot out from the stem to loosen the soil and find the underground stem that connects it—usually closest to the clump—and plunge the spade into the ground to sever it.

Lift the new plant and the roots (1) and place it on moist newspaper (2). This is a dormant, bare-root transplant and the paper should cover the roots to keep them damp (3). Slip the ball into a plastic bag (4). The tall sucker may quickly become a feature in the landscape (5).
Perennials with runners just below or above the ground may root where leaf nodes touch soil, such as ajuga and moneywort.

Garden strawberries and other plants make babies at the ends of runners. Peg the small plants in “daughter pots.”