Chapter 13
Decorating with Jewelry and Beads
In This Chapter
![]() Trying your hand at embellishing
Trying your hand at embellishing
![]() Applying jewelry techniques to home décor
Applying jewelry techniques to home décor
![]() Beading your home beautiful
Beading your home beautiful
Jewelry isn’t just for wearing anymore. I use jewelry making and beading techniques while decorating my home as well. I hang strands around to add a splash of color. I drape dangles around anything from lamps to vases to candleholders. If it’s got a hole or a rod, chances are it has (or will soon have) beads and wire hanging from it.
In this chapter, I show you how to add beads to everyday household items. I give you tips on using your jewelry techniques to create beautiful items you can use in your home every day and give as gifts. And finally, I help you work up several home beading projects.
Experimenting with Embellishing
Embellishing means to makes something more beautiful. Often artists use beads and other items, such as paint, sequins, rhinestones, ribbons, and colored threads, to embellish items. You can embellish lampshades, pillows, purses, clothing, picture frames — just about anything you can image. If you own it, you can probably make it more beautiful with beads. In this section, I give you quick and easy ways to add beads to things you probably already have around the house.
 If you're a fan of fringe, check out the video for the Tassel Bookmark project on the DVD that accompanies the printed version of this book (and at
 http://booksupport.wiley.com for you e-readers). You can create a little fringed tassel to carry with you wherever you go.
Project 13-1: Fringed Lampshade
Pre-made beaded fringe (short strands of beads sewn into ribbon) makes this project quick and easy. Look for beaded fringe at crafts stores, fabric stores, and specialty sewing stores.
 Unless you’re a whiz with a glue gun, I don’t recommend you use it on this project. This tool seems like it would be a good idea, but it has three problems:
 The glue dries too fast to work the fringe onto the shade correctly.
The glue dries lumpy because it’s too hot to smooth as you go.
Glue guns are also famous for giving you burnt fingers!
Tools and Materials
Flexible tape measure
Scissors
36 inches of beaded fringe (I used fringe made with pastel-colored seed beads.)
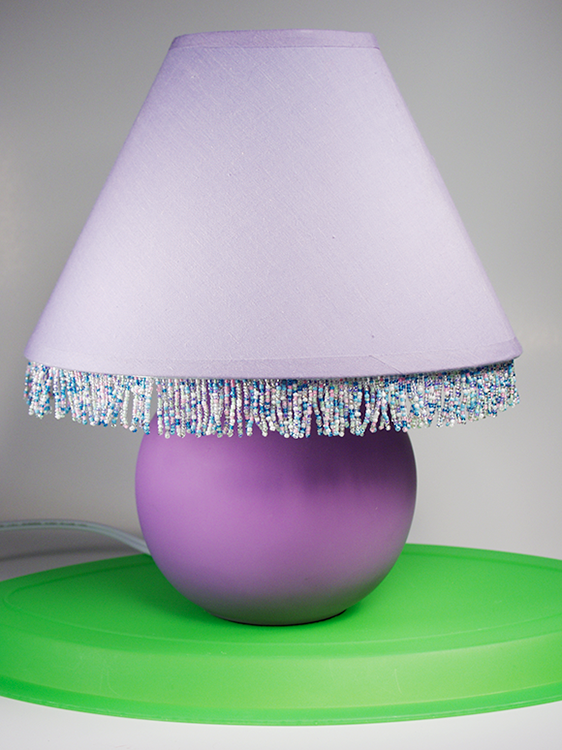
1 10-inch diameter lampshade (I used a cute lavender one to coordinate with my pastel beaded fringe.)
Crafter’s Amazing Goop adhesive (This adhesive is great for just about everything, and it dries pretty flat. Use a different adhesive if you prefer and follow the package directions.)
1. Run your fringe along the inside of the lampshade. Decide where you want to attach the fringe. I like to attach mine so that the top edge of the bead strands hits right at the bottom of the shade.
2. Run a strand of Goop along the inside edge of lampshade at the point where you want the fringe to hang. Let the Goop cure for 2 minutes. (Curing just means allowing the adhesive to rest and begin to start working.)
3. Begin applying the ribbon of the fringe to the Goop along the edge. Press the ribbon to make full contact with the lampshade. Take a look at Figure 13-1a to see how this looks in process.
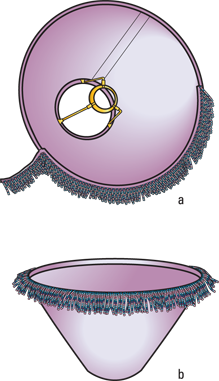
Illustration by Wiley, Composition Services Graphics
Figure 13-1: Gluing bead fringe to a lampshade.
4. Continue applying the fringe to the adhesive until you meet the start of your fringe. Trim the ribbon at the place where both ends meet. Apply a little dab of adhesive to the starting ribbon and then press the ending ribbon on top of it.
 Cut the ribbon a little longer than necessary. After you glue the ribbon down, you can always go back and trim it up.
5. Allow the lampshade to rest upside down for 24 hours so that the adhesive cures completely. I also recommend arranging the fringe on the outside of the lampshade during curing so that the weight of the beads doesn’t pull against the ribbon. Check out Figure 13-1b to see the lampshade during the curing process. See the finished lampshade in Figure 13-2.
Photograph by Andy Dismore
Figure 13-2: Fringed Lampshade.
Using Jewelry Techniques to Decorate Your Home
Wire wrapping and metal stamping are two of my favorite jewelry techniques for home decorating. In this section, I use several techniques from Chapters 6 and 7. Anytime I do, I make a little note about where to go for help, so don’t worry if you haven’t read those chapters yet. If you haven’t tried those techniques, these projects may be the ones that get you started.
Take a look at the DVD (or at http://booksupport.wiley.com for you e-readers) for a fun home decorating project using wire-wrapping techniques. The Copper Coil Napkin Rings use heavy gauge copper wire to create a sturdy yet elegant accessory that is beautiful on any table.
Project 13-2: Photo Wine Charms
Wine charms are those little beaded strands that hook around your stemmed glasses. They serve to identify your glass when several people at a party have the same kind of wine glass. Often, a set of charms will share a theme, such as wine accessories, and each charm will have a different wine accessory charm (like a bottle opener, cluster of grapes, and so on) and a group of beads.
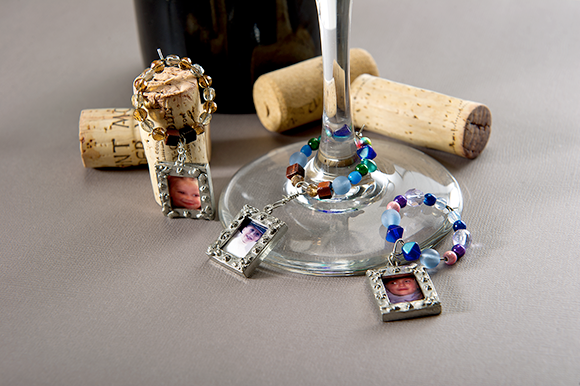
Truly personalize your wine charms by adding your own photo frames. Make one for each of your guests and include their pictures in their own charms. I made these awesome wine charms as a Mother’s Day gift for my mom. I put pictures of her grandkids in the frames. She loved them. Check out Figure 13-4 for the finished project.
Take a look at Chapter 8 if you need help resizing your photos to fit your frames.
Tools and Materials
Round-nose pliers
6 18mm×20mm picture-frame charms (take a look at Figure 13-3a for examples)
6 small photos to fit the frames
6 6-inch pieces of silver-colored 22-gauge wire
6 1-inch diameter beading hoops (check out Figure 13-3b to see what they look like)
6 sets of beads (depending on the size of the beads — 3mm to 6mm — you’ll need 14 to 18 per hoop, a total of about 3 inches)

Illustration by Wiley, Composition Services Graphics
Figure 13-3: Picture frame charms and beading hoops.
1. Insert one photo in each frame. Using your round-nose pliers, begin to create a wrapping loop (check out Chapter 6 if you need help) with one piece of wire. Before you close the loop, slip on the frame charm. Complete the loop. Create a second loop on the open end of the wire.
This step helps the frame lie flat on the base of the stemware.
2. Repeat with the remaining frames and pieces of wire. Set aside.
3. Slide half of one set of beads on a beading hoop. Add one photo frame component. Slide the last half of the same set of beads onto the beading hoop. The frame should hang in the middle of the hoop, surrounded by beads.
If you want to create a symmetrical design, lay one frame down on the bead board. Line up beads on each side of the frame to create your design.
4. Using your round-nose pliers, bend a small 90-degree angle at the end of the beading loop. (See Figure 13-3c for what a bend on an empty beading hoop looks like.) Connect the bend to the loop in the beading hoop to complete the charm. Repeat with the other five charms.
Photograph by Matt Bowen
Figure 13-4: Photo Wine Charms.
Choose a different combination of beads for each charm to help you distinguish one charm from the other. I matched my bead sets to match the preferences of each grandkid. For example, I chose the colors of the baby’s nursery for her charm. The 4-year-old thinks she’s a pink princess, so her charm uses several shade of pink beads. You get the picture.
Ring-size memory wire is another great choice for creating wine charms. After you’ve added the beads and charm, either glue half-drilled beads to the ends of the coils or bend the end of the coil into loops with your round-nose pliers. Add dangles to the loops to create more details.
Project 13-3: Handstamped Herb Garden Markers
Metal stamping is a hot technique in the world of jewelry making. You can find several projects and stamping techniques in Chapter 7. With this project, I use recycled silverware to create markers for the garden. Take a look at Figure 13-7 to see my finished pieces. Head out to your local thrift store, estate sale, or flea market to find spoons or large meat forks to stamp. Get a few more pieces than you think you’ll need so that you can experiment and practice with them. If you can find sterling silver or silver-plated pieces, they are easier to stamp, but stainless steel works fine. You just need to give them a little harder smack with the hammer. Customize the words on your markers. Label specific plants in your garden, or stamp more general words to inspire you and anyone else relaxing in your space.
Tools and Materials
Scrap paper
Black marker
5 spoons or assorted flatware
Dishtowel
Steel bench block (If you don’t want to invest in a block for this project, find a sturdy piece of wood.)
Hammer
1⁄4 inch alphabet stamp set (I used an uppercase, block letter set.)
Masking tape
Polishing cloth
1. Write out the words you want to spell on scrap paper. Write them approximately the size you want them to be on your garden markers to make sure they will fit. This step may seem unnecessary. Maybe it’s just me, but somehow I feel like if I write it out first, I’m bound to spell it write — I mean, right — when I emblazon it in medal — er, metal.
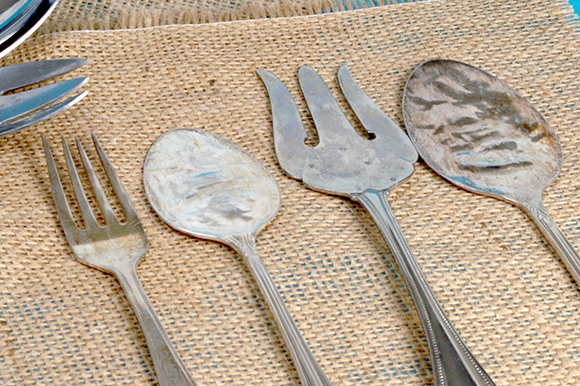
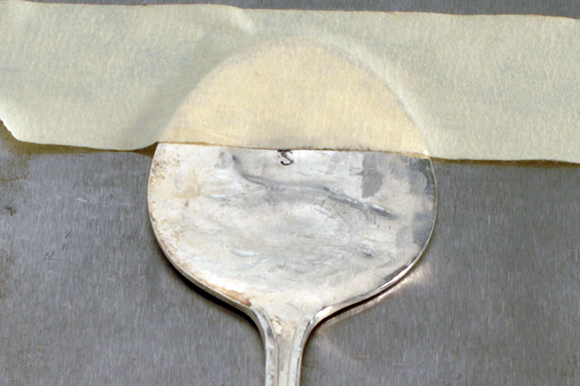
2. Wrap a spoon in a dishtowel. Lay the wrapped silverware face down on the bench block. Hammer the silverware flat like the ones in Figure 13-5. Repeat with remaining silverware.
The dishtowel saves your spoon from extra damage from the hammer and saves your bench block from extra marks from the hard silverware. Over time as you use your bench block, nicks happen. These nicks transfer easily to softer precious metals in your jewelry pieces.
3. Place a strip of tape on your silverware to line up your word. If you prefer to freehand your stamps, go for it. They will likely be slightly askew, but that’s part of the fun.
4. Select the stamp that corresponds with the letter in the middle of your word. If you want your word centered, always start stamping it from the middle and move toward the outside. I stamped the word BASIL, so I started with the S in the middle of the spoon along the tapeline, as shown in Figure 13-6.
5. Holding the stamp at a 90-degree angle to your flattened spoon, use the hammer to strike the stamp solidly.
Photograph by Andy Dismore
Figure 13-5: Hammer the silverware flat.
Photograph by Andy Dismore
Figure 13-6: Stamp from the middle to the outside.
6. Continue stamping your word, working from the middle to the right. I stamped the IL next to my S. Then work from the middle to the left to complete the word. Next I stamped the A, then the B, to finish BASIL.
7. (Optional) Using your black marker, fill in the stamped words as I describe in Chapter 7. Work the ink into the grooves left by the stamp. Remove the excess ink with your polishing cloth. This step isn’t required, but it makes such a difference in your finished markers. You can read the words so much more easily with the addition of the black ink.
8. Repeat Steps 3 through 7 with the remaining silverware and words. I used the names of herbs that I regularly keep: BASIL, THYME, CHIVES, MINT, and DILL.
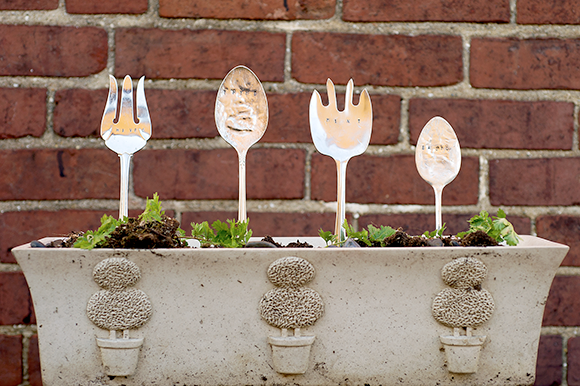
Photograph by Matt Bowen
Figure 13-7: Hand-stamped Herb Garden Markers.
Beading Your Way to Home Beauty
Beads are a natural choice for adding beautiful touches to just about any home accessory. They can turn something as ordinary as a candlestick into a thing of beauty.
Be careful: After you get started beading items around your home, it’s tough to stop! Home projects can definitely eat up your bead budget if you’re not careful.
Project 13-4: Beaded Candlestick
This candlestick can be created with virtually endless color combinations. I was feeling very Valentine’s Day when I designed this project. Feel free to substitute earthy tones or hammered metal accents for a completely different look. You could also string multiple strands of chain for a gothic feeling.
Tools and Materials
1 metal candlestick, silver colored (mine had a diameter of 33⁄4 inches)
Ruler
Marker or pen
Drill with 1⁄8-inch bit for metal
1 16-inch silver-colored chain
4 12mm twisted silver-colored jump rings
4 3-inch pieces 20-gauge wire, silver colored
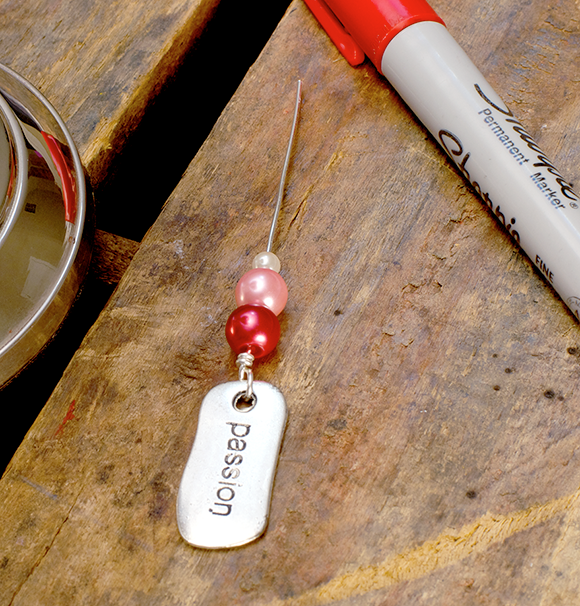
4 inspiration charms (Mine say Dream, Passion, Journey, and Follow Your Dreams.)
4 8mm red glass pearls
4 8mm pink glass pearls
4 4mm cream glass pearls
Round-nose pliers
Chain-nose pliers
Wire cutters
1. Using a marker and ruler, measure and mark four evenly spaced spots around the top of the candlestick. You’ll hang your dangles from these spots.
2. Drill holes in the marked spots along the edge, as shown in Figure 13-8. Brush away any metal shavings. Using your pliers, open a jump ring (as shown in Chapter 2) and insert it through the newly drilled hole. Repeat with remaining jump rings and holes. Leave the jump rings open.
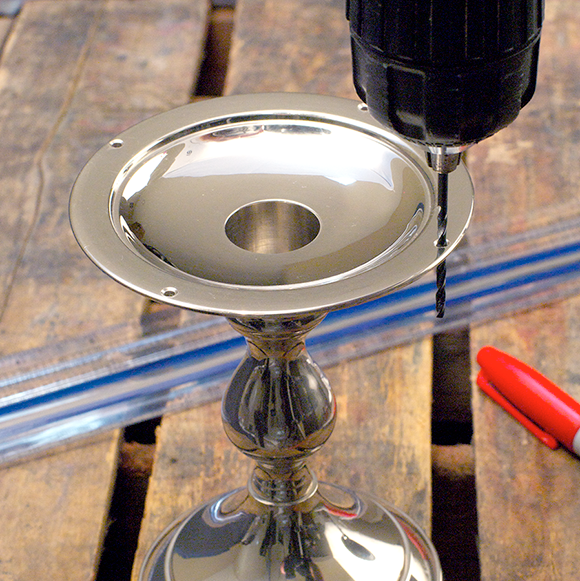
Photograph by Andy Dismore
Figure 13-8: Drill holes in the edge of the candlestick to hang your chain and beads.
3. Hang the end of the chain through one open jump ring. Use your ruler to measure about 4 inches of chain and loop this segment into the next jump ring to create a swag of chain. Continue draping the chain until both ends of the chain meet at the first jump ring. Take a look at the final project in Figure 13-10 to see how the chain drapes between the jump rings.
Take a step back and look at the candlestick at this point to confirm that your chain is hanging evenly all around. Sometimes, depending on the size of the links, you may have an obviously too long or too short swag of chain. Adjust, if necessary.
4. Create the dangles. Using your pliers, begin a wrapped loop (see Chapter 6). Before closing the loop, slide on an inspirational charm. Complete the wrapped loop. Slide on a red pearl, a pink pearl, and a cream pearl; see Figure 13-9. Create another wrapped loop to complete the dangle. Repeat with remaining wire, charms, and pearls.
5. Hang a dangle on each jump ring. Close the jump rings with your pliers (see Chapter 2) to complete your candlestick.
Photograph by Andy Dismore
Figure 13-9: Create the dangles.
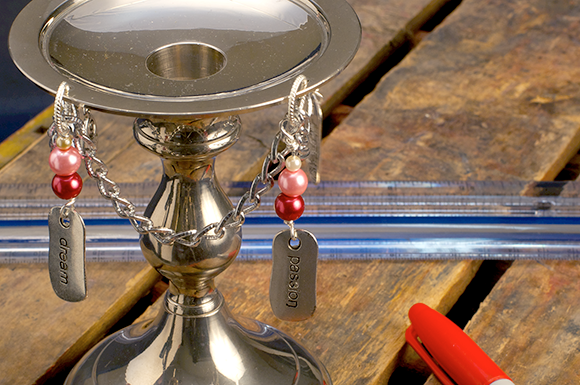
Photograph by Andy Dismore
Figure 13-10: Beaded Candlestick.
Displaying Jewelry as Art
One of the hottest home design trends is artistically displaying oft-used accessories. Whether it’s open kitchen shelving displaying a colorful collection of dishes, or a cabinet with glass doors showcasing favorite leather-bound books, curating a collection is a great way to incorporate practicality with beautiful simplicity. The projects in this section accomplish two purposes: They give you somewhere to store your jewelry and create a work of art at the same time.
Two projects in the section require painting, so allow yourself an extra day or two to allow for the paint to dry.
Project 13-5: Embroidery Hoop Earring Organizer
This project is a quick and easy way to make almost-instant organization for your dangles and studs. Using mesh screening (which you can find at any hardware store) and an embroidery hoop, this project goes together in under 10 minutes. You can find embroidery hoops new at crafts stores, but I like using vintage ones that I come across at antiques malls and thrift stores. This project looks great hung with other hoops displaying colorful fabrics. I used wooden hoops in my example (see Figure 13-13), but if you like the look of colorful plastic or metal, feel free to use it. Just make sure the glue you choose works on your material.
Make sure you use a hoop with a screw tension mechanism. Snap-together hoops allow the screening to slip and sag over time. As a bonus, the screw tension mechanism makes a nifty little handle to hang the finished piece on the wall.
Tools and Materials
1 6-inch 2-piece wooden embroidery hoop with screw tension (I used a 6-inch round and an 8×3-inch oval in the example.)
Scissors
1 10×10-inch square of mesh screening (For my oval, I used a 14×8-inch piece as well.)
E-6000 glue (optional but recommended if you have heavy earrings)
1. Situate the screening in the embroidery hoop like it’s the fabric in a cross-stitching project. Take a look at Figure 13-11 to see how this step looks. Cover the smaller, inner frame of the embroidery hoop with the mesh screening. Place the outer frame on top and clamp it into place.
2. Dryfit the fabric in the hoop, meaning before you apply glue or trim to the screening, you confirm that the screening fits the frame nicely and that you have plenty of fabric all the way around the hoop so that the screening won’t slip out. Remove any slack in the fabric before tightening the screw completely. The backside of the hoop should resemble Figure 13-12. If you’re using glue, proceed to Step 3. If you’re not, trim away the excess screening and hang your new project on the wall.
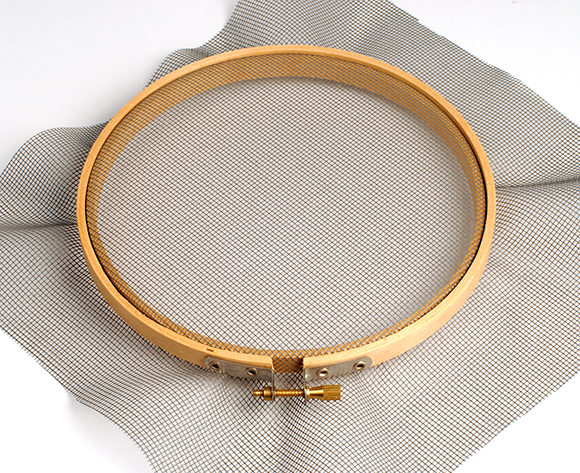
Photograph by Andy Dismore
Figure 13-11: Clamp the mesh screen between the two frames of the embroidery hoop.
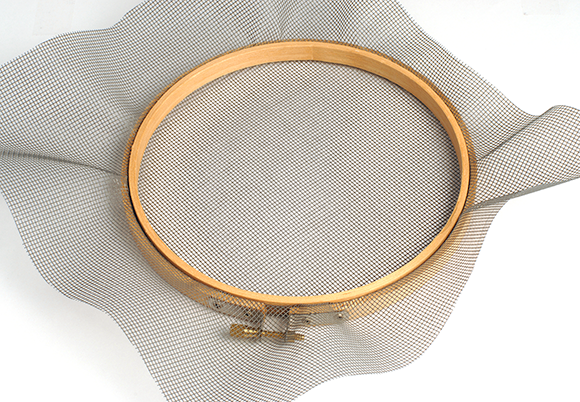
Photograph by Andy Dismore
Figure 13-12: Flip your hoop over and tug evenly at the fabric to remove any slack.
3. Remove the mesh screening from the hoop. Apply a thin layer of glue to the outside of the inner, smaller frame of the embroidery hoop. Lay the glued frame flat on your work surface.
4. Lay the screening on top of the frame with the frame roughly in the center of the screen. Cover it with the outer frame. Again, remove as much slack from the screening as possible as you tighten down the screw. Trim away the excess screening.

Photograph by Andy Dismore
Figure 13-13: Embroidery Hoop Earring Organizer.
Project 13-6: Flea Market Frame Jewelry Display
This organizer (see Figure 13-14) is probably the most customizable display piece. Plus, you probably already have the pieces lying around the house. (Who doesn’t have an old picture frame just waiting for new life?) If you don’t, though, you can find one at any flea market or thrift store. Don’t worry if you find one with cracked or broken glass; you don’t need the glass. All you need is the frame itself. For maximum visual impact on your wall, choose a frame that’s made from thick ornate trim or interesting detail. Choose paint to match the color scheme of the room you’re hanging it in.
Tools and Materials
Frame for an 8×10-inch picture (Note: You just need the frame, not the glass or backer board.)
Sandpaper
Paint and glaze (I used turquoise blue and black antiquing glaze.)
Paintbrush or paint rags
Acrylic sealer (optional — I used a high-gloss spray sealer)
8 1⁄2-inch screw eyes, silver-colored
Ruler
Pencil or pen
Drill with a 3⁄32-inch drill bit
4 12-inch lengths of craft wire, silver-colored
Wire cutters (I recommend using general-purpose wire cutters rather than jewelry wire cutters. Save your good pliers for precision work and jewelry-grade wire.)
Needle-nose pliers
1. Sand your picture frame lightly to create a slightly rough surface so that your paint will adhere nicely. Use tack cloth or a damp paper towel to remove any sanding dust.
2. Paint your frame. Depending on the look you’re going for, you may want multiple coats of paint. See the directions on your paint for drying time. I wanted to add an antiqued appearance to a new(ish) frame, so I simply dabbed a rag in my paint and rubbed it into the frame. I applied a medium weight coat, allowed it to dry for a few minutes, and then rubbed off the excess paint, allowing some of the original finish to show through. I let this dry for several hours. Then I applied antiquing glaze in the same way, rubbing it on, letting it dry a bit, and then rubbing it off. I let the frame dry overnight at this point.
3. (Optional) Seal your frame to protect the finish. This optional step makes the final project look professional. Let it dry for 12 hours or overnight after sealing.
4. Using your ruler and pencil, measure and mark the spots where you want your wires to hang. You’ll string wires from one side of the frame to the other, so make sure your marks (and ultimately your screw eyes) are parallel. You don’t want your wire at an angle, or your earrings will slide to one side.
Take a look at Figure 13-14 to see how mine is set up. The inside measurement of my frame is 8×10 inches. I divided the space along the 10-inch sides to accommodate four strands of wire. I could have simply evenly spaced them out over 10 inches. Instead, I chose to hang the first wire 1 inch from the top of the opening. This gives enough room to allow me to easily hook ear wires over the wire but still position the earrings near the top of the frame, so I’m not wasting space. Then I hung the next wire 2 inches below that. Next, I hung the third wire 2 inches below that. Finally, I split the remaining distance (5 inches) in half, to hang the last wire 21⁄2 inches below the third wire. This spacing allows me to hang shorter earrings at the top and then progressively hang longer earrings toward the bottom.
5. Use your drill to drill pilot holes where you’ve made your marks. Screw in your screw eyes.
6. Loop one piece of wire through the eye of the screw eye on the top row. Leave a 1-inch tail. Twist the tail around the length of wire near the eye to make a loop. Continue wrapping the wire neatly to complete a wrapped loop, just like the one in Chapter 6. Trim away any excess wire. Use your pliers to flatten the wire, if necessary. Thread the end of the wire through the corresponding screw eye on the other side of the frame. Pull the wire taut. Wrap the tail over the wire near the eye to create a loop. Continue wrapping the wire to create a wrapped loop. Trim the wire and flatten it, if necessary. Repeat with the remaining pieces of wire.
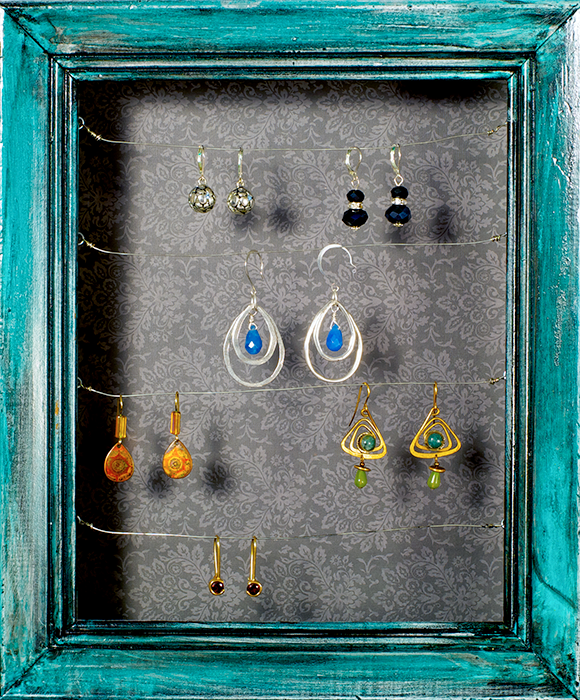
Photograph by Andy Dismore
Figure 13-14: Flea Market Frame Jewelry Display.
To make this organizer more versatile, add matching cup hooks to hang necklaces from the bottom edge. This frame could easily accommodate five or six cup hooks and necklaces. If you have large statement necklaces, you could use two cup hooks so the necklace stays flat against the wall.
Project 13-7: Salvaged Silverware Tray Jewelry Display
From its lowly beginning of a laminated silverware organizer to its adorable finale, this jewelry organizer is practically unrecognizable in this thrift store makeover. Take a look at the before and after pictures in Figure 13-15 and 13-16. A little paint and scrapbook paper are the main ingredients in turning this discarded tray into a great addition to any bedroom. The final touch requires a trip to the store to get some hanging hardware, for both the finished project and your beautiful jewelry pieces.
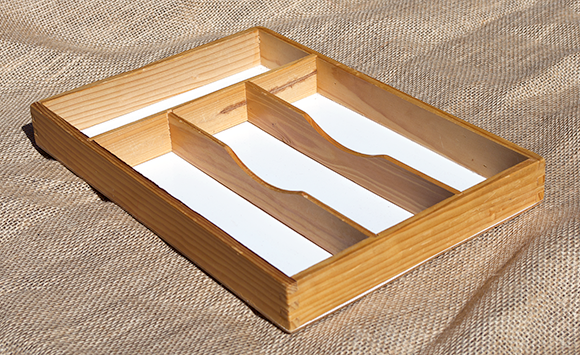
Photograph by Andy Dismore
Figure 13-15: Salvage a silverware organizer from the thrift store.
Tools and Materials
1 salvaged 4-compartment silverware organizer, roughly 10×12 inches
Spray paint (I used high gloss ivy green)
Scrap paper (I used recycled copy paper)
Pencil or pen
Ruler
Scissors
1 piece of 12×12 scrapbook paper (I used a cream and black with a bold floral print)
Mod Podge (or glue of your choice)
Small drill with a 3⁄32-inch drill bit such as a dremel (optional)
6 1⁄2-inch cup hooks, brass
6 1⁄2-inch screw eyes, brass
1 sawtooth picture hanger and hardware
1. Spray paint your silverware organizer. You’ll likely need a few coats of paint so read the directions on your paint to determine drying times in between coats. I gave mine three coats of paint, allowing it to dry 15 to 30 minutes between coats. Allow it to dry completely, until it’s ready to handle. Consult the directions on your paint, but most likely you’ll need to let it dry for about 24 hours.
Focus on painting the walls and sides of the organizer. Don’t worry about covering the bottom, where the silverware used to sit. You’ll cover that part with scrap paper later so you can save your paint. Look at the final project in Figure 13-16.
2. Measure the compartments of your organizer. I recommend you measure all four compartments, even if they seem to be the same size. They are likely slightly different sizes. Several of mine were about the same size but varied by 1⁄8 to 1⁄4 inch.
3. Make a paper template of each compartment out of scrap paper. My compartments weren’t square, and yours probably won’t be either. This step ensures that you have a nice clean fit for your lining. Dryfit the templates to make sure they fit the way you want them.
4. Trace the templates onto the scrapbook paper. Cut out the traced shapes. Dryfit the scrapbook paper to make sure the pieces fit snugly. Trim any edges, if necessary.
5. Apply glue to the back of one of the scrapbook shapes. Carefully set it into place. Smooth it gently but firmly to get rid of any wrinkles or air bubbles. Repeat with remaining shapes.
6. Using your ruler and pencil, measure and mark the spots to place your hooks (for necklaces) and screw eyes (for earrings). I wanted to hang necklaces in each of the three long compartments and earrings in the shorter compartment. So I used my ruler to find the center point of each long compartment and made a small dot. Then I used my ruler to line up each dot with a coordinating spot in the smaller compartment. I drew one dot on either side of this point, so a set of screw eyes would line up with the cup hook. Then mark a final set of three dots along the bottom edge. Use your ruler to line up these dots with your first set of dots. This way, all your necklaces will line up nicely when you hang them.
7. Using your drill and a 3⁄32-inch bit, drill a guide hole in each dot. Then screw in the cup hooks and eye screws.
8. Using your ruler, find the center point of the back of the organizer. Attach the sawtooth picture hanger. Hang your finished piece on the wall.
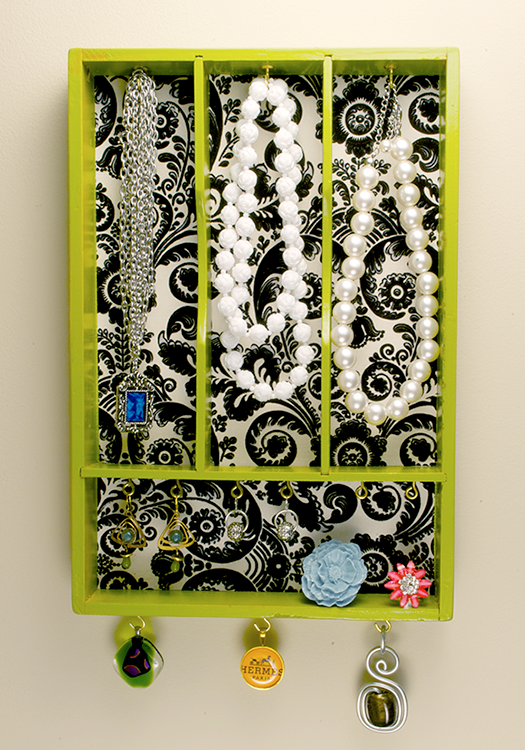
Photograph by Andy Dismore
Figure 13-16: Salvaged Silverware Tray Jewelry Display.