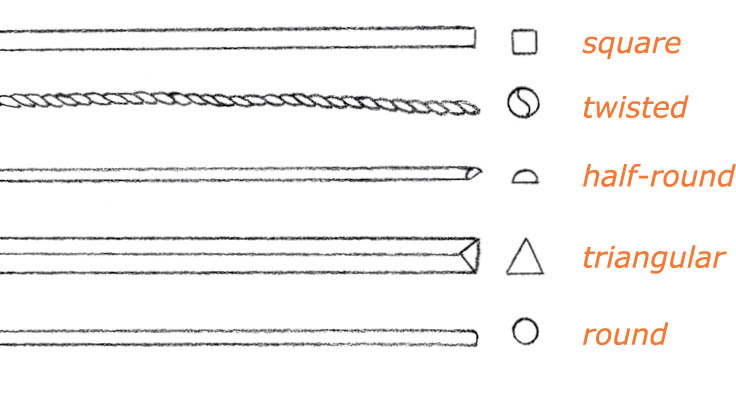
PROFILE OF WIRE
Shapes
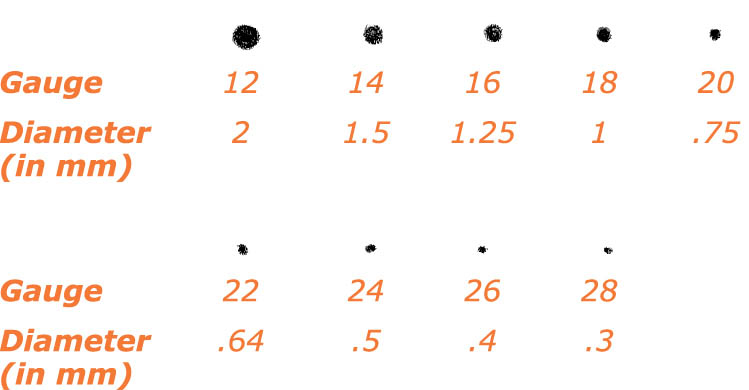
Guide to Gauge
Q: I see classes offered on wirework, but I don’t understand why I need to know about that. How is wire used in beading?
A: The ability to manipulate wire is a skill that’s essential to well-rounded beadwork. You can use wire in a basic way to join pieces together or in a more advanced way to create an entire necklace of wire links. “Chain mail” techniques, once used to make medieval armor, are now popular again. It’s a beautiful way to work with wire, creating wearable wiremesh jewelry pieces from the simple to the ornate. In chain mail, hundreds of jump rings are joined together to create a heavy, slinky mesh fabric that can be formed into a bracelet, necklace, earrings, or other objects.
Wirework may be disguised by other names that you recognize. For example, a jump ring is simply a round or oval loop made of wire. A headpin is a piece of wire with one end either flattened or embellished with a decorative stopper so beads don’t fall off. An earring hook, a hoop, a length of chain, or a simple S-clasp can easily be made from wire. You can purchase wire and tools and learn to create these pieces yourself. Or you may just become comfortable using and manipulating the wire-based findings that you purchase.
You may recognize these wire components of beadwork as findings we discussed in chapter 3. Findings include all of the parts used in beaded jewelry that are made of metal.
Q: My local bead store sells so many different kinds of wire, and I see even more options in catalogs. How do I know which type to buy?
A: The choices for wire can seem overwhelming, but you don’t need all of them! First, let’s look at the options, and then I’ll recommend a good basic wire for much of the wirework you’ll be learning at the beginning.
Q: What do the gauge sizes mean?
A: Even though wire in the United States is sized by gauge, in other parts of the world wire is measured by the diameter in millimeters. The Guide to Gauge chart (see above) shows the approximate diameter of our various gauge sizes.
Q: When would I want a hard wire versus a softer one?
A: The hardness or softness of wire is referred to as “temper.” The three most common tempers are:
Bending and working with wire will harden it (called work-hardened), as does hammering or planishing (flattening the wire’s shape with a hammer). Hardening can make the wire hold its shape, but it’s also more brittle and prone to break. To soften wire that’s been hardened, you can heat it, which is called annealing.
For most basic, beginning wirework, you’ll want to start with round, 18- or 20-gauge dead-soft or half-hard wire. The metal used depends on the color you want and the quality of the finished piece. Precious metal wires such as sterling silver, fine silver, and gold-filled are relatively expensive. Most wirework and jewelry makers practice and work out their designs in less expensive copper or silver-plated copper wire, and then they may turn to precious metal wire for the final product.
Q: Can you explain more about the different metals for wire?
A: Let’s look at them one at a time.
Sterling silver. Like other sterling findings, sterling silver wire is 92.5 percent pure silver, alloyed or mixed with 7.5 percent other metals, such as copper. The term “sterling silver” is very old, and was in use in England by the thirteenth century.
Sterling tarnishes, so it’s best to store it in a ziplock bag when not in use. It’s not only the pure silver itself that tarnishes, but the copper used in the alloy that reacts with oxygen and then darkens. You can also buy special papers, fabrics, and bags that have been treated to retard tarnishing. Some people store sterling pieces in double ziplock bags to further reduce exposure to oxygen.
Fine silver. Wire made from 99.9 percent pure silver tarnishes more slowly than sterling silver. It is softer than sterling silver and slightly more flexible. For this reason, fine silver is a great choice for crocheting and knitting projects. It can also be heated without changing color; therefore, fine silver is the wire of choice for inclusion in lampworked beads or for precious metal clay.
Gold-filled. Gold-filled wire is durable, does not tarnish, has most of the same properties as gold wire, and has a long life span, so it’s a great alternative to real gold. This wire is more expensive than gold-plated wire, because it is made with a thicker layer of gold. It’s also less expensive than real gold wire, which is gold all the way through.
Gold. Available in alloys from 10- to 24-karat (41.67 percent gold to 100 percent gold), gold wire comes in a variety of different colors, including yellow, green, pink, red, and white gold. Gold wire is expensive and is usually available from fine jewelry suppliers.
Copper. Beautiful and inexpensive, copper wire is an excellent choice for practicing wirework techniques. A rich, red-brown color, copper can be polished to a bright shine or allowed to oxidize, which darkens the color to an interesting green patina or deeper brown. Dipping the piece in a liver of sulfur solution or one of the other oxidizing products will speed the process. (For tips to prevent tarnishing, see below.)
Copper wire also is available with poly/nylon enamel coatings. Such coated wire is sometimes called art wire or artisan wire and is made in at least 30 brilliant colors. Use tools carefully to avoid marring the coating, and protect finished pieces so they won’t become scratched.
Silver-plated and brass-plated copper wires also are excellent inexpensive choices for learning and practicing a new design, as well as creating finished pieces. Gold-plated copper wire is also available, but it’s more expensive.
Q: How is precious metal wire sold?
A: Some local bead stores may sell sterling and gold-filled wire by the foot. If you need a larger quantity, you also can purchase it by the ounce. If you’re buying wire online or from a wholesale source, you may run into a different measuring system called “troy weight.” This is an ancient system of measuring precious metals that dates from before the eleventh century. A troy ounce is about 10 percent larger than a standard ounce; it equals 31.1 grams, while a standard ounce weighs 28.35 grams.
Q: I love the look and color of copper wire, but I don’t want it to tarnish or turn my skin green. How can I prevent this?
A: Some people prefer the tarnished or “aged” look of copper, but if you’re not one of them, you could spray the copper with polyurethane or another sealer to keep it from tarnishing. Personally, I don’t recommend this practice, because when the sealer begins to wear off, the copper piece may tarnish unevenly and look blotchy.
You can’t really prevent copper from tarnishing, although storing your jewelry in a ziplock bag will slow it down. But this won’t be a problem if you keep your copper jewelry clean and bright. Here are some suggestions:
Q: I’ve seen designs made with twisted wire that look really interesting, but my local bead store doesn’t stock twisted wire. What should I do?
A: You can make your own twisted wire by using plain round wire in a thinner gauge. Remember that the finished twisted wire will be twice the diameter of the plain wire, so two strands of 24 gauge will result in 18 gauge twisted wire. (See Profile of Wire/Guide to Gauge.)
Whichever method you choose, be careful not to twist too much, especially with thinner gauges, or the wire will snap.
Q: Tell me about the wire rings I’ll need.
A: Several types of rings are used in jewelry making. These are the most commonly used wire rings:

SEE ALSO: Basic Wirework Techniques
Q: What is a headpin?
A: A headpin is a length of wire with a flattened head on one end to keep beads from falling off. Headpins may be simple (with a flat round head) or decorative (with a ball, scroll, flower, or other decorative head).

Q: What is the pin that has a loop on one end?
A: This type of pin is called an eyepin. The end loop keeps beads from falling off and offers a place to hang another bead, link, or segment below the pin. While you can purchase eyepins, they’re also easy to make by cutting lengths of wire and using round nose pliers to make a loop at one end.
Q: What kinds of pliers do I need?
A: You’ll need a basic set of jeweler’s pliers for working with wire and other metal findings. Jeweler’s pliers feature smooth jaws, rather than the serrated jaws of many other pliers. When working with wire, serrations can damage the wire, leaving noticeable marks and dents behind, making it impossible to create smoothly finished wirework.
Inexpensive jeweler’s pliers are fine for a beginner, but as your work becomes more refined, you’ll probably want to invest in high-quality German tools. They’re more expensive, but if you reserve them only for jewelry work, they will last for many years.
SEE ALSO: Basic Tools
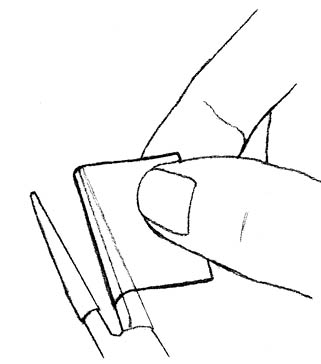
Q: Are there any special wire cutters I need to buy?
A: There are different styles of wire cutters that can be used for wirework, but my favorite style is called a flush cutter, as discussed in chapter 4. If you purchase the one made for cutting flexible beading wire, you can also use it for dead-soft and half-hard wire. A good pair of flush cutters makes a straight, smooth cut on the back side of the pliers, which saves you time in filing and smoothing cut ends of wire.
SEE ALSO: Basic Tools
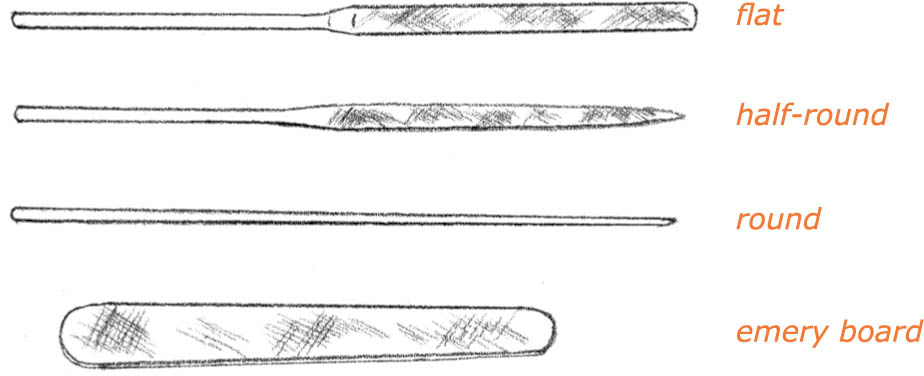
Jeweler’s files can be useful for filing and smoothing the rough ends of cut wire. They’re available in various shapes, such as those shown below. Emery boards from the drugstore also can be used for smoothing cut ends of wire and sharp edges.
Q: What other tools do I need when doing wirework?
A: Here are a few items you may find useful, depending on the kinds of wirework you are doing.
A small hammer is used to flatten and harden wire while adding strength, shape, and design features to many findings such as clasps and ear wires. Shaping the wire with a hammer is also called planishing. There’s a wonderful small hammer available that has interchangeable faces and works well for planishing. One side has a brass face that you can use for flattening and shaping wire. On the other side is a nylon face that will work-harden wire without flattening it (that is, harden it by hammering). The hammer’s best feature is that the replacement inserts are inexpensive and easy to install when a face becomes dented or scarred.
A ball-peen hammer has a flat head on one side and a rounded peening head on the other, both of which are metal. The round side can be used to set rivets or make decorative texture marks in metal.
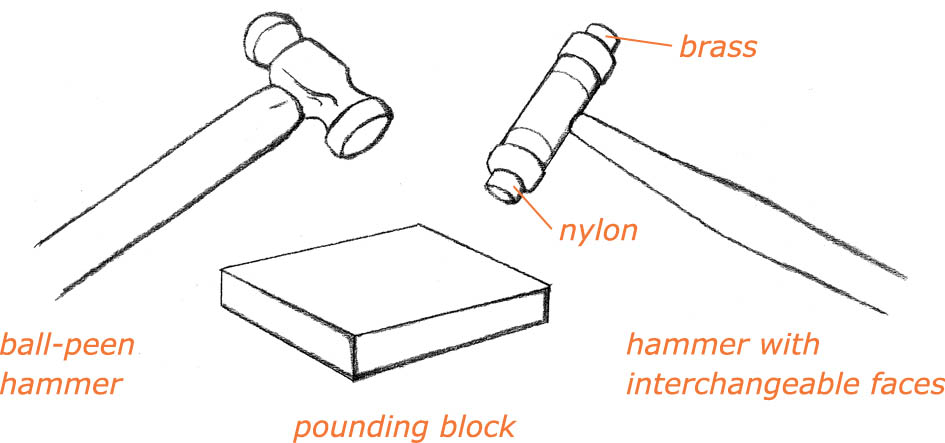
A steel pounding block, used with either hammer and sometimes also called a bench block or anvil, provides a foundation for hardening and shaping wire. You can use a small block of steel or the flat side of a large, old hammer head (watch for these and other useful tools in yard sales).
A Dremel tool is a small variable-speed tool that works like a miniature electric drill. While not an essential piece of equipment, a Dremel can be helpful for drilling holes in coins, shells, and other objects to create beads, as well as in cutting and polishing wire and metals. Sets with varying numbers of attachments and accessories are available at home centers and hardware stores. (See Resources.)
A polishing cloth is a piece of fabric that’s been chemically treated so it removes dirt, fingerprints, and tarnish from precious metals and wire.
Q: Why do I need to hammer on the wire?
A: Hammering or planishing is used for several reasons. Gentle hammering and bending of wire:
If you want to harden wire evenly without flattening it, use the nylon face of the hammer. To soften hardened or half-hard wire, you can anneal or soften it by heating the wire over a flame. However, once wire has been hardened by hammering, or work-hardened, it becomes easier to break, so work with it carefully.
Q: I’m just getting started with wirework. Do I need to invest in the expensive German tools right away?
A: The quick answer is “no.” Good-quality, basic hand tools are available in a wide range of prices. If you’re just starting out, you’d probably rather spend your money on beads and other materials, than on tools!
If you do purchase topquality jewelry-making tools, I suggest you store them separately from the other household tools. You don’t want to find someone using them to tinker in the garage, or worse, find a pair after they’ve been left in the driveway for a couple of weeks (my son at nine years old comes to mind).
It’s fine to start with the relatively inexpensive hand tools made in Pakistan, but don’t just buy the first cheap pair you see. Try grasping the pliers and opening and closing the jaws to see how they fit your hand and how well they operate. You don’t want to end up with shoddy tools that really don’t work well and don’t last.
On the other hand, if you’re a person who loves fine tools or plans to do a lot of beading and wirework, it makes sense to invest in higher-quality German hand tools. You just can’t beat the quality and durability of their steel and construction.
The two hand tools in which German quality matters most are the round nose and chain nose pliers. On the round nose pliers, it’s wonderful to have tips that are truly round, strong enough to keep their shape, and taper to a very narrow tip. On the chain nose pliers, the tips taper to a smaller end so they fit into tiny spots more easily. If you also have a less expensive pair, it won’t go to waste. It can be your second pair, because it’s often handy to have a set of chain or flat nose pliers for each hand.
Q: I’m having trouble working with wire without leaving dents and scratches from my hand tools. Do you have any suggestions?
A: As you work more with hand tools and get the feel of the wire, you’ll learn to hold and shape the wire gently without using a tight grip or a lot of force. Once you learn to use your tools correctly, you’ll start to leave fewer marks.
Even with practice, though, it can be difficult to work with soft or fragile metals, such as color-coated wire, without leaving dings in the finish. There are several options that can help:
wrapping pliers jaws with masking tape
Q: I want my wirework to have a smoother look. How do I make neater ends and flat joins?
A: You’re right that if you just nip off the end of the wire with any old cutters, you will end up with a gnarled bite, also called an angled cut. To make a clean, square end, or flush cut, consider the following:
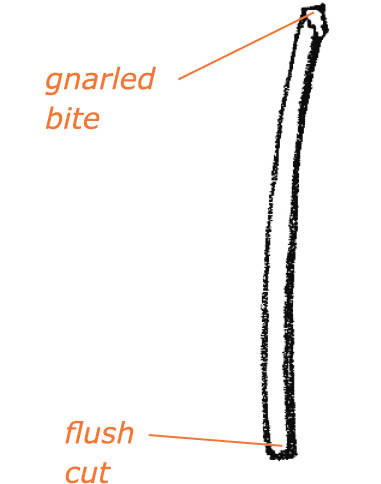

Use a finger to keep cut bits of wire from flying.
Q: What’s the best way to close a jump ring so the ends meet without any gaps?
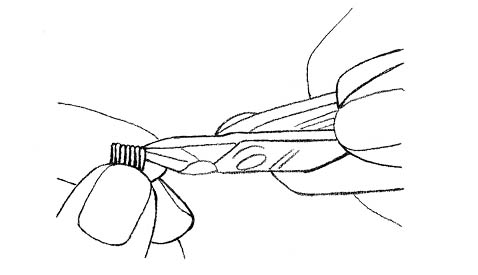
A: Never open the jump ring by making the circle wider, as it will be impossible to return the ring to a smooth circle. To open and close a jump ring, always use two pliers (one in each hand) and a twisting motion, as shown in the illustration below. Chain nose and round nose pliers work well for me. You might prefer chain nose and bent chain nose pliers, or two sets of bent chain nose pliers. Practice with the tools you have available to see what works best for you. Here’s how:
For a smooth tight join, push the ends slightly together while closing them, a little beyond where they meet, and then pull back just a bit to bring the ends together perfectly. You can feel the ends pressing against each other when you’ve done it right. Now they’ll stay that way.
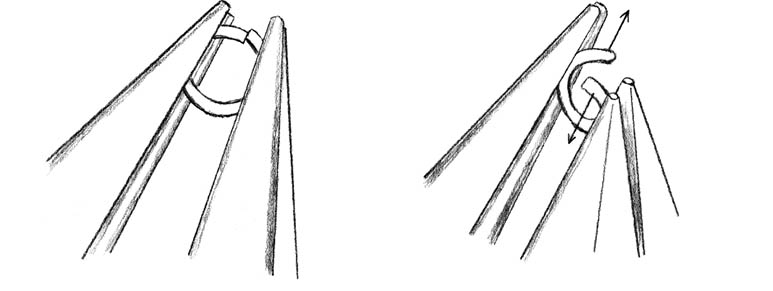
Twist to open and close a jump ring.
Q: It can be tricky to find jump rings in just the right sizes for some projects, such as chain mail designs. Is it possible for me to make my own jump rings?
A: Yes, it’s possible to make your own jump rings, but it takes care and precision to make high-quality jump rings. I know that purchasing hundreds of jump rings for a chain mail project can seem expensive, but don’t undertake the project of making your own jump rings lightly, just to save money! Perfect jump rings make smoother, stronger chain mail. Some designs have very specific size requirements so the pattern will fit together correctly. If the rings are not the exact size and gauge, some patterns will not work. With that said, if you still want to try making small amounts of your own rings, here are some pointers you’ll need to consider.

snipping jump rings with a flush cutter
Q: When I make my own jump rings from a coil, they don’t close evenly. How can I make a jump ring with a smooth seam or join?
A: To make a clean jump ring that closes smoothly, you first need to cut each end of the ring with flush cutters. After making the first cut, flip the pliers over to cut the second end. Now examine the ends. If they aren’t smooth and flat, file them with a jeweler’s file as described earlier. (See previous question and answer, above.) When you close the jump ring, the two flat, square ends should match neatly.
Q: I have a pile of jump rings to open for a chain mail project I’m making. Is there any way to make this job go faster?
A: For opening and closing jump rings, I can suggest a tool that you can quickly make yourself, and another inexpensive tool that you can purchase.
Learn to use your tools correctly so you’re not gradually injuring your wrists or hands. Never make a loop in one continuous motion; rather, move the pliers in several small, repeated segments as you rotate the loop away from you.
Another option is to purchase a metal jump ring opener that you wear like a ring on the index finger, with different sizes of slots to stabilize one side of the jump ring. It works in the same way as the dowel. Either tool allows you to open and close jump rings more quickly with only one set of pliers, once you become accustomed to using it. It’s just easier to get the tool into position than it is to manipulate a second set of pliers.
Q: I’m learning to make easy earrings by placing beads on a headpin, making a loop above the beads, and then hanging the loop from ear wires. But my headpins don’t hang straight. How can I fix this?
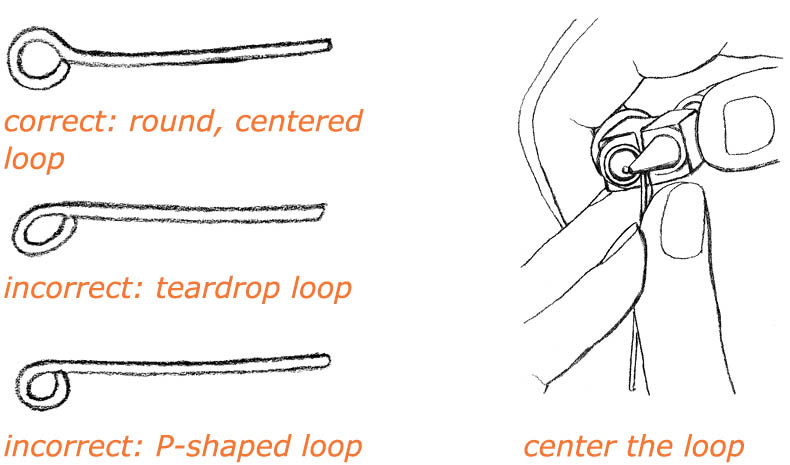
A: If you make a loop that’s shaped like a teardrop or “P,” as shown below, the earring will not be centered or hang straight. Your goal is to make a round, closed loop centered over the headpin or wire.
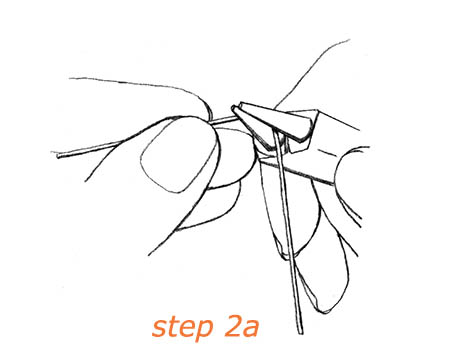
Here’s how you make a round, centered loop:
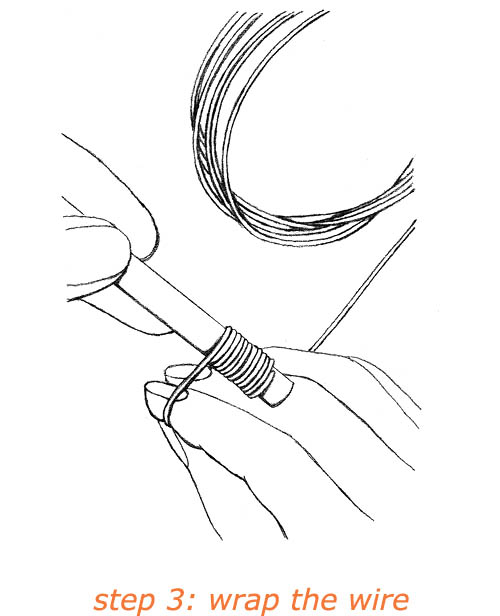
Q: What if I have too much length at the top of the headpin? Is there a way to make a good loop other than just guessing the length and cutting it?
A: If you have extra length in the headpin, you can use a trick I learned from wirework guru Linda Linebaugh, who taught me many wire techniques. Rather than cut the headpin and hope you’ll have enough length to make a wellformed loop, try this:

wrap the excess length of a headpin
Q: When I’m making earrings, how can I make the loops the same size so they look like a matched pair?
A: The easiest way to ensure that your loops will be the same size is to shape both loops at the same spot on your round nose pliers. Use a fine-point permanent marker to mark the tips of your pliers at the diameter you want for the loops. Bend the wire around the pliers at this point every time, and you’ll get loops that are always the same size. You can make several tiny marks for loops of different sizes. It’s easy to remove the marks with acetone, nail polish remover, or an emery board if you need to reposition them.
When you’re first learning to make perfect loops, it’s easiest to begin near the center of the round tips of your pliers. After you’ve had more practice, try making tiny loops near the very ends of your pliers. These small loops look beautifully polished on delicate earrings and other fine jewelry.
Whether you’re making a basic earring with beads on a headpin or a more elaborate design, it usually looks best to match the size of the hanging loop to the one on the earring finding. The two loops then create balance in the design.
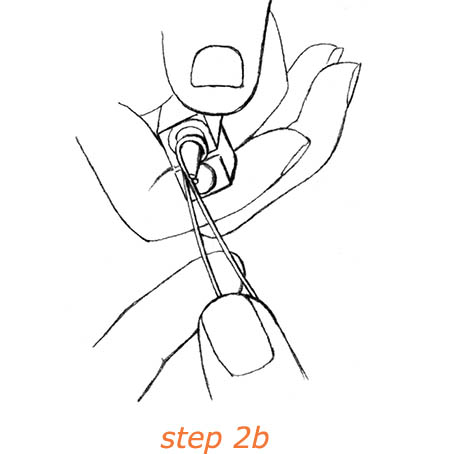
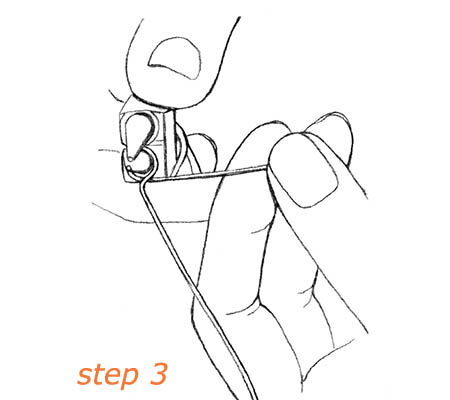
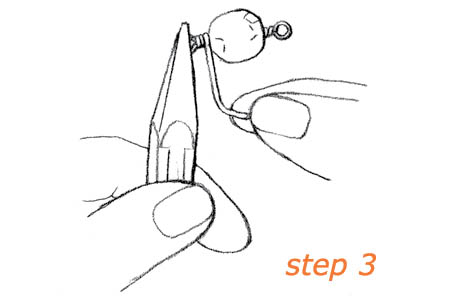
Q: I like the look of wrapped loops. What’s an easy way to make them?
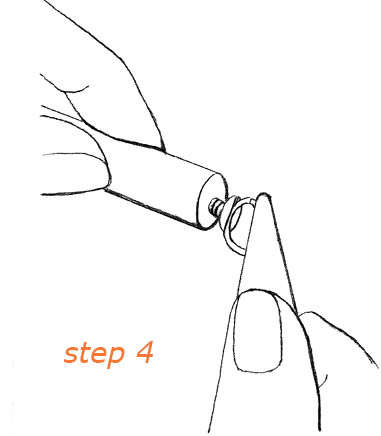
A: To make a wrapped loop, think of it in two stages. The first stage consists of steps 1 through 3 below. After step 2, you can insert a chain link, ear wire or other finding, or another ring inside the loop before you close it. For the second stage, continue with the remaining steps to finish the loop.

Q: Why would I want to make a wrapped loop instead of a regular loop?
A: From a design standpoint, wrapped loops are popular in jewelry because they can add a playful, organic style to a piece. But there are also structural reasons to use a wrapped loop. If you prefer to work with thinner wire such as 24-gauge because it’s easier to bend and kinder to your hands, you’ll need to use a wrapped loop for added strength. A simple loop won’t stay closed in wire that’s thinner than 22-gauge (actually 20-gauge is preferable). Sometimes, it’s necessary to use thinner wire, because the bead has a small hole, such as a pearl, and larger wire won’t fit. So always use wrapped loops when working with thinner wire.
Q: What other jewelry parts can I make with wire?
A: Besides jump rings and loops, you can use lengths of wire to make components or parts for jewelry, such as a dangle for an earring, a pendant for a necklace, one end of a clasp, or a link that can be joined with other links to make a bracelet or a necklace. A wire component is usually joined to another jewelry component with either a simple loop or a wrapped loop.
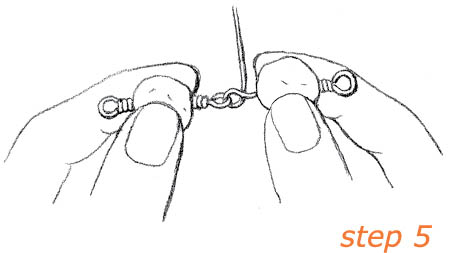
Q: What is it called when a wire piece has a loop on each end?
A: Some people call this wire formation a barbell, because it resembles a hand weight. I call it a “link,” because it can be used to join, or link, two other jewelry components. A link may have a bead strung at the center, or two plain links can be placed together as part of a chain to add texture and interest.

Links can be made from any type of metal wire used in regular wirework. The choice of wire really depends more on the design and the finished look you want to achieve. For example, if you love the way copper and green look together, use copper wire with a green bead at the center. If you love how silver and black play off one another, join sterling silver links together to form a chain, and attach a gorgeous black pendant at the center.
Depending on the other pieces it will connect, the link may have one loop facing vertically and the other end facing horizontally (rotated 90 degrees), or both loops may face in the same direction, as shown in the illustration above. Again, the direction of the loops has more to do with the design and function than with a set principle on how links are made.
Q: When I put a wire through a bead and try to bend it, the bead sometimes breaks. This especially happens with crystals, which are expensive. How can I avoid this problem?
A: To avoid breaking beads, be careful to bend the wire without placing stress on the bead hole. Make the bend just above the hole, rather than using the bead hole to push against. For a wrapped loop, you can hold the wire above the hole with the tips of fine chain nose pliers and bend the wire above the pliers. This creates a small space for the wrap. If you want a simple loop, you don’t need this much space.
Using either simple loops or wrapped loops, you can create a quick, fun bracelet made from wire links. Each link can hold a bead: a piece of chunky furnace glass, lampwork, or a Czech glass bead. You’ll need six to eight of these beads, depending on the size of the bead and the desired length of the bracelet.
Q: I’ve seen wire pieces that look like the number eight. How do I make these?
A: A simple figure-eight wire shape is sometimes used as a link in a chain, or in place of a jump ring as a closure to fasten a hook or lobster claw. To make a figure-eight:
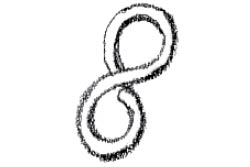
simple figure-eight link
If the largest section of your round nose pliers doesn’t make a large enough loop for the Sclasp you want to make, try using the shaft of a round, disposable ballpoint pen, mascara tube, or knitting needle.
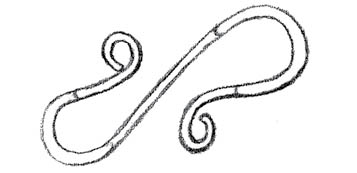
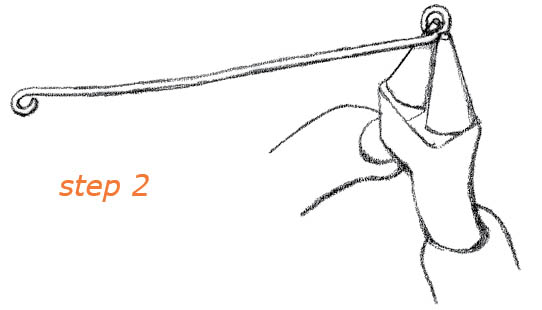
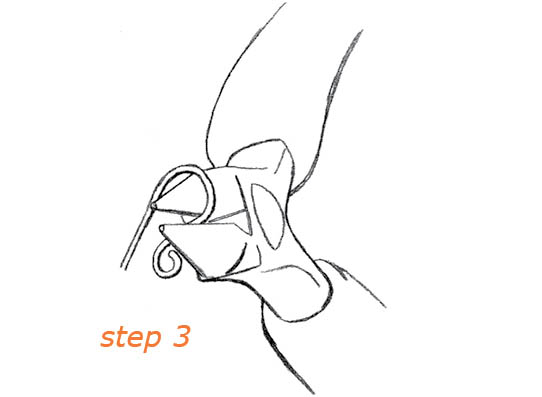
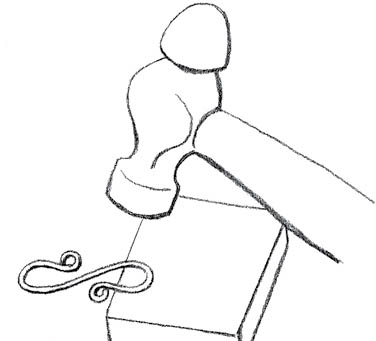
Q: How do I make an S-clasp?
A: An S-clasp is similar to a figure-eight, just a little fancier. For an attractive S-clasp about ⅞” long or smaller, use 20-gauge round wire. For a larger S-clasp, use about 4” of 18-gauge wire and make larger loops. Here’s how you make a small one:

When planishing wire, hang any area that you don’t want to flatten off the edge of the block. That way you can’t strike and ding it by accident.
S-clasps can be used in a number of ways. Try one of the following:
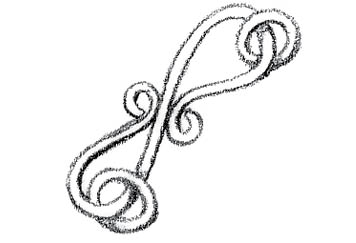
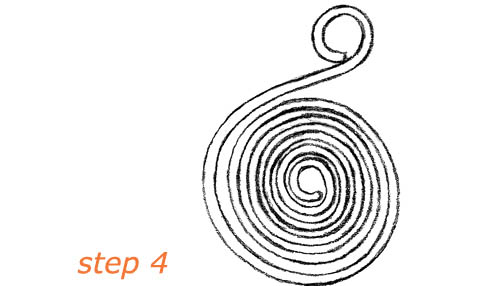
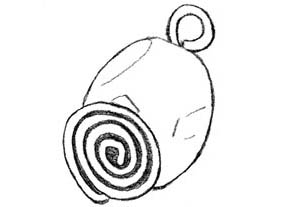
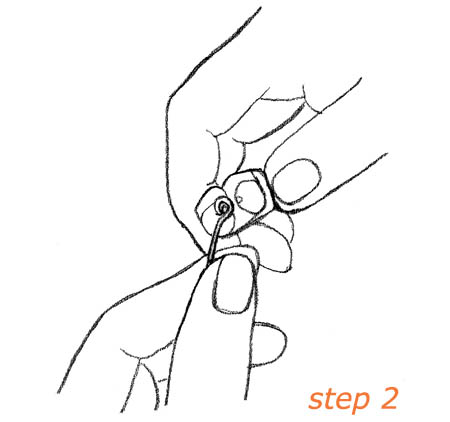
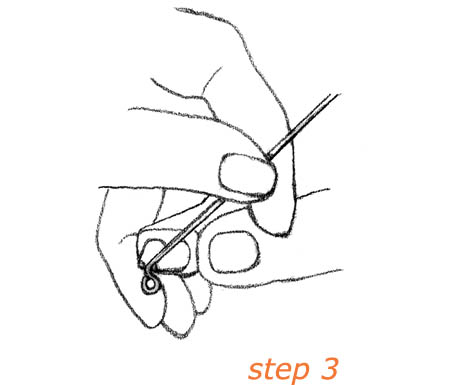
Q: I’ve often seen spirals on wire pieces. Are they hard to make?
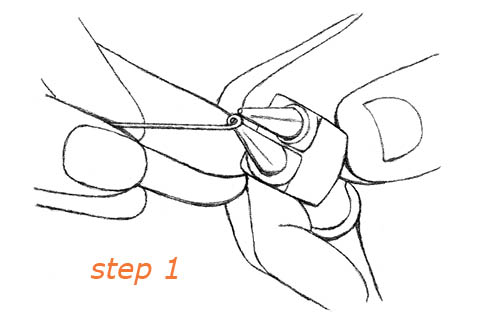
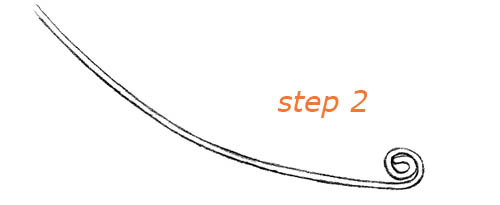
A: A wirework spiral can be used as a decorative finish at the end of a wire. It’s versatile and easy to make.
Q: Is it possible to make my own earring findings from regular wire?
A: It’s not difficult to make basic ear wires using 20-gauge half-hard or dead-soft round wire.
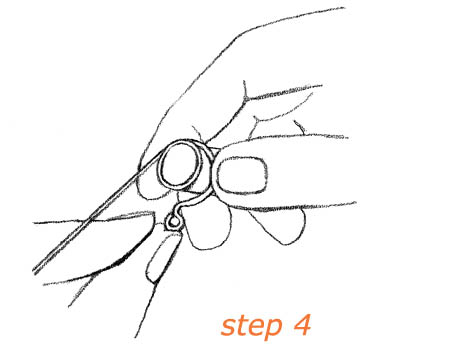
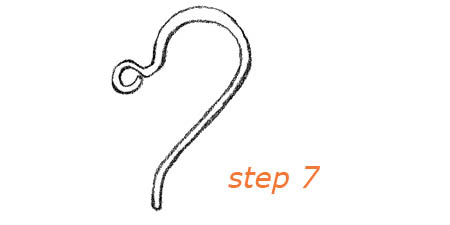
It’s important to smooth and polish the cut end of the wire so it doesn’t scratch and irritate the holes in your ears. Use a small jewelry file or emery board flat across the cut, filing in one direction only; do not use a sawing motion. Then, file the edges on a 45-degree angle, all the way around, for a smoothly rounded tip. Or if you have an electric tool with a small cup burr attachment, you can quickly smooth the points of the ear wires. Choose a cup burr that’s a couple of gauges larger than your wire so it’s easier to use.