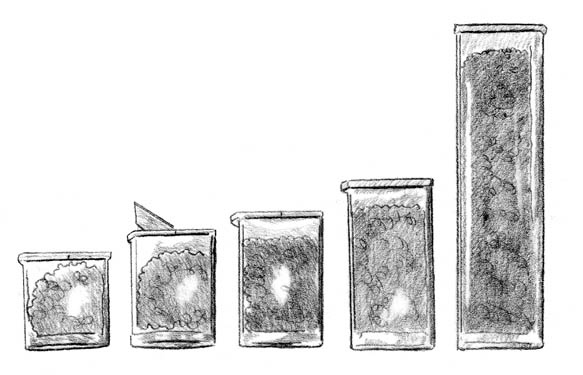
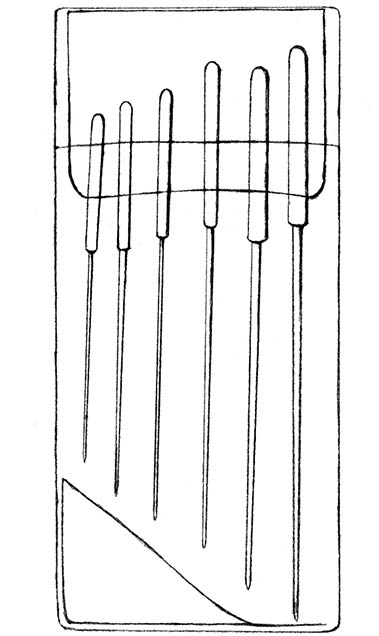
Small boxes and tubes fit neatly into a larger box.
Q: I’ve purchased quite a few beads that I’d like to use, but have trouble seeing what I have and finding a certain bead that I want. Do you have any tips on organization?
A: My favorite storage system for smaller beads, from seed beads to pearls to strands of Czech glass, is a system of transparent plastic boxes with six or more different sizes of clear flip-top rectangular tubes. Individual tube sizes range from 1” to 33⁄4” high.
Inside the 4” × 6” × 11⁄2” clear plastic storage boxes, you can organize the small tubes containing your beads by color, shape, or size. It’s easy to search through the boxes to find a bead you want, or just hold the box up to a window to gaze at the beautiful colors or see how much you have of each bead. I find that browsing through the beads and organizing them is a good way to begin when designing a new project. This system is also wonderful because it’s modular. You can add additional boxes as your bead collection expands, so you never outgrow it.
As with anything, your choice of container for storing your beads is really just that — a personal choice. What works best depends on the size and quantity of the beads you have. Besides the clear, rectangular storage boxes, here are some other options:
The main idea is not so much the system you choose but, rather, the simple idea that keeping things organized will help to free your mind of clutter and encourage creativity.
Regardless of how you store and organize your beads, keep them out of direct sunlight in a safe, dry place that is easily accessible. Moisture can damage bead finishes and is certainly not good for metal findings. Safety is also key, especially in homes where there are children. Beads are a choking hazard for small children, so it is better to store them out of the reach of little hands.
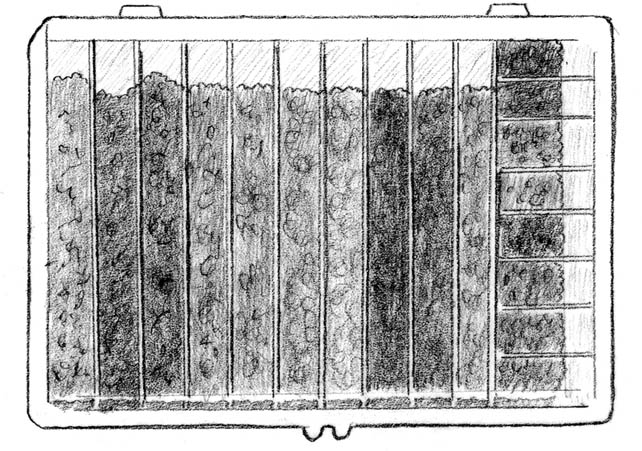
Small boxes and tubes fit neatly into a larger box.
The rectangular tubes used for bead storage are often referred to as “tic-tac boxes” — after the plastic candy boxes that inspired them. The story I’ve heard is that teens were saving Tic-Tac candy boxes to use for storing their beads, and someone got the idea to produce the boxes specifically for bead storage. I don’t know whether it’s true, but it makes a good tale (and was a great business idea).
Q: How can I remember which beads I have?
A: My local bead store uses a system of stick-on labels that includes useful information for identifying the bead, such as the color number, bead size, manufacturer, and price. Carefully peel off these labels (if you do it slowly, they won’t rip) and transfer them to the flip-top tubes. That way, if you need to buy more of a particular bead, you’ll have all the information at hand.
If the container your beads came in doesn’t use this labeling, adopt your own. Record the bead’s color, size, manufacturer, price, and any code numbers on a white address label sticker for your own tracking purposes.
Q: How do I store larger beads that are still on strings?
A: You can store strands of beads, such as semiprecious stones or pearls (especially if you don’t have a lot of storage space) by hanging them on a wall on a man’s tie rack. It’s easy to see what you have and experiment with color combinations. If you artfully arrange the strands, you can start enjoying them on your wall long before you use them in a piece of jewelry. Tie and coat racks with wooden pegs are a great way to display and store finished necklaces and bracelets, as well.
Q: I see people working with their beads in little ceramic or plastic dishes. They seem so slippery, and I think I have too many colors to use a separate dish for each one.
A: Some people love to bead from dishes. These are sometimes referred to as “honey pots,” any variety of single round glass or plastic dishes or the 50-cent metal triangular dishes. Another dish option is what’s called a “bead sorting dish,” generally a larger ceramic dish with a circular section in the middle and several other sections fanning out around the center circle (like those used by watercolor artists).
For me, though, the vertical sides of dishes tend to get in the way of my needle, and the beads slide around too much. I prefer picking up beads from a nonslippery fabric surface, such as a piece of Vellux fabric (used to make lightweight blankets). Other fabric options include a placemat-sized piece of faux suede, felt, velvet, or a terrycloth towel (my last choice because the needle can catch easily in the terry loops).
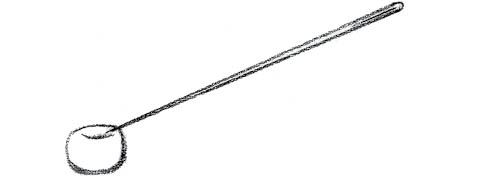
Rather than having a separate dish for each bead color, you can just dump out a little pile of each color or type of bead onto the fabric surface. When you’re finished working, it’s easy to scoop up each bead pile with a metal triangle dish (see illustration) and use the corner to dump the beads back into their flip-top storage box, without needing to remove the lid.
Preference for a beading surface is again a personal choice. There’s no right or wrong way! Be sure to try different methods, and then use the one that works best for you.
You can pick up a bead with a needle by scooping it from the side.
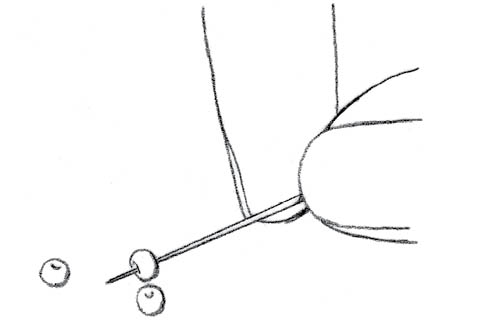
Or you can “needle” it to tip it over and scoop it.
A: A bead board is a design tool with a soft, flocked surface that is used for testing bead and color arrangements. The bead board surface has grooves and inch markings to help you plan a piece at its desired length. Use it to lay out beads, see what looks good together, get an idea of length, and make color and design decisions before you start stringing the piece together.
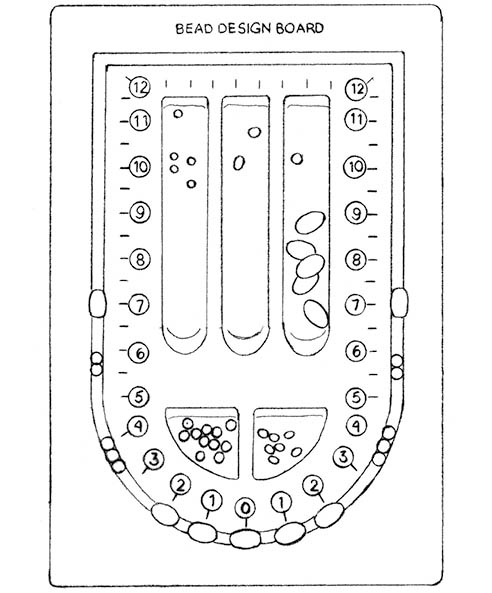
Use a bead board to plan and lay out a stringing design.
Q: I hate it when I’m beading along, enjoying myself, and then I see a mistake I made several rows back. How can I catch my mistakes sooner?
A: One of my friends, who is also a wonderful and patient beading instructor, always tells her students to “stop and admire your work.” In other words, pause often and look at your work to see whether everything looks correct. If a pattern or sequence doesn’t look or feel quite right, chances are it’s not! You want to catch any mistake quickly, so you won’t have to do much ripping to fix it. If you make a habit of stopping frequently and checking over your work, you’ll feel confident about cruising ahead.
Q: I’m always bringing my beadwork with me to appointments, my kids’ baseball games, or on car trips. Sometimes, it seems that I’m leaving a trail of beads behind me. Do you have any suggestions to make my work more portable?
A: It’s great to keep your hands busy. You accomplish something creative with those empty minutes and realize that you don’t even mind waiting at the doctor’s office. Bringing your beads with you works best if you choose a project that’s easy to take out and put away quickly. You also need to organize your supplies accordingly.
You don’t want to lug a big plastic suitcase with half your beading stash in it. By the time you get everything out and set up, it’ll be time to put it away. I like to carry my beadwork in a hard plastic sandwich keeper. It’s the perfect size for a small beading project and will easily hold your beading supplies. You can keep a portable project ready to go at all times.
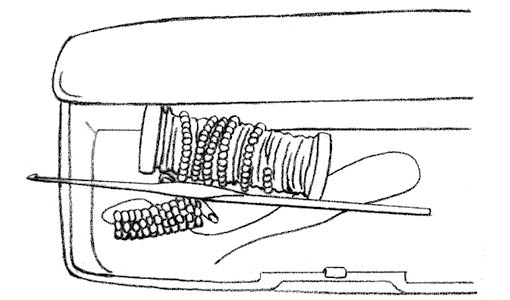
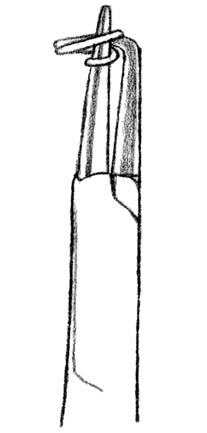
The perfect project for on-the-go beading, especially if you have only 10 or 15 minutes free at a time, is a crocheted rope bracelet (see illustration). Because the beads are prestrung, you don’t have to worry about picking up individual beads, or dropping the ones in your lap when the hygienist calls your name. When it’s time to stop beading, all you have to do is place a safety pin in the last stitch crocheted, so it won’t unravel in your bag.
Keep up with small beads by tipping out a small amount at a time onto the adhesive strip of a sticky note. Don’t laugh! The beads stay put and the adhesive leaves no sticky residue.
A great gadget to store and carry your bead crochet projects is a plastic eyeglass case. Unbreakable and water resistant, they’re available at drugstores, department stores, and your local eyeglass shop.
Q: I’m confused about sizes of beading needles and wire. What do the numbers mean?
A: It may help you to remember that seed beads, beading needles, and wire all follow the same rule: the higher the number, the smaller the bead, needle, or wire. So 26-gauge wire is smaller than 22-gauge; a size 12 needle is smaller than a size 10; and an 11° seed bead is smaller than an 8°.
Q: Why are beading needles so hard to thread?
A: In order to fit through a bead as many times as possible, the eye of a beading needle (unlike that of a regular sewing needle) is designed to be very narrow. The same goes for the shorter needles called sharps; the eye is nearly as narrow as the shaft. When sewing on regular woven or knit fabric, a needle can push the fibers aside to make more room for the eye. But glass beads have a finite amount of space inside, and for some stitches, you’ll pass through the same bead a number of times. When adding a new thread, you’ll make even more passes through beads. To accomplish these stitches, you need a needle with a slender eye.
Beading needles are available in various sizes, from 10 (the largest) to 15 (the smallest). In general, you want to use the largest needle that works for your project, because it’s stronger and easier to thread. Always keep a few smaller needles on hand, though, in case you reach a tight spot.
Be assured that when you can’t pass through a bead, it’s due less to the thread you’re using than to the width of the needle. You can use a chain nose pliers to gently ease the needle through a tight bead, but it’s always better to stop and change needles than to risk breaking a bead by forcing the needle through it. There’s a sickening little “pop” when one of your beautiful seed beads breaks as you try to pass the needle through it one more time. Trust me, you don’t want that to happen.
Teachers often joke that learning to thread the needle is the hardest part of beading. Sadly, there is some truth to this joke! Here are a few tips to make the job easier:
You may find beading needles a little easier to thread than sharps, because the longer needle also has a slightly longer eye. If you do find threading needles difficult to master, though, there’s an ultrafine needle-threading tool available that works with needles up to size 13 and thin threads. Most regular needle threaders are too large to use in the thin eye of a beading needle.
Keep practicing, and it will get easier!
Q: Why is my needle sometimes easier to thread from one side than from the other?
A: It’s a trade secret that needles have two different sides. The eye of the needle is created by stamping a hole through the needle shaft. Even in the best English-made steel needles, this results in a hole that is smoother on one side than the other. So, if you’re having trouble threading a needle, flip it over and try the other side. If you’ve been working with waxed thread, check the eye to see whether it may be clogged with wax. If so, use the point of a second needle to gently clear out the wax before attempting to rethread.
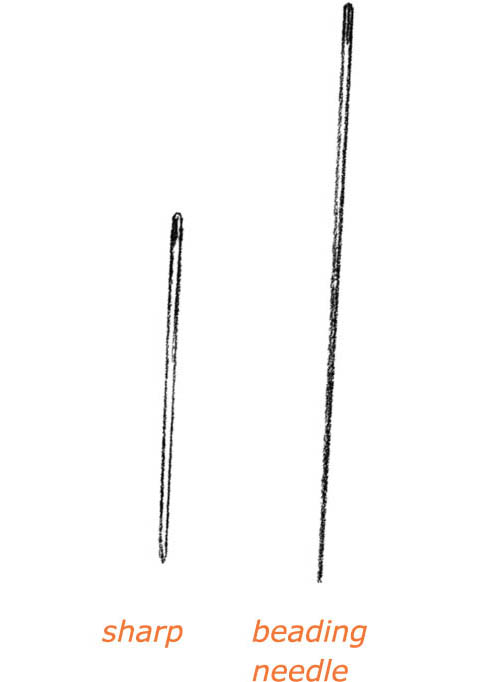
Q: When would I use a beading needle instead of a sharp of the same size?
A: A sharp is similar to a beading needle, only shorter. There are times when you need a long needle: when picking up a number of beads at a time to work fringe, or when passing the needle all the way across a wide bracelet. But when picking up one or two beads at a time as for most off-loom woven beadwork, either needle works fine; it’s a matter of preference.
I use a sharp whenever possible. When making a piece that requires thousands of stitches, I can’t help but think that passing that extra 1” of metal through each and every stitch must add up to miles of extra work.
Q: I’ve seen large-eyed needles at the store. What are they used for?
A: A large-eyed needle has a long eye that extends down the center of the needle, with a blunt point at each end. Available in a couple of lengths, from 21⁄4” to 41⁄2”, the elongated eye makes these types of needles very easy to thread. Gently push a fingernail into the eye vertically to separate the wires and insert the thread.
Some beaders, especially those who dislike threading beading needles, adore the large-eyed needles, which are marketed in a couple of different brand names (See Resources), and use them whenever possible. I love these needles for certain jobs, such as stringing beads for bead-crochet ropes. The thread is too thick to fit through a beading needle, but the larger eyes can accommodate large thread in their long flexible opening.
But for many beading jobs, large-eyed needles aren’t the best choice. They’re too thick for a lot of bead weaving and bend too easily for some types of work. Note that you will need to treat your large-eyed needles more carefully than you would a regular steel needle. The eye in these needles is held together with a soldered join and can break if you yank on it too hard.

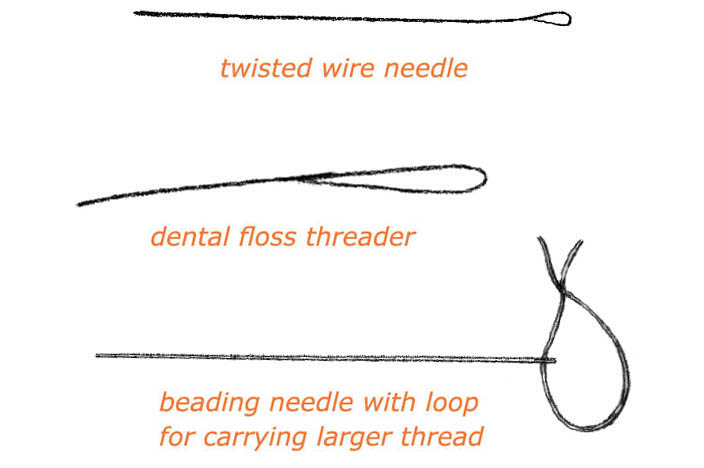
Q: I’m trying to string beads on thread for crocheting a rope — but the bead holes are too small for the large-eyed needle, and my thread is too thick to fit through a beading needle. Do you have any other ideas?
A: Try using a twisted wire needle, which has a large collapsible eye, or a dental floss threader. The eye of a twisted wire needle can accommodate thicker thread and flattens when you pull it through the first bead. If you have difficulty rethreading it after the eye has collapsed, use the blunt end of a tapestry needle to gently push the eye open again. Handled carefully, a twisted wire needle can be reused many times.
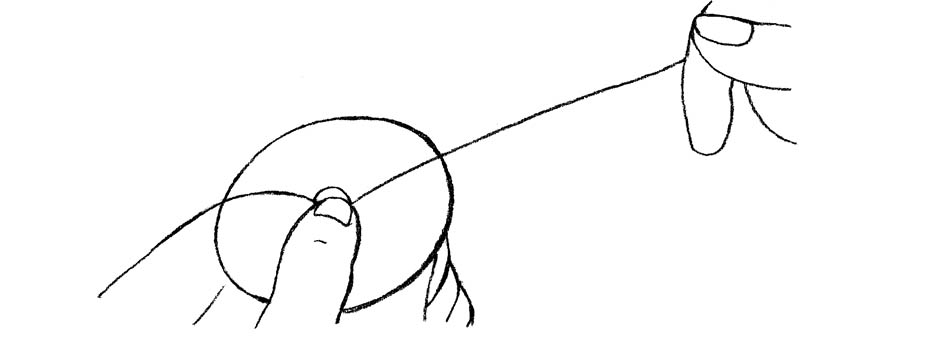
Or you can try this trick, which works anytime you need to string beads on a thicker thread with a thinner needle:
Q: Why are there so many different kinds of beading thread? How do I know which thread to choose?
A: It’s true that we bead lovers have more thread types to choose from than ever before. In the early 1980s, when the current resurgence of interest in beading was just getting under way, there was only one type of thread available: Nymo. It was sold in two colors: black and white.
These days, stores sell many types of thread in a variety of sizes and strengths. Each one has slightly different properties and tends to be used for a different type of beadwork. Beading threads are used primarily in projects that incorporate off-loom weaving, loom weaving, and bead embroidery. By contrast, flexible beading wire works better for most stringing projects (such as bracelets and necklaces).
Today, most beading threads fall into two categories: nylon and gel-spun polyethylene. (See box below.)
For some projects, we may want a thread that matches the bead color, because it’s going to show a bit between beads. At other times, we want the strongest, thinnest, smoothest thread available. And sometimes, we just use whatever is lying around. This is how we develop our thread preferences, by trying them all to find out what tangles least for the way we wield a needle, and what works best for a given project.
Nymo, a parallel multifilament nylon thread originally made for sewing leather, was one of the earliest and is still one of the most popular bead-weaving threads. You’ll find a lot of beaders who still wouldn’t consider using anything else. I tend to use the finer sizes of Nymo when I need an extremely thin thread. Here are some of its characteristics:
Silamide, a two-ply twisted nylon thread, is prewaxed tailoring thread that’s also been used for bead weaving for many years. Like Nymo, it has a group of devotees who use it exclusively. Interestingly, the Nymo people seem to cluster on the East Coast, while the Silamide lovers tend to gather on the West Coast. Here’s the lowdown:
C-Lon is a parallel multifilament nylon created just for beading, and it’s particularly good for bead weaving. Here are its properties:
Illusion cord, also known as monofilament nylon fishing line, is the only nonstretch beading thread that’s completely clear, which makes it great for floating or illusion necklace styles, but it’s not recommended for regular bead weaving. Check out the details:
PowerPro and FireLine, both made from gel-spun polyethylene, are high-tech fishing lines. Both are prewaxed, strong, and flexible with a soft hand. Because they’re so strong, these two threads can be difficult to cut with regular scissors, which tend to chew them without cutting. Surprisingly, the best scissors for cutting them cleanly are small, blunt Fiskars scissors made for children. Being hard to cut makes these threads ideal for use with crystals, which can have sharp edges that cut other threads. They knot easily, resist fraying, have near-zero stretch, and are available in very limited colors.
PowerPro is braided (similar in construction to plied or twisted thread made with four plies). Some other details include:
FireLine also has a braided construction, but feels thinner and smoother, and I find it easier to thread than PowerPro. Details include:
Q: What weight of thread is best for beading?
A: There are no hard-and-fast rules about which weights of thread to use. The decision depends not only on the hole size of the beads you’re using, but also on the stitch you’re weaving, and how many times you need to pass through each bead. Consider these tips:
Each beader’s thread preferences tend to be based on the type of work they do, the threads recommended by teachers and/or favorite books, and their own past experiences with threads. (See Threads: Multiple Choice)
New beading materials are constantly becoming available, so be sure to experiment with new offerings to find your favorites. It’s probably better not to be blindly loyal to a single brand of thread. For one type of work, you may choose a thread for strength; for another piece, a perfect color match may be the overriding concern.
Q: I bought a bobbin of Nymo thread and really liked it, so I bought a large cone of it. The thread on the cone doesn’t seem the same. What’s up with that?
A: The two threads are not the same, and there’s a simple explanation. Nymo thread originated in the sewing industry, where it is used for sewing leather. The cone serves as the upper thread on a powerful sewing machine, and the bobbin is used for the lower thread. To form the machine stitch correctly, these two threads are not the same; the upper one is heavier. So if you like the bobbins, stick with bobbins. If you want a slightly heavier weight, try the cones or spools.
Q: Why can’t I use the same string my beads come on to make a necklace?
A: When you purchase a strand of beads, it’s generally strung on either cotton cord or stiff nylon monofilament. Both methods are meant to be temporary. The cotton cord will rot and break over time, and the monofilament will not give a fluid drape to your finished piece. They’re both designed to be replaced with better materials when you’re ready to create a piece. These days, the material of choice for stringing projects (necklaces and bracelets) is flexible beading wire. (See chapter 7.)
Q: When is it necessary to wax the thread?
A: When weaving with beads, waxing your thread is a matter of preference. Some beaders always use wax, while others rarely do. But I can help you make an educated decision. A few reasons to wax:
Q: What kind of beeswax should I buy?
A: Pure beeswax for beading and sewing is usually sold in a small block or flat, round button, sometimes enclosed in a plastic case to keep it clean.
Another option is synthetic beeswax, sold in a small cup, which many beaders prefer over regular beeswax because it’s softer, stickier, and spreads more evenly than natural beeswax. Once I tried it, the synthetic form quickly became my favorite choice for bead weaving.
Q: What’s the difference between treating thread with Thread Heaven versus beeswax?
A: Thread Heaven is a thread conditioner with a synthetic formula designed to reduce static electricity and lubricate the thread, which helps keep thread from tangling. It’s packaged in a little blue box that lasts for years. Although applied to thread in the same way as beeswax, Thread Heaven is less sticky than beeswax, so it doesn’t build up and clog your needle, but it also doesn’t assist in beading more tightly the way beeswax does.
I generally prefer beeswax over Thread Heaven, but many other beaders love it. Which product you choose depends on the type of work you’re doing. Try Thread Heaven if you’re having trouble with static electricity and tangling. Use real or synthetic beeswax if you want to work firmly, for example when bead weaving a vessel or other structure that needs enough body to stand up. Use the tools that help you succeed and reduce the hassles you encounter.
Q: How do I use these products to wax or condition my thread?
A: The goal is not to carve the thread into the wax, but to deposit a light, even coating of wax on the thread. Here’s how to condition your thread:
coating a thread with wax
Q: What length of thread should I work with?
A: My quick answer: As long as you can tolerate! I like to work with a long thread so I don’t have to stop and add thread often. Adding thread can take time, especially when you’re weaving tightly on an intricate piece.
But if you’re a beginner or find that your thread tangles easily, start by using a shorter thread. This will give you more practice at tying secure knots, and you can build up to longer lengths of thread after you’ve had a little more experience.
I usually suggest that beginners start with about 1 yard of working thread, plus whatever amount they want to leave as a tail (which may be used for adding a clasp or working an extra row later). Another alternative is to cut a 2- to 21⁄2-yard length of thread, and wrap half of it into a small ziplock bag. Begin work at the center of your piece or design. When you’ve finished working with the first half of the thread, you have another fresh thread ready to work in the other direction, without stopping to add thread.
Q: Sometimes I get a knot in my beading thread, or even in a fine metal chain. Do you know any tricks for untying knots?
A: I do have a trick for untying knots that seems to always work. First, recognize that the only difference between a tangle and a knot is that when a tangle is pulled tight, it becomes a knot. You can loosen a knot back to a tangle using two needles or pins. Here’s how:
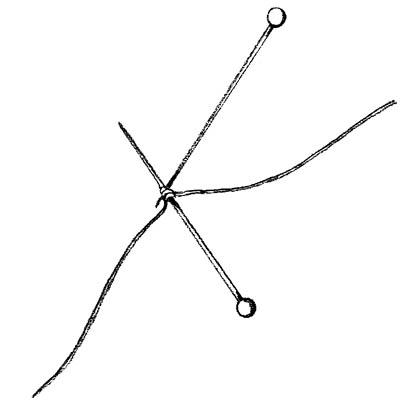
teasing out a knot
Q: I’m weaving a project with 13° Czech seed beads. How do I get through these beads several times?
A: You’re not only working with very small beads, but the Czech beads also have relatively tiny holes. For this work, you’ll need a thin thread such as Nymo 0 with a size 13 needle. (See Threads: Multiple Choice)
If you run into tight spots where the needle won’t fit, such as when adding a new thread, switch temporarily to an even smaller size 15 needle. These needles are more expensive, harder to thread, and break rather easily, so I suggest reserving them for emergency tight spots.
There are several ways to keep track of your beading thread. You want to be able to put your hands on it quickly, so find the method that works best for you. Here are some ideas:
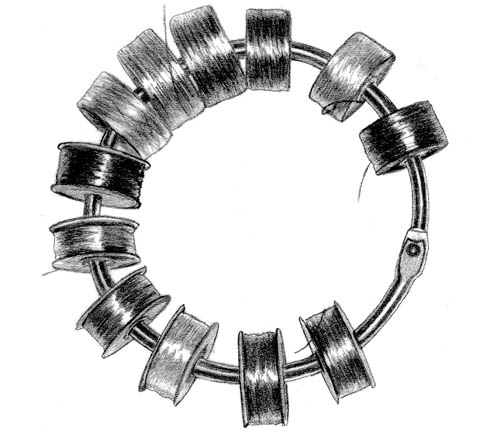
thread bobbins organized on a binder ring
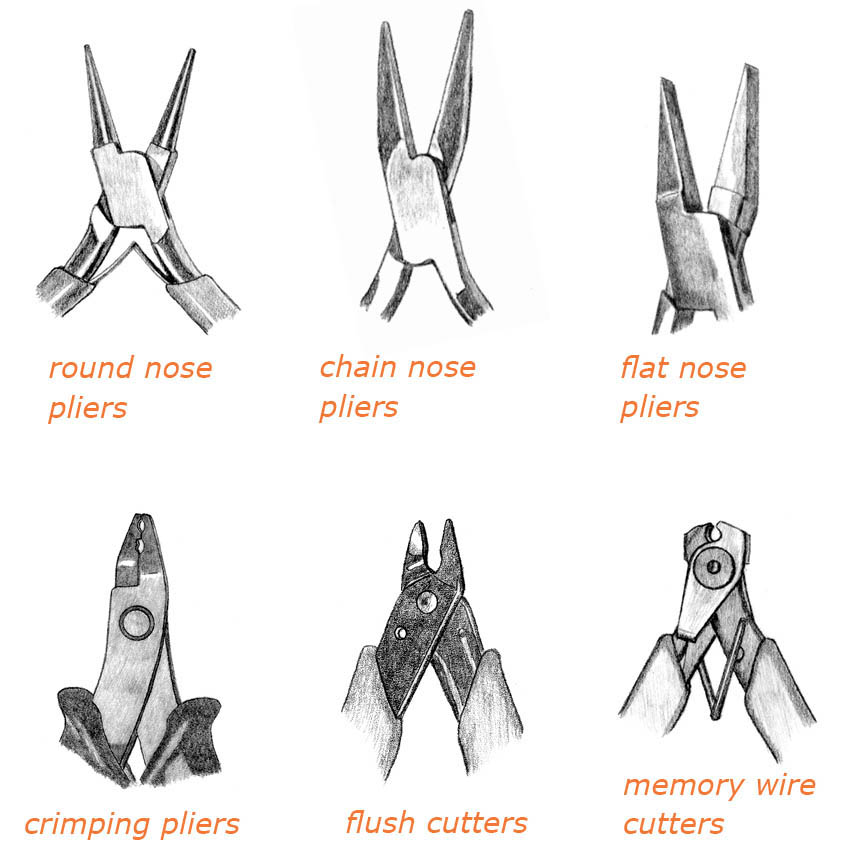
Q: What the heck is a stopper bead? Do I really have to use one?
A: Yes and no. The purpose of a stopper bead is to prevent beads from falling off the end of the thread at the beginning of a weaving project before you have a chance to get a couple of rows completed. It’s a helpful thing.
You add a stopper bead by stringing it and then passing through it once again (or even twice) in the same direction, without piercing the previous wrap of thread. The bead is able to slide along the thread but still provides a little tension.
Instructions often say to use a larger or contrasting bead for the stopper bead, but I usually just use the first regular bead of my row. This way, I don’t have to locate a different type of bead, and I don’t have to bother removing it later. When it’s no longer needed for tension (usually after the first few rows are completed, but there’s no hurry), just remove the extra wrap(s) of thread around the first bead.
Once you become comfortable with starting a piece of bead weaving, you may find that you don’t always need a stopper bead. Use your own judgment.
Q: Instructions often warn not to split the thread, but I don’t really know what this means. Will something bad happen if I do?
A: Yes, what’s the big deal about splitting thread? Frequently beading instructions tell you not to split your thread, without telling you why not, or how to avoid it.
First, the why: When you insert the needle through a bead and split or pierce through the thread that’s already inside the bead, it:
Now, how to avoid splitting the thread: When you insert your needle into a bead, lift up gently on the needle to create some “air space” at the top of the bead hole and slide your needle into that space. Creating a space helps you to avoid piercing other strands of thread that are already inside the bead hole.
Some expert beaders snip off the sharp tip of their needles, so they’re working with a blunt needle, rather than a sharp point. Using a blunt needle can help to reduce splitting, because the tip won’t pierce the thread so easily. If the snipped-off end seems rough, you can smooth it by dragging the tip several times across a jeweler’s file or emery board.
Q: I often see instructions to leave a thread tail at the beginning of the work, but I never know how much to leave. Why should it be 4”?
A: When instructions say to leave a 4” tail, be aware that 4” is the least amount of thread to leave at the beginning of a piece of work, as it is just enough thread to weave in the tail after the piece is completed. If you think you might want to add a clasp, or work an extra row or two, or you just aren’t sure what you want to do yet when beginning a piece, please consider leaving additional thread. Thread is cheap. You can always cut it off if you don’t need it.
I recommend leaving at least 12” to 18” of thread as a tail, so you don’t have to add on a new thread later just to complete a small bit of sewing. If a longer tail of thread gets in your way when you’re starting the piece, wrap it up and put it into a small ziplock bag. It will stay clean and unknotted until you need it.
Q: Do I have to buy a lot of tools to start beading? What are the most important things I need to get started?
A: One of the great things about beading is that you really don’t need a lot of tools and supplies to get started. I know that most new beaders would prefer to spend their money purchasing beautiful beads, rather than spending it on all the peripheral supplies. Some basic items you’ll need right away, while others can be added gradually as you refine your techniques or branch off into different types of beading. Here are the basics to get you started:
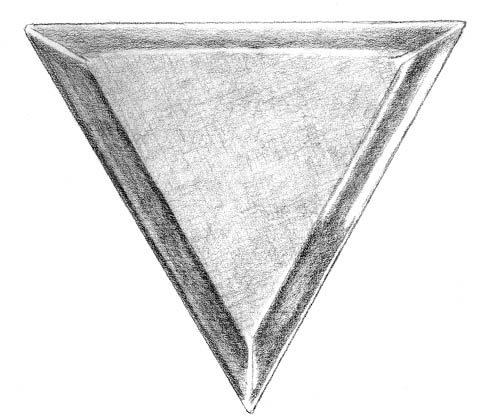
A triangle tray is handy for either sorting or scooping up beads.
SEE ALSO: Stringing Tools, and Wire Tools
Q: Do I need any special scissors for beading?
A: Besides the sharp-pointed pair that’s so helpful for closely trimming threads from your work, you’ll also need a pair of kids’ scissors to cut strong, “uncuttable” polyethylene threads. For some reason, the blades on these scissors align just perfectly for cutting these tough threads.
Q: When I use hand tools on metal, especially sterling silver, my tools leave scratch marks. How can I prevent these dings and scratches?
A: The goal is not to crush the wire with the tool, but to grasp and hold it gently so it can be bent or shaped. To prevent scratches on sterling, you can use a piece of soft cloth between the metal and the pliers. If you need to use electrical pliers in a pinch, wrap the ridged jaws of the pliers with masking tape.
Liquid rubber products are also available, which you can use to coat the tips of pliers. Such products dry smooth and soft to prevent scratching or scarring, and the rubbery texture makes it easier to grip wire and other metal findings. Available in a variety of colors, liquid rubber is easy to peel off and reapply when needed. Look for these products in beading stores; in jewelry-making or beading catalogs; online at jewelry-making, beading, or auction Web sites; and in hardware stores.
As you practice and do more wirework, you’ll learn to use your tools more gently so they don’t mar the wire.
SEE ALSO: Wire Tools
Round nose pliers have two smooth, tapered, cone-shaped tips that are used to make loops of different sizes, usually at the end of a wire, or on a headpin or eyepin. This is probably the most important tool for doing wirework. If you’re able to purchase one good German hand tool, make it this one. Round nose pliers are available in a variety of sizes. My favorite pair has long tips that offer a lot of options for loop sizes, from tiny to large.
Chain nose pliers have smooth, flat, tapered tips that are good for getting into small places. Use them for opening and closing jump rings, gripping wire firmly but gently, attaching bead tips and other findings, breaking out an extra bead, and pulling the needle through a tight spot. (Be careful not to force it, however, or you may break the bead.) Chain nose pliers are also available with bent tips. Pliers with very long, tapered tips are sometimes called needle nose pliers.
Flat nose pliers are similar to chain nose pliers but with wider, squared-off jaws. These also have smooth jaws and are good for making clean square bends, but are less versatile for many types of wirework because they don’t fit into tight spaces.
Crimping pliers have a unique two-section jaw that allows you to securely attach a crimp bead in any stringing project by first crimping the bead around the wires (first jaw section) and then folding the crimp bead onto itself (second jaw section).
Flush cutters/diagonal wire cutters can be used for cutting regular, soft, and half-hard metal wire. The backs of the blades meet smoothly so they create a straight cut, while the fronts of the blades make an angled cut. For smoother work, always place the straight cut on the wire end that will be visible in your piece. If necessary, flip the tool and cut again so both ends are smooth. To cut flexible beading wire as discussed in chapter 5 (see here), use the SoftFlex flush cutter, which can also be used for cutting regular wire. Don’t ever use either of these flush cutters on memory wire, which is hardened steel and will ruin the cutters.
Memory wire cutters are the appropriate cutters to use on memory wire, which is made from hardened steel and requires a heavy-duty cutter that basically snaps the wire rather than cuts it. You can also use a pair of cutters designed for piano wire.
Q: I prefer to use split rings because the double wrap is more secure than an open jump ring. But when I open these little rings with a fingernail, I tend to launch the ring across the room and lose it. Is there an easier way?
A: I agree that the fingernail “tool” is convenient because it’s attached to the arm, but I lose far fewer split rings if I use a pair of split ring pliers or tweezers. Made just for this job, the tool has a small “L” on one jaw that presses one side of the split ring open and holds it in that position while you attach the clasp or other finding. Switch to chain nose pliers and rotate the ring until the object is completely inserted. This method results in fewer lost rings.
Small-diameter split rings are more challenging to use than larger ones. It takes practice to insert a clasp or other ring into the split ring without distorting its shape. Especially with smaller split rings, pliers take care to open them as little as possible.
split ring pliers
SEE ALSO: Beading Essentials; Examples of Findings; and Wire Findings
Q: How can I learn to work with smaller beads, if I can’t really see them?
A: You’re touching on the most important beading tools of all: magnification and light. If you can’t see the beads clearly, you won’t be able to follow the stitch or execute the design.
The problem is that many beaders do not realize that they’re not seeing the beads well. Regular prescription glasses that are perfect for reading and driving may not provide the magnification needed for beading. Remember that your doctor’s goal is to correct your distance or close-up vision, but for beading, we really want to see those tiny beads a little larger than life-size. For that reason, it’s helpful to have a pair of stronger reading glasses on hand.
Magnification. If you’d like to wear your prescription glasses plus obtain some additional magnification, you have several options:
Each of these styles is available in a variety of magnification strengths.
Lighting. Good light is another essential “tool” that you need. Here are some pointers:
Q: Before I crimp and finish off a necklace or bracelet, I like to try it on to check the length and make sure that I like the design and bead arrangement. How can I try on and play with the piece without dropping the beads on the floor?
A: Yes, this is tricky. In my stringing classes, I can count on at least one person dropping their carefully arranged efforts on the floor before the piece is completed. There’s an easy solution to this problem.
First, never rely on your fingers to hold the wire. Wire can be slippery and hard to control. Before you walk around with the piece to examine it in the mirror or test the length, or anytime you’re not quite ready to crimp and finish the piece, be sure to secure each end to prevent accidents. One easy method is to fold a strip of invisible tape around the wire. This works well if you plan to finish the piece fairly soon. (If you wait too long, you may find a sticky residue from the tape on your wire.)
Other helpful tools are available. For years, beaders have used a hemostat (a tool used in surgery) or an electrical clip at each end, but each has its drawbacks. The hemostat is heavy and clunky, and the electrical clip has sharp teeth that can cut through the protective nylon coating on the beading wire.
There’s another nifty gadget that offers the perfect solution, called a stopper clip. (See Resources. It has coils of smooth wire that safely grip your beading wire without cutting into it, causing kinking, or leaving a residue. This little spring device is so secure that you can place one on each end of the piece and then walk around with it, try it on, or transport it in your bag without worrying about losing beads. It won’t come off until you squeeze the ends to release it. And it’s so small that you can stash a pair in your beading kit so you’ll always have them handy. It’s one of those inexpensive accessories that you don’t want to live without.
stopper clip
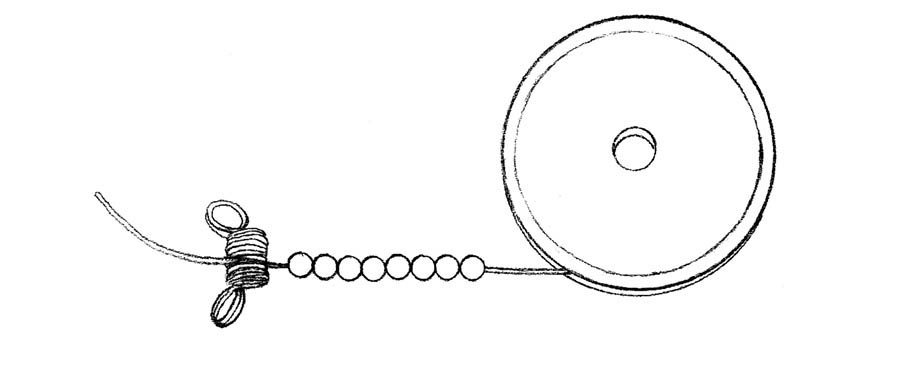
A: A bead spinner is a handy tool to help you string solid-color or randomly mixed seed beads more quickly. The spinner is basically a small bowl with a spindle or post at the center. Here’s how it works:
When you first try using a bead spinner, experiment a bit to get the angle of the needle right for picking up the most beads. It doesn’t take long to become proficient in using this helpful tool. Bead spinners are available at local bead stores and online. (See Resources.)
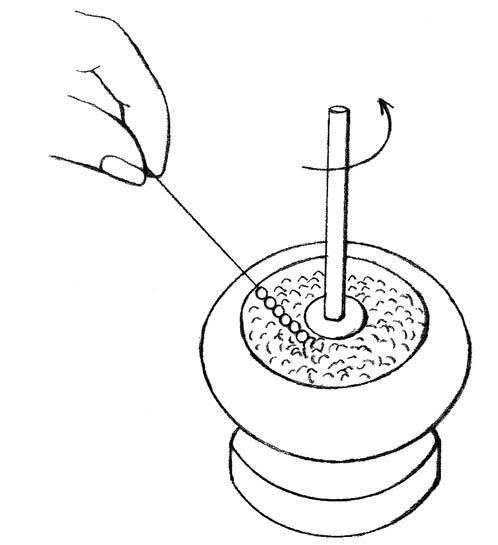
bead spinner
Q: Is there an easy way to make bead holes larger?
A: For removing glue on a few beads in a restringing job or widening the holes in a couple of pearls, it can be very helpful to have a set of bead reamers or broaches. The steel reamers are graduated in width and have five cutting surfaces along the length of each tool. The tiny sizes are fragile and break easily, so use them with care.
I must include a few words of caution. The reamers work best on softer materials such as pearl, amber, and sterling silver beads. Don’t try to use them on hard bead materials such as glass or hard stone, or you will quickly dull the cutting blades. And don’t plan on reaming out uneven holes on an entire strand of beads! This is not a fun or an easy job, and it’s the reason we attempt to purchase beads with well-made holes in the first place. (See here.)
For serious hole drilling, you’ll need a more professional setup, such as a drill with a flexible shaft and diamond drill bits in various sizes. (See Resources.) Some materials must be drilled underwater, so they don’t overheat. If you have a friendly local jeweler, you may be able to pay him or her to drill out a couple of troublesome bead holes for you.
set of bead ream
Q: My friend makes wedding dresses, and worries about keeping her hands clean so she doesn’t stain the dress. Does this problem come up in beading?
A: You bet it does, and for the same reasons. Whenever you’re working on something white or light-colored, especially a fiber-related piece such as knotting pearls or bead embroidery, it’s essential to keep your hands clean and dry. Just a bit of sweaty hand grunge transferred to the silk cord, beading thread, or background fabric can give a ground-in dingy effect that won’t go away with washing or cleaning. So, wash your hands or keep a small pack of baby wipes or instant hand cleaner in your beading bag to use before starting to work on a light-colored project.
Q: I love matte beads, and can’t always find them in the colors I want. What do you suggest?
A: As bead lovers, we are lucky that beads today are available in more colors, finishes, and options than ever before. But if you can’t find a certain glass bead that you want in a matte finish, or you already own some shiny beads that you wish were matte, there is an easy way to matte the beads yourself. Liquid, nonacid etching products allow you to matte any glass object by immersing it in etching solution for 15 minutes or so. Etching solutions are relatively expensive but reusable, so a jar lasts a long time. You can probably buy or order some from your local bead store, or it’s available from various online suppliers. (see Resources.)