Crocheted Rope Bracelets
Q: I like to knit and love to bead, but I don’t understand why anyone would want to add beads to knitting or crochet. Aren’t they very different types of work?
A: Actually, combining beads with fiber adds a whole new dimension to both! Glass has such a wonderful relationship with light, and can bring some of that light into relatively opaque threads and yarns. The hard, smooth surface of glass provides a beautiful contrast and intriguing texture, while the fiber adds fluidity and drape. These mediums have been combined for centuries, in knitted beaded purses; heavily bead-embroidered wedding costumes; and bead-woven aprons, neck- and arm-rings, and head pieces.
Q: Okay, so how does it work?
A: The usual method for creating bead crochet or knitting is to prestring beads on thread or yarn. You then slide them into place as you crochet or knit, so each bead (or group of beads) is captured in or sits above a stitch. To combine beads with crochet, you can use a number of different styles.
SEE ALSO: Knitting with Beads
Q: My friends all seem to be crazy about bead-crochet ropes. What’s so great about this technique?
A: Well, for one thing, the resulting bracelets provide wonderful opportunities to play with color and patterning. They’re soft and comfortable to wear, can be worn in coordinating sets, and make terrific gifts. Sewn with an invisible join, they look seamless and there’s no need for a clasp. The bracelets roll over your hand and can fit the way you prefer, either close to the wrist or more loosely like a bangle. The fluid, claspless style is especially comfortable for those of us who bang around on a mouse all day.
When beads are strung on thread and then crocheted in a spiral — with a bead placed in every stitch — the beads form a cylindrical tube or rope. The thread becomes nearly invisible. These supple beaded tubes are certifiably delicious and addictive, both to make and to wear. For examples of this style, look for beadwork by Martha Forsyth and Pat Iverson, as well as books by Judith Bertoglio-Giffin, Carol Wilcox Wells, and many others. (See Resources.)
Q: I already know how to crochet. Why does everyone act like bead crochet is so hard to learn?
A: Making bead-crochet ropes is one of my favorite beading techniques, but I also think it’s one of the more difficult to learn — and teach! Even if you know how to crochet, learning to crochet beaded ropes is different, because the work is small and placing the beads correctly adds another level of skill. Bead crochet requires dexterity in both hands, the ability to control thread tension, good vision, and the patience to work with tiny objects. For beginners learning the technique, the trickiest two areas seem to be starting the rope and learning to make an invisible join in the finished rope.
If you’re having trouble learning, stick with it! It’s well worth the effort. I’ll give you a lot of troubleshooting tips here, which may help you over the hurdle. Or that next class may be the one that makes it all come together for you. These flexible, comfortable bracelets are my daily companions. I don’t go anywhere without wearing several of them on my arm.
Q: My bead-crochet teacher is insisting that the members of our class make several bracelets in multicolor spiral patterns with opaque beads that are all the same size. This seems boring and so restrictive. Why can’t I make the crocheted ropes I want?
A: Don’t worry, you’ll be making the ones you want soon enough! It’s a good idea to trust your teacher, who has probably taught bead crochet to quite a few others before you and knows some of the tricks that make it easier to learn the technique. A few people seem to pick it up easily, but for many students, crocheted ropes can be difficult to learn. When first learning to crochet a beaded tube, a recent student called it “horrifying,” which is quite a strong word for a really fun beading technique, but it’s the way a lot of students feel while they’re learning. She can laugh about it now.
Try not to be too impatient. After you’ve made a few simple crocheted ropes with spiral designs, you’ll have the confidence to try incorporating other sizes of seed beads, drops, small Czech glass donuts, pearls, or crystals, and to attempt more elaborate patterns. Making a solid color rope is probably the most difficult of all, because there’s no pattern to follow as you crochet the beads. It can be relatively easy to “lose” a bead, which means suddenly finding you don’t have the correct number of beads in your round.
Some bead-crochet students learn the technique in a class or two, while others come back for 10 or more classes before they feel completely confident to crochet a rope from start to finish on their own. Take your time, practice, and enjoy the process. If you’re determined to master the technique, you will.
One of the easiest ways to learn is to have an experienced bead-crochet friend or teacher begin the rope by crocheting 1” of the tube for you, so you’ll have something to hold onto. It’s much easier to take over and practice the beaded slipstitch until you feel comfortable with it, matching a red bead over a red bead of the previous row, a white bead over a white. That’s why we use six different colors to learn, so you can see the pattern and know it’s correct. Once you’re comfortable with the crochet technique, it’s easier to go back and learn how to start the tube. But if you don’t have a crochet friend handy, it’s okay to start at the beginning. Learning this way, the process may seem slower. Be patient with yourself.
Q: If I want to learn bead crochet on my own, what’s the best way to start?
A: Of all the various types of beading that you might want to learn, I think bead crochet benefits most from learning with a teacher. Many local bead stores offer group classes or individual coaching sessions, which will help you identify mistakes quickly and get you started with good technique. But, of course, it’s fine to try it first on your own. First read Pointers for Bead Crochet (see above), and let’s see if I can get you started.
Note: These instructions assume that you are right-handed. If you work left-handed, you’ll hold the hook in your left hand and carry the thread in your right, just the mirror-image of these directions. You’ll be crocheting in a clockwise direction, but the rest of the directions remain the same.

step 3: string six colors in an A-B-C-D-E-F pattern.
step 4: make a slipknot
Find a comfortable way to provide tension on the thread to keep it from slipping. One way is to wrap the thread around your left pinky finger a couple of times and then over the index finger. Another method is to wrap the thread around the ring finger and then twice around your index finger.
how to hold a crochet hook and thread
step 7: making a chain stitch around a bead
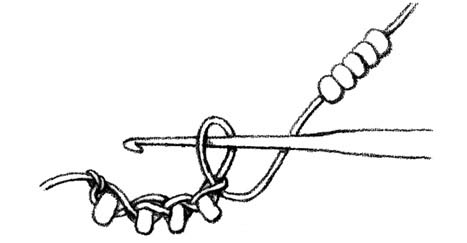
step 8: chain stitch with beads captured inside
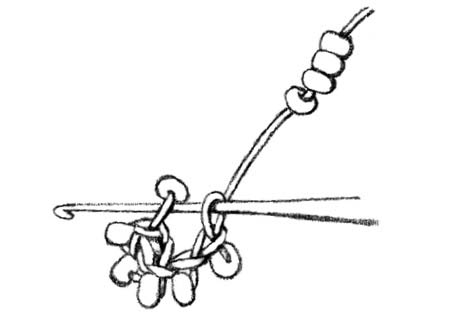
step 10: closing the circle
To make it easier to pull the thread through the loops on the hook, slide the loops up the hook to make the loops larger. Then grab the thread, pull it through, and rotate the hook down toward you so it doesn’t catch on the loops as it passes through. Maintain even tension on the thread. If you pull too hard, the work will be too tight; too loose and the loop will flop off the hook.

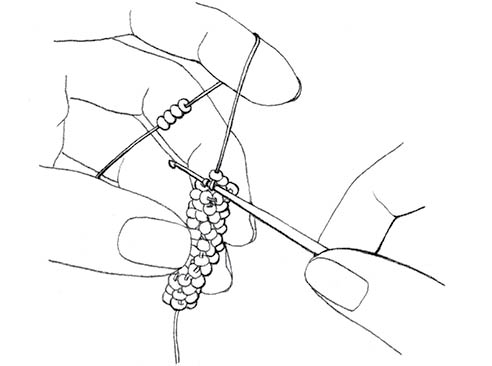
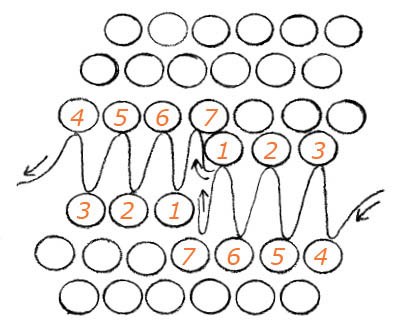
step 13: working the second round
Notice that for each stitch, you’ll work a yellow bead on top of the previous yellow bead, a red bead on top of the red, and so on. When you move to a more complicated stitch pattern, this will no longer be true, but for now it can help you stay on track. Also notice that the beads in the top row are standing up sideways, while beads that have been crocheted and flipped into place are sitting down flat on their holes, so the holes are vertical. If you ever fail to flip a bead correctly and keep the new bead above it, you’ll get a visible mistake, with a “loose” bead that’s not sitting correctly.
Q: What does it mean when you refer to “six-around?”
A: The number of beads “around” refers to the number of beads worked in each round of the rope, with one bead in each slipstitch. It determines the diameter of your rope. Various patterns require differing numbers of beads per round, to create the design.
Q: How many beads do I need to string to make a rope?
A: A rough guideline is that 42” of strung beads will make a 7” bracelet, when crocheted six around. This equals 6” of beads for 1” of finished rope. From here, you can calculate quantities based on the size bead you are using. For example, if you’re using 11° beads, which run 19 beads per inch, multiply 19 times 6 to determine that you need 114 beads per inch of rope. For a 7” bracelet, multiply times 7 for a total of 798 beads. Now divide by 6 to find that you need 133 beads (1.21g) of each color.
A different number of beads crocheted around will create a difference in the number of beads that need to be strung:
As you plan your rope, keep the following in mind:
After you’ve made a bracelet or two, you can switch to a stronger topstitching-weight polyester thread. These threads come in a wide range of colors and are more durable than cotton. They may be more difficult for a beginner to use, though, because they’re springier and can be easier to split with the crochet hook.
To crochet a bracelet 7” to 71⁄2” long, here’s a guide to approximately how many beads you’ll need.

Q: Okay, so now I have a bead-crochet rope. How do I join it into a bracelet?
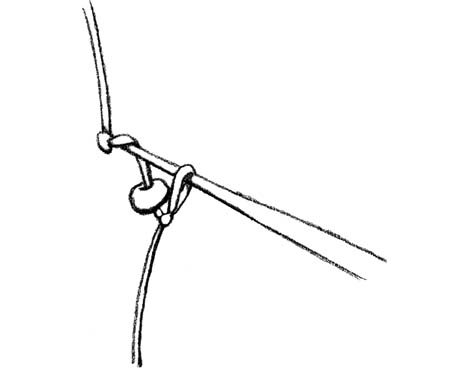
A: The invisible join is a beautiful thing, like fitting tiles neatly together. Here’s how:
step 3: stitching the ends together
For the bracelet with six colors around and most other spiral repeat patterns, you’ll notice that the colors match up when you’re sewing the ends; red on bottom sewn to red on top, yellow on bottom sewn to yellow on top, and so on. Colormatching can be a big help when learning to join, a reassuring check that you’re aligning the bracelet ends correctly.
Q: I just strung a whole length of seed beads in a complicated pattern to make a bracelet. Now I see that there’s an extra bead in the pattern, way back near the beginning. I don’t think I can stand to string it all over again! What should I do?
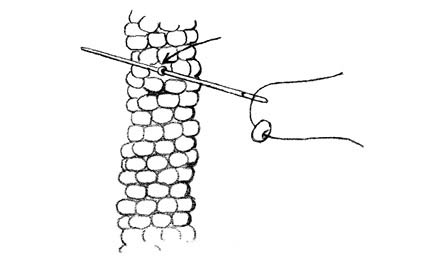
A: If you picked up an extra bead by accident, you can break it so your pattern will be correct. The trick is to break the bead without cutting or damaging the thread inside it. If you simply break the bead with pliers or wire cutters, the sharp edges of glass can easily slice the thread. Here are two possible solutions, either of which is a lot faster than restringing the entire design:
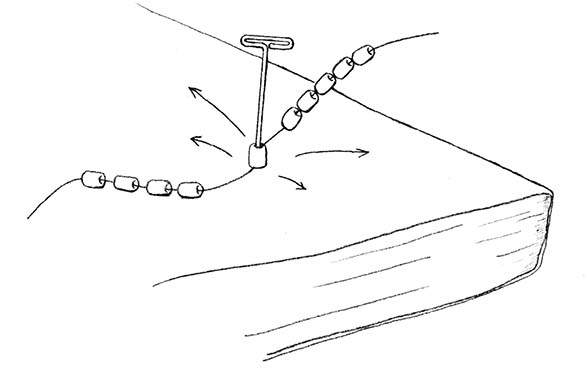
breaking an extra bead with a T-pin
Q: What if I missed a bead?
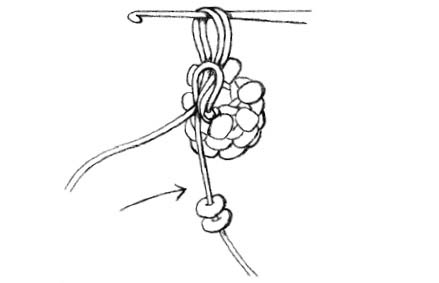
A: If you’ve left out a bead in the pattern, mark the spot with a small safety pin, or tie on a piece of contrasting thread. When you reach that part of the design, crochet a chain with no bead at that spot. On the next round, be sure to work into this stitch so your pattern will be right. Later, sew a bead of the correct color in place using sewing thread.
correcting for a missing bead
Q: Help! I’m running out of thread in the middle of crocheting a bracelet!
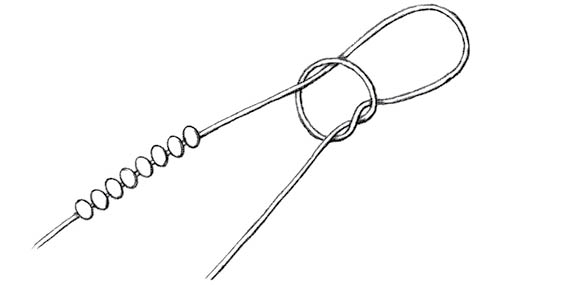
A: It’s not difficult to join a new spool of thread securely. Make sure it’s the same color, though, or it can have a dramatic effect on the look of the bracelet. There are a number of ways to add thread; this is how I do it.
step 4: adding new thread
Q: Sometimes I have a bead in the tube that doesn’t look quite right; it’s looser and sits sideways, instead of horizontally, on the tube. How can I fix that?
A: You’re describing a common error made in bead crochet, especially by beginners. When you crochet through a loop and flip the old bead away from you, the thread must travel straight up from the row below, without wrapping around a bead. The new bead you’re adding must remain on top of the flipped bead. If the new bead slips below it, you’ll get a strange, floating bead in that row.
To avoid this mistake, make sure the old bead is pushed down firmly after flipping, with the thread coming straight up beside it and the new bead sitting on top.
Once the tube has been completed, this is not an easy problem to fix. You can try turning the bead into the correct position and anchoring it with a couple of hand-sewn stitches, which may look fine if the pattern is relatively busy.
The best solution, to quote expert crochet instructor Ann Feeley of Boston, is to “stop and admire your work” often while crocheting, and rip out any row that doesn’t look quite right. The top row of beads should all be standing up sideways, while the previous rows should all be seated neatly with vertical holes. If you check your work often, you’ll learn to catch these problems before you continue crocheting.
Q: What about thread color? Does the thread really matter, since it doesn’t show very much?
A: Even though the thread seems to nearly disappear between the beads, the choice of thread color actually has a significant effect on the design and look of the finished rope. It can be a lot of fun to play around with the thread color as an additional design element. If you’re using transparent beads in your design, be aware that the thread color will show through and affect the bead color. A lot of bead crocheters always use thread that matches their beads. This is one good option, but it is certainly not the only choice.
Let’s say you want to crochet a summertime rope using opaque aqua beads. You can play it safe and try to match the thread as closely as possible, or break out of the box and try bright orange thread. The orange thread may make the piece really pop!
One of my favorite bracelets uses chrome yellow thread with olive luster beads and chardonnay-mix drops. You don’t really see the yellow thread, but it makes the bracelet appear to be lit from within. Made with olive thread, it’s a completely different bracelet.
For another interesting effect, try using light gray thread for crocheting pale pink transparent 8° seed beads. String a silver-lined light gray 3mm square bead every 43 beads, and crochet six-around. The result is delicate and not too sweet, like an antique piece.
So go ahead and have fun with the thread color. It can be an interesting experiment to make the same bracelet twice, using the identical beads and stringing pattern but with two different thread colors. See how much difference the choice of thread can make. And remember: The difference will be even greater if you’re crocheting with larger beads or tend to crochet more loosely.
Q: I’ve learned how to do crocheted ropes, and my work usually looks good. Sometimes, though, the rope seems a little too stiff or the beads too loose, so the pattern doesn’t look quite right. Do you have any ideas to help me with that?
A: Your question is really about crochet tension. If you crochet too tightly, you’ll end up with a stiff, inflexible rope. At the extreme, it may not even want to curve enough to fit around the wrist!
One solution is to relax more while crocheting, which often happens naturally as a person becomes more comfortable with the process. Even smiling and relaxing your mouth can cause your stitching to relax. (I could draw some parallels to labor and giving birth, but I won’t.)
Another solution is to adjust the size of the crochet hook. A larger shaft will create looser stitches.
For those times when your rope seems too loose, the beads flop out of their assigned places a bit so the design looks wrong, or you feel you’re seeing too much of the thread, try using a hook one size smaller to give a slightly firmer, more stable result. Larger-diameter ropes, such as those crocheted eight-around, are more susceptible to a looser look.
Each person has her own unique crochet tension, so it’s a matter of trial-and-error to determine the best-sized hook for the project you’re making. Most experienced bead crocheters are accustomed to tinkering with the size of the crochet hook to get the results they want. Even if you always use 11° beads, some of them run smaller (such as Czech 11°), while other 11° beads are relatively large (such as the French ones). Be willing to experiment. But in general, when you crochet with larger beads, you’ll probably want to change to a larger hook.
Q: If I don’t always want to make an invisible join, what are some other ways to finish crocheted ropes?
A: As an alternative to the invisible join, a crocheted rope bracelet or necklace can include a normal clasp, much like any other bracelet or necklace.
For a smooth finish at the ends, try adding a decorative Bali silver bead cap over each end of the rope before joining the clasp. The clasp can be sewn in place using the ends of the crochet thread, or a length of flexible beading wire can be strung through the center of the rope, through the bead cap, and then crimped around the clasp, as for any other strung bracelet or necklace.
For another finish that works beautifully on a crocheted rope necklace, try a Bali magnetic clasp as both the clasp and the focal point of the necklace. Use the end of the crochet thread to alternately stitch through a bead on the rope, the clasp loop, and the opposite bead until all beads are secured and the clasp fits snugly.
If you’re crocheting a skinny little rope with 2mm sterling silver beads (see Sterling Rope below), create a polished finish by sewing a matching 6° seed bead at each end as a transition to the clasp. Or, for a virtually invisible clasp, stitch half of a small, ordinary sewing snap onto each end of a crocheted rope necklace. It practically disappears when fastened.
Q: I’ve made a lot of bracelets. Can I crochet a piece that’s long enough for a necklace?
A: Crocheted ropes make beautiful necklaces and lariats. A lariat is a longer clasp-free style that’s worn with the ends draped over each other, or with one end looped through a ring at the other end. Be aware that as your rope becomes longer, it becomes more difficult to slide all the beads down the thread each time you need more thread to continue crocheting.
For a shorter necklace of 16” or less, you can string all the beads at once and crochet it in one piece. For longer necklaces, many crochet pros create the rope in sections, and then join the sections with invisible joins (see Making Bracelets). The sections can be all the same, or you can use a subtle or bold pattern variation in each section to create texture and variety.
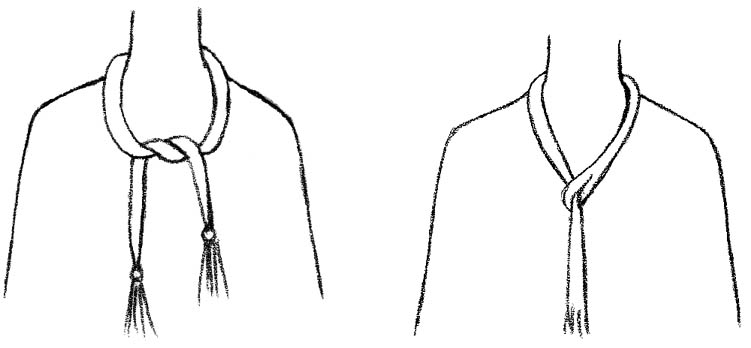
two lariat styles
For a beautiful, plain sterling silver necklace, string 2mm round sterling silver beads on light gray thread and crochet five-around.
Q: I’ve made a few basic ropes, but now I want to try some new patterns. Can you suggest a few?
A: The sky is the limit. Once you start doing bead crochet, you’ll notice others wearing and making these ropes, and meet other crocheters in classes. Crochet friends often swap favorite patterns, color combinations, and design ideas.
You can find other patterns in books and on the Internet, from simple to complex. Judith Bertoglio-Giffin’s first book, Bead Crochet Ropes, includes the Basketweave bracelet with an 84-bead repeat! (See Resources.) The chart of Bead-Crochet Patterns (see Bead-Crochet Patterns, below) shows the bead sequencing for several more basic crocheted rope designs, to get you started.
It can be difficult to imagine how these patterns will look when completed — and impossible to show effectively in this book. Varying the bead size, shape, and color will dramatically change the effect.
To make any of these ropes, you’ll first decide on a pattern, select the beads, prestring the beads in the pattern for the length you want, and then crochet it using the correct number of beads around. All of these are six-around patterns except for the last one; repeat each bead sequence for 42” or the desired length.
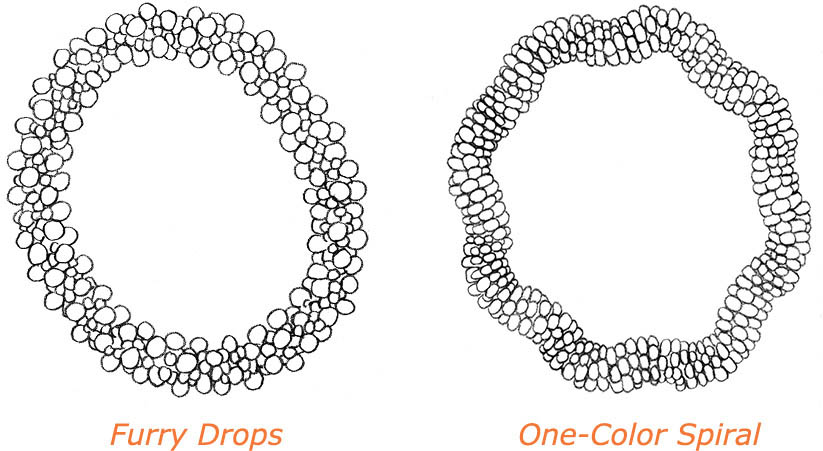
Furry Drops. Use 3.4mm drops (A) and one color of 11° seed beads (B). The drops come in many amazing colors and mixes, including metalliclined drops that have a wonderful, magnified, watery look when viewed through the wide end. For a fun variation, substitute 10° triangle seed beads for the 11° round seed beads. (See the finished Furry Drops bracelet.)

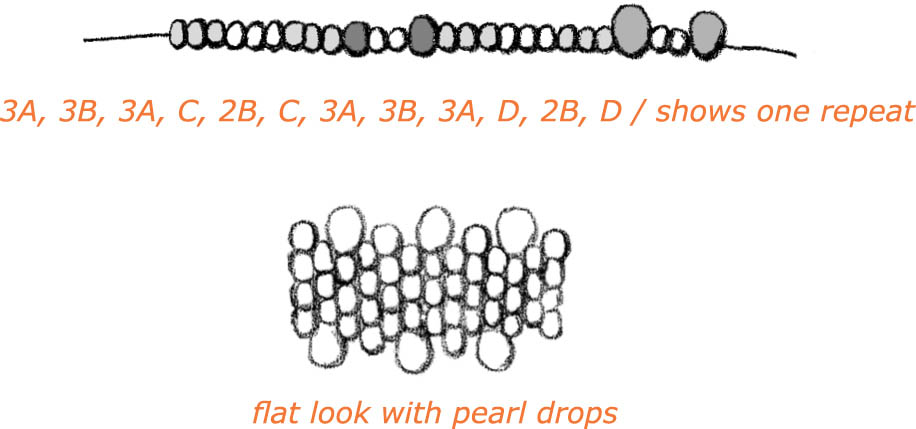
Textured Stripe. Use two colors of 11° (A and B) for some stripes, Delicas (C) for others, and 8° hex-cut beads (D) for another repeating stripe. Varying the bead shape and size adds an interesting texture to this simple bracelet. The extra bead (13 beads in each color instead of 12 that would typically be used in a six-around design) will create a little jog between colors. You can also make a Textured Stripe bracelet using random lengths of each color.

Dotty. Use 8° seed beads (A) and 11° beads (B). The larger beads will pop up off the background.

Scattered Crystal. As a variation to the Dotty pattern, try using 3mm crystals (A) and 11° seed beads (B). The crystals can be all one color, or alternate between three complementary colors. Slightly larger 4mm crystals look nice, too, but are a bit more difficult to crochet. My favorite bracelet in this style uses 11° beads in matte metallic dark green iris and crystals in citrine, olivine, and Indian red.

Classic Raised Spiral. Use one color of 11° beads (A), one color of 8° beads (B), and one color of 6° beads or 4mm crystal or Czech glass (C). This pattern makes a great texture.

Bumpy Spiral. Another interesting variation of this design adds a larger bead as every fourth bead at the center of the spiral. One of my favorites uses an 11° bead (A), 8° (B), slightly larger 8° hex-cut (C), and 2mm × 3mm Czech FP donuts (D). The bracelet has texture and sparkle, with the donuts poking out at interesting angles. Round 4mm Czech FP also works well as the pop-out bead.

One-Color Spiral. Try using 11° beads (A) and the same color beads in 8° (B). The larger bead creates a raised spiral. My favorite is in matte metallic dark green iris with burnt orange thread. Also try using variegated thread with transparent beads. The thread creates the color changes, from subtle to bright. (See the finished bracelet here, right.)

Crystal Flowers. It’s fun to make a set of skinny bracelets with 2mm round sterling silver beads (A), with flowers made of 3mm Swarovski crystal bicones (B and C). The flowers can zigzag evenly around the bracelet, or you can place three or four flowers on the top of the bracelet and leave the rest of the rope plain. Then, make a few that include just a single flower — adorable!

Tiny cord. For another delicate rope that makes a great necklace for a focal bead, use 13° charlottes (one-cuts) or 15° Japanese seed beads in a single color. If you use topstitching thread, the thread shows between beads and its color can become an interesting design element. To see only beads and no thread, use finer sewing thread (which will not provide as much strength). Use a headpin or wire to make a pendant with the focal bead, creating a wrapped loop at the top that’s large enough to slide along the rope. (See how to join a multistrand necklace using a cone.) The finished rope size is 3/16” diameter. For an even thinner rope, try crocheting three-around.

Q: About the crystal flower pattern: Isn’t it tricky to get the flowers to line up correctly?
A: There are a number of different flower patterns in crocheted ropes. But if you’d like to place several crystal flowers (see above) on a single rope, it’s fun for the flowers to line up along the top of the rope. So, spacing becomes important.
For crocheting six-around, string as follows, repeating for the desired number of flowers.
To make a rope with a single flower:
Q: Is it possible to make a crocheted rope ring? I saw one that looked crocheted, and I need a pattern.
A: You can make a crocheted rope ring using small beads such as 2mm sterling silver beads or 11° seed beads, crocheted three-around. One fun ring design has a flounce of larger beads at the top; either daggers or drops work well for the flounce.
To make an average-sized ring (the rope has some give):
Q: What about working with larger beads? How can they be used for crocheted ropes?
A: My favorite crocheted ropes are simple one-color designs made with larger Czech glass or semiprecious stones. They have a bold, chunky look when worn stacked in threes. And they work up very quickly! I use a size 9 steel hook with larger beads. Test to see which hook works best for you.
If you decide to crochet with large or irregularly shaped beads, I suggest working with doubled thread for added strength. To string and crochet with double thread, hold the two strands together and use them as one. I use doubled thread whenever working with beads larger than 8° seed beads.
Here are some juicy pattern ideas for larger beads. For stringing amounts, see Guidelines for Larger Beads.
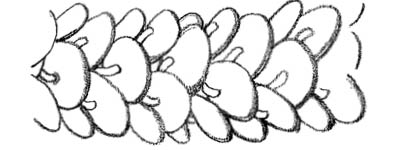
pinecone pattern with larger beads
It’s a good idea not to attempt a solid color bracelet until you are confident with working patterned designs. Using several colors helps you as you crochet each repeat by providing a natural reference point to the other beads in the pattern and allows you to notice more quickly when you have made a mistake.
I made the Squares bracelet (see here) in matte metallic dark green iris squares with pine green transparent 6° seed beads. Can you tell that I love this rich dark green? I also love to make bracelets in interesting sets, since I never wear just one bracelet at a time. If I’m wearing smaller 11° ropes, I may pile five or six on my wrist. With the chunky beads, a set of three coordinating bracelets looks good. So think of sets when choosing bead colors, and build around a color or two that you love and wear often.
Q: I feel like I’ve already explored so many of the patterns for 11° beads. Is it possible to make these wider by working more beads around?
A: Yes, you can crochet 11° seed beads with eight-around, which opens up a whole new range of pattern possibilities. If you work with a number higher than eight in each round, the tube may start to collapse (although you can try filling the tube with fabric cording or plastic tubing, if you want). When you crochet with eight-around, you may find that changing to a hook one size larger gives a smoother result.
Some people prefer to string and work from a charted pattern, while others are happy to follow a list of beads to string. As the pattern becomes more complicated, it’s probably easier to follow a chart. In this chapter I’ve presented patterns both ways, so you can try them both.
Here is a gorgeous diamond pattern developed by Barbara Bush of Boston for 11° beads worked eight-around. It’s designed for four colors (A, B, C, X), but can easily be adapted to more or fewer colors after you’ve made one and learn how the colors are placed.
To understand this pattern, note that each line is a row, and each line adds up to 8. You can string them in order, then crochet it like any other pattern, but with 8 beads in each round.
Row |
Pattern |
1 |
1A 4B 3X |
2 |
2A 3B 3X |
3 |
3A 2B 3X |
4 |
4A 1B 3X |
5 |
5A 3X |
6 |
1C 4A 3X |
7 |
2C 3A 3X |
8 |
3C 2A 3X |
9 |
4C 1A 3X |
10 |
5C 3X |
11 |
1B 4C 3X |
12 |
2B 3C 3X |
13 |
3B 2C 3X |
14 |
4B 1C 3X |
15 |
5B 3X |
The Diamond Twist pattern looks beautifully luminous in four closely coordinating colors, such as silver-lined gold, copper, light brown, and medium brown, or silver-lined crystal, amethyst, and two soft shades of blue.
Q: What if I’d like to make up some of my own patterns?
A: Developing your own bead-crochet patterns can be a lot of fun. The process requires a certain amount of trial-and-error to make the parts of the design end up where you want them on the rope, but the results will be worth it. One way to begin is by varying an existing design that you like. Another method goes as follows:
To design original patterns, some crocheters have adapted graphing software to meet their needs. Others chart their designs on diagonal strips of bead-crochet graph paper and then wrap the paper around a pencil or other cylinder to test it. Be aware that the diameter of the cylinder will affect the way the beads line up, and some patterns twist more than others. Also remember that changing the number of beads around the rope will alter the pattern.
If you use water-soluble markers, you may be able to wipe the dots off the white beads and reuse the test piece a few times. Shiny white beads are easier to wipe clean than matte white ones.
Q: I’ve seen a different type of bead crochet that looks artsy and organic. Do you know how this is done?
A: There’s another style of bead crochet that tends to be much less symmetric and more free-form. Often worked in single-crochet instead of slipstitch, it can include:
Rather than the regular repeats of crocheted ropes, this random style often includes a wide variety of bead shapes, sizes, and colors combined in a more organic fashion, which may be crocheted in a tube or back and forth in rows.
Selecting and arranging the beads can be very playful and creative. This style includes the work of Bethany Barry, as seen in her book Bead Crochet: A Beadwork How-To Book, as well as some designs of Lydia Borin (search for her work on the Internet).
For more organic bead crochet, such as a rectangular bracelet, you’ll prestring beads on the thread just as for bead crochet ropes, using a mix of 8° and 6° seed beads, drops, squares, triangles, crystals, Czech glass beads (daggers, ovals, rondelles, and rounds), Bali silver beads, and small lampwork and furnace glass beads. For strength and to provide a sturdy fiber base, you’ll want to string the beads on a heavier nylon cord or nylon upholstery thread. (See Resources.)
This random style of bead mixing is often referred to as “bead soup.” Adding three beads to each single-crochet will create a short, beaded drop in each stitch.
If you have difficulty fitting the thread with a large-eyed needle through some of your beads, you can stiffen the end of the thread by cutting the end on an angle and painting about 3⁄4” of thread with nail polish, fray reducer, or correction fluid; roll it between finger and thumb and allow it to dry. Now use the stiffened end of the thread as a needle to pick up the beads.