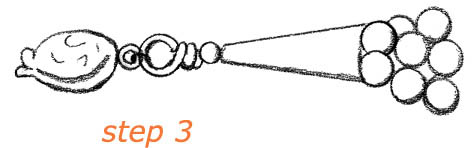
memory wire bracelet
Q: When is it a good idea to use memory wire?
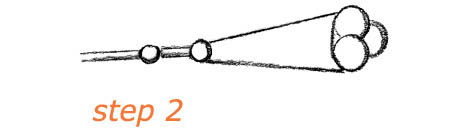
A: Steel memory wire is another stringing material that can be used to make quick, fun bracelets and other jewelry. Memory wire is made from hardened steel that retains its shape, as long as it’s handled gently. It’s available in four sizes that are used for different purposes (the measurement equals the diameter of the memory wire loop):
Available finishes include regular dark steel, stainless, and bright shiny steel, as well as bright gold- and silver-plated in fewer sizes. Memory wire is inexpensive and usually sold by the loop or in packages of 12 loops.
Q: When stringing bracelets on memory wire, how do I figure out the length or number of loops I need?
A: For a bracelet, one factor in deciding the number of loops of memory wire is whether or not the finished bracelet will slide on over your hand. I’ve made memory wire bracelets with as many as 26 loops or wraps using 11° Delicas on 21⁄4” wire, but it would take forever to put on this bracelet if it didn’t fit over my hand and had to be donned one wrap at a time! Test the fit with plain wire before you begin to add beads.
Other factors include the bead size you’re using, and how you want the finished bracelet to look. If you’re stringing 11° Delicas or seed beads, eight wraps may be a good choice, and the finished bracelet doesn’t take so long to put on. For chunkier beads, such as Czech glass, I find that three to five wraps work well. You can also wrap the strung beads with regular wire to embellish the design. As always, test your design by making one bracelet and see what number of wraps you prefer.
If you like the look of a 26-wrap bracelet, but want it to be easier to wear, you can make sets of coordinating shorter bracelets with eight to ten wraps each and wear them together. It’s fun to shade the colors, stringing a couple of wraps before progressing to the next bead color.
memory wire bracelet
Q: Can I make a necklace from memory wire?
A: Necklace lengths for memory wire are a little different. Because you don’t want to choke the wearer, memory wire necklaces usually wrap the neck only once, with a short overlap. To create a necklace, you’ll need one-and-a-half to two wraps of wire (since our necks are not 33⁄4” in diameter). Memory wire tends to relax when you string the beads. How much it relaxes depends on the size and weight of beads used. For example, the 21⁄4” wire relaxes to 23⁄8” when strung with 11° seed beads and to 21⁄2” when strung with 6mm beads.
Again, testing is a good idea. Be sure to make notes of what works, so you don’t have to reinvent the necklace the next time you make one. A memory wire necklace also looks great with a pendant strung at the center.
Q: How do I cut memory wire?
A: Please, please, do not use your good wire cutters to cut memory wire. Many a nice pair of cutters has been instantly ruined while trying to cut memory wire. Because the wire is hardened, most of the cutters made for memory wire snap or break the wire, rather than cut it. Purchase a special pair of memory wire cutters, or use piano wire cutters.
If you’re not ready to purchase this extra tool for working with memory wire, you can politely ask that it be cut into bracelet or necklace lengths at the bead store where you purchase the wire. Most stores will try to accommodate this request, or they will let you use their memory wire cutters.
SEE ALSO: Pliers and Cutters
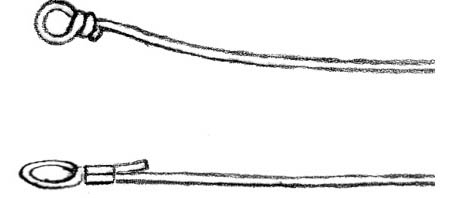
Q: Is it tricky to finish the ends of a piece made on memory wire?
A: There are several ways to finish cut ends of memory wire so the beads don’t fall off. The quickest option is to turn a small round loop or triangle loop in the wire end using round nose pliers. When you first try this, you’ll realize that this wire is very hard! Here’s the best way to go about it:
Another finishing option is to glue one of the beads from your design on the end of the wire, or use a half-drilled bead end made just for this purpose. Either way, I find that the glued beads will not stay in place unless you use very strong glue, such as two-part epoxy, which is available at hardware stores.

Q: Why would I make a bracelet with stretch cord? It seems a bit amateurish.
A: Some people turn up their noses at bracelets made on stretch cord, feeling that it’s not “real” jewelry. But this style of bracelet is quick and fun to make and wear. If the beads are beautiful, it can look great. It’s ideal for people who are allergic to metal, take their jewelry off a lot, or have trouble fastening clasps. I confess that I find metal clasps to be chilly on my bare arms during Boston winters, so there’s another argument in their favor.
Q: What is stretch cord, anyway?
A: There are a number of brands of stretchy, clear elastic jewelry cord available in beading stores. Most are made from a high-tech polymer that’s very strong and doesn’t crack, yellow, or harden over time. Because the ends do not fray, you can use the cut end to pick up beads without the need for a needle. It’s also usually latex-free (check the package), which is ideal for people with allergies, and it’s easy to knot. Here are a few pointers:
SEE ALSO: Basic Knots
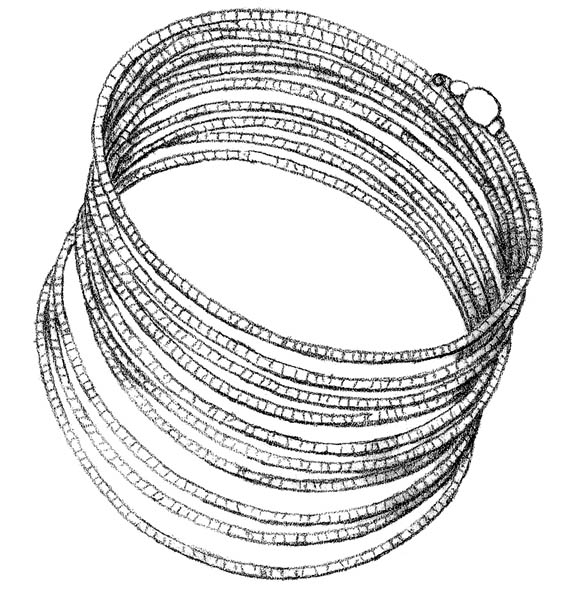
I have a particular love of stretch cord, because it is how I first became interested in making beaded jewelry. As a low-risk way to try playing with beads and colors, I decided to make one stretch bracelet every day. I’d spend about 10 minutes arranging colors for each one, string 1” or 2” to test the idea, and come up with a fun design. I spent no more than 15 minutes making each bracelet. In about a month, I had 40 interesting stretch bracelets that I wore all together as a 4” wide, funky cuff of bead beauty and chaos. I made some bracelets slightly larger, so they would fit further up my arm.
I loved wearing this rich armful of colorful bracelets, and many people asked me about them. I still drag them out occasionally to inspire beginners with an easy, painless way to get started playing with beads and jewelry making.
Q: What about crimps? Can’t I crimp on stretch cord?
A: I don’t recommend using crimps with any of the stretch cords. Crimping can cut through the cord or cause it to fray. For the same reason, when choosing beads to use with any of the stretch cords, check to be sure there are no sharp edges. A sharp bead can cut through the stretch cord and cause the piece to break.
Q: My stretch bracelets keep breaking. What am I doing wrong?
A: When you make a stretch bracelet using one of the good-quality stretch cords available, the weakest area is your knot! That’s why it’s important to use the right type of knots and tighten them securely. Don’t cut the ends too short.
Another reason a bracelet might break is that you’re using beads or crystals with sharp edges. Avoid them; they may cut through the cord.
Finally, handle your bracelets gently. The stretch cord itself is strong and should not break unless it’s stretched to many times its normal length.
Q: When using a stretch stringing material, what is the best way to hide the ends after knotting?
A: If any bead in the design has a larger hole, you can string it last if you’d like to hide the knot inside the hole. Here’s how:
Repeated stretching from putting on and wearing the bracelet may eventually pull the knot out of its glued hiding place. Don’t worry if you’re not able to hide the knot inside a bead. If you’re using clear cord, knots tend to disappear when placed next to a larger bead in the design. This is because the eye is distracted by the larger bead.
Q: What kinds of beads do I need in order to make some other designs?
A: There are an infinite number of fun patterns and arrangements of beads that you can make using stretch cord. Flowers, dangles, and straight stringing can all be combined using a variety of shapes, sizes, and colors. What you make will depend on the beads you have on hand and what’s available in local stores.
The simplest bracelets are my favorites. Here are just a few suggestions:
If you feel the Delicas on these strands look too narrow, substitute a larger Delica or seed bead or a short bugle bead. Each strand doesn’t seem narrow when several are worn together, so it depends on how you plan to use them.
Q: What if I want my stretch bracelets to look more like a set?
A: Certainly, your colors don’t have to be as diverse as mine! You can make a set of 5 to 10 bracelets that all have the same three or four colors, so they look great together. A set like this is also a wonderful, quick gift that you can make for a friend — especially if you know the colors she loves and wears often. It’s a great way to explore interesting color combinations.
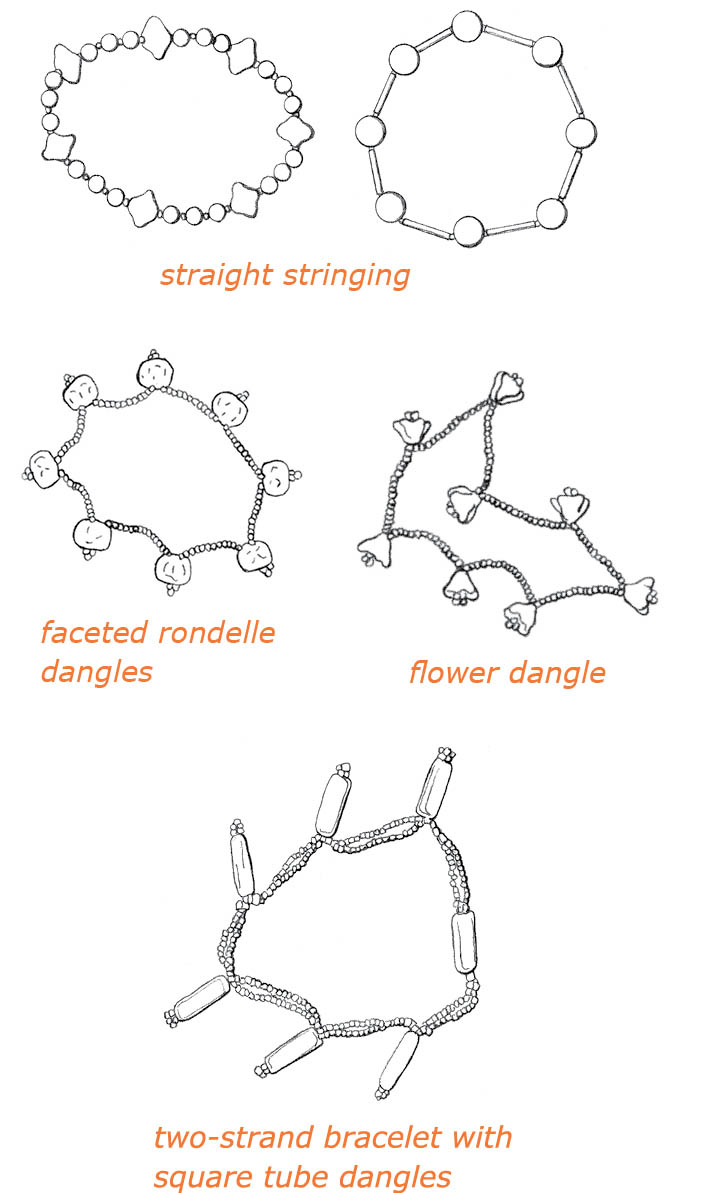
Q: What is a flower dangle and how do I make one?
A: Flower dangles are a collection of beads that have a center and look like flowers when they hang off a strand. You’ll need about six to eight larger beads to make dangles for a stretch-cord bracelet, and there are a couple of ways to create the dangles. Experiment and take notes about spacing between dangles, so the bracelet is both symmetric and fits you.
One option is to create dangles separately and string them on the cord. I placed some bright orange drops with vertical holes onto headpins with a seed bead at the bottom, and turned a loop at the top of each. I then strung eight of these dangle beads separated by 3⁄4” of 8° seed beads in two colors: two light opal green, alternating with one transparent purple. Creating dangles in this way is not only for stretch cord; beaded dangles work equally as well on flexible wire with crimped ends and a clasp.
Another method to make a stretch bracelet with dangles uses the cord throughout. Here’s how:
Your local bead store will reveal many other interesting options for dangle beads. These may include:
If a strand doesn’t look right or isn’t a good size, snip it apart and start again. Remember that each strand takes only about 15 minutes to make, so be willing to play and experiment.
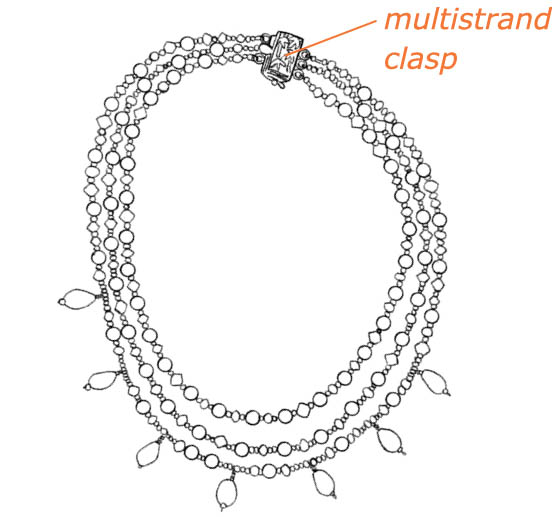
Q: What is meant by multistrand bead stringing? Is it hard to do?
A: Multistrand work is a slightly more advanced version of the basic stringing detailed in chapter 5 and offers a way to make your designs more intricate. Most of the same information applies to both necklaces and multistrand bracelets. There are several ways these pieces can be constructed, and there are also several different styles:
twisted
graduated lengths
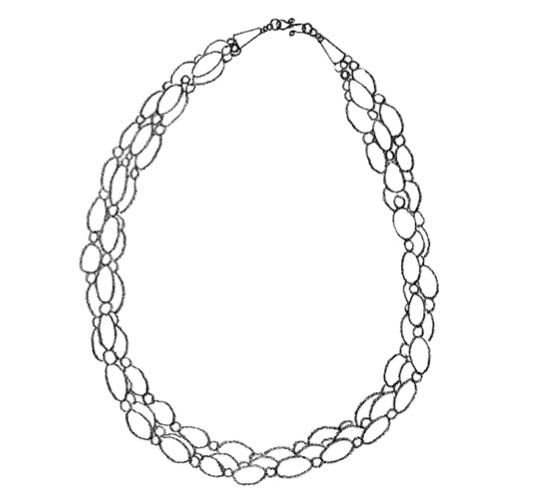
same length
Q: Can a stretch bracelet be multistrand?
A: One fun way to make a multistrand stretch bracelet is to make several dangle strands that are alike or use the same beads, and join them using a multihole spacer, such as one of the beautiful Bali silver ones. This is a great use for a single, leftover spacer. Here’s how:
Another fun multistrand stretch design that I call the “bubble bracelet” looks like a chunky single strand, but includes little three-strand bubbles along its length. Color combinations are only limited by your imagination!
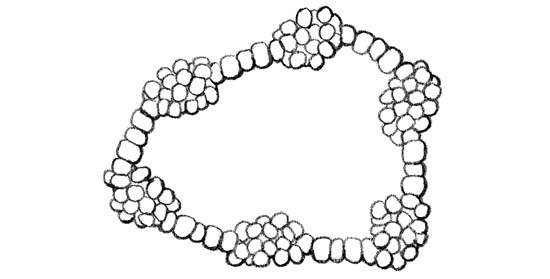
bubble bracelet
Use large-hole beads such as 4mm Miyuki squares and 6° seed beads, with Miyuki 3.4mm drops for the bubbles. A color mix is fun to use for the drops. Try one of the prepared mixes or mix several colors to make your own. Here’s how you make it:
Q: How do I make a necklace with more than one strand?
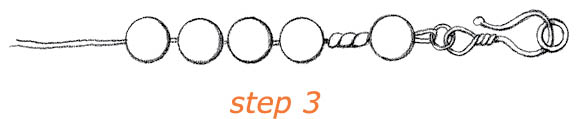
A: The easiest way to make a multistrand piece is to use flexible beading wire and a multistrand clasp. For example, if you want a three-strand necklace: buy a three-strand clasp, string three separate strands, then crimp one strand into each hole of the clasp. Strands can be all the same length, and worn either straight or twisted. Strands also can be graduated in length, with each lower strand slightly longer than the one above it.
To create a twisted look, you can gently twist a multistrand piece before fastening the clasp. To make a permanently twisted piece, use a multistrand clasp, then interlace and twist the strands before crimping. (See the floating bracelet design.)
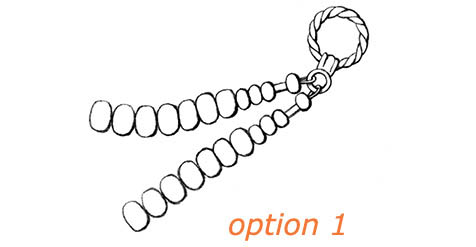
Other techniques for joining two or three strands to a single-strand clasp work best with strands of smaller beads near the ends. (Adding crimp covers can give the second and third options a more polished look.) Try these:
Q: How do I make a necklace with strands that are different lengths?
A: To make a necklace with graduated strands, string each strand slightly longer than the one above it, so the necklace lies smoothly around the neck. The length of each new strand depends on the look you want and the size of your beads, but making each strand 11⁄2” to 2” longer is a good place to start. Decide on the length of the shortest (top) strand first, so you don’t end up with a necklace that’s going to choke you.
Q: What’s another way to join two strands smoothly to a single strand clasp?
A: To transition to a single-strand clasp, you can first crimp the two strands together and then join the remaining strand to the clasp. To disguise the first crimp, one solution is to use a crimp cover, so it looks like a round metal bead in the design. Another option is to use a decorative accent bead with a larger hole to cover the join, so the folded crimp can slide inside it. Here’s how that works:
Use a decorative bead to cover the crimp and join.
If you want the crimp to disappear, use a largehole bead as the cushion bead. The folded crimp will slip inside it.
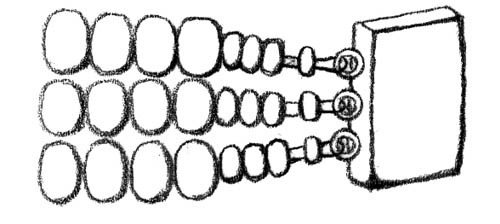
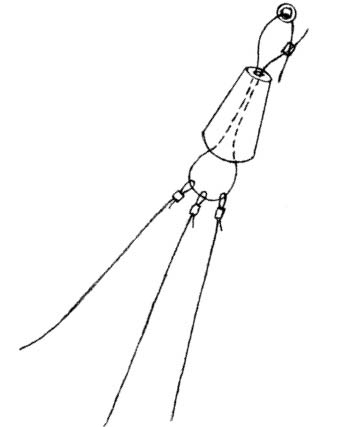
Q: How do I use a cone?
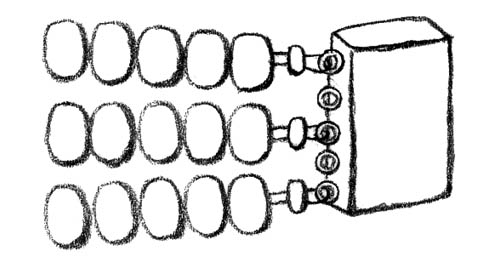
A: A final method for making a multistrand piece involves that mysterious finding called a cone. (See Examples of Findings.) The cone is a fancy cover for a group of strands, and serves as a bridge to a single-strand clasp. If you want a multistrand necklace with strands that all bunch together, this is the method to use. A cone is a graduated cylinder that’s open at both ends, designed to bring three to 12 strands together and hide the crimps or knots used to finish the strands. Cones are available in a wide variety of widths and lengths to accommodate different numbers of strands and various sizes of beads.
Here’s one way to join a multistrand necklace using a cone:
An alternative method uses flexible beading wire in place of the regular wire.

The beaded strands don’t have to fit completely inside the cone. But if they don’t nestle into the cone enough to hide the loop and crimps or knots, add a couple of smaller beads at each end of the strands, or switch to larger cones.
Q: I want to make a three-strand necklace using larger beads, and my clasp has holes that are too close together. How do I make the beads fit the clasp?
A: You’re right that if you try to bring larger beads into a smaller multistrand clasp, the beads will bunch up and won’t lie smoothly. Two solutions to this problem:
Solution 1: Use smaller beads near clasp.
Solution 2: Create more room with a five-strand clasp.
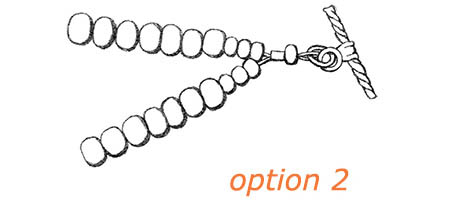
Q: I have a beautiful large Chinese pendant with a bar across the top, but there’s no hole to string through. How can I use it as a focal piece for a necklace?
A: One solution is to string the left and right sides of the necklace separately, looping each side through the bar on the pendant as shown below. Consider these tips before you start:
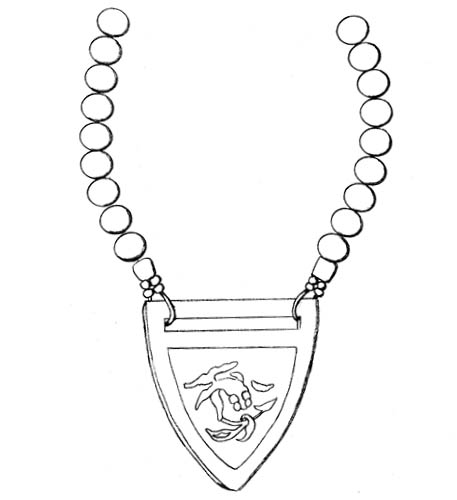
Option 1: Hang the pendant from two beaded strands.
Here’s how to make it work:
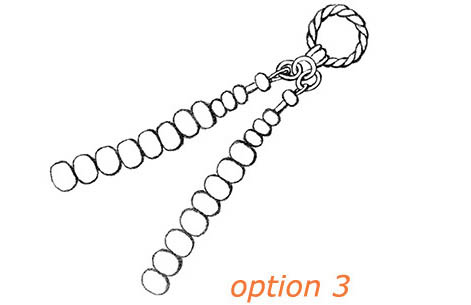
An alternate option is to create a two-strand necklace by passing both strands through a larger bead at each side of the pendant and then stringing each strand of wire separately to the back, as shown below.
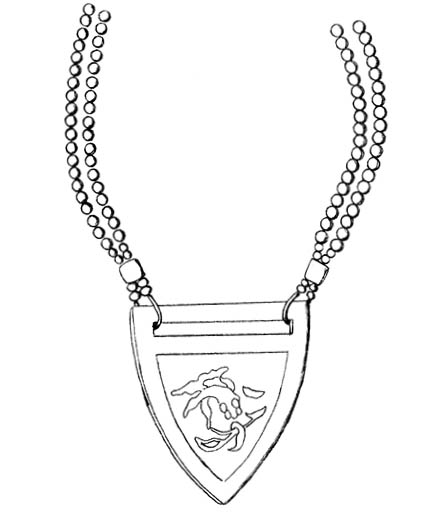
Option 2: String separately for a two-strand necklace.
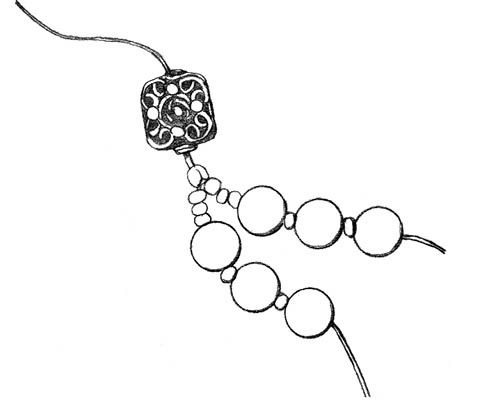
Q: I have a three-strand necklace that needs to be restrung. It was strung on thread, and a strand broke. The strands come together at each end into a larger silver bead with a big hole, but it’s not wide like a cone. How can I restring the piece using beading wire instead of thread, so the ends are hidden inside that bead?
A: Solving this kind of problem with a necklace you already own can be tricky. Some people might try to fix only the broken strand, but you’re right to restring the entire piece on beading wire. When thread starts to break in one area it’s an indication that the other strands may soon follow.
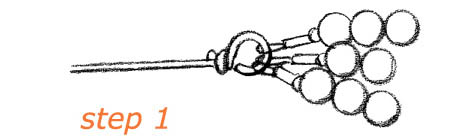
When you don’t have enough room to crimp multiple strands of beads into a stiff wire loop in the standard way you would with a cone, try this. Use a small loop of beading wire with a single crimp to join the strands instead, and hide the loop and crimp inside the large-holed bead, as follows:
If this single-crimp method seems too tricky, you can use the second method shown above for working with regular cones. It results in an extra crimp tube above the large-holed bead. If desired, you can hide it inside a larger-hole cushion bead strung after the crimp.
A large-holed bead can hide the join for three strands, using a beading wire loop.
Q: If I want to make a necklace with no clasp, and my beads are too small for the wire to pass through twice, how do I finish the necklace so it looks nice and is secure?
A: For strength, I like to use two cylinder crimps on a strand that will not include a clasp. (See here). One solution that works well is to add a balanced group of beads with larger holes around the crimps, so no wire ends protrude to scratch your neck. To add symmetry and allow the crimps to blend into the design, add a group of large-hole beads on either side of and between the crimps.
Remember that beads with larger holes do not necessarily have a larger outside diameter than beads with smaller holes. For large-hole beads that have room for two strands of most flexible beading wire, try using 8° or 6° glass seed beads, or 3mm sterling silver or gold-filled large-hole hollow metal beads. For balance, you may choose to integrate the large-hole beads into the design of the necklace, as well.
A necklace 24” long or more will usually fit over the head, but swingy rope-style necklaces can be as long as 36”. Use heavy .024 wire whenever possible on longer necklaces. They need strength to withstand the extra tugging from toddlers and snagging on furniture that they tend to attract.
To plan the necklace, measure or estimate the length of the large-hole bead section and subtract this amount from the length you string for the main body of the necklace. You’ll also want to be sure that the focal bead or center front remains centered. String the two sides of the necklace the same length, and then add the large-hole beads and crimps at one end. Complete as for the no-clasp necklace.
Q: Can I make a necklace that uses both wire and thread?
A: Sometimes, a piece of jewelry may combine both wire and thread techniques in its construction. You may find designs that are written using thread only, where you can make the piece more durable by stringing the base on flexible beading wire. Such examples include:
Often the first row of beads can be strung on flexible beading wire and crimped to create a strong base, and then the thread-woven beadwork is stitched into this base. Besides providing strength to a complex piece, the wire base row can also add support for a larger focal bead, if desired.
Here are two other examples of combination beading techniques:
Q: I’d like to make a necklace using beads on leather. What’s the easiest way to accomplish this?
A: Necklaces strung on leather often have a rugged, casual look. It’s one type of necklace that some men are willing to wear. For stringing on leather, you’ll need beads with large holes, such as large-hole lampwork beads, ceramic beads, faceted roller beads, or pony beads (very large seed beads). Test your bead holes on the cord you plan to use.
Round leather cord is available in .5mm, 1mm, and 2mm diameters, while flat leather or suede thong is 1⁄8” to 1⁄16” wide. Both are available in a variety of colors. Synthetic leather round cord looks like leather, but it is stronger and more durable, especially in the narrow .5 and 1mm sizes.
Q: How do I finish the ends of leather?
A: To finish the ends and attach a clasp, you can use one of several types of findings. A round coil crimp end is made from wire shaped in a spiral. A flat, metal fold-over crimp end works best with flat leather thong. Each style has a loop on one end for attaching the clasp.
To apply crimp ends to leather cord:
attaching coil crimp ends to leather cording

attaching fold-over crimp ends to leather cording
For a casual necklace, tie the ends of the cord in sliding knots, so the necklace can fit over the head and then be tightened. To make the knots, see the illustration below. Like thread, leather cord doesn’t last forever. It will need to be replaced when it starts to dry out and crack.
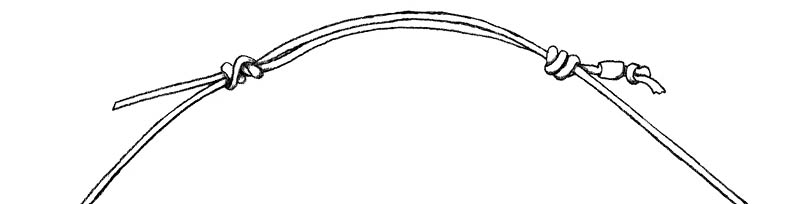
adjustable knots for leather cord
Q: I always see pearls strung with knots between each one. What are the advantages and disadvantages of this style of stringing?
A: The practice of stringing pearls on silk began centuries before there was a fluid, high-tech material available for stringing, such as the flexible beading wire we use today. A knot was tied between each pearl because, at that time, pearls were more valuable than diamonds. Plied silk didn’t last forever, and if the strand broke, the knotting prevented all but one pearl from being lost.
Nowadays, many people still choose to knot pearls onto silk cord because it’s a traditional style that evokes quality and elegance. Brides often choose it, and anyone who owns a beautifully matched set of pearls, even though they no longer cost as much as diamonds, may prefer to wear them in the traditional style.
The disadvantage of knotting pearls on silk is that the pearls will need to be restrung every few years, with some experts saying as frequently as every two years. Silk frays, stretches, and wears out, so it’s not such a permanent stringing method.
I encourage anyone who’s not terribly attached to the knotted style to consider switching to flexible beading wire the next time those pearls need to be restrung. Adding a carefully chosen small seed bead between each pearl can replicate the spacing, length, and even the luster of the silk knots, resulting in a more durable, reliable, and still very elegant necklace.
Q: I want to string some beads on silk and tie knots between each bead. How do I know what size cord to use for knotting it?
A: When knotting between beads, use the largest cord that fits comfortably into the holes of your beads, so you don’t run the risk of a too-skinny knot slipping inside one of the bead holes. (It happens!) The easiest way to determine which size cord to use is to test it in the bead.
Most bead stores sell silk bead cord in closed packages or spools, so you can’t easily try it out. So it’s a good idea to maintain your own sample set of the sizes you use most. Whenever you finish a project using silk cord, save about a foot of the cord and tape it into your beading notebook. Jot the thread size next to it. Try to accumulate samples of the basic sizes, so you’ll have them available to test with your beads the next time you want to do knotted bead stringing.
The easiest silk cord to find is a brand from Germany. (See Resources.) Packaged on cards with an attached needle, it’s available in 20 colors in sizes from 0 (thin) to 16 (thick). Each 2-meter package is enough to make about two necklaces.
Another high-quality silk is sold on spools in 42 colors with a different sizing system from A to FFF. If you’re using silk cord on a spool, you’ll string it on a twisted wire needle and use it doubled throughout the piece. Test the doubled cord in your bead holes to determine the correct size.
Before you decide to knot a strand of beads, examine the holes closely. If the bead holes are larger on one side of the bead than the other, or if the holes are sharp, jagged, or uneven, these beads are not good candidates for knotting. Why? If you use the largest cord that fits into the smaller hole, the knot on the larger side will slip inside the hole and disappear. This looks very unattractive in a knotted piece, and should be avoided. If the holes are sharp, they will fray and chew through the silk, ending in a broken strand.
In general, pearls have smaller holes and tend to work well with carded silk cord in sizes 2 to 4, if using a single strand. For Czech glass, you can usually use sizes 6 to 8 silk cord. For chunkier semiprecious beads with larger holes, use the largest thread that fits comfortably into the holes. This may require that you use two or more strands of cord to achieve a good fit.
Q: I know the knots will make my necklace longer. How do I know how long the finished piece will end up?
A: A general rule of thumb for pearls is that the knots and clasp will add about 2” in length to your necklace. If you start with a 16” strand of pearls and knot between each bead, the finished piece will measure about 18” with the clasp.
You can also estimate the finished length this way:
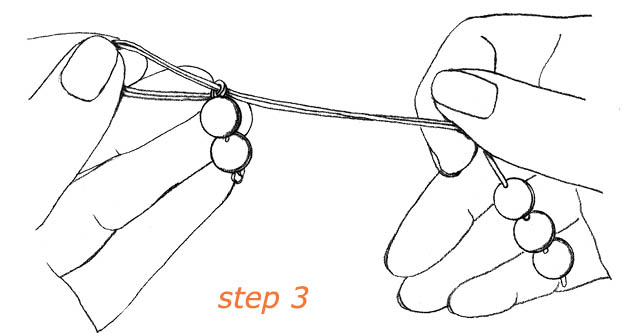
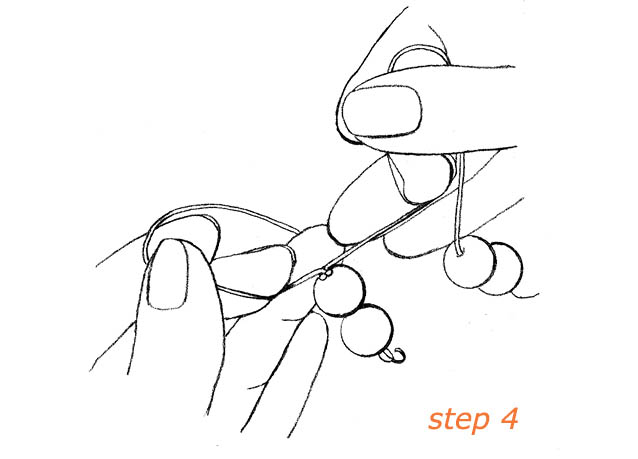
Q: What’s the best way to knot pearls?
A: There are many different methods for knotting pearls, and each beading expert seems to have her favorite tricks and secrets. As with all these techniques, it is a matter of habit and personal preference, not absolutes. I prefer a traditional knotting method using a double strand of silk and overhand knots, which can be tightened with tweezers, an awl, or a large tapestry needle, or by using fingers alone. Here are some pointers:
Q: How do I make the knots?
A: After the cord has been dampened in water, prestretched and dried, knot the strand as follows:
Your knots will become smoother and more even as you make more of them. Be sure to practice tying a few knots before you begin knotting a real piece.
SEE ALSO: Basic Knots
Here’s a tip from master beader Terry Kwan of Boston. When using silk cord doubled, Terry prepares the cord for stringing before prestretching it, as follows:
Q: What about nylon cord for knotting? I’ve seen it packaged on cards, too.
A: Plied bead cord for knotting is available in both silk and nylon. Silk is the traditional choice, while nylon is stronger, frays less, and is less fluid. The cords labeled “highperformance nylon” are said not to stretch.
Personally, if I’m not going for the sheen and fluidity of silk, I would rather string on flexible beading wire. But if you want a piece to be both knotted and more durable, nylon beading cord is worth a try. Use it as you would silk cord.
Q: How do I decide between tying single knots and tying double knots?
A: Double knots are used only if a single knot isn’t large enough to hold the bead in place. The result will never be as smooth or as even as with single knots, so use a double knot only in a dire emergency (for example, when the knot is disappearing inside the bead hole).
Q: When I’m planning to knot a necklace, why would I buy more expensive carded silk cord rather than using less expensive silk cord on a spool?
A: Carded silk cord is convenient to use because each card holds just enough for one or two necklaces, and the cards are relatively inexpensive at $1.25 to $1.50 each. Silk cord on a spool is much less expensive per yard, but the initial outlay is greater. A 1⁄2-ounce spool of size E holds 200 yards and costs around $12.50 per spool.
Whether carded or spooled, both types of silk are available in a range of beautiful colors. The best choice for you depends on the quantity of knotting you do, and the variety of colored silk cords you want to have on hand.
Q: How much cord do I need to knot a necklace?
A: When using silk cord to knot between each bead of a necklace, you should allow double the length of the finished necklace, and then measure twice that if you plan to use the cord doubled.
Q: I knotted a pearl necklace and it looked really nice when it was finished. But now that it’s been worn several times, there are spaces between the pearls. Why did this happen?
A: There are two reasons that spaces could open up between your knotted pearls:
Q: I’m almost through knotting a pearl necklace (two more pearls to go), and the needle broke off. How can I finish stringing the pearls?
A: This should not happen, because the correct way is to string all the beads on the cord first, before you begin knotting. The twisted wire needles strung on silk cord are not terribly strong. When stringing, especially if the beads fit tightly on the thread, always pull on the cord as you bring it through a bead, rather than on the needle. Repeatedly pulling on the needle can cause it to weaken and break.
Now that yours is broken, though, it would be a shame to start over. One trick you can try is to dip the end of the thread in glue or clear nail polish, and allow it to dry. You may need to dip it twice and roll it between your fingers, so it’s stiff enough to serve as the needle. Use the end of the thread to string the remaining pearls.
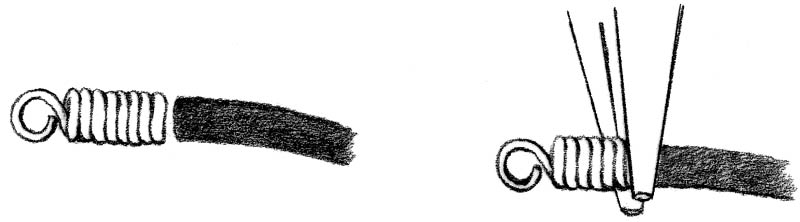
Q: What is French coil, and how is it used?
A: French coil or French wire is finely coiled wire, like a tiny spring, used over the stringing material where it goes through the ring or clasp. This wire can add polish to the piece and is said to protect the stringing material from wear against the metal clasp, but its main function is decorative.
Although usually used with thread, French coil can also add an elegant detail to a design strung on beading wire. French coil is available in four sizes from fine to extra-heavy. Often used in finishing better-quality strung jewelry, such as pearls, French coil is very fragile, so handle it carefully to avoid crushing or distorting it.
Here’s how to use French coil on flexible beading wire with a twisted tube crimp.