backstitching with beads
Q: I’ve heard that you can combine beads with knitting. Is that true?
A: Yes, beads can add a gorgeously subtle accent to a knitted garment, or they can become a predominant feature of the design. Here are two different ways to incorporate beads into knitting.
You can also use the second method to add shank buttons to the button bands of a sweater. Lily Chin’s book, Knit and Crochet with Beads, includes a wealth of information about combining knitting and beads, as well as adding beads to crocheted fabric. The Rowan pattern books also include beautiful knitting patterns that incorporate beads. (See Resources.)
As a bead knitter, my major complaint is that a lot of knitting patterns leave us hanging when it comes to the beads. It’s as if the beads were an afterthought, or as if bead stores only sell one type of bead. I just hate a great-looking knitting pattern that says only that I’ll need 600 beads. Wait, what type? Size? Color? At least tell us what you used, because the photos are never clear enough for us to see the bead details. Not to mention that the beads must have holes large enough to fit on the yarn. So please, knitting designers, tell us exactly what beads you used in the sample garment, so that we bead knitters will at least have a starting point for purchasing appropriate beads.
Q: What’s a good smaller project for adding beads to knitting?
A: One frequently suggested project for knitting with beads is a pendant bag, with curved loops of beads between knitted stitches. These are lovely, fluid objects, but I rarely see them being worn. For something you’ll wear often, you can use similar techniques to make a beautiful bead knitted bracelet. Soft and comfortable, the beads add sensuous weight and drape.
I knitted one with chocolate-brown size-8 pearl cotton and acid green 11° charlottes (any 11° seed bead will work), using tiny size 0000 steel knitting needles. Yes, the needles are small — but so is the bracelet, and the project goes quickly. As with bead-crocheted ropes, you’ll prestring the beads onto the thread before you begin. This type of bead knitting is actually much easier than making crocheted ropes: Instead of capturing a bead in each stitch, you’ll slide small groups of beads between knitting stitches.
A hank or ounce of seed beads is more than enough for most bracelets. On my knitted bracelet I added groups of 4 and 5 beads across each row, and used two small sewing snaps for the closure. The snap closure is smooth and practically invisible, and the bracelet feels wonderful to wear. Here’s how you make one:
(For books and websites with bead-knitting supplies and information, see Resources.)
Q: I want to include beads in my knitting, but the beads that fit easily on my yarn seem too big and clunky. How can I incorporate smaller, more delicate beads for a subtle look?
A: I agree that proportion is really important when combining beads with yarn. Since knitting patterns often neglect to tell us what size beads to use, it falls on the individual bead knitter to determine which beads will fit on the yarn and look great for a given project. If you bring a ball of your yarn to the local bead store, most bead store employees will be happy to advise you about different beads and help you come up with a solution.
To get the smallest beads onto your yarn, the trick is to use beads with relatively large holes. In general, Japanese seed beads have larger holes than Czech seed beads. I’ve tested a lot of these larger-hole beads with different weights of yarn to help get you started.
When shopping for beads, always bring your yarn and stringing needle with you so you can test the beads for fit. If you’re having trouble stringing the beads on your yarn, realize that part of the problem may lie with the needle, rather than the bead hole itself. In most instances, you can use a large-eyed needle or a dental floss threader to string beads onto the yarn. A twisted wire needle is another option for thin yarns, because they’re available in a variety of sizes, including fine size 12. The thinnest needle option is to add a loop of beading thread to a size 12 beading needle and string the yarn through this loop, so that the needle and yarn do not pass through the bead hole at the same time. (See here.)
SEE ALSO: Bead Sizes, and Beading Needles
Q: Are there any tricks to fitting smaller beads onto my yarn?
A: One problem is that when stringing, a doubled strand of yarn has to fit through the bead, just after the needle. There are some beads that would slide easily onto a single strand of your yarn, but a doubled strand won’t fit through. To eliminate this double-strand problem, you can try:
Finding a viable solution is certainly worth a try, especially if you’d really like to try knitting with smaller beads.
Q: How many beads should I string onto each ball?
A: Most knitting patterns will instruct you on how many beads to string onto each ball of yarn. You’ll be pushing the beads along the yarn until you’re ready to knit them, so the yarn needs to be relatively smooth and strong enough to withstand the abrasion.
One way to reduce abrasion, especially good for delicate yarns, is to knit with a plain ball of yarn until you reach a row that includes beads, and then switch to a ball that has beads strung on it. Depending on the design, you can carry the unused yarn along the edge, twisting the two yarns together every few rows so you don’t have long floats at the edge.
Another way to avoid scooting so many beads along the yarn is to prestring about three-quarters of the beads you’ll need for that ball before you begin knitting with it, and then string the last one-quarter of beads onto the other end as you near the end of the ball.
Q: Is there any other way to use a smaller-hole bead with bigger yarn?
A: Yes, if you’re using a thicker yarn and would like to incorporate beads into the design that just will not fit onto your yarn, there is another option that allows you to use any size bead.
Q: Is bead embroidery a new technique?
A: Although bead embroidery is enjoying new popularity these days, it’s actually one of the most ancient forms of beading, next to stringing. Bead-embroidered garments play a significant role in the traditions of nearly every culture throughout the history of the world, from Africa to Thailand to Hungary.
Embroidering with beads is one of the most versatile types of beading. It’s easy to learn, with just a few basic stitches to master, and you can sew beads onto just about any garment or object. When embroidering a fabric with beads, you have virtually unlimited options: you can scatter a bead here and there, sew beads just along the edges, or completely cover a fabric with beads.
You’ll want to consider the strength of the fabric when planning bead embroidery, especially if the beading will be dense. The fabric must be sturdy enough to support the weight of the beads in the finished piece. When hung or worn, gravity exerts a continuous pull on the fabric.
Although I’ll explain a few of the basic stitches, there are others you can learn and many interesting variations to explore. You can combine a wide variety of bead sizes and types. Try couching a line of beads in place, or use backstitch to get a similar result.
If you’d like to learn more about bead embroidery, check out two wonderful books: Amy Clarke and Robin Atkins’ Beaded Embellishment: Techniques & Designs for Embroidering on Cloth and Yukiko Ogura’s Bead Embroidery. (See Resources.)
Q: I’m just getting started with bead embroidery. What sorts of fabric work well?
A: You can embroider with beads on many different types of fabric, from sheer chiffon to velvet to heavy tapestry fabric. But when you’re first getting started, it’s a good idea to choose a medium-weight, stable fabric such as woven cotton, denim, or wool.
Printed or jacquard-woven fabrics can add another interesting element. The print or woven design can either dictate the embroidery colors or design, or complement a design you have in mind.
Q: When I’m sewing beads in a design onto fabric, how do I keep the fabric from puckering or gathering up?
A: Stiff fabric, such as heavy denim, will probably be fine, but to create smooth bead embroidery on most other fabrics, you’ll need to do something to stabilize the fabric before beading. Options include:
The best method for stabilizing depends on the weight of your fabric, the density of the embroidery, and the final use of the piece. For example, you probably won’t want a layer of paper lining a beaded garment, but it may be the perfect choice for a beaded wall piece or other nonwearable project.
Q: How do I work with a paper backing?
A: You can baste the paper to the wrong side of the area to be embroidered, or if the piece will be densely beaded, you can draw a design on paper and baste it on top of the fabric, so you’re able to follow the design while beading. The paper will seem stiff at first, but it will soften as you work. Once you’ve completed your design, you can carefully tear away the paper from the perforated holes created by your needle going in and out to create the beaded design, or leave it in place. If you’re using interfacing or stabilizer, baste it to the wrong side of the fabric before beginning to bead.
Q: Is there a trick to working with a hoop?
A: If you decide to use an embroidery hoop when sewing beads onto fabric, try to use one that’s larger than the embroidery area. If this is not possible, you’ll need to pad the hoop by wrapping the inner ring with strips of fabric and making a few stitches to anchor the strips in place. The padding will help keep the piece from slipping while you work, as well as cushion any beads that lie between the hoops after you reposition the work. Work with the fabric taut, but avoid overstretching it in the hoop, which may cause the design to pucker or distort after the hoop has been removed.
Q: Do I need special needles for bead embroidery?
A: Needles for bead embroidery have similar requirements as needles for bead weaving; they need to fit through glass bead holes, which do not stretch or give. For most bead embroidery, you can use size 11, 12, or 13 beading needles (long) or sharps (short).
SEE ALSO: Beading Needles
Q: What threads should I use? And how can I tie a secure knot that won’t pull through the fabric?
A: For bead embroidery, especially if you’ll be embroidering a garment that will be worn and tugged, use strong thread that can hold up to wear. Use any of the strong synthetic beading threads discussed in chapter 4, not regular sewing thread. (See Threads: Multiple Choice.) Since it’s easier to add thread when embroidering than when weaving, you can start with a shorter thread of 1 yard or less, if desired.
Before starting to stitch, tie a knot at the end of the thread. Here’s how:
This knot takes a little practice. If it’s not happening easily for you, try making a loop near the end of the thread, passing the cut end through the loop twice, and then tighten it (a double overhand knot).
To make the knot more secure, especially on more loosely woven fabrics, it’s a good idea to sew a backstitch or two before you begin to embroider. Take a couple of small stitches in place, and then bring the needle to the right side to begin work. Hide these stitches with the first couple of beads.
SEE ALSO: Basic Knots
Q: What stitch can I use to make an outline or write someone’s name?
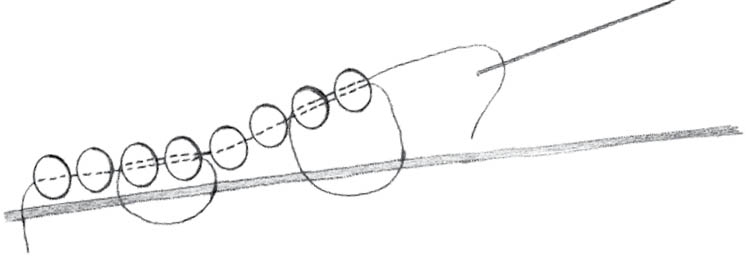
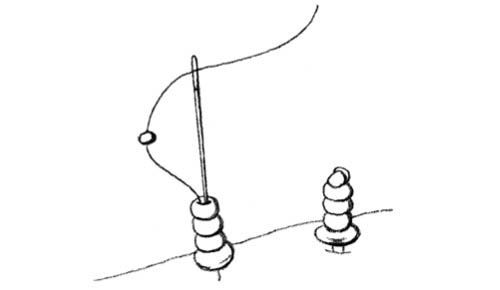
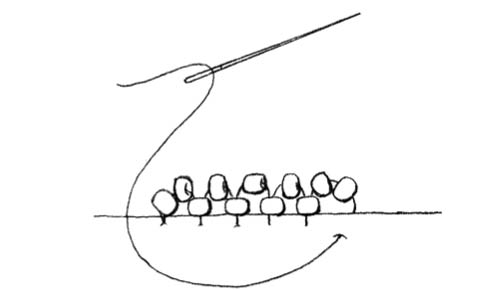
A: My favorite stitch for making straight or curved lines is the backstitch. It can be worked with different numbers of beads in each stitch, depending on how much heavy use or wear the piece will receive. You can follow a penciled line, work random lines, or use the backstitch to fill in an entire area by working in straight or curved rows. I generally work backstitch with four beads per stitch, but you can also try three, five, or more. Here’s how:
backstitching with beads
A: Couching, an embroidery stitch used to tack down items on fabric, is another option for making beaded outlines. It can be worked with one or two needles and threads.
To work beaded couching with a single thread:
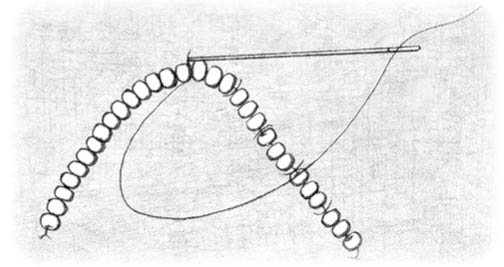
single-needle couching
To work beaded two-needle couching:
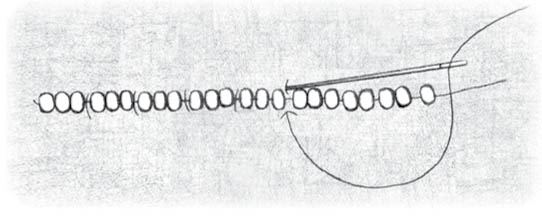
two-needle couching
Q: I’d like to scatter beads over a fabric background, like random sprinkles or stars. How do I do that with bead embroidery?
A: Working scattered bead embroidery enables you to use the bead color and finish to create additional impact to every stitch. For a single-bead stitch:
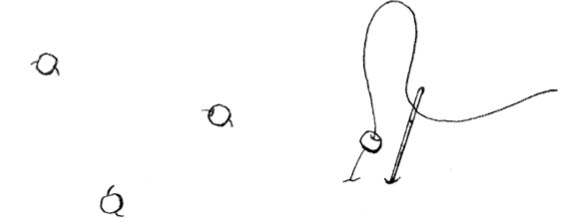
embroidering single scattered beads
You can make these single-bead stitches in neat rows, or scatter them randomly over the fabric. If you’ll be jumping more than 1” between stitches, it’s a good idea to go through the bead again, and/or knot the thread between stitches, so the beads are not too loose and floppy.
Q: What is a bead stack?
A: You can work the same type of single stitch (described in the previous Q&A) with several beads to create a fringe or stack of beads. This can be used to create interesting texture in the bead embroidery. You can cluster these in groups of the same or different heights, or scatter them evenly over an entire fabric. Here’s how:
embroidering a bead stack
Q: What’s the best way to add beads to the edge of fabric?
A: You can outline a fabric edge or hem with beads by working a picot stitch. It works equally well at the edge of a picture frame or book or to improve the drape of a lightweight garment.
embroidering a beaded picot edge
Q: What’s a good idea for a first bead embroidery project?
A: One fun way to experiment with bead embroidery is to embellish a few greeting or gift cards. Using a purchased card, you can stitch scattered beads over the design or create an elegant beaded edge. Or start with some medium-weight cardstock and create your own simple design, using one or more of the bead embroidery stitches.
Before you mail the card, add a thin sheet of foam or small piece of bubble wrap so the beads won’t be crushed in the sorting equipment at the post office.
Q: What if I want to embroider beads onto a T-shirt? How can I be sure the shirt will be washable?
A: Whether you plan to wash or dry-clean a beaded garment, it’s a good idea to make sure the beads will come through the cleaning process with colors and finishes intact — before you start beading. Some beads change color and appearance when they are dry-cleaned or washed, while others do not. Silver-lined, galvanized, and dyed beads, for instance, are usually not good choices as well as others that have less-stable finishes. (See Finishes and Choosing Colors That Last.)
The best idea, whichever cleaning method you prefer, is to test the beads before you use them. Stitch a few of each color and type of bead onto a swatch of the fabric, and launder or dry-clean it the way you plan to care for the finished piece.
To launder a washable garment, either hand wash it carefully or place it in a zippered laundry bag and use your washer’s gentle cycle, so the hand-applied beads don’t get tugged on too much. Lay the piece over a rack or hanger to dry, smoothing and finger-pressing it into shape to reduce wrinkles. If the piece requires ironing, place the beadwork face down on a doubled bath towel and press it gently from the wrong side with low to medium heat.
Q: Where can I find ideas for embroidering with beads?
A: If you’re having trouble coming up with beading designs, here are some thoughts to get you started:
Q: What if I want to bead a picture or design that’s completely covered with beads?
A: The more densely you place the beads, the stronger the fabric and beading thread need to be to support the weight of the embroidery. You can work most any bead embroidery stitch close together over an entire fabric, or use a combination of stitches to get the result you want.
Q: Is there a way to make beaded garments less heavy?
A: You can control the weight of a beaded garment by adjusting the size of the beads and the distance between beads. In order to be beautiful and effective, a bead-embroidered garment doesn’t have to have wall-to-wall beads. With beads, a little light and sparkle go a long way.
If you’re concerned that a garment may be too heavy, use an airier design with more open areas and fewer beads. Also, make sure that the fabric you’re embroidering on is strong enough to support the weight of the beads.
Q: I recently heard of a fantastic evening dress. It had an uneven hem with the front at the knees and a floor length “train” (sweeping the floor, not dragging on it). The back tail of the dress was beaded on both sides. How do you suppose that was accomplished?
A: The dress sounds beautiful. I would probably embroider the beads on the right side of the fabric first, and then embellish the inside layer. For each side, it’s important to use thread that matches the fabric and short, neat stitches, so the stitches do not show between beads.
Another way to approach this project would be to stitch back and forth between the right and wrong sides, adding beads on both sides as you go.
Q: I’ve seen beads added to skating and dance costumes to add sparkle and movement to the garment. How is this done?
A: As a skater glides and twirls, glinting beads and swaying beaded fringe can create subtle but dramatic effects that enhance the skater’s movements. To create this type of embellishment, you can try a couple of different methods.
One way is to embroider the beads onto a strip of ribbon or fabric, and then sew or snap the embellished sections onto the costume.
A second method is to sew the beads directly onto the costume. If you use this method, be aware that most skating and dance costumes are made from very stretchy fabrics. When the garment is stretched, the thread carrying the beads can be pulled to the breaking point. To avoid this problem, knot small sections of beading carefully and cut the thread so lengths of thread do not float across the back of the fabric. You may want to use a backing layer or patches of another, nonstretch fabric behind the beaded area. Then you’ll be beading through two layers to add extra support for the weight of the beads.