MAPLE TREE SILHOUETTE

DIFFICULTY:

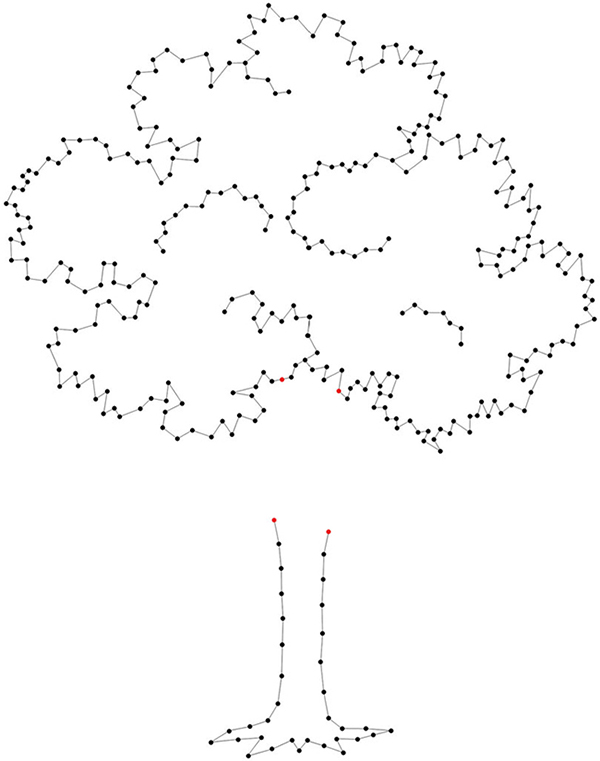
The maple tree is one of my favorites and is a symbol of balance and promise. When designing the pattern, I added light foliage detail in the middle to add dimension. It’s subtle but adds a nice touch. For this project, we’ll be combining the silhouette, pattern expansion, and double-wrap techniques.

Materials

Pine board: 1" × 12" (2.5cm × 30.5cm), cut to 14" (35.5cm) long and stained (Shown: Minwax Wood Finish in Red Chestnut)

58" (1.6cm) silver nails

Size 10 crochet thread in 1 color (Shown: White)

Embroidery floss in 1 color (Shown: DMC 3787/Dark Brown Gray)

Photocopy of patterns (page 124)

Picture-hanging hardware

2 felt furniture pads

Tools: Hammer, needle-nose pliers

Basic supplies: Thumbtacks, superglue, scissors, transparent tape

Techniques Used

Preparing a board (page 8)

Applying a nail pattern (page 9)

Stringing basics (pages 1011)

Double-wrap technique (page 13)

Finished Size (h × w)

14" × 11.5" (35.5cm × 29cm)

  1. Trim both your patterns, the treetop and the trunk, down to a more manageable size. Secure your tree top to the board with tape.
  2. Using the thumbtack pattern expansion technique (see the Triangle Tiles project on page 88 for details), match the red dots of the trunk pattern with the red dots of the treetop pattern. Secure the trunk with tape.
  3. Hammer your nails through the pattern. Remember, trees in nature aren’t perfect, so if any nails are slightly off or crooked, it will only add to the realistic look. Remove the patterns and debris.
  4. Outline your pattern with string. Refer to the pattern page to help you connect the right nails.
  5. Now that you can see the overall shape, start with the fill. I chose to do both the treetop and trunk in white, though you can see it would be easy to do them using two separate colors. This takes a good amount of string, which is why I’m working with a spool of crochet thread. Zigzag across the pattern until you’re happy with the density. You can cross over or attach to any of those nails in the center; they remain sort of invisible until we highlight them in the next step.
  6. Follow up with the double-wrap outline. It’s important in string art to do your outlining last, so it’s on top of the fill and more noticeable. I chose a subtle brown and used two skeins of floss. Be sure to double-wrap the foliage detail nails in the center to really make them visible to the viewer. Two of the detail lines are not connected to the border, so you’ll need to cut your string and do those separately. When tying on and off, be sure to seal all of your knots.
  7. Attach your picture-hanging hardware and felt pads to the back. Sign and date your work and choose where to “plant” your tree.

MAPLE TREE SILHOUETTE PATTERNS

Enlarge at 200%.