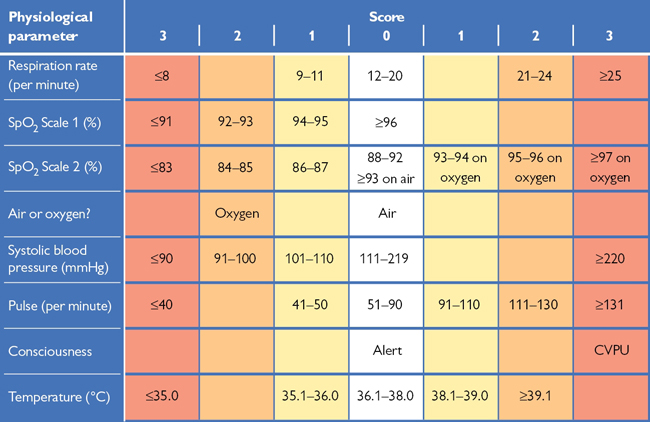
Fig. 6.1 National Early Warning Score (NEWS2). A total score ≥5, or any individual parameter scoring 3 should prompt urgent review by a doctor Ask yourself, could this be sepsis? © Royal College of Physicians 2017.
Early detection of the ‘unwell’ patient This has repeatedly been shown to improve outcome. Identification of such patients allows suitable changes in management, including early involvement of critical care teams or transfer to critical care areas (HDU/ICU) where necessary.
Identification of the ‘at-risk’ patient Relies on measurement of simple physiological parameters, which generally deteriorate as the patient becomes more unwell; these include RR, HR, BP, O2 saturation, level of consciousness, and temp. Remember that the sick patient might not always look that unwell from the bottom of the bed. See Box 6.1.
Scoring of these parameters Usually undertaken by nursing staff and it creates a means by which staff can more quickly identify clinical deterioration. In 2017, the Royal College of Physicians updated their National Early Warning Score (NEWS) and published the NEWS2;1 shown in Fig. 6.1. There is currently no standardized version for pregnant patients or paediatrics. Normal observations are awarded a score of 0, while abnormal observations attract higher scores. The values for each physiological parameter are added together. If this total score reaches a ‘threshold’ value (≥5, or any individual parameter scoring 3), the nursing staff should increase the frequency of observations and alert a doctor to review the patient, depending on local policy/guidelines.
Trends in physiological parameters Often more useful than one-off observations. Some patients may have abnormal scores even when they seem relatively ‘well’ because of compensatory mechanisms. For these patients, higher thresholds may be agreed by senior doctors, but bear in mind that they are also likely to deteriorate much more quickly. Take care in the interpretation of NEWS. For example, a patient with severe chest pain can be very unwell yet have a NEWS of 0. See Box 6.2.
Patients who should be closely monitored by such scores Include:
• Emergency admissions, unstable or elderly patients
• Patients with pre-existing disease (cardiovascular, respiratory, DM)
• Patients who are failing to respond to treatment
• Patients who have returned from ICU/HDU or recent surgery.
Box 6.1 Key updates in NEWS2
In the original NEWS charts, COPD patients might constantly cross alarm thresholds for low oxygen saturations. As with many persistent alarms, users might become desensitized to high scores in this patient cohort. NEWS2 has a separate row (“SpO2 scale 2”) for saturations if the patient has been allocated to target saturations of 88–92% to ensure that they are appropriately monitored. Additionally, in the original score a patient could be confused, but still be considered as not at risk since they were ‘alert’ on the AVPU scale. NEWS2 recognizes new confusion by allocating a score of 3 to this worrying feature as a new category, ‘C’, in addition to a similar score allocated for patients responsive to Voice or Pain only, or Unresponsive (hence CVPU).
► Box 6.2 Calling for the cardiac arrest team
Calling for help is easily said in an exam situation, but actually initiating the call is much harder. It feels a little embarrassing to have to cancel the arrest call since it was just a patient fainting, but it was still right to call for help. Remember, the cardiac arrest team can be called for peri-arrest patients where you simply need many more pairs of hands and some senior support. It’s better to prevent a cardiac arrest! Always state ‘Adult/paediatric/obstetric cardiac arrest team to Ward A’, even if it’s a peri-arrest patient.
Fig. 6.1 National Early Warning Score (NEWS2). A total score ≥5, or any individual parameter scoring 3 should prompt urgent review by a doctor Ask yourself, could this be sepsis? © Royal College of Physicians 2017.
This section aims to provide a brief introduction to the decisions involved in referring and accepting a patient into ICU (Intensive Care Unit).
• Close monitoring using non-invasive and invasive devices (such as arterial and central venous lines)
• Organ support for vascular, renal, or respiratory failure (some units can offer cardiac support too)
Intensivists offer organ support and resuscitation; each patient will have a parent team overlooking their care who should visit on regular ward rounds (this will most likely be your first encounter with ICU).
Admitting a patient onto intensive care It can sometimes seem that intensivists are ‘reluctant’ to accept patients, but there are certain questions that must be satisfied in order to ensure that a patient can benefit from ICU. Patients have frequently described post-traumatic stress disorder following prolonged ICU stays; this serves to remind us that it is a tough environment with frequent exposure to painful and invasive procedures. The decision to commit a patient to a rigorous treatment pathway is a complex process. A possible referral needs to be discussed with your consultant, as the decision to admit will be made by an ICU consultant who will often phone your consultant for further discussion.
The information required Includes any known current/previous wants and wishes, details of the current illness and underlying medical conditions, the response to treatment so far, and the general physical/functional baseline. This is put together to decide on likely prognosis and trajectory, and therefore whether the benefits will outweigh the risks. What are the patient’s wishes? (Not always possible in the acute setting, but some patients are admitted to ICU electively following planned surgical procedures such as complex open AAA repairs.)
The most difficult aspect of the decision is deciding how likely it is that the patient in front of you will go on to have a quality of life that they will find worthwhile. Is ICU really going to make a difference? (Eg ICU cannot entirely replace liver function, but it can support the respiratory system long enough to enable the body to recover from an infection.) Intensive care therapies can be aggressive and unpleasant. You need to ensure that the patient is motivated to endure this, but also has a good pre-existing baseline to rely upon.
Reversibility is another aspect frequently considered. Is the presenting complaint something that we have the chance of reversing (such as infection)? Or is this new presentation just the natural sequelae of their existing disease process. For example, a patient with a degenerative neurological disease develops an infection. ICU can offer organ support and intensive antibiotics while the infection is being treated, but there is little that can be offered if the patient is becoming breathless because of diaphragmatic weakness.
If you need help with a sick patient Call ICU—they may not necessarily need to take over care but they can advise you on further action.
Indications for intubation Not all patients on ICU are intubated (see Box 6.3), ICU offers patients organ support beyond just managing the airway. Patients are only intubated in situations where they are unable to protect their own airway, or it may be that ICU will intubate and ventilate a patient in order to facilitate treatment (this is what is called ‘an induced coma’ in layman’s terms).
• Respiratory problems (eg hypoxia, hypercapnia, trauma)
• Neurological problems (eg low GCS so cannot maintain airway, mandatory sedation is required, e.g. for agitation)
• Physiological reasons (to reduce the work of breathing in cardiac failure, respiratory failure, and acidosis, to prevent hypercapnic cerebral vasodilation in raised ICP, e.g. head injury, and for ‘neuroprotective measures’, e.g. in severe encephalitis/meningitis).
Respiratory wean Refers to the process of reducing ventilatory support in a patient who is on positive pressure ventilation, in order for the patient to be able to breathe unaided by themselves. In a patient who has been on a ventilator for a long period time, has COPD, or who is weak and malnourished, this complex process may take several weeks or even months. There is no universal protocol.
Receiving an ‘ICU step-down’ patient on your ward When patients no longer need ICU level care, they are ‘stepped down’ to the wards. Generally, a written handover document from ICU should accompany the patient to the ward and sometimes a telephone handover as well. Some questions to consider:
• What are the priorities of care for this patient and the next stages?
• What happens if they deteriorate? Would ICU readmit them? ICU patients will often be discharged with a plan for re-escalation
• Have all the central venous and arterial lines been removed?
• Are there any drugs prescribed that you are not familiar with?
• Remember that there are teams from ICU in each hospital who help with psychological counselling after a prolonged ICU stay.
Most hospitals have an outreach team who review step-down patients.
Box 6.3 Levels of care in hospital
Level 0 General medical/surgical bed.
Level 1 Patients needing outreach support from ICU for medical advice, close monitoring, or clinical intervention as they may need escalating to ICU or have just come from there.
Level 2 Often called HDU Care; provision of single organ support but maintaining own airway (e.g. vasopressors, renal replacement therapy).
Level 3 Patients who are intubated or needing more than one organ supported.
If the ICU team feel that a patient may benefit from ICU but the Unit is full, they will try to accommodate the patient elsewhere, such as theatre recovery until an ICU bed becomes available, or in some cases may arrange a transfer to an ICU in another hospital that has availability.
►► Call the arrest team if you are concerned about A, B, or C (see  Box 6.2, p. 227); call for senior help early. Do not think you have to manage this alone.
| ► Airway | Check airway is patent; consider manoeuvres/adjuncts with C-spine control in trauma |
| ► Breathing | If no respiratory effort—CALL ARREST TEAM |
| ► Circulation | If no palpable pulse—CALL ARREST TEAM |
| ► Disability | If GCS ≤8—CALL ANAESTHETIST |
• Look inside the mouth, remove obvious objects/dentures
• Wide-bore suction under direct vision if secretions present
• Listen for signs of airway impairment (stridor, snoring, gurgling, or no air entry)
• Jaw thrust/head tilt/chin lift with cervical spine control in trauma
• Look for chest expansion (does R = L?), fogging of mask (Box 6.4)
• Listen to chest for air entry (does R = L?)
• Feel for expansion and percussion (does R = L?)
• Non-rebreather (trauma) mask and 15L/min O2 initially in all patients
• Look for pallor, cyanosis, distended neck veins
• Feel for a central pulse (carotid/femoral)—rate and rhythm
• Monitor defibrillator ECG leads and BP
• Remove all clothing, check temp
• Look all over body including perineum and back for rash or injuries
► Box 6.4 Signs of life
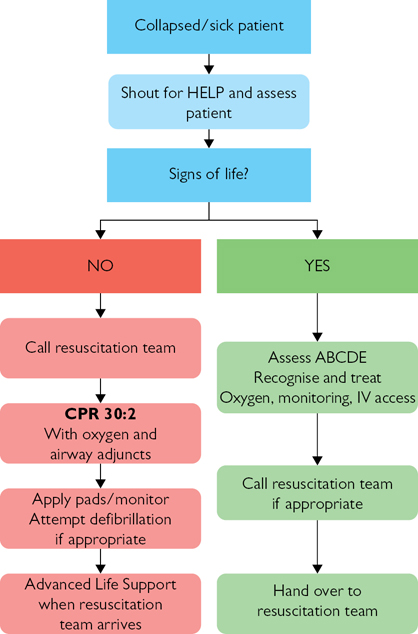
Fig. 6.2 In-hospital resuscitation algorithm; 2015 guidelines.
Reproduced with the kind permission of the Resuscitation Council (UK).
► Box 6.5 Common causes
| ► Airway | Check airway is patent; consider manoeuvres/adjuncts with C-spine control in trauma |
| ► Breathing | If no respiratory effort—CALL ARREST TEAM |
| ► Circulation | If no palpable pulse—CALL ARREST TEAM |
Basic life support Should be initiated and the cardiac arrest team called as soon as cardiac or respiratory arrest is suspected.
Advanced life support This is centred around a ‘universal algorithm’ (Fig. 6.3) which is taught on a standardized course offered by most hospitals.
The cardiac arrest team This usually consists of a team leader (medical registrar), F1, anaesthetist, CCU nurse, and senior hospital nurse:
• Team leader—gives clear instructions to other members
• F1—provides BLS, cannulates, takes arterial blood, defibrillates if trained, gives drugs, performs chest compressions (see Box 6.6)
• Anaesthetist—airway and breathing, they may choose to bag-and-mask ventilate the patient, insert a laryngeal mask, or intubate ( pp. 556–557)
• Nurses—provide BLS, defibrillate if trained, give drugs, perform chest compressions, record observations, note time points, and take ECGs.
Needle-stick injuries ( p. 108.) Commonest in times of emergency. Have the sharps box nearby and never leave sharps on the bed.
Cannulation Can be very difficult during a cardiac arrest. The antecubital fossa is the best place to look first; alternatively try feet, hands, forearms, or consider external jugular if all else fails. Take bloods if you are successful, but don’t allow this to delay the giving of drugs.
Blood tests Occasionally useful in cardiac arrests, especially K+ which can often be measured by arterial blood gas machines. Use a blood gas syringe to obtain a sample (the femoral artery with a green needle (21G) is often easiest—NAVY p. 530) and ask a nurse to take the sample to the machine. Other blood tests depend on the clinical scenario; if in doubt fill all the common blood bottles ( p. 531).
Defibrillation Taught on specific courses (eg ILS, ALS) and must not be undertaken unless trained. The use of automated external defibrillators or AEDs ( p. 546) is becoming routine in non-clinical areas as rigorous training is not required.
Cardiac arrest drugs These are now prepared in pre-filled syringes: adrenaline (epinephrine) 1mg in 10mL (1:10,000), atropine (several preparations available), amiodarone 300mg in 10mL. Always give a large flush (20mL saline) after each dose to encourage it into the central circulation. inside back cover of this handbook for further emergency drug doses.
Cardiac arrest trolleys Found in most areas of the hospital. Know where they are for your wards. Ask the ward sister if you can open the trolley and have a good look at the equipment within it as they differ between hospitals. They are often arranged so the top drawer contains Airway equipment, the second contains Breathing equipment, the third contains Circulation equipment, and the lower drawer contains the drugs and fluids. You’ll seldom need anything that isn’t on the trolley.
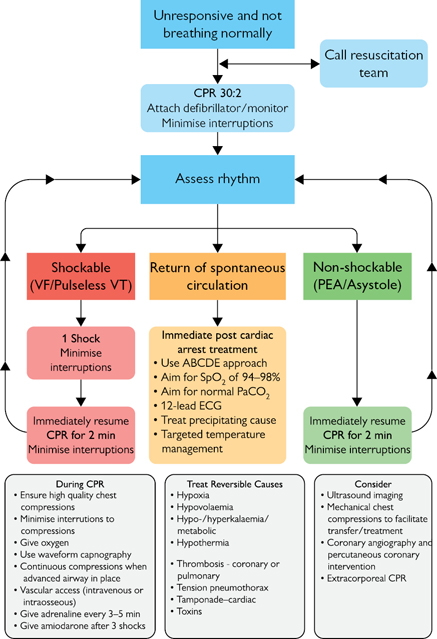
Fig. 6.3 Adult Advanced Life Support algorithm; 2015 guidelines.
Reproduced with the kind permission of the Resuscitation Council (UK).
► Box 6.6 What can you do?
When you start to attend arrest calls as a foundation doctor, you can often feel out of your depth and a little useless. That’s not the case at all! Here is a list of incredibly useful things to start immediately when you arrive:
• Announce that you will scribe (keep a timed record of drugs and shocks given) and communicate the need for the next dose/shock loudly to your team
• Be a tourniquet for your colleague, this steadies the hand during CPR so IV access is gained faster
• Find the notes and start looking through the background so that you can educate the team on the patient’s clinical background which can give significant clues on why the cardiac arrest has taken place.
Jaw thrust Pull the jaw forward with your index and middle fingers at the angle of each mandible. Pull hard enough to make your fingers ache.
Head tilt Gently extend the neck, avoid if C-spine injury risk.
Chin lift Pull the chin up with two fingers, avoid if C-spine injury risk.
Oropharyngeal airway (Guedel) A rigid, curved plastic tube; choose the size that reaches the angle of the mouth from the tragus of the ear. Insert upside down to avoid pushing the tongue back, then rotate 180° when inside the mouth (do not insert upside down in children).
Nasopharyngeal airway A flexible, curved plastic tube, not to be used with significant head injury. Choose the size that will easily pass through the nose (size 6–7mm in most adults); insert by lubricating and pushing horizontally into the patient’s nostril (not upwards). Use a safety pin through the end to prevent the tube being lost.
Suction Cover the hole on the side of a wide-bore suction catheter to cause suction at the tip. Secretions in the parts of the oropharynx that can be seen directly can be cleared. A thinner catheter can be used to clear secretions in the airway of an intubated patient.
Non-rebreather mask A plastic mask with a floppy bag attached; used in acutely ill patients to give ~80% O2 with a 15L/min flow rate.
Standard mask (Hudson mask) A plastic mask that connects directly to O2 tubing; delivers ~50% O2 with a 15L/min flow rate.
Venturi A mask that connects to the O2 tubing via a piece of coloured plastic, delivering either 24%, 28%, 35%, 40%, or 60% O2. Adjust the flow rate according to the instructions on the coloured plastic connector, eg 4L/min with the 28% Venturi connection.
Bag and mask (Ambu bag) A self-inflating bag and valve that allows you to force O2 into an inadequately ventilating patient. Attach the O2 tubing to the bag with a 15L/min flow rate then seal the mask over the patient’s nose and mouth. Easiest with two people; one person stands at the head to get a firm seal with both hands while the other squeezes the bag. The mask can be removed to attach the bag to an ETT or LMA ( p. 558).
Pulse oximeter Plastic clip with a red light that measures blood O2 saturations. Clip onto the patient’s index finger. Do not rely on the reading unless there is an even trace on the monitor and the patient has a pulse; use on the different arm from the BP cuff.
Nebulizer This is a 3cm-high cylinder that attaches beneath a mask. The cylinder is made of two halves that can be untwisted so that the fluid to be nebulized can be inserted. The nebulizer can be connected to a pump or directly to an O2 or medical air supply.
Defibrillation ( p. 546) Successful defibrillation requires ECG monitoring to identify a shockable rhythm, and delivery of current through electrodes attached to the chest wall. Previously, monitoring was performed using ECG leads: red to right shoulder, yellow to left shoulder, and green to apex ( p. 542). Separate paddles were applied to deliver current. Most NHS trusts now use hands-free adhesive defibrillation electrodes which are safer and also double as monitoring leads ( p. 543).
Only defibrillate if you have been trained, otherwise many defibrillators have an automated mode (AED) that can provide computerized rhythm analysis and advice.
• Check the adhesive electrodes are correctly applied to the chest
• Switch the defibrillator to ‘monitor’ mode
• If a shockable rhythm is identified, select required defibrillation energy using the circular dial, then charge defibrillator using ‘charge’ button
• Tell staff to stand clear and stand clear yourself—strive to minimize the interruption of chest compressions which should continue until the latest possible moment
• Check the O2, staff, and you are clear (O2, top, middle, bottom, self)
• Check the rhythm is still shockable then press the ‘shock’ button to deliver the charge. Resume CPR, without pausing to check rhythm.
Blood pressure Attach the cuff to the patient’s left arm so it is out of the way and leave in place. If it does not work or is not believable (eg irregular or tachyarrhythmia) then obtain a manual reading.
Venous access Ideally an orange/grey venflon in each antecubital fossa; however, get the best available (biggest and most central). Remember to take bloods but don’t let this delay giving drugs.
Glucose Use a spot of blood from the venous sample or a skin prick to get a capillary sample; clean skin first with water to avoid false readings.
Examination GCS, pupil size and reactivity to light, posture, tone of all four limbs, plantar reflexes.
Exposure Take all the patient’s clothes off; have a low threshold for cutting them off. Inspect the patient’s entire body for clues as to the cause of the arrest, eg rashes, injuries. Measure temp. Remember to cover the patient with a blanket to prevent hypothermia and for dignity.
Arterial blood gas Attempts to sample radial artery blood in a patient in extremis may be futile and waste valuable time. Instead, attach a green (21G) needle to a blood gas syringe, feel for the femoral pulse (½ to ⅔ between superior iliac spine and pubic symphysis) and insert the needle vertically until you get blood. Press hard after removal. Even if the sample is venous, it can still offer useful information.
Femoral stab ( p. 530.) If no blood has been taken you can insert a green needle into the femoral vein which is medial to the artery (NAVY). Feel for the artery then aim about 1cm medially. If you hit the artery take 20mL of blood anyway and send for arterial blood gas and normal blood tests, but press hard after removal.
ECG Attach the leads as shown on p. 543.
CXR Alert the radiographer early so that they can bring the X-ray machine for a portable CXR.
ATLS This is designed to quickly and safely stabilize the injured patient. The purpose of ATLS is not to provide definitive care of all injuries, but to recognize the immediate threats to life and to address these. Remember to act immediately: ~10% of trauma deaths arise from airway obstruction. As with ALS, in ATLS the patient’s care is delivered by a team which will consist of a leader and various members. Details of how to undertake an ATLS course are given in Box 6.7; it is really useful if you are considering a career in the acute services or surgery.
The primary survey This allows a rapid assessment and relevant management to be undertaken. If a life-threatening issue is found this must be treated before moving on to the next step of the primary survey. The primary survey is as follows: Airway with cervical spine protection ( OHCS10 p. 782); Breathing: ventilation and oxygenation ( OHCS10 Chest trauma, p. 788); Circulation with haemorrhage control (see Box 6.8 and OHCS10 Management of shock in trauma, p. 784); Disability: brief neurological examination; Exposure/Environment; Adjuncts to primary survey; Reassess patient’s ABCDE and consider need for patient transfer.
The secondary survey This follows once all life-threatening issues have been identified and dealt with; the secondary survey is a top-to-toe examination looking for secondary injuries which are unlikely to be immediately life-threatening. See Table 6.1 for a mnemonic to make sure you don’t miss anything. The secondary survey is as follows: AMPLE history (Allergies, Medications, Past medical history, Last meal, Events leading to presentation) and mechanism of injury; Head and maxillofacial; Cervical spine and neck; Chest; Abdomen; Perineum/rectum/vagina; Musculoskeletal; Neurologic; Adjuncts to the secondary survey.
Table 6.1 Secondary survey mnemonic
| Mnemonic | Secondary survey |
| Has | Head/skull |
| My | Maxillofacial |
| Critical | Cervical spine |
| Care | Chest |
| Assessed | Abdomen |
| Patient’s | Pelvis |
| Priorities | Perineum |
| Or | Orifices (PR/PV) |
| Next | Neurological |
| Management | Musculoskeletal |
| Decision? | Diagnostic tests/definitive care |
Reproduced from Emergency Medicine Journal, Hughes S.C.A, 23:661–2, 2006, with permission from BMJ Publishing Group Ltd.
Trauma and the foundation doctor It is highly unlikely the foundation doctor will be the first person to attend to a major trauma patient, though ATLS can be applied in principle to any patient who has sustained an injury. Having a logical, step-wise approach to injured patients minimizes the risk of missing life-threatening complications or injuries which subsequently may become debilitating if left unrecognized and untreated. If you are working in the ED you will likely be involved in gaining IV access or perhaps conducting parts of the primary survey under supervision. Get involved with conducting the secondary survey; it is often poorly performed as all the adrenaline of performing life-saving interventions wears off. This bit is essential though, as the unconscious patient will be unable to report a finger fracture, or damaged genitalia.
► Box 6.7 ATLS course
In the UK, ATLS courses are coordinated by the Royal College of Surgeons. The course is currently 3 days long, and details of where and when courses are run can be obtained from the College ( p. 615 for contact details). There is usually a long waiting list for places as this is a popular course; the cost for the 3-day course is around £600.
The ATLS principles provide a structured approach to managing complex trauma patients by identifying the life-threatening priorities and treating quickly. Keep an eye out for new research though as some of the ATLS teachings are not always what are done in practice (eg the ATLS approach to fluid management does not include hypotensive fluid resuscitation now used in many departments). Check with your local protocol over how trauma is best managed.
For those who are especially interested in trauma management after sitting the ATLS, then consider the European Trauma or ATACC (Anaesthesia Trauma and Critical Care) courses when you are more senior.
► Box 6.8 On the floor and four more?
The main cause of shock in trauma is hypovolaemia and the way to think about blood loss is that it can accumulate on the floor and in four other places. Long bones can harbour up to 0.75L and a pelvic fracture can hide several litres of blood loss. Abdominal and chest wounds can hold nearly your whole blood volume and will required immediate surgical intervention if suspected. See Fig. 6.4 for where to look for occult blood loss.
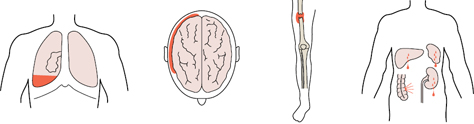
Fig. 6.4 Where to look for occult blood loss
Reproduced from Baldwin, Oxford Handbook of Clinical Specialties, 2016, with permission from Oxford University Press.
| ► Airway | Check airway is patent; consider manoeuvres/adjuncts |
| ► Breathing | If poor respiratory effort—PAEDIATRIC ARREST TEAM |
| ► Circulation | If HR <60bpm—PAEDIATRIC ARREST TEAM |
| ► Disability | If unresponsive to voice—PAEDIATRIC ARREST TEAM |
►► Call the PAEDIATRIC arrest team if severely unwell; call for senior help early (Fig. 6.5). (See Box 6.9 for life-threatening causes.)
• Airway manoeuvres: (head tilt), chin lift, jaw thrust (Box 6.10)
• Oropharyngeal or nasopharyngeal airway if responding only to pain
► If you suspect epiglottitis (stridor, drooling, septic), do not look in the mouth, but give O2, call your senior help urgently, and an anaesthetist and ENT surgeon.
• Bag and mask with 15L/min O2 if poor or absent breathing effort
• Non-rebreather mask and 15L/min O2 in all other patients
• Effort stridor, wheeze, RR, intercostal recession, grunting, accessory muscle use (head bobbing in infants), nasal flaring
• Efficacy chest expansion, air entry (does R=L?), O2 sats
• EffectsHR, pallor, cyanosis (late sign), agitation, drowsiness.
• Start CPR if HR absent or <60bpm and unresponsive
• Monitor defibrillator ECG leads
• StatusHR + rhythm, pulse volume, cap refill (≤2s normal), BP (see Box 6.11)
• EffectsRR, mottled/pale/cold skin, urine output, agitation, drowsiness
• Venous access (consider intraosseous) check glucose and send blds
• Consider fluid bolus (20mL/kg IV 0.9% saline STAT) if shocked
• Exclude heart failure↑ JVP, gallop rhythm, crepitations, large liver.
• Assess AVPU (Alert, responds to Voice, responds to Pain, Unresponsive); check glucose if not already done
► Box 6.9 Life-threatening causes
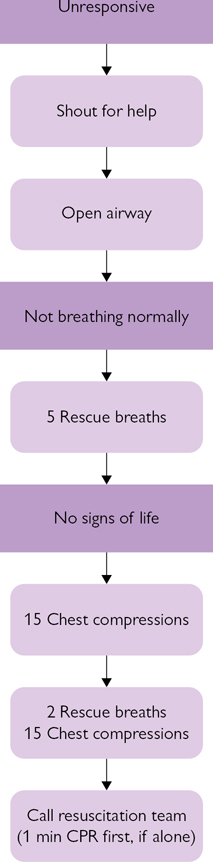
Fig. 6.5 Paediatric Basic Life Support algorithm; 2015 guidelines.
Reproduced with the kind permission of the Resuscitation Council (UK).
► Box 6.10 Main age-related differences in paediatric life support
| Feature | Infant <1yr | Child >1yr | Post-puberty |
| Airway position | Neutral | Slightly extended | Slightly extended |
| Breaths | Mouth and nose | Mouth, ±nose | Mouth only |
| Pulse | Brachial | Carotid | Carotid |
| CPR position | 1 finger above xiphisternum | 1 finger above xiphisternum | 2 fingers above xiphisternum |
| For CPR use | 1 finger | 1 or 2 hands | 2 hands |
| Compressions:breaths | 15:2 | 15:2 | 15:2 |
► Box 6.11 Normal range for observations by age
| Age | RR (/min) | HR (/min) | Systolic BP (mmHg) |
| <1yr | 30–40 | 110–160 | 70–90 |
| 2–5yr | 20–30 | 95–140 | 80–100 |
| 6–12yr | 12–20 | 80–120 | 90–110 |
| >12yr | 12–16 | 60–100 | 100–120 |
► If you are concerned then fast bleep a senior or CALL THE NEONATAL ARREST TEAM (Fig. 6.6).
• Turn on the heater and place warm towels on the resuscitaire
• Turn on O2/air and check pressure, set PIP/PEEP to 30/10cmH2O for term babies
• Turn on suction and check it works
• Get the laryngoscope and size 3.5 and 4.0 (term babies) ETT ready
• Post-delivery start the clock and place the baby on the resuscitaire
• Dry vigorously with a warm towel and cover
• Babies <30/40 gestation should be placed directly in a plastic bag.
► Meconium delivery If the baby is not breathing, suck out meconium (Box 6.12) from the mouth and beneath the vocal cords under direct vision with a laryngoscope before drying; if the baby breathes then stop and resuscitate as usual.
• AssessRR and HR, if either is impaired and not improving:
• place the baby’s head in the neutral position
• place Neopuff™ over nose and mouth, jaw thrust; give 5 inflation breaths:
• If unsuccessful, reposition head and give a further 5 inflation breaths
• If unsuccessful, consider intubation
• Look for oropharynx obstruction and consider a Guedel airway
• Continue Neopuff™ breaths at lower pressures (eg 20/5, 1s on 1s off).
• Assess the HR by gripping the umbilicus or listening to the heart
• Start CPR if HR <60bpm/absent despite inflation breaths:
• grip round the chest and use both thumbs over lower sternum
• Attempt to get IV access, eg umbilical venous catheter, check glucose.
• Adrenaline 0.1–0.3mL/kg of 1:10,000 IV if HR not improving
• Na+bicarbonate 4.2% 2–4mL/kg IV if acidotic and not improving
► Box 6.12 Life-threatening causes of unresponsive neonate
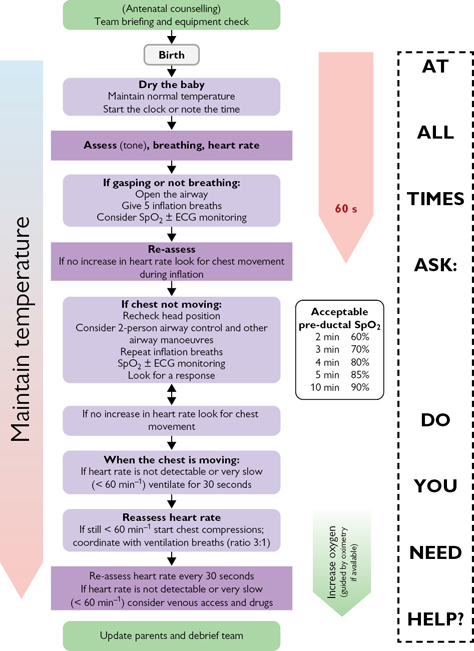
Fig. 6.6 Newborn Life Support algorithm; 2015 guidelines.
5Reproduced with the kind permission of the Resuscitation Council (UK).
| ► Airway | Check airway is patent; consider manoeuvres/adjuncts |
| ► Breathing | If no respiratory effort—OBSTETRIC ARREST TEAM |
| ► Circulation | If no palpable pulse—OBSTETRIC ARREST TEAM |
| ► Disability | If GCS ≤8—OBSTETRIC ARREST TEAM |
► Left lateral position (>15°) using a Cardiff Wedge, pillows, or your knees to take the pressure of the uterus off the vena cava and aorta
• Look inside the mouth, remove obvious objects/dentures
• Wide-bore suction under direct vision if secretions present
• Feel for a central pulse (carotid/femoral)—HR and rhythm
• Mid-sternal chest compression (30:2) if pulse absent
• Arrhythmias—use a defibrillator/drugs as usual ( p. 546)
See Box 6.13 for causes of obstetric arrest.
► Box 6.13 Causes of obstetric arrest
See also p. 230.
1  https://www.rcplondon.ac.uk/projects/outputs/national-early-warning-score-news-2 See also NICE guidelines at https://www.nice.org.uk/guidance/cg50