Begun, but still Incomplete: Nicholas Hawksmoor’s Crossing Tower and Spire
Nicholas Hawksmoor was appointed as the next Surveyor of the Fabric in 1723, and held the post until he died in 1736. In the mid-1720s the clear goal in the minds of both Hawksmoor and the Dean and Chapter was to crown the crossing with a tower or lantern of some sort, and to complete the twin western towers.73 While the concept enjoyed both Parliamentary and public support, arriving at a scheme which satisfied all parties required patience and the tabling of numerous options. The House of Commons was still voting funds annually for ‘repairing and completing’ Westminster Abbey, although there appear to have been constant financial difficulties.74 More drawings were produced, representing at least six schemes, with a variety of further sub-options for detailing the crossing although, interestingly, most of these did not include a tall Gothic tower or a soaring spire, as envisaged by Wren and Dickinson, but tended to favour a domed lantern and cupola. Several of Hawksmoor’s schemes represent only minor reworkings of earlier proposals by Wren and Dickinson. Ironically, in his final scheme Hawksmoor once again embraced the idea of a tower and spire over the crossing, and work to this end was commenced. But for an accident of history, that would have been completed by 1730.
Hawksmoor’s Surveyorship was dominated by the subject of towers at Westminster Abbey, but only a small fraction of the documentation that must have been produced over the 13-year period has survived. Several drawings by Hawksmoor had long been preserved amongst the Abbey’s muniments, and a few others relating to towers were known elsewhere, but they did not tell a coherent story. However, in 1993 fresh light was shed on the proposals of the 1720s when a cache of twenty hitherto unknown drawings was found in the attic of a country house, and were purchased on behalf of the Abbey.75 All are considered together here.
The Hawksmoor Drawings
Scheme 1
What is almost certainly the earliest of Hawksmoor’s schemes is preserved in a sectional elevation of the crossing.76 [46] It shows the crossing piers in their original form, not enlarged but carrying a square lantern tower of two stages with octagonal corner-turrets, crenellations and pinnacles. The tower in turn supports a tall dodecagonal spire of three stages, with decorative bands and lucarnes in the cardinal faces only. The legend records that the complete structure would stand to a height of 400 ft (122 m) above pavement level in the quire. The design was clearly inspired by Wren’s model of 1710, while at the same time being derivative from Dickinson’s scheme 1, dated 1722. [38]
Scheme 2
This drawing is also undated, but must again be attributable to 1723–24.77 Several options are presented on paper flaps. In version (i) it shows a spire-less tower closely similar to that seen in scheme 1, but now of three fenestrated stages instead of two. [47] In version (ii), the same tower is topped by a two-stage octagonal cupola with windows, the construction evidently being of timber and lead. [48] Two further variations exist, showing the lantern finished, first with a short spirelet (version iii), and then with a taller one (version iv). [49]
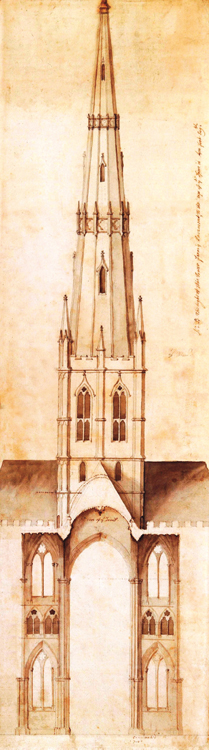
46 Hawksmoor, c. 1723–24. Scheme 1: a crossing tower of two stages, with a parapet, pinnacles and a three-stage spire. The total height was to be 400 feet. WAM (P)913

47 Hawksmoor, c. 1723–24. Scheme 2, version (i): a square crossing tower of three stages, with corner-turrets, a crenellated parapet and pinnacles. WAM (P)912
Scheme 3
A drawing, dated 1724, shows a plain square base (up to ridge-level), surmounted by an octagonal lantern with paired lights in the four cardinal faces and canopied statue niches applied in the angled sides. [50] The lantern was roofed with an ogival lead dome. This was the simplest of Hawksmoor’s schemes, involving the construction of a much lower tower than had previously been envisaged. An addition was made to the drawing, dated 1731, in the form of a plan showing freestanding octagonal stair-turrets in place of the statue niches.78 A second drawing relating to this scheme comprises a half-section along the length of the church, looking south and showing how Hawksmoor proposed to treat the interior of the crossing and lantern.79 [51]

48 Hawksmoor, c. 1723–24. Scheme 2, version (ii): the same tower as in Figure 47, surmounted by a two-stage, lead-covered cupola with an ogival base. WAM (P)912

49 Hawksmoor, c. 1723–24. Scheme 2, version (iii): the same tower and cupola as in Figure 47, but this time finished with a short spirelet. Alongside, on a flap, is an alternative for a taller spirelet (version (iv)). WAM (P)912
Following Wren’s proposal (p. 32), the main piers have been increased in size, and the capitals now support low semicircular arches, surmounted by crocketed canopies of ogival form.80 Above is a pointed relieving arch which does not correspond to the existing Gothic crossing arch, implying that the latter was to be destroyed and replaced. At eaves level the thickness of the tower wall has been reduced and pierced by a large arch containing a triplet of smaller pointed arches, opening into the void of the high roof beyond. Just above ridge-level is the junction between the square tower and the octagonal lantern, the angled faces of which are carried on shell-shaped squinches. Internally the lantern is finished with a hemispherical dome, the crown of which stands 185 ft (56.5 m) above floor level.
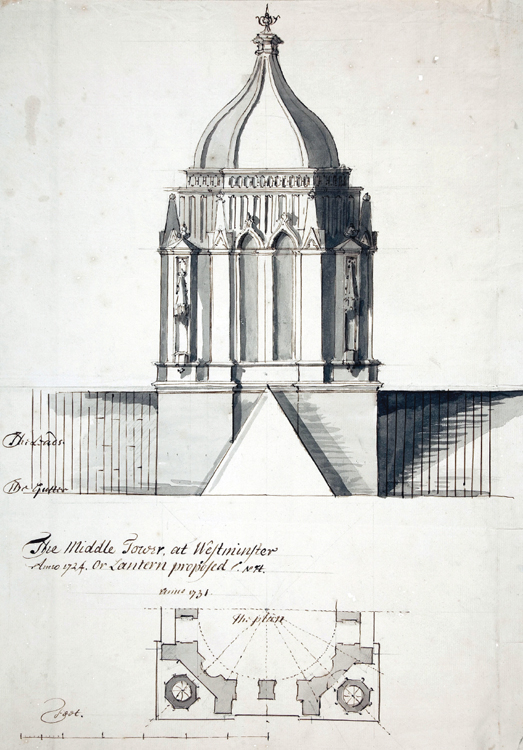
50 Hawksmoor, 1724 and 1731. Scheme 3: elevation and plan for a modest octagonal lantern with an ogival dome and statue niches on the angled faces, but no turrets or pinnacles. WAM, Hawksmoor no. 5
51 Hawksmoor, 1724. Scheme 3: south-facing section through the proposed tower and lantern, showing the proposed treatment of the interior of the crossing. A plan of the upper stage of the lantern is also included. WAM (P)910
Scheme 4
Another drawing, which probably dates from 1724, shows the entire north elevation of the Abbey ‘with ye west towers and the middle lantern as intended’. Again, by affixing a series of flaps, Hawksmoor offered three possible versions of the proposed lantern tower.81 Version (i) shows a low, square tower finished with a cornice and parapet just above ridge level. Rising behind that is a large onion-shaped dome with crocketed ribs, oval oculi and a ball-finial surmounted by a cross. [52] Visually, the whole composition is heavy and squat. In version (ii) Hawksmoor attempted to alleviate this effect by attenuating the onion-shaped dome and adding a crocketed collar and stem below the ball-finial. [53] The result completely overwhelmed the diminutive tower upon which it was placed. So, Hawksmoor attempted version (iii), in which he first raised the square tower by adding a blind-panelled stage; then came a buttressed octagonal stage with windows in the cardinal faces and capped staircases against the others; on top of that he added a short, octagonal stage with large quatrefoiled openings in each face, a crenellated parapet and spindly pinnacles; finally, the whole composition was completed with a highly ornate lead dome and finial. [54] For all its stylistic idiosyncrasies, the last is visually the most satisfactory.
52 Hawksmoor, c. 1724. Scheme 4, version (i): the crossing does not rise above ridge level, and is finished with a parapet and squat dome. WAM, Hawksmoor no. 4
53 Hawksmoor, c. 1724. Scheme 4, version (ii): this has the same parapet as in Figure 52, but a more attenuated dome. WAM, Hawksmoor no. 4
Schemes 5 and 6
Hawksmoor prepared two elevations of the north side of the Abbey, to show how it might look if it were completely remodelled as a quasi-classical structure, while retaining Gothic tracery in the windows.82 These undated designs owe not a little to St Paul’s Cathedral and to All Souls’ College, Oxford, upon both of which Hawksmoor had previously been engaged. His designs of 1720 for the cloister and west gate at All Souls are especially relevant.83 The two schemes show the lantern tower as a massive, squat structure with an ogival dome set between four square turrets. [55, 56] The resemblance of the central tower to a mosque has also been noted.84
These schemes were radically different from all others in that they involved the enlargement of the crossing to take in the adjacent bay on all sides. To achieve this would have required a drastic reconstruction of the centre of the church.

54 Hawksmoor, c. 1724. Scheme 4, version (iii): the crossing is topped by a highly ornate octagonal lantern and dome. WAM, Hawksmoor no. 4
55 Hawksmoor, mid-1720s. Scheme 5: the exterior of the Abbey substantially remodelled and a new crossing tower added. This represents an amalgam of Gothic and classical detailing, and the footprint of the central tower has been substantially increased. © Westminster City Archives

56 Hawksmoor, mid-1720s. Scheme 6: a variation on the proposal shown in Figure 55. © Westminster City Archives
Repairing the Damaged Medieval Crossing
In April 1724, the newly appointed Hawksmoor erected a scaffold inside the crossing, ‘to examine the condition of the sealing of the middle tower which appears ruinous, and dangerous to be under, and to see what condition the four large leggs of the said tower are now in’.85 On 8 June 1724, Dickinson (who was now employed in Hawksmoor’s office) prepared a sectional elevation drawing with dimensions. It appears to have been taken on the north–south axis, and shows a plain, low tower with the walls above the crossing arches reduced in thickness, a simple ridged roof without a parapet, and a shallow domed ceiling.86 [32] Superficially, this might be taken to represent a lightweight, minimalist solution to enclosing the crossing, but it is undoubtedly a record drawing, not a proposal. As already observed, it can be identified as a section through the sixteenth-century boxed-in top of the crossing (p. 26).87
Dismantling the upper part of the crossing evidently began straightaway, since Edward Stanton, the mason, submitted a bill for work done by him between June and Michaelmas 1724, ‘taking down the stone walls of the middle tower or dome, and placing by all the good and useful stone there taken down’.88 In April 1725 an estimate was prepared for ‘finishing the doome to the ridge of the roof of the church & repairing the 4 great arches and vaulting from the pillars’. At the same time, Hawksmoor was also instructed to inspect ‘the spandrills and arches adjoining to the dome [to] make a report what more it will be absolutely necessary to take down’.89 This refers principally to the triforium arcades adjacent to the crossing, the fractured condition of which had already been noted by Wren in 1713. Some repair must also have been necessary at clearstorey level, since this will have been affected by structural movement too.
For next three years workmen were employed in the crossing, dismantling and reconstructing the masonry at the base of the tower. In May 1725, they were authorized to rebuild only up to the level of the ‘battlement of the church, provided the old stones that were taken down from the said dome will be sufficient for that purpose … and to desist from going so far if the old stone will not hold out to do it’.90 This confirms that there was no masonry tower rising up to or beyond ridge level, otherwise there would not have been a shortage of building stone. We may therefore deduce that Stanton’s men had removed the sixteenth-century boxing of the top of the lantern, and the plaster dome inside; they must also have dismantled any masonry that remained of the former octagonal lantern base and its corner supports, in order to access and repair the fractured crossing arches. That having been done, they began to build up the walls again with what little stone was available for reuse. The level from which the reconstruction took place is plainly visible in the masonry today, as well as being marked on Hawksmoor’s elevation drawing. [15, 57, 58, 59]
Hawksmoor’s Model of the Crossing
In April 1726 Hawksmoor was authorized to carry the reconstruction up to the next level, namely ‘to the top of the old roof … according to [the] model now laid before the Committee’.91 Mention of a model calls to mind a series of fragments of limestone models, now in the Westminster Abbey Collection. Some of these fragments are identifiable as relating to the crossing. A reference to the commissioning of a model of proposed works in the crossing is preserved in the muniments: in September 1724, Edward Stanton, the mason who dismantled the old lantern, billed the Abbey for ‘modelling a design according to Mr Hawksmoor’s directions for the finishing of the said middle tower or dome’. His charges included ‘for 10.0 cub. of freestone for the model at 2s. 1d. per foot – £1 0s. 10d.’ This model must have been quite substantial for ten cubic feet of limestone to have been used in its making. Constructed at a scale of 4 feet to one inch (i.e. 1:48), the quantity of stone purchased would have been ample to make a model of a tower and spire representing a height of three hundred feet, or more. The situation is however complicated by the fact that there were interchangeable components, so that the model could be reassembled to show several variations on the basic proposal.

57 Masonry in the spandrels above the main arches at the north-west angle of the crossing. The small blocks in the lower area are part of Henry III’s work, while everything above belongs to Hawksmoor’s rebuild (cf. Figs 15 and 59). Author

58 Hawksmoor, 1725. Sectional elevation through the crossing tower, showing the rebuilt masonry over the main arch and the new basement of the lantern above. The abutment of the high roofs is indicated, together with a temporary gabled roof over the lantern. WAM, Hawksmoor no. 9

59 Hawksmoor, 1725. Detail of the proposed Gothic arcade in the base of the lantern from Figure 58. This also shows the reconstruction of the masonry immediately above the crossing arch. WAM, Hawksmoor no. 9
Only a few fragments of Hawksmoor’s model survive today, and these relate to the easternmost bay of the nave vault, the northwest crossing pier, the lantern and the proposed vaulted ceiling (‘dome’) over the crossing itself.92 In all, five components of the model partially survive, and three of them appear to represent alternative treatments of the lantern stage. To some extent they complement the extant drawings (p. 39). The model did not encompass the entire tower and lantern, from the floor upwards, but began just below the springing of the crossing arches. Also, the tower may only have been represented by the western half-section. The material used for the model is fine-grained cream limestone. Architects’ models in stone are much rarer than those in timber, and these fragments are thus an important survival.93

60 Hawksmoor’s stone model, 1724: component A. North-west corner of the crossing, showing the capital and springing of the north and west arches and part of the vault of the easternmost bay of the nave. On the far right is the beginning of the first bay of the north transept clearstorey. WA Lib. Coll.

61 Hawksmoor’s stone model, 1724: component C. Reconstruction of part of the octagonal lantern stage with a pair of windows in the cardinal face and freestanding corner-turrets with fliers adjacent to the diagonal faces. WA Lib. Coll.

62 Hawksmoor’s stone model, 1724: component C. Reconstruction of part of the octagonal lantern stage (as in Fig. 61), showing a window with a crocketed ogee-headed canopy. WA Lib. Coll.
Components A and B
These two adjoining pieces are from the lowest part of the model and comprise the easternmost bay of the nave vault, together with the capital of the north-west crossing pier and parts of the two great arches springing from it; also included is a small fragment of the first bay of the north transept. The crossing pier is shown in its thirteenth-century form, and not the enlarged version proposed by Wren and Hawksmoor. [60]
Component C
Several non-adjoining fragments evidently belong to a model of the lower part of an octagonal lantern, with pairs of pointed windows in each face. [61, 62] The window heads are surmounted by ogival canopies embellished with crockets and poppyhead finials. Two freestanding octagonal corner-turrets survive, complete with evidence at their bases for roofed link-structures which would have facilitated access from the top of the turret-stair into the base of the lantern. Higher up on each turret is a flier which provided a supporting link between the lantern and the turret. This section of the model must have stood directly on top of the square basement stage of the crossing tower, the octagonal turrets rising from the four corners and being supported from below by corbelling or squinch arches.94 The design possibly relates to one of the Wren-Dickinson plans, or a derivative. [31, 44]
Component D
This half-section represents a high-domed vault contained within the upper stage of an octagonal lantern, above the windows. [63] The octopartite ribbed vault is intact, and has a bell manhole or oculus at the centre. Externally, the model has no elaboration, although there are hints of setting-out lines for blind tracery on one of the faces.
Component E
This is another half-section of the upper part of a square lantern tower. [64] It represents the vaulted stage above the lantern windows, and shows that there was a ribbed vault of twelve compartments, contained inside a square tower with attached octagonal turrets at the angles. The vault itself has been broken away and only the springings of the ribs survive. The exterior is blank. On the top edge of this section of model are some lightly scored setting-out lines relating to the construction; they also show that there was to be a newel stair in one of the turrets.95

63 Hawksmoor’s stone model, 1724: component D. Half-section of a rib-vault above an octagonal lantern. This could have fitted on top of component C, except that the latter has pilasters at the angles. WA Lib. Coll.
Construction of the New Lantern Tower Begins
Even though we lack explicit written evidence detailing the conclusion that had been reached regarding the treatment of the lantern tower, the important point to note is that a firm decision must have been made by May 1725. Rebuilding of the lower stage of the tower could not have begun until it was known what kind of superstructure it had eventually to support (see further, p. 56). It was not necessary for every detail of the upper stages of the lantern to have been decided upon at this point, but the erection of its ‘basement’ (as Hawksmoor referred to it) would prescribe the general form hereafter.
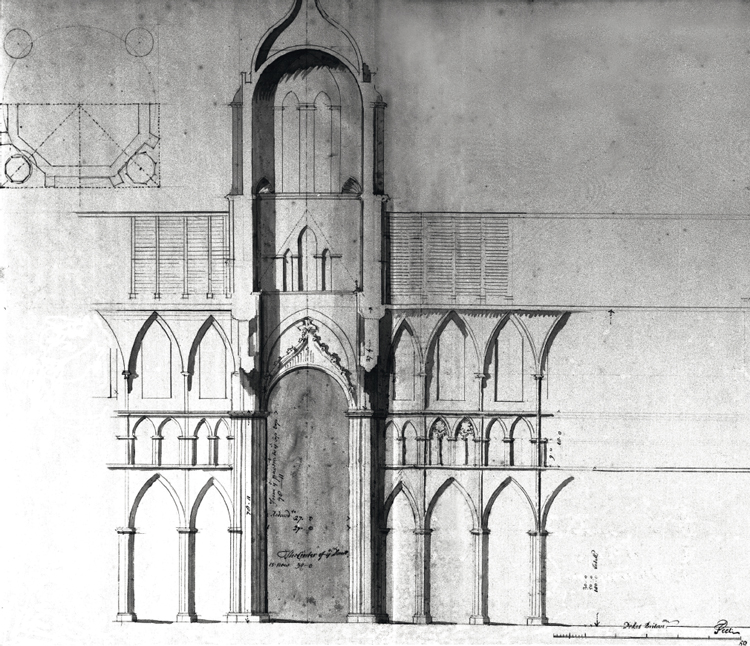
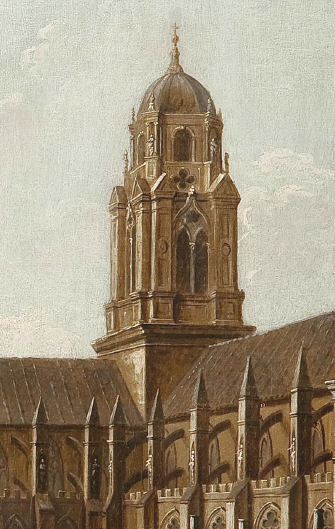
The construction of the tower base in Portland stone then went ahead in accordance with a surviving drawing dated 4 May 1725.96 This is an east–west sectional elevation through the crossing, showing a squat and obviously unfinished lantern tower, surmounted by a temporary, gabled roof. [58] The style is firmly thirteenth century. Just above the apices of the crossing arches the masonry was reduced in thickness from 5 ft to 3 ft (1.5 m to 0.9 m), at the level defined internally by a broad offset and string-course, and externally by two steps. [14, 15] This is the foundation off which the basement stage of the tower was built. Each wall of the tower was pierced by a large opening taking the form of a two-centred arch, the purpose of which was undoubtedly to reduce the superincumbent weight of the tower on the crossing piers. The openings communicated with the voids of the adjacent high roofs. The drawing shows a single bay of traceried arcading within each aperture, the components of which comprise four trefoil-headed arches surmounted by a pierced quatrefoil. [59] The design is an adaptation of Henry III’s triforium arcade. Above each opening is a pair of lancet windows flanking the apex of the high roof. The section drawing also reveals that the ceiling of the crossing was to be vaulted. The external angles of the tower were clasped by polygonal turrets. As we have seen, these were not only on the sites of their medieval predecessors, but also incorporated some original masonry (p. 12).

64 Hawksmoor’s stone model, 1724: component E. Half-section of a square tower with octagonal corner-turrets, containing a rib-vault above the lantern stage. WA Lib. Coll.

65 Hawksmoor’s northwest angle-turret of the lantern tower, containing a newel staircase which incorporates some medieval masonry in situ. Author

66 External east elevation of Hawksmoor’s lantern tower, including the area enclosed within the presbytery roof. Key: orange, Hawksmoor; maroon, Wyatt; blue, Scott; green, modern. The Downland Partnership and author
Nearly all of the above appears to have been built in 1726–27, since substantial components of what is shown in the drawing are still present in the fabric today, including the octagonal corner-turrets. [65, 66] One element is however missing: there is no arcading in the large openings, and later references and illustrations confirm that it was never installed (p. 49). Inside the tower, the archaeological evidence is clear: while the four great arches of the crossing are thirteenth century, albeit repaired, the spandrels flanking them (and meeting at the corners of the tower) contain medieval masonry for less than half their height, the remainder having been rebuilt in much larger blocks by Hawksmoor. [15, 57]

67 Hawksmoor, c. 1725. Plan of the proposed ceiling vault for the lantern. This could be constructed in either stone or plaster. WAM, Hawksmoor no. 10
Hawksmoor designed an ornate, vaulted ceiling for the lantern, and he provided the Dean and Chapter with two estimates: one to construct it in timber and plaster, and the other in ‘stone and chalk’.97 The former option was cheaper and was duly chosen. The vault sprang from corbels at window sill level and the soffit was attached to a timber frame set just below the temporary roof of the tower. [67, 68] In the centre of the ceiling was a circular aperture 10 ft (3 m) in diameter. The vault was clearly conceived as a permanent feature, and not as a temporary work to be superseded when the tower was eventually raised to its intended full height. The circular aperture could be interpreted as a bell-manhole – in which case a belfry must have been envisaged in the upper stage of the tower, which is improbable – but it is more likely to have been designed as an oculus, admitting light from a cupola above. In the event, only a lead roof was ever built above the opening, and thus the aperture was never functional.
As an aside, it is worth observing that none of Hawksmoor’s proposals, or those drawn up by any other architect, would have made an appreciable difference to the volume of light at floor level in the crossing. The lantern is so high above the pavement, relative to its plan-dimensions, that there could be no expectation that shafts of sunlight would beam down upon the monarch during the coronation ceremony. The lantern must always have been regarded as a high-level, light-filled feature upon which to gaze in wonderment from below, and not as a significant source of downward illumination.

68 Hawksmoor, c. 1725. Sectional elevation of the proposed ceiling vault for the lantern shown in Figure 67. WAM, Hawksmoor no. 11
Work Stops for the Coronation, 1727
In February 1727 the order was given to install the new timber and plaster ‘dome’ (i.e. Hawksmoor’s vaulted ceiling), and to fill up ‘the 4 great arches into the roof with timber and boards’, also for ‘finishing the floor and roof over the dome’, and completing the abutments between its walls and the four high roofs.98 The tower-base was temporarily capped with a low-pitched lead roof without a parapet, and probably included a reinstatement of the pine trusses that had been put on by Wren a few years earlier. Filling the ‘4 great arches’ with timber boarding must also have been regarded as a temporary measure, pending the insertion of the stone arcading that was intended to decorate them, estimates for which had been prepared.99 Nevertheless, the scaffolding was ordered to be struck by Michaelmas 1727, implying haste to bring the project to a premature conclusion. The imperative for this is not hard to find: King George I had died on 10 June and the coronation of George II and Queen Caroline was scheduled to take place on 11 October. The crossing was, of course, pivotal to the coronation ritual, and it had to be both free from scaffolding and seemly in appearance.100
The boarding installed in the four arches had to be decorated in some way, and an undated quotation from William Kent may supply the solution.101 His proposal, costing £360, was ‘For painting, according to the sketches, the four arches in St Peter’s, Westminster, and the round in the middle. The figures must be at least twice as big as the life, to be painted upon cloth’. This suggests that allegorical scenes were envisaged. Whether the commission was executed is not recorded, but it seems likely (for possible conflicting evidence, see p. 71). In order to be appreciated, the paintings needed to be lit, and the glazier was instructed to fill the eight lancets in the new lantern base with clear ‘Newcastle glass’.102

69 Dixon, 1784. Detail from an engraving of the nave, looking east. The interior of the lantern tower is glimpsed, and has an arcaded design on the east face. This was not architectural detailing, but was presumably painted on cloth and may have been the work of William Kent. WA Lib. Coll.
The earliest known view of the interior of Hawksmoor’s lantern appears to be an engraving of 1784, showing the staging set up for the public commemoration of G.F. Handel in that year.103 The lower part of the east face of the lantern is glimpsed, where, directly above the string-course is an arcade of seven rounded arches, alternate ones being subdivided by a mullion and tracery, perhaps to give an illusion of depth, or syncopated arcading.104 [69] Presumably, this was painted on cloth or canvas, and it is tempting to regard it as William Kent’s work, with large allegorical figures filling the undivided arches. The effect would have been of a gallery, with figures looking out.105 Although of a different order of excellence and robustly classical, one is reminded of the gallery of figures under arches that Kent painted on the king’s grand staircase of Kensington Palace, also in the 1720s.106 Kent’s painting would have chimed well with other contemporary decorative elements in the Abbey: the rose window in the north transept, for example, was filled with standing figures designed by Sir James Thornhill in 1722, and the great west window was similarly treated in 1735.

70 Hawksmoor, mid-1720s. Detail from a ground plan of the nave and transepts, showing the proposal to thicken the crossing piers and infill the second arch of each arcade with masonry. Proposed iron tie-bars at triforium level are also indicated, running diagonally out from the crossing piers. North is at the top. Scale of feet. WAM, Hawksmoor no. 20
Executing Hawksmoor’s Final Design
Hawksmoor had evidently adopted one of the Wren–Dickinson designs for the tower, at least in part, since the existing stump has much in common with the lowest stage of the Gothic tower shown in several of Dickinson’s drawings. [38, 40, 47] However, nothing more was built, although the intention to continue at a later date cannot be in doubt. Two pieces of evidence are demonstrative. First, the tops of the walls of the lantern are finished, not with a conventional parapet coping, but with a moulded weathering which could have begun life as a string-course of the type that would have separated two structural stages of a tower.107 Second, there are spiral staircases in the north-west and south-east corner turrets, which simply end in open air. Having no stair-caps or practicable means of exit on to the roof, they are plainly unfinished and were meant to continue to a higher level.

71 Hawksmoor, mid-1720s. Detail from the ground plan of the crossing (Figure 70), showing the north-west pier. It illustrates the proposal to encase the thirteenth-century pier in new masonry, to infill the second bay of the arcades in the nave and transept, and to insert a diagonal iron tie-bar. This is a development of Wren’s earlier proposal (Figure 34). Scale of feet. WAM, Hawksmoor no. 20
Had it not been for George II’s coronation supervening, the crossing tower project would probably have continued to completion by c. 1730. But once the scaffolding was down, the impetus was lost, and attention turned to other fabric matters: initially, this was the erection of a new stone screen between nave and quire, and after that the monumental task of completing the west front was tackled. Notwithstanding, the lantern tower was evidently still under serious consideration, since further drawings were made by Hawksmoor in 1731 and 1732. One has survived, showing the first stage.108 [58] Drawings for the second lantern stage and spire have been lost, but that they were prepared is confirmed by a payment made to Hawksmoor in May 1732 for ‘a design for a spire upon ye centre of the cross[ing] and a section of ye same’.109
Raising the lantern tower by another stage, in whatever form it was intended to take, would impose considerable additional loading on the already deformed crossing piers. In 1713, Wren had stressed the need to strengthen the piers before increasing the structural loading (p. 29), and that was no small undertaking. It was the essential next stage, and Hawksmoor was evidently preparing to tackle it. He adopted Wren’s idea of encasing the medieval crossing piers inside new, much larger ones, and drew a plan to illustrate the proposal.110 [70, 71] Unfortunately, it is undated, but his sectional elevation of 1724 illustrates the impact of the scheme on the crossing arches. [51] According to the plan, Hawksmoor additionally proposed to infill with masonry the penultimate bay from the crossing in every arcade, so that these were transformed into solid sections of walling. He evidently regarded this as necessary for structural stability, although Wren seemingly did not.
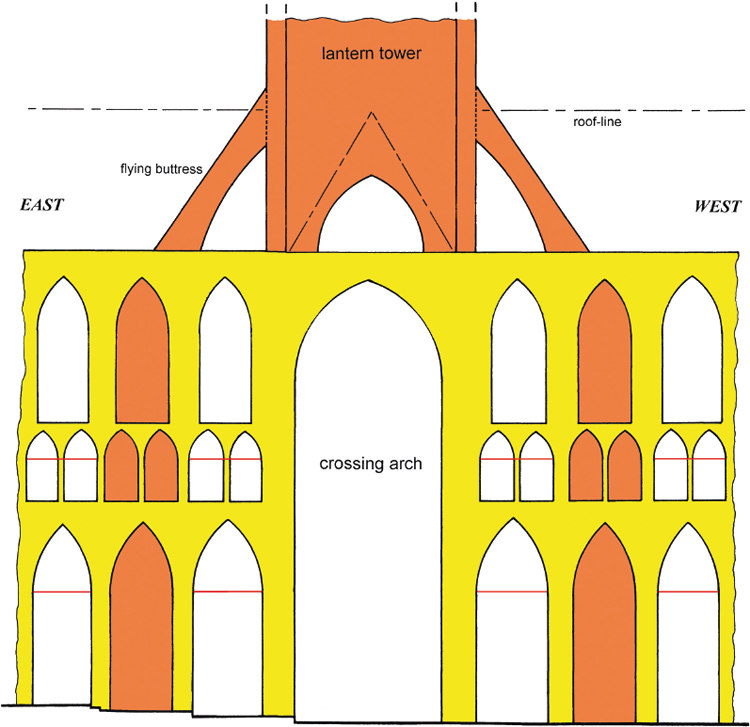
72 Diagrammatic reconstruction of Hawksmoor’s proposal to support the additional loading imposed by a crossing tower by introducing flying buttresses at parapet level. These would create a new load-path through the infilled arcades and windows below, relieving some of the extra weight on the crossing piers. Key: yellow, medieval masonry; orange, Hawksmoor’s additions; red, medieval iron tie-bars. Author, after Clive Richardson
Filling the penultimate bays around the crossing could not provide any support for the bowed piers and can only imply that Hawksmoor was intending to transfer some of the additional loading imposed by the new tower away from the piers altogether, and into the arcades. Although an elevation drawing illustrating how this was to be achieved has not survived, it can be reconstructed from the evidence of the plan. It would have been necessary to infill not only the main arcades, as shown, but also the triforium arches and clearstorey windows directly above. In other words, eight piers of solid masonry would be created from floor to parapet, their function being to carry flying buttresses that would clasp and support the corners of the new tower, creating new load-paths through the fabric. [72] The visual effect of enlarging the crossing piers, blocking eight bays of arcading, and infilling the same number of triforium and clearstorey openings would have been devastating, and must have engendered vigorous debate. Unfortunately, no record of this has come down to us.
Notwithstanding the foregoing, it is clear that Hawksmoor designed his lantern tower – the one that was begun – to be as light in weight as possible. Interestingly, none of his schemes show flying buttresses around the central tower, and it would appear that the option was not seriously pursued. Could it be that he was hoping to arrest the deformation of the crossing piers by other means, obviating the need to encase them, and build only a modest lantern? A hint that this may have been the case is found in the minute of the meeting on 10 April 1725, already mentioned, when Hawksmoor was ordered to prepare an estimate for ‘finishing the doome to the ridge of the roof ’ and for ‘repairing the 4 great arches and vaulting from the pillars in such a manner as any light ornament may be hereafter carried up upon it withoutside’.111 Further support for this suggestion is found on the plan, where he shows four tie-bars radiating out from the crossing piers; he doubtless intended to locate these in the triforium, at the point of maximum bowing. The two western ties ran diagonally across the corner bays of the aisles, linking each pier to the external wall at the junction between nave and transept. The eastern ties, on the other hand, not only crossed the corner bays of the aisles, but also extended to the outer angles of the chapels beyond. Hawksmoor later seems to have changed his mind, and struck out three of the four diagonal ties on his plan, leaving only the north-west one, presumably because that was the most seriously deformed corner. [70] In the event, not even that one was installed. Hence, we are led to the conclusion that Hawksmoor decided he could raise a lantern tower over the crossing without strengthening the medieval fabric.
Hawksmoor followed the decision of his predecessors in the mid-sixteenth century not to rebuild the walls of the lantern to their full medieval thickness. He also decided to construct octagonal corner-turrets on the footprint of the originals. [65] Two contain newel stairs, and the others are presumed to be solid (although they are hollow at parapet level). Some of the workmen helpfully left their marks just inside the south-east turret, including: ‘T. Symonds, May 9, 1727’, ‘T.T. 1727’ and ‘Ed. Ch’. [73]

73 Lantern tower. Graffito inside the southeast stair-turret of the lantern, left by one of Hawksmoor’s workmen on 9 May 1727. Author
Bowed Legs and Rent Fabric
We have already noted that in May 1725 Hawksmoor was instructed to examine and report upon the triforium arcades, which must have been seriously rent by the bowing of the crossing piers. Since the middle sections of those piers had moved inwards towards the centre of the crossing by an average of 10 cm (4 ins), there must have been cracks in the adjacent arches, and in the masonry above and below them, totalling the same. Wren had already drawn attention to the problem in 1713, and Dart reported in 1723 that the bowing of the piers had prevented the proposed erection of a tower and spire in the early sixteenth century (p. 21). There are no visible fractures today, no eye-catching deformation in the arcades, and no obvious evidence for the filling of wide cracks. So, who repaired them, and when? Although the record is silent, we must presume that Hawksmoor was responsible, and the work was most likely carried out hand-in-hand with that on the crossing tower. That would explain why the repairs to the crossing were so protracted, and scaffolding was in place for three years.
It is not easy to determine, without detailed archaeological investigation, precisely what was done in the bays adjacent to the crossing, but three pieces of evidence are worth mentioning. First, the spandrels of the triforium arcades are completely filled with a rectilinear grid of carved surface decoration, but in a few places there are small areas of plain masonry. These can hardly be other than replacements, where the original decorative stone has been lost: the effect is most noticeable in the nave, close to the north-west crossing pier. [74] Second, the spandrel between the first two bays of the main nave arcade on the north contains two vertical rows of mostly plain ashlar blocks where there should be diapered masonry. [75] The third clue concerns the iron tie-bars that link together the main arcade columns, and connect them with the crossing piers. [35, 72] Wren mentioned that some of these bars had been ‘stolen away’ (i.e. drawn from their anchorages by being subjected to excessive tension: p. 31), and since that is no longer apparent, we are led to the conclusion that Hawksmoor must have repaired the damage. Whether any of the bars were missing altogether is unknown, but this seems unlikely since a painting of c. 1700 confirms that they were still in situ to the west of the crossing.112 [33]

74 North nave triforium (above the quire stalls). Spandrels in the first bay to the west of the crossing, showing where plain ashlar blocks have been substituted for carved masonry during repairs necessitated by movement of the north-west crossing pier. Author
However, it is observable that the iron hooks onto which the eyes at the ends of the bars are dropped are not uniform in their placement: most are embedded in the Purbeck marble capitals, but some are set into the abacus (the separate moulding on top of the capital), and in a few instances iron stirrups fitted with hooks have been affixed to the arch mouldings immediately above the abacus. [35, 76] The last group plainly represent post-medieval repairs, and the second group may be similar. If the tie-bars were still in situ when the crossing piers bowed – and there is no reason to suspect otherwise – then something had to give way: either the eyes at the ends of the bars broke open, or the hooks in the marble capitals snapped or were torn out. If the latter happened, the capitals themselves would have been fractured in the process. Some of the capitals and abaci display evidence of careful repair, confirming that failures had occurred.

75 North nave arcade (above the quire stalls). Spandrel between the first and second bays to the west of the crossing, showing plain ashlar blocks interspersed amongst the decorative work to either side of the wall-shaft. These blocks probably relate to Hawksmoor’s masonry repairs resulting from the displacement of the north-west crossing pier. Author

76 South transept, west aisle. Inserted iron stirrup carrying a hook for the attachment of a tie-bar (since removed). This represents a repair, probably carried out by Hawksmoor. Author

77 Triforium adjacent to the south-east crossing pier: the first bay of the transept aisle. The Purbeck marble blocks on which the inner and outer capitals are carved have been cramped together; also both the tie-bars have been shortened and provided with hooked ends which engage with secondary eyes inserted into the abacus. Author

78 Triforium adjacent to the north-east crossing pier: the first bay of the presbytery aisle. Detail of the hook-and-eye junction between the outer tie-bar and the arcade capital; again, this represents a repair. Author
It was not only the main arcades that were linked together with iron bars in the thirteenth century. The much smaller arches of the triforium openings were similarly tied, although these did not involve detachable bars secured with hooks and eyes. Instead, the hooked ends of the ties were set directly into the tops of the Purbeck marble capitals before the voussoirs of the arches were erected upon them. Once again, any spreading of the arches caused by the bowing of the crossing piers had to result in fracture or displacement: either the triforium capitals would burst and the hooked ends of the tie-bars would come free, or the capitals themselves would be pulled bodily out of the piers into which they were set. Both scenarios seem to have occurred, but the damage has been skilfully repaired by Hawksmoor. Several instances may be observed where a tie-bar that has broken away from its original anchorage has been shortened, a new hook formed on its ‘free’ end, and an eye inserted into the capital for the reattachment of the hook. Examples of such repairs made where anchorages had failed are found in the bays adjacent to both the north-east and south-east crossing piers. [77, 78] Movement of the north-west pier caused collateral damage as far as the north side of the second bay in the transept aisle.
The Crucial Evidence of Pietro Fabris
There is a further source of evidence relating to Hawksmoor’s proposals, which has hitherto escaped serious consideration. Attributable to the 1730s are at least three oil paintings by the Italian-born artist Pietro Fabris, depicting Westminster Abbey from the north and northwest. Little is known about the paintings, but they are likely to have been commissioned to show how the Abbey might have appeared when restoration and completion of the ‘missing’ elements had been achieved. Since Parliament was shouldering the cost of ‘completing’ the Abbey, it is understandable that attractive pictorial representations of the anticipated result were needed to persuade Members of the desirability of making substantial funds available.
We do not know when Fabris was born, but he belonged to the Neapolitan School, was closely associated with Sir William Hamilton, and had a strong interest in England; his floruit is generally cited as c. 1756–79, solely on the basis of his dated paintings.113 However, Fabris’s Westminster commissions must have come much earlier in his career, since the paintings are datable to the 1730s on internal evidence.
1. |
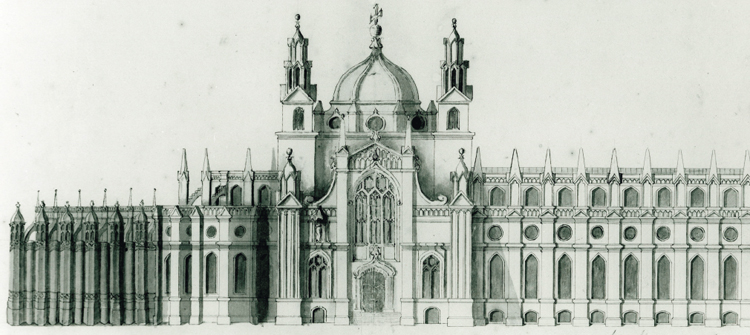
A view of the Abbey from the north, showing the line of domestic buildings that extended alongside the nave, and others masking the eastern ambulatory.114 [79, 80] The decision to demolish these was made in 1739, and they were down by the following year. Fabris shows the western towers completed according to Hawksmoor’s design, but with the addition of short spires. The lantern tower has a square basement with an overhanging cornice; the next stage comprises an octagonal lantern emerging from a square plinth course. The cardinal faces have Gothic windows with ogival heads, flanked by buttresses with classical detailing. Stair caps abut the diagonal faces. Above is an unbuttressed octagonal stage with an ornate parapet and quatrefoil openings in each face; this supports a lead-covered dome and finial. It is unmistakably Hawksmoor’s lantern, shown in his scheme 4, version (iii). [54] |
2. |
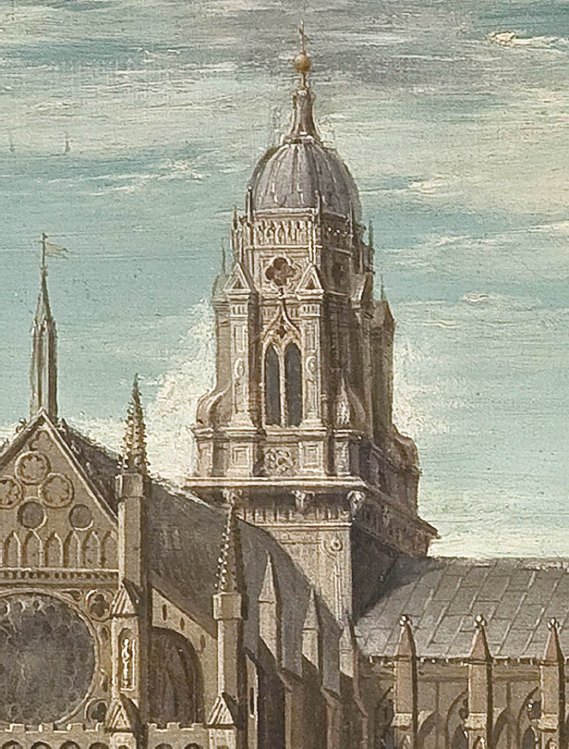
This depicts the Abbey from the northwest.115 [81, 82] Again, the domestic buildings that obscured much of its northern façade are present, but because the dominant feature of the painting is the north-west tower, the artist has omitted some of the intrusive structures and reduced the height of another by removing the uppermost storey. Had he included these buildings they would have overwhelmed the foreground and seriously detracted from the essential message that it was trying to convey. Indeed, the excision of some buildings may have been a deliberate attempt to demonstrate how much the north-western aspect of the Abbey would be improved if they were demolished. The painting thereby carries a subtle message. In this view, the northwest tower is shown with less height in the belfry stage, the spire is shorter, and the corner pinnacles are stumpy pyramids. The crossing tower has similar proportions to that in the previous painting, but is more overtly classical, although still retaining some Gothic detailing. The basement and principal stages are both square, and only the cupola and its surrounding parapet are octagonal. We do not have Hawksmoor’s drawing corresponding with the lantern in this painting, and it has presumably been lost. |
3. |
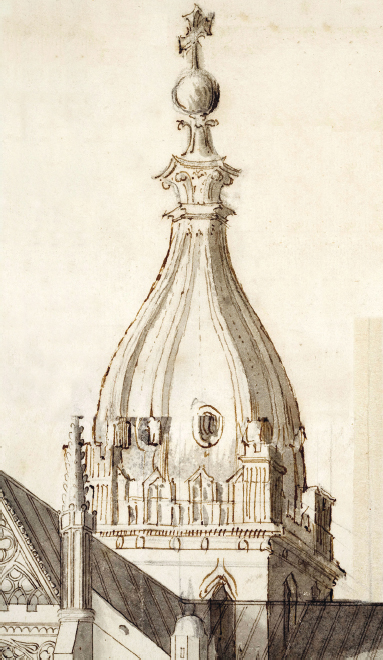
Lost too is Fabris’s third painting, which is the most important of the trio for our enquiry. It was sold at auction in 1972, and is known today only through a single monochrome photograph which was taken at the time.116 [83] The view is essentially the same as that in the first painting, but now the domestic buildings along the north side of the Abbey have all gone. The completed north-west tower is shown almost exactly as it is today, with only minor differences in detail to the panelling on the faces of the buttresses. Fabris also shows the basement stage of the lantern tower precisely as it was built by Hawksmoor in 1725–27. [65] The second stage of the proposed tower is square in plan, of squat proportions, and has two-light traceried windows. These would doubtless have been en suite with the openings from the tower into the roof voids in the stage below [59]: hence, the intended view from inside the crossing would have been architecturally cohesive. There is no parapet and the octagonal corner-turrets terminate in pinnacles. |
Rising from the top of the second stage is an octagonal broach-spire, the shoulders of which are visible behind the turrets; internally there would have been squinch-arches across the four corners of the tower. The spire is of four stages, separated by narrow bands of decoration (cf. Salisbury Cathedral), but it also has graduated lucarnes in the first three stages, as at Lichfield Cathedral, which undoubtedly provided the principal source of inspiration for the design. For further discussion of the spire, see p. 66 and Figure 87. |

79 Fabris, c. 1735. Painting no. 1: north view of the Abbey, showing a version of Hawksmoor’s scheme 4 for completing the western and crossing towers. WA Lib. Coll.
An initial reaction might be that Fabris executed the first two paintings sometime before 1739, and the third painting in c. 1739–40, after the houses alongside the nave had been demolished. For several reasons, that cannot, however, be the case. There can be little doubt that the paintings were a set of three, or perhaps more, prepared to show alternative schemes for the completion of the Abbey. There is no record as to who commissioned the paintings, but it could well have been Hawksmoor himself. The buildings obscuring the lower parts of the nave and ambulatory were still standing, and other sources confirm that Fabris, in his first painting, depicted them both accurately and in their entirety. That establishes a date before 1739, when demolition of the houses began. In the second and third views he shows, respectively, the aesthetic effect of removing some, and all, of these structures. We know that a proposal to demolish the encumbrances around the Abbey was topical, and Wren had already advocated it at the beginning of the eighteenth century. Fabris’s paintings appear to comprise a faithful record of the extant architectural detailing of the Abbey, and the omission of the small medieval doorway in the north aisle of the nave, from the third painting, is striking, but readily explicable. Until 1739 the doorway was obscured from view, being inside the building that abutted the nave, and thus the artist would not have known of its existence.117 This provides another indication that all three paintings antedated the demolition of the houses. Had they been later, this door would surely have been included.
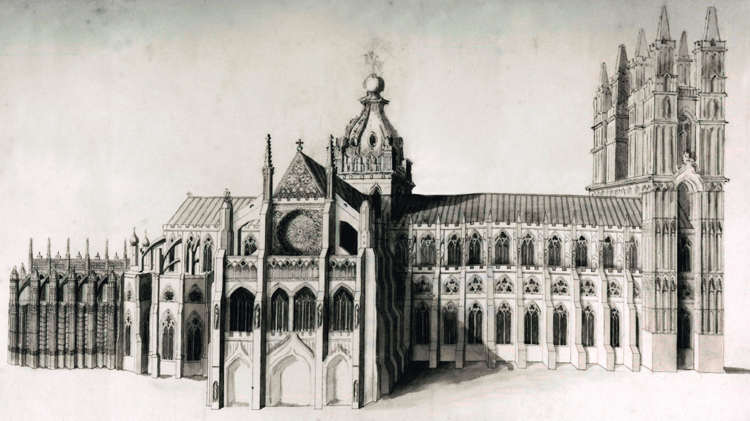
Thus, Fabris’s views are intrinsically related to several of Hawksmoor’s alternative schemes for completing both the western towers and the lantern tower. Moreover, it is clear that the third painting depicts Hawksmoor’s final proposal, being the one which was chosen and, in large measure, brought to fruition. The raising of the north-west tower was commenced in the spring of 1735.118 In January 1736/7 Hawksmoor was still hopeful that the lantern tower would be finished, but in the following month he reported that ‘the House of Commons have suspended our fund for repairing the Abby’.119 Nevertheless, funding was reinstated and work on the north-west tower was in progress when Hawksmoor died in March, and by 1738 it had been completed by his successor, John James. The latter then proceeded with the construction of the southwest tower, which was finished in 1745. The last of many annual grants had been voted by Parliament in the previous year and, a petition for further funding in December referred again to the desirability of building a spire above the crossing.120 But, despite its express undertaking to ‘complete’ Westminster Abbey, no further funds were forthcoming from Parliament. Indeed, the Dean and Chapter had to beg for the final tranche of money in 1743, to avoid halting the building programme on the west front, when it was so close to completion. The House of Commons had been supporting the ‘repairing and completing’ of Westminster Abbey since 1699, and about £149,000 had been expended on the work.121 No further grants from the public purse would be made, and that spelled doom for the lantern tower proposal.
80 Fabris, c. 1735. Painting no. 1: detail of the proposed lantern tower from Figure 79, showing a variant of Hawksmoor’s scheme 4, version (iii) (cf. Fig. 54). WA Lib. Coll.

81 Fabris, c. 1735. Painting no. 2: north-west view of the Abbey, showing another version of Hawksmoor’s scheme 4 for completing the western and crossing towers. WA Lib. Coll.
82 Fabris, c. 1735. Painting no. 2: detail of the lantern tower from Figure 81, showing a variant of Hawksmoor’s scheme 4, version (iii). WA Lib. Coll.
Fabris’s paintings must precede all of the foregoing. It would have been pointless to commission a set of fine paintings, presenting a selection of alternative proposals by the architect, after a final decision had been made and construction work had commenced. Consequently, the paintings can hardly be later than 1735, and since we know that Hawksmoor was paid for his design for a spire over the crossing in May 1732, that fixes a terminus post quem for Fabris’s commission. His inclusion of the tower of St Margaret’s Church in its present form in paintings nos 1 and 2 provides another date indicator.122 The church tower was restored and heightened by John James in 1734–35 but, as with the Abbey’s towers, the scheme need not have been implemented when Fabris painted his views. I therefore conclude that the Fabris paintings should be dated within the bracket 1732–35.

83 Fabris, c. 1735. Painting no. 3: north view of the Abbey, showing Hawksmoor’s final scheme for completing all the towers. © The Courtauld Institute of Art, London

84 James and Fourdrinier, 1737. Engraving by Fourdrinier of the north-west view of the Abbey, from a drawing by John James, showing Hawksmoor’s western towers which were then being completed. The crossing tower and spire are indicated in their intended form. Although the design is attributed to Wren, this version represents an amalgam of four architects’ work. Wren Society 1934
Hawksmoor’s missing drawings of 1732 for the upper stage of the lantern tower and spire may yet come to light, as may Fabris’s third painting, which probably remains somewhere in England. But his two other paintings – both depicting rejected schemes – would have had no particular significance any more, and it may be deduced that he took at least one of them back to Italy with him. The north prospect (no. 1) appeared on the market in Rome in 1826, when it was purchased and brought back to England.123 Far from being ‘fantasy paintings’, as they have often been dismissed, Fabris’s works constitute a crucial component of the historical and architectural record of Westminster Abbey in the eighteenth century, and they are no less important than Hawksmoor’s drawings or his models. They all go hand-in-hand.
It is not hard to see why the third Hawksmoor-Fabris scheme was chosen, because it so eloquently provided the correct visual balance between the crossing and the west end. By keeping the height of the western towers in check, and resisting the temptation to add spires to them, while at the same time imbuing the crossing with a slim but soaring spire, the architect externally directed the beholder’s focus on what is internally the most important part of the church. As Giles Worsley observed, the drawings show ‘Hawksmoor grappling with the complex structural problems of restoring a great, decaying Gothic church, and the even more complex aesthetic issues of adding sympathetically to such a venerable structure’.124

85 Anonymous, c. 1730. Engraving of the Abbey from the north, showing the completed basement stage of Hawksmoor’s lantern tower, before work began on raising the north-west tower. WA Lib., Langley Coll. I.1.(5)
As we have seen, in 1737 there was still an express intention to complete the lantern tower and spire according to Hawksmoor’s design, adapted from Wren’s initial proposal. It was probably immediately following Hawksmoor’s death that James drew the north-west view of the ‘completed’ Abbey church, and Fourdrinier engraved it. [84] The engraving was published in a large format for sale to the public.125 Nevertheless, numerous illustrations confirm that Hawksmoor’s lantern was taken no higher than the string-course that now forms a temporary parapet, and that its appearance remained unchanged until 1941. A northern prospect of the Abbey, dating from c. 1730, clearly shows the square lantern with small windows and octagonal corner-turrets without caps.126 [85] Another view by Samuel Scott, 1739, depicts the Abbey from the northeast, also with the lantern in its present form.127 Many further views, dating from the mid-eighteenth century onwards, show Hawksmoor’s ‘basement’, complete with its lancet windows, octagonal corner-turrets and the moulded string-course upon which the lantern stage was to be built.128
The Mysterious Woodperry House Painting
Notwithstanding the foregoing, there is one further piece of evidence which introduces an element of mystery. An oil painting on canvas incorporated in the chimneypiece of the hall at Woodperry House, Stanton St John (Oxon.), depicts Westminster Abbey from the northwest, with the two western towers in their present form, and the crossing tower capped by a spire.129 [86] The view of the Abbey is closely similar to Fabris’s painting no. 3, but the setting is more panoramic, and overall it is closer to his painting no. 2. St Margaret’s Church is also included in the view.130 The Woodperry House painting, which bears an incompletely deciphered signature, is dated 1748.131 It has been argued that the painting was based on one of Fourdrinier’s engravings of 1737 [84], and the artist’s viewpoint was undoubtedly the same in both.132 The painting, however, is more life-like than the engraving, which is very ‘flat’ and lacks a convincing three-dimensional quality,133 and there are significant differences of detail too. I am unconvinced that Fourdrinier’s engraving even provided the source for the spire. Additionally, the engraving does not include St Margaret’s Church or any of the other multitude of buildings and townscape features that are present in the painting. Consequently, the artist cannot have taken Fourdrinier’s engraving alone as his model, but must either have painted the scene on the spot (adding the spire), or diligently copied another artist’s work. The artistry is good, particularly in the depiction of fine detail, and the archaeological content is impressively accurate in many respects. Demonstrably, this is not a fantasy painting executed in Oxford.

86 Unattributed: Mar[…], 1748. Detail from an oil painting incorporated in the hall chimneypiece at Woodperry House, Oxfordshire. This shows Hawksmoor’s final scheme for the three towers at Westminster Abbey, and bears some resemblance to Fabris’s painting no. 3 (Fig. 83) and Fourdrinier’s engraving of 1737 (Fig. 84), although the latter lacks the surrounding buildings and townscape features. Author
No convincing explanation has been advanced for the addition of this very fine painting to the principal chimneypiece in an Oxfordshire country house in 1748.134 That the house should have been adorned with a painting of Westminster could be interpreted as a testimony to the public interest that was shown in the eighteenth century for seeing the Abbey completed. Curiously, though, once the raising of the western towers had been accomplished, contemporary writers tired of the subject and did not enthuse about them in the way that one might have expected. The Woodperry painting thus postdates the highpoint of public interest.
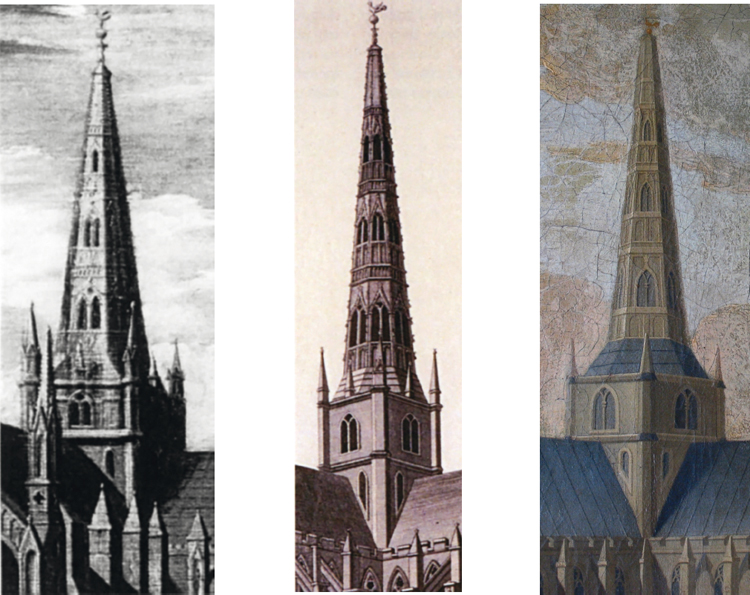
87 Details of the lantern tower and spire as depicted by (left to right): A. Fabris, painting no. 3, c. 1735; B. James and Fourdrinier, 1737; C. Woodperry House painting, Mar[…], 1748. Extracted from Figures 83, 84 and 86, respectively.
Although the drawings for Hawksmoor’s intended lantern and spire have been lost, comparison of the three artists’ illustrations is instructive and provides a clear picture of what would have been built, had not events been overtaken by the coronation of George II. [87] James’s drawing shows the architectural detailing more precisely than the others, and it is clear that Hawksmoor derived his inspiration from the western spires of Lichfield Cathedral. All eight faces are pierced by lucarnes, arranged in three tiers: the motivation for doing this at Westminster was doubtless to reduce as much as possible the gross weight of the spire. However, as drawn by James, the openings are too large, with the result that there is very little masonry at the angles to support the superstructure.135 Unless a complex internal support structure was envisaged, this spire would have been unstable. The faces of the spire were to be embellished with panels of blind arcading beneath each lucarne, and three narrow decorative bands (seemingly of diminutive arcading) marking the divisions between the main stages. The latter detail represents a simplified version of Dickinson’s proposal of 1722. [38]
The two paintings, on the other hand, show a structurally more realistic body of masonry at the angles of the spire, and the lantern stage is also shorter. Moreover, their representation of the octagonal corner-turrets is more accurate: James shows them as square in plan, and diagonally set. No parapet is represented in any of the pictures, the spirelets crowning the turrets differ slightly, and only Fabris and James include a small pyramidal finial midway along each cardinal face.