Menu Position MENU -->  1 --> View Mode
What it Does Allows you to specify what kinds of files to play back – stills, movies, or everything
Recommended Setting Date View
Menu Position MENU --> 1 --> View Mode
What it Does Allows you to specify what kinds of files to play back – stills, movies, or everything
Recommended Setting Date View
With this feature Sony has fixed a long-standing complaint: earlier Sony cameras would ONLY let you view stills, or .mp4 movies, or AVCHD movies when playing back. You couldn’t just view things in reverse chronological order like every normal person wanted to do.
And so finally Sony has added the “Date View” option which lets you do just that – view things in reverse chronological order.
Under what circumstances would it be better to switch to the other modes (stills / mp4 / AVCHD / XAVC S / 4K)? I can’t think of a scenario.
Menu Position MENU --> 1 --> Image Index
What it Does Lets you select whether the camera displays 12 or 30 images when in Index mode
Recommended Setting 12 (so you can sort of see the content of the thumbnails)
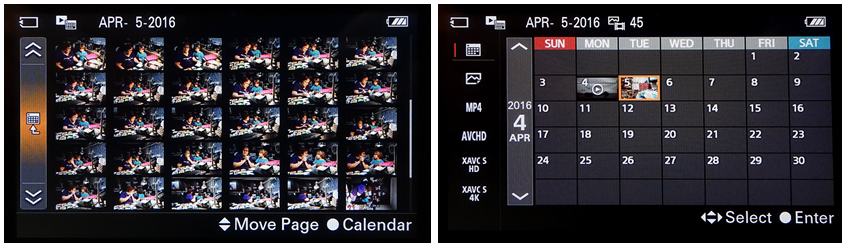
It’s not at all obvious that you can show thumbnails during playback mode as well as individual pictures. All you have to do is hit the down arrow button while playing back an individual image and Voilà! Image Index mode. To go back to viewing individual images, highlight an image you want to look at and press the center of the control wheel.
Figure 10-3: While in Index view (left), navigate to the left-most bar and hit the center button. This will take you to Calendar view (right). |
So this function lets you choose between seeing 12 or 30 images while in index mode.
Menu Position MENU --> 1 --> Display Rotation
What it Does Determines how vertical images are displayed when played back
Recommended Setting Off
When the camera plays back an image shot in horizontal format, the entire image fills the LCD. But what should the camera do when you’ve shot a vertical composition? Should the camera shrink the vertical image so it fits the height of the horizontal display (which is the factory default)? Or should it display it as large as possible and let YOU turn the camera to see it properly (my preference)?
So this function gives you three different choices:
In my mind this feature is a little broken, since in order to rotate the image manually in options 1 or 2 above, you have to dig into a menu: MENU -->  1 --> Rotate (or preferably you can assign it to a button via MENU -->
  7 --> Custom Key(PB)).
If you’ve hooked up your camera to an HDTV and are playing the images back using the Slide Show function (next section), then you’d want to use the “Auto” setting so vertical pictures are oriented on the screen correctly.
Menu Position MENU -->  1 --> Slide show
What it Does Displays your images for a few seconds each, either on the display or on an HDTV
Recommended Setting n/a
Your camera has the ability to hook directly up to an HDTV and play back your stills AND movies via a Slide show, scrolling through one image at a time on its own. Your camera also has the ability to do the same thing with a Wi-Fi enabled TV. (See Section 8.3 for more details.)
The camera will “optimize” images when they’re played on your HDTV: The contrast is bumped up and the image is sharpened – so if you’re a technical purist you might be disappointed by the incorrect color, increased contrast, and over-the-top sharpness you see on your display. (Everyone else in the room, however, is going “Wow!” because they’re not purists.) In fact, there is an HD-optimized thumbnail embedded within every .jpg (RAW files too) just for this purpose.
|
Figure 10-4: You’ll scream when you see how good your pictures look in HD! (And when I say "good" I really mean "High Contrast and over-sharpened"!) |
I’ve found that the SlideShow feature comes in especially handy when I’m taking studio portraits of couples or families. It allows a large group to review the shots taken in small batches. Once the subjects get the “instant feedback” through the magic of digital, the next batch of pictures in the studio almost always result in more relaxed, spirited portraits. It’s the next best thing to shooting with Wi-Fi (Section 5.4).
To have the camera give you a “slide show” (either through the LCD display or while hooked up to an HDTV):
 1 --> View Mode is set to either Date View or Folder View (Still).
TIP: The camera is VERY picky about images it will play back – if you have tweaked some images and/or have renamed them on your computer, and then uploaded them to a memory card hoping to use the slide show feature to display them on your HDTV, the tweaked images may not display. If this happens to you, try the MENU --> Another potential way to solve this problem is to transfer your non-native images from the computer to your memory card using the PlayMemories Home program while the camera is hooked up via USB in Mass Storage mode. |
|
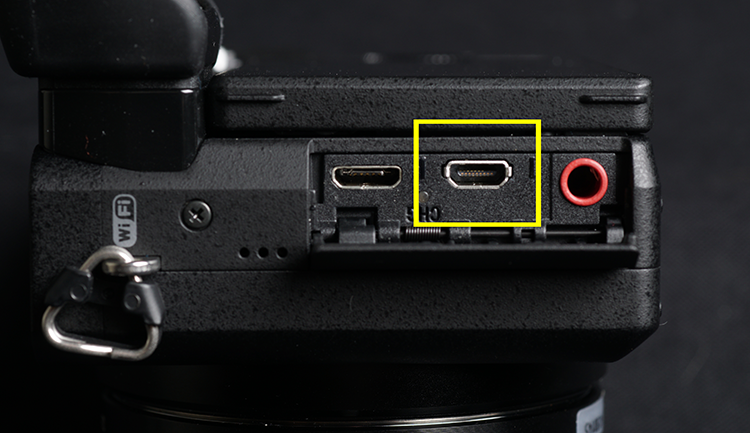
Figure 10-5: Here’s where to hook up the HDMI cable for slideshow viewing. |
1 --> Slide show --> [center button] and you will see a screen where you can set the interval (how often a slide changes if you’re showing stills) and whether the whole show will repeat when finished. Finally, highlight “ENTER” and press the center button to start the show.
TIP: When hooked up to the television, your camera’s Power Save setting (MENU --> |
Here’s an excerpt from Sony’s instruction manual: “This camera is compatible with the PhotoTV HD standard.” What’s that??
It’s marketing speak. One of the things that automatically happens when you hook up anything to an HDTV is that a conversation between the TV and the peripheral takes place, and the TV configures itself to show the content optimally. This happened long before someone in marketing decided to give it a name.
Another supported standard is called “Bravia Sync”, another attempt to give a trade name to a feature that adheres to an international standard (in this case the HDMI Consumer Electronics Control (CEC) protocol1. This standard was designed to solve the problem of having too many remote controls to deal with when many devices are hooked together via HDMI. (“Wouldn’t it be swell if there were just one remote control that could talk to all devices hooked up to our flat panel display?”) And so the CEC standard was born, which is not proprietary and Sony says that other brands adhere to this protocol “to an unknown degree”.
Anyway, because your camera is Bravia Sync / CEC compatible, you can operate your camera by the TV remote control when it’s connected via HDMI. What buttons do you press, and what functions can you operate? I took my camera to my local Sony store (back when they HAD local Sony stores) to find out.
Once you manually put the camera into Playback mode, very few of the TV’s remote control buttons will have an effect on your camera. The remote’s LEFT and RIGHT buttons are used to scroll through the images; if you come across a panorama the remote’s center button (equivalent to the center button on the camera) will scroll the panorama. Then in addition to scrolling you can also use the PLAY, PAUSE and STOP buttons on the remote.
TIP: If you find that the 3rd party device didn’t exactly adhere to the Bravia Sync standard properly, you can disable this feature and restore predictable behavior to your system. MENU --> 4 --> HDMI Settings --> CTRL for HDMI --> OFF (Section 11.18.6). |
Menu Position MENU --> 1 --> Rotate
What it Does Provides a cumbersome way to rotate your images during playback.
Recommended Setting n/a
Constraints Display Rotation must be set to Auto or Manual for this to work. Only works on images.
So here’s how it works. When playing back your image, if you want to rotate it, you have to dig into this menu item to get to the “Rotate screen”. Once there each time you press the center button the image rotates counterclockwise 90 degrees. Press it 4 times and you’re back to where you started. Press the MENU button to go back to play mode.
The camera remembers this new orientation, but that rememberance may not follow the image to your computer. (Not all image viewing programs pay attention to the orientation flag inside the .jpg!)
This feature can be assigned to either the C1 button or the Fn button for use during playback. You can do so via the MENU --> 7 --> Custom Key(PB) function.
Menu Position MENU --> 2 --> Enlarge Image
What it Does Lets you zoom in to examine images closely during playback mode
Recommended Setting n/a
Constraints Only works on images
Why is this even in the menu? You can use the AF/MF button on the camera to zoom in on images during playback already!!! (And then use the rear dial + arrows to wander around and change the zoom level while looking.)
Menu Position MENU --> 2 --> Protect
What it Does Protects images against accidental erasures while in the camera
Recommended Setting n/a
An image can be “protected” as an extra measure against accidental deletion. The way you mark pictures for protection is remarkably similar to the way you mark pictures for deletion:
 2 --> Protect and choose from “Multiple images”, “All with this date”, or “Cancel All with this date” which means “Unprotect all images on a given date”. (If you have more than one folder on the Compact Flash memory card, you will also see the options “All in Folder” and “UnProtect Folder”.)
TIP: Images are only protected while in the camera; once they have been copied to your computer they have no special protection against accidental deletion. |
Menu Position MENU --> 2 --> Specify Printing
What it Does Provides the means to print images directly to an attached DPOF-compliant inkjet printer, or tell a 1-hour photo lab (remember those?) which images you want to print
Recommended Setting n/a
The Digital Print Order Format (DPOF) standard was originally designed to make it easy (Ha!) for consumers to order prints directly from their camera without ever having to touch a computer first. In principle, you review your images using the camera’s LCD, mark the ones you want printed, and then plug the memory card into your inkjet printer or give it to your 1-hour photo lab and they’ll just print what you want.
To use, hit MENU -->  2 --> Specify Printing --> Multiple Images. Then use the arrow keys to select the pictures you wish to print using the same method as deleting multiple images (covered earlier in Section 10.1). Hit the MENU button to finish and confirm by selecting OK.
The camera will create a special file on the memory card called a DPOF file, which tells most modern 1-hour photo equipment which pictures you want. Note you can only specify .jpg files for printing – RAW files are not selectable for technical reasons.
TIP: Unlike Sony’s previous cameras, you cannot specify print quantities when selecting pictures for printing. Hopefully, all you’ll want is one. Also, index prints are no longer an option. |
This feature tells whatever DPOF-compliant device you’re using to include the date on the prints. Each device will print one in a different place, using a different font size and style, so those things need to be configured on the printer (if they can be configured at all). To use, do MENU --> 2 --> Specify Printing --> Print Setting, highlight Date Imprint and change it to On. Then hit Enter.
Once your pictures have been printed, and even if they have been erased, there may still be a DPOF file remaining on the memory card. To erase it, invoke MENU --> 2 --> Specify Printing, navigate to “DPOF Setup” and change it to Cancel All then hit “OK” when prompted.

 6 --> Recover Image DB function