CHAPTER 10
Shape, Color, and Fragrance
Wax is an extremely malleable and flexible substance. In the warm stage it can be hand-molded into an infinite variety of shapes. In the liquid stage, it can be poured into an equally infinite number of molds. In addition, wax can be carved into a multitude of shapes, limited only by the expertise of the candlemaker and his or her imagination and artistic sensibility.
Infinite Variety
Candle shapes are as varied as are the shapes of all natural and man-made objects—you can make a candle the shape of a tin can, or the shape of a banana. You can mold, carve, sculpt wax into figurines, flowers, fruits, and any number of other shapes to suit your fancy.
At Christmas, candlemakers make the usual decorations—Santa Clauses, Christmas trees, wreaths, baubles, etc. You can simulate just about anything with candle wax for just about any occasion or purpose you wish.
In this chapter, we are going to discuss what you can do with the basic shapes such as the cylinder, block, square, etc., and provide detailed instructions for making them. In addition, we are going to show you how to make some more complex—yet still fairly simple—shapes.
Wax Works
You can make candle shapes from all the methods of making candles that you have learned so far—dipping, molding, using sheet wax, etc. Of course, candles made in containers take on the shape of the container. Many objects used for making container candles will also serve as molds if you like a particular shape for that purpose.
Sheet wax is probably the simplest method for making a variety of shapes with little effort. Next in ease comes hand-molding.
Purchased sheets of embossed beeswax, for example, can be rolled into numerous shapes other than the plain taper or square, as we have already shown. (Refer back to the section on rolled beeswax candles in Chapter 6.)
Once you have made a plain rolled taper, you can bend and squeeze it into different shapes. You can also join two or more tapers together (see “Making Taper Trees from Danish Tapers,” p. 168) to make interesting shapes. If you buy beeswax sheets in various colors, you can fold one or more sheets together so that your candle’s shape displays the colors of the wax. For example, you can lay two different colored sheets of beeswax one on top of the other, and roll on the diagonal. Since beeswax is soft and sticky, it is easy to roll and mold into interesting shapes.
Gentle Beeswax
With beeswax sheets, you can stick to simple, basic shapes—such as the taper and spiral—or you can be as creative as you want. As beeswax is malleable at room temperature (in a fairly warm room), you can make these rolled candles easily and in many shapes—as complicated as you like. You can cut the sheets into strips of color and wind these around a basic taper to make parts of it thicker or thinner as well as adding different colors to the shape. With the same method, you can quite easily create spirals, diamonds, cones, pyramids, and other shapes.
To make a cone, simply roll the beeswax sheet into a cone shape. To make an ice-cream cone using a beeswax cone made from a sheet of beeswax, simply add a “scoop” of hand-molded wax that has been sculpted into a round shape. It needn’t be smooth—just as a scoop of real ice cream is not perfectly round. This is a wonderful project to do with children, who get a big thrill out of lighting their “ice-cream cones.” It’s great for a child’s birthday party, or as favors for any occasion. Even adults love getting an ice-cream cone candle!
Blending Waxes for Molding
If you require a certain melting point for wax and it is unavailable in a preformulated mix, you can combine the characteristics of two waxes by blending them. Blending two or more waxes together will ordinarily provide you with a combination of their individual characteristics. For example, if you blend equal amounts of 128° Fahrenheit melting point wax and 145° melting point wax, the end product will have approximately the same characteristics and melting point as 135° melting point wax would have. Another example is that if you blend microcrystalline wax with a low melting point wax, the resulting blend will be sticky and thus better suited for hand-forming.
Should you decide a blend is what you need, simply study the types of waxes until you find one with the characteristics you wish your base wax to exhibit. Add this wax to your base wax, experimenting with small batches until you achieve the right combination. The easiest way to do this is to blend several batches in different proportions at the same time. Then, after the blends (be sure to label each one with the proportions of what you used) have cooled and hardened, you can determine which is best for your purpose. Do keep records in your notebook if you choose to use this blending technique. There is, as always, much trial-and-error involved in home candlemaking, especially when you are making different shapes and getting creative.

Some fruit shapes are also very easy to make with hand-molding, such as apples, pears, oranges, and the like. Hand-molded wax lends itself to many applications in terms of making different shapes. We will discuss these more fully in the coming chapters on advanced candlemaking.
Basically Interesting
For now, let’s stick with the basic shapes and show you how to extrapolate on these to make many different—though easy and simple—interesting shapes.
Simple Circles
As you already know, round tin cans come in all sizes. These make splendid molds for creating unusual shapes of candles. From a slender tomato-paste can to a 32-ounce fruit juice can, round shapes are many and varied. You can use simple round or cylindrical shapes to mold candles, then glue these candles together with wax glue (or by a little judicious melting or overdipping) to create interesting shapes. For example, I created a wedding-cake shape from baking pans—of exactly the same sort one would use to make a real wedding cake! It was a simple matter of making several round shapes in several heights of differing diameters and layering them. Such a shaped candle can be decorated in several ways—one of them, the dripping method, is discussed on p. 180. Other ways of decorating candles will be discussed in further chapters.
Square Deal
After cylinders, squares or rectangles are probably the most versatile basic shape from which to create other shapes. Like tin cans, square shapes can be obtained in many sizes and diameters, from half-pint whipping cream containers to half-gallon milk cartons. Food storage containers also come in square shapes—half-pint, pint, quart—that are useful for making this basic shape.
Square or rectangular candles can be put together to make new shapes, using a variety of sizes and candle glue. One extremely interesting—yet actually simple—idea that I created was a castle! A few large squares for the base, a few cylinders for the turrets were all that was needed.
Incidentally, cardboard tubes such as come inside rolls of paper towels, kitchen wraps, and toilet paper, make excellent shape-making molds and are useful in a variety of ways in combination. For example, my castle tower was “fortified” with some tall candles made in cardboard tubes.
Cones
After cylinders and squares/rectangles, the next easiest shape to create is a cone. This can be done either with a purchased mold (cone molds come in various sizes), or it can be improvised with cardboard.
To improvise a cone shape, take a piece of stiff but flexible cardboard (the kind that is used as stiffener for photographs in the mail is ideal) and cut it into a square. Measure each side carefully so that you have a perfect square, or your cone will be lopsided. Then, just roll the square of cardboard into a cone shape. Tape it together securely (plastic strapping tape is good for this). Cut the large end of the cone so that it is level and flat. Then cut the tip off of the narrow end and glue this end to a piece of hard cardboard. This will be the base support for the cone. Make a hole in the base cardboard large enough to hold the cone’s tip. Before pouring in your wax, wipe the inside of the cone with a little dishwashing liquid to act as a mold release and to prevent the hot wax from penetrating the cardboard.
You can make any size cone you like. However, if you make large cones you may not be able to use the cardboard-base support described above. If the cone is large, you will need to stand it in a container of some sort—such as a large glass—for proper support. In any case, be sure you have glued the cardboard base securely so that the hot wax doesn’t drip out of the bottom end of the cone resting in its support vessel.
Cone-shaped molds are great for making chunk candles, as described in Chapter 9, p. 178. They are particularly nice when made with multicolored chips (or chunks).
To make a nice flat base for your cone-shaped candle, warm a baking tray in the oven slightly and then set it on a heat-resistant surface. Put the candle’s base on the tray and push down gently. The heat from the baking tray will melt the candle’s base evenly.
Identical Twins
Another method that is quite easy is to make two half-candles from the same mold (or two identical molds, such as custard cups or half-round bowls).
Play Ball!
To make a round spherical candle, use two half-round glass bowls for molds into which to pour the wax. With this method, you can quite easily make holes for the wick: While the wax is set but still warm in each half, join the two halves with the wick (previously primed by dipping in hot wax and cooling) between them, tying a secure knot at the end you have designated to be the bottom. After this, you can overdip the candle to hide the seam and give it a hard finish. In this basic way, you can make two halves of practically any shape and join them together to get a new shape.
Eggs-actly!
Egg-shaped candles can be molded in a plastic egg that screws apart in the middle to be filled with candies. You can purchase this type of plastic egg in many sizes during the Easter season.
To use these plastic eggs as molds, first take one apart and coat its inner surfaces with mineral oil (which works well as a mold release agent). With the point of an ice pick, or skewer, or very sharp knife heated over a candle flame, poke a hole in the center of the small end of the plastic egg cup. The hole should be large enough to accommodate the end of a small funnel—such as is used to fill perfume bottles.
Screw the plastic egg back together and stand it upright in something that will support it securely—a custard cup is good, or a small bowl, depending on the size of the plastic egg. Melt wax as directed in Chapter 6 and pour the melted wax through the funnel to fill the shell. Remove the funnel. Tie a metal weight to one end of a cord wick and drop it through the hole in the top of the shell. The weight will drop the wick through to the bottom of the mold.
After completing this procedure, set the entire mold in its container in the refrigerator until it is thoroughly cold and hardened. This will take several hours, depending on the size of the mold. Remove from the refrigerator and run hot tap water over the shell for a few seconds before taking it apart. Unscrew the two halves of the plastic egg, pulling them apart gently to release the egg-shaped candle inside. Smooth out the seam with a craft knife or other sharp knife, or melt it smooth with the flat side of a heated knife. You can overdip your egg-shaped candles in Easter egg pastel-colored wax and simulate real Easter eggs. Or, you can leave the candles white and decorate by painting. (See Chapter 13, “Surface Techniques for Decorating Candles.”)
Improvise
A quick look around your house—kitchen, bath, living room—will give you many ideas of how to create different shapes using improvised molds you already have on hand. Obviously, molded candles can only be released out of a shape that has a top as large as its bottom, or that comes apart. But, wonderfully shaped containers that can be used to make container candles are all around you. Bowls, glasses, jars, cups, antique baking pans, oddly shaped vessels, cut glass pitchers, copper bowls and pans—the list is seemingly endless.
While not exactly a shape, you can make interesting overall shaped designs from an arrangement of candles on a tray or platter. Using one shape—such as a cylinder or a block—in a variety of sizes (and/or colors), you can make attractive “candlescapes” that have form. Also, try mixing several different shapes—tall slender blocks with short, fat cylinders, for example. Or, mix cones with blocks and/or cylinders. These candlescapes can be monotone or multicolored, constructed of one shape or several shapes.
You can also make fun shapes from gelatin molds—the fancier the better! And don’t forget muffin tins. You can use muffin tins as two-part molds for a unique shape with a narrow bottom and a narrow top and a bulge in the middle. Ice-cube tray–made chunks can be threaded on wicks to make lots of varying shapes, like a spiral staircase or a building-block type of structure. A bit of candle glue and your imagination is all you need!
You can make your own molds for different shapes of candles from practically anything. (See the sections on moldmaking in Chapter 7.) Many objects lend themselves to this process, such as melons and hard-shelled squash. And you can purchase a wide variety of ready-made molds.
Using Color and Fragrance
One of the great joys of modern-day candlemaking is the use of color and fragrance. How glad we must be that the old days of “necessity,” of making tallow candles that smelled of the barnyard, or worse, are over and done with.
Though today there are many perfumes manufactured in the United States, these are almost all made not from flower essences, but from chemicals that mimic them exactly. This marvel of chemistry is not only what put the distinctive odor of roses or lavender in our perfumes, toilet waters, lotions, and shampoos—it is the same as what puts the smell of beefsteak into the vegetable oil used to make the French fries of fast-food chain burger purveyors.

Today’s home candlemaker has available to her or him such a wide variety of color and fragrance as to rival the master painters of the past and the great perfume makers of Arabia, who invented the process of distilling essential oils from plants and flowers. The French raised this to a fine art through their development of enfleurage, the meticulous and extremely complex process of pressing the essence out of flowers.
Luckily, the real thing is still available to us in essential oils, about which more will be said later in this chapter.
Delightful Shades
First, however, we will delve into the fascinating subject of color for your candles. Anyone who has shopped for candles has already seen how many color possibilities are available to the consumer. Most of the commercial colors are fairly standard: red, green, blue, pink, orange, purple. The higher-priced lines of candles offer many more colors in more subtle shades, and the recent spate of upscale candle shops, which produce mail-order catalogs, offer such a great range of beautiful and subtle colors as to almost defy belief. “All the colors of the rainbow” have been multiplied to the nth degree.
As a home candlemaker, you have as many possibilities for coloring your candles as does an artist for mixing his or her palette. This is the area of candlemaking that you can have the most fun with as you experiment with the almost endless possibilities. Often, serendipity takes a hand and you accomplish something that you hadn’t started out to do! These “happy accidents” deserve recording in your notebook.
Serendipity
Betty Oppenheimer describes one such incident in her highly recommended book, The Candlemaker’s Companion. In “My Rosemary Story,” she tells of her unique experience:
Like many other people, I love the scent of fresh rosemary and decided to try my hand at adding this delightful fragrance to a batch of candles. Once my wax was melted and 20° above its melting point, I added fresh sprigs from my garden and let the mixture steep for hours.
My house was filled with the smell of the herb and I eagerly anticipated burning the tapers I made with the wax. Imagine my disappointment when I lit my first rosemary candle and discovered all its scent had dissipated in the infusion. However, the wax was a beautiful shade of sage green.
Ah, well, you just never know until you try.
Try, Try Again
This charming story illustrates the always-prevalent trial-and-error component of candlemaking. It’s what makes it such a challenge and such an entertainment! Without these little unpredictable delights (and, yes, sometimes disappointments), our home candlemaking might be dull instead of exciting. Who wants to always have a perfectly predictable result? There she was, looking for a particular scent and getting instead a gorgeous, subtle color. Now, I call that a happy accident! (And plus, sage is my own favorite color, and I appreciated the tip on how to achieve it.)
Professional Coloring
In commercial, factory-scale candlemaking operations, coloring is done with different methods than are available to the home candlecrafter. This is not a bad thing, as commercial operations use solvents. For example, much coloring in large-scale candlemaking is done with powdered dyes that are dissolved in xylene solvent. I’ve never come in contact with xylene solvent, but I’m sure I’d not like to have it around my house!
These dye powders are so concentrated that, in many instances, a mere pinch will color several pounds of wax. In addition, these commercial dyes are so finely ground that the workers must wear protective masks over their noses and mouths—or even a respirator—to prevent them from inhaling the dye dust. Therefore, they would be a real danger to the home candlemaker. Fortunately, they aren’t available for public consumption.
Colorants at Home
On the other hand, aniline dyes are available, and this is what many professional candlemakers prefer for colorants. They are the best options for the home candlecrafter because they come already prepared as chips, disks, or even blocks. These can be dissolved in your melted wax. And, you can add color bit by bit (or chip by chip) so that you don’t overdo and find yourself with a pot of wax of a more intense color than you had intended to create. Always err on the side of caution when adding color chips or disks to your melted wax.
You can purchase a product called “ultraviolet inhibitor,” usually only through a candle-craft supplier rather than at your local craft shop, which helps to prevent candle colors from fading. My own opinion on the matter is that the fewer chemicals we come in contact with the better off we are!
And—I know this is getting repetitive but it cannot be emphasized too much—keep records in your notebook. You may one day stumble upon that absolutely perfect color and in your excitement make your candles but then fail to record exactly how many chips of which colors you used to what proportion of which waxes. Later on, when you want to duplicate that color, you won’t remember exactly how you obtained it.
Not Fade Away …
It’s important for you to realize that all colored candles will fade over time. Some colors will fade more readily than others. Darker, primary colors, like red, fade less than pastels like pink.
The best way to keep your candles from fading is to store them carefully wrapped, in a dark place, such as a drawer or closet, and always keep them away from direct sunlight. Since it is time that is the main culprit, it only makes sense to burn your candles before they begin to fade. If you allow them to age, they will fade—and candles aren’t fine wine, which benefits by aging. They are of a certain fragility and delicacy, and you are making them to use, not to store away like heirloom lace. An unused candle may look attractive sitting on display for a while—but it will become dusty and attract dirt from the air, and its colors will fade eventually. So, candlemaker, burn your art! It’s the only way to go.

Scents, too, will dissipate with age, so if you want that wonderful perfumed odor to permeate the room when you light up your candles for a soothing aromatherapy bath or for a festive party, use them while they are fresh.
Mix and Match
In using color chips or disks purchased from your supplier, you are not limited by the colors provided. You can blend and mix your own to achieve any shade you like. With a bit of practice and a color chart (available at art stores), you can create a veritable artist’s palette.
Paint stores provide free color cards, which give you a visual indication of how much color to white (in this case, white wax) you need to get almost any shade of almost any color. These are excellent guides to have around. You can also use them to make notes on for future reference.
Remember that you are starting with white, not with color. So, for example, just a smidge of blue in white wax will give an Easter egg–blue pastel. A tiny bit of red added will result in a lovely lavender pastel. For full-blooded colors, such as bright orange, you want to blot out the white base with color.
You can purchase a whitener that will make the dyes opaque (or whiter), for use in making pastel-colored candles. When deciding how much dye of which color to use, remember to take into account the color of your wax and its opacity. Also bear in mind whether your candle is going to be made of translucent wax (usually pure paraffin). This will make a big difference to the final color when the candle is burned. Pastel and translucent is a lovely combination for a candle.
To test the color you have mixed, dip the end of a long, tall block of wax into the colored wax. Allow it to cool completely, then judge the final result. Always remember to add color only in small amounts. You can always increase the intensity.
Blending Basic Colors
Primary colors—red, yellow, blue—are blended to make secondary colors as shown:
red + yellow = orange
yellow + blue = green
blue + red = purple
You can vary the proportions of the primary colors to achieve different shades of the secondary colors, such as a lemon yellow, a mint green, or a lilac or lavender shade of purple. Adding a bit of black will darken the color, but be careful and go extra slowly with black or it can muddy the result.
A Guide to Mixing Colors
White—No color needed
Red—Red color chip
Red seems to be the most powerful—and it can be overpowering—of dyes. Adding red to any mixture will often result in a red-brown color. Recycled blends of used colors of wax (candle ends, leftovers) that have red in them will ordinarily turn out with a reddish cast, even if red is not the largest proportion of color in your mixture.
Cherry red—Red color chip with a small bit of yellow
Pink—Small piece of red color chip; start with only a bit and then increase until you get the shade of pink you want
Wine red—Combine a red color chip, or a part of one, with a bit of blue; again, go slowly
Dusty rose—Start with half a red chip and a quarter of a blue chip; add more red if you want a rosier shade
Yellow—Yellow color chip
Lemon yellow—Start with a quarter of a chip and slowly add more bit by bit until you achieve the color you desire; a rich lemon might also benefit from just a touch of red, but only a hint
Orange—Use one yellow chip and one red chip; try this mixture first and then vary the proportion of yellow to red to achieve the exact shade of orange you want
Tangerine—Use the same formula as above, but increase the proportion of red to yellow—slowly
Blue—Blue color chip
Light blue—Small piece of blue color chip; add more until you achieve the desired result
Dark blue—Blue color chip with a very small piece of black
Green—One blue chip and one yellow chip
Light green—Use less color in the same proportion—half a yellow and half a blue; experiment until you get the shade you like (see “My Rosemary Story” above)
Mint green—Use part blue and part yellow in small amounts, starting with blue and adding yellow until you get the shade you had in mind
Turquoise—Use one blue chip and then add yellow slowly in small amounts until you achieve the shade desired
Purple—One blue chip and one red chip; check this shade and adjust the proportion of red and blue to achieve different hues of purple
Lavender or lilac—Use blue and red. Depending on the exact shade you are striving to achieve, start with either color and add the other until you have what you want.
Black—Black color chip
You probably won’t want to make solid black candles very often, except for ritual purposes. Black is used in tiny amounts to darken other colors, but always use with care or you may ruin your batch.
Brown—Use yellow, blue, and red, in that order, starting with yellow and small amounts of blue and red
Honey—Use natural beeswax, or tint other waxes with yellow, adding just a small amount of blue and red. You can get many shades by using three colors, but go slowly.
Decorate, Don’t Dye
If you are going to make a decorated candle, you won’t need much dye. And, you can also conserve dye by overdipping. If you are going to overdip in color, you don’t need the entire candle to be colored. The same applies to candles that are to be decorated. You may want an overdipped color behind your decorations, or you can just use white as a base.
A candle that is made to be decorated—either by painting, overdipping, adhering objects to its surface, and the like (candle decoration is discussed in detail in later chapters) is called a “core candle.” Your core candle can be plain white—you can then color your wax paints in rich, bold colors, make vivid wax sheets for cutouts, and use bright colors for overdipping.
Using Leftover Colored Wax
Chances are you’ll always have some colored wax left over. It takes a large amount of wax to make dipped candles, and if you dip in solid color, you’ll have a lot left. No matter how experienced you are, it’s nearly impossible to melt exactly the amount of wax you will need in a particular color. Still, it is best to make colored wax in the smallest quantity possible for your purposes. And, choose colors that are easily reusable—pink can be turned to rose or red, lavender or purple. On the other hand, five pounds of blazingly bright magenta isn’t what you’d call versatile. Of course, if your leftover wax is white, you are home free.
Colorants not made for coloring candles often will clog up the wick’s ability to burn its fuel. Using lipsticks, for example, isn’t a good idea. Oil paints used for fine arts are not recommended. Any of these products can cause your candle to burn badly.
Making Sense of Scents
Originally, the only scented candles were those made of a wax that was naturally scented—beeswax smells of honey, and bayberry wax smells of, well, bayberries, a unique fragrance. Today’s scented candles run the gamut of known fragrances—from floral to spicy. Among those available is everything from scents we associate with the flower garden to those that recall to us the smell of different foods—the fragrance of fruits such as citrus and homey cinnamon-and-apple smell of a freshly baked apple pie. With today’s flourishing business in chemical fragrances (though some of these are declared to be “natural” on the labels of products that contain them, they are nonetheless derived by a chemical process), you can scent your home or office in many ways, ranging from the commercial “air freshener” products to completely natural herb and/or flower potpourris.
Candlemaking certainly takes advantage of the variety of scents available for use. Generally speaking, you can purchase a variety of common scents from your craft store. These are known in the trade as “industrial odorants,” and are synthetic derivatives. Still, they smell good, and it’s sometimes difficult to tell the difference between a “real” fragrance—one made from an actual flower, plant, or herb—and a synthetically produced scent.
The perfume industry is also a source of fragrances that can be used to scent candles. There are concentrates of basic fragrances available and some blends that are licensed. When using scents of any kind, be sure they are oil-based (wax is an oil). Alcohol-based scents will simply evaporate on contact with the hot wax.
Using Potpourri for Scenting Candles
One source of candlemaking techniques suggests using potpourri for scenting candles by rolling the still-warm candle in the potpourri so that a layer of the leaves, flower petals, or whatever the potpourri is composed of, adheres to the candle. Then, the candle is overdipped to fix the potpourri bits to its surface. The possible problem here is that as the candle burns it might burn the plant material, producing an odor other than what was intended. However, if the candle is of large diameter and the overdip is made from a hard wax, this probably will not happen.
Never use basic potpourri “refresher” oils in a candle-wax mixture. The oils will change the balance of the wax formulation. One method of adding fragrance to candles is to soak the wick in essential oil prior to pouring the wax.
Combining Color with Scent
Clearly there are many color-scent combinations. Some of these are quite obvious—white or ivory with vanilla, for example. To get you started, here are a few suggestions about combining colors with scents:
White—Gardenia, lily of the valley
Red or pink—Rose, tea rose, carnation, geranium
Yellow—Honeysuckle, lemon, freesia
Orange—Citrus
Blue—Hyacinth
Green—Mint, herbs like tarragon, dill, eucalyptus
Purple or lilac—Lavender, violets, hyacinth
Brown—Clove, cinnamon, spices
Knowledge of the physiological and psychological effects of natural fragrances is the basis of aromatherapy, and scented candles are often used for aromatherapy.
All About Essential Oils
With the increasing popularity of aromatherapy, with various types of aromatherapy candles available for purchase, the essential oils are being used more and more. These are completely natural and readily available locally and from many Web sites, as well as from various mail-order sources that sell herbs and other natural health products. They are well worth your attention and investigation, not only for the pleasant scents they can provide for your candles, but also for the therapeutic possibilities they offer.
Many excellent books are available on the fascinating subject of essential oils. You can obtain a detailed listing of essential oils, descriptions, Latin names, the part of the plant used, and the country where the oil is produced, at www.halcyon.com/kway/details. Another useful source of information is www.aromaweb.com. This site will provide information about where to buy essentials, allow you to look up books, contact experts, and gives lots of tips for beginners. The advice here is straightforward and no-nonsense—written by real people who know their stuff, not by manufacturers or someone trying to sell you something.
A History of Essential Oils
How, one might wonder, is it possible to extract those tiny droplets we call “essential oils” from the bulk of the plant material? And how can these extracted oils be stored?
Considering this secret was known some 5,000 years ago in Egypt, it seems quite odd that it has been so often “lost” through the ages and has had to be rediscovered.
Archaeologists discovered distillation devices in Mesopotamia, circa 5,000 B.C., and Egypt was using essential oils as early as 4,000 B.C. The most frequently used oils in that ancient era were distilled from cedar and other conifers, cinnamon, lily, dill, basil, and coriander—all plants still familiar to us today. Used for healing as well as cosmetic purposes—and for ritual ceremonies—essential oils were known in Babylon, India, and China. After their conquest of the Egyptian empire, the Romans incorporated the knowledge of essential oils into their culture.
However, there are no records suggesting that essential oils were used after the fall of the Roman Empire. They reappeared at the end of the tenth century in Arab countries where physicians used them to treat patients. It is believed that the famous Arabian physician who went by his European name of Avicenna (980–1037) rediscovered the method for extracting the precious oils from plants. Later, after their conquest of Spain, the Moors taught the art of extracting essential oils at universities in Spain, which they founded. However, with the ouster of the Arabs from Spain, essential oils once again fell into disuse.
Ironically, the first major indication of the antiseptic properties of essential oils in Europe came from the fact that perfumers—who handled the oils daily as part of their profession—were seemingly immune to the plague known as the “Black Death” and to the epidemics of cholera that periodically swept Europe during the Middle Ages. By the late seventeenth century, the oils were back in use, primarily for medicinal purposes.
Toward the end of the nineteenth century, scientific inquiries into the antibacterial properties of plants began to clarify the chemical composition and potential healing powers of essential oils, which work on a molecular level, benefiting the chemical makeup of our organisms. Alas, and as usual, instead of this discovery leading to an increase in the use of essential oils, scientists attempted to mimic their properties in order to create synthetic chemical substitutes.
It was the work of a French chemist, René-Maurice Gattefossé in the early 1900s that brought renewed interest to this form of healing. Considered the “father of modern aromatherapy,” Dr. Gattefossé coined the term aromatherapy when he used it as the title of a book he published in 1937. He was especially interested in the medicinal aspects of essential oils.
During World War II, another French physician, Dr. Jean Valnet, who had been much impressed with Gattefossé’s findings, used essential oils in the treatment of wounds received by soldiers in wartime Europe. He used the oils to disinfect and heal, and in turn published a book, translated into English as The Practice of Aromatherapy: A Classic Compendium of Plant Medicines & Their Healing Properties.
Fortunately, Dr. Valnet was interested in teaching other physicians the medical uses of essential oils and, as a result, there are today more than a thousand physicians in France who use essential oils in their practices.
During the 1920s, Italian scientists conducted experiments with the psychological effects of essential oils. Two of them, Dr. Renato Cayola and Dr. Giovanni Garri, published an article in 1922 discussing the effects of essential oils on the nervous system. They had not only observed the bacteria-destroying capacities of the oils, but they had studied their stimulating and calming effects as well.
Another Italian, Professor Paolo Rovesti, at the University of Milan, conducted research on the psychological effects of essential oils, treating patients afflicted with depression and hysteria. He recommended a variety of combinations of the oils—for example, for depression he recommended combining jasmine, sandalwood, orange blossom, verbena, and lemon oil.
How Essential Oils Work
Today, people all over the world are paying attention to the healing effects of essential oils, and scientists are continuing to conduct research in an attempt to understand more about the effects of these amazing aromas on the human mind, body, and psychology.
Essential oils are extracted from the aromatic essences of certain plants, trees, fruits, flowers, herbs, and spices. Natural volatile oils, they have identifiable chemical and medicinal properties. At this point, over 150 have been extracted—and each has its own definitive scent and unique healing properties. Oils are produced from a wide range of plants—from the exotic jasmine to the garden-variety parsley. For optimum benefit, the oils must be extracted from natural raw ingredients with attention to purity. They must be stored in dark, tightly-stoppered glass bottles and kept away from light and heat in order to maintain their potency. They can be used individually or in combination.
Essential oils affect people through the sense of smell, which is the most potent of all the senses because the information is delivered straight to the hypothalamus. As moods, motivation, and creativity all stem from the hypothalamus, odors affect all of these processes. Think of a disgusting odor and how it can put you off at dinner—or think of a fragrance that brings back a pleasant memory of a loved one, and you’ll get the idea of how intimately intertwined scents are with our emotions, memories, and ideas.
Despite considerable research, the chemistry of essential oils is not fully understood. Each oil—by current count—contains at least 100 different constituents, which are chemically classified. Not only that, scientists think there may be many other chemical compounds in essential oils, yet to be identified.
Thus, the oils and their actions are extremely complex. Not only are all of them antiseptic, but each also possesses individual properties. The collective qualities of each oil give it a dominant characteristic—stimulating, calming, energizing, relaxing. Essential oils have obvious psychological effects, and they also have notable physiological effects, which means that within the body they are able to operate in three ways: pharmacologically, physiologically, and psychologically. From the pharmacological perspective, the oils act like medicine by reacting with body chemistry, but with a slower and more sympathetic effect—and with fewer side effects.
Handle essential oils carefully! Do not get essential oils directly on your skin. If accidentally ingested, get immediate medical help. Do not get essential oils in the eyes. Keep all oils away from children.
Some oils, like lavender, are known as adaptogens. As the name implies, these oils adapt to whatever condition needs assistance. In addition, certain oils have a particular affinity for different body parts—spice oils, for example, tend to benefit the digestive system. Finally, the psychological effect of essential oils is triggered by the connection the aromatic molecules make with the brain.
Those to Leave Alone
Not all natural plants and essential oils are beneficial. The following essential oils should never be used:
| Bitter almond |
Mustard |
Tansy |
| Boldo leaf |
Pennyroyal |
Thuja |
| Calamus |
Rue |
Wintergreen |
| Horseradish |
Sassafras |
Wornseed |
| Jaborandi leaf |
Savin |
Wormwood |
| Mugwort |
Southernwood |
Yellow camphor |
Source: The Complete Book of Essential Oils and Aromatherapy by Valerie Ann Worwood
Using Essential Oils to Scent Candles
Essential oils are volatile, which means that merely adding an essential oil to your wax mixture may not produce the strength of fragrance you expect when the candle is burning. One way to use essential oils to scent your candles is to soak the wick in the oil before pouring in the wax. Another is to add a drop or two of the oil to the pool of melted wax after the candle has been burning for a while. This is the same principle as the aromatherapy “diffuser,” which is a small cup or indentation under which a small candle is lit, such as a votive or tealight. The heat from the candle releases the constituents of the oil into the air where they produce the results through the olfactory system.
Commercially prepared candle scents contain fixatives and stabilizers to make the fragrance last while the candle burns. Most of these products are synthetic, and so the person in search of a natural alternative usually turns to the essential oils, or to herbs and flowers from the garden.
One candlemaker suggests experimenting with the ingredients commonly found in your home: vanilla beans, scented bath oils, or any other scented oil-based product. Often these oils are made with a small percentage of essential oil in what is known as a “carrier base,” which could be vegetable oil or mineral oil—a neutral oil. You can also purchase various oils made from spices—cloves, cinnamon, and so on, at your pharmacy for use as candle scents. Just remember the scent must be oil-based or it will be useless.
If you’re interested in mixing scents to achieve unusual duplications of such things as baby powder and apple strudel, check www.candlemaking.org.uk/scentrecipes.html for a list of such inviting scent combinations as pink champagne and blueberry muffins!
As a general formula for using essential oils to scent candle wax, start out with half a teaspoon of essential oil to one pound of wax. Never use more than 3 percent of oil by weight, unless you are deliberately trying to mottle the candle’s surface. (See “Surface Mottling” on p. 175.)
Here are some representative examples of the uses of essential oils to make scented candles:
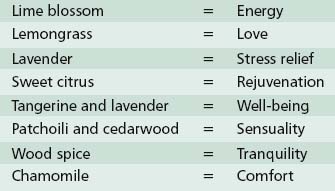
Herbal Scents
In addition to essential oils, you can try adding herbal scents, using the leaves or powders you have in your kitchen—any dried herbs can be used to scent wax. (You should realize, however, that they don’t always work: see “My Rosemary Story” on p. 190 for an interesting anecdote on what happened with one such experiment.)
To use dried herbs for scenting candles, allow the herbs to steep in the melted wax for several minutes. Then, either filter them out (with cheesecloth) or leave them in to create an interesting visual effect. Remember, however, that any plant material within the candle runs the risk of being burned as the candle burns—and it might not smell so good! You can also use the method described above for using potpourri with dried herbs.
Here are some herbal/spice suggestions: allspice, caraway, cinnamon, cloves, coriander, fennel, ginger, mint, nutmeg, rosemary, tarragon, thyme, vanilla. You may also use pure oils of citrus—oil of lemon, oil of orange, and so on. These oils can be added directly to the melted wax. As is usual with candlemaking, you have to be willing to experiment and exercise your creativity—and keep records.