CHAPTER 12
Holidays and Special Occasions
Naturally, you will have many private special occasions that you can celebrate with your candle-making skills—births, weddings, etc. And there are so many joyous holidays throughout the year that can be enhanced by the presence of warm candlelight. This chapter will give you some suggestions for making all of your holidays and special occasions really special with your own handmade candles.
Gift-Giving
Candles are always welcome gifts—especially when you have made them yourself. Giving your art away is gratifying when you know how much pleasure you are providing for a friend or loved one.
Theme gifts are always appropriate. These can be based on specific holidays or religious celebrations, or made in a person’s favorite color. For example, when I redecorated my home in sage and peach, I received a dozen lovely handmade tapers, six of each color that exactly matched my décor! Be aware that candlemakers have their personal trade secrets—when I exclaimed over the colors and said, “How did you get those colors?” the answer was along the lines of, “Oh, I just fooled around until I got it right.”
If you are giving candles as holiday presents, you can make candle sets appropriate for whichever one you are honoring. Giving your handmade candles in the correct colors and holders and quantities to light for each night of these oncoming holidays is an especially thoughtful gift. The recipient will appreciate an early arrival of such a gift in order to plan their celebration with family and friends, using your gift as a showpiece.

Traditionally, New Englanders believe that a gift bayberry candle, burned down to the end on New Year’s Eve, will bring the recipient many benefits in the coming year. They say, “A bayberry candle burned to the socket, puts luck in the home, food in the larder, and gold in the pocket.”
Candle-Wrapping Tips
For a single candle, taper or pillar, simply roll it in a sheet of tissue paper and twist the ends of the tissue, securing with a ribbon tie (or a twist tie). To wrap pairs, wrap one first, overlapping it with paper to protect from scratching, and then lay the other in the paper and wrap, twist, and tie. You can do this with multiples, too.

See-through wrapping is particular nice for candles. You can use cellophane or plastic food wrap for bundles of tapers, tying a ribbon around the heavier bottom end. A strip of interesting fabric that doesn’t clash with the candle’s color can also bind several candles together for an attractively presented gift.
Constructive Covering
You can also use construction paper to make a holder for the candles. Cut a section about half the height of your candles. Roll it first around each candle, making a tube, and then continue rolling around the others so that in the end each candle is nestled in its own protected enclosure. Wrap the end of the paper totally around the package. Tape and tie with a decorative ribbon and bow.
Yule Rules!
The magic of glowing candlelight really lights up the festive celebrations of our holidays. Candlelight is always welcome, but some holidays just wouldn’t be what they are supposed to be without candles to help us celebrate. The season that first comes to mind when we think of candles is Yule time. Whether you are celebrating Christmas, Hanukkah, Kwanzaa, Las Posadas, or Ya Dhiu, it’s the season of the Winter Solstice, or Yule.
The Winter Solstice is the point in the calendar year when night is longest and day is shortest; after the Winter Solstice the days begin gradually to lengthen. With its bold red and green traditional colors taken from nature’s holly berries and evergreen trees repeated in our candles and decorating schemes for the home, schools, offices, and public spaces, it’s a time of celebrating the victory of light over darkness.
Yule is the perfect time to deck your own personal halls with an abundance of handmade candles intertwined with the brightly colored decorations traditionally hung from our Christmas trees and with branches of evergreens from the woods and fields, or your own backyard.
Making candles for Yule time couldn’t be easier—and it’s festive and fun, something the whole family can enjoy. Even small children can help make a seasonal candle by doing the polishing or gathering small branches and berries for the decorating. Kids usually have lots of good ideas about decorating—and they like to feel a part of things, so it’s always a treat for them to help you with your candlemaking, just as they like to help with baking and decorating special cookies for the holidays.
Everybody can have a hand in the decorating—a toddler can put a candle in a holder and a teen can be a real help. Every age in between can play a part—each child can be assigned a special candle of his or her own, for example, to light and take care of.
Hearts and Candles
Though the banks don’t close and the mail still gets delivered—as it must!—Valentine’s Day is a holiday that almost everyone holds dear. Who doesn’t like sending and receiving Valentines and Valentine gifts? And what better gift for a Valentine than a candle you made yourself? It says “love” with all its heart—especially if it’s a heart-shaped pink candle!
If you don’t have heart-shaped cookie cutters, you can cut out heart shapes by hand. They may not be perfect—but love is known for its imperfections. You can overdip your hand-cut heart shapes to cover up the rough edges.
Making heart-shaped candles is a snap. All you need is wax, a shallow baking pan, a chip of red colorant (for both red and pink colors), and a heart-shaped cookie cutter—or a bunch of different sizes of heart-shaped cookie cutters.
How to Make Heart-Shaped Candles
To make your heart-shaped candles you will need shallow baking trays (one for each color heart you want to make), some heart-shaped cookie cutters, a few ounces of wax, a red color chip, a melting pot and double-boiler system, a l” primed wick for each heart candle, and a skewer or wicking needle.
Before you start, decide how many hearts you want of each color (red, pink, white) and in which sizes. You will need cutters for each tray of color. If you don’t have enough cutters, make one tray at a time, remelting the wax in between pourings.
Set up your double-boiler system.
Put out your baking trays.
Melt the wax to 180° Fahrenheit.
If you want some white hearts, make them first. Pour a thin layer of wax (¼”) on the bottom of each tray. Press the molds into the bottom layer to set them and then gently fill the molds with the hot wax.
Next, add enough of the red color chip to color your wax the pink you prefer. Pour a tray of pink wax as directed above—first set the molds, then fill.
Then, add more of the red color chip to color the remaining wax red. Pour a tray of red wax, set molds, and fill them.
After filling each mold, push a hole into its center and insert the wick.
Add a bit more wax to each mold to smooth the surface (remember that wax shrinks as it hardens), being careful to keep the wick centered.
After the candles have completely cooled, remove the molds from the tray(s) and push the heart shapes out. You now have heart-shaped candles!
If you are going to stack your heart-shaped candles, do not wick them individually. Wick the finished hearts according to the directions for wicking stacked candles.
There are several ways you can use heart-shaped candles. You can make them into “floaters,” or candles designed to float in a shallow bowl of water (see Chapter 17, “Novelty Candles”). Another option is to make a stacked candle with hearts. For a stacked candle, you can use different size hearts and/or different colored hearts—red and pink, for example. And don’t forget twisted tapers for Valentine’s day (see p. 208) Twisted tapers are lovely in any combination of red, pink, and white. Spirals (p. 210) are another good idea for your Valentine’s Day dinner table.
Candy Is Dandy
You can simulate chocolate candies in wax quite easily and give your Valentine a gift box of “chocolate” candles. This is a really nice touch for the candle-lover you love.
To make wax chocolates, simply color your wax chocolate brown and use the ice-tray molding method described on p. 178. Wick each “candy” as described above by poking a hole and inserting a short length of primed wick into each section of the ice-cube tray mold. While you are at it, make some for yourself, too. These make cunning place-markers on the dinner table. Or offer each guest a chocolate candle candy as a take-home favor. If you want to get fancy about it, wrap each one in gold foil!
Spring!
Spring! What a welcome change for candlemakers. In the same way that flora and fauna change in their annual cycles, with the colors of flowers and fruits and vegetables marking different seasons, so candles can be used as part of holiday displays year round.
Easter presents the home candlemaker with a wonderful opportunity to create egg-shaped, pastel-colored candles for decorations and gift-giving. (See “Eggs-actly!” in Chapter 10.) Bunny-shaped molds can be purchased or hand-molded. Flowers can be shaped from pliable wax (see Chapter 17, “Novelty Candles”). A myriad of lovely colors that mimic the flowers of spring can be created in candle wax.
Easter is the feast in which candles have the greatest meaning for Christians. During the period known as Lent, the symbol of the victory of light over darkness is demonstrated during the Easter Vigil, with the lighting of the Paschal Candle. Those participating in the Easter Vigil renew their baptismal vows while holding candles that have been lighted from the flame of the Paschal Candle.
Easter brings a feeling of joy and optimism and a sense of the renewal of earth life’s yearly cycle. Spring evenings during the season of Easter bloom with the magic of candlelight.
The Fourth of July
Decorating for the American national holiday isn’t much of a challenge—it’s the good old red, white, and blue motif. Red and blue are primary colors, so they always go well together, even if the bands aren’t playing or the parades marching. But, when the summer’s high point comes around and there are lots of outdoor activities, the bright colors of our nation’s flag can be displayed in your candles, indoors and out.
Not only does this color scheme set off a patriotic vibration, it suits the bold colors of summer and contrasts with summer’s bright colors in the natural world.
If you’ve mastered the art of braiding tapers, the Fourth of July is the perfect time to show off your skill. Red-white-and-blue braided tapers are the perfect decoration for a Fourth of July celebration.
Red-white-and-blue candles can be created several ways. Layered cylinders and blocks work well, especially for outdoor dining when you want long-burning candles. Using milk-carton molds for Fourth of July motif candles is easy: just pour in equal amounts of the three colors in any order.
Groupings of single-colored candles in each of the three colors work well too. Try a group of different size pillars set on a tray—equal numbers of the three colors, or in any proportion and arrangement you choose. One friend made a flag out of multiple same-size blocks, using Danish tapers for the stars. When lit, it was stunning.
Halloween Candles
When fall rolls around and all the countryside changes color to shades of orange, gold, reddish-brown, and pumpkin, it’s a good time to begin thinking of making special candles for Halloween. What could be more appropriate in the prime season of the jack-o’-lanterns?
No doubt you’ve already made your share of carved faces out of pumpkins and put a single store-bought candle inside to make the cutouts leer menacingly—or with a friendly grin. You can be as creative as you like with pumpkin carving, and make a variety of Halloween lanterns. You can make star-shaped cutouts, create unusual designs of incised lines in geometric or freeform shapes, make leaf shapes, etc. Just be sure to use a sharp blade (a lino or woodcutting tool is good) to carve the designs. And, make holes so that the candle inside can get sufficient oxygen to burn well.
You need not limit yourself to the common orange pumpkin. You can use all sorts of hard-shelled winter squash, such as acorn and butternut. These hard-shelled vegetables will also work as molds to give you gourd-shaped candles to burn during this season. (See Chapter 7, “Molded Candles.”)
For other types of candles—pillars, tapers, molded—your color scheme for Halloween is predetermined—make half-orange and half-black layered candles; twist one black and one orange taper together; or make pillars and blocks in black and orange and arrange them in groups here and there.
If you want to delight a child, make a hand-molded ghost shape out of white wax, forming it around a wick. Paint on black eyes. Or, take a large blob of orange wax and hand-mold a pumpkin shape; carve the child’s initials into the warm wax.
Put branches of autumn leaves around the candles for further decoration, and when Halloween is over and Thanksgiving is coming round, make your candles in the shades of russet, bronze, brown, and gold that nature provides in the gloriously colored dying leaves of the autumn foliage.
Making Candles for Thanksgiving
The annual feast of Thanksgiving doesn’t have any specific color scheme, but it does have its theme: thankfulness. As you make candles for your holiday table, give thanks for the abundance you enjoy. Not the least of our blessings these days is the luxury of making our own sweet-smelling and beautifully colored candles as a joyful hobby, not an onerous chore.
Candle Etiquette
When setting your Thanksgiving table (or any other dining occasion), place candles and centerpieces about two inches below the eye level of your guests. A candle flame flickering between your gaze and the person opposite is annoying, and certainly not conducive to delightful conversation.
Burn the tips of new candles down an inch or so before using them on the dinner table, to take off the sense of “newness.” When having guests for dinner, light the candles immediately before seating the guests. Allow them to continue burning until the dinner is over and everyone stands.
Here are some other guidelines to keep in mind when preparing candles for a dining occasion:
Tall, slim candles are best for elegant dining.
Short, wide pillars/blocks are good for casual dining.
Arrange candles with different heights and shapes around the room on windowsills, sidetables, and fireplace mantles.
Light candles at dusk, or on overcast days to dispel gloom.
New Baby
Oh, what a joyful event it is in any family’s life when new life graces the circle! You can make a perpetual birthday candle for the happy new parents. This is very easy and will be appreciated for years as the child grows.
Begin with a tall white pillar candle—10” or so. Mark the surface at ½” intervals for the eighteen years it will take for the new baby to reach legal maturity. You can do this with a small pen and a ruler as a guide. Make a tiny pinprick in the candle at each division so you will know where to paint the yearly separations.
Beginning at the top with “1,” continue downward to the base until you reach “18.” You will have about an inch of candle left at the base. Decorate the candle at each point of division by painting on a line and add some other surface decorations, or sheet wax appliqués.
The perpetual birthday candle described above is a perfect gift for a baby shower. But, you can also use some other candle ideas, such as aromatherapy scented candles to soothe, relax, or invigorate the mother-to-be during her pregnancy.
Include in your gift basket for the new baby and his or her parents a note on how to use the candle. It will burn for about 1 hour for each yearly division. As the child grows old enough to understand the candle’s purpose, he or she will delight in this visual evidence of growth—and look forward to the lighting of the birthday candle each year. Of course, you can also include regular birthday candles for the celebration of the first birthday—which comes all too soon for most parents!
Romantic Weddings
The romance of candlelight and weddings is a given. What would one be without the other? Whether it’s a huge formal wedding with all the trimmings or a small, private affair, candles will enhance the proceedings and make the bride and groom—and everyone else—feel special on that meaningful occasion.
Depending on the time of day chosen for the ceremony and the reception, candles can be utilized in a number of different ways. If, for example, the wedding is a daytime affair followed by a luncheon reception, suitably decorated candles can be placed on every table as place-markers.
To remove bits of wax residue from votive cups, place them in the freezer overnight. Because wax shrinks when it freezes, it will then be easy to remove. Another nonstick idea is to coat the inside of votive cups with pan spray, which also will prevent wax from sticking.
The wedding that is followed by an evening reception provides the best venue for using candles, which can be displayed throughout the reception area, be it a great hall or a private living room. Popular colors include, of course, white and ivory, surrounded with lilies and stephanotis or other white-flowered sprays of the season.
For a different note, try using pastel colors—perhaps to match the bridesmaids’ dresses. If the bride has chosen a specific color scheme for her wedding party’s gowns, that can be repeated in the candles used both for the ceremony and the reception. These can be combined with the flowers chosen for the bride’s and her bridesmaids’ bouquets.
Or, for an autumn wedding, choose rich, deep colors—like burgundy and russet—and mix these with the colors of the season. Whichever color scheme is chosen, all types of candles work well, depending on the type of wedding.
Post-Wedding Candles
A nice note for the newly married couple is to save a pair or two of elegant dipped tapers from the wedding candles for after the ball is over. A thoughtful “morning after” gift of their special wedding candles will remind them that it’s important to take time out for a candlelit dinner just for two to keep the spark of romance alive after their return to normal—hectic and busy—life. There’s no better way to strike a romantic note—just make sure to include matches!
And don’t forget about engagement parties and wedding anniversary celebrations. These too will be enhanced with thoughtfully chosen candle arrangements.
Birthdays
Blowing out candles on the birthday cake and making a wish is a time-honored tradition, and it’s just as important for adults who are growing older as it is for children. Handmade birthday candles are a real treat—I’ve described some variations on these earlier but you can devise your own as well. And after the little candles are blown out and removed for serving the cake, how festive it is to have made some other candles with which to adorn the birthday table.
Another idea for a birthday party is cupcake candles (see Chapter 17, “Novelty Candles”). These little wax cakes aren’t for eating, but you can make them look like the real thing.
Cone-shaped candles can be made to look just like party hats, especially using the method for making chunk candles (see p. 178 in Chapter 9). You can stick some colorful tinsel around the top to complete the effect. (Be sure to remove the tinsel before lighting the candle: it’s only window dressing.)
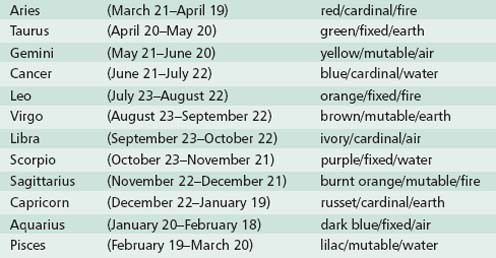
Zodiac Candles
Making a candle for the birthday person’s sign of the zodiac is especially thoughtful. A simple large pillar is best. Although there are no hard and fast rules, each of the signs of the zodiac is related to specific colors. Here’s a list:
Wax glue is a soft, sticky wax that is available in solid form for attaching pieces of wax together and also to stick decorations to candles. Use it to glue a small zodiacal symbol (make sure it is nonflammable) to the candle, incise the symbol with a knife, or just paint on the name of the sign. (Also see Chapter 13, “Surface Techniques for Decorating Candles.”)
The planet Mars, ruler of the astrological sign of Aries, is known as the “fire god.” He is visible to us as a red sphere in the night sky, the only such tinted planet. When Mars is active in a person’s chart, they are imbued with the energy of Fire, an element of vital importance to human life.
Candle Centerpieces for Special Occasions
Mirrored tiles make great bases for candles in holders, for they reflect light. You can use all sorts of decorative embellishments to surround a candle on a mirror tile—greens, ribbons, net, confetti, potpourri. Flowers can be fresh, dried, or artificial.
To make a centerpiece with a mirror tile, simply place greens or stems of flowers diagonally across the square of tile. Add ornaments of your choice in the spaces between the greens/flowers, or fill in with more flowers. Add two votive candles in tall glass cups on either side of the diagonal of greens and flowers. As a final touch, sprinkle confetti or glitter on the mirror tile.
For simple elegance, place a spray of long stemmed flowers such as roses or calla lilies, tied with a ribbon bow, across the mirror tile. Add two tall tapers on either side of the flower spray.
For a more casual presentation, put a pillar or block candle in a hurricane lamp holder on a platter and lay greens around the base of the candleholder. Scatter a few flowers or berries, or autumn leaves, amongst the greens.