Combine multiple photos into a single image for convenience and dramatic effect.
When you choose to host your own photos [Hack #76] , eBay allows you to specify only a single image URL to appear beneath your auction description. If you have any additional photos, you'll have to include them directly in the description with HTML [Hack #52] . But you also have the option of combining all your photos into a single image file, thus completely eliminating the need to use thumbnails [Hack #77] or a photo album [Hack #79] to organize multiple pictures.
A single collage of your photos is easy to build, and may ultimately require less work to insert into your auctions than hand-coding HTML or JavaScript. A collage also provides a good amount of control over the presentation of your photos, allowing you to easily emphasize the most important pictures.
You don't have to host your own photos to take advantage of this hack. However, if you use eBay's Picture Services to host your photos, you'll be limited to their cramped 400 X 300 standard size, which is much too small for a photo collage. And while the Supersize upgrade [Hack #46] would remedy this, your customers won't see it full size unless they click the Supersize link underneath the smaller version.
To build a collage, start with the most prominent photo of your item, properly cropped and resized [Hack #74] . Then, use your image editor to increase the canvas size to accommodate additional photos. Most people are accustomed to scrolling web pages up and down, rather than side to side, so you'll need to orient your photos vertically rather than horizontally. For example, if you're combining three 600 X 450 photos, make the canvas at least 700 X 1400.
Next, place your additional images on the newly enlarged canvas. In most image editors, you can do this via copy-and-paste. First, open one of the images you want to place in the new canvas, select the entire image area (Ctrl-A), and copy the image to the clipboard (Ctrl-C). Then, paste the image into your new canvas (Ctrl-V) and use the mouse to position it. (See the next section for some shortcuts for Photoshop users.)
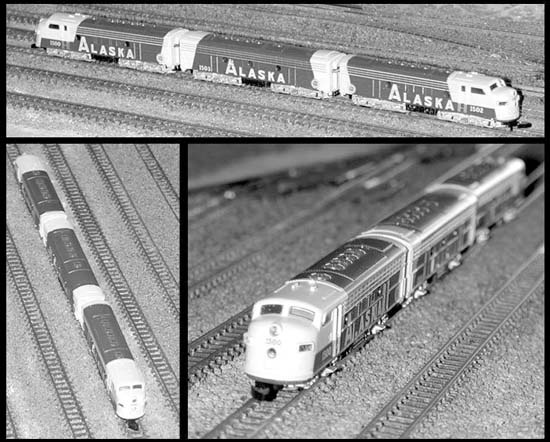
Figure 5-16 shows a completed photo collage. Here, a black background was used to make the collage a bit more striking. You can use white if you want the photos to blend in more smoothly with the surrounding auction. Try to avoid brightly colored backgrounds, however, as they can be hard on the eyes.
When you're done, crop out any unused background (except perhaps for a nice thin border), and, if needed, shrink down [Hack #74] the collage, so it's no larger than 600 to 800 pixels in its larger dimension. Save it as a JPG file, upload it to your server [Hack #76] , and you're ready to go!
Adobe Photoshop has a few nice features that can make collages much easier and quicker to create. First, you can create an action (a.k.a. macro) to increase the canvas size and turn the original photo into a floating layer. (You can also download this action at www.ebayhacks.com.) Here's how to do it:
Open a sample photo in Photoshop. Any file will do, as long as it's smaller than 1000 X 1000 pixels. (If you need to work with larger photos, modify the numbers in step 7.)
Show the Actions palette by going to Window → Actions.
Record a new action by clicking the arrow button at the top-right of the Actions palette, type a name like "Increase Canvas Size," and click Record.
Click the little black/white icon below the color swatches to reset the colors to black and white.
Press Ctrl-A to select all.
Press Ctrl-X to cut the selection to the clipboard.
Go to Image → Canvas Size, type arbitrarily large numbers for the new width and height (try 1000 and 1000), and click OK. (You can use larger numbers if you think you'll need them.)
Press Ctrl-V to paste the image back into the newly enlarged canvas.
Press the square Stop button at the bottom of the Actions palette.
Click the little arrow button at the top-right of the Actions palette and select Button Mode.
From now on, to increase the canvas size and float the image, all you need to do is click the Increase Canvas Size button on the Actions palette.
Once the canvas size has been increased, the next step is to paste other images onto the collage. Photoshop has a shortcut for this, too: just open the other photos and use the Move tool to drag them from their own document windows onto the newly enlarged canvas (no fussing with copy-and-paste).
You can then press Ctrl-T to begin a free transform and resize the photo in place (hold the Shift key to preserve the aspect ratio). When you're done, select any tool on the toolbox to commit the free transform.
Finally, go to Layer → Flatten Image to combine all the floating layers so that the collage can be saved into a JPG file. Or, to preserve the floating layers, go to File → Save for Web (Photoshop 7.x and later only).