5
GET TO KNOW REPEATS
When you paint a giant canvas or a big mural on a wall, you usually create one whole scene or abstract image that takes up the entire space. While it’s true that you can do that with fabric, wallpaper, and paper, the real building blocks of surface design are repeats.
In the context of fabric and paper design, the word “repeat” refers to the element that makes up your design. To fill yards of fabric or paper, this element is duplicated over and over again—yes, you repeat your repeat! You can arrange your repeat (also called a block or tile) in grids of rows and columns.
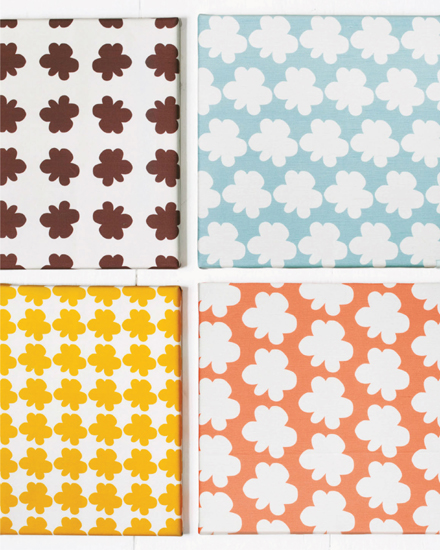
We created a variety of repeats from a 3-inch (7.5 cm) flower shape we cut from construction paper, scanned, recolored, and uploaded to Spoonflower. After our designs were printed on linen-cotton canvas, we stretched the fabric over premade canvases from the hobby shop and stapled in back to create easy “artwork” to display.
Repeat Options
The Spoonflower site offers five different repeat options, each of which can be created with the click of a mouse once you have uploaded your artwork. If you want to test your eye on real fabric designs, take our quiz on this page.
+ BASIC. The design is replicated in a regular grid of columns and rows, like tiles on a floor. You may see this option referred to as a block repeat or a square repeat elsewhere.
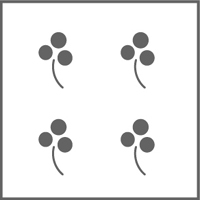
BASIC
+ HALF-DROP. In this staggered layout, each vertical row of tiles is shifted a half-block from the one beside it.
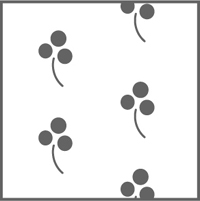
HALF-DROP
+ HALF-BRICK. Another staggered option, the half-brick shifts the design block in horizontal rows, each row offset a half-block from the one below it.
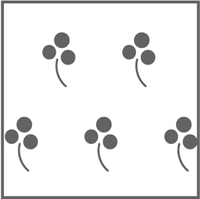
HALF-BRICK
+ MIRROR. A mirror repeat flips the design horizontally and vertically along its edges, so that each row and column is a mirror image of the one next to it.
MIRROR
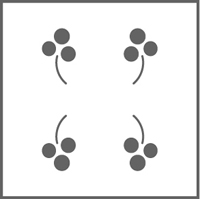
+ CENTER. This option centers a single copy of your tile in the layout; it is the only layout we offer that is not based on a grid of repeated blocks.

CENTER
Planning a Repeat
As you are planning a design, it’s important to consider what size you want your repeat to be. Do you want to start with a tile that is 1 × 1 inch (2.5 × 2.5 cm) or 12 × 12 inches (30.5 × 30.5 cm)? It’s helpful to think about your intended project; for example, see the Citrus Dish Towels on this page. We knew we wanted small-scale repeats at a different size for each towel, and we knew that we wanted to fill the space with pattern. For quick reference, the limes are each 1 inch (2.5 cm) wide, while the larger oranges are 4 inches (10 cm) wide. There are certainly ways to resize and scale a repeat—some of which we use in this project—but it is helpful to have a concept from the beginning.
It is also important to understand how we tile the designs you upload. We repeat your design from the bottom left-hand corner; this is clearly shown in the preview in your Design Library.
Understanding Negative Space
Negative space is the area around and between the subject of an image and it can have a big impact on the look of a design. In the repeat patterns shown here, we varied the amount of negative space between each flower and also the color of the positive (flower) and negative space. When considering negative space, step back and look at your design from a distance. See if the negative space draws your eye in or disrupts the flow.

Seamless Repeats
On most fabric and wallpaper you can’t easily see where one repeat ends and the next begins. That is because often designers intentionally make their repeats “seamless.”
A seamless repeat is a way of designing a block to hide or disguise the repeat style you are using (it also hides the seams between the blocks). To make a design seamless, you need to make elements of it extend to the edges of the tile so that there is no obvious line, interruption, or empty space when the tiles are put next to one another. You still create the pattern using one of the layouts (basic, half-drop, or half-brick), but the design itself creates the illusion that there is no grid involved. Sneaky, right?
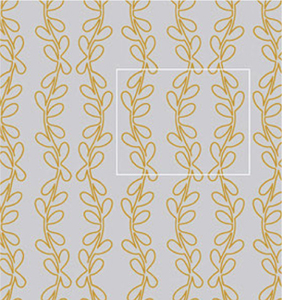
The white box shows the repeat tile for this design. The elements of the design continue to the edges of the tile and match up when the tiles are placed side by side, disguising the edges of the repeat.

CREATING A SEAMLESS REPEAT
Here’s an easy exercise to help you understand how a seamless repeat is made. All you need is a standard piece of copy paper, a pencil, and a pair of scissors. (In Chapter 8, we show you how to do the same thing digitally.)
Pick a random image to draw. Add different components to it but make sure that none of them touch the edge of the paper. Imagine that you made twenty photocopies of this sheet of paper and laid them out, according to one of the grid patterns we’ve learned. By repeating this block just as it is right now, it would be pretty easy to see where the edges of the image are because they are surrounded by blank space.
To turn this into a seamless repeat, you need to extend the image to fill most of the blank space. Here is an exercise technique to help you draw those parts of the image and make them match up easily.
1 Cut the image in half horizontally. Then, cut it in half vertically. Your lines don’t have to be straight; in fact, cutting slightly wavy lines will help you match everything up later. Put them back in the original order.
Step 1
2 Pick up the two pieces that are on the left and move them so they are on the right. Now pick up the two pieces that are on the bottom and move them so they are on the top. All of the outside edges of the original drawing should meet in the center and all of the wavy cut edges should be on the outside.
Step 2
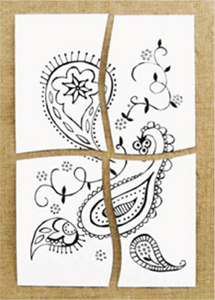
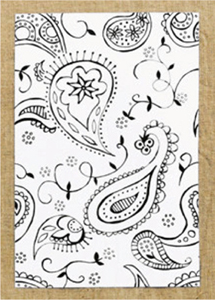
3 Carefully match up the four corners at the center and lightly tape the pieces together on the back so they don’t move around. Fill in the empty space with more imagery (additional paisley elements were added here), drawing across the seams in the paper.

Step 3
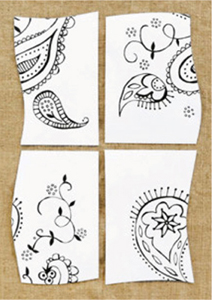
4 Carefully remove the tape and reassemble your drawing with all of the pieces in their original places. Now the elements of your drawing will continue over the edges of the block and connect seamlessly with the next block in the layout.
Step 4
To preview your repeat, just make a few photocopies of the finished drawing and lay them out side-by-side in a grid to create a basic repeat pattern like the option we offer at Spoonflower. Once you have finished fine-tuning your drawing, you can scan it and use it to create your fabric, wrapping paper, or wallpaper. Or, you can use it as a guide if you want to create an all-digital design based on your artwork.