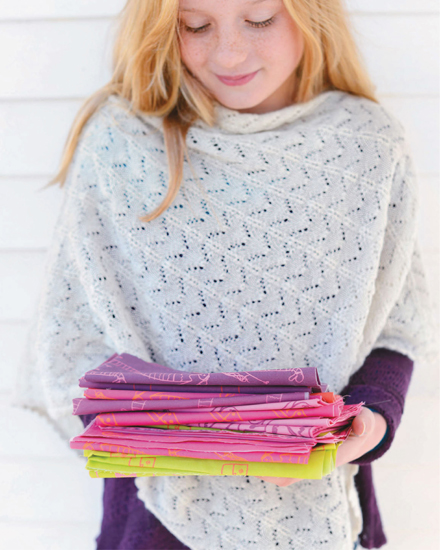
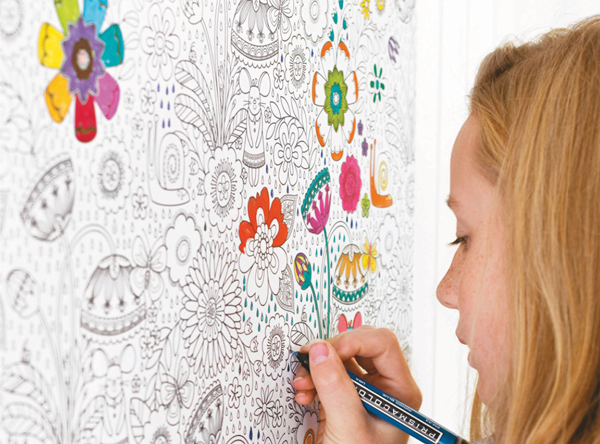
We used a floral coloring book design by Suzanne Dye for this scarf; we also used it to create the wallpaper on this page.
FROM PAINT TO PIXELS
SKILLS LEARNED IN THIS CHAPTER
+ Refining Artwork: Using the Paintbrush tool, Eyedropper tool, Paint Bucket tool, Magic Wand tool
One of the things we see at Spoonflower nearly every day is that the ephemera of life makes some of the most interesting and poignant designs. The drawings your kids create, the doodles and sketches that come from your imagination, the vintage postcard that inspires you to grab your paintbrush and create—it’s all teeming with design possibility!
Creating a design from an original piece of art on paper is a fantastic way to start a project. After you’ve made your art, the next step is to scan it and make it digital as you learned in Chapter 6. Once you have a design on your computer screen in front of you, there are some easy enhancements and fixes you can make in your graphics program before printing it. For example, you can touch up some areas in your artwork, like removing stray pencil lines or cleaning up a wobbly or smudged area. You can also experiment with changing colors. Let’s explore some of the tools that will help you.
We used a floral coloring book design by Suzanne Dye for this scarf; we also used it to create the wallpaper on this page.
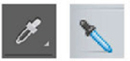
These two tools are pretty easy to recognize: The Eyedropper tool looks like an eyedropper and the Paintbrush tool looks just like a paintbrush. You can use these two tools together to touch up a scanned image.
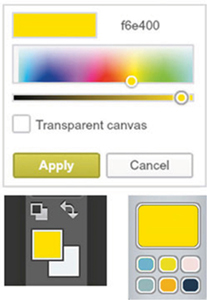
The Eyedropper allows you to select a color you want from your design and “copy” it so that you can put it somewhere else in the design. After you’ve opened your image in your graphics program, click with the Eyedropper to choose the exact color from the spot that you click. See which color you’ve selected by finding the color palette in your graphics program, as shown in Figure 1. It usually looks like a set of colored rectangles or a painter’s palette, and the largest or most prominent rectangle shows the color you have selected.
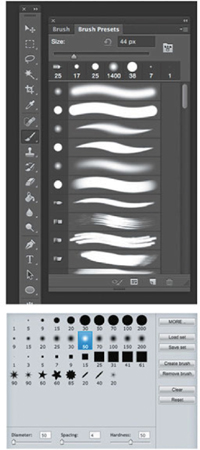
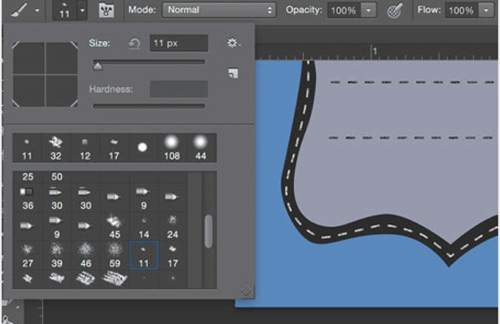
To remove a stray mark from the background of the image, click with the Eyedropper and select the color of the background. Switch to the Paintbrush tool and use the brush to paint with the color you have selected. Paint over any lines or smudges that you want to make disappear. You can tweak your design in this same way: Select a different paint color and add in new lines or shapes to the artwork. Look for a menu item or palette (a set of tools or functions) that is labeled “Brushes.” You’ll find options for changing the size, shape, and edges of the brush—yielding many different effects that you can use to your advantage (Figure 2). Many of the other tools featured in this book also have palettes or panels that offer additional functionality.
FIGURE 1 Here are three examples of color palette tools from three graphics programs (clockwise from top): Photoshop, Pixlr, and PicMonkey. They look a little different, but all function in the same way. In these screenshots we show what you’ll see when you choose a color with the Eyedropper tool.
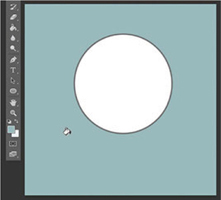
FIGURE 3 When you use the Paint Bucket tool, the paint flows around any objects already in place. To select an object to fill, you first need to define it with the Lasso or Marquee Select tool.
The Paint Bucket tool looks like a bucket of paint that is about to tip over—that icon tells you a lot about how the tool works!
Use the Paint Bucket when you want to fill in a large area of color, like the background for an image. Choose a color from the palette in your graphics program, and when you click on the image with the Paint Bucket, it “spills” the paint and flows into the image. If you have a blank page and click, it will fill the entire space. However, if you already have objects on the page, the paint will flow around them (Figure 3). To fill a complicated shape, you might need to click to fill each area one by one; to fill a specific area, use the Lasso or Marquee Select tool to define that area and then use the Paint Bucket tool to fill it with color.
Magic Wand Tool
This tool looks like a wand with a sparkle or star on top of it.
You already know how to select parts of an image using the Lasso and Marquee Select tools (this page). The Magic Wand tool helps select parts of the image not based on a line that you trace, but on the color that you click. When you click on the image with the Magic Wand, the tool selects everything that is the same color as the point you clicked. Usually, the tool has options you can set to fine-tune what it is selecting. “Contiguous” means that when you click a color, you select all of that color that is touching the spot you clicked, not everything on the entire image. “Tolerance” tells the tool how picky to be about finding exactly the color you clicked. A high tolerance setting means, “Pick this red and any other shade of red that is pretty close to this,” while a low tolerance setting means, “Be exact.”
SARAH GIFFORD / MAPLEWOOD, NJ
Sarah Gifford is the graphic designer who designed this book. When she asked her daughter Daphne if she wanted to draw some pictures for party napkins, Daphne was quick to agree, and then big sister Della and friend Ali decided to join in. Each girl drew her pictures using black markers on an ordinary piece of white copy paper. Sarah scanned five of them (birthday cake, unicorn, mermaid, dog in a party hat, and pig in a party hat), played around with repeats and colors (with Daphne by her side for approvals), and then uploaded and printed them. The girls are thrilled, of course.
MATERIALS & TOOLS
TO DESIGN THE FABRIC
A piece of artwork, ideally about 2 to 3 inches (5 to 7.5 cm) square
Scanner
1 yard (.9 m) of basic cotton, cotton, poplin, or sateen (we used basic cotton)
TO MAKE THE NAPKINS
Printed fabric
Rotary cutter, self-healing cutting mat, and acrylic quilting ruler
Basic sewing tools (optional—this page)
designing the fabric
1 Scan the artwork.
Choose the drawings to use for your napkin designs. Artwork that is between 2 and 3 inches (5 and 7.5 cm) square is ideal because of the small scale of this project.
We wanted the finished design to be the same size as the original drawings, so we scanned each drawing at 150 dpi (see the Scaling Formula on this page if needed). Scan and save each drawing you want to use for the designs; refer to this page for more information on scanning.
2 Clean up, crop, and refine.
Review the basic information on refining your artwork (this page). Open each scanned file in your image-editing program and use the Paintbrush and Eyedropper tools to clean up any stray marks or smudges. Then crop close to the edges of the artwork. If you want to change the color of the drawings, as Sarah did, use the Magic Wand and Paint Bucket tools to play with the artwork as desired (this page). (To easily pick the entire drawing with the Magic Wand tool, be sure that “Contiguous” is not checked.) You can change the background colors separately, using the same set of tools.
3 Save and upload.
Save the image. Upload it to Spoonflower (this page) and choose your favorite repeat style (this page)—we used different repeat styles for the different drawings shown here. For example, the cake design is a half-brick layout. Print onto 1 yard (.9 m) of basic cotton, poplin, or sateen.
4 Prepare the fabric and trim.
Wash, dry, and press the fabric. Using the rotary cutter, ruler, and mat, trim the napkins to size. If you prefer cocktail napkins, trim to 12 × 12 inches (30.5 by 30.5 cm); for dinner napkins, as shown in the collection in this photo, trim to 16 × 16 inches (40.5 × 40.5 cm). From 1 yard (.9 m) of fabric, you will get about 9 cocktail napkins or about 4 dinner napkins.
5 Finish the napkins (optional).
For this project, we chose to keep the napkins very casual and leave them unhemmed. Alternatively, you could cut the edges with pinking shears, which will help prevent them from raveling when washed, or you can hem the edges following the instructions for the Recipe Tea Towel (this page) or the Pet Silhouette Hankies (this page).
ELLEN GIGGENBACH / WELLINGTON, NEW ZEALAND
Ellen Giggenbach (ellengiggenbach on Spoonflower) hails from New Zealand (by way of Bavaria) and studied graphic design in Vienna. She is a freelance designer who creates art for textiles, books, greeting cards, stationery, home goods, and other products; she also has her own Etsy shop. For the fabric that she created for this baby quilt, she handpainted paper in different colors; cut out shapes and layered them to create a butterfly and flower scene; then scanned her artwork and scaled it up so it would fit on exactly 1 yard (.9 m) of fabric.
MATERIALS & TOOLS
TO DESIGN THE FABRIC
Original artwork
Scanner
1 yard (.9 m) of basic cotton
TO MAKE THE QUILT
Printed fabric
40 × 48 inches (101.6 × 122 cm) of cotton batting (we recommend Warm & Natural by Warm Company for its weight and durability)
1¼ yards (1.2 m) of coordinating fabric for backing (see Note)
½ yard (.5 m) coordinating fabric for binding (see Note)
Masking tape
Rotary cutter, self-healing cutting mat, and acrylic quilting ruler
Large safety pins
Perle cotton in a coordinating color and large-eye embroidery needle (optional)
Basic sewing tools (this page)
Note: Read “Getting a Color Match” on this page if you prefer to print your own fabric for the backing and binding.
design the fabric
1 Prepare the artwork.
For this design, Ellen created an original piece of artwork that is exactly 9 × 10½ inches (23 × 26.5 cm). She chose this size because these dimensions scale up to fit precisely on 1 yard (.9 m) of her chosen fabric, the basic cotton, which is 36 × 42 inches (91 × 107 cm). Note that it’s important to choose the kind of fabric you want to print on before creating the design, so you will know the finished size the artwork needs to be—the dimensions of the yard (.9 m) of fabric (length and width) each divided by 4. Create your own artwork based on this formula.
2 Scan and scale the artwork.
Scan the artwork to scale it up from 9 inches (23 cm) to 36 inches (91 cm); revisit the Scaling Formula on this page if necessary:
36 INCHES ÷ 9 INCHES = 4; 4 X 150 DPI = 600 DPI
So set the scanner to scan the design at 600 dpi, which gives you enough pixels to scale up from 9 inches to 36 inches. Save the image.
3 Rotate, upload, and print.
Open the file in your graphics software. Because fabric is printed crosswise (this page), rotate the image so that its long side matches the long side (or width) of the yard (.9 m) of fabric. Select the image and choose “Rotate” or “Image Rotation” from the “Edit” or “Image” menu to rotate it 90°.
Save the file and upload it to Spoonflower (this page). Choose a centered repeat (this page).
4 Prepare the fabric.
Wash and dry the fabric. Press to remove any wrinkles. Using the rotary cutter and ruler, cut the binding fabric into 3-inch (7.5 cm) wide strips across the width of the fabric. Trim away the selvedges and set aside.
5 Assemble the quilt layers.
On a large table, lay out the quilt backing fabric with the wrong side up. Use masking tape to secure the backing to the table at the corners and sides of the fabric, stretching it just slightly to remove any wrinkles and make sure it is smooth. Lay the batting on top of the backing and smooth to remove any wrinkles. Center the quilt top (right side up) on top of the other layers. The batting and backing will be larger and should extend past all the edges. Starting from the center, smooth the fabric in place.
6 Baste and trim.
Pin through all the layers to baste them together, placing a safety pin about every 6 inches (15 cm) over the entire quilt. Remove the tape. With a long basting stitch on the sewing machine, stitch ¼ inch (6 mm) from the edge of the quilt top, through all the layers. Trim all the layers to match the edges of the quilt top.
7 Quilt or tie.
Add machine quilting or hand-tie the quilt to keep the layers together. Quilt around large shapes by stitching along the edges with a straight stitch or stitch in an allover pattern like a grid or random swirls. Optionally, you can use perle cotton to make ties over the surface of your quilt, as seen in the photo on the opposite page: Make a small stitch through all the layers and then tie the thread ends in a square knot and trim. Remove the safety pins.
8 Add the binding.
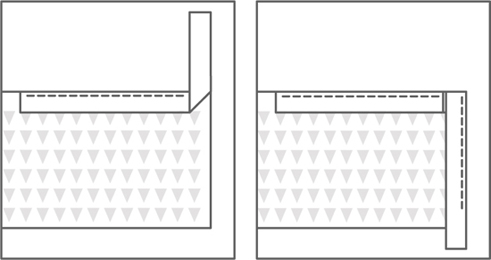
Join four strips of binding together at the short ends, using a ¼-inch (6 mm) seam allowance. Press the seams open and press under ½ inch (1.2 cm) on one short end. Fold the binding strip in half lengthwise and press. Working on the front of the quilt and beginning with the folded short end of the binding, align the raw edges of the binding and the quilt, starting in the center of one long side. Pin the first side and begin to stitch about 2 inches (5 cm) from the folded end, using a ½-inch (1.2 cm) seam allowance. Stitch to within ½ inch (1.2 cm) of the corner; stop your line of stitching and backstitch. Fold the binding strip up and press with your fingers to create a diagonal fold, then fold it back down to align the raw edges along the next side. Stitch and continue in this manner to bind all sides (see Figure 1). When you approach the folded end, lap the raw end of the binding inside the folded end, trimming as needed, and complete the line of stitching.
Fold the binding out, then press and fold it to the back of the quilt, covering the raw edges. Handstitch the binding edge to the back of the quilt.
FIGURE 1 Fold the binding strip up so it lines up with the next side you will be stitching to create the diagonal fold. Then with that diagonal fold still in place, fold the length of the binding strip back down and continue stitching, starting at the corner.
Coloring Wallpaper & Desk Wrap
TASHA GODDARD / GLOUCESTERSHIRE, UNITED KINGDOM; SUZANNE DYE / OREM, UT; AND OLIVIA HENRY / QUEENSLAND, AUSTRALIA
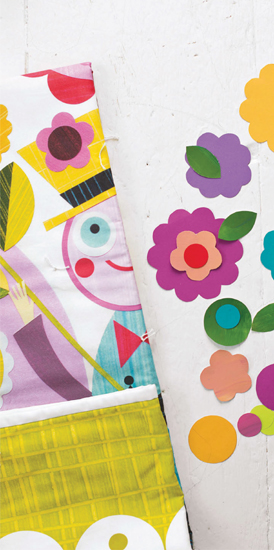
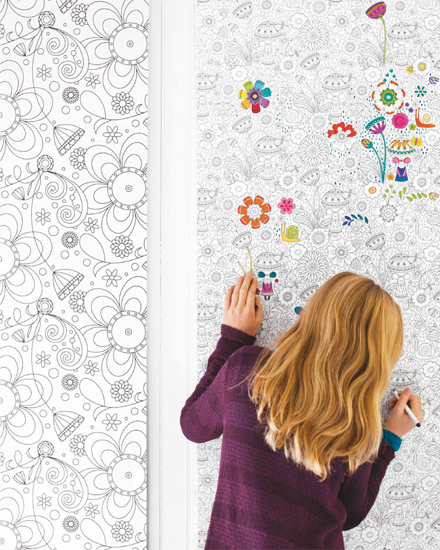
This project idea came from one of Spoonflower’s weekly contests. The challenge: design floral coloring book wallpaper. We chose two of the top ten submissions to feature at right: an allover floral by Tasha Goddard (near right) and a mouse floral by Suzanne Dye (far right). They’re known as tasha_goddard_design and suzanne_dye, respectively, on our site.
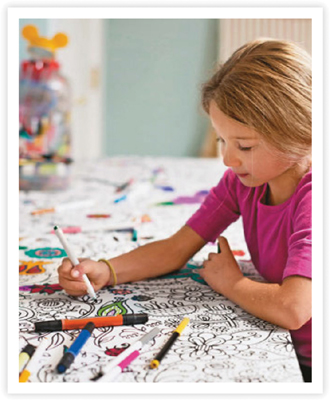
We love the idea of letting the kids (and the kids at heart) color on the walls, but for our photo shoot we decided to improvise a bit and adhered our paper to precut 2 × 6-foot (.6 × 1.8 m) wooden shelving boards from the hardware store (see right). And then we thought, let’s color on the furniture too, so we adhered another floral paper designed by Olivia Henry (house_of_henry on the site) to a long desk/arts-and-crafts table we made out of a door (this page).
When it comes time to print your paper, you can choose either our peel-and-stick wallpaper, which peels off easily when you are ready to take it down, or our water-activated paper, which is more permanent. You can color on either using colored markers, crayons, colored pencils, or pens.
MATERIALS & TOOLS
TO DESIGN THE WALLPAPER OR DESK WRAP
White paper
Black markers or pens
Peel-and-stick or water-activated wallpaper, in your preferred amount (see Step 3)
TO INSTALL PEEL-AND-STICK WALLPAPER
Printed wallpaper
Scissors
Pencil
Ruler and level
Burnishing tool (credit card or rubber squeegee)
Colored markers, crayons, or pens
TO INSTALL WATER-ACTIVATED WALLPAPER
Printed wallpaper
Scissors
Sponge
Wallpaper tub or trough
Drop cloth (optional)
Colored markers, crayons, or pens
designing the wallpaper
1 Create the design.
Draw your design on paper using a black marker or pen. Make a single repeating element or create a seamless repeat (this page) to fill the whole space. We show three different designs in the various photos for this project. Because wallpaper is typically meant to cover a large area, you might consider a larger repeat, say about 12 × 12 inches (30.5 × 30.5 cm), as long as your scanner bed is large enough. You are going to add color later by treating this design like a coloring book, so your artwork just needs to be black-and-white line drawings.
2 Scan your design.
You choose the settings for this design. Remember that you can scan your design at a higher resolution and enlarge it for your final pattern by scaling (this page). Or, you can scan and shrink it down by resizing (this page), depending on the kind of finished design you want to create. Note the difference in scale of the two designs in the photograph on the opposite page, for instance. See the Pixel Equation on this page if you need a reminder about the how the variables of pixels, resolution, and size work together.
Review the basic information on refining your artwork (this page). Clean up any flaws in the drawing with the Paintbrush tool (this page).
Save the file and upload it to Spoonflower (this page). Choose a swatch of wallpaper if you want to decorate just a small area of your wall—or print a whole roll! One standard roll that is 2 × 12 feet (.6 to 3.7 m) will cover 24 square feet (2.2 square meters).
installing the wallpaper
4 Prepare the surface and apply the wallpaper.
Clean the surface where you are planning to stick your wallpaper and let it dry thoroughly.
PEEL-AND-STICK. Use scissors to trim the wallpaper to your desired size, including an extra 3 to 4 inches (7.5 to 10 cm) in each direction. Draw a straight line on the back of the shelving board or door about 3 inches (7.5 cm) from the top; peel back 1 to 2 inches (2.5 to 5 cm) of the backing paper from the top of the wallpaper strip and place it on the line. Press it to hold in place. Peel away the backing paper as you wrap the wallpaper over the top of the shelving board or door and around to the front. Smooth in place, working from the center out. You can use the edge of a credit card or a rubber squeegee to burnish the paper to the surface and help gently push out any bubbles or wrinkles. Fold the extra wallpaper to the back of the board or door; this allows you to have extra coloring space on the edges of your board or door, too.
WATER-ACTIVATED ADHESIVE. Since this product must be submerged in water and needs to sit for several minutes before it is applied to the wall, you may want to protect the floor in your working area with a drop cloth. Trim the wallpaper to your chosen size with scissors; if you want to wrap the paper around the edges of your board or door as we did, cut extra as described in the peel-and-stick entry. Submerge the wallpaper in the tub or trough of water until it is wet and then remove the strip; now “book” the wallpaper by folding each end toward the middle of the strip with the pasted sides touching. Leave the paper for 3 to 5 minutes while the paste activates, then unfold one end only and smooth it onto your surface. Unfold the remaining end and smooth in place with the sponge.
CYNTHIA FRENETTE / BRITISH COLUMBIA, CANADA
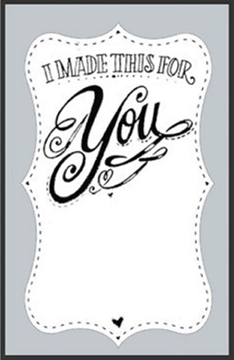
Graphic designer and illustrator Cynthia Frenette (known as cynthiafrenette on Spoonflower) hand-drew the lettering for this delightful label, then completed the design in a graphics program. She left a blank space with dotted lines to add a personal message after it’s printed, which makes it possible to use the same label design for more than one quilt. For another label idea, see this page.
MATERIALS & TOOLS
TO DESIGN THE FABRIC
Regular pencil
White colored pencil or crayon
Black construction paper
Scanner
Basic graphics program
1 swatch of basic cotton, poplin, or sateen, 8 × 8 inches (20 × 20 cm) (we used poplin)
TO ADD THE LABEL
Basic sewing tools (this page)
designing the fabric
1 Draw the label and add the lettering.
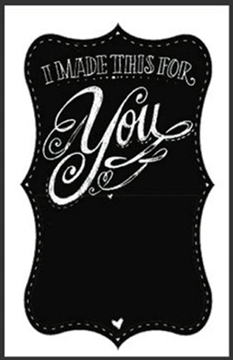
Sketch your label shape on black paper and cut it out; it should be about 4 × 7 inches (10 × 17.5 cm). (Don’t worry about the gray part of the design for now—that is added in Step 3.) Draw the letters “I Made This for You” or the message of your choice on the upper half of your label using the white colored pencil or crayon, referring to the photo opposite as a guide. Refine the lettering and add details and flourishes (see this page for suggestions about drawing letters). To recreate Cynthia’s chalkboard, trace over the letters in your message to make them more bold or fill them in with color; both techniques were used in this drawing.
2 Scan the drawing.
Place your design face down on the scanner and cover it with a sheet of white paper. Scan it at a 1:1 ratio or 150 dpi.
3 Create a new canvas.
Review the basic information on refining your artwork (this page). Create a new canvas that is 8 × 8 inches (20 × 20 cm) / 1200 × 1200 pixels. “Place” or “Insert” your scanned image and use the Magic Wand to select the background. Choose a color to match your quilt (Cynthia chose blue) and use the Paint Bucket to fill the background area with color. Remember you can use the Color Map (this page) to help you choose a color by matching a chip to your quilt.
4 Add the message area.
Use the Lasso tool to create the message area to add the personal information (shown in gray in this project). To do so, carefully trace a shape that mirrors the outside edge of the design; you could also use the Marquee Select tool to select a simple rectangle. Once it is selected, choose a color and fill it with the Paint Bucket.
Add lines to write your message with the Paintbrush tool. Choose a small brush with a rough edge from the Brushes palette to match the “chalkboard” style of Cynthia’s design (Figure 1).
5 Save, upload, and print.
Save the image as a .jpg and upload to Spoonflower (this page). Choose a centered repeat (this page) and a swatch of poplin; although you can also use basic cotton or sateen, poplin is easiest to write on. Remember that you can adjust the size of your design once uploaded (this page), should you wish to do so.
6 Add the label.
Cut out the label, leaving ¼ inch (6 mm) on all sides. Turn under ¼ inch (6 mm) on all sides and press. Stitch the label by hand to a corner or edge of the back of your quilt.
FIGURE 2 To create the chalkboard look without black paper, first draw your design on white paper with a black pencil or crayon and scan.
FIGURE 3 Next, open your artwork in your graphics program and find the “Invert” command to switch the black and white areas of the design.
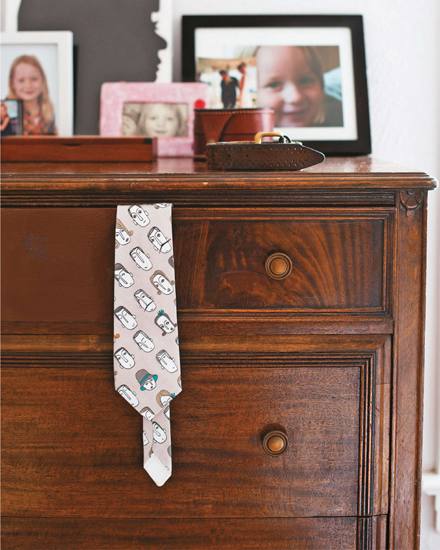
SAMANTHA COTTERILL / NISKAYUNA, NY
Although she calls upstate New York home now, Samantha Cotterill (known as mummysam on Spoonflower) is originally from England. She acknowledges the European influence in her work, particularly her affinity for drawing what she calls “grumpy old men.” But mid-century illustrations, especially those done in portrait style, have a warm place in her heart. She loves this pattern because each character appears to have come straight from a classic children’s book. Samantha drew these faces by hand using a fine-point pen and then scanned her artwork to create these intriguing repeats.
MATERIALS & TOOLS
TO DESIGN THE FABRIC
Pencil or pen
White paper
Scanner
1 yard (.9 m) of poplin, sateen, or silky faille (we used poplin for its crisp body)
TO MAKE THE NECKTIE
Printed fabric
Necktie pattern (this page)
1 yard (.9 m) woven wool flannel for interlining
Basic sewing kit (this page)
designing the fabric
1 Create the design.
This design is made of a number of smaller elements—lots of different faces. There are several factors to consider before you create your drawing:
+ Remember that a necktie is only about 4 inches (10 cm) wide, so make sure the scale of your design suits your goal for the project: If your design is drawn at a small scale, you will see many motifs; if it is at a larger scale, you may only see parts of each design element.
+ Keep the size of your scanner in mind when choosing a repeat size, so your drawing will fit on the scanner bed.
+ This fabric is cut on the bias or diagonal to make the tie, so keep that in mind when creating the art. Read more about bias on this page.
Make a grid on the paper with faint pencil lines to mark your repeat design space; for example, if you want to draw 8 different faces in two rows, make a grid with four spaces for drawing in each of the two rows. Draw in some light guidelines to help line up elements within the design, marking height or width of each separate drawing, for instance. Draw the individual elements that make up your complete design, using pencil or pen. Although you can add some color to your drawing now, see Step 3 if you prefer to add color after you’ve saved your image and opened it in your graphics program.
Remember that you can scan your design at a higher resolution and enlarge it for your final pattern (this page). Or, you can scan and shrink it down by resizing (this page), depending on the kind of finished design you want to create. You choose the settings for this design.
3 Clean up, add color, and upload.
Review the basic information on refining your artwork (this page). Clean up any flaws in the drawing with the Paintbrush tool. Then use the Magic Wand or Lasso tools (this page) to select the elements or areas you want to color and fill each one using the Paint Bucket; paint with the Paintbrush instead for a more hand-drawn look.
Save the file and upload it to Spoonflower (this page). Choose any repeat layout you like (this page).
making the necktie
4 Trace and assemble the pattern.
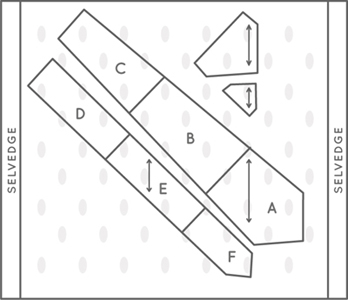
Copy and enlarge the pattern pieces on this page and tape them together as needed, using the diamond-shaped markings to align the pieces. You will have a total of five pattern pieces when they are taped together: tie front (made from pieces A, B, C), tie back (made from pieces D, E, F), tie interlining (indicated with a dotted line on A–F), front lining, and back lining.
5 Cut the pieces.
All of the pieces for the tie are cut on the bias (or diagonal grain of the fabric). Look for the grainline arrows on the pattern pieces and align them with the lengthwise grain of the fabric as seen in Figure 1.
Cut one each of the tie front and back, tie front lining, and tie back lining from your printed fabric.
Cut one tie interlining (indicated by the dotted line on the pattern pieces) from wool flannel.
Match the tie front and back centers with right sides together. Stitch using a ¼-inch (6 mm) seam allowance. Press the seam allowance open.
7 Add the lining.
Match the lining front to the tie with right sides together. Stitch the bottom edges only, using a ½-inch (1.2 cm) seam allowance. Trim the corner and turn right side out. Gently push out the tip with a knitting needle or chopstick and press well. Repeat for the tie back lining.
To insert the interlining, lay the tie flat on a table. Insert the tie interlining into the tips of the tie between the tie fabric and lining and pin in place at each tip. Center the interlining on the tie fabric. Fold each raw edge of the tie fabric toward the center, following the edge of the interlining piece as a guide. The raw edges will overlap at the center. Pin generously.
8 Hand-stitch to finish.
To finish the tie, turn under ¼ inch (6 mm) on the raw edge on the top to form the center back seam. Use a slipstitch to sew the seam by hand. Stitch through the back layers of fabric only so the stitches are not visible on the front of the tie.
Hint: Do not press a crease into the folds at the edges of the tie. Let the fabric “roll” around the edge of the interlining without a sharp crease; the tie will hang better and have a more professional-looking finish.
BECKA RAHN / MINNEAPOLIS, MN
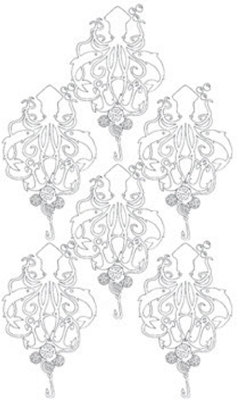
Damask is an age-old reversible pattern; traditionally, it involves an ornate floral motif woven into the fabric with a monochromatic color scheme. For a modern take on damask, Becka (known as beckarahn on our site) drew a diamond-shaped squid motif on paper with a fine-tipped Sharpie, scanned her artwork, and made a seamless repeat in her graphics program using a very simple blue and white colorway. In Chapter 5, we showed you how to make a seamless repeating tile on paper. In Becka’s project, we show you one way to do it digitally.
MATERIALS & TOOLS
TO DESIGN THE FABRIC
Pencil and fine-tipped Sharpie
White paper
Scanner
5 yards (4.6 m) of linen-cotton canvas, silky faille, eco-canvas, or sateen (we used linen-cotton canvas)
TO MAKE THE SHOWER CURTAIN
Printed fabric
2¼ yards (2.25 m) of 2-inch (5 cm) wide grosgrain ribbon in a coordinating color
Grommets and grommet setting tool
Basic sewing tools (this page)
designing the fabric
1 Create your artwork.
On white paper, use the pencil to lightly sketch a diamond motif to serve as a framework for your damask design. Your diamond motif should be the same size as your drawing; the artwork used in this project was about 8 inches (20 cm) high. Draw your damask pattern with pencil, using the diamond-shaped sketch to help you place the elements. Trace over the lines with the Sharpie. To get the “damask look,” think about using bold curving shapes and smooth thick lines.
2 Scan and touch up your artwork.
Review the basic information on refining artwork (this page). This design was scanned at a 1:1 ratio (meaning full size, 8 inches [20 cm]) at 150 dpi. (Refer to the Scaling Formula on this page, if necessary.) Open the image in your graphics program and use the Paintbrush tool to clean smudges or stray pencil marks.
3 Create a seamless pattern.
For this design, Becka wanted the squid motifs to be very close to one another, with little space separating them, so she made a seamless tile digitally. To do this, make a new canvas in your graphics program that is about four times larger than your motif so you have plenty of space to work. Using the Lasso tool (this page), select your image, tracing very close to the edges of the design. Copy that selection and then paste it into your new canvas, using the Move tool (this page) to put it in the top left corner of the canvas. Paste another copy of the design and move it to the right, aligning the top and bottom edges with your first copy.
Continue to copy and paste until you have 6 copies of your design in 3 staggered lines as in Figure 1 on the next page; one in each corner and one in the center. Carefully align them so they are close together, fitting in like puzzle pieces with tops and edges aligned. Your graphics program may have an option to turn on rulers or a grid to help you line things up (this page).
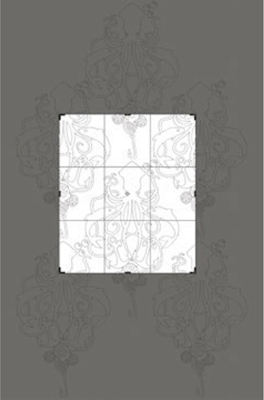
Next, crop the tile. Look for a distinctive element in your design (a guide element) to help you place the crop. For this design, we used the left eyeball of the squid as the guide element.
Place the four corners of the crop box at exactly the same place on each of the outer four designs in relation to the guide element. Here that means each corner of the crop box is at the center of the squid’s left eyeball (Figure 2). After cropping, you have a tile that should repeat seamlessly. You can test the repeat several ways:
+ Open a new canvas and copy and paste this tile, placing the tiles in a grid.
+ Upload and preview it at Spoonflower (this page).
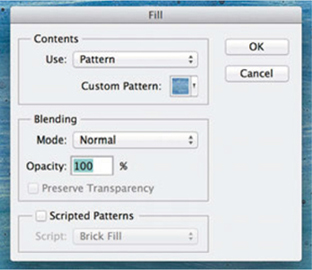
+ Use the Photoshop Pattern tool (see below).
Check the edges of your design carefully to confirm that the lines are smooth. It is easy to be off by a pixel or two, so you might need to undo and re-crop to get it exactly lined up. This can take a little trial and error.
4 Add color and upload.
Use the Magic Wand tool to select the areas of your design, beginning with the Sharpie outline. Fill it with your preferred color to cover the outline, then fill in the rest of your design with the same color. Select the background color and fill using the Paint Bucket tool for a simple two-color design. Upload your design to Spoonflower (this page) and choose a basic layout.
FIGURE 1 To create a seamless pattern, first place 6 copies of your design in three staggered lines, creating a tiny section of what you want the repeat to look like.
FIGURE 2 Next place the 4 corners of the crop box at exactly the same spot on each of the outer 4 designs.
FIGURE 3 The Pattern Fill tool in Photoshop allows you to define a repeat tile and then use it to fill any space.
5 Cut the curtain panels.
Cut two pieces that are 78 inches (198 cm) long and the full width of the fabric. Trim away the selvedges. Trim to your desired width: determine the finished width, add 2 inches (5 cm) for seam allowances, divide that number in half, and then cut pieces to that measurement.
6 Connect the two lengths of fabric.
Use a flat-felled seam to create a neat finished seam on the inside of the curtain. Place the long sides of the two pieces of fabric together with right sides facing, stitch with a ½ inch (1.2 cm) seam allowance, and press to one side. Trim the lower seam allowance to ¼ inch (6 mm), turn under ¼ inch (6 mm) on the remaining seam allowance, and fold it over the trimmed seam allowance. Stitch close to the fold (see Figure 4).
7 Add the top ribbon facing.
Along the top edge of the curtain, measure and press a ½-inch (1.2 cm) seam allowance toward the inside of the curtain. Adding the grosgrain ribbon to the top edge creates stability and reinforcement. Match the edge of the ribbon to the folded edge of the fabric and pin in place. Stitch close to both long edges of the ribbon.
8 Hem the edges and bottom.
Turn under a ¼-inch (6 mm) seam allowance on each side edge of the curtain and press. Turn in another ¼ inch (6 mm), folding the raw edge to the inside. Press and stitch close to the inner folded edge.
Press under ½ inch (1.2 cm) at the bottom of the curtain. Fold under an additional 5 inches (12 cm), press, and stitch close to the inner fold.
9 Add grommets.
Follow the instructions on the package to install the grommets along the top edge of the curtain. Space the grommets about 6 to 8 inches (15 to 20 cm) apart (12 to 14 total grommets) and center them in the ribbon facing. If using a plastic liner inside the curtain, you may want to use it to mark your grommet placement or to determine how many you need.