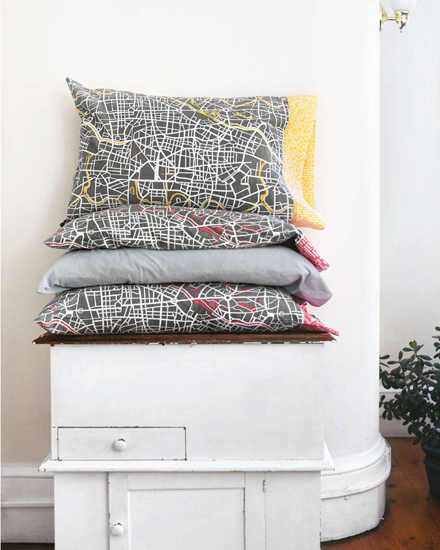
A map of a favorite city inspired these pillowcases.
NO REPEATS NECESSARY
SKILLS LEARNED IN THIS CHAPTER
+ Creating Cut-and-Sew and Whole Cloth Designs
+ Using Rulers, Grids, and Guidelines
Many of the projects we’ve presented so far have been based on repeat patterns. But you can also create patterns that don’t repeat or that only repeat to fill part of a space. This technique is called “whole cloth” design or “whole surface” design, because your design takes up the entirety of what you are printing, without repeating.
These designs often are created as separate elements and then combined together into one file. The finished design could fit on a fat quarter … or it could fit on 2 yards (2 m) of fabric. It’s your choice!
You may not have noticed at the time, but the Flutter Baby Quilt (this page) is an example of a whole cloth design, because the entire yard (.9 m) of fabric is filled with one large image. You also may have heard of cut-and-sew projects, where all of the pattern pieces for a project such as a soft toy are grouped together on a single piece of fabric. Then they are printed, cut out, and sewn.
There is so much you can do with whole surface or cut-and-sew designs. Projects we commonly see at Spoonflower include:
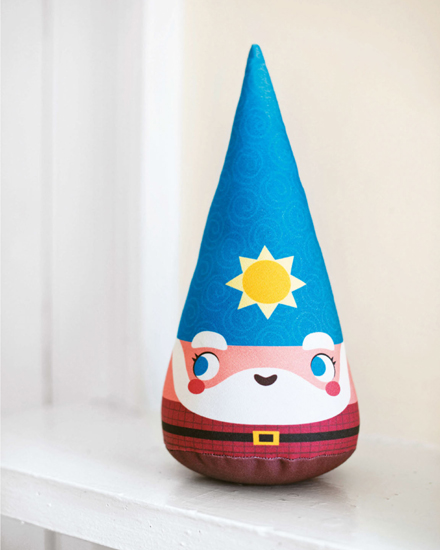
+ Stuffed toys and dolls, like the Gnome Stuffed Toy on this page
+ Clothing, such as skirts; kids’ shirts or dresses; or accessories such as bags and purses with relatively few pattern pieces—the Stacked Skeins Skirt on this page is an example of a cut-and-sew garment
+ Quilt tops (called “cheater quilts” because they mimic the look of real patchwork)
The first thing to think about when you are creating a whole surface design is what surface you want to fill, of course. If you need a refresher course on how to choose a surface, flip back to this page. Only when you know the size of the surface can you set up your file to create a design that fits exactly on it.
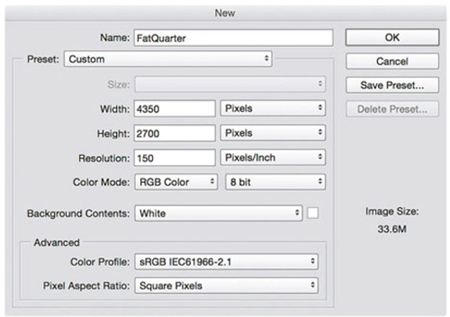
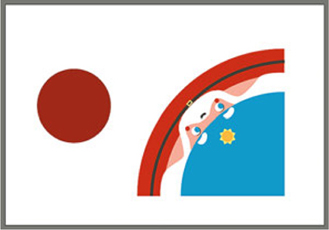
Let’s use the cut-and-sew Gnome Stuffed Toy on this page as an example. Let’s pretend you are designing it and you would like to fit the pattern pieces on a fat quarter of twill that is 29 × 18 inches (73.7 × 46 cm). Your new canvas for a fat quarter will need to be 4350 × 2700 pixels (Figure 1), based on the Pixel Equation (this page):
29 INCHES X 150 DPI = 4350 PIXELS
18 INCHES X 150 DPI = 2700 PIXELS
Now you can lay out all of the pieces to see if they fit on the digital canvas and if they do, you know that they will fit on your printed surface. If they don’t fit, then you know you need to revise the size or scale of your design.
FIGURE 1 To create a whole surface design, first you need to set up a file that matches the size of your desired surface. The file here is set up for a fat quarter of our twill, which is 29 × 18 inches (73.7 × 46 cm) / 4350 × 2700 pixels at 150 dpi.
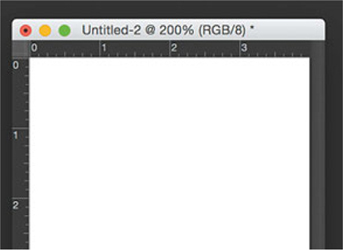
When you are working with a specific-size design or a cut-and-sew project with multiple pattern pieces, it’s helpful to be able to tell at a glance how large a piece is or how much space you have between the pieces. Since it’s very hard to determine spacing and scale by looking at your computer screen, many programs have an option that allows you to view rulers and/or a grid in the design space.
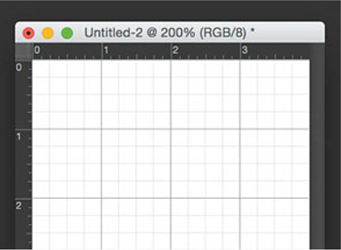
Rulers are visible along the sides of your canvas, much like the rulers you see when you upload your designs to Spoonflower. The option to turn on rulers is generally under the “View” menu (Figure 2). You can also turn on a grid, a transparent set of lines (like graph paper) that appear under your image while you work. You can usually set the distance of the grid markings to your preferred scale (i.e., 1 inch [2.5 cm] apart or ¼ inch [6 mm] apart). Look for a menu option that says “Show Grid” to turn it on (Figure 3).
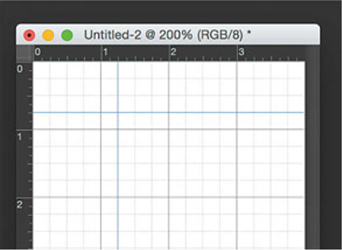
One additional function we use in this chapter is the guideline, a highlighted line in your canvas that helps you line up elements easily or place points to create a shape to specific dimensions. The guideline function is only available in Adobe Photoshop or Illustrator, and it does not have an icon or symbol. (You can use a ruler or grid in another program to help you align elements.) To make a guideline in either Photoshop or Illustrator, click inside the top or left ruler area and drag into the page. You will see a colored guideline appear (Figure 4). To move a guideline after you have placed it, switch to the Select tool, click on the guideline, and drag it.
FIGURE 3 The grid also helps to judge spacing and scale; you can usually customize the distance of the grid markings.
JOCELAN THIESSEN / VANCOUVER, BRITISH COLUMBIA
A Vancouver-based storyboard artist for cartoons, Jocelan Thiessen (cutesypoo on Spoonflower) loves making 3-D representations of her sketches. For this gnome, she wanted something modern and simple: the easiest toy possible without compromising appeal. It was her first foray into using Spoonflower, and she was instantly hooked! Her husband, Jayson, pitched in to help take this charming fellow from doodle to doll by re-creating Jocelan’s hand-drawn sketch in a vector program.
MATERIALS & TOOLS
TO DESIGN THE FABRIC
Paper and drawing media of your choice and/or vector-based graphics program
1 fat quarter of twill, 29 × 18 inches (73.7 × 46 cm) (see Note for other fabric choices)
TO MAKE THE GNOME
Printed fabric
Basic sewing tools (this page)
Chopstick, knitting needle, or point turner
Polyfill or other stuffing
Plastic bean-bag pellets (optional)
Note: While sateen, canvas, basic cotton, and even knit fabrics could be appropriate for this project, each of them has a different width, and thus their fat quarters are different sizes. Be sure to set up your canvas for the correct size if you use a fabric other than twill, and note the information about scaling a design in Step 3.
designing the fabric
1 Create a new canvas and turn on rulers.
Create a new canvas that is sized for a fat quarter of your chosen fabric. This toy is made from heavy twill, so Jocelan created a file that is 29 × 18 inches (73.7 × 46 cm) / 4350 × 2700 pixels. Turn on the grid view (if available) and rulers to help place the pieces you create in Step 2, especially if you want to place them along the straight grain of the fabric—more about this in Step 3.
2 Create the parts of your toy.
Review the information about whole cloth and cut-and-sew designs on this page. Using the shapes or Pen tool in your program, make two circles: a circle for the base that is 6 inches (15 cm) in diameter and a large circle that is 24 inches (61 cm) in diameter. With the large 24-inch circle, draw a cone for the body that is a quarter of a circle. Think of it like a big piece of pie! Your “piece of pie” will have 12-inch (30.5 cm) straight sides when cut from a larger circle.
Now add color and design to the two pattern pieces. Make the base a solid color and draw clothing and facial features onto the cone-shaped body piece (or create your own version of this simple toy—you could make yours more like an animal than a human or you could just stick with this shape and add a less literal, more decorative design, for example). For the body, use some of the shapes available in your graphics program to create various parts, such as a circle or ellipse shape for the eyes and a rectangle for the belt buckle (use a Line tool to make the belt itself). You could also use the Pen tool to make all the shapes, including additional facial features. Fill each area with color; remember that you can layer shapes and move them forward or backward as needed to create backgrounds, such as the swirls for the hat and the checks for the clothing.
Use the grids/rulers to double-check the size of each piece to make sure you sized your pieces as instructed in Step 1 and have enough room for seam allowances. Remember that if you decide to scale a piece up or down, you will want to make the same change to each of the pieces so that they will fit together when you are ready to sew. Arrange each piece leaving at least a ¼-inch (6 mm) seam allowance around all sides of the shape moving them as needed (Figure 1). You can rotate pieces to fit them in the space, but think about the fabric grain (this page) as you do this. The rulers or guides can give you an easy reference to check to see if your pieces are aligned properly, since the lines can represent the lengthwise or crosswise grain of the fabric.
4 Save and upload.
Save the file and upload it to Spoonflower (this page). Select a fat quarter of your chosen fabric and a centered repeat.
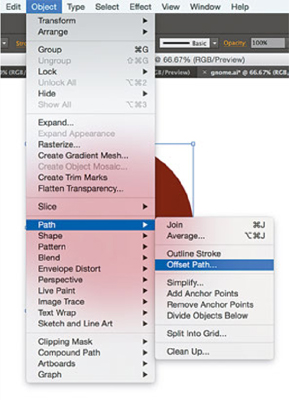
FIGURE 2 To add a seam allowance in Illustrator, first select the entire vector shape, then choose “Path” and “Offset Path” in the Object menu.
5 Cut out the pieces.
Cut out the pieces of your gnome. Make sure you include ¼ inch (6 mm) around all sides for the seam allowance.
6 Pin and stitch the body.
Fold the body in half with right sides together, matching the long straight sides. Pin and stitch together, leaving a 2-inch (5 cm) opening in the center to use for turning the toy right side out. Leave the body inside-out for now.
7 Add the base.
Pin the base to the bottom edge of the body with the right sides facing. Stitch around the outside edge using a ¼-inch (6 mm) seam allowance.
8 Clip, turn, and stuff.
Clip the curves around the base. Trim the seam allowance slightly at the point of the cone. Turn your gnome right side out. Stuff firmly, starting at the tip of the cone and working down. Use a chopstick or knitting needle to help stuff the small space at the tip. As you get to the bottom of the toy, you can add some bean-bag pellets to give your toy some weight to stand up on its own. Slipstitch the opening.
STACY IEST HSU / SAN CARLOS, CA
Being a mom to three young kids is a full-time job for Stacy Iest Hsu, who started designing on Spoonflower (as stacyiesthsu) after her own mother told her about it. Stacy’s first design was for a contest about outer space designs, and that experience was all she needed to get hooked (that, and her Wacom tablet).
Stacy designed this Berlin map–inspired fabric to celebrate her love for exploring new countries. Her passport hasn’t seen much activity lately, but she suspects new adventures are on the horizon, with three new explorers ready to go.
MATERIALS & TOOLS
TO DESIGN THE FABRIC
A vector design program or digital drawing tablet
1 yard (.9 m) of basic cotton or sateen (we used basic cotton)
TO MAKE THE PILLOWCASE
Printed fabric
Basic sewing tools (this page)
designing the fabric
1 Create the pillowcase repeat.
Review the information about whole cloth and cut-and-sew designs on this page. This pillowcase has two different repeat patterns, a main design for the body of the pillowcase and a coordinate for the hem.
Make a map design by following the same process we used for the Pet Silhouette Hankies (this page), tracing over an actual map (rather than a photo of your pet). Get a map of your favorite place by scanning a paper copy, finding an image online (Google Maps is a good source) and downloading it, or by taking a screenshot. Place that image into your design file, trace over it using vector lines, and then delete the actual map layer when you are done. Some additional tips:
+ Don’t try to trace every road and detail, but look for the main streets and those that might make interesting or distinctive shapes.
+ It is easier to use maps that have a basic grid shape with some interesting road patterns. Maps with a lot of curved roads can sometimes be challenging because it is hard to match the repeat nicely.
+ Add rivers, lakes, or other features in a contrasting color.
If you want to make a seamless repeat for this design (which we have to admit is a little tricky), once you have laid out your main features, crop to create your repeat tile (this page). To make the roads, rivers, or other features that meet at the edges of the repeat match up, check that the line ending at the right edge of the design has a line to match it starting at the left edge. If they don’t match up, change the lines you traced by altering their pin points or curves (this page). This may take a little patience and some trial and error as you check the crop to make sure it works. Review the information about seamless repeats on this page.
2 Create the hem repeat.
The coordinating pattern for the hem section of the pillowcase can be anything that complements the design. (See the sidebar at right for some hints about creating coordinates.) For this map design, Stacy created an eccentric polka dot from little circles, which reminds us of lights in buildings at night, and made a chevron pattern from thin slanted rectangles, which complements the lines in the map and might bring to mind traffic signals or street signs. She matched the colors in the hem design to those used in the body design. As we explained in “Making a Repeat Pattern in Photoshop” on this page, you can save these patterns and use them to fill the shapes you make in Step 3.
Note: The layout of this design is perpendicular to the grain of the fabric. In other words, the repeats should be rotated 90° so the designs are oriented with the length of the fabric when printed (this page).
3 Lay out the pillowcase.
Create a new file that is the size of the whole cloth you want to print. For this pillowcase, you want 1 yard (.9 m) of fabric 42 × 36 inches (107 × 91 cm) / 6300 × 5400 pixels. Turn on the rulers/grid view.
The pillowcase design is made up of three basic rectangles side by side (Figure 1).
FIGURE 1 The pillowcase file is divided into three sections, shown here top to bottom: hem allowance, hem, and body.
+ For the hem allowance, make a rectangle that is 42 × ½ inches (107 × 1.2 cm). Fill it with a solid color; this area won’t show after the pillowcase is sewn.
+ For the hem, make a rectangle that is 42 × 8 inches (107 × 20 cm). Fill it with the coordinating repeat pattern. Use a pattern fill as referenced in Step 2 or simply copy and paste the tile to fill the space. When you sew the pillowcase, this hem section will be folded in half, so 4 inches (10 cm) of this rectangle will show on the outside of the pillowcase and 4 inches (10 cm) will be on the inside.
+ For the body of the pillowcase, make a rectangle that is 42 × 26½ inches (107 × 67.3 cm). Fill this rectangle with the main pillowcase repeat pattern. The body will be folded in half lengthwise when it is stitched. There will be 1 inch (2.5 cm) of unprinted space at the edge of your design.
4 Save and upload.
Save the file and upload it to Spoonflower (this page). Choose a centered repeat and 1 yard (.9 m) of fabric.
making the pillowcase
5 Trim, press, and hem.
Trim away the selvedges and the excess inch (2.5 cm) of fabric. Place the fabric wrong side up. Turn the hem allowance ½ inch (1.2 cm) toward the inside and press. Fold the hem in half, 4 inches (10 cm) toward the inside of the fabric, and press. Pin the hem in place. Stitch close to the inside fold.
6 Make a French seam.
Fold the pillowcase in half lengthwise, wrong sides together. Pin and stitch the long sides using a ¼-inch (6 mm) seam allowance. Trim the seam allowance slightly. Turn inside out, so the right sides are together, and press. Stitch again with a ¼ inch (6 mm) seam allowance, encasing the raw edges inside the new seam allowance.
7 Stitch the end.
Stitch the end of the pillowcase, using a ½ inch (1.2 cm) seam allowance. Turn right side out and press.
BECKA RAHN / MINNEAPOLIS, MN
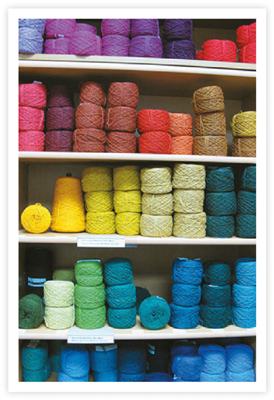
Becka Rahn loves to design fabric for clothing (check out her Infinity Scarf on this page), because of the way she can deliberately place patterns for maximum effect. She especially likes to manipulate photos so they become more abstract and textural, like this skirt fabric she designed using a photo of the much-admired wall-of-yarn at the Weavers Guild of Minnesota. Her collection of photography is her favorite digital design tool because it inspires so many of her ideas.
The grand finale for our book is divided into three sections. The design is in two parts: first, you will learn to draft a simple A-line skirt to fit your measurements, and second, you will manipulate the photo to create the fabric design. The third part is simple cut-and-sew instructions to make the skirt. You will get to use many of the skills learned throughout the book, as well as try out some new tools in Adobe Photoshop and Illustrator; because of the complex nature of this project, you can only create it using these graphics programs in combination.
Note: Because the pieces for this skirt are designed for an exact fit, you must consider your fabric’s expected rate of shrinkage when you are creating this design; shrinkage information is provided on the website. To accommodate the widest range of fabrics and to give you more freedom to choose which type of fabric you prefer—crisp canvas or cotton with more structure or silky faille with a lot of drape—we’ve written basic instructions that you can tailor to your fabric. If you choose linen-cotton canvas or sateen, add 1 inch (2.5 cm) to your length measurement and an additional ¼ inch (6 mm) to your seam allowances when you create your design to account for shrinkage; you can fine-tune your fit as you sew. Silky faille will not shrink, so you can follow the instructions exactly as presented here.
MATERIALS & TOOLS
TO DRAFT THE PATTERN
Adobe Illustrator
Flexible measuring tape
A few pins or pieces of masking tape
TO DESIGN THE FABRIC
Adobe Photoshop
A high-quality photograph (see sidebar on this page)
1 to 2 yards (.9 to 2 m) of linen-cotton canvas, silky faille, sateen (see Note—Becka used linen-cotton canvas)
TO MAKE THE SKIRT
Printed fabric
7- or 9-inch (17.5 or 23 cm) zipper
Seam ripper
1 package of single-fold ½-inch (1.2 cm) bias tape in a matching or contrasting color
1 small hook-and-eye closure
Basic sewing tools (this page)
drafting the skirt pattern
1 Take your measurements.
You need four basic measurements to make an A-line skirt: waist, hips, rise, and length; see below for more details. The more accurately you measure, the better the fit. Don’t measure over your regular clothes. Put on something close fitting such as a leotard and tights and get a friend to help so you can measure accurately. You’ll be marking spots directly on these garments.
WAIST: Measure where you want the finished waistline to fall, which is not necessarily at your natural waist. Pull the measuring tape snug but not tight. Write down this measurement to the closest ⅛ inch (3 mm). Use a piece of masking tape or a pin to mark on your garment where you measured this waistline height. You will need this mark for a later step.
HIPS: Measure at the widest part of your bum. Mark this hipline height on your garment with another piece of masking tape or a pin.
RISE: This is the distance between your hips and your waist, which is the measurement in inches (cm) between the two marked spots.
LENGTH: Measure the total length you want the skirt to be, from the waistline to the hem. See Note on this page about shrinkage.
Now you need to do a little math to transform these measurements into numbers to use for patternmaking.
+ WAIST (W): You will probably want to add some ease to the waistline of your pattern—ease is the amount of extra room you like in the fit of your clothes. For a waistline, you usually want to add up to ½ inch (1.2 cm) to your overall measurement. Then divide this total number by 4, because you will add the ease incrementally to both front and back, right and left sides. (Waist + ease) ÷ 4 = W
+ HIPS (H): You will need to add ease to the hips measurement so that you can move and sit down in your skirt comfortably. Add about 1 to 3 inches (2.5 to 7.5 cm) to the hip measurement. Then divide this total number by 4, as was done for the waist measurement. (Hips + ease) ÷ 4 = H
+ Rise (R) and Length (D) measurements are used as is and do not need adjustment.
2 Create a new canvas.
Review the information about whole cloth and cut-and-sew designs on this page. Make a new canvas in Adobe Illustrator. Create a document that is at least 36 × 36 inches (91 × 91 cm) with plenty of space to work, as you will draft the skirt to scale.
Turn on the rulers and grid view. Adjust the units and spacing on both tools to ¼ inch (6 mm) increments by going to the “Illustrator” menu item, choosing “Preferences,” and then choosing “Units.” Then go to the “Illustrator” menu item, choose “Preferences,” and then choose “Grids & Guides.”
Remember, these grids and guides will not show up in the final project, they are just to help draft the pattern.
3 Set up guidelines.
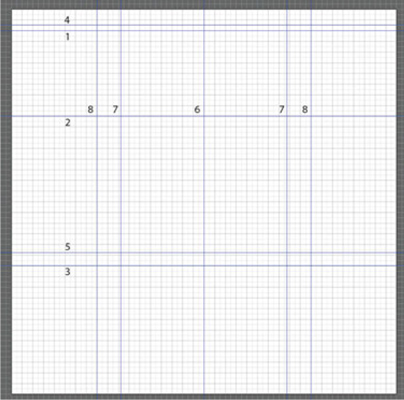
Refer to the measurements you took earlier. Each is labeled W, H, R, and D. Refer to Figure 1 as you work through Step 3.
First, lay out the horizontal guidelines (this page).
+ Place one guideline at 2 inches (5 cm) from the top of canvas. (1)
+ Place one guideline that is (R) inches (cm) below line 1. (2)
+ Place one more line that is (D) inches (cm) below line 1. (3)
+ Put another guideline ½ inch (1.2 cm) above line 1. (4)
+ Put another guideline 1¼ inches (3.2 cm) above line 3. (5)
Now, lay out the vertical guidelines.
+ Place a guideline in the center of the canvas. (6)
+ Place a guideline that is (W) inches (cm) to the left of the centerline. Add another that is (W) inches (cm) to the right of the centerline. (7)
+ Drop a guideline that is (H) inches (cm) to the left of the centerline. Add another that is (H) inches (cm) to the right of the centerline. (8)
Once the guidelines are inserted, lock them in place so you don’t accidentally move them around as you work on the rest of the design. Go to the “View” menu item, choose “Guides,” and then choose “Lock Guides.”
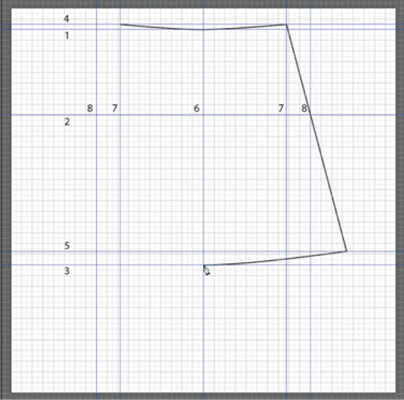
4 Draw the skirt shape.
See Figures 2 and 3 to make the skirt shape. Start at the top left and continue clockwise around the shape beginning with the waistband curve. At the top left click point W (intersection of lines 4 and 7). Continue the line by clicking the center point (where lines 1 and 6 cross) and dragging to make a curved line. Then click at point W on the right side (the intersection of lines 4 and 7). Don’t worry if your curve is not quite symmetrical as you can go back with the Direct Select tool and adjust it later. This is the waistline.
FIGURE 1 Use the Guideline function to place eight guidelines based on your measurements to help you to accurately draft the skirt pattern.
FIGURE 2 Starting at top left of waistband, use the Pen tool to place the points and curves to form the waistband, sides, and hem.
FIGURE 3 Use the Direct Select tool and handles to adjust the curves at the waist and hem so they are smooth and symmetrical.
From point W (intersection of lines 4 and 7) click to create a straight line that crosses point H (intersection of lines 2 and 8) and ends at line 5. To make a straight line, click to create the end point, but don’t drag to pull out the handles, just click to make the other end of the line.
Continue the line to draw the curve at the hem by clicking back to the bottom center point (intersection of lines 3 and 6) and dragging to form the curve. Then click to place the lower left corner of the skirt shape. You will need to approximate the placement of this point, making it symmetrical with the right side and go back to adjust later. Finally, close the shape by clicking again to make a straight line ending at the starting point at the top left.
5 Adjust the curves.
Use the Direct Select tool to go back and adjust the curves: make sure the curves at the waist and hem are symmetrical and that they form smooth curves from the sides to the center without bulging in or out; adjust the position of the lower corners so that the side seamlines are each crossing point H (intersection of lines 2 and 8) and ending at line 5.
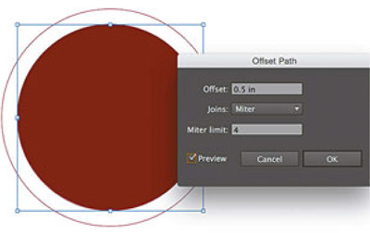
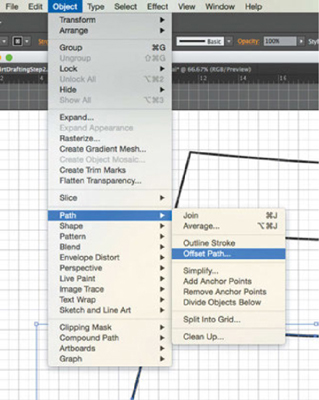
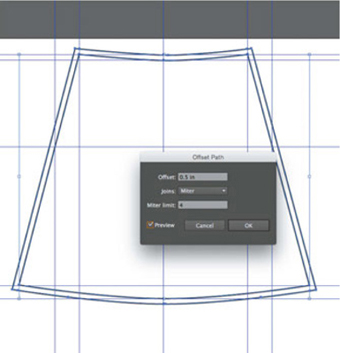
See Note about shrinkage on this page before adding seam allowances. Use the Select tool (this page) to click and select your entire shape. Go to the “Object” menu item and choose “Path,” then “Offset Path.” In the box labeled “Offset,” type in “.5 in” to add a ½-inch (1.2 cm) seam allowance and click OK. A second shape will appear that is ½-inch (1.2 cm) bigger on all sides than the original skirt shape. You can now select and delete that original smaller shape (Figures 4 and 5).
FIGURE 5 In the Offset Path dialog box, enter the seam allowance amount (1/2 inch [1.2 cm]) to create a new shape that is 1/2 inch (1.2 cm) larger on all sides.
7 Make the waistband facing.
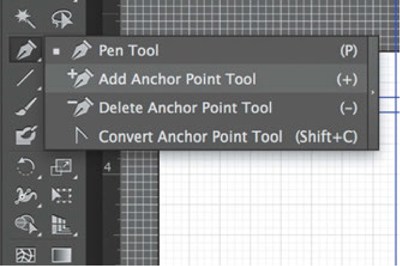
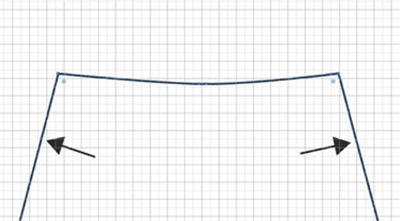
In the toolbar (the collection of available tools), click and hold the Pen tool icon. A menu will pop up with options. Choose the Add Anchor Point tool, which looks like a pen with a + next to it (Figure 6). Click on each side seamline to add an anchor point about 3½ inches (8.9 cm) down the side (Figure 7).
FIGURE 6 To draw the facing, add a couple of extra points to the side seams using the Add Anchor Point tool (a variation on the Pen tool).
FIGURE 7 The arrows show the placement of the two new points, which are about 31/2 inches (8.9 cm) from the waistline.
Switch to the Direct Select tool, and hold down the Shift key and click while you select the following points: the two new side seam points you just added and the other points along the top edge of the waistband. Copy and paste this selection to make a duplicate of the top edge of the skirt. Switch back to the Pen tool and connect the bottom edges of the waistband facing by clicking the points and adjusting the curve (Figure 8).
FIGURE 8 To make a facing that exactly matches the top of the skirt, copy and paste the points that form the top of the skirt. Connect the bottom points and adjust the curve.
It is a good idea to print this pattern on paper and make a test skirt to adjust any fit issues before you complete your design. You can go back to this file and adjust the measurements as needed. Either print the pattern at home on multiple pieces of paper and tape them together, or see if your local copy shop has a large-format printer and can print for you if you send them a .pdf file or take it to them on a flash drive.
Use some muslin or inexpensive fabric and follow the sewing instructions that follow to baste together the skirt and try it on to make sure you like the fit. Remember, once you have this part of the design finished, you will have a skirt pattern you can use over and over with different surface designs. It is worth the time at this step to get the pattern right!
9 Create a solid shape and save.
Once you have finalized the fit of your pattern, switch to the Select tool. Select and fill the skirt and facing shapes with black and make the outline blank, which is shown with a red line through the box. Save the file (Figure 9).
FIGURE 9 To complete the pattern pieces, fill the skirt and facing shapes with black with no outline.
Choosing a Photo for Your Skirt
Making a great manipulated photo design is all about seeing the potential in a photograph. It doesn’t need to be a technically “great” photograph because you are using it as a tool to create a piece of art. (Of course, you can also use a photo just as it is, without any manipulation, but exploring the options can lead to some intriguing results.) Here are some tips to consider when choosing a photo:
+ Look for a photo that has contrast in colors, shades of color (color values), or shapes. The photo Becka used (right) had a wide range of colors.
+ Look for a photo that shows texture. The texture of the yarn in Becka’s photo adds depth to the image.
+ Don’t be too literal. Look beyond the “what it is” of the image to see interesting shapes or areas of the image that might make a good design. Look at the image from a few feet away and see how it might look different than it does up close. Alternatively, zoom in so that you are just looking at a section of the image out of context.
+ Think about the end use. Is the placement of an element in the photo going to draw attention to something you would rather not emphasize? For instance, if you are making a skirt, you might not want lines pointing to your hips.
+ Check the file size. Ideally your photo will be somewhere around 25 to 30 inches (63.5 to 76.2 cm) at 150 ppi / 3750 to 4500 pixels square. Depending on how you manipulate the photo and the look you are trying to achieve, you might be happy with a file smaller than that, knowing that it may look more pixelated when it prints. Sometimes you can cheat a bit with resolution, depending on the result you are trying to achieve.
Through the “magic” of filters, Becka transformed a simple photo of yarn on shelves into an exciting fabric.
designing the fabric
Note: It is helpful to decide which fabric you want to print your skirt on before you do the final design. Each fabric has a different width and that will determine whether you can fit both the front and back of the skirt on 1 yard (.9 m) of fabric or if you need to lay out and print on 2 separate yards (2 m) of fabric. For this example, Becka worked with a fabric that is 54 inches (137.2 cm) wide and both the front and back fit on 1 yard (.9 m) of fabric.
10 Set up the file and place image.
Becka made her skirt in linen-cotton canvas, so she created a new Photoshop file that was 54 × 36 inches (137.2 × 91 cm) / 8100 by 5400 pixels. Select and place the photo image that you have chosen to work with; put it anywhere on the canvas. The photo will be on its own layer in the Layers palette.
11 Manipulate the photo with filters.
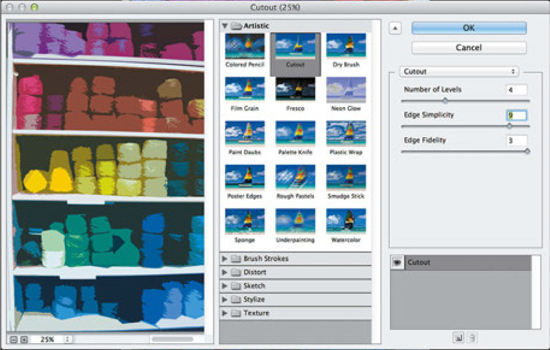
Filters can soften sharp edges, add texture and interest, and generally transform a photo in many intriguing ways. You can layer filters on top of one another to create even more effects. Many photo programs include all kinds of filters.
Go to the “Filter” menu item and choose “Filter Gallery.” Becka chose the “Cutout” filter and adjusted the settings in the panel that popped up until she had a result she liked. She also applied a Warp effect to the photo to bend the lines from the photo to match the curve of the skirt. Click OK to apply the filter (Figures 10 and 11).
12 Cut out your skirt shape.
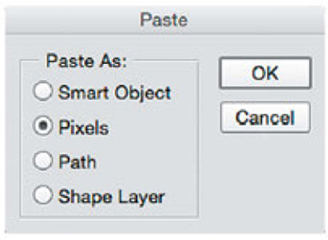
Once you are finished manipulating the image, it is time to “cut out” the skirt shape from the photo. In Illustrator, open the skirt pattern document from earlier and select the skirt shape. Copy, switch to Photoshop, and paste this shape as a new layer in the Photoshop document. Choose “Pixels” from the dialog box that pops up (Figure 12).
Now look at your photo layer. The photo should cover the entire skirt shape layer that you just placed. Move the photo layer and skirt shape so that they appear right on top of each other and are aligned the way you like. You may need to adjust the size of your photo layer at this point so that it fits the skirt. Use the transform command to allow you to resize just that layer. Caution: Do not adjust the size of your skirt shape layer or the finished skirt will not fit you!
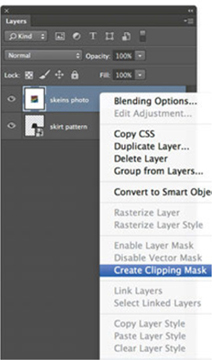
In the Layers palette (the panel for adjusting layers), drag the skirt shape layer so it appears below the photo layer (Figure 13).
FIGURE 10 Photoshop has many Filters and Effects that can change the look of your photo, such as add texture or make it more abstract.
FIGURE 13 Arrange the layers in the Layers palette with the photo on top and the skirt shape layer on the bottom.
FIGURE 14 Right click the photo layer and choose “Create Clipping Mask” to cut away extra parts of photo and leave the skirt shape.
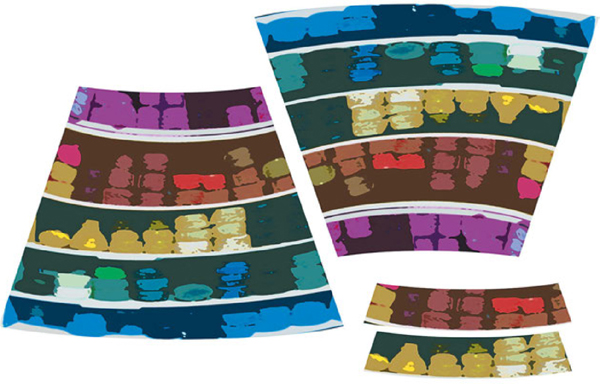
FIGURE 15 Duplicate your shapes to create two skirt panels and two facing pieces and place on your canvas.
Click the right side of the mouse (right-click or option-click) on the photo layer and choose “Create Clipping Mask” from the pop-up menu (Figure 14). This will cut away everything that you don’t need and leave you with exactly the skirt shape cut out from your photo.)
13 Duplicate to make front and back.
Duplicate the shape you made in Step 12 to make the other half of the skirt. In the Layers palette, select both the photo layer and the skirt shape layer. Right-click (option-click) on one of the layers and choose “Merge Layers” from the menu that pops up. This will combine the two into one layer. Then right-click (option-click) again on the new merged layer and choose “Duplicate Layer.” This will make a copy for the other half of the skirt.
Use the Move tool to move this new layer around to fit it on the canvas. You may need to rotate it so it will fit in the space. With the duplicate layer selected in the Layers Palette, go to the “Edit” menu, choose “Transform,” and then choose “Rotate 180°.”
14 Repeat to make the facing pieces.
Repeat Steps 12 and 13 to “cut out” and place your waistband facing pieces. Make two waistband facing pieces and place them on your canvas in the available space (Figure 15).
Note: If the two skirt pieces don’t fit on the 1-yard (.9 m) Photoshop canvas, then lay out just one half of the skirt (one skirt, one waistband facing) and print 2 yards (2 m) of that design.
15 Save and upload.
We recommend that you first save this file as a .psd (Photoshop) format so that you can make revisions later to the layers if necessary. When you are ready to upload and print, save it as a .jpg. Choose your fabric and order 1 to 2 yards (.9 to 2 m) as determined in Step 14.
16 Prepare the fabric.
Wash and dry the fabric. Press it to remove any wrinkles. Cut out the skirt and facing pieces along the printed edges. Since Becka built a seam allowance into the design, you don’t need to cut with extra space. The more accurately you cut, the easier your skirt will go together. Use a zigzag or overlock stitch, or a serger, to finish all of the raw edges of the skirt and facing pieces.
17 Stitch the side seams.
With right sides facing, match up the side seams on the right side of the skirt and pin. On the left side, match the top edge of the zipper tape to the waistband edge of the skirt. Mark with a pin at ¼ inch (6 mm) above the zipper stop at the bottom, then set aside the zipper. Match the remaining left side seams and pin.
Stitch each side seam using a ½-inch (1.2 cm) seam allowance. On the side with the zipper, stitch from the hem edge to the pin marking the end of the zipper. Backstitch to reinforce the stitching. Switch the stitch length on your machine to the longest length (a basting stitch). Do not backstitch but continue to stitch from the zipper stop mark to the waistband of the skirt. (Be sure to switch the stitch length back to normal as soon as you are finished with this step.)
18 Insert the zipper.
Press the side seam allowances open. With the zipper closed, pin it face down onto the wrong side of the basted side seam, with the zipper teeth centered over the seam. Match the top edge of the zipper tape to the top edge of the waistband. Pin in place. Hand-baste the zipper in place and then remove the pins.
Switch to the zipper foot on your sewing machine. Stitch down the side of the zipper, across the bottom, and up the other side, keeping your stitches close to the zipper teeth. Use the seam ripper to pull out the basting stitches along the zipper portion of the side seam and remove any stray threads. Press.
19 Add the waistband facing.
Stitch the right side seam of the facing and press the seam allowances open. Matching the right side of the facing to the right side of the skirt, pin the facing to the waistband edge, matching the side seam.
Stitch the waistband edge with a ½-inch (1.2 cm) seam allowance, catching the top edges of the zipper tape in the stitching.
Press the waistband seam allowance toward the facing. Understitch the facing by stitching through the seam allowance and the facing piece, ¼ inch (6 mm) from the waist seamline. Press the facing to the inside of the skirt.
Turn under ½ inch (1.2 cm) at the short ends of the facing and slipstitch them to the back of the zipper tape. Add a few stitches to secure the right side of the facing to the right side seam of the skirt to keep it in place. Handstitch a hook-and-eye closure to the very top edge of the zipper.
20 Hem the skirt with bias tape.
Becka hemmed her skirt with bias tape because she likes how it adds an extra pop of color. (If you prefer not to use bias tape, simply make a narrow hem by machine.) To hem with bias tape, unfold one long edge of the bias tape. Match this unfolded raw edge of the bias tape to the bottom edge of the skirt, right sides together. Pin in place, overlapping the bias tape slightly at the ends. Trim the extra bias tape.
Stitch all the way around the hem, following the original foldline of the bias tape. Press the bias tape away from the skirt and then fold it to the inside of the skirt along the stitching line. Pin in place.
Stitch once more very close to the upper folded edge of the bias tape. Press to set the curve.