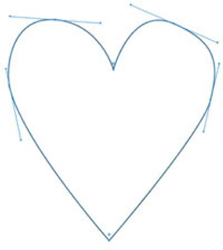
One easy way to create a vector image is to trace an element from a photo. Here we used that technique to create a new version of a monogrammed hankie.
THE WORLD OF VECTORS
SKILLS LEARNED IN THIS CHAPTER
+ Creating Vector Images: Using the Pen tool, Select tool, Direct Select tool
+ Arranging and Saving Vector Files
So far, we have been working with raster-based images only—that is, images made up of pixels (this page), such as photos and scanned artwork. Now we are heading in a slightly differently direction and teaching you how to work with vector-based images—artwork created solely on the computer. When you work with vectors, you have a lot of flexibility to scale designs to any size without compromising quality and you can create precise geometric patterns with smooth outlines because they are based on mathematical formulas. Learning these techniques opens up a new world of possibilities!
One easy way to create a vector image is to trace an element from a photo. Here we used that technique to create a new version of a monogrammed hankie.
Vectors are made by creating shapes defined by a mathematical formula. Imagine a set of pins and rubber bands. You arrange the pins in the shape that you want to create, and then you stretch the bands between the points. The rubber bands can curve around the pins and you can fiddle with them to adjust the shape of the curves. You can “stretch” a vector to any size without it looking jagged, blurry, or pixelated because the vector image is converted to pixels only when printed (see this page for more detail).
Graphic designers often like to work in vectors when creating digital art that needs to be constantly scaled up or down. For example, a logo created using vectors can be used on a small clothing tag as well as a giant billboard and still look exactly the same. Compare Figures 1 and 2 to see what happens when each type of image is enlarged.
FIGURE 1 If you draw a button in a vector program, you can use it at any size and the quality will be the same.
FIGURE 2 If you draw the same button in a raster program, you can use it at the size you draw it or smaller; if you try to make it larger, it will pixellate, as shown here.
A Very Simple Guide to Drawing with Vectors
To work with vector images you need to have a graphics program designed specifically for this purpose, such as Adobe Illustrator or Inkscape. While Adobe Photoshop has some simple vector-drawing tools built in that might suit your needs, they are limited in scope.
Here is an overview of the tools you’ll need to start drawing with vectors. On this page is an exercise you can do if you want to practice making a vector image.
PEN TOOL
This is the tool you’ll use most often to draw vector images. It looks like an old-fashioned fountain pen.
Click with the Pen tool to create a pin or point. When you click to make the next pin, the two pins will be connected with a stretchy line.
See the practice exercise on this page for more details. A good rule of thumb: When making a shape, place a pin at every point where your line has a major change of direction. To finish your design, click back at the original pin to close the shape.
SELECT TOOL
The Select tool often looks like a solid black arrow.
When you click an object you’ve drawn with the Select tool, you select the whole object as a unit and you can move, resize, and rotate it as one piece. For example, if you draw a simple square by connecting four dots, you can move the square around your design space by clicking it with the Select tool and dragging. Resizing is easy: Select the object and click and drag on the toggles (the little boxes) at the corners of the selection to make it larger or smaller.
DIRECT SELECT TOOL
The Direct Select tool looks like an outlined or white arrow.
Direct Select is used to select individual points or pins in your vector design. When you select an individual pin, you can move that specific point to adjust the shapes, curves, and lines. For example, if you create a square and want to turn it into a parallelogram, you can select one bottom pin and drag it, then the opposite bottom pin and drag it, to extend the bottom of the shape.
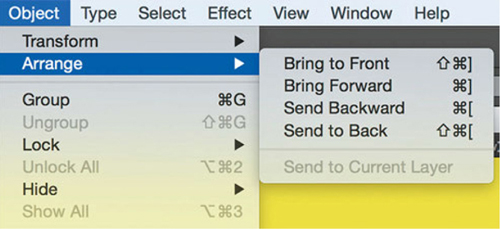
USING THE ARRANGE FUNCTION
Vector images work similarly to layers (this page), where different parts of a design exist as separate elements. You organize them with a menu item labeled “Arrange” or “Order.” To change the order of the elements in a design, select the object and then use the “Forward” and “Backward” options to move it to the front or back (Figure 4). “Arrange” functions the same way as changing layers but uses a different vocabulary.
SHAPES
Vector programs often have tools or functions that will make basic shapes like squares, circles, polygons, or stars. These tools make drawing a snap! See how we used them in the Pet Silhouette Hankies project on this page.
Saving Vector Files
Most vector-based programs have their own file formats. For example, Adobe Illustrator’s format is .ai. Although Spoonflower printers can work with some of these vector file types, ultimately they need to be converted to a .jpg for the printers to understand what to print. If your program saves your vector files in a proprietary format such as .ai, choose a “Save As” or “Export” option to save it as a .jpg.
You will also probably have an option to choose the resolution to save or export your file so the vectors can be converted to pixels. Remember that digital printers like our inkjet machines need to have pixel-based images to print (this page.) This works exactly as it does with scanning. If you want the image to print at a 1:1 ratio (full size), you want to export at 150 ppi (this page).
Geometric Soiree Kitchen Chairs
LISA BARRETT / CANBERRA, AUSTRALIA
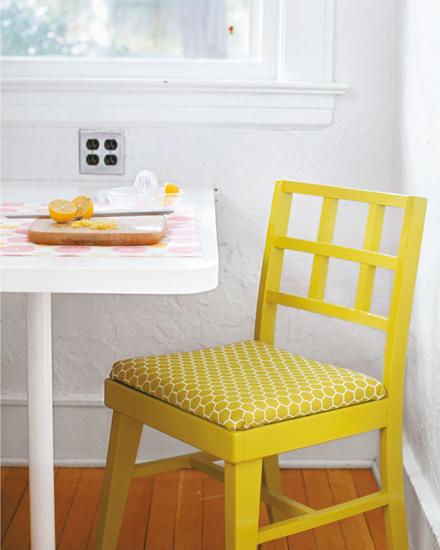
Although Lisa Barrett studied fashion and textiles years ago, she never imagined that she could design fabric herself … until she tried it with Spoonflower! Now, Lisa (known as ninaribena on our site) runs Tango & James, an interior design studio where she rescues old pieces of furniture and uses her fabrics to give them new life. When designing upholstery fabric, Lisa suggests that you create prints that complement the shapes in the piece of furniture you’re refurbishing.
MATERIALS & TOOLS
TO DESIGN THE FABRIC
Vector-based graphics program
1 yard (.9 m) of heavy cotton twill, basic cotton, linen-cotton canvas, sateen, or faux suede (we used heavy cotton twill) (see Note)
TO COVER THE CUSHION
Printed fabric
Chair with removable seat
Paint in a matching color (optional)
Washable fabric-marking pen or chalk
Staple gun and staples
Screwdriver
Fabric scissors
Note: The amount of fabric you need will vary depending on the size of your chair(s). Measure the length and width of the chair cushion and add about 5 inches (12 cm) on all sides so that you have enough fabric to wrap around to the bottom of the cushion. Unless your chair is very small, you will almost always need 1 yard (.9 m) of fabric, as a fat quarter will not be enough.
designing the fabric
1 Create a new canvas.
Review the information about vector-based images on this page. This simple geometric design is created by cropping out a part of a collage of vector shapes and then using a mirrored or other repeat on Spoonflower to make a seamless geometric design; your final design can be any size you wish. Create a new canvas that is larger than the finished design size so that you have space to work—at least several inches (cm) on each side so you have some room for cropping.
2 Add some vector shapes.
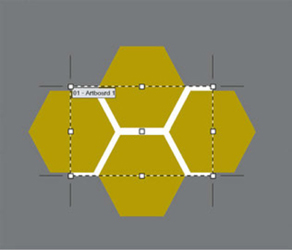
Using the Pen tool, create some basic geometric shapes. Copy and paste to create more shapes and arrange them in a pattern you like. For the fabric shown here, Lisa drew a hexagonal shape about 1 inch (2.5 cm) tall and filled it with a green color she chose from the color palette in her graphics program (this page). See the collage she created from this basic shape and cropped in Figure 1, below.
FIGURE 1 The highlighted part of the collage was saved, uploaded to Spoonflower, and repeated to create the honeycomb effect seen on the fabric.
Crop out a part of the collage design (Figure 1). Note that some vector programs do not have a Crop tool per se, but when you export your artwork as a .jpg, the program will automatically crop the design following the edges of the canvas or “artboard” instead. As you create your design, keep in mind that anything outside of this design space will get cropped away, so you can extend your design elements off the artboard to “crop” them.
4 Save and upload design.
Save the design and upload it to Spoonflower (this page). Try each repeat layout (this page) to see what sort of cool pattern results and pick your favorite. (If you’re really inspired, you can create several coordinating geometric prints by cropping a variety of areas from your collage and using different styles of repeat for each when you upload to Spoonflower, as shown in Figure 2.)
FIGURE 2 An assortment of designs that can be created by adjusting the original collage and changing the repeat pattern.
5 Prepare the chair.
Remove the chair seat cushion from the chair. These are often held in place with a few screws or bolts between the seat and chair frame. Set aside the screws in a safe place so you don’t lose them! If you want to paint the chair itself, as we did for this project, take a swatch of your fabric to the paint store and have them mix a custom color to match. Or remember that you can use the Color Map when creating your design to find a color that matches your paint (this page). Paint the chair and let dry before reattaching the seat.
6 Cut the fabric.
Remove the fabric cover from the chair cushion and use it as a pattern piece to cut the new fabric. If you are not able to remove the previous cover, place the cushion facedown on your printed fabric and trace around it, including an extra 5 to 6 inches (12 to 15 cm) on each side to wrap around to the bottom of the seat.
7 Attach the fabric.
Starting at one side of the seat, smooth and wrap the fabric to the bottom of the seat and secure with staples. Pull the fabric tautly to remove any wrinkles and then secure the opposite side. Continue in the same manner to staple the remaining sides. Depending on the shape of the chair, you may need to trim away a little of the extra fabric at the corners or ease it around curves. Use the previous cover as a guide if you can.
8 Finish.
Test the fit of your seat on to the chair frame and trim away any excess fabric. Reattach the chair seat to the frame.
ALLISON JANSSEN / LAGUNA BEACH, CA
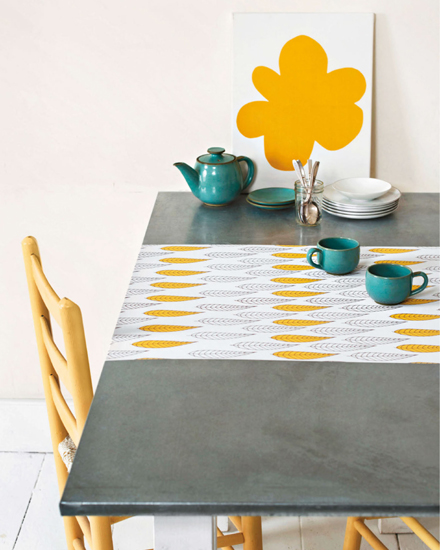
If you visit us at Spoonflower headquarters in North Carolina, you’ll likely notice that we like to dress up our furniture with our peel-and-stick paper. For this table wrap, we looked for a design in the Spoonflower marketplace and were happy to find Golden Leaves by Allison Janssen (known as fable_design on our site). A former art director at a greeting card company, Allison now runs a freelance design/illustration business. She describes her style as bright, whimsical, happy, modern, and always a bit imperfect. A few leaves picked up off the ground during a run inspired this design, proving once again that inspiration is everywhere.
We’ve written the instructions so that you can understand how Allison created her leaf shapes, but of course, you can create whatever shape you desire. Look around you to see what interests you—flowers, faces, birds, bottles, shoes, spiders, etc.—and make your drawing as simple or as complicated as you like. If you’re just beginning to draw in a vector program, you might be more comfortable with basic shapes like Allison’s leaves, but as your confidence grows, so might the complexity of your ideas.
MATERIALS & TOOLS
TO DESIGN THE WALLPAPER / TABLE WRAP
Vector-based graphics program
1 roll of peel-and-stick wallpaper, 2 × 12 feet (.6 × 3.7 m) (see Note)
TO INSTALL THE TABLE WRAP
Printed wallpaper
Flexible tape measure
Scissors
Pencil
Ruler and level
Burnishing tool (credit card or rubber squeegee)
Note: Depending on the size of the piece of furniture you’re wrapping, you may need only a swatch (24 × 12 inches [61 × 30.5 cm]) rather than an entire roll. Measure the length and width of the area you wish to decorate as in Step 6 to decide how much you need to order.
designing the wallpaper/wrap
1 Create a new canvas.
Review the information about vector-based images on this page. To give yourself room for repeating elements, create a new file that is about 4 times the size of the main element. In this design, the leaves are about 5 inches (12 cm) tall, so we made our file 20 × 20 inches (50 × 50 cm) / 3000 × 3000 pixels.
2 Draw the solid leaf shape (or shape of your choice).
This design has two versions of the leaf motif. The solid one is filled in with color (yellow) while other is just an outline. Draw the solid shape first; use the Pen tool to create a single leaf shape. Since vector shapes can have a fill and an outline color (this page), select the leaf shape and fill it with a color, but choose “no color” for the outline. (The “no color” selection usually looks like a box with a red line through it, as shown on this page.)
3 Draw the leaf outline (or outline of your choice).
To make the leaf outline, select, copy, and paste the solid leaf shape. Select and move the original solid leaf shape aside into the margin of the canvas for now. Working on the pasted shape, select it and choose to fill with no color and outline with black. Use the Pen tool to add the veins of the leaf (or any details you desire), also in black. To create disconnected line segments, like the veins, click to add the endpoint and then hit the esc key to end the line and deselect the shape (so you can continue to the next one). When you have the outline design you like, select all of the pieces (click and drag a box around all of the shapes) and “Group” the design by choosing the menu item object and then group. This will make it easy to move around all of the pieces as one unit; note that to select an object with no fill color in Adobe Illustrator, such as this leaf shape, you must click on the outline.
4 Create the repeat.
You now have the two basic elements of the design. Copy the outline leaf and paste it onto your design area and move the original solid-colored leaf to align with it; group the two together as in Step 3. Now copy and paste each of the two different leaf designs to create your repeat. Allison’s repeat featured two rows of outline leaves alternating with one row of colored leaves, as shown in the photo at left.
5 Crop, save, and upload.
Crop your repeat tile, remembering to test and check the alignment if you are making a seamless design (this page). Save the file, export as a .jpg, and upload it to Spoonflower (this page). Choose the amount of wallpaper you need and a basic repeat.
installing the table wrap
6 Measure and trim the wallpaper.
Using the flexible tape measure, measure the top of your table or the specific area of the table you wish to decorate; we installed a single width of wallpaper around the center of the table. Add several inches (cm) to your measurement to wrap each end to the underside of the table. Cut a piece of wallpaper to match your measurement.
7 Prepare the surface.
The surface to which you are applying wallpaper should be clean and free of dust. Patch or sand any rough spots that might tear the paper.
On the underside of the tabletop, draw a straight line about 3 inches (7.5 cm) from the top, using a ruler or level as needed; peel back 1 to 2 inches (2.5 to 5 cm) of the backing paper from the top of the wallpaper strip and place it on the line. Press it to hold in place. Peel away the backing paper as you wrap the wallpaper over the edge and around to the top of the table. Smooth in place, working from the center out, and wrap the remaining end of the strip to the underside of the table. You can use the edge of a credit card or a rubber squeegee to burnish the paper to the surface and help gently push out any bubbles or wrinkles. Peel-and-stick wallpaper is removable and repositionable, so you should be able to adjust it easily.
If you’re interested in using a design like this one to cover your walls, refer to “Wallpaper FYI” on this page for information about hanging.
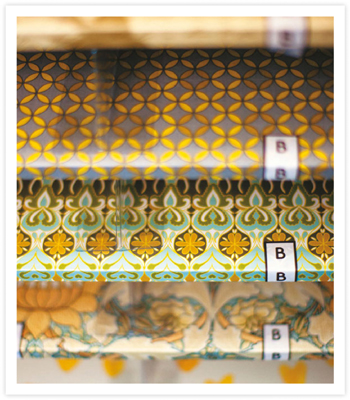
Papers on the shelves shown designed by (top to bottom): Top two Holli Zollinger, Sarah Walden, Vivian Ducas.
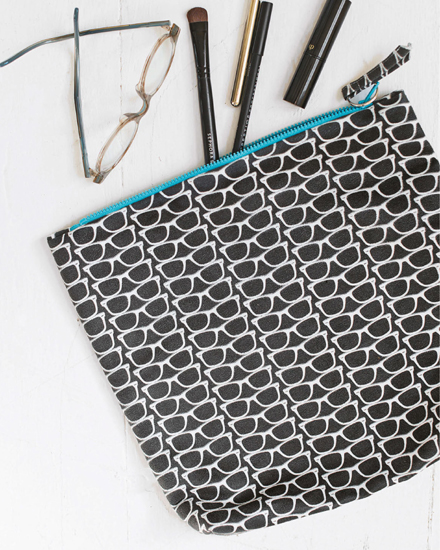
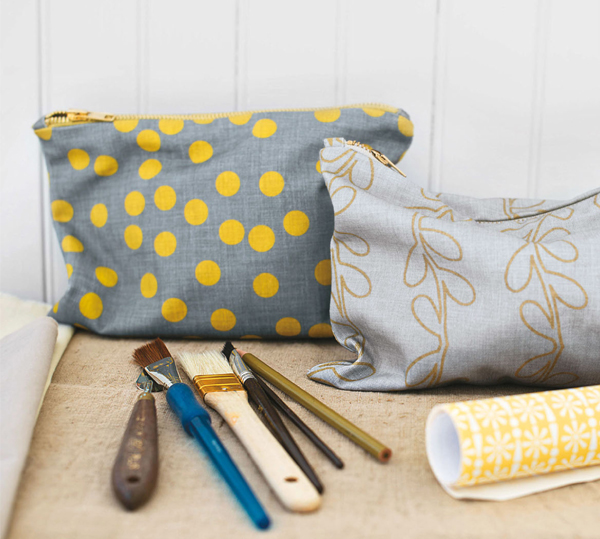
AMY PEPPLER ADAMS / SEATTLE, WA
Amy Peppler Adams started designing with Spoonflower in 2010, after a friend told her about the site. The first design she uploaded was an entry in a Tea Towel Calendar challenge, and when it came in second place, she was hooked. Amy—or pennycandy as she is known on the site—earned a degree in graphic design many years ago, before computers were commonplace, then learned digital design on her own. Her wonderful sense of humor comes out in her vibrant, lighthearted work.
MATERIALS & TOOLS
TO DESIGN THE FABRIC
A photo of sunglasses or other object to trace (see Note)
Vector-based graphics program
1 fat quarter of faux suede, canvas, or twill, 27 × 18 inches (68.6 × 46 cm) (we used faux suede)
TO MAKE THE POUCH
Printed fabric
Lining fabric, 27 × 18 inches (68.6 × 46 cm)
10-inch (25.4 cm) chunky coat zipper
Basic sewing tools (this page)
Rotary cutter, self-healing cutting mat, and acrylic quilter’s ruler
Washable fabric-marking pen or chalk
Chopstick, knitting needle, or point turner
Small split ring (optional)
Note: When choosing a subject for your photo, note that you will be tracing the subject, and therefore it will be helpful if you can clearly see it and if there is some contrast between the subject and the background. For a very clean graphic look like Amy’s, photograph an item that doesn’t have too many details and shoot straight onto it, not from an angle.
designing the fabric
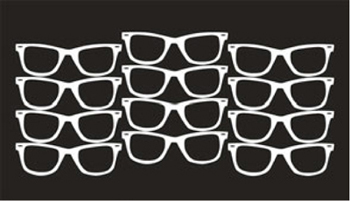
1 Create a new canvas.
Review the information about vector-based images on this page. Create a canvas that is a several times larger than the design you want to create. Create the shapes you need using the Pen tool; think about breaking up your design into several simple shapes that you can stack or put together. For example, the frames in this design are one solid shape with the lenses arranged on top. Click and place pins anywhere the line needs to change direction. Remember to use the handles as explained on this page to adjust the curves and points for each shape. (Alternatively, if you’re not confident with your drawing skills, you can trace a photo of an object like we show in the Pet Silhouette Hankies instructions on this page.)
2 Trace the subject of the photo.
Trace the entire image in your photo using the Pen tool. Click and place pins anywhere the line needs to change direction. Remember to use the handles as explained on this page to adjust the curves to match the shape you’re tracing. Trace around the lenses separately as you will manipulate them separately in Step 2. The frames in this design are one solid shape with the lenses arranged on top.
When you have the shape complete and adjusted to your liking, select the temporary layer with the photo and delete it.
3 Add colors.
To add the background color, draw a rectangle, fill it with the color black (or the color of your choice), and place it behind the other elements. To color the rest of the image, select the sunglasses frame and choose white (or the color of your choice); select the lenses and choose black (or the color you chose for the background).
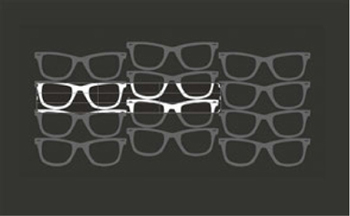
4 Make the repeat tile.
Many vector programs will let you select a collection of shapes and group them together so you can move them as one object. To do this, first select all of the pieces of your sunglasses and look for a menu item labeled “Group.” (You can “Ungroup” if you need to adjust something later.)
If you want to reduce the size of your grouped artwork, do so now (the sunglasses in Amy’s fabric are roughly 2 inches (5 cm) wide).
Although this design looks like a simple half-drop repeat that you might choose after you upload a design to Spoonflower, it actually requires a little more finessing because it is seamless. To create a seamless tile, select, copy, and paste multiple copies of your image into a new file, arranging them in a half-drop pattern (Figure 1). Place them very close to each other. Carefully align the motifs so the rows and columns are precise.
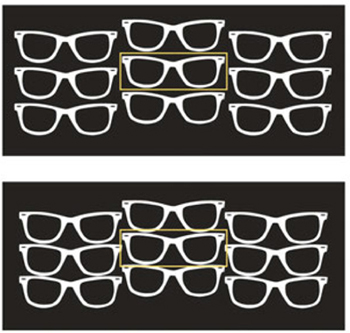
Look for a distinctive element in your design or guide element like the “sparkle” at the left corner of the glasses frame. Crop the image, placing the four corners of the crop selection at exactly the same place in relation to the guide element (Figure 2). Remember that some vector-based graphics programs use artboards instead of the Crop tool; if you’re working in such a program, create a new artboard the size of your crop and when you export your artwork as a .jpg, the program will automatically crop the design following the edges of the artboard.
FIGURE 2 The “sparkle” on the left corner of the glasses is the guide element for cropping the art to create the seamless tile.
FIGURE 3 In the top screenshot the rectangle around the sunglass motif contains the entire design without overlapping any other motifs. In the bottom screen shot, the sunglass motifs are closer together; as a result, there is an overlap at the right side of the rectangle with the adjacent motif. This tells you that to make the design work as an uninterrupted pattern, you would need to create a seamless tile.
Test your repeat as suggested in the Squid Damask Shower Curtain (this page) and check the edges of your design carefully where they should align; the lines should be smooth. It is easy to be off by a pixel or two, so you might need to undo and re-crop to get your repeat lined up precisely.
making the pouch
5 Save and upload your design.
Save the file, export as a .jpg, and upload it to Spoonflower (this page). Choose a fat quarter of fabric and a basic repeat.
6 Prepare your fabric.
Wash, dry, and press your outside (printed) and lining fabrics. From each outside and lining fabric, cut 2 squares that are 12½ × 12½ inches (31.8 × 31.8 cm). From the printed fabric only, cut two rectangles that are 1½ × 2 inches (4 × 5 cm) for the zipper ends; if you would like an optional zipper pull, cut a rectangle 1 × 5 inches (2.5 × 12 cm).
7 Stitch the zipper ends.
At each end of the zipper, align one of the small rectangles so that one short edge matches the end of the zipper tape. Use a small backstitch to hand-sew the rectangle to the zipper tape, ½-inch (1.2 cm) from each end, as this zipper is bulky and impossible to sew on a machine. Fold the fabric to the outside along the stitching line and press. Trim any extra zipper tape.
8 Install the zipper.
Place one square of lining fabric right side up. Center the zipper on the top edge of the square of fabric, right side up, aligning the long edge of the tape with the edge of the lining. Place one square of outside fabric right side down and align with the top edge of the lining and the zipper. Pin in place. Install a zipper foot on your sewing machine and stitch across the top edge through all layers, close to the zipper teeth. Open out the fabric layers, fold them back along the stitching line, and press. Repeat these steps to stitch the opposite side of the zipper tape. Trim the extra fabric from the zipper ends.
Unzip the zipper. Fold the bag in half with the right sides of the printed fabric facing each other on the inside and the right sides of the lining pieces covering them, facing the outside. Match and pin the sides and bottom edges. Stitch around the sides and bottom of the bag using a ½-inch (1.2 cm) seam allowance. Reinforce and finish the edge by stitching again with a wide zigzag stitch (or use a serger if you have one).
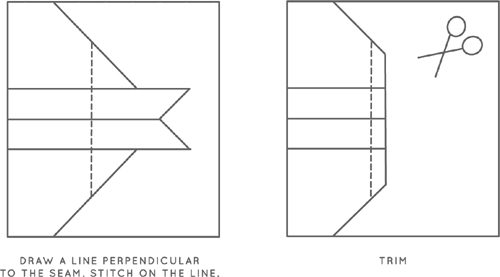
10 Stitch the gussets.
Open out one bottom corner of the bag and press it flat, matching the seamlines from the side and bottom. Pin. Measure 2 inches (5 cm) from that corner and use the fabric marker to draw a line perpendicular to the seamlines. Using a straight stitch, stitch through all layers, following the marked line. Trim away the extra fabric at the corner, leaving about a ¼-inch (6 mm) seam allowance (Figure 4). Finish with a zigzag stitch or a serger. Repeat for the other corner.
11 Turn and press.
Turn the bag right side out and use a chopstick, point turner, or knitting needle to press out the corners at the bottom and at the zipper ends. Press.
12 Add an optional zipper pull.
To add a zipper pull, fold the long edges of the 1 × 5-inch (2.5 × 12 cm) fabric rectangle to meet in the center and press. Fold again in half, matching the long edges. Stitch close to the folded edges. Trim the short ends at an angle. Thread the zipper pull through a small split ring and fold in half. Stitch across the fabric close to the ring and backstitch to reinforce. Slip the split ring onto the zipper pull.
Fabric pouches are irresistible to a lot of us, especially when we have so much special fabric around. Here we used two of Holli Zollinger’s prints to make pouches similar to the one on this page. We changed the shape to a rectangle and followed Steps 6 through 11 minus the gussets. You can make these simple bags in virtually any size or shape you want so long as you have a zipper that fits along the top edge.
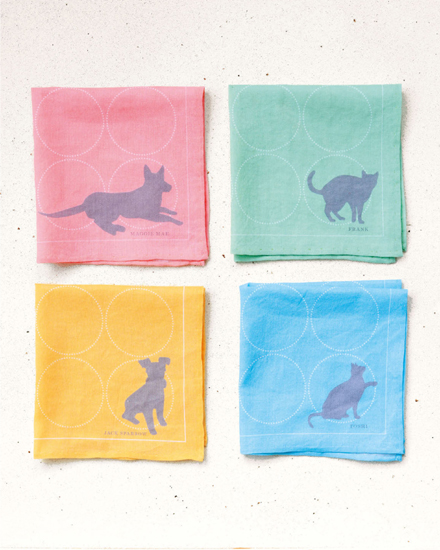
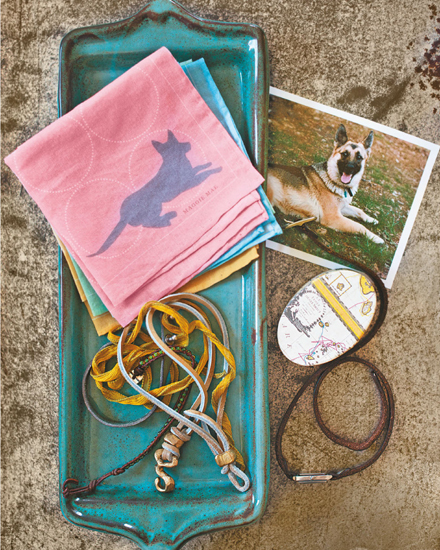
Sharing pet photos is up there with sharing baby photos—no matter what, it’s hard to resist. For these hankies, we used photos of our dear canine and feline friends—Frank, Jack Sparrow, Toshi, and Maggie Mae—to create silhouettes that we used instead of traditional monograms on cotton hankies.
MATERIALS & TOOLS
TO DESIGN THE FABRIC
A pet photo (see Note)
Vector-based graphics program
1 yard (.9 m) of basic cotton, sateen, or silk crepe de chine (we used basic cotton)
TO MAKE THE HANKIE
Printed fabric
Basic sewing tools (this page)
Note: It’s best to use a photo of your pet by him or herself, with nothing in front of your pet’s image. We gave tips about photographing your pet in the Doppelganger Dog Pillow project on this page, and each of them also apply to this project; pay particular attention to the tip about capturing your pet’s unique characteristics so you can create a singular silhouette.
designing the fabric
1 Create a new canvas.
Review the information about vector-based images on this page. This technique uses a photograph as the basis for your design, so create a canvas that is a several times larger than the original photo you will use. Place or insert the photo you will trace into the canvas. This layer will be temporary; you will use it to help trace the shapes you need and then it will be removed later.
2 Trace your pet.
Using the Pen tool, trace around the outline of your pet, clicking and placing pins where the line needs to change direction. Remember to use the handles (this page) to adjust the curves to match the shape of your pet. When you have completed the shape and adjusted it to your liking, you can select the temporary photo layer and delete it.
3 Create a new file and add the background.
Create a new file for the hankie, 12 × 12 inches (30.5 × 30.5 cm) / 1800 × 1800 pixels. Draw a square that fills the entire canvas for the background layer of the hankie. Fill it with a color; we made a variety of hankies from diverse pet silhouettes and made each of the backgrounds a different color—pink, green, yellow, and blue.
4 Add a border and circles.
Many vector programs have tools or functions that will automatically make basic shapes like squares and circles. Use this tool to add a 10-inch (25.4 cm) square for the border of the design; you can also use the Pen tool to draw a square. Center the square in the canvas. Fill it with the same color you chose for your background in Step 3 and add an outline in a contrasting color (we used white). To make the circles, use the shapes tool again to create circles and place them inside the square shape, using the same colors to fill and outline them as you used to make the square. Some programs will let you add an effect like a dotted or dashed line to the outline of your shape; we used this option in our project.
5 Place your silhouette and personalize.
Copy and paste your pet shape into the hankie design. Choose a contrasting color (we used gray) and fill the pet shape. Click and drag at the corners of the shape to adjust the size of your silhouette and place it in the lower right-hand corner of the hankie. Use the Text tool to add your pet’s name; we used dark grey text.
6 Save and upload.
Save the file, export as a .jpg, and upload it to Spoonflower (this page). Choose a lightweight fabric and repeat the design to fill as much fabric as you like; you can get 9 hankies from 1 yard (.9 m) of basic cotton.
making the hankie
7 Cut out the fabric.
Wash and press your fabric. Carefully cut out the hankies. Having nice, even edges will make rolling the hems easier and will look tidier, too. Once they’re all cut apart, press the hankies again if needed.
8 Make a rolled hem.
Thread a sharp needle with a single length of coordinating thread and knot the end. With the hankie facing wrong side up, start at a top corner and roll the edge toward you, using your thumb and forefinger. The hem roll should take up about ¼ inch (6 mm) of fabric. Make the roll nice and tight so that the raw edges of the fabric are securely enclosed.
Insert the threaded needle through the end of the rolled tube and bring it out about ½ inch (1.2 cm) away from the corner and near the bottom edge of the roll. Take a tiny stitch in the hankie fabric, picking up just a couple of threads. Insert the needle again into the bottom edge of the roll and bring the needle back out again ¼ inch (6 mm) away. Once again, take a tiny stitch that picks up just a couple of threads on the hankie. Continue on in this way until you’re close to the first corner.
As you near the first corner, roll the next side of the hankie to meet the first side, rolling evenly from both sides so that you maintain as much of a crisp point as possible. You should end up with a wee mitered corner.
Continue on in this way until you’ve hemmed the entire hankie.
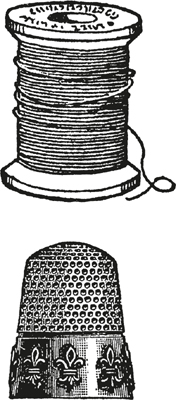
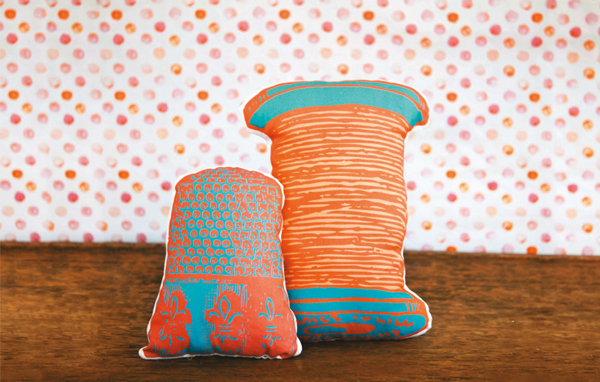
The clip art Caroline used to create the thimble and spool of thread pillows at right came from pixgood. com and thegraphicsfairy.com, respectively. Using a special Illustrator tool called Image Trace, she was able to convert the original raster images into vector format and enlarge them.
We take these Sewing Notions Pillows designed by Spoonflower art director Caroline Okun to trade shows, and they always attract a lot of attention. Although they don’t look at all like the Pet Silhouette Hankies, they’re actually based on a similar concept: tracing artwork (pet photos for the hankies, copyright-free vintage illustrations for the pillows). The difference is that for the hankies, you trace with the Pen tool, and for the pillows you trace with an Illustrator tool called Image Trace. This tool converts raster images to vector format so you can enlarge and modify them. The Image Trace tool is complex; the instructions here are specific to working with a black-and-white illustration.
Start with a canvas slightly bigger than your desired project size, leaving room for a ½-inch (1.2 cm) seam allowance and some blank fabric to frame the illustration. Choose “Place” under the “File” menu to add the illustration to the canvas. (If you need to resize your image, click it with the Direct Select tool now.)
Under the “Window” menu, choose “Image Trace” to open the tool panel. Be sure the “default” preset is chosen so the illustration remains black and white; also check “Ignore White” under the Advanced options. Choose “Trace” to create a vector image preview. Click “Expand” in the Image Trace control panel, and switch to RBG mode in the Color Palette so you can change the black by clicking on your desired color.
Choose “Deselect” from the Select menu and create a new layer. Working on this new layer—not the original illustration layer—use the Pen tool to trace the parts of the image you want to fill with another color. Use the Direct Select tool to refine your selection by adjusting the points as needed (this page). When you’re satisfied with your tracing done with the Pen, you can rearrange so the original illustration layer is on top. Add more color as desired.
Save the design and export as a .jpg to upload to Spoonflower. Depending on design size, print on a fat quarter or 1 yard (.9 m) of fabric. You’ll also need the same amount of fabric to make the pillow back, plus stuffing. Follow Steps 5 and 6 on this page to sew a pillow.
Notes: Depending on the version of Illustrator, commands may be slightly different than those here. In versions earlier than CS6, use a similar tool called Live Trace, then use the Pen tool to refine the design. For free, vintage, copyright-free illustrations, check antiqueimages.blogspot.com, oldbookillustrations.com, pixgood.com, and thegraphicsfairy.com.