TEST YOUR EYE!
It’s time for your Repeat Quiz! Put all the things you’ve learned to the test by trying to identify each of the repeat layouts used at right. Look at each of the images and decide if the repeat is basic, half-drop, half-brick, or mirror. To refresh your memory, go to this page. Then, decide if it is simple (you can see the grid) or seamless. You may want to revisit the little trick we taught on this page about identifying seamless repeats. (Turn to this page for the answers.)
Why do you do this? Because looking at other designs can help you be a better designer. Looking at the repeat for a design you like might give you an idea about how to create that feeling in your own design.
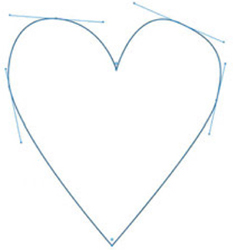
In Chapter 10 (this page) we introduced vectors. To practice making a vector, try drawing a simple heart.
1 Open a new canvas.
2 Click with the Pen tool to make the point at the bottom of the heart.
3 Place the next pin to change the line direction at the side where a heart needs to curve. Click at the left side to place the pin, holding down the mouse and dragging the cursor. You will see the line start to curve and two little handles will appear attached to your pin. Don’t worry about what the curve looks like or where the handles are right now—you’ll adjust later (Figure 1).
4 Continue around the heart shape, clicking and dragging to place a pin at the top left of the heart, at the dimple, the top right, the right side, and finally clicking to connect with the very first pin you placed to close the shape (6 pins total; Figure 2).
5 Once you have the shape roughed out, use the handles on each pin to adjust the curves. Click each pin with the Direct Select tool to make the handles appear. Click one of the round knobs on the ends of the handle and drag it to adjust the curve; try using each handle to see how the changes affect your drawing. Work your way around the heart to adjust the shape as you like it (Figure 3).
You can change the curve in many ways:
+ Push the knob closer to the pin to shrink the curve or pull it farther away to make it bulge out.
+ Push the handles all the way in toward the pin to make a sharp point.
+ Click the pins themselves to move them around and the lines will stretch to fit.
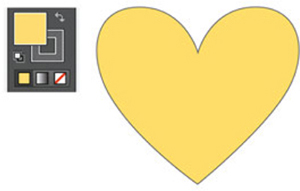
6 When you are finished adjusting the shape, fill it with color by clicking the shape with the Select tool. You can choose both the fill color and the outline color in the color palette (Figure 4).
For each design, one possible repeat tile is outlined. For many designs, there is more than one way to create a repeat tile.
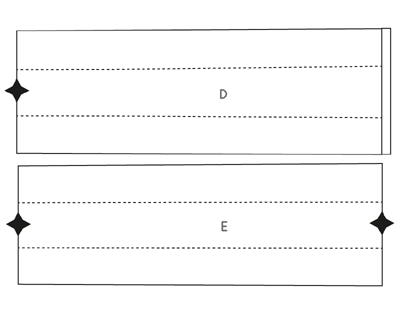
PATTERN PIECES FOR FAMILY PORTRAITS NECKTIE (THIS PAGE)
To use these pattern pieces, first photocopy this page at 100% and cut out each rectangular area (as shown by the white background). Then, photocopy each rectangular piece at 400%. Each rectangular area should fit on an 8½ × 11-inch piece of paper. All of these pieces are cut from the tie fabric. To make the front tie pattern piece, tape together A, B, and C in that order, matching the diamonds on each piece. To make the tie back pattern piece, tape together D, E, and F in that order. The dotted line on each piece indicates the fold line and also the cutting line for the tie interlining (cut from wool flannel). The arrows on each piece indicate the grain line. The seam allowances are included in the pieces.
There are a number of software programs for designing textiles and papers, and choosing the ones that suit your needs best, especially when you are just starting out, can be challenging. We’ve explored numerous programs and rounded up our favorites here, from Adobe products to free programs.
When looking for software, the first decision to make is whether you want to work with raster or vector images. Raster images are made up of a set grid of dots called pixels, while vector images are based off simple geometric shapes such as lines, curves, and points. Adobe Photoshop is an example of a raster-based program, while Adobe Illustrator works with vector images.
You also have the option to purchase design software or use an open-source option. Open-source design programs are free to use and are either downloadable or accessible through the program’s website.
The programs listed here offer a range of capabilities, from novice to expert.
ADOBE PHOTOSHOP is a robust graphics editor that works primarily with raster images (pixels), allowing users to create their own images or easily edit photographs. Photoshop contains a ton of tools with a range of functions, offering new users the ability to really grow their skills to the level of professionals. With Photoshop, designers can easily select colors or groups of pixels to manipulate very fine details of any image in a myriad of different ways. Many industry designers work in Photoshop, giving them the opportunity to learn and grow. Adobe now gives designers the option to purchase a monthly subscription rather than buying the program outright.
PICMONKEY is an open-source web-based editing tool that gives users the ability to create images from scratch or edit photographs. While this is a relatively powerful tool, it doesn’t allow users the ability to do quite as much as other tools, like Photoshop. For example, you won’t be able to go back in and edit font size/color once you’ve saved your finished PicMonkey file—your changes will be final. This is a great resource if you’re looking to add basic text, colorful, cute stamps, or graphic icons to your image. We recommend this program for beginners creating simple designs with geometric shapes, text-based designs, adding text to existing designs, or creating a master file with multiple images.
GIMP, OR GNU IMAGE MANIPULATION PROGRAM, is a free program that’s great for editing and resizing photos, combining multiple images into one file, adding text to images, and adjusting colors. For a free program, it packs a punch and can do many of the things Photoshop can, but because it’s an open-source program, it has a slightly steeper learning curve and less professional interface than Photoshop. We recommend this program for intermediate designers interested in editing existing images on a budget.
PIXLR is another image editing software program that’s great for photos and existing images, rather than for creating new ones from scratch. With filters, frames, text, and even the ability to overlay and combine two different photos into one image, it’s similar to PicMonkey with a focus on editing existing photographs, not resizing them or creating a seamless repeat. There are several different versions you can choose from based on your needs.
ADOBE ILLUSTRATOR is a vector-based design program (as opposed to raster-based) that allows users to create original artwork that can be resized and easily manipulated. The latest version of this software also has the tools necessary for creating unique repeat textile patterns. Start with a blank canvas or use a scan of hand-drawn art to get started. Using the Pen tool, it’s easy to “trace” over scanned artwork, bringing to life a sketch that may have started out with just pencil and paper. Illustrator is a powerful tool that many professional designers choose for fabric design.
INKSCAPE is a free alternative to Adobe Illustrator. Like other open-source programs, Inkscape isn’t quite as user-friendly as its more expensive competitors, but has a plethora of powerful drawing and designing tools. If you don’t have an image already and are starting with a blank canvas, Inkscape can help you create editable shapes and freehand lines to draw your image. If you’re trying to make a simple design or trace a hand-drawn design with digital lines and don’t want to pay for Adobe Illustrator, Inkscape is a great option. If you’re hoping to create simple designs that are digitized from the get-go, or images that will fill a yard or more, this tool is for you.
REPPER is an online program from the Netherlands that gives users simple digital tools to make repeat patterns for use on fabrics, stationery, and more. They offer a free demo to play around with, or you can purchase the full program, which allows you to export higher-quality files. You start out by uploading any digital file from your computer, selecting a portion of it, then use a selection tool to create super fun Kaleidoscope-esque repeating patterns. Repper then allows you to export a repeating tile, or the entire surface selection. A ton of fun for beginning surface-design artists wanting to create something truly original.
SEAMLESS LITE is an online open-source tool created by the popular color palette website ColourLovers. This tool makes it super easy to design great-looking vector patterns for textile design projects. With simple editing tools you can resize, rotate, and add shapes, lines, and text to the canvas and it tiles automatically. Once you’re ready to select a color palette for your creation, Seamless integrates smoothly with the ColourLovers interface so you can create a unique color palette for your repeating design and name it. Save your pattern template and share it with the world, or send it directly to your Spoonflower library.
ADOBE COLOR is a web-based tool where users can create and save color palettes that can be easily translated to patterns created in other design programs. This is particularly useful when creating a range of designs to ensure the same colors are used throughout the collection.
The best and most obvious ways to source images to print on Spoonflower—which are well covered in this book—are these: