Chapter 4
Reading, ’Riting, and Rhythm
In This Chapter
![]() Discovering different types of notation
Discovering different types of notation
![]() Finding notes in all octaves
Finding notes in all octaves
![]() Playing with the metronome
Playing with the metronome
![]() Understanding phrases, measures, and beats
Understanding phrases, measures, and beats
![]() Reading music and playing while reading
Reading music and playing while reading
Reading music isn't nearly as important for bass players as it is for classical musicians (who re-create someone else's music as they read it). A bassist usually creates his or her own bass lines for a tune by choosing notes from chords and scales (see Chapter 5). Sometimes, you may even come up with an idea for a bass part that's perfect for a tune, and you don't want to forget it, so you need to be able to write it down. Then, when you need it, you can read it.
In this chapter, I introduce you to some fast and easy ways for tackling the dilemma of reading music. And by the time you're finished with this chapter, you'll probably agree that reading music is pretty easy . . . and useful.
Reading Notation: No Pain, Much Gain
 Reading music is nothing to be afraid of. You don't even have to read music to be a good (or great) bass player, but it certainly enriches your musical experience and opens doors that otherwise may remain shut.
When you solve the mystery of reading music and discover the joy in it, you may find yourself reading Bach preludes instead of a novel before going to sleep. In this section, I introduce four types of musical notation: chord notation, music notation, tablature (or tab), and the vocal chart (or lead sheet). For bassists, these are the most important notational systems.
Chord notation: The chord chart
Chords can evoke certain moods. For example, a major chord usually sounds happy and bright, whereas a minor chord sounds sad and dark. Just as a color on canvas may evoke a certain feeling, a chord works on the same principle, only acoustically instead of visually.
The chord chart, which is one form of musical notation, tells you in chord symbols what notes you can choose for playing a particular song and how many beats each chord lasts. Chord symbols name the root of a chord, such as E (see Chapters 2 and 5 for more info on the root), and the color of that chord, such as m for minor or Maj for major. You can choose to play any of the notes from the chord or scale that relate to the chord symbol. For more details on the happy mating of chord symbol, chord, and scale, check out Chapter 5.
A chord chart doesn't tell you exactly which notes to play. The style of the music and your (or your bandleader's) taste influence the sequence and rhythm of the notes you choose from the chord. Part of the fun of playing is choosing your own notes and developing your own creative style. Just keep an open mind . . . and open ears. If it sounds good to you, it usually is.
For more information about which notes are best, look at Part IV of this book, which discusses the many genres of music and tells you how to play different chords in different styles. Figure 4-1 shows you how to play four beats of music for the E minor chord in a rock style.

Figure 4-1: Measure of E minor from a chord chart in chord notation.
Music notation: Indicating rhythm and notes
Another form of notation spells out both the rhythm and the notes; it's known as music notation. Regular music notation is written on a musical staff. The musical staff consists of five lines and four spaces on which the notes are written. The clef (the first symbol you see at the beginning of the musical staff) shows whether the notes on the staff are low (bass) or high (treble). For bass players, the bass clef is the clef of choice. (We try to stay out of treble if we can.)
Music notation is much more exact than the chord chart (see the preceding section). Not only does it tell you what note to play, but it also tells you which octave to play the note in, how long to hold the note, which note to accent, and so on. In short, this method doesn't leave much room for creativity, but it does leave the embellishments up to you. Figure 4-2 shows the measure of E minor in music notation; it also shows the different parts of the staff.
 You can hear exactly what Figure 4-2 sounds like when you listen to Track 8. Every note is accounted for.

Figure 4-2: Measure of E minor in music notation with a description of the staff.
The bass sounds one octave lower than the written note. Piano players, when reading from the same sheet as the bass player, play the same notes an octave higher (see Chapter 2 for a discussion of octaves).
Tablature notation: Showing strings, frets, and sequence
Tablature (or tab) shows you which strings to press and on which frets for the correct notes. Using this method, you can see the exact notes and their sequence, but you generally can't see the rhythm, which is why tablature usually is accompanied by music notation (see previous section).
When you rely on tab notation, bear in mind that the frets indicated may not be the only places on the neck where you can find those notes. For example, you can find the G of the open G string in these spots as well:
- The 5th fret of the D string
- The 10th fret of the A string
- The 15th fret of the E string
See Figure 4-3 for the different locations of the same note G.

Figure 4-3: Tab for G on the fingerboard.
 The best choice of note to play is determined by the position of the other notes in the pattern you're playing. Keep in mind that you want to avoid any unnecessary shifts in your left hand; whenever possible, play the notes of the chord in one area of the bass neck.
The vocal chart: Using lyrics and chords for a singer or songwriter
The vocal chart is a common form of notation (combining the lyrics of a song with its chords) that you use when you're working with a singer or songwriter. With this type of notation, you're getting only the most basic information for your accompaniment, which means that you're free to explore different ways of interpreting a song. In a vocal chart, the chord is simply written over the word that's sung when the chord is played.
For example, the song “Happy Birthday” would have a G over “Happy,” a C over “birthday,” and a G over “you.” The line would look like this:
- G C G
- Happy birthday to you
Vocal charts are an imprecise notation technique, but if you're familiar with the song, sometimes that's all you need. Just make sure all your bandmates are familiar with the same version of the song you're playing. And remember, in this particular case . . . follow the singer!
Finding Any Note in Any Octave
After you understand the four types of musical notation, the next step is to find out where the notes are located on the bass neck and what they look like on paper. Figure 4-4 gives you an illustration of this.


Figure 4-4: The notes on the neck of the bass and on the staff.
Finding notes over the entire bass range can be challenging (but not impossible), because each note occurs in at least two places on the neck of the bass. Knowing where the alternative notes are located allows you to play easily and efficiently anywhere on the fingerboard. You can use one of the three following methods to help you find the notes you want on any part of the neck:
- The octave method
- The handspan-plus-two-frets method
- The marker method
The octave method, also called the two-strings/two-frets method is the most common way to find the same note in a different place. Here's how to do it:
- Place your left-hand index finger on any note on the E string and strike it with your right hand.
You can find the same note an octave higher by letting your ring finger cross one string and land on the D string, the second string up. The ring finger naturally positions itself on the higher octave of the original note, two frets above the index finger.
- Press your left-hand ring finger down for the octave.
Your octave note is two strings and two frets above your original note. This method also works from the A string to the G string, and you can use your middle finger and your pinkie. If you have a note on the G or D string and you want to find its lower octave, just reverse the process. Figure 4-5 shows the relationship of the notes using the octave (or two-strings/two-frets) method.

Figure 4-5: The octave, or two-strings/two-frets, method.
While the octave method helps you locate a note two strings away, the handspan-plus-two-frets method helps you locate a note on the adjacent string. Follow these steps:
- Press down a note on the A string with your left-hand index finger, and strike it with your right hand.
- Shift your left hand two frets toward the bridge, and move your pinkie from the A string to the E string.
- Press your pinkie down on the E string in the new position and play that note.
You now have the same note in the same octave as your original note on the A string. This process also works in reverse. You also can use this method when going from the D to the A string and from the G to the D string. Figure 4-6 shows the relationship of the notes in the handspan-plus-two-frets method.

Figure 4-6: The handspan-plus-two-frets method.
If you need to locate a note on the same string, use the marker method. With this method, you simply use the markers (dots) embedded on the side and face of your bass neck. If you look at the neck, you can see one section — on the 12th fret — that has two dots in the space of one fret. This fret is your octave marker for your open strings. You can play the octaves for all the open strings (E, A, D, and G) at this fret.
For example, the octave of open E is directly at the double dot on the same string. If you want to play the octave of low F on the E string (the note on the 1st fret of the E string), you can find its octave one fret above the double dot (on the 13th fret). If you want to play the octave of low G on the E string (the note at the first dot of the E string), you can find its octave at the first dot past the double dot (15th fret) of the E string. The marker method applies to all the other strings as well.
You can practice all these methods of finding notes by choosing a note at random, such as C, and then locating all the instances of that note on your bass neck. When you're finished, move on to another note (A , for example). Repeat this exercise until you cover all 12 notes: C, C
 /D, D, D/E, E, F, F/G, G, G/A, A, A/B, and B. Note: A (“sharp”) raises a note by one half step, and a (“flat”) lowers it by one half step.
Later in this chapter, I show you how to put the different kinds of musical notation into practice, but first you need to understand rhythm, which is what the next section is all about.
Using the Metronome: You Know, That Tick-Tock Thing
A metronome is a device that helps you develop good rhythm. Metronomes come in many shapes and colors, but they all have one thing in common: They give you a steady clicking sound on which to base your timing. Like a very loud clock tick, the metronome produces a steady beat. You can adjust the speed of the click to suit your needs.
The old-fashioned acoustic metronomes have a small weight that swings back and forth. They need to be used on a level surface and must be wound up periodically. Electric metronomes need to be plugged into a wall outlet. The small battery-powered metronomes are the most common and the most user-friendly.
Just in case you don't have a metronome handy, but you have a computer hooked up to the Internet, you can find plenty of free metronomes online. There goes any excuse you may have for not using one.
Setting the metronome
The face of the metronome has a sequence of numbers (usually from 40 to 208). These numbers tell you how many clicks per minute you hear when you set the dial to a particular number. In other words, if you set your metronome to 162, you hear 162 clicks per minute at regular intervals.
Playing along
Don't be surprised if it takes some practice to regulate your playing to the ticking of the metronome. It's a challenge at first to get in sync with the clicks and not to rush or drag during the space between each one. The slower the tempo on the metronome, the farther apart the clicks are from each other and the more difficult it is for you to keep exact time.
Here's an exercise that may help you get used to playing with a metronome: Set the metronome to 80 and play a repeated note on your bass, matching the click of the metronome exactly.
Listen to Track 9 to hear a bass playing precisely to the click of a metronome set at 80.
Playing with a metronome enables you to keep a steady rhythm not only at tempo 80 but at any tempo. Set your metronome at different tempos and try playing along.
Dividing Music into Phrases, Measures, and Beats
Tunes are divided into phrases. You can recognize a phrase by listening to singers — they tend to take a breath between each phrase. Phrases are divided into measures (bars), and measures are divided into beats (or clicks of the metronome).
In most tunes, four clicks of the metronome equal one measure, and four measures equal one phrase. In other words, a musical phrase is 16 beats long, or 16 clicks of the metronome. The organization of phrases makes it easier to keep your place in the music and communicate with the other musicians. To see what phrases, measures, and beats look like, check out Figure 4-7.

Figure 4-7: Phrases, measures, and beats.
To subdivide the phrases into smaller units, you need an understanding of rhythm and its notation. Figure 4-8 shows all the rhythmic notes discussed in this section and how they relate to each other. You may want to refer to this figure as you read through the section.

Figure 4-8: Rhythmic notes.
On Track 10, you can hear the different duration of each note in comparison to the beat. Whole notes are at 0:00; half notes at 0:11; quarter notes at 0:23; eighth notes at 0:35; sixteenth notes at 0:48; and eighth-note triplets at 1:00.
The quarter note
Each of the four beats (metronome clicks) in a measure (or bar) equals a quarter note. These four beats make up the 1-2-3-4 of the musical count. Imagine that you're marching on the street. You're walking at a steady, even speed, and your feet are going in a regular rhythm: Left, right, left, right, and so on. This steady marching is what your quarter-note rhythm feels like — a regular pulse: 1-2-3-4, 1-2-3-4, and so on and on and on. . . .
Each of the four beats can in turn be divided into equal parts. To come up with interesting grooves and bass parts (like the ones I describe in Chapter 6), you want to be able to divide a beat in several different ways.
The eighth note
The eighth note is twice as fast as the quarter note. Imagine that you're still marching — left, right, left, right. As you continue, tap your hand twice on your thigh, at regular intervals, for each step you take. Instead of counting 1-2-3-4, subdivide the beat by adding an and at the end of each number, making it 1 and 2 and 3 and 4 and, evenly spaced. If you do this correctly, you're still moving at exactly the same speed as before.
Playing eighth notes on the bass works the same way as marching and tapping. Play two evenly spaced notes on your bass to each click of the metronome. Concentrate on keeping the notes evenly spaced — one note on the click and the other note halfway between the clicks.
The sixteenth note
The sixteenth note is twice as fast as the eighth note, and four times as fast as the quarter note. Imagine that you're still marching (by this time you're probably tired and miles from home) and counting 1 and 2 and 3 and 4 and. Without changing your pace, tap your hand twice as fast as before. You're now tapping four times for each step. This is the sixteenth-note rhythm. Take your count of 1 and 2 and 3 and 4 and, and add an e (pronounced “ee”) after the number and an a (pronounced “uh”) after the and. Keeping the count even, count 1 e and a 2 e and a 3 e and a 4 e and a. Your pace is unchanged, and you're still marching at the same speed, but the subdivision of the beats gives you much more to “talk” about.
You may want to try this exercise with your metronome. Keep the tempo reasonable (between 60 and 80) until you get used to it. First try marching your feet to the clicks of the metronome and tapping out the subdivisions for the eighth and then the sixteenth notes with your hand. When you're comfortable with this exercise, try playing the subdivisions on your bass.
The half note
The half note is half as fast as the quarter note. In other words, two quarter notes fill the space of one half note. If you're still marching (by now you're probably halfway across the continent), tap your hand once for every two steps you take. You're still moving at the same speed, but your rhythm is now only half as fast.
The whole note
The whole note is half as fast as the half note, and four times slower than the quarter note. If you're still marching (and you haven't come to a large body of water yet), tap your hand once for every four steps you take. As always, your speed doesn't change; the rhythm of your hand is the only thing that changes.
The triplet
All the subdivisions of the notes I describe in the previous sections are either double or half and can be divided by two. In many tunes, however, the beats are subdivided into three parts, which brings me to the triplet.
A triplet rhythm subdivides the beat into three even rhythmic intervals. As you continue to march your way across the globe, tap your hand three times evenly for each step you take. Your step still represents the quarter note, but your hand is now tapping three notes for each quarter note. You call these eighth-note triplets.
The dot
The dot is a notational device that allows you to extend the value (duration) of a note by half of its original value. The quarter note, for example, has a value of two eighth notes. When you add a dot to a quarter note, you add one extra eighth note to its value, and you end up with a note that has a value of three eighth notes. Figure 4-9 shows you the most common dotted notes.

Figure 4-9: The most common dotted notes.
The tie
The tie combines two notes. For example, if you tie a quarter note to another quarter note, you increase the length of the original quarter note by another quarter note. However, you don't restrike the second note. The tie simply adds the two notes together. You can combine any two notes with a tie. Figure 4-10 shows common ties between notes.

Figure 4-10: Common ties between notes.
The rest
You don't have to play a note on every single beat. Many beats are silent. The rest tells you when to be silent and avoid playing. It works exactly like the other rhythmic notations (including the dot) except that you don't make a sound.
Figure 4-11 shows you the rest that's equivalent to each note (a quarter-note rest takes the same amount of time as a quarter note, an eighth-note rest takes the same amount of time as an eighth note, and so on).

Figure 4-11: The values of notes and rests and their typical application.
On Track 11, you can hear the notes in Figure 4-11. In place of each rest, the word “rest” is spoken. (No, you don't have to say “rest” when you encounter one in your own playing; just give it a rest.)
Discovering How to Read Music
As you read this sentence, notice that you're not reading letter by letter; you're reading words. You read music the same way. Music notation is recognizable in chunks of notes (or musical words). Certain chunks tend to be repeated again and again, and you can train your eyes to recognize these patterns. When you get used to seeing and hearing music in chunks, you can get a good idea of what the music on the page sounds (and feels) like merely by scanning the page.
Rhythmic chunks
Reading music in chunks makes playing much easier. The chunks may be a group of four sixteenth notes or perhaps two eighth notes. Become familiar with the way these notes look when grouped together for faster recognition (see Figure 4-12), and practice playing and singing them to the click of your metronome. (For more on metronomes, check out the earlier section “Using the Metronome: You Know, That Tick-Tock Thing.”)

Figure 4-12: Seeing beats as chunks of notes.
You can hear the notes from Figure 4-12 on Track 12. Memorize what each of the “chunks” of notes looks and sounds like.
You can substitute any of the notes with a rest of equal value and still have the same rhythmic chunk; the only difference is that now you have a “silent” note (the rest) in place of the note. The rhythmic value of the beat is still the same.
Figure 4-13 shows what the beats look like if you substitute a rest for any of the notes. These are still the same rhythmic combinations but with rests inserted. The top line of the figure shows the original beat with all the notes played. The bottom line shows the same rhythmic figure with a rest replacing one note at a time.

Figure 4-13: Beats and rests as chunks of notes.
Listen to Track 13 to hear how the rests take the space of a note in Figure 4-13.
Interval chunks
You can read the notes of intervals in groups, much like you can read chunks of rhythm. Being able to recognize the intervals in chunks visually helps you read more fluidly. You can see the shapes of chunks rather than having to analyze each individual pitch. The relationship of the notes to each other gives you a hint at which interval you're facing.
For example, when your first note is on a line of the musical staff and the next note is in the space directly above that line, you have an interval of a second (2nd). You can see the two notes as a chunk. If your first note is on a line and your next note is on the line directly above, it's a third (3rd). (For intervals and how to play them, take a detailed look at Chapter 2.) You won't know right away whether it's a major or a minor interval, but you're already in the ballpark. With a bit of practice, you can see the intervals in an instant, much like recognizing words, and you can position your hand to be ready to play them.
The same holds true if your first note is in a space. Each line and each space represent a step and thus an interval. At first, you need to count from space to line to space and so on to recognize the interval. Eventually, your eyes get used to the distance between the notes, and you can see the intervals as chunks in an instant.
Take a look at Figure 4-14. Note that there's no bass clef, or clef of any kind. This is a conceptual approach. All you need are the lines and spaces to see how the notes form the intervals.
When you want to know what interval two notes form, just count the lines and spaces between them, starting with the line or space of the first note. For example, if the first note is on the lowest line of the staff and the next note is two lines and three spaces in the space above it, the interval is a sixth (6th). Note the line, space, line, space, line, space — six steps in all. It forms a picture that you can become familiar with.

Figure 4-14: The most common intervals.
What comes up must come down
A perfect example of the visual impact of music notation is Figure 4-15, a collection of all 12 major scales. Each scale is played with the exact same fingering, only moving that same hand position on the fingerboard to accommodate the new root. All the major scales move from line to space or from space to line, step by step. The sharps and flats adjust the intervals into the proper half and whole steps to create each major scale. When you see music notation like Figure 4-15, you can easily see that each chunk is a scale, and you can set up your hand accordingly.

Figure 4-15: The major scales notated.
No chapter on reading would be complete without taking a look at the chromatic scale. In Figure 4-16, you can see the notation of every note in the practical range of the bass guitar. Follow along as you play each note and see how the notes go up when the music goes up and the notes go down as the music goes down.

Figure 4-16: The chromatic scale notated.
The intricacies of reading music can fill an entire book, but this bit gets you started on the right track.
Playing Your First Song While Reading Music
It's about time to apply all the theoretical stuff in this chapter and play some music, wouldn't you say? With sheet music, you usually get one or two different notational devices to work with, such as notes and tablature, or a chord chart and a vocal chart. Behold, I have a special treat for you.
In this section, you get to read and play “Two Too Tight Shoes Blues,” using all four notational systems in the same song. The first part is written as regular music notation with tablature underneath so you can play the intended bass part. I also include the vocal chart with the chords written above the words. Finally, you get to play with the chord chart, which shows you the chords for each measure. (Refer to the earlier section “Reading Notation: No Pain, Much Gain” if you need more information on notation.)
Listen to Track 14 to familiarize yourself with “Two Too Tight Shoes Blues.” Then look at the notation in Figure 4-17 to see what the sound looks like. When you're ready, pick up your bass and play along with the song on the audio track. Make sure to keep your eyes glued to the page; this exercise is about reading and playing at the same time. When you're comfortable with the song, pan the bass out of the mix and play the song with the track on your own.
A word of advice: If you intend to make reading and playing music your new bedtime-reading activity, make sure you don't crank the amp and keep your entire household up until 2 a.m.
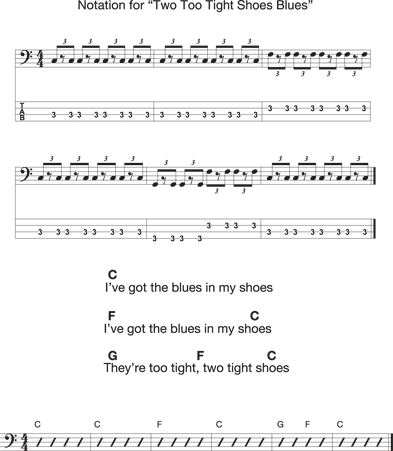
Figure 4-17: Notation for “Two Too Tight Shoes Blues” using four notational systems.