Chapter 6
Creating the Groove
In This Chapter
![]() Analyzing the elements of a groove
Analyzing the elements of a groove
![]() Creating a groove of your very own
Creating a groove of your very own
![]() Building grooves with a drummer
Building grooves with a drummer
![]() Grooving with other musicians
Grooving with other musicians
![]() Changing up existing grooves
Changing up existing grooves
![]() Access the audio tracks and video clips at www.dummies.com/go/bassguitar
Access the audio tracks and video clips at www.dummies.com/go/bassguitar
What do rock, funk, blues, reggae, and all the other musical styles have in common? Each one has its own distinctive groove. A groove is a short musical phrase made up of notes from chords and scales that a bassist plays repeatedly throughout a tune. Grooves establish the rhythm and harmony for the band and the listener. Knowing how to create grooves in different styles is absolutely essential for a bass player — and it's a lot of fun.
This chapter introduces you to the wonderful world of grooves. To get the most out of the chapter, you need to have a handle on two vital concepts. Hmmm, if the groove establishes rhythm and harmony, could those two vital concepts be . . . rhythm . . . and harmony? Yes! Rhythm gets the audience snapping their fingers, and harmony sends them home singing. (You can find out more about rhythm in Chapter 4 and harmony in Chapter 5.) Are you ready? Then get into the groove!
Anatomy of a Groove: Putting Together the Necessary Elements
A good groove can make you tap your feet, bob your head, and snap your fingers. You can move the same groove from chord to chord in a tune without changing the basic phrase. Sounds wimpy, you say? Actually, grooves are anything but wimpy. One of my teachers (a long, long time ago) told me something I'll never forget: “With the right groove, a good bassist alone can move a whole roomful of people.” A groove is constructed of several elements, and you can use these different elements to create your own earth-shaking grooves. To get started, check out the guidelines in this section.
Getting your groove skeleton out of the closet
 The first two notes of any groove are what I refer to as the groove skeleton. A groove can contain other notes besides the groove skeleton, but these first two notes are the most important because they establish the root of the chord, the pulse or tempo for the tune, and the feel of the rhythm:
- The root of the chord: You usually play the root as the first note of your groove. The root of any chord (or scale) is the most important note in that chord — it's the note your ear gravitates toward (the most satisfying note). The second note, or the other half of the groove skeleton, is usually a chord tone (root, 3, 5, or 7) that further defines the chord. With these two notes, you give the listener a good idea of the harmony in a tune. Check out the chord tones for each tonality (sound) in Chapter 5.
- The pulse (tempo) of the tune: Music has a certain pulse. The pulse is the speed at which you count the beats in a measure (1-2-3-4) — the speed at which you tap your feet in time with a tune. The pulse can be fast, slow, or something in between. The time that elapses between the first and second notes of the groove skeleton establishes the pulse for the groove and for the song. It tells the listener how fast the music is.
- The feel of the rhythm: You can divide a beat only so many ways: into quarters, eighths, sixteenths, or triplets. No, I'm not referring to babies. Triplets divide a beat into three equal parts. (See Chapter 4 for more on rhythm.) When you choose the division of the beat for your groove skeleton, you signal the feel of the groove and song to the listener, whether it's funk, Latin, or rock. The feel has nothing to do with tempo (see the previous bullet). For example, a Latin song can go at a fast tempo or at a leisurely pace. On the other hand, different feels can be applied to the same tempo. A feel can give the listener a sense of urgency or a sense of laziness in a tune, all without changing the overall tempo of the music. Figure 6-1 shows how the groove skeleton creates different feels.
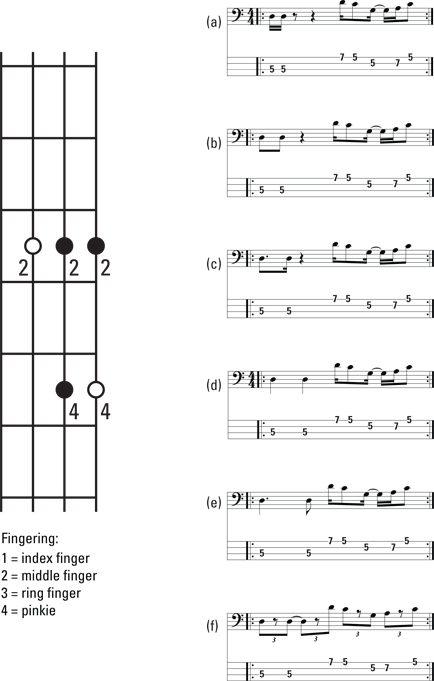
Figure 6-1: Six grooves with different groove skeletons.
 As you listen to the grooves from Figure 6-1 on Track 37 (also Video 13), tap your feet in tempo. At the beginning of the audio track, you can hear the count-off, which establishes the tempo. Groove (a) is at 0:00, (b) is at 0:15, (c) is at 0:30, (d) is at 0:33, (e) is at 1:00, and (f) is at 1:15. Notice how the tempo for all six of these grooves remains the same. Also notice that all six grooves use exactly the same notes. Even so, as you listen to them, pay special attention to how very different they are from one other. Each groove has its own unique characteristics, created simply by slight changes in the rhythm of the two notes in the groove skeleton. This variation shows the power of the groove skeleton: If you change the groove skeleton and leave everything else exactly the same, you still end up with a completely new groove. In this audio track, the groove skeleton is the only thing that changes from groove to groove.
Playing a song using only the groove skeleton
How important is the groove skeleton? It's so important that you can accompany an entire song on your bass using solely (or is it “soul-ly”?) the groove skeleton. Doing so isn't just an arbitrary exercise, either. It's a perfectly legitimate and successful method of playing bass on a song.
Need proof? Just listen to the hit “Stand by Me,” one of the top rock ’n’ roll hits of all time. And plenty of modern dance hits operate on the same premise of using just the groove skeleton alone on the bass with little else.
When you're learning a new tune, starting with just the groove skeleton is a great way to get to know its harmonic structure — the movement of the roots of the chords — without having to worry about playing a complex groove on each one of those chords. You can always add notes to the groove later as you become more familiar with it.
On Track 38, you can hear a song that's accompanied by only the groove skeleton. Figure 6-2 shows the harmony of the song. To play it with the audio track, all you need to do is find the roots of the chords on your bass neck and play the groove skeleton for each root. Are you comfortable playing along with the bass on the audio track? If so, pan it out and be the only bass.

Figure 6-2: Song played using only the groove skeleton.
 Player beware! Space is the most difficult thing to play, and if you're playing only the two notes of the groove skeleton, you have plenty of space to contend with for the remainder of the measure. (For more on measures, also called bars, see Chapter 4.)
Choosing the right notes for a groove
Playing grooves is an elusive art form. I remember when I came out of school I could only copy other people's grooves. I didn't have a clue about how to create my own. Finally, after years of research and analysis, I discovered what makes a groove . . . groove. Yes, there's a method to the madness, and a science to the art.
A few basic guidelines
The following list gives you a few basic guidelines to remember when you're creating any groove:
- Choose notes from the appropriate scale for the chord. Almost every tune has its own unique set of chords that accompany the music. The notes you choose when playing it need to come from the scales and chords particular to that tune. If your groove doesn't match harmonically with what's going on in the music, it's no longer music; it's noise. You can check out Chapter 5 to see which scales go with which chords.
- Settle on a finger position. Try to choose notes for your groove that fit into a box (a pattern of notes on your fingerboard that requires no, or very little, shifting with your left hand; see Chapter 5 for more info). The less you shift your left hand, the easier it is to play the groove. You may think that sliding all over your fingerboard looks cool, but the best bassists tend to hold one position for as long as possible. Your hand gets used to a certain sequence, and you don't even have to think about playing the groove (after you've practiced it enough, of course).
- Make your groove mobile. Some tunes consist of only one underlying tonality throughout, so you don't have to move your groove around (just listen to some James Brown tunes). In most tunes, however, the chords change as the tune proceeds, which means you have to move your groove to match the chord changes within the tune. With this type of tune, you need to make sure you pick a group of notes that are simple to execute when you move from chord to chord.
Ranking the best and leaving the rest
The list in the preceding section gives you a general idea of what to consider when creating a groove. Now, I want to give you some guidelines in choosing the best notes to incorporate into your groove. The three most commonly used scales in a groove are the major, minor, and dominant scales. Chords are made up of the root, the 3, the 5, and sometimes the 7 of the scale they're related to. Check out Figure 6-3 for the structure of the major (Ionian), minor (Dorian), and dominant (Mixolydian) scales. Take a look at Chapter 5 for more on these scales.

Figure 6-3: Common scales used for grooves (Ionian, Dorian, and Mixolydian).
Not all notes are created equal. Certain notes in a scale sound better in a groove than others. The following notes are the prime choices for your grooves (listed in order of importance):
- Root: There's no question about it; you have to know the root of each chord in the tune. The root identifies the sound of the chord for your band and for the listener. For example, a D minor chord has D as the root; an E dominant chord has E as the root. The root is the most important note in a chord. Your band counts on you to define the sound of each chord for them. That's why bassists play the root as the first note almost every time the chord changes; so be sure to play that root with authority.
- 5th: The 5 reinforces the root, and it's fairly neutral (it fits over any major, minor, or dominant chord). The interval (distance) between the root and the 5 is the same for major, minor, and dominant chords. If you have a lot of chord changes between major, minor, and dominant in a tune, the root and 5 combination is the perfect choice for your groove notes.
- 3rd: The 3 identifies the chord as either major or minor. Choosing the 3 also forces you to settle on a hand position. If the chord is major and therefore requires a major 3, start your groove with your middle finger on the root to reach all the notes in the scale for that chord without shifting. If the chord is minor and therefore requires a minor 3 (
 3), start the groove with your index finger on the root. (Check out the fingering of the scales in Chapter 5 for more info.)
 - 7th: The 7 is another excellent choice for a groove, especially if the chord is minor or dominant. Both minor and dominant chords have a 7. If the chord is major, the 7 is commonly substituted with the 6 because it's just a more pleasant sound.
- 4th: The 4 is a great note to play as a passing note (an unstressed note that you play on your way to the next important note). A passing note adds a little spice to the groove (it gives the groove an interesting sound). Just be careful not to emphasize a passing note, because doing so tends to obscure the chord. (However, keep in mind that an emphasized passing note makes a good choice if you intend to play an ambiguous groove, as I explain in Chapter 5).
- 6th: The 6 is a good choice to play as a neutral note. In other words, no matter what your chord is, the 6 will generally fit. As with the 4, you don't want to emphasize it too strongly, though. Using the 6 as a passing note is ideal. Passing notes are used to smooth the passage from one strong note to the next.
- 2nd: The 2 isn't exactly a terrific choice to include in your groove. It's too close to the root (only two frets away), so it clashes, and it doesn't give your bass line enough variety. However, the 2 can work as a passing note.
Creating Your Own Groove
With a little help from your friend (that's me!), you can create your own groove. The process that goes on in your head each time you create a groove for a tune is the same, no matter what kind of chord you're playing (major, minor, or dominant).
 If you haven't already looked at the section “Choosing the right notes for a groove,” earlier in this chapter, you may want to now to familiarize yourself with the important decisions you need to make before creating a groove.
Covering the “basses”: Creating dominant, minor, and major grooves
The process in preparing to play any groove is the same, but you need to make a few adjustments to accommodate your groove to each kind of chord: dominant, minor, and major (see Chapter 5). Read on for some help in creating some unforgettable grooves.
The dominant groove
Imagine that you're getting together with a bunch of other musicians to play some music. The guy in charge says, “Let's jam in D7.” (He's talking about playing in D dominant.) Don't panic. The following list gives you some guidelines for determining what notes to play during a D7 jam. Figure 6-4 shows you the process.
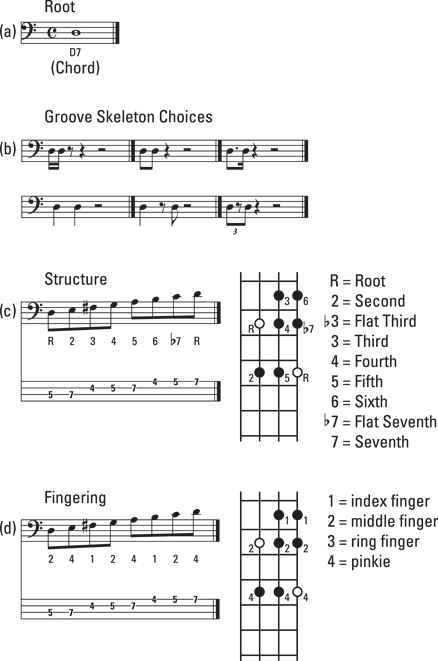
Figure 6-4: Creating a groove for D7 (D dominant).
- Determine the root of the chord.
In this case, the chord is D7, so the root of the chord is D (see Figure 6-4a).
- Decide what kind of groove skeleton you want to play.
Figure 6-4b shows your basic choices. This groove example uses two eighth notes, but feel free to experiment with the other possibilities. In fact, let your ear decide which rhythm sounds best for the given situation. (For more on the groove skeleton, see “Getting your groove skeleton out of your closet,” earlier in this chapter.)
- Choose the appropriate scale for the chord.
For the D7 chord groove in this example, the proper scale is D Mixolydian (see Figure 6-4c). Chapter 5 can help you find which scale goes with which chord.
To play the D Mixolydian scale, start the scale on the 5th fret of the A string and end on the 7th fret of the G string. Choose the notes for your groove from this scale. You can pick the choice notes (see “Ranking the best and leaving the rest,” earlier in this chapter, for details) from the intervals marked in Figure 6-4c. My choices are the root, 5, and
7 for the simple groove, and the root, 3, 4, 5, and 7 for the complex groove (see Figure 6-5).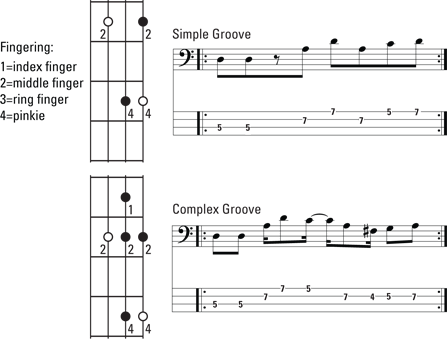
Figure 6-5: A simple groove and a complex groove for D7.
- Position your left hand.
You want to play the groove with the least amount of effort, so you need to avoid any unnecessary shifting with your left hand. Start the D Mixolydian scale with the middle finger of your left hand on the root D (5th fret of the A string). You can reach all the notes of the scale from this position without moving your left hand. Refer to Figure 6-4d for the fingering for this scale.
- Determine how mobile your groove needs to be.
If the tune has different chords (if the roots change), your groove has to be mobile, moveable from chord to chord. In this case, you need to make your groove simple. Choose only a few notes and make them easy to play.
However, if you stay on one chord for a while (which is the likely scenario if someone wants to jam in D7), you can make your groove a bit more complex to keep it interesting. Refer to Figure 6-5 for both a simple and a complex version of the same groove.
- Enjoy playing your groove.
You read correctly. Have fun! Whatever groove you come up with, make it meaningful. Jamming isn't work — it's play!
On Track 39, you can listen to the steps necessary when creating a dominant groove. And you can see me play the grooves in Video 14. First, you hear the D7 chord played on the keyboard, with the bass playing just the root. Then you hear the bass playing different groove skeletons on the root of the D7 chord. Next is the sound of the Mixolydian mode, the correct scale for D7. Finally, you hear a simple groove in D7, followed by a complex groove in D7. As you listen, follow the process in Figures 6-4 and 6-5.
The minor groove
You're playing with the band, jamming on a dominant groove . . . but wait . . . what if the guy in charge yells, very enthusiastically, “Let's jam in D minor!” Uh, oh . . . a minor adjustment is in order. Relax. Figure 6-6 shows you the process.

Figure 6-6: Creating a groove for D minor.
- Determine the root of the chord.
In this case, the chord is D minor (Dm or Dm7), so the root of the chord is D (see Figure 6-6a).
- Decide what kind of groove skeleton you want to play.
I show you the basic choices in Figure 6-6b. My choice is the dotted eighth and sixteenth notes as the groove skeleton, but you can experiment with the other possibilities.
- Choose the appropriate scale for the chord.
For the D minor chord in this example, the proper scale is D Dorian (see Figure 6-6c). For more info about the D Dorian scale, see Chapter 5.
To play the D Dorian scale, start the scale on the 5th fret of the A string and end it on the 7th fret of the G string. Choose the notes for your groove from this scale. You can pick the choice notes from the intervals marked in Figure 6-6c. My choices are the root, 5, and
7 for the simple groove, and the root, 3, 4, 5, and 7 for the complex groove (see Figure 6-7).
Figure 6-7: A simple and a complex groove for D minor.
- Position your left hand.
You want to avoid any unnecessary shifts with your left hand. The D Dorian scale requires one (itty, bitty) shift, however, so it's best to begin the D Dorian scale with the index finger of your left hand on the root D (5th fret of the A string). You can reach all the notes of the scale from this position until you get to the G string. At that point, you need to shift your hand toward the nut by one fret to reach the remaining three notes. Check out Figure 6-6d on how to finger this scale.
- Determine how mobile your groove needs to be.
Your groove has to be mobile if the tune has different chords. In this case, be sure to create a groove that's simple. Choose only a few notes that are easy to play. Even though the D Dorian scale requires you to shift your hand, you don't have to play every single note in that scale. You may decide to choose only the notes of the scale that you can reach from one position (without shifting).
If you stay on one chord for a while (which is the likely scenario if someone wants to jam in D minor), you can make your groove a bit more complex to keep it interesting. Figure 6-7 shows both a simple and a complex version of the same groove. Notice that neither of the two grooves requires any shifting with the left hand.
On Track 40, check out the steps necessary when creating a minor groove. First, the D minor chord is played on the keyboard, with the bass adding the root. Next, different groove skeletons are played on the root of the chord. Then you can hear the sound of the Dorian mode, the correct scale for D minor. Finally, you can listen to a simple groove in D minor, followed by a complex groove in D minor. Follow this process along in Figures 6-6 and 6-7.
The major groove
Say you're jamming away with the band on a minor groove when all of a sudden the guy in charge yells (with uninhibited enthusiasm), “Let's jam in D major!” Hmmm, does he really mean major? Here's the way to respond to that enthusiasm. Figure 6-8 shows you the process.

Figure 6-8: Creating a groove for D major.
- Determine the root of the chord.
In this case, the chord is D major (DMaj or DMaj7), so the root of the chord is D (see Figure 6-8a).
- Decide what kind of groove skeleton you want to play.
Figure 6-8b shows the basic choices. I chose the two sixteenth notes as the groove skeleton, but you can experiment with the other possibilities as well.
- Choose the appropriate scale for the chord.
For the D major chord in this example, the proper scale is D Ionian (see Figure 6-8c). You can find more info on the Ionian scale in Chapter 5.
To play the D Ionian scale, you start the scale on the 5th fret of the A string and end it on the 7th fret of the G string. Choose the notes for your groove from this scale. You can pick the choice notes from the intervals marked in Figure 6-8c. My choice is the root, 5, and 6 for the simple groove, and the root, 3, 4, 5, and 6 for the complex groove (see Figure 6-9).
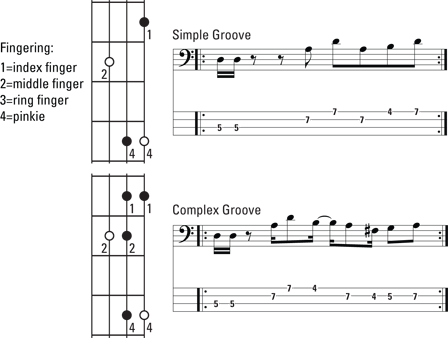
Figure 6-9: A simple and a complex groove for D major.
- Position your left hand.
You want to avoid any unnecessary shifting with your left hand. So start the D Ionian scale with the middle finger of your left hand on the D (5th fret of the A string), which is the root. You can reach all the notes of the scale from this position without moving your left hand. You can refer to Figure 6-8d for the fingering for this scale.
- Decide how mobile your groove needs to be.
If the tune has different chords — if the roots change — your groove has to be mobile (moveable from chord to chord), so the groove you create needs to be a simple one. Use only a few notes and make them easy to play.
If you stay on one chord for a while, you can make your groove a bit more complex to keep it interesting. You can see both a simple and a complex version of the same groove in Figure 6-9.
In the case of the major chord, you have to consider one more thing when choosing the notes for the groove: The 7 of the Ionian scale doesn't sound all that great in a groove format, so avoid it if you can. Choose the 6 instead; the 6 is usually a great choice, but let your own ears decide what's right.
On Track 41, check out the steps necessary for creating a major groove. First, the D major chord is played on the keyboard, with the bass adding the root. Next, different groove skeletons are played on the root of the chord. Then you hear the sound of the Ionian mode, the correct scale for D major. Finally, listen to a simple groove in D major, followed by a complex groove in D major. Notice how the 6 of the mode is played in the groove rather than the 7. Follow this process in Figures 6-8 and 6-9.
Waggin’ the groove tail
You can find a tail at the end — the end of a puppy, the end of a horse, and the end of a groove. Alerting your fellow band members that the next groove is coming up with a groove tail, or the back end of a groove, is essential to keeping everyone harmonically and rhythmically aligned.
The groove tail occurs in the last beat or two before the end of the groove, and its sole purpose is to lead to the next groove, whether it's a repeat of the current one or a brand new one. A groove tail is a bit of a free radical; it doesn't have to be part of either the old or the new groove's harmony, and it can use notes that aren't part of the scale of either groove. This causes momentary tension, but tension and release are the name of the game. The groove tail leads into the next groove pattern, which releases the tension built up by the groove tail.
No hard and fast rules exist for how to use the groove tail. You kind of put your own stamp on your style of playing, depending on how you use it. Be creative and remember to keep the first part of the groove consistent.
Check out some examples of the groove tail in Figure 6-10. Listen to Track 42 or see Video 15 to appreciate how the groove is consistent in the first part and then different in the second part. It still sounds like the same groove, but it has a bit of an unexpected element in it now, which keeps things interesting. However, despite the different groove tails, there's never a doubt where the groove starts — and that's the point. Oh, and by the way, playing nothing at the end of the groove can be a very cool groove tail as well. Never underestimate the power of silence.
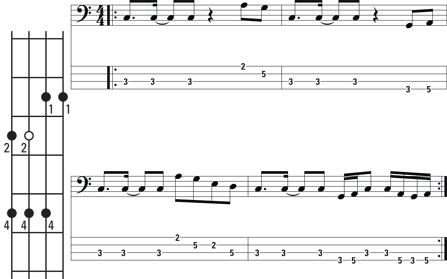
Figure 6-10: Creating a groove tail.
Movin’ and groovin’ from chord to chord
Imagine that you're jamming on D7, D minor, and D major (all three are covered in the previous section), and the grooves are just cascading off your fingers. The whole room is positively rocking. In fact, things are going so well that the leader of this musical extravaganza decides to surprise you by handing out chord charts (pages of musical notation) of a tune he or she wrote the previous week.
The chords of the tune move all over the place and change between major, minor, and dominant more frequently than your lead-footed cousin Jimmy changes lanes on a four-lane highway. Should you tremble? Absolutely not. Just take a look at the chord chart in Figure 6-11 and find out where the roots are located. Using the concepts from the previous sections, you can come up with a simple groove that you can move easily from chord to chord. All you have to do is set up your groove skeleton, embellish it by adding the proper notes, and then create a groove tail that helps you move the groove from one chord to the next.

Figure 6-11: A chord chart.
Using constant structure
Using constant structure is one way to move a groove easily between chords with different tonalities (major, minor, and dominant). Constant structure refers to a group of notes in a groove that can be moved from chord to chord, regardless of whether the chords are major, minor, or dominant tonalities (for more on tonality, check out Chapter 5). The root and 5 of a scale are one of the most common constant structures for grooves and can be easily moved between chords. Grooves using the root and 5 are simple but powerful. In fact, most songs incorporate root-5 grooves. The following steps, along with Figure 6-12, show you how to create a mobile groove:
- Create a groove.
To create a groove, take a look at the section earlier in this chapter, “Covering the ‘basses’: Creating dominant, minor, and major grooves.” Keep the groove simple, because you need to move it to several different chords. My choice is a groove that doesn't require any shifting of your hand to reach all the notes (see Figure 6-12a).
To play this groove, you need access to two strings above your root, so choose the root on either the E or the A string. You won't have enough strings to play this groove if you start on either the D or G string.
- Find the roots of the chords.
Look at your chord chart (simulated in Figure 6-11) and find the root of each chord on the fingerboard of your bass. Remember that all your roots have to be on the E or A string to play this groove. Figure 6-12b shows you where the roots for the chords on the chord chart are located on your bass.
- Practice moving the groove smoothly from one chord to the next.
You have to make these moves without any hesitation. Figure 6-12c shows the movement of the chords on your fingerboard. Use the groove tail to lead from one chord to the next. Keep in mind that the groove tail isn't necessarily part of the harmony; it just has to lead to the next chord or groove.

Figure 6-12: Mobile groove using constant structure.
The groove you hear on Track 43 can be moved anywhere without your having to change the fingering. You do, of course, have to shift your hand into position for each new chord, however. Follow the chart in Figure 6-12.
Using chord tones
Another way to move a groove between chords with different tonalities is to use chord tones. Chord tones are the notes in any chord (root, 3, 5, and 7) that identify the chord type.
When you play a song that includes several tonalities, such as major, minor, and dominant, you need to make slight adjustments in your groove to play the different chord tones. Your fingering changes as you move from one kind of chord to the next. Keep the groove simple, because you have your hands full (pun intended) just changing the groove from chord to chord.
The following steps and Figure 6-13 help you create a mobile groove that uses chord tones:
- Create a groove.
Make your groove simple enough to handle. My choice is a groove that includes the root, 3, and 5 of a chord. You can see the different patterns for major, minor, and dominant in Figure 6-13a. (For the sake of comparison, all the patterns start on C.) Practice this groove, starting on one note to get comfortable with it. This groove covers three strings: the string you play the root on, and the two above it. You can start the groove on the E or A string.
- Find the roots of the chords.
Using the chord chart (refer to Figure 6-11), find the roots of the chords on your fingerboard. Your roots can start on the E or A string. Refer to Figure 6-12b for the locations of the roots for this particular chord chart.
- Practice moving the groove smoothly from one chord to the next.
You have to change your fingering from chord to chord. Practice until you can transfer this fingering without hesitation. Figure 6-13b shows the configuration of the groove for different chords. Use a groove tail to get from chord to chord. If you like, you may try using different notes than shown for your groove tail; just be sure it gets you to the next chord.
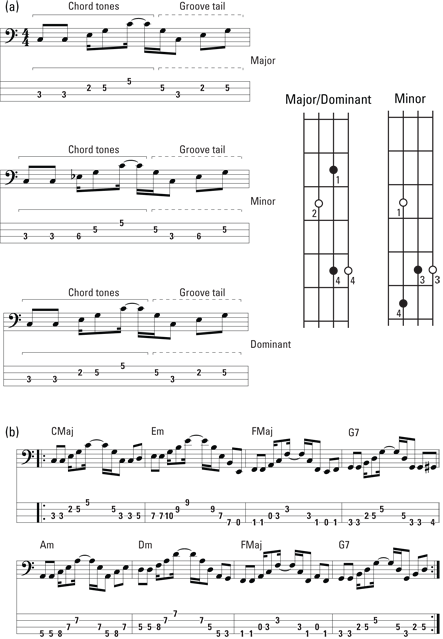
Figure 6-13: Mobile groove using chord tones.
The groove on Track 44 changes shape with each new chord tonality, which means you need to adjust your fingering with each chord (in addition to shifting your hand into position). Keep an eye on Figure 6-13 to get a handle on this concept.
Finding the perfect fit: The designer groove
Every now and then you hear a bass groove that simply knocks your socks off — a groove that seems to fit the song like a glove. I call these grooves designer grooves; the musician literally designs the groove to fit perfectly with everything that's going on harmonically and rhythmically in a particular tune. Just listen to Michael Jackson's “Shake Your Body (Down to the Ground).” In addition to having the groove skeleton (for details, see “Getting your groove skeleton out of the closet,” earlier in the chapter), designer grooves also have a groove apex, which I discuss in the following sections.
The groove apex
An apex refers to the highlight of something, and in this case, the groove apex is the note that's the highlight of a groove. Every groove has an apex. The groove apex is usually either the highest or the lowest note of the groove. Either way, it's often the note farthest from the root of your groove.
Determining which note is the groove apex is open to interpretation. If you hear one note in a bass groove that really sticks out for you, that note is the groove apex.
Accenting the groove apex helps your groove fit better with the music. For example, you can accent a hit by your drummer or a special rhythm by your singer — whatever you think deserves more attention.
The upper groove apex
An upper groove apex is the highest note of a groove. Figure 6-14 shows a groove with a clear upper groove apex. Notice how the groove skeleton sets up the groove.

Figure 6-14: Groove with upper groove apex.
To practice playing an upper groove apex, check out the exercise in Figure 6-15. This exercise focuses on the upper groove apex alone, and practicing it can greatly improve your ability to execute the groove apex on any note.

Figure 6-15: Upper groove apex exercise.
Track 45 includes an example of a groove with an upper groove apex, followed by an exercise to practice playing it accurately, as shown in Figures 6-14 and 6-15.
The lower groove apex
The lower groove apex is the lowest note of a groove. Figure 6-16 shows a groove that has a lower groove apex. Notice how the groove skeleton establishes the groove.

Figure 6-16: Groove with lower groove apex.
To get comfortable playing the lower groove apex, check out the exercise in Figure 6-17. This exercise shows you how to place the lower groove apex on any part of the beat.

Figure 6-17: Lower groove apex exercise.
On Track 46, you hear an example of a lower groove apex. You can see it in Figures 6-16 and 6-17. In Video 16, I play both the upper and lower groove apex.
In both the upper groove and lower groove apex exercises (wow, that's a mouthful), the groove apex follows right behind the groove skeleton (the first two notes). These exercises are a great way to get comfortable playing not only grooves but also rhythms.
After you're comfortable playing along with the audio tracks, try playing these exercises without them. For even more of a challenge, try setting your metronome at varying speeds (refer to Chapter 4 for more on setting a metronome).
Grooving with a Drummer
No instrument is more important to your well-being as a bass player than the drums. (By the way, the bass is just as important to the well-being of a drummer.) Bassists and drummers work hand in hand to create grooves. If you want to build great grooves (and great relationships) with drummers, you need to know what all the different drums on a drum set sound like and what they're generally used for. This section gives you a quick overview of the different types of drums. If you want to read more, you can always check out Drums For Dummies, by Jeff Strong (Wiley).
The bass drum
The bass drum produces the lowest sound on the drum set. This drum is very closely aligned with your part as a bass player. Generally speaking, drummers play the bass drum on the first beat of a measure to start the groove and then play it at least once more within that measure. If you play notes that match the rhythm of the bass drum, you'll fit right in. Figure 6-18 shows you how to match the rhythm of the bass drum.

Figure 6-18: Grooving with the bass drum.
You can listen to Track 47 for a demonstration of how the bass drum sounds, followed by a bass groove that enhances the bass drum (at the 0:04 mark of the track).
The snare drum
The snare drum is the loudest drum on the drum set. This drum is usually played on the backbeat (beats 2 and 4) of each measure. You can match up one of your notes with the snare drum, or you can create some sonic space(where you don't play at that moment) so the snare drum sounds alone. Hmmm, now there's an interesting concept: Instead of looking confused when you're lost, just give the band leader your most serious look and say you're experimenting with sonic space.
Listen to Track 47 for the sound of the snare drum (playing along with the bass drum), and then take a look at Figure 6-19 to find out how you can join in with the snare and bass drums. On the track, the snare drum is at 0:16, followed by the groove at 0:21.

Figure 6-19: Bass grooving with the snare drum and the bass drum.
The hi-hat
No, the hi-hat isn't a tall cap you wear on your head. The hi-hat (the two interconnected circular brass plates that snap together when played) is your real-life metronome. The drummer uses the hi-hat to mark the subdivisions of the beat (usually eighth notes or sixteenth notes) and keeps the hi-hat snapping right through a groove.
Sometimes, instead of using the hi-hat, the drummer uses one of the cymbals (the big, circular brass plates on the drum set) to keep the rhythm. You may have trouble hearing the hi-hat at first, but after you get used to listening for its constant sound, you'll be able to play your notes easily, because the rhythm of most of the notes you play on the bass coincide rhythmically with the hi-hat.
Listen to Track 47 for the sound of the hi-hat playing along with the snare and bass drums, and check out Figure 6-20 for a groove you can play with the three instruments. On the track, the hi-hat is at 0:34, followed by the groove at 0:42.

Figure 6-20: Grooving with the hi-hat, the snare drum, and the bass drum.
Jammin’ with Other Musicians
Jammin’ is the all-important yet elusive activity that musicians do to get to know one another and create some memorable music in the process. Sometimes the jam participants agree on a chord or even on a set of chords (see Chapter 5 for more information) ahead of time, but in its purest form a jam starts by someone playing and the rest of the band joining in. As you can imagine, jam sessions can get pretty chaotic — sort of like a bunch of people riding their bicycles crisscross in a deserted parking lot at full tilt at night in total darkness. Yeah, it can be painful.
So how do you join in a jam session if you don't know what anybody else is playing? Well, of course, you can be the one who starts playing first, and then the other jammers have to figure out what to do, but I have a feeling this works only occasionally. Most of the time, you have to use your ears and figure out what sounds best.
You're jamming! You aren't playing a composition or somebody else's idea of a song. You're part of a creative collaboration for making music. Jamming lets you shed any fears of making mistakes. In its truest form, there are no mistakes — only choices that sound better than others. So take this as your chance to experiment. Just remember that jamming is a truly democratic process. Everybody's input is of equal importance, so go forth and create!
In the following sections, you get a clear, step-by-step guide on what to do in a jam session.
Preparing your ear
First things first: You can't just step into the ring (even the musical ring) to spar with your bandmates without proper preparation. Jamming is ear-based, thus you have to prepare your ear. The best way to hear is to sing! That's right, to hear you have to be able to locate the notes by singing them. Harmony is based on scales; therefore, singing the different steps in a scale is a great way to acquire an ear for jamming.
Play a root on your bass, just one note. Now sing the major scale (for more about the major scale and a host of others, check out Chapter 5). Then try singing the root, followed by one of the other scale tones (2, 3, 4, 5, 6, 7, or the octave). In other words, play the root (such as C), sing the note, and then sing the 3 of that major scale (in this case, E). You can also sing the root and any of the other notes; just make sure you can relate back to the root, which is what helps you center the harmony.
Eventually, you want to try doing this exercise with all seven basic modes (see Chapter 5). This exercise helps you find your way around the harmony without having to rely entirely on your bass. In essence, you're training your ear.
Listening for “the note”
In a jam session, somebody (it may not even be the person who begins the jam) comes up with a musical phrase, a sequence of notes that's repeated several times. Be alert for this phrase and treat it as a melody. Here's what you do to get in on the action and contribute mightily to a jam session. The first part is the “ear” part, where you have to listen.
- Listen for one note that sounds like it's at the center of the phrase.
Hum the note until you have it solidly established in your head (don't do anything else until you have a firm grasp of the note). Try to find it on your bass. See the sidebar “A trick to finding a note that's in your head (or in your ear)” for the process of finding a note on your bass. You are looking to form a chord.
- Listen for a second note that seems important to the phrase.
Go ahead and find that note on your bass as well.
- See how the two notes relate to each other.
You need to figure out whether the two notes you've found can form a chord. I guarantee you they can; just look at Figure 6-21 for guidance.

Figure 6-21: Finding the root in a two-note relationship.
- Name your two notes.
Knowing the names of your notes isn't absolutely essential, but it does make your life a lot easier if you know what they're called.
- Locate the two notes within three strings and four frets of each other on your bass.
Locating these notes in this way enables you to see what interval they form and generally where you're going to place your hand. (For more on intervals, flip to Chapter 2.)
- Choose your root.
One of the two notes you've already picked is the root. Use the diagram in Figure 6-21 to identify which one it is. At that point, you know where to place your fingers: index finger on the root if it sounds minor or middle finger if it's major or dominant.
The final part of the process is the “play” part, where you get to . . . well, play:
- Fill in your chord and mode according to the root you've picked using Figure 6-21.
Chapter 5 provides more information on filling in your chord and mode.
- Settle on a groove.
See the earlier section “Creating Your Own Groove” to find out how to develop a groove.
- Jam!
Go ahead and find out how your groove can influence what your bandmates are playing, and then play to your heart's content; this is the fun part. Don't worry about so-called “wrong” notes — just try to make the music sound good. The more you jam, the better you get.
Seems pretty complicated, doesn't it? Don't worry; if you're with the right group of musicians, jamming is really a blast! Just keep listening. Jamming is like a conversation. You have to hear what the others are saying to be able to join in with relevant ideas of your own. As with everything else, the more you do it, the better you get. After you establish the prevailing harmony in a jam, the other players usually rally around you. Jamming is very much a team sport, so don't fret it. (Well, actually do fret the notes, but don't fret anything else.)
Pivoting the note
Imagine that you're jamming away with a group of musicians. Things are positively hot, and your groove is simply smokin’. In fact, the music is sounding so good that you want to take it to another level and add another chord or two instead of staying on the same chord throughout the jam. In this case, it's time to pivot the note!
Pivoting the note that's at the center of your jam harmony allows you to create new chords that relate to it and to each other. The new chords then give the music a fresh direction by adding variety and making it more interesting. After all, no matter how smokin’ hot a groove is, how interesting can you make a song if it stays on the same chord for three hours?
The trick to pivoting a note is to treat the central note (the root) of the chord you're playing as if it's not the root at all but a supporting note to the new central note (root) in a new chord. You're using the old note to pivot to a new chord.
For example, if you're tired of jamming in E, you can treat the E (the 1 of the chord) as if it's the 3 of another chord by finding and playing a second note that's three steps lower in the scale — which happens to be C. (E is the 3 of the C major chord.) Now you can continue playing, using C as the new 1, and E as the new 3. E has pivoted from a 1 of one chord to a 3 in another. The E is still an important part of the harmony, but it's not quite so central anymore. How can you get away with simply changing the root in the harmony? You're the bassist and roots are your business!
The root is the bassist's business, whether you're choosing it or you're hearing it from another player, especially from the soloist (or whoever's playing the melody). Always listen to the other players, because one of them may initiate a new chord sound, in which case you follow the guidelines in the previous section for finding two central notes. The diagram in Figure 6-22 shows you the best choices for pivoting the central note.

Figure 6-22: The best choices for pivoting a note and the resulting chords.
When you create new chords in a jam, keep in mind that it's easier to move around from chord to chord if you're playing a simple groove rather than a complex one. (Check out the earlier section “Covering the ‘basses’: Creating dominant, minor, and major grooves” for more information on simple and complex grooves.) The rule of thumb is this: The more chords you have and the faster they change, the simpler you want your groove to be. Often, the best initial move is to just lay down a pumping eighth-note rhythm on the root. (Head to Chapter 8 for the eighth-note rhythm on the root.)
Let your own ear be the final judge of whether a choice you make sounds good, and give it a little time to ferment, especially in a jam session. To let a groove ferment, you have to keep your choice of chords consistent and repeat them over and over again to give the other players a chance to get familiar with the duration and sequence of your chords (also called a chord progression) and to respond with musical phrases that enhance the new progression.
Getting Creative with Existing Grooves
Music is a creative art, and being creative is something every musician must be comfortable with. Just as is the case with technique and repertoire, creativity is something you can practice. Without using the creative juices, every bass player in the world would sound exactly the same, and that's certainly not the case. So how do you put your own personal stamp on your music?
You can get really creative with your bass playing by using the elements of a groove from earlier in this chapter. Just pick a groove — either yours or someone else's — and start making little changes: a different groove tail perhaps, or displacing the groove apex, or how about changing the feel pretty drastically by using a different rhythm in the groove skeleton? You'd be surprised by how a little change can affect the music in a big way. It keeps the song fresh, and it makes it unique — uniquely yours.
Altering a (famous) groove
An absolutely fabulous way to practice your creativity is to take a famous groove and to change it in a way that keeps the basic structure of the groove in place (making it recognizable) but gives it enough of a variation to make it a new groove, your own. For example, take Paul McCartney's bass line on The Beatles’ song “Come Together,” one of the most recognizable bass grooves in music.
First, check out the original groove by listening to “Come Together” by The Beatles. It's beyond obvious; the bass groove is central to the song and comes in right at the beginning. You can hear the first two notes (the groove skeleton) establishing the rock feel. Then there's a little transition before the bass soars to the high note and lets it ring (the groove apex; this one really sticks out). Then the last part of the groove leads back to the beginning of the next groove by way of an array of different notes, sometimes just one, sometimes several (typical of a groove tail).
You can alter this groove mildly, by adding some dead notes or some notes in the groove tail that don't bear a lot of weight. You can also alter the groove drastically by changing the rhythm of the groove skeleton or by moving the groove apex onto different parts of the beat. You can also gradually change the groove as you play through the song, which is especially effective if your song goes on for several minutes and the groove never changes.
Figure 6-23 shows you a few variations on the theme of “Come Together,” which by no means exhaust the possibilities. So experiment with these variations and then come up with your own. You can hear these variations on Track 48.
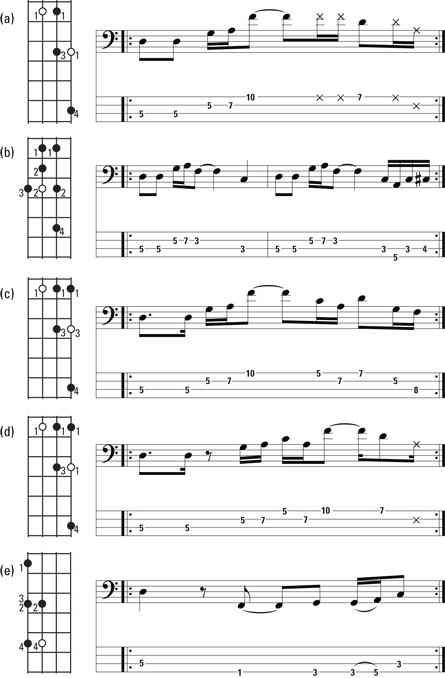
Figure 6-23: Different variations of “Come Together.”
Figure 6-23a (at the start of the track) is a variation of the “Come Together” groove, using a few dead notes (see Chapter 5). The dead notes have a very light impact on the original groove and really change it only mildly.
Figure 6-23b (at 0:29) shows a denser version of the same groove. The groove apex is played on a lower octave (for more on octaves, see Chapter 4), making it less dramatic, and the groove tail varies from one measure to the next, giving the groove variety.
In Figure 6-23c (at 1:02), you can see a change in the groove skeleton, which is always a consequential change, because it alters the feel and possibly even the genre of the groove. In this case, it makes it more of a funk groove. The groove apex is still in the same place as the original groove.
Things get really interesting in Figure 6-23d (at 1:32). The groove skeleton has a funky sixteenth note feel, and the groove apex is now rhythmically displaced; it occurs later in the measure than the original.
Finally, in Figure 6-23e (at 2:01), you can see the whole shape of the groove inverted. Instead of a groove apex soaring up, it now goes down (and actually becomes part of the groove skeleton, because it's now the second note in the groove).
Listen to all these variations of the “Come Together” groove on Track 48 and play along with them. In fact, play them with the original recording and see how you like them. Try equalizing the bass down so you can hear your own versions more clearly.
Simplifying a groove
At times, you may want to simplify a groove, giving it more space by eliminating some of the notes. This task seems easy at first glance, but it's actually a real challenge. After all, you need to choose the notes that keep the integrity of the original groove intact. Take out the wrong ones, and the groove becomes unrecognizable.
Figure 6-24 and Track 49 give you several examples of how to proceed. Make sure you refresh your ear by listening to the original bass groove of “Come Together” (The Beatles’ version). Then go ahead and experiment with Figure 6-24a (at the start of the track), which is a pared down version of the same groove. It consists of only the groove skeleton, the groove apex, and the one-note groove tail of the original groove. The transitional notes between the groove skeleton and the groove apex are gone, and the groove tail is in its simplest version.
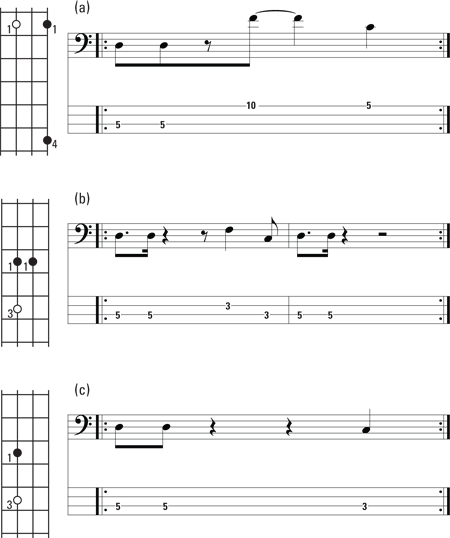
Figure 6-24: Different pared down variations of “Come Together.”
Figure 6-24b (at 0:30) changes the groove skeleton, making it funky, and also displaces the groove apex harmonically and rhythmically to give it variety. In the second measure of this groove, you play only the groove skeleton. This turns a one-measure groove into a two-measure groove by making the sequence twice as long before repeating it.
In Figure 6-24c (0:57), the paring down process is taken to an extreme by eliminating the groove apex. You can hear that the groove still functions, but it now has lost some of its distinctive character. This works well when you're building a groove and plan to really launch into it at a later point in the tune, making it more climactic.
Check out Video 17 and play these variations along with the original recording of “Come Together” and see how they work for you. You can also try playing some of the variations of Figures 6-23 and 6-24 and build from one to the next, getting a whole lot of dynamic range in your groove.