Chapter 7
Going Solo: Playing Solos and Fills
In This Chapter
![]() Choosing solo scales based on your chord tonality
Choosing solo scales based on your chord tonality
![]() Playing fills to make your groove dazzle
Playing fills to make your groove dazzle
![]() Access the audio tracks and video clips at www.dummies.com/go/bassguitar
Access the audio tracks and video clips at www.dummies.com/go/bassguitar
Imagine that you're playing with a great bunch of musicians and you're holding down a monster groove so solidly that the music takes on a life of its own (see Chapter 6 for more on creating a groove). In fact, things are sounding so good that the other musicians decide to reward you with a solo — a chance to show off your bass chops (bass-speak for “skills”). Looks like you need to prepare for your moment in the sun, because when the time comes for your solo, you want to burn (bass-speak for “showing off your chops”).
This chapter presents three surefire scales you can use to create a solo or a fill (a mini-solo) that will make you and everyone else smoke (bass-speak for “dazzle”).
Soloing: Your Moment to Shine
A solo is the music (musical and rhythmic line) you create when you're the featured player in a band. Solos usually are reserved for the traditional melody instruments, such as the guitar, saxophone, and trumpet, but bassists also are asked to perform a solo on occasion.
 Making a solo sound good is a bit more challenging for the bassist, because the sound of the instrument is very deep and you don't have a groove backing you. (You can't play a groove and a solo at the same time.) Despite these challenges, bass solos can be very effective in the hands of a good player.
The following sections introduce some common scales that are sure to help you create a killer solo for your moment in the spotlight.
Playing with the blues scale: A favorite solo spice
The six-note blues scale is one of the most commonly used scales in soloing — and with good reason: It's comfortable to play, it's easy to move from chord to chord, and it sounds great. The blues scale is a one-size-fits-all scale, no matter what the chord tonality (major, minor, or dominant). However, as with those one-size-fits-all pieces of clothing, the blues scale doesn't always give you a perfect fit; you may have to move a note or two by a fret.
When you create a solo with the blues scale, it of course will sound bluesy. Let your ears be the judge of which notes you can linger on and which notes you should use as passing tones (unaccented notes that connect two strong notes). It's just like salt for the soup: When you add the right amount, it's delicious; when you use too much, you spoil the broth.
You need three strings to complete the blues scale for one octave, so start on either the E or A string on the root of the chord you're playing (see Chapter 5 for more about chords). However, when you're playing a bass solo, it sounds really nice if you extend into the next octave and use all four strings of your bass for the blues scale licks (musical themes). The following steps explain how to play a blues scale, and Figure 7-1 shows you its structure.

Figure 7-1: Structure of the one-octave blues scale.
- Press the index finger of your left hand down on the root of the chord (on the E or A string) and play the note.
- Press your pinkie down on the same string and play the note.
This note is
 3 (flat 3); it's one of the blue (slightly dissonant) notes.
 - Press your index finger down on the next higher (thinner) string and play the note.
This note is a 4; it sounds fairly neutral.
- Press your middle finger down on the same string and play the note.
This note is a
 4 (sharp 4); it's another blue note.
 - Press your ring finger down on the same string and play the note.
This note is a 5; it's present in almost all chords.
- Press your index finger down on the next higher (thinner) string and play the note.
This note is a
7 (flat 7); it's usually a cool choice. - Press your ring finger down on the same string and play the note.
This note is your octave; you've arrived at the root again.
Three strings. No shifts. The blues scale couldn't be easier.
 You can use the notes of the blues scale in any order — not just straight up and down. You also can use the blues scale over any chord: major, minor, or dominant. Use the blues scale tastefully and sparingly; don't overdo it. Pay attention to which notes sound good for any of the chords. For example, don't hang on the 7 when you're soloing over a major chord; instead, just pass through it and land on the root (that's just one option).
Figure 7-2 shows you some useful blues-scale licks. A lick, in this case, doesn't refer to how your dog welcomes you home. A lick is a short melodic phrase you play in a solo — a solo is a succession of licks. You can collect a repertoire of licks from your favorite musicians, and you also can create some of your own.
 On Track 50, you hear what a blues scale (in A) sounds like, followed by three distinctive blues-scale licks (each preceded by a groove). To view the fingering for each, look at Figures 7-1 and 7-2. Figure 7-2 uses an extended four-string pattern to increase the range of your blues scale and to make the lick more lickety-slick. If you start the extended-range blues scale on the E string, you won't have to shift. You can see me playing the scales in Video 18.
Jamming with the minor pentatonic scale: No wrong notes
The structure of the minor pentatonic scale is very similar to the blues scale (which I cover in the previous section). However, the minor pentatonic scale has only five different notes: one fewer than the six-note blues scale.
You use the minor pentatonic scale when the tonality of the chord you're playing is minor. (For more on chord tonality, see Chapter 5.) You need to make sure you have three strings available to complete the scale in one octave, so find your root on the E or A string. The following steps explain how to play the minor pentatonic scale, and Figure 7-3 shows the pattern of the scale.
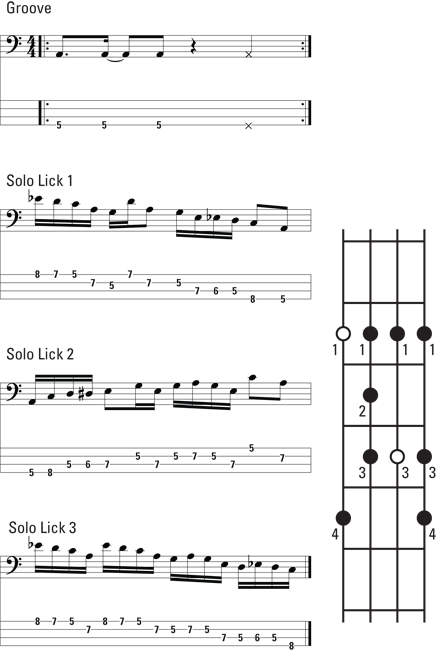
Figure 7-2: Blues-scale licks.

Figure 7-3: The one-octave minor pentatonic scale.
- Press the index finger of your left hand down on the root of the chord (on the E or A string) and play the note.
- Press your pinkie down on the same string and play the note.
This note is a
3 (flat 3); it's one of the main ingredients of the minor chord. - Press your index finger down on the next higher (thinner) string and play the note.
This note is a 4; it's part of the minor scale.
- Press your ring finger down on the same string and play the note.
This note is a 5; it's another main ingredient of the minor chord.
- Press your index finger down on the next higher (thinner) string and play the note.
This note is a
7 (flat 7); it's yet another main ingredient of the minor chord. - Press your ring finger down on the same string and play the note.
This note is your octave; you've arrived at the root again.
Voilà! Three strings. No shifts. No problem.
As with the blues scale, you can use the notes of the minor pentatonic scale in any order when playing your solo — not just straight up and down. Use this scale over any minor chord. All the notes sound good played over a minor chord, so you can land on any of them. If you find that your solo needs spice, use the blues scale. (Flip to the section “Playing with the blues scale: A favorite solo spice,” for more information.)
Figure 7-4 shows some useful licks you can play, using the minor pentatonic scale. These licks use the extended four-string version so your solo gets more of a range and sounds more interesting. To extend the range, start the scale on the E string. The minor pentatonic scale comes in handy in every solo, so add it to your repertoire.
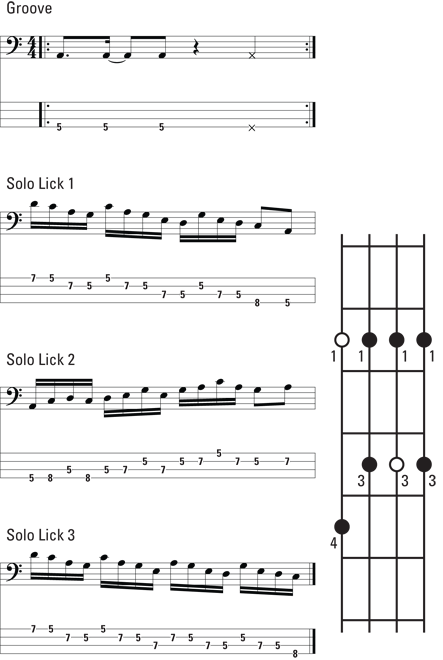
Figure 7-4: Minor pentatonic scale licks.
You hear the minor pentatonic scale and three minor pentatonic licks (each lick is played four times) on Track 51. Follow along with Figures 7-3 and 7-4 and Video 18.
Using the major pentatonic scale: Smooth as can be
You can use the major pentatonic scale for two different chord tonalities: the major chord and the dominant chord. Think of this scale as a two-for-one deal. (For more on major and dominant chords, see Chapter 5.)
You need only three strings to complete one octave of the major pentatonic scale, so start it on the E or A string. The following steps explain how to play the major pentatonic scale, and Figure 7-5 shows its structure.

Figure 7-5: One octave of the major pentatonic scale.
- Press the middle finger of your left hand down on the root of the chord (on the E or A string) and play the note.
- Press your pinkie down on the same string and play the note.
This note is a 2; it's a fairly neutral note that's part of the scales of both the major and dominant chords.
- Press your index finger down on the next higher (thinner) string and play the note.
This note is a 3; it's one of the main ingredients of both the major and dominant chords.
- Press your pinkie down on the same string and play the note.
This note is a 5; it's another main ingredient of the major and dominant chords.
- Press your index finger down on the next higher (thinner) string and play the note.
This note is a 6; it's another neutral note that's part of the scales used for both the major and dominant chords.
- Press your pinkie down on the same string and play the note.
This note is your octave; you've arrived at the root again.
Three strings. No shifts. Okay, you're ready for the limelight.
You can use the notes of the major pentatonic scale in any order — not just straight up and down. Play this scale for any major or dominant chord. All the notes of the major pentatonic scale sound good with a major or dominant chord, so you're perfectly safe landing on any of them. If you find that things start to sound bland, you can add some spice in the form of the blues scale. (See “Playing with the blues scale: A favorite solo spice” earlier in this chapter for more information.)
Figure 7-6 shows some specific licks you can play using the major pentatonic scale. You can play these licks throughout your solo. To make it even more effective, use the extended four-string version and start it on the E string.
You can hear the major pentatonic scale on Track 52 and Video 18, followed by three distinct major pentatonic licks (each lick is played four times) as shown in Figures 7-5 and 7-6.
Moving from chord to chord
If your band is playing a tune and all of a sudden your solo comes up, don't worry. The blues, minor pentatonic, and major pentatonic scales (see the three previous sections) give you plenty of ammunition for playing a cool solo.
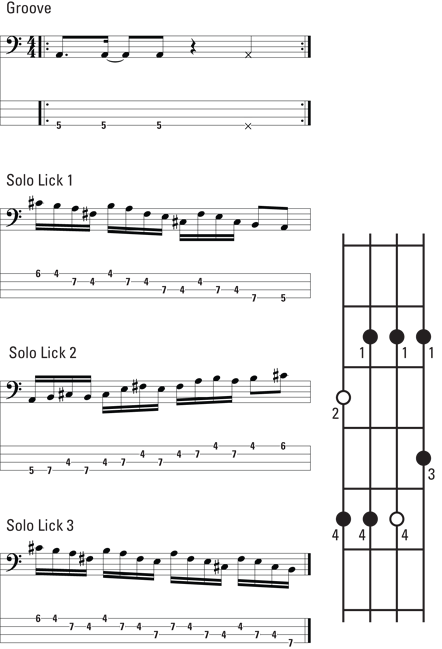
Figure 7-6: Major pentatonic scale licks.
When performing a solo, you use the minor pentatonic scale for a minor chord, the major pentatonic scale for a major or dominant chord, and the blues scale for any chord to add a little twist to the harmony. The following steps give you some guidelines to follow when soloing for a tune that has all three of the common chords (minor, major, and dominant). These steps tell you how to approach each individual chord:
- Find the root of the chord.
You need to make sure you have enough strings to cover the entire scale, so stick with the E and A strings, preferably the E string to give you the extended range option.
- Determine whether the chord is minor, major, or dominant.
- If the chord is minor, place your index finger on the root of the chord. You're now in position to execute the minor pentatonic scale for this chord.
- If the chord is either major or dominant, place your middle finger on the root of the chord. You're now in position to execute the major pentatonic scale for this chord.
- Add some spice to your solo by occasionally placing your index finger on the root of any chord and playing a blues-scale lick.
Check out “Playing with the blues scale: A favorite solo spice” earlier in the chapter to find out more.
Figure 7-7 shows you a chord chart for a tune. Listen to Track 53 for samples of soloing over these chords, and then try coming up with your own solo.

Figure 7-7: Chord chart for soloing.
Creating Fills without Any Help from Your Dentist
Fills are mini-solos that give grooves a little flash every now and then. (Check out Chapter 6 if you aren't sure what a groove is.) The purpose of the fill is to
- Lead you back to the beginning of the groove
- Give your line (the bass part you're playing) some variety
- Fill a little space when the rest of the band is quiet
A fill works the same way as a solo: You use the minor pentatonic scale as a fill when playing a minor chord, the major pentatonic scale as a fill when playing a major or dominant chord, and the blues scale as a fill when playing any chord. (Refer to the section “Soloing: Your Moment to Shine,” earlier in this chapter, for more details on how to use these scales as solos.)
A fill is usually short (only about two to four beats long), so you need to fit the notes of the fill within the allotted beats and blend them smoothly with the other notes.
A match made in heaven: Connecting your fill to the groove
You can take more liberties in terms of rhythm with a solo than you can with a fill. When fills are a part of the groove, the rhythm for the fill has to relate closely to the rhythm of the groove.
When you put a fill into a groove, you need to be acutely aware of the number of beats you have to fill before returning to the beginning of the groove. You can't miss the beginning of a groove — not even for the greatest of fills.
Timing a fill
Most of the time a fill within a groove lasts for about two beats — the last two beats of a measure. In other words, you play beats 1 and 2 (the first two beats of the measure) as a regular groove, and then you replace beats 3 and 4 (the last part of your groove) with a fill.
Don't play a fill every time you play a groove, because it will obscure the groove, which is the sound the band depends on to guide them in rhythm and harmony. A fill is usually only played every fourth measure or every eighth measure.
Figure 7-8 shows examples of fills for major, minor, and dominant chords using eighth notes, triplets, and sixteenth notes. The following list guides you step by step through the process of creating a fill.
- Establish a groove.
See Chapter 6 to find out how to establish a groove.
- Determine where the third beat starts in your groove.
Because you'll be substituting your fill for beats 3 and 4, play the groove up to the third beat.
- Determine how many notes you can hit in the two beats (beats 3 and 4).
The two beats for the fill have a total of four eighth notes, six triplets, or eight sixteenth notes. (See Chapter 4 for more about rhythms.) A lot depends on the tempo of the groove and on how accurately you can fit the notes into the two beats of the fill before the first note of the next groove. You can fit more notes into a fill at slower tempos.
- Work out a fill, paying attention to the number of notes you can play and using the appropriate pentatonic or blues scale for the chord of the groove.
For details on how the different scales relate to the different chords, see “Soloing: Your Moment to Shine,” earlier in this chapter.
- Practice going back and forth between the groove and the fill until your transitions are seamless.
To create a successful fill, your groove must flow without hesitation, leading into the next groove seamlessly and on time.
- Play your fill no more than every four or eight bars so that each fill sounds special.
If you play your fill more often than every four or eight bars, it will just sound like another groove.
On Tracks 54, 55, and 56, listen to examples of two-beat fills. And watch me play them in Video 19. All the fills have different subdivisions: The first group (Figure 7-8a, Track 54) subdivides the beat into eighth notes, the next (Figure 7-8b, Track 55) subdivides the beat into triplets, and the last (Figure 7-8c, Track 56) subdivides the beat into sixteenth notes. Each group includes first the blues scale for the fill, then the minor pentatonic, and last but not least the major pentatonic. To make the exercise more realistic, it begins with a groove and then immediately is followed by the fill in the last two beats, just the way you would play it in a song.
When you feel comfortable playing the fills from Figure 7-8, incorporate them into some of your more complex grooves. (The grooves in Figure 7-8 consist of simply three roots and a dead note in the first two beats so you can concentrate on getting the fills at the end right.) You also can create a collection of your own favorite fills and incorporate them into your playing.
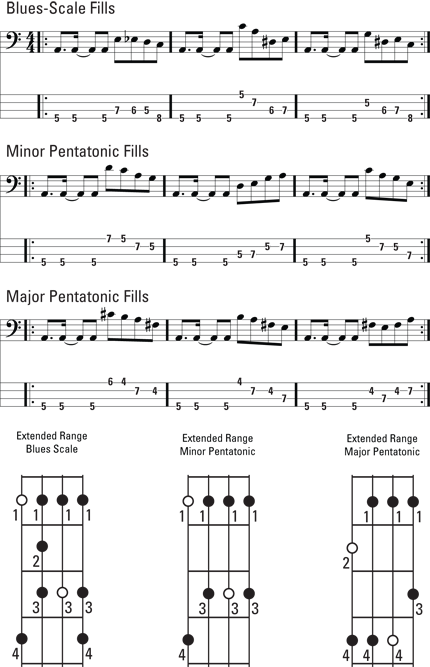
Figure 7-8a: Groove with an eighth-note fill.
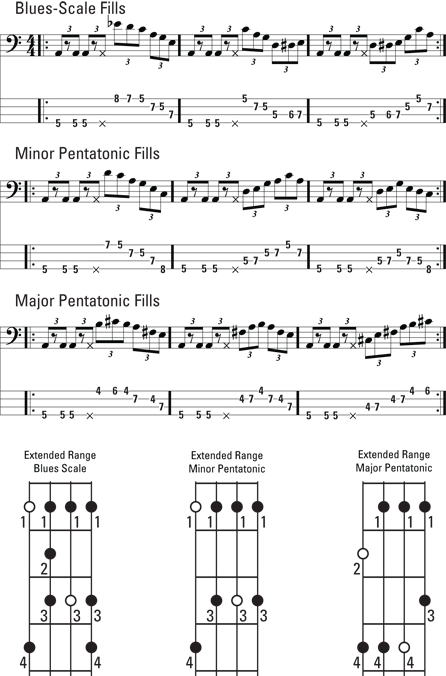
Figure 7-8b: Groove with a triplet fill.
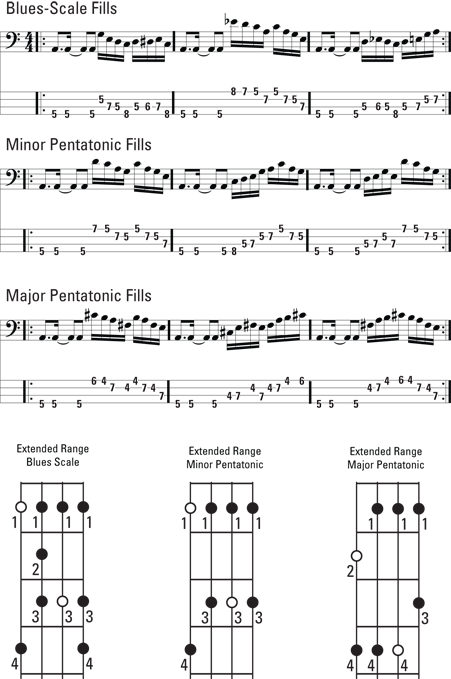
Figure 7-8c: Groove with a sixteenth-note fill.