Chapter 17
Changing the Strings on Your Bass Guitar
In This Chapter
![]() Removing old or damaged strings
Removing old or damaged strings
![]() Attaching new strings
Attaching new strings
![]() Keeping your new strings in good condition
Keeping your new strings in good condition
What kind of strings do you use?
I dunno. They came with the bass.
Some bassists think that you don't need to change the strings on a bass until they unravel — and then you need to replace them only if you absolutely need that particular string. If this were true, you'd be waiting a long time to change your strings, and eventually the only sound you'd get out of your poor old strings would be a dull thud.
The fact is, bass strings need to be changed regularly. The dirt from your fingers and the dust particles from the air wear them out. In addition, they get metal fatigue from being under constant tension. (Hey, come on! Don't you get fatigued when you're under constant tension?) Old strings lose their brightness (clarity of sound) and sustain (length of time that a note rings out); they get sticky and become difficult or even impossible to tune. So in this chapter, I lead you step by step through the painless process of changing the strings on your bass.
 Always replace all your strings at the same time. The strings wear at the same rate. So when you replace them all simultaneously, you ensure that they all sound the same; in other words, you ensure that one doesn't sound clearer than the others.
Knowing When It's Time to Say Goodbye
How do you know when it's time to replace your strings? Here are some clues that signal a change is necessary:
- The strings show wear and tear. You can see dark spots along the strings, probably as a result of dirt stuck in the windings of the steel. You also may see corrosion (or rust spots) on the strings.
- The strings sound dull and lifeless. Your notes don't sustain (ring out for an extended length of time), and hearing an exact pitch is difficult. Playing a harmonic for tuning also is a challenge. (See Chapter 2 for more on tuning with harmonics.)
- The strings feel sticky and stiff. Unless you ate a cinnamon roll before playing your bass, this is a sure sign of trouble. (As with swimming, you should always wait at least a half-hour to play bass after eating a cinnamon roll.)
- Jimmy Carter was president when you last changed your strings, or you just can't remember when you last changed them. In other words, if you've lost count of how many decades it's been since you've changed your strings, do it now!
Off with the Old: Removing Bass Strings
Before you can put new strings on your bass, you need to remove the old ones. The quickest way to remove your old bass strings is simply to take wire cutters (sturdy ones — bass strings are pretty thick) and cut the string at the thin section, between the tuning post (the round metal post that has one end of the string wound around it) and the nut (the little bar near the tuning posts that has a groove for each string; see Chapter 1).
If you're afraid that the string is going to whip across your face and leave a scar (imagine trying to explain that one), turn the tuning head to loosen the tension of the string before cutting it. Just remember which size string is connected to which tuning post. After cutting the old string, pull the coiled part off the tuning post, and then pull the other part through the bridge. Take a look at Figure 17-1 to see what this process looks like.
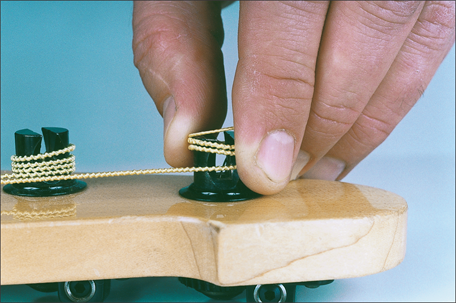
Photo by Steven Schlesinger
Figure 17-1: Cutting the string and pulling the coiled part from the tuning post.
 If you want to save your strings as an emergency set (in case one of the new strings breaks), don't cut the string. Just release the tension until you can grab the coiled end and pull it off the tuning post. Straighten the end of the string as best you can, and then pull the entire length through the bridge (see Figure 17-2).
One common myth says that you should change only one string at a time to maintain tension in the neck. I disagree. Take ’em off. Take ’em all off. Your bass can handle it, and removing all the strings at once gives you access to your fingerboard and pickups for some basic cleaning. (See Chapter 18 for info on how to clean your bass.)
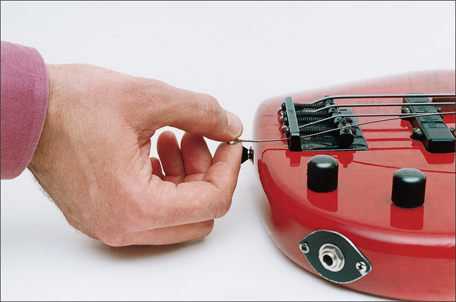
Photo by Steven Schlesinger
Figure 17-2: Pulling the string through the bridge.
On with the New: Restringing Your Bass
After you clip the old strings and clean any grime off the fingerboard, renew the voice of your bass by adding brand-new strings. You need to be in a clean and comfortable environment for this task. After all, why put on new strings if you're going to get sawdust all over them as soon as you're done? Be sure to lay your bass on a clean towel before restringing it.
Have wire cutters nearby when you restring your bass. You'll need to cut the new strings down to size.
You attach strings to your bass at two points:
- The bridge
- The tuning posts
New strings are usually coiled in envelopes. The envelopes are numbered according to string size (the thickest string has the highest number). With most basses, the new string has to be pulled through a hole in the bridge, so that's the place to start. Here's a step-by-step guide to changing the strings of your bass guitar:
- Put a towel on the floor in front of you and lay the bass on it, with the neck pointing to the left (to the right if you're left-handed).
- Remove the old strings.
See the previous section for instructions on how to remove the old strings.
- Take the thickest string out of its envelope (make sure you leave the string coiled) and take a look at it.
Notice that it has a ring (called a ball) at one end; the other end is pointed, with its tip wrapped in silk. Figure 17-3 shows you what a coiled string looks like.
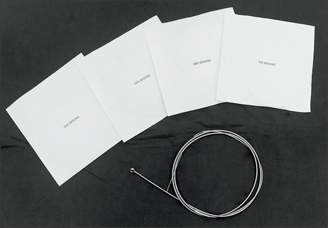
Photo by Steven Schlesinger
Figure 17-3: Coiled string with envelopes.
- Straighten the string and push the pointed end (the one without the brass ring) through the hole that's nearest you on the bridge.
Each string goes into a separate hole. Pull the string through the proper hole, toward the nut. As you pull it through, make sure the ball at the end of the string comes to rest against the bridge. Figure 17-4 shows how to perform this step.
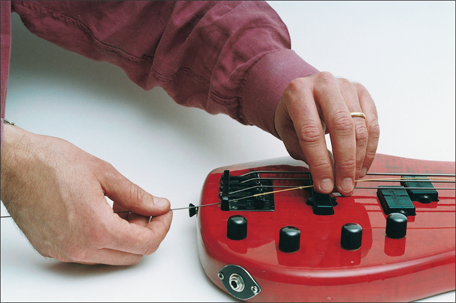
Photo by Steven Schlesinger
Figure 17-4: Pulling the string through the bridge.
- Pull the string until it's resting against its designated tuning post.
The post has a groove that crosses the top and also has a hole in its center. Make sure you have enough string to extend 4 to 5 inches beyond the tuning post. This extra length ensures that your string is long enough to wind several times around the tuning post (so the string doesn't slip when tightened).
- With your wire cutters, snip off any excess string 4 to 5 inches past the post (see Figure 17-5).
 Cut only from the part of the string that's wrapped with silk. Never cut the thick part of the string itself (the metal). If you cut this part of the string, it will simply unravel.
 - Take the tip of the string (now freshly cut) and stick it straight down into the hole in the center of the tuning post, bending the string to the side so it rests in the groove at the top of the tuning post.
Hold the string in place at the tuning post with your right hand. Figure 17-6 shows you how to perform this step.
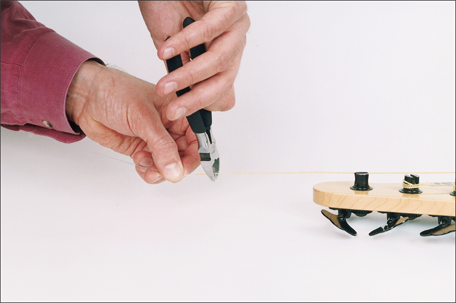
Photo by Steven Schlesinger
Figure 17-5: Cutting the string to size.
Photos by Steven Schlesinger
Figure 17-6: Inserting the string into the tuning post.
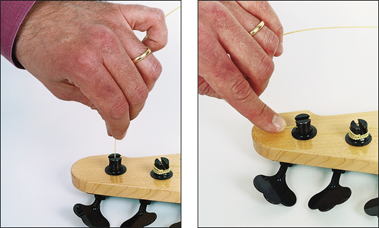
- Turn the tuning head with your left hand to increase the tension of the string.
Make sure the string winds down the post (you can guide it with the fingers of your right hand). This downward winding increases the slight bend (breaking angle) of the string against the nut and ensures that the string sits firmly in its groove on the nut, giving the notes better sustain.
At the same time, make sure the other end of the string runs over the proper saddle (a small moveable part that has a groove for the string to fit into) at the bridge. Figure 17-7 shows a properly wound string, and Figure 17-8 shows how the strings lie over the saddle.
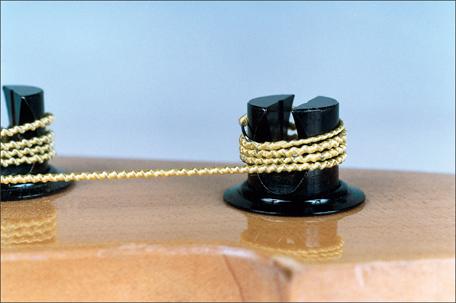
Photo by Steven Schlesinger
Figure 17-7: Windings of a string at the tuning post.
- Repeat the entire process for all the other strings, moving from thick to thin.
Some basses have string retainers that hold the two thinnest strings close to the headstock (the top part of the neck). Pass the two thinnest strings under the string retainers before tightening them. Now tune them up. You need to go through the tuning process (described in Chapter 2) several times right then and there, because the strings stretch out and the neck bends forward under the increased tension. When your strings are in tune, you're ready to play.
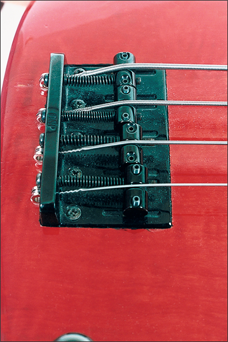
Photo by Steven Schlesinger
Figure 17-8: The strings at the saddle.
Turn the tuning heads to wind up the strings. Don't wrap the strings around the tuning posts by hand; if you do it by hand, the strings will twist and lose their ability to sustain notes.
You can get many happy playing weeks (even months) out of your new strings. Just keep them reasonably clean so you don't have to change them too often. New bass strings come at a price: $15 to $40 for a four-string set.
Ensuring a Long Life for Your Strings
After you get those new strings onto your bass, you want to do all you can to keep them in good, working condition, right? Well, increasing the life of your strings is easier than you think. All you have to do is follow two basic rules:
- Wash your hands before you touch your strings.
- Don't let anyone else touch your strings unless he washes his hands first.
The natural oils and sweat on clean hands are hard enough on your bass strings. If you indulge in a greasy roast chicken or change the oil in your car before your next rehearsal, all that grease, grime, and dirt ends up on your strings. This kind of debris shortens string life drastically. So wash those paws before you play.