Chapter 18
Keeping Your Bass in Shape: Maintenance and Light Repair
In This Chapter
![]() Cleaning your bass
Cleaning your bass
![]() Repairing just the bass-ics
Repairing just the bass-ics
![]() Adjusting the neck and bridge
Adjusting the neck and bridge
![]() Putting together a bass toolkit
Putting together a bass toolkit
![]() Storing your bass safely and properly
Storing your bass safely and properly
Bass guitars are like their owners — tough, hard, and rugged — but only on the surface. Deep down, basses (like their owners) yearn for some tender, loving care and affection and, of course, for some appreciation.
Despite the most careful handling and the best of care, your instrument is bound to collect battle scars. If you play your bass a lot, it needs to be cleaned regularly, and certain parts will need replacing from time to time — or at least tightening and adjusting. This chapter tells you what maintenance you can easily do yourself and what maintenance is best left to your friendly, neighborhood instrument repairperson.
Cleaning Your Bass, Part by Part
Cleaning your bass is the most basic of maintenance jobs, and the first step is to wash your hands. No, really, I'm not kidding! The finish on the wood and hardware shows every fingerprint. So the least you can do is keep those fingerprints clean; don't enhance them with grime. The next few sections walk you through cleaning the various parts of your bass, one by one.
The body and neck
Clean the body of your bass the way you clean your favorite antique furniture — very carefully. You can polish the finish with a cloth (such as an old sweatshirt), but use guitar polish (available in a spray bottle at any music store or online) rather than furniture polish. Guitar polish gets dust and dirt off your instrument and leaves your bass looking well cared for.
Apply a squirt or two of the polish to the cloth and work it into the fabric. Then rub your bass down — work on the body (front and back) and on the back of the neck. Your bass will love it. Keep the polish away from the strings and the fingerboard, though; I deal with them a little later.
The hardware
The hardware consists of all the brass and metal parts attached to the wood, with the exception of the frets and pickups. The tuning heads, bridge, and strap pins are all considered hardware. Rubbing the hardware down with a dust cloth helps keep it shiny. If too much dirt builds up on the hardware, you can use a mild brass polish from the supermarket to clean the metal. Make sure that the polish isn't abrasive and that it doesn't get onto the wood because it will mar the finish.
The pickups
When it comes to cleaning your bass, the pickups are in a category all by themselves. A lot of dust accumulates where the wood meets the metal of the pickups (see Chapter 1 for a picture of the pickups on a bass guitar).
 Whatever you do, don't use any liquids for this part of the cleaning. Pickups are electronic, and they can't deal with liquid. The liquid can cause them to short out, making it necessary to replace them.
Of course, getting new pickups every four weeks is one way to keep them clean. Otherwise, use dry cotton swabs to clean the area where your pickups meet the wood.
The fingerboard
The fingerboard consists of two major parts:
- The long wooden strip on the front of the neck
- The metal frets embedded in the long wooden strip
These two parts are made of very different materials, so each needs to be cleaned in its own special way. You can clean them only after removing your old strings and before restringing. (See Chapter 17 to find out how to restring your bass.)
The wood
Because the wood on your fingerboard is normally exposed, it's prone to drying out. To restore the wood to its original luster, use a dry cloth to get rid of the dirt, and then place a few drops (no more than five or so) of fingerboard oil (which you can get from your local music store or online) on a clean cotton cloth and work it into the wood. The wood absorbs fingerboard oil easily, so let the oil dry thoroughly before rubbing down the fingerboard again to remove any excess oil. Apply oil to the wood every time you change the strings, or at least every other time.
The frets
You can use a jewelry polishing cloth that has polish already soaked into it (available in any supermarket) to polish the frets. The cloth is inexpensive, and your frets will sparkle with joy (maybe not as bright as diamonds, but you never know).
When polishing the frets, don't use an abrasive jewelry polish that you have to pour out of a bottle. That stuff is rough on the wood of the fingerboard.
The strings
Yes, the strings need to be cleaned as well. After all, they take the most abuse. After the strings are on the bass, you can simply wipe them with a dry cotton cloth after you've finished playing. However, using a couple drops of rubbing alcohol (available in any pharmacy) on a cotton cloth is even better.
Let the alcohol sink into the cloth for a few seconds. Then put a moist section of the cloth between your index finger and thumb and pinch one string at a time, rubbing the cloth up and down along the string's length. Check out Figure 18-1 for the proper method for cleaning bass strings.

Photo by Steven Schlesinger
Figure 18-1: Cleaning the strings.
Don't get any of the alcohol on the wood; it'll dry it out.
Making Minor Repairs to Your Bass
You can do your own minor repairs to your bass to keep it in top-notch playing condition — tweaking a few screws, touching up a bit of finish, soldering a couple of electronic connectionszzzzzzzzzap! . . . well, maybe not the electronics.
The taming of the screw(s)
The parts of the bass guitar are held together in two ways: with glue and with screws. A luthier (a person who builds stringed instruments) uses specific glues for each type of wood on the bass. If anything that's supposed to be glued comes apart, take your instrument to a qualified repairperson.
If, on the other hand, a piece of hardware comes loose or starts rattling, you can simply screw it back where it belongs. Just remember one thing: Your bass has an array of different-sized screws. Most of the screws are of the Phillips variety. Buy a set of screwdrivers at the hardware store and make sure you have a perfect fit for each screw on your bass. Why do I say that? The reason is simple: If you force a screwdriver that doesn't fit into a screw, you'll end up stripping the head of the screw . . . and then you're really screwed.
 If you don't feel comfortable turning the screws on your bass, don't mess around. Take your precious instrument to a qualified repairperson.
Taking care of the finish
The finish is the thin layer of lacquer that seals the wood of your bass. The finish usually is glossy; it looks beautiful when the instrument is new. The finish also serves a function: It protects the wood from severe changes in humidity. Low humidity makes the wood brittle and prone to cracking; high humidity causes the wood to swell and warp.
Collisions between your bass and other objects (such as the drummer's cymbals) may leave dings or cracks in the finish. If you want that perfect look back, you have to take your bass to a pro for refinishing, which can be costly. If you're not overly concerned with the look, or you think that battle scars are cool, seal the cracks with colorless nail polish. You can also try to match your bass's color with a small bottle of model paint from a toy store.
Be vigilant in protecting the back of your bass neck. If you scratch it, you'll be able to feel the scratch when you're playing. If the scratch is shallow, try to get it out by rubbing the entire neck up and down with 0000-grade (superfine) steel wool. Sand the entire length of the neck. The steel wool will give the back of the neck a nice satin feel. If you still feel the scratch, have a repairperson refinish the neck of your bass.
Don't get too used to just sanding the scratches off the neck of your bass. Each time you sand the neck, even with the finest-grade steel wool, you take a layer of finish off. Eventually, none of the finish will be left, and you'll need to get the neck refinished. Of course, you'll be better off if you don't get your bass neck scratched in the first place.
Leaving the electronics to the experts
If you hear crackling when you turn any of the knobs, it may be a minor problem. Just turn the knobs vigorously back and forth to eliminate the crackling. If that doesn't do the trick — you guessed it — take it to a pro.
 With the advent of high-tech basses that feature complex pre-amps and pickups, I don't recommend touching the electronics. Take your bass to a pro to have any electronic problem fixed — unless, of course, you have a graduate degree in electrical engineering.
Adjusting the Bass Guitar
Your bass is a sturdy instrument, but every now and then it needs some slight adjusting. As the weather changes from season to season (provided you live in a location that has seasons), the wood in your bass also changes. The neck tends to bend or straighten slightly, causing the strings to either pull away from the frets or rest against them; at times this makes playing almost impossible.
You can counter the forces of nature by
- Tweaking the truss rod (a metal rod that runs inside the length of the bass neck)
- Adjusting the saddles (the little, moving metal parts of the bridge that have grooves for the strings to lie across)
Providing relief to the truss rod
The truss rod controls the curvature of your bass neck. Because the strings need space to vibrate freely over the entire length of the fingerboard, your bass neck has to have a slight relief (curve) to give them room. Now, notice that I said slight relief. If the relief is too great, the action (the space between the strings and frets) will be too high, and you'll need arms like Popeye's to press down the strings.
How much action is enough to keep the strings vibrating while still making them easy to press down? To check your action, press the E string (the thickest one) down at the first fret with your left hand. At the same time, press the E string down at the last fret with your right hand. The space between the E string and the neck (between the 7th and 12th frets) should be about the thickness of a credit card (finally, a good use for credit cards). You can have a little more space if you prefer, or slightly less space if you play very lightly.
To adjust the action, you need to turn a screw in the truss rod, which changes the curvature of the neck. The screw is located either on the headstock or at the other end of the neck. Turn the truss rod only between one-quarter and one-half of a turn per day. You need to allow the wood to settle before doing any more adjustments.
On some basses, you have to remove the neck from the body to reach the screw of the truss rod. Don't attempt to loosen the screws at the back of the bass that hold the neck in place without first loosening the tension of the strings. Otherwise, the neck will snap off, stripping away the wood that holds the screws.
In most cases, you can adjust the truss rod with the small Allen wrench that comes with your bass. If you lose this wrench, you can get another from your local music store or the bass manufacturer. On other basses, the screw of the truss rod requires a Phillips screwdriver, which may not come with the bass. (You can buy it at the hardware store.) Here's how to adjust the truss rod:
- If you have too much space between the E string and the neck, insert the Allen wrench or Phillips screwdriver into the screw and tighten the truss rod by turning the wrench or screwdriver clockwise.
- If your strings buzz when you play on the first four frets (near the headstock), you need to loosen the truss rod by turning the wrench or screwdriver counterclockwise.
Take a look at Figure 18-2 to see how to adjust a truss rod.
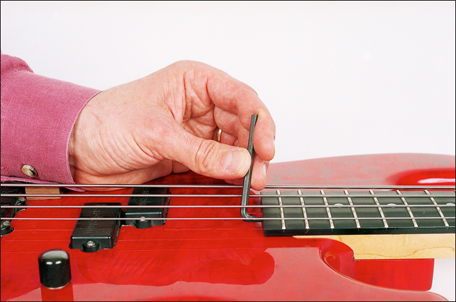
Photo by Steven Schlesinger
Figure 18-2: Adjusting the truss rod.
Use only the specific wrench or screwdriver that fits into your truss rod. If you don't have the proper tool, get one from your local music store or the manufacturer of the bass. Don't try to force the truss rod with anything that doesn't quite fit. If you strip the truss rod, it'll cost you.
Raising and lowering the bridge
You also can adjust the action of your bass by moving the saddles on the bridge. The saddles can be lowered or raised by turning the screws at the top with an Allen wrench. When you adjust the saddles, you lower or raise the string height (the action). Figure 18-3 shows how to adjust the saddles.
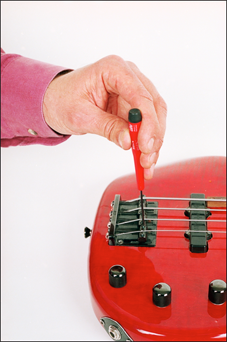
Photo by Steven Schlesinger
Figure 18-3: Adjusting the height of the saddles.
Getting your bass set up by a repairperson initially is a good idea. After you get your bass back from the repairperson, take note of how high he or she set the saddles and how the strings feel. From then on, you can fine-tune your bass by comparing it to the original setup.
You also can use the saddles to correct the intonation of your bass. If you hear your bass going out of tune when you play on the very high or low frets, you need to adjust the intonation. To do this, find a screwdriver that fits the screws at the back of the bridge. Turning these screws moves the saddles back and forth. Read the following steps and check out Figure 18-4 to find out how to adjust the saddles to correct the intonation:
- Play the harmonic of one of the strings at the 12th fret, and tune that pitch to a tuner.
When the harmonic of the string is in perfect tune, play the same string by fretting it at the 12th fret, and compare the pitch of the note with the pitch of the harmonic. They should be the same. (See Chapter 2 for how to play a harmonic.)
- If the fretted note is sharp compared to the harmonic, lengthen the string by tightening the screw.
Moving the saddle away from the neck lengthens the string. Now tune the string again using the harmonic. Compare the pitch of the harmonic with the fretted note, and keep adjusting the saddle until both the harmonic and the fretted note are in tune.
- If the fretted note is flat, shorten the string by loosening the screw to move the saddle toward the neck.
Tune the string using the harmonic, and keep adjusting the saddle until both the harmonic and fretted note are in tune.
- Repeat this process with all the strings.
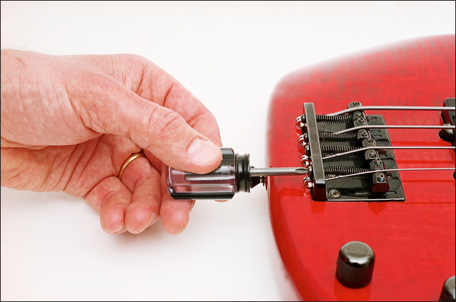
Photo by Steven Schlesinger
Figure 18-4: Adjusting the intonation.
Be patient and take your time when you're adjusting your bass. It needs to be done only about four times a year (as the seasons change), but you have to take a whole afternoon to do it right, especially if you're adjusting your bass for the first time. The process will bring you closer to your instrument — you know, bass bonding.
Assembling a Cleaning and Repair Tool Bag
Before you attempt any of the adjustments or cleaning procedures I cover in this chapter, you need to make sure you have all the required tools. Start assembling a tool set just for your bass. Here's a list of what needs to be in a bass tool bag (see Figure 18-5):
- Truss-rod wrench (usually the Allen wrench that comes with your bass)
- Screwdrivers and Allen wrenches for every screw on the bass
A multi-screwdriver tool is okay, but you can get more leverage with separate screwdrivers. Make sure you have a screwdriver or Allen wrench that fits each of the screws for the saddle.
- Rubbing alcohol (make sure it's in a bottle that won't leak)
- Cotton rags for cleaning (make sure to replace them once in a while)
- Super-fine steel wool
- Colorless nail polish (or a color that matches your bass)
- Electronic tuner (this needs to be part of your tool set if you adjust the intonation yourself)
- Wire cutters for changing your strings (make sure you always have a spare set of strings with your bass)
- Jewelry polish cloth for polishing the frets
Be sure to keep your bass tools separate from your household tools so they won't get lost or damaged. Besides, basses can get jealous if they find out that their truss-rod wrench was used to tighten the bathroom faucet.
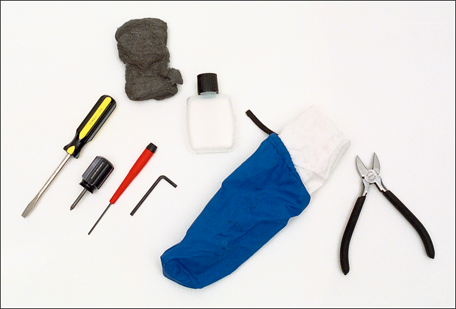
Photo by Steven Schlesinger
Figure 18-5: Contents of a bass tool bag.
Storing Your Bass
Keeping your bass guitar happy is really quite simple. If you're comfortable, your bass will be comfortable. You want to keep it out of direct sunlight, and you want to keep it out of the snow — at least for any extended period of time. The safest place to keep your bass is in its case, but then it can be kind of a hassle to get to when inspiration strikes. If you want to keep your bass handy, place it on a sturdy bass guitar stand, preferably with the strings covered by a soft cloth. Just make sure you set it up in a safe corner of the room that doesn't get a lot of traffic. (In other words, don't place it in the path of the family dog, which just happens to be a clumsy Saint Bernard.)
If you have a gig bag (a soft, padded carrying pack), you can store your bass in it when you're not playing. The gig bag gives your bass some protection (actually a good gig bag can give the bass a lot of protection), and it also allows you to get to your bass relatively easily.
Nearly all bass guitars are solid-body instruments (they're not hollow), making them quite sturdy. Solid-body bass guitars have a large tolerance for humidity and temperature change, but you still need to make sure you keep your bass in an area with a reasonable, consistent temperature. For example, keeping your bass right next to the fireplace isn't a good idea. Room temperature with moderate humidity will do the trick, making your bass as happy as a clam.
When you go away and can't take your bass with you, be kind to it. Put your bass in its case and keep it in a climate-controlled environment. You can stand it upright in a closet or lay it flat under your bed. Don't store your bass in a damp basement or an uninsulated garage. You want it to still love you when you come back, don't you?