14
CHAPTER
Automatic Dishwashers
When a dishwasher is properly used, it will provide satisfactory results. There are times, however, when the dishwasher is blamed for poor performance. Perhaps the customer does not know how to load the dishwasher properly or the wrong amount of detergent was used—in some cases, the dishwasher might not run at all. Whatever the case might be, it is up to the technician to either repair the dishwasher or instruct the owner in its proper usage.
This chapter provides the technician with the basic skills needed to diagnose and repair automatic dishwashers. The actual construction and features might vary, depending on what brand and model you are servicing.
Principles of Operation
After placing the dishes properly in the dishwasher, the detergent is placed in the dispenser, and the rinse conditioner is checked for the proper level. The door is closed, and the type of wash cycle is selected. The door latch holds the door closed and activates the door latch switch. This will complete the electrical circuit for the dishwasher to operate. If the door is opened during the cycle, this will cause all operations to cease.
The timer will energize the water inlet valve, and water will begin to enter the tub. The dishwasher does not fill with water like a washing machine. It is designed so that the tub does not have more than two gallons of water in it at any one time. Should the timer switch contacts fail to open during the fill cycle, a float switch assembly, located inside the tub, will open the electrical circuit to the water inlet valve at a preset level.
The fill safety switch is part of the float assembly. Should the timer fail to open its switch contacts, water will keep entering the tub until the float, located inside the tub, rises and engages the float switch to shut off the water. Note: The float switch will not protect against a mechanical failure of the water inlet valve.
During the wash and rinse portion of a cycle, the heater element heats the water (on some models) to at least 140 degrees Fahrenheit. This feature is built into the dishwasher and is designed to save the customer money on the operating cost. Also, the customer does not have to raise the water temperature of the water heater to 140 degrees Fahrenheit. He or she only needs to set the water heater temperature at 120 degrees Fahrenheit. This will prevent any member of the household from getting burned.
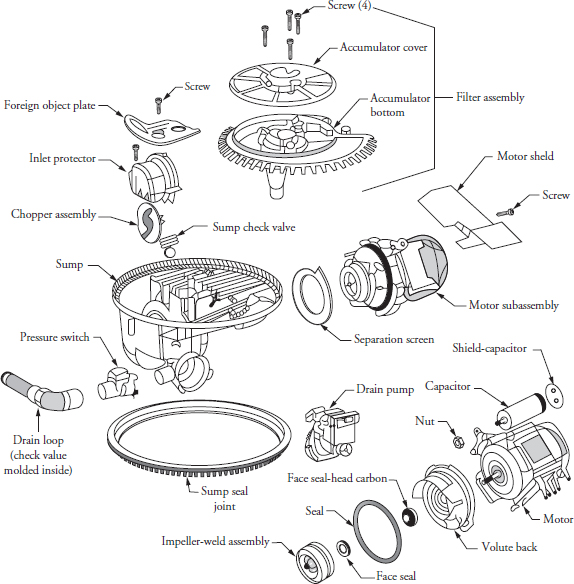
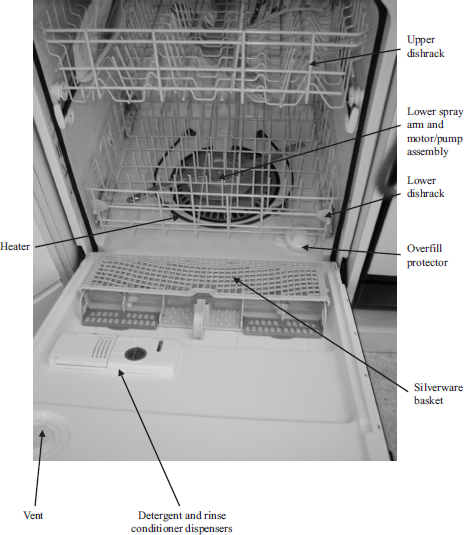
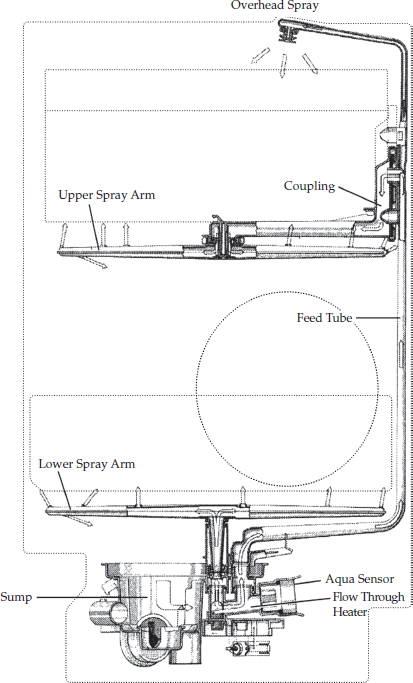
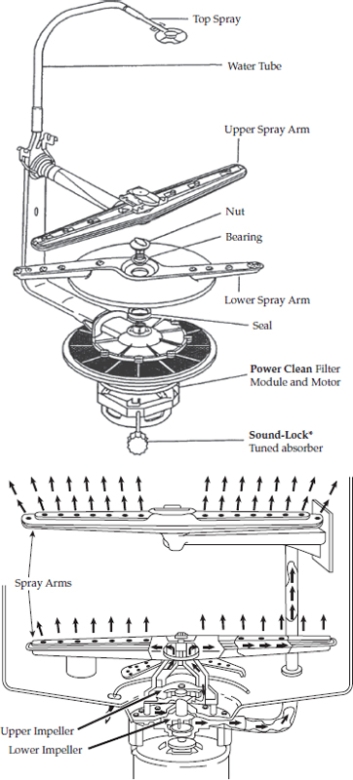
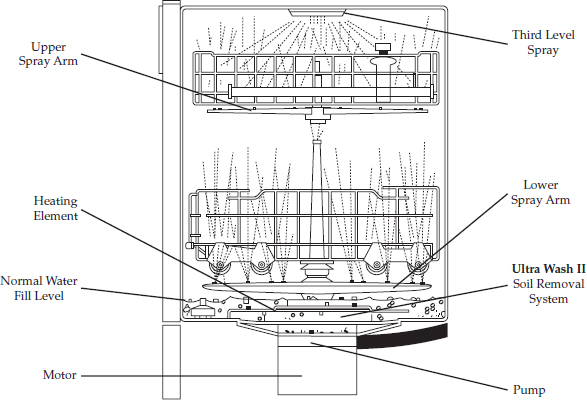
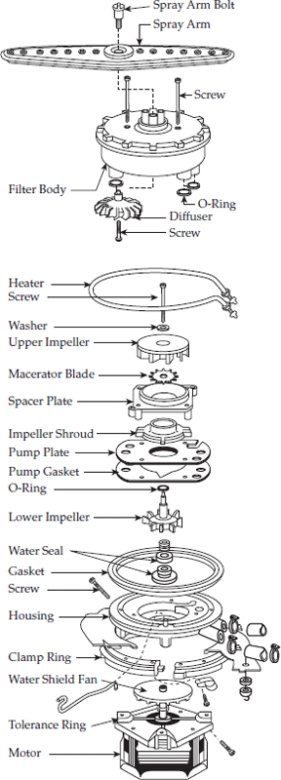
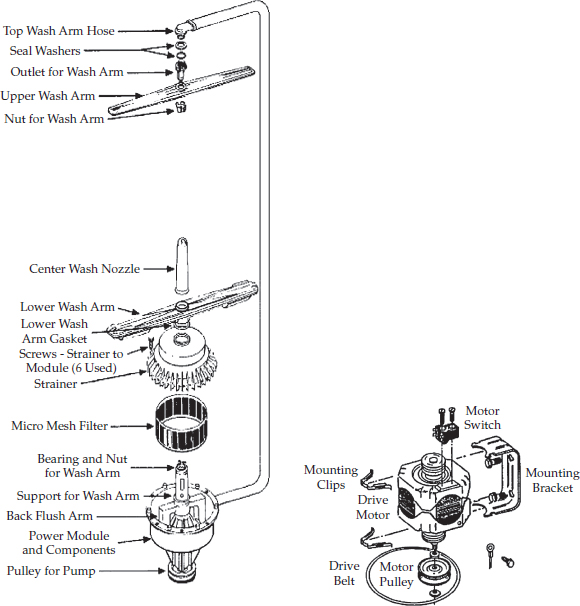
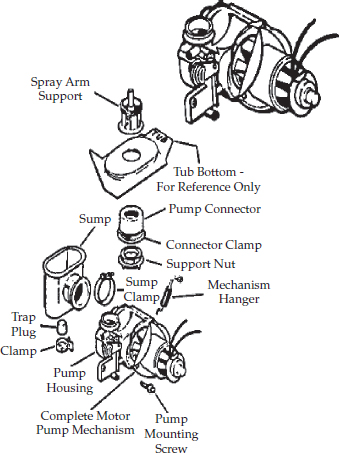
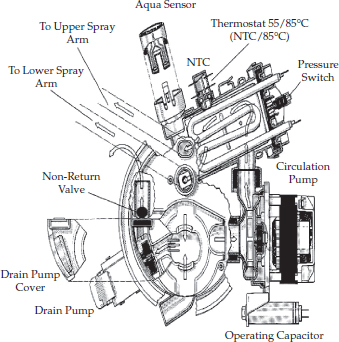
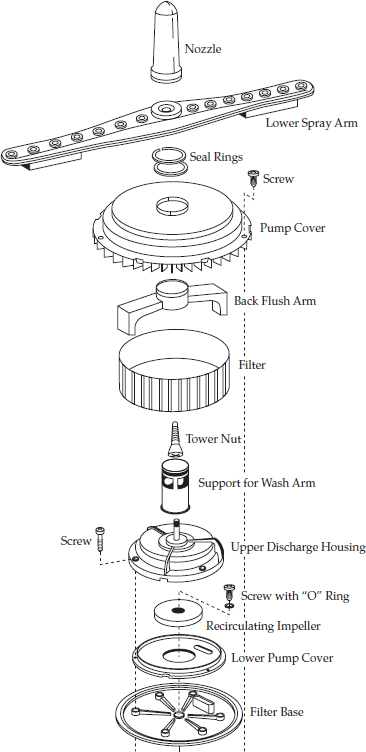
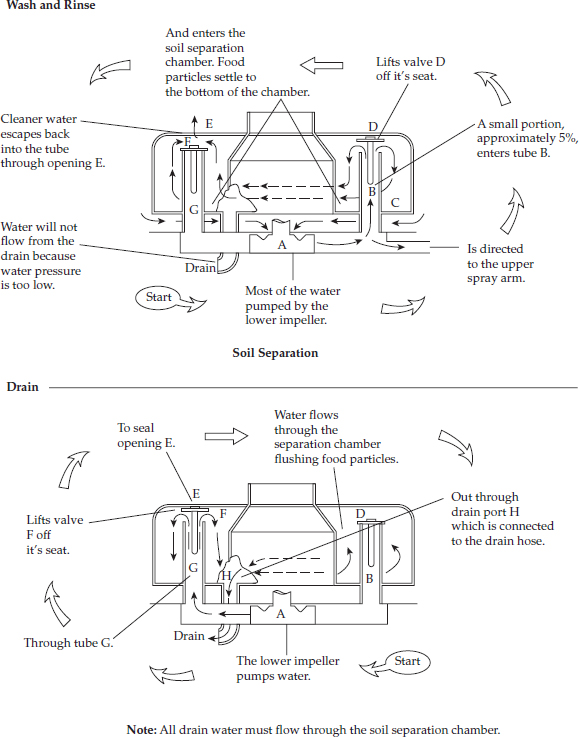
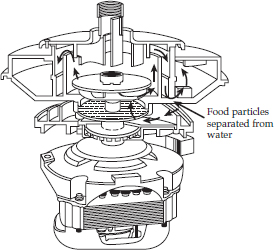
The water is repeatedly pumped through the lower and upper spray arms and onto the dishes (Figure 14-1). As the water runs off the dishes and back to the pump, it flows through a filtering system. On some models, the filter is designed to separate most food particles from the water so that they aren’t sprayed back onto the dishes (Figure 14-2).
FIGURE 14-1 An outside view of inside a dishwasher tub with the water circulating.
FIGURE 14-2 An exploded view of a dishwasher pump, motor, and filter assembly.
At the end of a wash or rinse cycle, the water is pumped out of the dishwasher, flushing the filter of any small food particles. The larger pieces of food are trapped on the pump guard, which must be cleaned out before the next use. On some models, the pump screen removes food particles from the water, stores them, and then grinds them up as they are washed down the drain. During grinding, some sounds will be heard. All dishwasher models have some type of mechanism to dispense a rinse aid agent during the designated rinse cycle. The rinse aid agent will not allow the water to stay on the dishes. This will improve the drying time and prevent spotting and filming on the dishes.
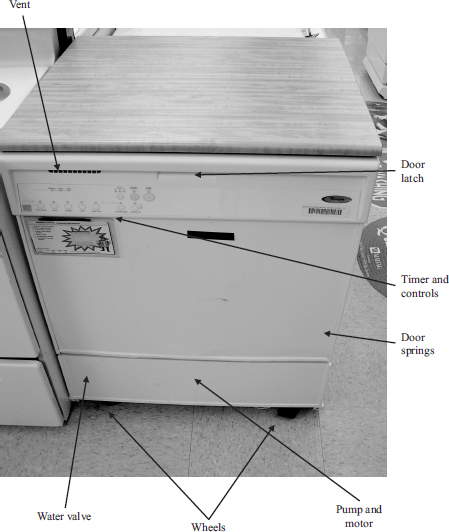
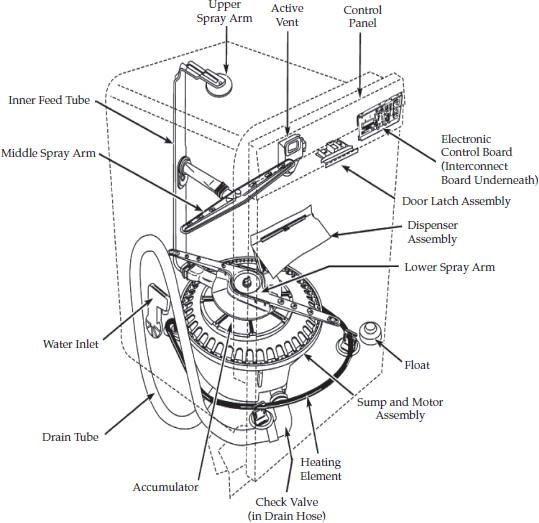
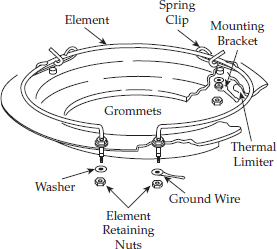
At the end of the cycle, the heater element (Figure 14-3a) comes on (if selected) and helps dry the dishes. Certain models have a fan that circulates the air to speed up the drying cycle, thus making sure that the dishes dry evenly. Some models have a cool-dry cycle. This allows the dishes to be dried without the heater element operating. Combined with the heated air within the tub (from the wash cycle) and the dishwasher door opened a little bit, it will cause the water that remains on the dishes to condense and roll off them. Figure 14-3a and b illustrates component locations within the automatic dishwasher (under-the-counter, portable, and dish drawer).
FIGURE 14-3a Dishwasher component locations.
FIGURE 14-3b Dishwasher component locations.
FIGURE 14-3c Dish drawer dishwasher.
Safety First
Any person who cannot use basic tools or follow written instructions should not attempt to install, maintain, or repair an automatic dishwasher. Any improper installation, preventive maintenance, or repairs could create a risk of personal injury or property damage.
If you do not fully understand the installation, the preventive maintenance, or the repair procedures in this chapter, or if you doubt your ability to successfully complete the task on the automatic dishwasher, call your service manager.
Before continuing, take a moment to refresh your memory on the safety procedures in Chapter 2.
Dishwashers in General
Much of the troubleshooting information in this chapter covers the various types of dishwashers in general, rather than specific models, in order to present a broad overview of service techniques. The pictures and illustrations that are used in this chapter are for demonstration purposes only—they clarify the description of how to service an appliance, and they in no way reflect any particular brand’s reliability.
Location and Installation of a Dishwasher
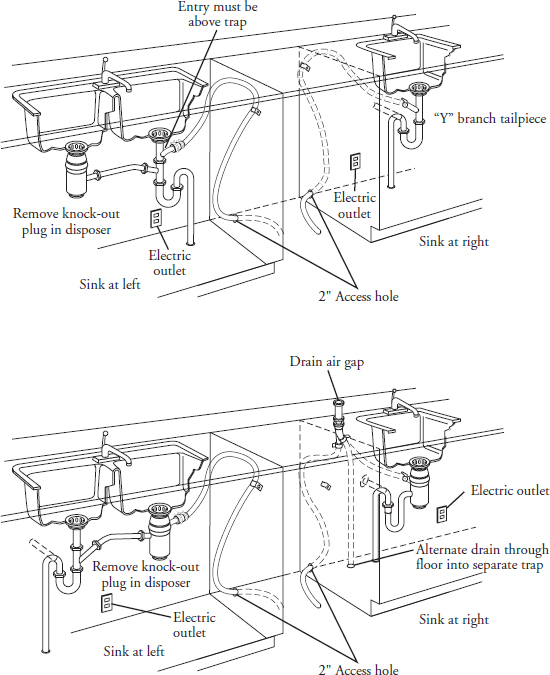
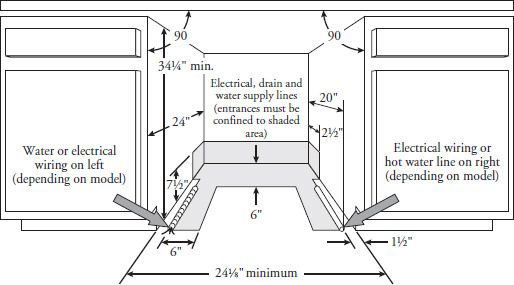
Locate the dishwasher where there is easy access to existing drain, water, and electrical lines (Figure 14-4). Be sure to observe all local codes and ordinances for electrical and plumbing connections. It is strongly recommended that all electrical and plumbing work be done by qualified personnel. The best location for the dishwasher is on either side of the sink.
FIGURE 14-4 Typical dishwasher installation for a left or right sink application.
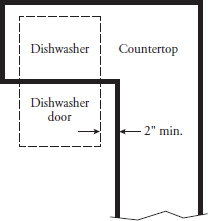
For proper operation and appearance of the dishwasher, the cabinet opening should be square and have the dimensions as shown in Figure 14-5. If the dishwasher is to be installed in a corner, there must be sufficient clearance to open the door (Figure 14-6).
FIGURE 14-5 Undercounter dishwasher cut-out dimensions.
FIGURE 14-6 Corner dishwasher installation dimensions.
Take the time to read over the installation instructions and the use and care manual that comes with every new dishwasher. These booklets will provide you with very important information, such as:
• Safety
• Tools needed for the installation
• How to remove the panels
• How to change the color of the panels
• Locating drain, water, and electrical supplies
• Positioning, aligning, and leveling the dishwasher
• Drain hose connection
• Water line connection
• Connecting the dishwasher to the electrical supply
• Securing the dishwasher in the opening you have selected
• Proper operation of the dishwasher
Most important, read the warranty information that is supplied with the dishwasher.
Functions and Cycles
Dishwashers are similar to automatic clothes washers. They apply three kinds of energy on the things to be washed. These forces are:
• Mechanical energy Water that is sprayed onto the dishes by the motor and pump assembly to remove the food particles. Detergent is added to aid in cleaning of the dishes.
• Heat energy Using hot water (120 to 140 degrees Fahrenheit) to liquefy the fats and greases on dirty dishes. If the water temperature falls below 120 degrees Fahrenheit, the customer must select the water heating option (if available).
• Chemical energy Detergent dissolves the fat and grease off the dishes and keeps the soils suspended in the water to be removed later in the cycle.
Rinse aids are added to the rinse cycle to prevent water spotting of the dishes and to prevent the water from clinging to the dishes. A rinse aid agent will allow the dishes to dry quicker.
Dishwashers perform four basic functions that are modified and put together in different ways to create the various cycles. The four functions are:
• Fill
• Wash/rinse
• Drain
• Dry
As with clothes washers, the only difference between the wash and rinse cycles is the presence of detergent in the wash water. The mechanical activities that make up a wash and a rinse cycle are basically the same function.
Unlike clothes washers, most dishwashers fill and begin to wash (or rinse) at the same time. The functions are put together in various ways to make up different cycles. For example:
• Normal wash cycle A single or double wash with several rinses and a dry.
• Heavy wash cycle Adds a wash to the normal wash cycle.
• Pots and pans Similar to the heavy wash cycle, but this cycle heats the water in the wash cycles and (on some models) also heats the rinse cycles. On certain models, the timer will not advance until the water temperature is 140 degrees Fahrenheit. This will extend the total time of operation. Depending on the model, the cycle time can increase from 15 minutes to 2 hours. (Check the use and care manual for exact details.)
• Light wash cycle This cycle is like the normal wash cycle, but minus a wash cycle.
• Rinse and hold Two rinses for holding dishes to wash later.
Water Temperature
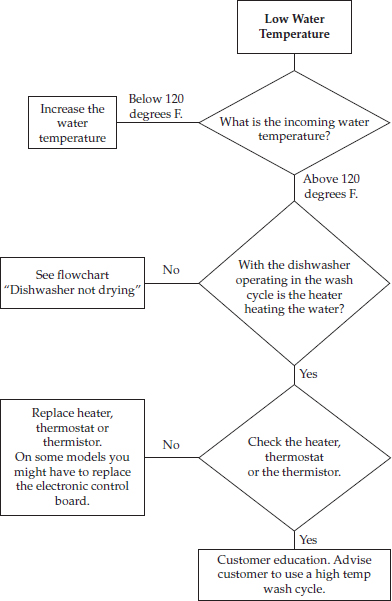
The temperature of the incoming water is critical to the operation of a dishwasher. Most dishwashers have heaters, and some have delay periods that extend the time during which water is heated to a specified point, but this does not fully compensate for low temperature of the water supply. You can check the temperature of hot water at the sink nearest to the dishwasher with a thermometer. Open the hot water faucet. Let the water run until it is as hot as possible, and then insert the thermometer into the stream of water. On some models, if the thermometer reading is below 140 degrees Fahrenheit, you will have to raise the water heater thermostat setting. On other models, the dishwasher was designed to operate with water temperatures as low as 120 degrees Fahrenheit. These models have longer detergent wash periods that allow 120-degree Fahrenheit supply water to be heated up to a temperature that gives good washability results. The dishwasher delay periods occur in only one, two, or three of the water fills, and do little for the remaining rinses. Except during delay periods, the water is not in the dishwasher long enough to be heated adequately.
Water Temperature Above 150 Degrees Fahrenheit
It is not recommended to have the water temperature above 150 degrees Fahrenheit in a domestic dishwasher; above this temperature, certain components in the dishwasher might be adversely affected.
Water Temperature of 150 Degrees Fahrenheit
A water temperature of 150 degrees Fahrenheit is the ideal temperature for a mechanical dishwasher. Detergent action and the dissolving of grease are at the maximum at this temperature. Drying of most materials in the dishwasher will be satisfactory.
Water Temperature of 140 Degrees Fahrenheit
Water temperature of 140 degrees Fahrenheit is the minimum temperature recommended by most dishwasher and detergent manufacturers. At this temperature, detergent is still quite active, and most fats are dissolved so that they can be emulsified in the water by the detergent and washed down the drain. Drying will be fair to poor, as water temperature in the last rinse is lowered toward 140 degrees Fahrenheit in some models. Some improvement in drying is possible if a liquid wetting agent is added to the dispenser.
Water Temperature Between 130 and 140 Degrees Fahrenheit
Water temperature between 130 and 140 degrees Fahrenheit is outside the range for most dishwasher operations, and users will have to exert special care if they are to obtain satisfactory results. The cleaning action of detergents and the dissolving of fats are gradually reduced as temperatures drop below 140 degrees Fahrenheit, so the dishes will probably have to be rinsed well before putting them into the dishwasher. Satisfactory drying becomes less likely as water temperature becomes lower. Some dishwashers have an optional feature which will increase the temperature of the water in the tub at different points during the cycle.
Water Temperature Between 120 and 130 Degrees Fahrenheit
Water temperature between 120 and 130 degrees Fahrenheit will aggravate all of the conditions and problems mentioned for the 130- to 140-degree range. Very few fats will dissolve, so the greasy buildup in the lower areas of the tub will be accelerated. Sudsing and foaming are more likely to increase. Detergent action is further reduced, so pre-rinsing of the dishes becomes even more important. The water heat feature will most likely have to be used.
Water Temperature Below 120 Degrees Fahrenheit
Because of poor washing, grease buildup, poor drying, and foaming, it is unlikely that the dishwasher will perform to the user’s satisfaction if the water supply is less than 120 degrees Fahrenheit.
The Detergent
The kind and amount of dishwasher detergent that is used is an important part of getting the dishes clean. Different brands of dishwasher detergent contain different amounts of phosphorous, which works to soften water and prevent water spots. If the water is hard, you will have to instruct the customer to use a detergent with a higher phosphorous content—above 12 percent. If the water is soft, the customer can use a low-phosphorous dishwasher detergent. Some areas restrict the phosphate content to 8 percent or less. This means that the customer will have to increase the amount of detergent used in those areas where the water is hard. This is done by adding 1 teaspoon of dishwasher detergent manually in the main wash cycle for each grain of water hardness above 12 grains (general guideline: minimum of three teaspoons) (water hardness is measured in grains):
• 0 to 3 grains for soft water
• 4 to 9 grains for medium-hard water
• 10 to 15 grains for hard water
• Over 15 grains for very hard water
If the hardness of the water supply is unknown, contact the local water department.
If the user is using a concentrated detergent, then advise them to use half the amount recommended earlier.
If the water is above 15 grains, the dishwasher will not perform properly (spots and film will appear on dishes), and a water softener will have to be added to the dishwasher water inlet supply.
Always instruct the user to use automatic dishwasher detergent only. The use of soap, hand dishwashing detergent, or laundry detergent will produce excessive suds and will cause flooding and damage to the dishwasher.
Loading the Dishwasher
To obtain the optimum cleaning performance from a dishwasher, the most important factor is loading the dishwasher properly (Figure 14-7). When placed in the dishwasher, the dishes should be positioned in relation to the wash action. The dirtiest side of the dishes should face the source of the water spray. Glasses, cups, and bowls should be positioned slanted and with the bottoms up to prevent any water from collecting on the bottoms. The flatware should be loaded according to the manufacturer’s recommendations as stated in the use and care guide. Any metal items that are loaded into the dishwasher should not touch one another unless they are made from the same materials. Any contact from dissimilar metals could result in permanent damage to the item. Do not place the silverware or dishes crowded together; this will prevent the water from reaching all of the soiled items. Delicate items should be positioned on the racks so they do not move around and cause breakage or chipping. Remember, for optimum cleaning, never overload the dishwasher.
FIGURE 14-7 Proper loading of the dishes in the dishwasher upper and lower racks.
Types of Dishwasher Systems
The basic dishwasher cycles, regardless of manufacturer, will perform the same basic functions when cleaning the dishes. One complete cycle consists of a water fill, water circulation with detergent (wash cycle), then the water is pumped out (drain cycle), again there is a water fill, water circulation without detergent (rinse cycle), and a drying cycle (heated or air only).
Water Fill Cycle
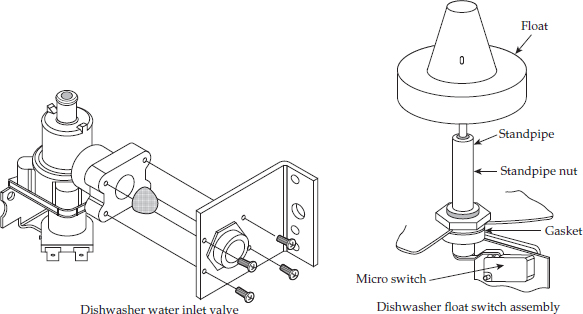
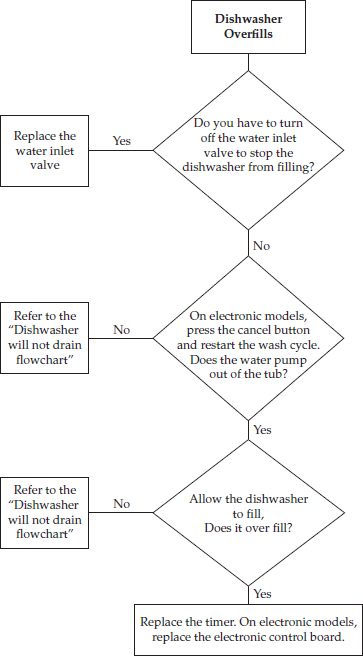
All dishwashers have a timed water fill. The dishwasher timer (mechanical or electronic) controls the amount of water that enters the dishwasher. In most cases, the customer’s water pressure entering the home will dictate the quantity of water allowed in the dishwasher. If the home has low water pressure, the dishwasher might encounter problems filling completely, which will lead to not enough water to wash the dishes. Every dishwasher has an overfill protection device called a float and switch to protect the dishwasher from overfilling. If the water pressure is high, the float and switch will turn off the water inlet valve to prevent flooding, regardless of how much fill time is left on the timer. Each dishwasher has a specific time allotment for the amount of water needed for proper washing. The fill system for the dishwasher will consist of the water inlet valve and the overfill protection device (Figure 14-8).
FIGURE 14-8 The water inlet valve and the overfill protection device.
Water Circulation Systems
The wash phase begins after the water that entered the tub has reached the correct level. This is the beginning of the wash cycle with detergent added. Next, the water pump assembly begins to circulate the water and detergent (Figures 14-1 and 14-9). For a specific period of time, the soil is removed from the dishes with water heated to 140 degrees Fahrenheit and mixed with detergent. When the dishwasher stops and goes into the next phase, the dirty dishwater is pumped out through the drain hose. Then the rinse phase begins. This phase is the same as the wash phase but without the detergent. Some models have two or three spray arms to spray water onto the dishes.
FIGURE 14-9 Various types of water distribution systems used in dishwashers.
Motor/Pump Assemblies
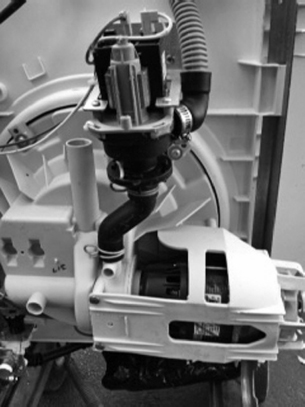
After the water has stopped entering the dishwasher, the timer contacts close to begin the wash/rinse cycle, and the motor and pump assembly will begin to run. The shaft of the motor is connected directly to the pump assembly. There are many different types of motor and pump assemblies manufactured (Figure 14-10). All of these motor and pump assemblies accomplish the same thing. They circulate water throughout the tub, and most of them drain the water out of the tub, too. Some models add a separate drain pump motor for draining the water from the dishwasher tub.
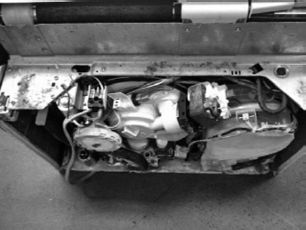
FIGURE 14-10a This is an older-model dishwasher motor and pump assembly manufactured by Frigidaire. This system is a direct drive system. In the wash/rinse cycle, this type of motor/pump system turns clockwise. In the drain cycle, the motor/pump system reverses the direction to drain out the water from the tub.
FIGURE 14-10b This is an older model manufactured by Jenn-Air/Maytag. This model utilized a belt drive system, where the motor will operate a separate pump for wash and drain.
FIGURE 14-10c This dishwasher motor and pump assembly is an older model manufactured by General Electric. This model uses a shaded pole motor and only turns in one direction. To drain the water from the tub, this model uses a solenoid coil to open a valve to drain the water.
FIGURE 14-10d This is the newer-style motor and pump assembly manufactured by General Electric. The motor is an induction motor with a capacitor. It is quieter and more energy efficient.
FIGURE 14-10e This is an older model of a dishwasher motor and pump assembly manufactured by Whirlpool. This system is a direct drive system. The motor turns in one direction for wash and turns in the other direction for drain.
FIGURE 14-10f This motor and pump assembly is a Whirlpool model. This model uses a system for separating the food particles from the recalculating water. It will then flush the food particles down the drain, keeping the water in the tub cleaner during the wash cycle.
FIGURE 14-10g Here is another model manufactured by Whirlpool. This dishwasher motor/pump assembly is a direct drive system without a separate pump-out motor.
FIGURE 14-10h This model is manufactured by Bosch. It utilizes a direct drive system.
FIGURE 14-10i This is a Miele model. Due to the closeness of the components, this model will have to be removed from its installation housing to be repaired.
FIGURE 14-10j This model is manufactured by Frigidaire. It uses a separate drain pump motor to drain the water from the dishwasher tub.
Dishwasher Filtering Systems
Many dishwasher models incorporate some type of wash/rinse water filtering system to separate the food particles from the wash/rinse water (Figure 14-11). This will prevent the food particles from being deposited back on the dishes.
FIGURE 14-11a The LG dishwasher filtering system grinds up the food particles before disposing the food waste down the drain.
FIGURE 14-11b This type of filtering system used by Maytag allows the food particles to be trapped by the filtering screen before the water enters the recalculating pump.
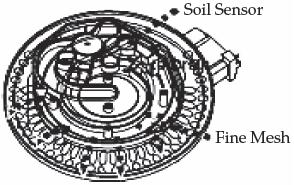
FIGURE 14-11c The Frigidaire dishwasher filtering device. This is an internal view of the water circulating through the pump as the food particles are separated from the wash/rinse water.
FIGURE 14-11d In this Whirlpool dishwasher model, the food particles are contained in a separate chamber to be disposed of in the drain cycle.
FIGURE 14-11e This type of filtering system manufactured by General Electric will separate the food particles during the wash/rinse cycle and dispose of the food particles in the drain cycle.
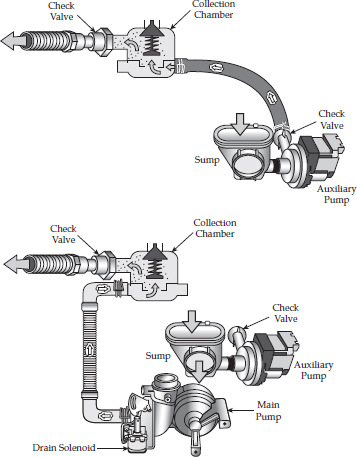
FIGURE 14-11f General Electric models with and without auxiliary pump motor. This motor removes all remaining water in the tub.
Dispensing Systems
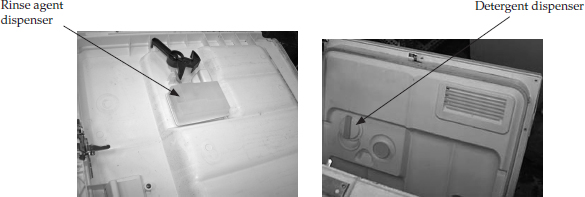
Over the years manufacturers have developed many types of systems used to dispense detergent and rinse agent into the tub (Figure 14-12). A dispensing system must be able to dispense detergent in the wash cycle and also dispense the rinse agent in the rinse cycle. Most dispensing systems used today are electrical or mechanical in nature.
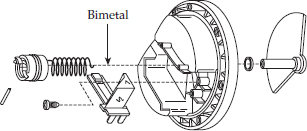
FIGURE 14-12a A bimetal activated dispenser used in a Maytag dishwasher. Current passing through the bimetal will warp it, releasing the detergent.
FIGURE 14-12b This mechanical dispenser was manufactured by General Electric. It is the rotation of the timer and cam that moves the lever that releases the detergent cup and rinse agent.
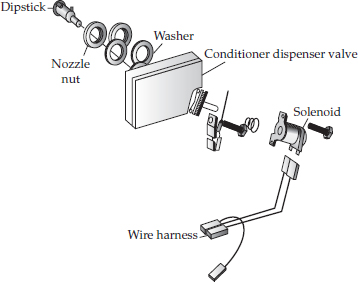
FIGURE 14-12c This Maytag dishwasher uses an electric solenoid to activate the detergent dispenser.
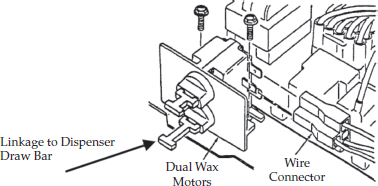
FIGURE 14-12d Wax motors are used to activate both the detergent and rinse agent dispensers in a Whirlpool dishwasher.
Drying Systems
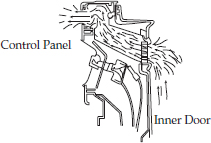
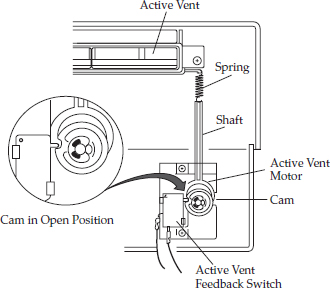
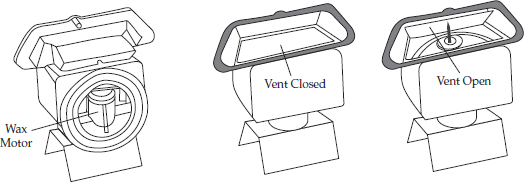
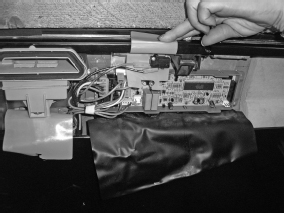
Manufacturers also have used various systems for the drying phase. The drying phase begins with the water fill. When a hot water supply is used in the washing phase, that will assist in the drying process. When the dishes are heated by the hot water, they are better able to evaporate the water during the dry cycle. Most dishwashers are equipped with an electric heating element (Figure 14-13). Some models are also equipped with a blower motor assembly to circulate the heat within the dishwasher during the heating cycle. Other models use natural convection to direct the air flow in the drying process. Cool air enters the dishwasher tub and is heated, and then the heated air rises and absorbs the moisture, escaping through the vent in the dishwasher door. Various types of vent systems are used (Figure 14-14).
FIGURE 14-13a The electric heating element is located within the dishwasher tub area on most models.
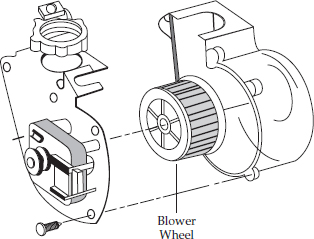
FIGURE 14-13b Some dishwasher models use a forced air blower to force the moisture out of the dishwasher and through the vent.
FIGURE 14-13c A blower motor assembly used by Jenn-Air to aid in drying the dishes.
FIGURE 14-14a This vent design by Frigidaire allows heated air to escape but keeps the water in the dishwasher tub during the wash/rinse cycles.
FIGURE 14-14b This active vent designed by General Electric will close during the first fill cycle and remain closed until the drying phase.
FIGURE 14-14c This powered vent by Whirlpool closes the vent during the wash/rinse cycles, and in the drying phase the wax motors will open the vent.
FIGURE 14-14d The powered vent is located next to the electronic control behind the front panel on the dishwasher.
Step-by-Step Troubleshooting by Symptom Diagnosis
In the course of servicing an appliance, you might overlook the simple things that could be causing the problem. Step-by-step troubleshooting by symptom diagnosis is based upon diagnosing the malfunctions, with possible causes arranged into categories relating to the operation of the dishwasher. This section is intended only to serve as a checklist to aid in diagnosing a problem. Look at the symptom that best describes the problem you are experiencing with the dishwasher, and then proceed to correct the problem.
Before testing any electrical component for continuity, disconnect the electrical supply to the appliance.
No Water to Dishwasher
1. Is the water turned on?
2. Is there voltage to the water inlet valve solenoid?
3. Is the water inlet valve solenoid defective? Disconnect the electrical supply, and check the solenoid coil with an ohmmeter.
4. Is the water valve plunger stuck? Disassemble the water valve and check.
5. Is the water valve inlet screen blocked? Turn off the water supply and remove the water supply line to inspect the screen.
6. Is the water fill line that goes to the water valve kinked? Check visually.
7. Is the water siphoning out of the dishwasher while it is filling? Check the drain hose installation.
8. Are the door latch switches working? Test switch(es) for continuity.
9. Is the float assembly stuck? Check for obstructions. Check assembly and test float switch for continuity.
10. On electronic models, run the diagnostic test mode.
11. Check for loose or burned wires.
12. Check the float assembly and float switch.
Low Water Charge
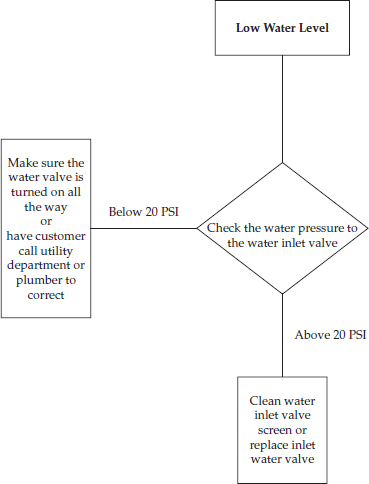
1. Is there adequate water pressure to the water inlet valve? Pressure should be between 15 and 120 pounds per square inch.
2. Is the water volume adequate? Take a quart container and fill it at the tap. The water must fill the container in seven seconds or less.
3. Is the water valve inlet screen clean? Turn off the water supply and remove the water supply line to inspect the screen.
4. On portable models, check the aerating snap adapter on the faucet.
5. Is the timer defective? Disconnect the electric supply and check the switch contacts for continuity.
6. Is the electronic control functioning properly? Run the test mode.
7. Is the float switch improperly positioned? Is the switch defective? Disconnect the electric supply and check the switch contacts for continuity.
8. Is the water fill line that goes to the water valve kinked? Check visually.
9. Check the service manual for the model you are servicing for the correct water level in the tub when the fill cycle ends.
Poor Washability on the Upper Rack
1. Is the upper spray arm turning?
a. Are the holes in the spray arm plugged?
b. Check to see if the spray arm is split.
c. Is there uneven loading of the dishes?
d. Check the filter assembly for blockage.
e. Check the lower impeller to see if it is defective or blocked with debris.
f. Are any objects protruding down that might prevent the upper spray arm from rotating?
2. Is the water charge okay?
3. What is the temperature of the water entering the tub? Is the temperature at 140 degrees Fahrenheit?
4. Is the consumer using the proper amount of detergent?
5. Is the detergent dispenser functioning properly?
6. Are the dishes loaded properly? Ask the user to load the dishwasher so that you can observe whether he or she is loading the dishwasher properly.
7. On some models you may have to check the filters for blockages.
Poor Washability in the Lower Rack
1. Is the lower spray arm turning?
a. Are the holes in the spray arm plugged?
b. Check to see if the spray arm is split.
c. Is there uneven loading of the dishes?
d. Is the spray arm binding on the housing?
e. Are any objects protruding down that might prevent the lower spray arm from rotating?
2. Is the water charge okay?
3. What is the temperature of the water entering the tub? Is the temperature at 140 degrees Fahrenheit?
4. Is the consumer using the proper amount of detergent?
5. Is the detergent dispenser functioning properly?
6. Are the dishes loaded properly? Ask the user to load the dishwasher so that you can observe whether he or she is loading the dishwasher properly.
7. On some models you may have to check the filters for blockages.
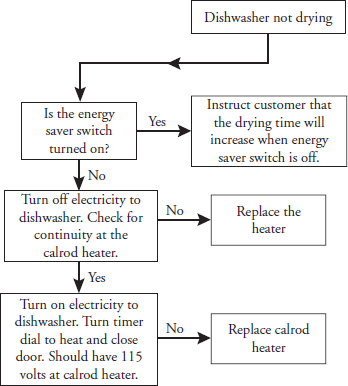
Poor Drying
1. Is the water hot enough? Check the water supply temperature. On certain models, check to see if the cycle extender is functioning properly.
2. Is the heater working?
a. Check the wiring.
b. Check the timer or the electronic control board.
c. Check for the correct voltage.
d. Check the heater itself.
e. Check the heater fan assembly.
3. Is a wetting agent being used? Check wetting agent level.
4. Check the door baffle.
5. Check the vent system.
6. Suggest that the user open the door a little after the dry cycle has been completed.
Water Leaks at the Front of the Dishwasher
1. Is the spray arm turning? Is it split? Are any of the holes blocked with debris? If so, this can cause the water to spill out of the tub.
2. Is the tub gasket in place? Check the corners especially. Worn tub or corner gaskets will cause water to leak out of the corners.
3. Did you check the vent baffle gasket?
4. Some models have a corner gasket located in the inside front of the tub. Check to see if it is in place.
5. Check to see if the tub is not overcharged with water. Too much water will spill over the front tub flange.
6. Does the door close properly and tightly where the latch fits the strike?
7. On some models, are the gasket clips in place? These clips secure the gasket to the tub.
8. Is the dishwasher loaded properly? Ask the user to load the dishwasher so that you can observe whether he or she is loading the dishwasher properly.
9. Check to see if the dishwasher is draining properly. Inspect the drain hose where it enters the drain.
10. Most important, is the dishwasher level?
11. Check the door liner for any cracks.
12. Check to see if the wetting agent dispenser is working properly. Too much wetting agent will cause sudsing. Also check the gasket between the door and the dispenser.
Water Leaks at Sides, Top, or Bottom of Dishwasher
1. Check the side inlet tube on the side of the dishwasher.
2. Check to see if water is leaking out from the pump assembly.
3. Check the motor seals for water leakage.
4. Does the tub have a hole in it? Is the tub rusted out?
5. Check the nut on the water inlet port. Is it tight?
6. Are the heater element nuts tight?
7. Check to be sure that all screws are tight (motor and pump assembly, upper rack screws, etc.).
The Dishwasher Cycle Will Not Advance (But the Lights Will Come On)
1. Is there voltage to the timer motor or electronic control board?
2. Are the cams in the timer rotating?
3. Is the dishwasher wired correctly?
4. Check to see if the timer is jammed.
5. Check to see if the selector switch is defective.
6. On electronic models, run the test mode.
The Dishwasher Cycle Will Not Advance Past Start
1. Is the thermostat functioning properly? The thermostat must be flush with the underside of the tub.
2. Check for correct timer settings.
The Detergent Cup Won’t Open
1. Is there voltage to the solenoid?
2. Is the detergent mechanism properly adjusted?
3. Check to see if there is any binding at any point.
4. Check to see if any dishes are preventing the detergent cup door from opening.
The Detergent Cup Won’t Close
1. Check the detergent cup actuator and cams.
2. Check to see if there is any binding at any point.
3. Is the detergent mechanism adjusted properly?
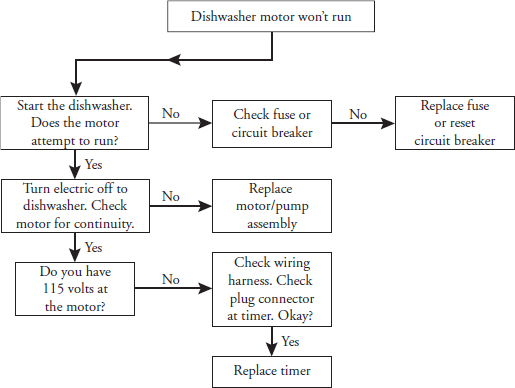
The Main Motor Won’t Operate
1. Check for continuity at the start and run windings. Check the motor for a shorted or grounded winding.
2. Is there voltage to the motor?
3. Is the motor jammed? Check for foreign debris in the pump assembly.
4. Check to see if there are any loose wiring terminals or burned wires.
5. Check to see if the motor assembly is wired correctly.
The Motor Runs but Goes into Overload
1. Check the relay.
2. Is there any binding? Check the pump assembly for broken pieces of glass.
3. Be sure you have the correct voltage and the correct polarity.
4. Check to see if the motor windings are shorted.
5. Some models have a run capacitor. Test the run capacitor.
Door Liner Hits Side of Tub in Undercounter Models
1. Check to see if the tub is square.
2. Check the installation, and correct as needed.
Dishwasher Won’t Start
1. Is there voltage to the dishwasher? Check the plug, circuit breaker, or fuse box. Also check the wires in the junction box, located behind the lower front panel.
2. Check the door switch for continuity of the switch contacts.
3. Check the selector switch for continuity of the switch contacts.
4. Check to see if the timer and selector switch have been wired correctly.
5. On electronic models, check the electronic control board.
6. Check for any wires that might have come off the timer or switches.
The Dishwasher Repeats the Cycle
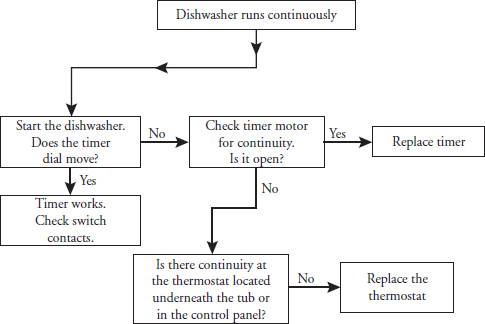
1. Check the timer contacts; they should be open in the “off” position.
2. Check to see if the timer motor wires are shorted.
Wetting Agent Assembly Leaks
1. Open the door assembly and check for leaks in the holding tank.
2. Check the wetting agent assembly for proper operation.
Water Siphons Out Through the Drain Pipe While the Dishwasher Is Trying to Fill
1. Is the drain line properly installed?
2. Check the installation instructions for proper installation.
Common Washability Problems
If there are no mechanical problems with the dishwasher’s operation and the complaints are that the dishwasher will not clean the dishes properly or that the glassware is cloudy etc., the next step will be to look at the best possible cause for the problem that the customer is experiencing with the dishwasher. Then proceed to correct the problem. If necessary, instruct the user on how to get better results from the dishwasher.
Poorly Cleaned Dishes
On occasion, there might be some food particles left on the dishes at the end of the cycle.
• Possible cause: Water temperature might be too low. Remember, the water temperature should be 140 to 150 degrees Fahrenheit as it enters the dishwasher tub.
• Solution: Check the water temperature at the closest faucet. Let the water from the hot water tap run before starting the dishwasher in order to clear the water line of any cold water.
• Possible cause: Not enough detergent for the degree of water hardness or for the amount of dirty dishes to be cleaned.
• Solution: Use 1 teaspoon of detergent for each grain of hardness, with 3 teaspoons of detergent, at a minimum, in soft water. The dishwasher will require extra detergent for greasy pans.
• Possible cause: The detergent was placed in the wrong side of the dispenser cup.
• Solution: Instruct the user on how to fill the dispenser, and have the user reread the use and care manual so that the detergent is placed in the correct dispenser for the cycle that is selected.
• Possible cause: Improper loading of the dishes into the dishwasher.
1. Blocking the spray nozzle. If a large bowl or pot is placed over the center of the lower rack, this will block the spray nozzle washing action when the lower rack is pushed in.
2. Larger items that shield smaller items from the washing action.
3. Observe to see if there is a nesting of the bowls or silverware so that the water cannot reach all surfaces.
4. The spray arms are blocked from turning, for example, tall items or an item that fell through the racks.
5. If an item blocks the detergent dispenser from opening, this will not allow the detergent to mix with the water.
• Solution: Instruct the user to reread the use and care manual for the proper instructions on how to load the dishes for proper cleaning.
• Possible cause: Improper filling of water in the tub. Water pressure must be between 15 and 120 pounds per square inch. After the fill has stopped, check the water level in the tub. On most models, it should be even with the heating element in the bottom of the dishwasher.
• Solution: If the water pressure is low, be sure that no other faucets are in use while the dishwasher is operating.
• Possible cause: Not enough hot water.
• Solution: Instruct the user to use the dishwasher when the hot water is not being used for laundry, baths, or showers.
• Possible cause: If the dishwasher detergent is old and caked, it will not dissolve completely.
• Solution: Instruct the user to use fresh detergent and always store it in a dry place.
Etching
Etching occurs when the glass is pitted or eroded. It appears as a permanent film on the glass. The beginning stages of etching can be identified by an iridescent look—shades of blue, purple, brown, or pink when the glass is held at an angle to the light. In the advanced stages of etching, the glass surface appears frosted or cloudy.
• Possible cause: Certain types of glass will etch in any dishwasher with the combination of soft water, the alkalinity of dishwasher detergents, and heat.
• Solutions: There is no way to remove the filmy appearance caused by etching; the damage is permanent. There is no way to predict what glassware might be affected— it is not related to the cost or quality of the glass. To prevent etching from recurring:
• Adjust the amount of detergent according to the water hardness.
• Adjust the water temperature so that it enters the dishwasher at approximately 140 degrees Fahrenheit.
• Recommend to the customer that the Energy Saver dry cycle be used.
• Instruct the customer not to manually pre-rinse the dishes before loading them into the dishwasher.
Discoloration
Discoloration (red, black, or brown) might be present on the dishwasher interior or dishes.
• Possible cause: If iron or manganese is in the water, the dishes and/or the interior of the dishwasher might turn red, black, or brown.
• Solution: A rust remover can be used to remove the discoloration from the dishwasher interior. With the dishwasher empty, turn to the rinse and hold cycle, and start the dishwasher. During the fill, open the door and add 1/2 cup of rust remover to the water. Allow the dishwasher to complete the cycle. Then start the dishwasher on the normal wash cycle, with detergent but without dishes. To keep this condition from returning, the customer might have to install special filters to remove the iron and manganese. Use a rust remover according to the manufacturer’s recommendations to remove the discoloration from the dishes and the glassware.
Lime Deposits on the Dishwasher Interior
• Possible cause: If there is a lot of calcium in the water, a lime film or deposit might eventually build up on the interior surfaces of the dishwasher.
• Solution: You can try one of the following methods:
• Use a mild scouring powder and a damp cloth to clean away the lime deposit.
• With the dishwasher empty, turn the timer to the rinse and hold cycle. During the fill portion, open the door and add 1/2 cup of white vinegar to the water. Let the dishwasher complete the remaining cycle. Do not use detergent. After the cycle is completed, run the dishwasher with a regular load.
• Use a product that removes lime deposits. Follow the manufacturer’s directions.
Suds or Foam in Dishwasher
• Possible causes:
• Sudsing in the dishwasher can be caused by protein foods (milk, eggs, etc.) and an insufficient amount of detergent.
• The water in the dishwasher is not hot enough to activate the defoaming agents in the dishwasher detergent.
• The user has used a non-automatic dishwasher detergent.
• Solutions:
• Increase the amount of detergent to reduce sudsing. Dishwasher detergents contain defoaming agents to break down the suds in the dishwasher water.
• Check that the water temperature is between 140 and 150 degrees Fahrenheit. Only use detergents that are made for automatic dishwashers.
Darkened Aluminum
• Possible cause: A combination of water, heat, and alkaline foods will darken or stain aluminum products.
• Solution: To remove this discoloration, instruct the customer to use an aluminum cleaner and to clean the item by hand. Never allow undissolved dishwasher detergent to come in direct contact with the metal. Avoid placing aluminum items in the lower rack, directly in front of the detergent dispenser.
Discoloration of Copper
• Possible cause: Some copper items will discolor when washed by hand, as well as when washed in the dishwasher, because of the heat and detergent alkalinity.
• Solution: Instruct the customer to use a copper cleaner to restore the copper color.
Cracking (Crazing) of China
• Possible cause: Crazing is the appearance of tiny cracks that appear over the entire surface of the china. It can occur when porous earthenware, good china that is very old, or lower-quality china is exposed to heat and moisture.
• Solution: Once the glaze is cracked or crazed, the damage is permanent. This characteristic is inherent in some clayware; this type of damage can occur during use, handwashing, or automatic dishwashing.
Chipping of China and Crystal
• Possible cause: Chipping usually occurs during normal use and handling, and simply might not be noticed until the dishes are removed from the dishwasher. When the dishes are loaded into the dishwasher according to the manufacturer’s instructions, there is nothing in the dishwasher that can chip the dishes. The dishes should only come in contact with the cushioned vinyl-coated racks.
• Solution: Instruct the user to follow the manufacturer’s instructions in the use and care manual for loading the dishwasher properly.
Metal Marks on Dishes and Glassware
• Possible cause: If a metal item, especially aluminum, touches a dish in the dishwasher, a metal mark might result. This symptom appears as small black or gray marks or streaks on dishes or glasses. However, most metal marks occur during normal use, when the dishes come in contact with the flatware.
• Solution: Instruct the user to load the dishwasher carefully in order to prevent metal items from touching other dishes. There are products on the market that will remove these marks. Have the user read over the use and care manual or check with the manufacturer for this information.
Staining of Melamine Dinnerware
• Possible cause: Stains on melamine dinnerware can result from contact with coffee, tea, and some fruit juices. If the surface is worn, it will stain more readily.
• Solution: Some specialty products on the market are recommended for removing these stains. Instruct the customer to read over the use and care manual or check with the manufacturer for this information.
• Part VI: Appliance Service, Installation, and Preventive Maintenance Procedures
Melting or Warping of Plastic Items
• Possible cause: Some plastic items cannot be exposed to the temperatures usually found in dishwashers without changing shape.
• Solution: Once the plastic item has distorted, it cannot be returned to its original shape. In order to minimize or prevent plastic items from warping or melting, instruct the user to do one of the following:
• Choose the air-dry cycle to dry the dishes.
• Place the plastic items on the top rack.
• Purchase and use plastic items that are labeled “dishwasher-proof.”
Discoloration of Silverplate
• Possible cause: When silverplate takes on a copper- or bronze-colored appearance, the silverplate has worn thin and the base metal is showing through. The combination of dishwasher detergent and the lack of hand-toweling might result in discoloration of this base metal.
• Solution: This discoloration can usually be removed by polishing the item with a silver polish or by soaking the item in vinegar for about 10 minutes. This is only a temporary solution, however. Only a replating with silver by a jeweler will correct the problem.
Tarnishing of Silverware (Sterling or Silverplate)
• Possible cause: Sulfur in the water supply might be the cause. This effect might be accelerated by the automatic dishwasher because of the higher water temperature and because the usual hand-drying with a towel has been eliminated.
• Solution: Because sulfur cannot be readily removed from the water supply, frequent polishing is the only answer.
• Possible cause: Silver will tarnish easily if it is left in contact with foods such as mayonnaise and eggs.
• Solution: If silverware has been in contact with such foods, instruct the user to rinse the item thoroughly as soon as possible after its use.
Bluish Discoloration of Stainless Steel
• Possible cause: A bluish discoloration of some types of stainless steel is caused by heat and the alkalinity of the automatic dishwasher detergent.
• Solution: This discoloration can be removed by using a paste of baking soda and water or a stainless steel cleaner.
Corrosion or Rusting of Stainless Steel
• Possible cause: When the protective oxide film on the surface of the steel is removed, corrosion will take place, as with ordinary steels. Certain foods will remove the oxide film, such as table salt, vinegar, salad dressings, milk and milk products, fruits and juices, tomatoes and tomato products, and butter. However, if the stainless steel is washed, rinsed, and dried thoroughly, the oxygen of the air will heal the breaks in the oxide film and return the stainless property to the steel. But if food is not washed off promptly, the air cannot heal the break, and corrosion will occur.
• Solution: There is no permanent solution. To minimize rusting, instruct the user to rinse or wash the flatware as soon as possible after use.
Dishwasher Maintenance
The dishwasher’s interior is normally self-cleaning. However, there are times when the customer will have to remove food particles or broken glass in the bottom of the tub. Instruct the customer to clean the bottom edge of the dishwasher tub, which is sealed off by the gasket when the door is closed. Food and liquids drip on to this area when the dishwasher is loaded. The control panel should be cleaned with a soft damp cloth. Tell the customer not to use any abrasive powders or cleaning pads. Also, advise the customer to read the use and care manual for proper maintenance procedures for his or her brand of dishwasher. Dishwashers are designed to flush away all normal food soils that have been removed from the dishes. However, on occasion, certain foreign objects, such as fruit pits, bottle caps, etc., might collect in the openings of the pump. These items should be removed periodically to avoid clogging the drain system. Also, on occasion, some of these foreign objects can get caught in the spray arm openings and will have to be cleaned out. Check the racks carefully to see if there are any nicks or cuts in the vinyl. These nicks and cuts can be repaired. A liquid vinyl-repair material is available through the manufacturer or at any appliance supply store.
Repair Procedure
Each of the following repair procedures is a complete inspection and repair process for a single dishwasher component, containing the information you need to test a component that might be faulty and then replace it, if necessary.
Any person who cannot use basic tools should not attempt to install, maintain, or repair any dishwashers. Any improper installation, preventative maintenance, or repairs will create a risk of personal injury, as well as property damage. Call the service manager if installation, preventative maintenance, or the repair procedure is not fully understood.
Water Inlet Valve
The water inlet valve controls the flow of water into the dishwasher tub, and is solenoid-operated.
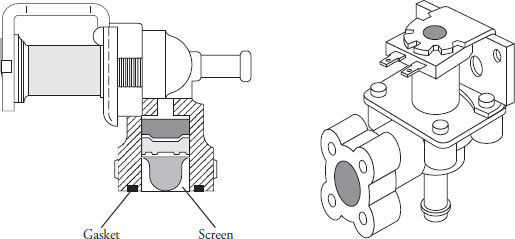
The typical complaints associated with water inlet valve failure (Figure 14-15) are:
• The dishwasher will run, but no water will enter dishwasher.
• The dishwasher will overfill and leak onto the floor.
• When the dishwasher is off, water still enters the tub.
• The dishes are not clean or not enough water enters the tub.
FIGURE 14-15 A typical dishwasher water valve.
When dealing with these complaints, perform the following steps:
1. Verify the complaint. Verify the complaint by operating the dishwasher through its cycles. Listen carefully, and you will hear if the water is entering the dishwasher. On electronic models, turn off the electricity to the appliance and wait for two minutes before turning it back on. If a fault code appears, look up the code. If the dishwasher will not power up, locate the technical data sheet behind the control panel or under the tub of the dishwasher for diagnostics information. On some models you will need the actual service manual for the model you are working on to properly diagnose the dishwasher. The service manual will assist you in properly placing the dishwasher in the service test mode for testing the dishwasher functions.
2. Check for external factors. You must check for external factors not associated with the appliance. Is the appliance installed properly? Is the voltage supply correct for the dishwasher? Is the water turned on all the way? The voltage at the receptacle is between 108 volts and 132 volts during a load on the circuit. Do you have the correct polarity? (See Chapter 6.)
3. Disconnect the electricity. Before working on the dishwasher, disconnect the electricity. This can be done by pulling the plug out of the wall receptacle. Be sure that you only remove the dishwasher plug. Double-check to ensure that the electrical supply has been disconnected before removing any service panels. Another way to disconnect the electricity is at the fuse panel or the circuit breaker panel. Turn off the electricity.
WARNING Some diagnostic tests will require you to test the components with the power turned on. When you disassemble the control panel, you can position it in such a way that the wiring will not make contact with metal. This act will allow you to test the components without electrical mishaps.
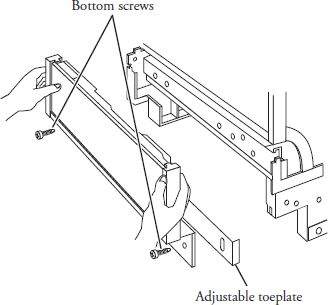
4. Remove the bottom panel. In order to gain access to the water valve, the bottom panel must be removed (Figure 14-16). The bottom panel is held on with either two or four screws, depending on the model. Remove the screws, and remove the panel.
FIGURE 14-16 Removing the bottom panel.
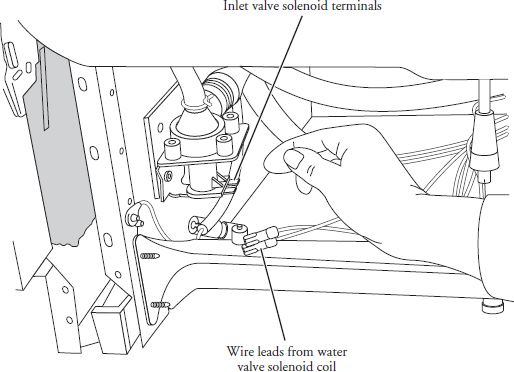
5. Remove the wire leads. In order to check the solenoid coil on the water valve, remove the wire leads that connect to the solenoid coil from the wire harness (Figure 14-17). These are slide-on terminal connectors attached to the ends of the wire—just pull them off.
FIGURE 14-17 Removing the wire leads from the solenoid coil.
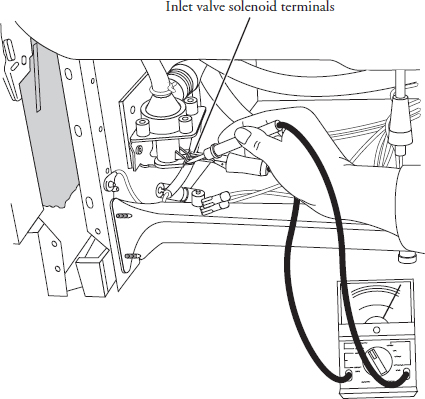
6. Test the water valve. Using the ohmmeter, set the range on R × 1000, and place the probes on the solenoid coil terminals (Figure 14-18). The meter should read between 700- and 900-ohms resistance. If not, replace the water valve.
FIGURE 14-18 Connect meter probes to the water valve solenoid coil.
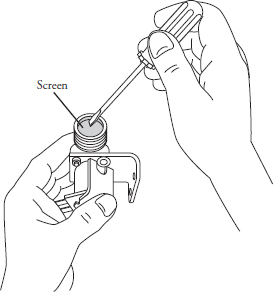
7. Inspect the inlet screen. If you determine that the water valve is good, but there is little water flow through the valve, inspect the inlet screen. If this screen is filled with debris, it must be cleaned out. To accomplish this, use a small flat-blade screwdriver and pry out the screen (Figure 14-19). Then wash out the screen, making sure that all of the debris is removed. Reinstall the screen. Turn on the water supply. Plug in the dishwasher. Allow the water to enter the tub to check the flow rate of the water valve. The tub must be empty, because this will allow you to check the flow rate properly. On a normal fill, the water line (on some models) should be over the heating element within two minutes (Figure 14-20). When you turn the dishwasher on and energize the water valve, if no water enters the dishwasher tub, replace the water valve. If the water valve checks out okay, then check the timer or electronic control board, float switch, and the wiring harness.
FIGURE 14-19 Removing water valve inlet screen. Be careful not to distort the screen.
FIGURE 14-20 Diagram indicates water level in dishwasher tub.
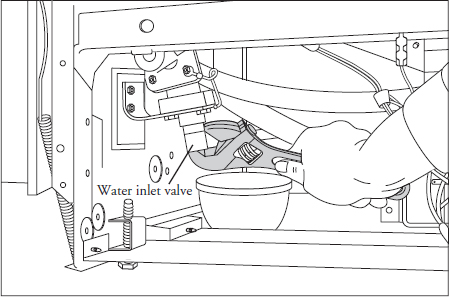
8. Remove the water valve. Before removing the water valve, turn off the water supply to the dishwasher. Then disconnect the water supply line from the inlet end of the water valve and remove the fill hose from the outlet side (Figure 14-21). Next, remove the screws that hold the water valve to the chassis of the dishwasher. To install the new water valve, just reverse the disassembly procedure and reassemble. Check for water leaks. If none are found, reinstall the bottom panel and restore the electricity to the dishwasher.
FIGURE 14-21 Disconnect the water supply line.
9. Operate the dishwasher. Set the timer and control settings to operate the dishwasher through its cycle.
Motor and Pump Assembly
The motor and pump assembly today utilizes a direct drive motor/pump assembly. This means the motor drives the pump, which is attached to the motor. The shaft seal (Figure 14-22) is a two-part seal needed to keep water from dripping onto the motor. This ceramic and carbon seal is fragile. The water in the tub acts as a lubricant for the seal.
FIGURE 14-22 Dishwasher motor and pump seals. The seals prevent water from leaking out of the dishwasher.
The typical complaints associated with pump and motor failure are:
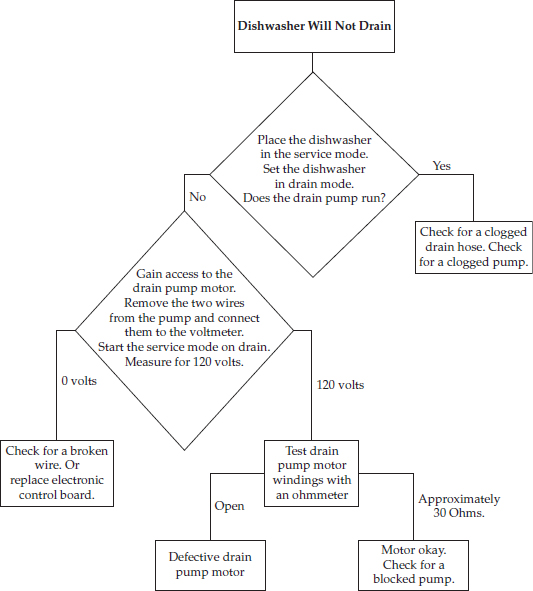
• The water will not drain out of the dishwasher.
• Poor washability of the dishes.
• When the motor runs, there are loud noises.
• The fuses or circuit breaker will trip when the dishwasher is started.
• Water is leaking from the bottom of the dishwasher or leaking on the motor/pump assembly.
When dealing with these complaints, perform the following steps:
1. Verify the complaint. Verify the complaint by operating the dishwasher through its cycles. Listen carefully, and you will hear if there are any unusual noises or if the circuit breaker trips. On electronic models, turn off the electricity to the appliance and wait for two minutes before turning it back on. If a fault code appears, look up the code. If the dishwasher will not power up, locate the technical data sheet behind the control panel or under the tub of the dishwasher for diagnostics information. On some models you will need the actual service manual for the model you are working on to properly diagnose the dishwasher. The service manual will assist you in properly placing the dishwasher in the service test mode for testing the dishwasher functions.
2. Check for external factors. You must check for external factors not associated with the appliance. Is the appliance installed properly? Does the appliance have the correct voltage? The voltage at the receptacle is between 108 volts and 132 volts during a load on the circuit. Do you have the correct polarity? (See Chapter 6.)
3. Disconnect the electricity. Before working on the dishwasher, disconnect the electricity. This can be done by pulling the plug out of the wall receptacle. Be sure that you only remove the dishwasher plug. Or disconnect the electricity at the fuse panel or at the circuit breaker panel. Turn off the electricity.
WARNING Some diagnostic tests will require you to test the components with the power turned on. When you disassemble the control panel, you can position it in such a way that the wiring will not make contact with metal. This act will allow you to test the components without electrical mishaps.
4. Remove the bottom panel. In order to gain access to the pump and motor assembly, the bottom panel must be removed (see Figure 14-16). The bottom panel is held on with either two or four screws, depending upon the model. Remove the screws and remove the panel.
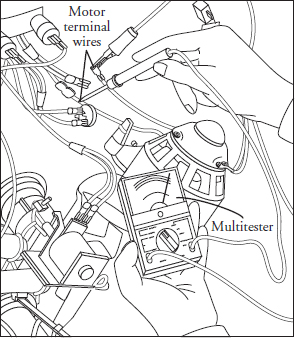
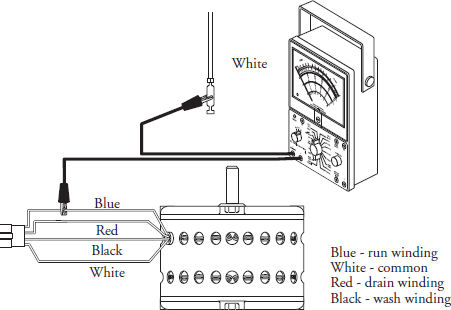
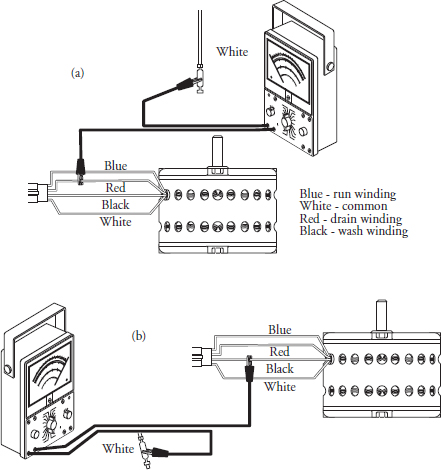
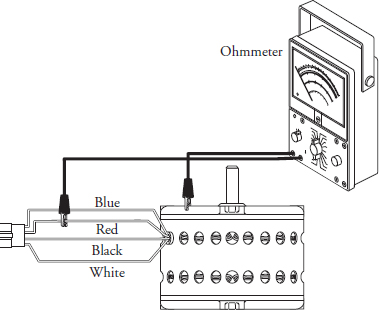
5. Disconnect the motor wire leads. Disconnect the motor wire leads from the wiring harness. Check the motor windings for continuity (Figure 14-23). Check for resistance from the common wire lead to the run winding (Figure 14-24). Check from the common to the wash winding (Figure 14-25).
FIGURE 14-23 Check the motor windings for continuity.
FIGURE 14-24 Check from the common to the drain winding.
FIGURE 14-25 Check from the common to the wash winding.
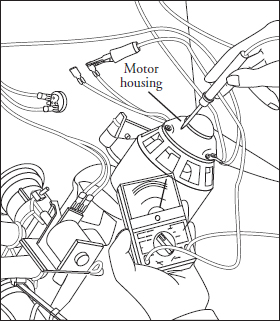
To check for a grounded winding in the motor, take the ohmmeter probes and check from each motor wire lead terminal to the motor housing (Figure 14-26). The ohmmeter will indicate continuity if the windings are grounded (Figure 14-27).
FIGURE 14-26 Check for the grounded motor.
FIGURE 14-27 The grounded motor.
If the motor/pump assembly shows signs of water leaking, replace the motor/ pump assembly as a complete unit. Most part manufacturers give a one-year warranty on the motor/pump assembly. There is no advantage in tearing down the motor/pump assembly to replace only one or two parts and receiving only a partial warranty. Replacing the motor/pump assembly as a complete assembly will save you time and money in the long run. If the motor/pump assembly checks out okay, then check the timer and the motor relay (if the model you are repairing has one) and check for a kinked or plugged drain line.
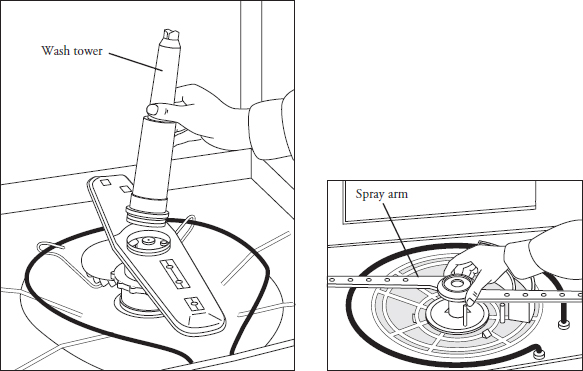
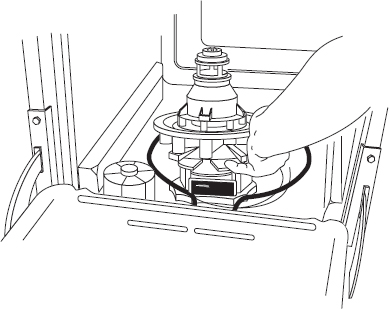
6. Remove motor and pump assembly. Remove the lower dishwasher rack from the dishwasher. As shown in Figure 14-28, remove the wash tower and spray arm assembly. If there is a filter, remove it also. Remove the motor wiring leads from the wiring harness. Then remove the drain line from the pump assembly.
FIGURE 14-28 Remove the wash tower and the spray arm assembly.
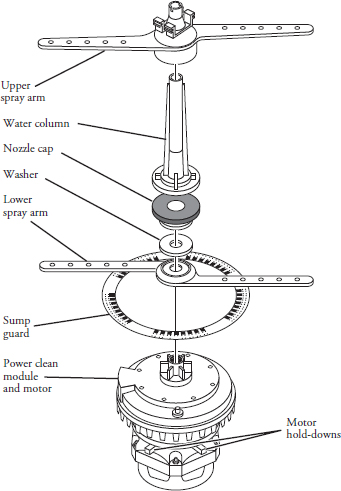
Reach underneath the tub and rotate the four pump hold-downs 90 degrees inward (Figure 14-29). You are now ready to remove the motor/pump assembly. Lift the motor/pump assembly out from the inside of the tub (Figure 14-30). Keep the work area dry to help prevent electrical shocks.
FIGURE 14-29 An exploded view of a dishwasher motor/pump assembly.
FIGURE 14-30 Remove the motor/pump assembly. After removal, inspect the tub for rust.
7. Reinstall motor and pump assembly. To reinstall the motor/pump assembly, just reverse the order of step 6. Before restoring the electricity to the dishwasher, pour a gallon of water into the tub and check for leaks underneath the tub. Restore the electricity to the dishwasher, and run the dishwasher through a cycle. Check for leaks again. If no leaks are found, reinstall the bottom panel.
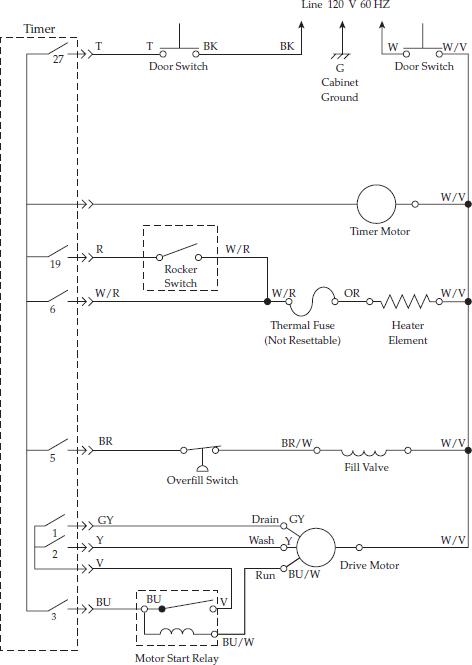
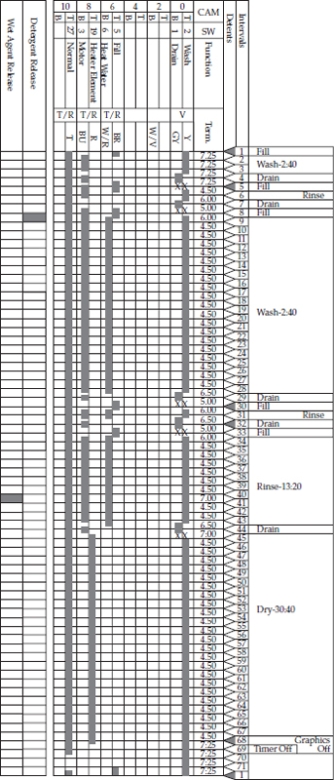
Dishwasher Timer
Electromechanical timers are utilized for controlling the different cycles. The timer assembly is driven by a synchronous motor in incremental advances. It controls and sequences the numerous steps and functions involved in each cycle of a dishwasher.
On models with an electronic control board, refer to the service manual for proper removal and testing. On models that use an electronic control along with a sequence switch, refer to the service manual for proper removal and testing.
The typical complaints associated with dishwasher timer failure are:
• The cycle will not advance.
• The dishwasher won’t run at all.
• The dishwasher will not fill.
• The dishwasher will not pump the water out.
When dealing with these complaints, perform the following steps:
1. Verify the complaint. Verify the complaint by operating the dishwasher through its cycles. Before you change the timer, check the other components controlled by the timer.
2. Check for other factors. You must check for other factors that could affect the operation of the appliance. Is the appliance installed properly? Does the appliance have the correct voltage? The voltage at the receptacle is between 108 volts and 132 volts during a load on the circuit. Do you have the correct polarity? (See Chapter 6.)
3. Disconnect the electricity. Before working on the dishwasher, disconnect the electricity. This can be done by pulling the plug out of the wall receptacle. Be sure that you only remove the dishwasher plug. Or disconnect the electricity at the fuse panel or circuit breaker panel. Turn off the electricity.
WARNING Some diagnostic tests will require you to test the components with the power turned on. When you disassemble the control panel, you can position it in such a way that the wiring will not make contact with metal. This act will allow you to test the components without electrical mishaps.
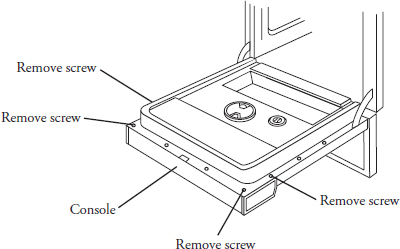
4. Remove the console to gain access. Begin by removing the four screws from the console to access the timer (Figure 14-31). Turn the timer knob counterclockwise to remove it from the timer shaft, and slide the indicator dial off the shaft. Remove the console panel from the dishwasher. On some models, the latch handle knob will also have to be removed.
FIGURE 14-31 Remove the screws to access the control panel.
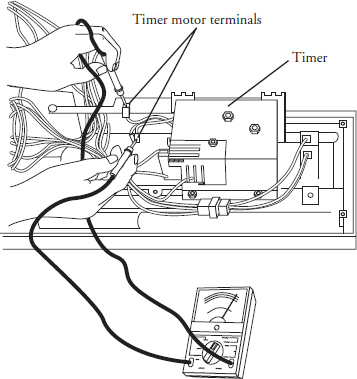
5. Test the timer. Disconnect the timer motor wire leads from the timer assembly. Using the ohmmeter, set the range on R × 1000, and place the probes on the timer motor terminals (Figure 14-32). The meter should indicate some resistance. If not, replace the timer. If the motor checks out, then check the door latch switch, cycle extender relay, and the float switch assembly.
FIGURE 14-32 Attach the meter probes and test for continuity.
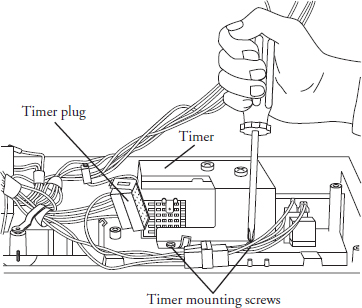
6. Remove the timer. To remove the timer, remove the timer mounting screws (Figure 14-33). Remove the wire lead terminals from the timer. Mark the wires as to their location on the timer. Some timers have a disconnect terminal block instead of individual wires, which makes it easier to remove the timer wires.
FIGURE 14-33 Removing the timer.
7. Install the new timer. To install a new timer, just reverse the disassembly procedure, and reassemble. Reinstall the console panel, and restore the electricity to the dishwasher. Test the dishwasher operation.
The Dishwasher Door Is Hard to Close
Check the latch assembly, door gaskets, tub gaskets, and on some models, the corner gaskets.
The typical complaints associated with a dishwasher door being hard to close are:
• The door is hard to close.
• The door won’t latch.
• The dishwasher won’t run.
When dealing with these complaints, perform the following steps:
1. Verify the complaint. Verify the complaint by trying to close and latch the door.
2. Check for external factors. You must check for external factors not associated with the appliance. Is the appliance installed properly? Be sure that the dishwasher door is not binding against the side cabinet.
3. Run the dishwasher. By pushing on the door, you finally latch the door closed. Next, run the hot water faucet closest to the dishwasher to flush out the supply line. Then turn the timer to the normal wash cycle with heated dry, and let it run through the entire cycle. By doing this procedure, the gasket will soften enough to form itself to the tub while it is compressed. This should make it easier to latch the door. If not, adjust the latch assembly. If it is still too hard to close, replace the door gasket.
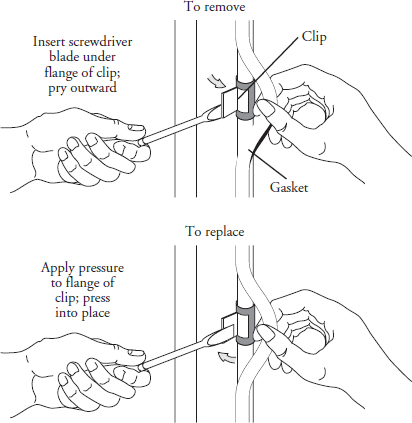
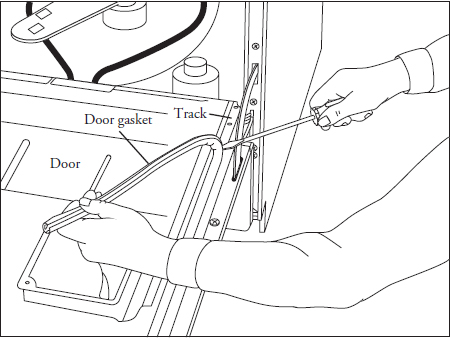
4. Replace the door gasket. To remove the old gasket, remove the screws or clips that hold the old gasket in place (Figure 14-34). On some models, the gasket is pressed into the inner door assembly. Remove the inner panel from the dishwasher, and pull off the gasket from the panel (Figure 14-35). Soak the new gasket in warm water to make it more flexible.
FIGURE 14-34 Removing dishwasher door gasket.
FIGURE 14-35 Pull off the gasket, being careful not to damage the door liner.
5. Test a new gasket. After you have installed the new door gasket, close the dishwasher door, and test to see if the door latches without pushing hard against it.
6. Check for water leaks. Run the dishwasher through another cycle to check for water leaking out the door. Most models have a baffle, or tub, gasket. If the dishwasher that you’re working on has one, check to make sure it is not defective. The tub gasket is located either on the tub or behind the inner door panel.
Dishwasher Heating Element
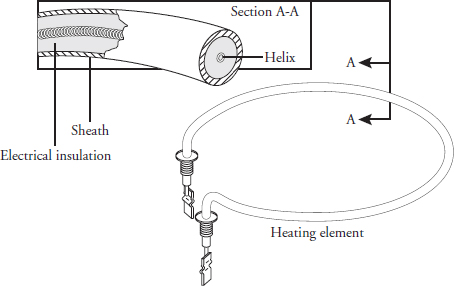
Most dishwashers use a calrod heating element to heat the water and dry the dishes. The element consists of a tungsten wire packed in magnesium oxide and surrounded by a coated stainless steel sheath. The resistance and voltage can be measured with a multimeter to verify if the element is functioning properly.
The typical complaints associated with the heating element are:
• Dishes are still wet at the end of the cycle.
• The dishwasher stalls in the middle of the cycle.
When dealing with these complaints, perform the following steps:
1. Verify the complaint. Verify the complaint by operating the dishwasher, starting at the dry cycle. On electronic models, turn off the electricity to the appliance and wait for two minutes before turning it back on. If a fault code appears, look up the code. If the dishwasher will not power up, locate the technical data sheet behind the control panel or under the tub of the dishwasher for diagnostics information. On some models you will need the actual service manual for the model you are working on to properly diagnose the dishwasher. The service manual will assist you in properly placing the dishwasher in the service test mode for testing the dishwasher functions.
2. Check for external factors. You must check for external factors not associated with the appliance. For example, check the Energy Saver switch. Is it set for heat-dry? Is the appliance installed properly? Does the appliance have the correct voltage? The voltage at the receptacle is between 108 volts and 132 volts during a load on the circuit. Do you have the correct polarity? (See Chapter 6.)
3. Disconnect the electricity. Before working on the dishwasher, disconnect the electricity. This can be done by pulling the plug out of the wall receptacle. Be sure that you only remove the dishwasher plug. Or disconnect the electricity at the fuse panel or the circuit breaker panel. Turn off the electricity.
WARNING
Some diagnostic tests will require you to test the components with the power turned on. When you disassemble the control panel, you can position it in such a way that the wiring will not make contact with metal. This act will allow you to test the components without electrical mishaps.
4. Remove the bottom panel. In order to gain access to the heater wire terminals, the bottom panel must be removed (see Figure 14-16). The bottom panel is held on with either two or four screws, depending on the model. Remove the screws and remove the panel.
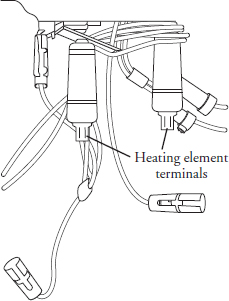
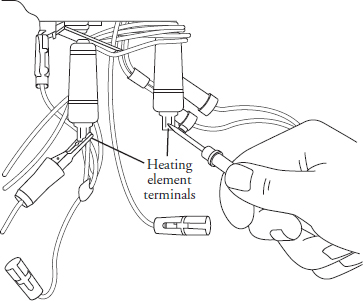
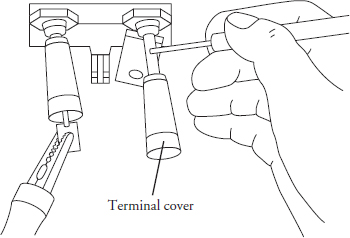
5. Test the heating element. To test the heating element (Figure 14-36), remove the wires from the heating element terminals (Figure 14-37). These are slide-on terminal connectors attached to the ends of the wire. Use the ohmmeter to check for continuity between the two element terminals (Figure 14-38). If the meter indicates no continuity between the terminal ends, replace the heater.
FIGURE 14-36 The dishwasher heating element.
FIGURE 14-37 Remove the wire terminals from the heater element.
FIGURE 14-38 Set the meter on the ohms scale. Connect the probes to the heater terminals.
To check for a shorted-out heating element, take one end of the ohmmeter probe and touch the element terminal; then, with the other probe, touch the sheath (outer cover of element), shown in Figure 14-39. If the meter indicates continuity, the element is shorted out and should be replaced.
FIGURE 14-39 To check for a shorted-out element, attach the meter probe to one terminal and attach the other probe to the sheath.
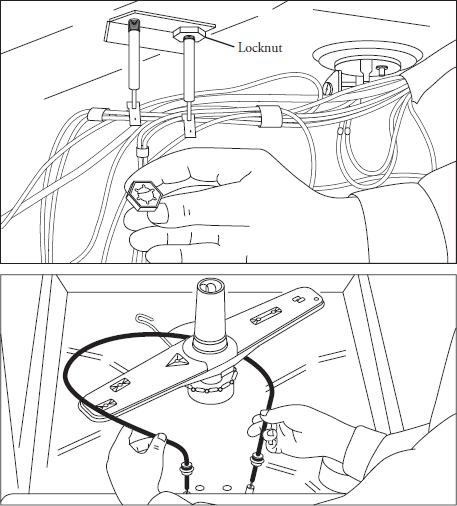
6. Remove the heating element. To remove the heating element (with the wires already removed from the heater terminals), unscrew the locknuts that hold the element in place. From inside the tub, remove the heating element (Figure 14-40).
FIGURE 14-40 Removing the heating element.
7. Install a new heating element. To install a new element, just reverse the disassembly procedure and reassemble. Then test the new element by repeating step 1.
Cycle Selector Switch
The dishwasher cycle selector switch allows the consumer to select the various cycles and options for that model dishwasher. When the consumer turns on the timer to start the dishwasher cycle, if the cycle selector switch buttons are not selected correctly the dishwasher will not perform to the consumer’s satisfaction.
The typical complaints associated with the cycle selector switch are:
• Inability to select a different cycle.
• The consumer inadvertently selected the wrong cycle.
When dealing with these complaints, perform the following steps:
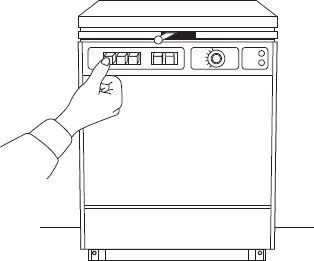
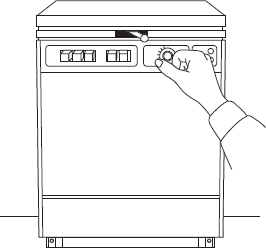
1. Verify the complaint. As shown in Figure 14-41, verify the complaint by trying to select different cycles. On electronic models, turn off the electricity to the appliance and wait for two minutes before turning it back on. If a fault code appears, look up the code. If the dishwasher will not power up, locate the technical data sheet behind the control panel or under the tub of the dishwasher for diagnostics information. On some models you will need the actual service manual for the model you are working on to properly diagnose the dishwasher. The service manual will assist you in properly placing the dishwasher in the service test mode for testing the dishwasher functions.
FIGURE 14-41 Selecting a cycle.
2. Check for external factors. You must check for external factors not associated with the appliance. For example, is there any physical damage to the component? Did you check for the correct voltage? The voltage at the receptacle is between 108 volts and 132 volts during a load on the circuit. Do you have the correct polarity? (See Chapter 6.)
3. Disconnect the electricity. Before working on the dishwasher, disconnect the electricity. This can be done by pulling the plug out of the wall receptacle. Be sure that you only remove the dishwasher plug. Or disconnect the electricity at the fuse panel or circuit breaker panel. Turn off the electricity.
WARNING Some diagnostic tests will require you to test the components with the power turned on. When you disassemble the control panel, you can position it in such a way that the wiring will not make contact with metal. This act will allow you to test the components without electrical mishaps.
4. Remove the control panel. To remove the control panel, remove the screws along the top inside edge of the door (see Figure 14-31). On some models, you might have to remove the door latch knob in order to completely remove the control panel.
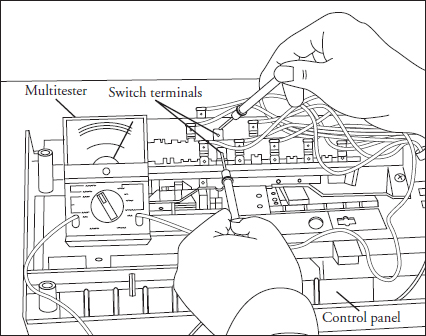
5. Test the cycle selector switch. To test the cycle selector switch, remove all wires from the switch. Just remember—you will have to identify the wires according to the wiring diagram in order to reinstall them back on the cycle selector switch properly. Take your ohmmeter, and check for continuity on the switch contacts; press the switch that coincides with the terminals that are being checked (Figure 14-42). At this point, you have to use the wiring diagram to identify the switch contacts.
FIGURE 14-42 Testing the selector switch contacts.
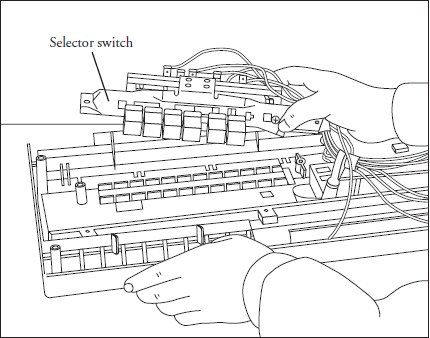
6. Remove the cycle selector switch. To remove the cycle selector switch, remove the screws that hold the component to the control panel (Figure 14-43).
FIGURE 14-43 Removing the selector switch.
7. Reinstall the cycle selector switch. To reinstall the cycle selector switch, just reverse the disassembly procedure and reassemble. Remember—you will have to identify the wires according to the wiring diagram in order to reinstall them back on the cycle selector switch properly.
Dishwasher Door Switch
Sometimes, the dishwasher door latch assembly and/or switch malfunctions and the door will not close properly, or the door switch will prevent the dishwasher from coming on at all. When dealing with these complaints, perform the following steps:
1. Verify the complaint. As shown in Figure 14-44, verify the complaint by closing the dishwasher door and turning the timer dial to start the wash cycle. On electronic models, turn off the electricity to the appliance and wait for two minutes before turning it back on. If a fault code appears, look up the code. If the dishwasher will not power up, locate the technical data sheet behind the control panel or under the tub of the dishwasher for diagnostics information. On some models you will need the actual service manual for the model you are working on to properly diagnose the dishwasher. The service manual will assist you in properly placing the dishwasher in the service test mode for testing the dishwasher functions.
FIGURE 14-44 Closing the door and running the dishwasher.
2. Check for external factors. You must check for external factors not associated with the appliance. Is the appliance installed properly? Does the appliance have the correct voltage? The voltage at the receptacle is between 108 volts and 132 volts during a load on the circuit. Do you have the correct polarity? (See Chapter 6.) Is there any physical damage to the component?
3. Disconnect the electricity. Before working on the dishwasher, disconnect the electricity. This can be done by pulling the plug out of the wall receptacle. Be sure that you only remove the dishwasher plug. Or disconnect the electricity at the fuse panel or circuit breaker panel. Turn off the electricity.
WARNING Some diagnostic tests will require you to test the components with the power turned on. When you disassemble the control panel, you can position it in such a way that the wiring will not make contact with metal. This act will allow you to test the components without electrical mishaps.
4. Remove the control panel. To remove the control panel, remove the screws along the top inside edge of the door (see Figure 14-31). On some models, you might have to remove the door latch knob in order to completely remove the control panel.
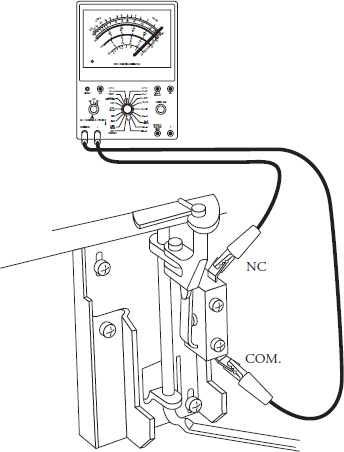
5. Test the door switch. To test the door switch, remove the two wires from the switch (Figure 14-45). Close and latch the door. With your ohmmeter, check for continuity between the two terminals on the switch. Then open the door latch and check for no continuity between the terminals. If the switch fails these tests, replace the switch.
FIGURE 14-45 The dishwasher latch assembly in the closed position.
6. Remove the door switch. Remove the screws that secure the switch in place. Remove the switch.
7. Install new door switch. To install the new door switch, just reverse the disassembly procedure and reassemble. Then reconnect the electricity and test the dishwasher.
Float and Float Switch
Sometimes, the dishwasher float and the float switch malfunctions and water will not enter the tub, or water overfills and spills onto the floor. When dealing with these complaints, perform the following steps:
1. Verify the complaint. Verify the complaint by closing the dishwasher door and turning the timer dial to start the wash cycle. On electronic models, turn off the electricity to the appliance and wait for two minutes before turning it back on. If a fault code appears, look up the code. If the dishwasher will not power up, locate the technical data sheet behind the control panel or under the tub of the dishwasher for diagnostics information. On some models you will need the actual service manual for the model you are working on to properly diagnose the dishwasher. The service manual will assist you in properly placing the dishwasher in the service test mode for testing the dishwasher functions.
2. Check for external factors. You must check for external factors not associated with the appliance, as was done in the previous sections. Did you check for the correct voltage? The voltage at the receptacle is between 108 volts and 132 volts during a load on the circuit. Do you have the correct polarity? (See Chapter 6.)
3. Disconnect the electricity. Before working on the dishwasher, disconnect the electricity. This can be done by pulling the plug out of the wall receptacle. Be sure that you only remove the dishwasher plug. Or disconnect the electricity at the fuse panel or the circuit breaker panel. Turn off the electricity.
WARNING Some diagnostic tests will require you to test the components with the power turned on. When you disassemble the control panel, you can position it in such a way that the wiring will not make contact with metal. This act will allow you to test the components without electrical mishaps.
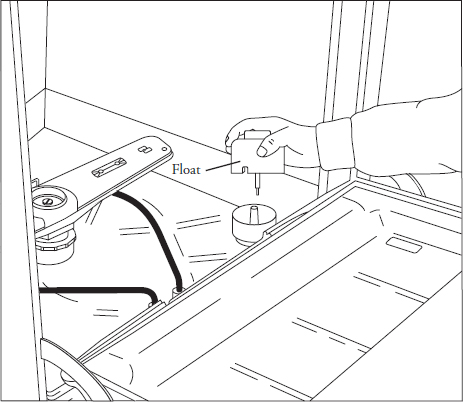
4. Check the float. Check the float from the inside of the tub (Figure 14-46). Be sure that the float moves freely up and down. If there is any soap buildup around the float, clean it off.
FIGURE 14-46 Inspecting the float assembly. Check for soap buildup around the stem and inside of the float.
5. Remove the bottom panel. In order to gain access to the float switch terminals, the bottom panel must be removed (see Figure 14-16). The bottom panel is held on with either two or four screws, depending on the model. Remove the screws, and remove the panel.
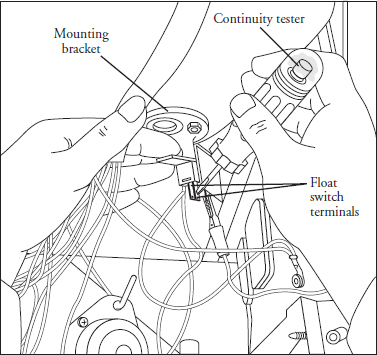
6. Test the float switch. The float switch is located under the float, underneath the tub (Figure 14-47). Remove the wires from the terminals, and test for continuity. Lift the float—there should be no continuity. Let the float rest, and you should have continuity. If the test fails, replace the float switch.
FIGURE 14-47 Testing the float switch contacts.
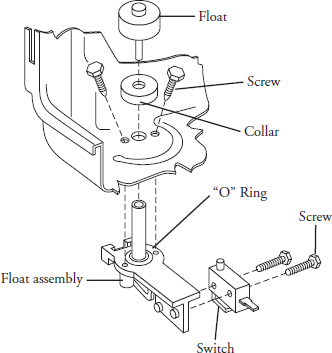
7. Remove the float switch. To remove the float switch, you will have to remove the screws that hold the switch in place (Figure 14-48).
FIGURE 14-48 An exploded view of the float switch assembly.
8. Install a new float switch. To install the new float switch, just reverse the disassembly procedure and reassemble. Then reconnect the electricity and test a dishwasher cycle that fills the dishwasher.
Wetting Agent and Detergent Dispensers
The dishwasher detergent dispenser will operate by electrical or mechanical means. On some models, the detergent dispenser will operate by a bimetal, motor-driven, or mechanical lever working off the timer assembly. The dishwasher wetting agent dispenser will dispense the wetting agent by an electrical or mechanical lever too. On some models the detergent and wetting agent dispensers are combined into one assembly.
The typical complaints associated with the wetting agent and detergent dispensers are:
• The dishes are dirty.
• The dishes have spots on them.
• Detergent remains in the dispenser.
• Wetting agent is leaking onto the floor.
When dealing with these complaints, perform the following steps:
1. Verify the complaint. Verify the complaint by operating the dishwasher through its cycles. Make sure that the detergent dispenser door is not blocked by dishes. Also check the wetting agent level in the dispenser. On electronic models, turn off the electricity to the appliance and wait for two minutes before turning it back on. If a fault code appears, look up the code. If the dishwasher will not power up, locate the technical data sheet behind the control panel or under the tub of the dishwasher for diagnostics information. On some models you will need the actual service manual for the model you are working on to properly diagnose the dishwasher. The service manual will assist you in properly placing the dishwasher in the service test mode for testing the dishwasher functions.
2. Check for external factors. You must check for external factors not associated with the appliance. For example, is there any physical damage to the component? Is the water in the dishwasher at the correct level? Did the consumer fill the wetting agent dispenser with wetting agent? Did you check the voltage? The voltage at the receptacle is between 108 volts and 132 volts during a load on the circuit. Do you have the correct polarity? (See Chapter 6.)
3. Disconnect the electricity. Before working on the dishwasher, disconnect the electricity. This can be done by pulling the plug out of the wall receptacle. Be sure that you only remove the dishwasher plug. Or disconnect the electricity at the fuse panel or circuit breaker panel. Turn off the electricity.
WARNING Some diagnostic tests will require you to test the components with the power turned on. When you disassemble the control panel, you can position it in such a way that the wiring will not make contact with metal. This act will allow you to test the components without electrical mishaps.
4. Remove the control panel. To remove the control panel, remove the screws along the top inside edge of the door (see Figure 14-31). On some models, you might have to remove the door latch knob in order to completely remove the control panel. Then reconnect the electricity, latch the dishwasher door, and test a dishwasher cycle. A cam follower next to the timer will actuate the detergent dispenser when the wash cycle is in the second wash. The cam follower will engage the draw bar (Figure 14-49) and pull up on the detergent lid latch, releasing the detergent lid and allowing the detergent to enter into the wash cycle. In the final rinse cycle, the same operation occurs to release the wetting agent from the wetting agent dispenser.
FIGURE 14-49 A side view of the detergent dispenser.
5. Remove the wetting agent dispenser. As illustrated in Figure 14-50a, remove the drip cover and drawbar spring. Now begin to remove the upper and lower drawbars by aligning the lower drawbar holes with the locating tabs. In Figure 14-50b, you will note that the locating tabs will align with their respective holes while removing the drawbars. Remember where they reattach when it comes to reassembly later. Begin to slide the drawbars apart, as shown in Figure 14-50c. Next, you will have to remove the wetting agent cap by turning the cap and seal assembly counterclockwise, as in Figure 14-50d. Using a ¾-inch socket wrench, begin to insert it into the wetting agent dispenser locking tabs, shown in Figure 14-50d, to release the wetting agent dispenser from the inner door liner. Now you are ready to remove the wetting agent dispenser actuator. Spread apart the two locking tabs, as shown in Figure 14-50e, and remove the upper and lower slides from the dispenser actuator. Next remove the diaphragm spring and diaphragm (Figure 14-50e). To remove the detergent door and actuator assembly, use a small flat-blade screwdriver to depress and release the lower tabs, noting the position of the door latch level through the hole in the lower slide (Figure 14-50f). Finally, remove the upper slide, slide spring, and the lower slide (Figure 14-50g).
FIGURE 14-50a Remove the drip cover and drawbar spring.
FIGURE 14-50b Removal of the drawbars. Take note of the alignment of the locating tabs.
FIGURE 14-50c The upper and lower drawbars. To remove, follow the direction of the arrows.
FIGURE 14-50d Removal of the wetting agent dispenser.
FIGURE 14-50e Removal of the actuator, diaphragm spring, and the diaphragm from the wetting agent dispenser.
FIGURE 14-50f Removal of the detergent door actuator assembly and detergent door latch. Remember the tab alignment when dissembling and reassembling.
FIGURE 14-50g The upper slide, slide spring, lower slide, detergent door actuator, and spring will be removed last in disassembly; it will be the first step in reassembly.
6. Install new wetting agent and detergent dispenser. To install the new dispenser, just reverse the disassembly procedure and reassemble. Then reconnect the electricity and test the dishwasher.
Water Heater Operating Thermostat or Thermistor
The bimetal thermostat is secured and located underneath the tub. The purpose of the thermostat is to either act as a safety net to prevent overheating or is used to raise the water temperature in the tub. The thermistor is used in some models to sense the water temperature on certain cycles. The thermistor sends signals back to the electronic control.
The typical complaints associated with the water heater operating thermostat are:
• Poor washability
• The dishwasher timer will not advance.
• Low inlet water temperature.
• Dishwasher water line hooked up to the cold water line.
When dealing with these complaints, perform the following steps:
1. Verify the complaint. Verify the complaint by operating the dishwasher through its cycles. Take the temperature of the water in the dishwasher tub when the dishwasher is in the wash cycle. Also check the hot water temperature at the sink. It should be between 120 to 140 degrees Fahrenheit. On electronic models, turn off the electricity to the appliance and wait for two minutes before turning it back on. If a fault code appears, look up the code. If the dishwasher will not power up, locate the technical data sheet behind the control panel or under the tub of the dishwasher for diagnostics information. On some models you will need the actual service manual for the model you are working on to properly diagnose the dishwasher. The service manual will assist you in properly placing the dishwasher in the service test mode for testing the dishwasher functions.
2. Check for external factors. You must check for external factors not associated with the appliance. Test the hot water temperature at the sink. The water temperature should be around 120 to 140 degrees Fahrenheit. The purpose of this thermostat is to delay the wash cycle until the water temperature reaches between 135 and 145 degrees Fahrenheit. The rule of thumb is it takes 20 minutes to raise the water temperature two degrees. The thermostat will then close and complete the timer motor circuit, allowing the dishwasher cycle to continue. Did you check the voltage? The voltage at the receptacle is between 108 volts and 132 volts during a load on the circuit. Do you have the correct polarity? (See Chapter 6.)
3. Disconnect the electricity. Before working on the dishwasher, disconnect the electricity. This can be done by pulling the plug out of the wall receptacle. Be sure that you only remove the dishwasher plug. Or disconnect the electricity at the fuse panel or circuit breaker panel. Turn off the electricity.
WARNING Some diagnostic tests will require you to test the components with the power turned on. When you disassemble the control panel, you can position it in such a way that the wiring will not make contact with metal. This act will allow you to test the components without electrical mishaps.
4. Remove the bottom panel. In order to gain access to the water heater operating thermostat terminals, the bottom panel must be removed (see Figure 14-16). The bottom panel is held on with either two or four screws, depending on the model. Remove the screws, and remove the panel. Inspect the wiring connections first.
5. Remove and test the water heater operating thermostat. Locate the thermostat (Figure 14-51) underneath the tub, and remove the wires from the terminals. Remove the thermostat from the dishwasher tub. Take a metal pot of water, and heat it up on the range until the temperature reaches between 150 and 160 degrees Fahrenheit. Next, set your multimeter to the ohm scale. Test the thermostat before placing it against the metal pot—it should read infinite resistance. Now place the thermostat against the metal pot of hot water—the thermostat should close and the multimeter will read continuity. If not, replace the thermostat.
FIGURE 14-51 The heater operating thermostat will allow the water to heat up to 145 degrees Fahrenheit.
6. Remove and test the thermistor. Locate the thermistor underneath the tub, and remove the wires from the terminals. Test the thermistor using the multimeter, and set the meter on the ohm scale. Write down the resistance reading and check it against the technical data sheet for the proper rating. If the resistance does not match the technical data sheet, replace it.
7. Installing a new water heater operating thermostat or thermistor. To install the new thermostat or thermistor, just reverse the disassembly procedure and reassemble. Then reconnect the electricity and test the dishwasher.
High-Limit Heater Thermostat
The high-limit heater thermostat is a protective device that will prevent the heater from overheating.
The typical complaints associated with the high-limit heater thermostat are:
• The dishes are extremely hot at the end of the cycle.
• It smells as if something is burning.
• Excessive steam is coming from the vent.
When dealing with these complaints, perform the following steps:
1. Verify the complaint. Verify the complaint by operating the dishwasher through its cycles. The purpose of this thermostat is to act as a safety switch to disconnect the heater in the event the temperature rises above 185 degrees Fahrenheit. On electronic models, turn off the electricity to the appliance and wait for two minutes before turning it back on. If a fault code appears, look up the code. If the dishwasher will not power up, locate the technical data sheet behind the control panel or under the tub of the dishwasher for diagnostics information. On some models you will need the actual service manual for the model you are working on to properly diagnose the dishwasher. The service manual will assist you in properly placing the dishwasher in the service test mode for testing the dishwasher functions.
2. Check for external factors. You must check for external factors not associated with the appliance. Did you check the voltage? The voltage at the receptacle is between 108 volts and 132 volts during a load on the circuit. Do you have the correct polarity? (See Chapter 6.)
3. Disconnect the electricity. Before working on the dishwasher, disconnect the electricity. This can be done by pulling the plug out of the wall receptacle. Be sure that you only remove the dishwasher plug. Or disconnect the electricity at the fuse panel or circuit breaker panel. Turn off the electricity.
WARNING Some diagnostic tests will require you to test the components with the power turned on. When you disassemble the control panel, you can position it in such a way that the wiring will not make contact with metal. This act will allow you to test the components without electrical mishaps.
4. Remove the bottom panel. In order to gain access to the high-limit heater thermostat terminals, the bottom panel must be removed (see Figure 14-16). The bottom panel is held on with either two or four screws, depending on the model. Remove the screws, and remove the panel. Inspect the wiring connections first.
5. Remove and test the high-limit heater thermostat. Locate the high-limit thermostat (Figure 14-52) underneath the tub, and remove the wires from the terminals. Remove the thermostat from the dishwasher tub. Take a metal pot of water, and heat it up on the range until the temperature reaches 185 degrees Fahrenheit. Next, set your multimeter to the ohm scale. Test the thermostat before placing it against the metal pot of hot water—the multimeter will read continuity. Now place the thermostat bimetal section against the metal pot of hot water—the thermostat should open and the multimeter will read infinite resistance. If not, replace the thermostat.
FIGURE 14-52 The high-limit heater thermostat location.
6. Install a new high-limit heater thermostat. To install the new thermostat, just reverse the disassembly procedure and reassemble. Then reconnect the electricity and test the dishwasher.
Dishwasher Motor Start Relay
The dishwasher motor start relay is a solenoid-activated relay used to start the dishwasher motor in some models.
The typical complaints associated with the motor start relay are:
1. The dishwasher motor will not start.
2. The dishwasher motor hums and shuts off on overload.
When dealing with these complaints, perform the following steps:
1. Verify the complaint. Verify the complaint by operating the dishwasher. If the motor does not start, turn the dishwasher off immediately. On electronic models, turn off the electricity to the appliance and wait for two minutes before turning it back on. If a fault code appears, look up the code. If the dishwasher will not power up, locate the technical data sheet behind the control panel or under the tub of the dishwasher for diagnostics information. On some models you will need the actual service manual for the model you are working on to properly diagnose the dishwasher. The service manual will assist you in properly placing the dishwasher in the service test mode for testing the dishwasher functions.
2. Check for external factors. You must check for external factors not associated with the appliance. Is there electricity to the dishwasher? The voltage at the receptacle is between 108 volts and 132 volts during a load on the circuit. Do you have the correct polarity? (See Chapter 6.) The purpose of the motor start relay is to protect the dishwasher motor. This current-sensitive relay will close the contacts when the current increases for about one or two seconds when the motor begins to start. When the dishwasher motor starts and runs, the current will decrease in the motor start relay thus opening the contacts.
3. Disconnect the electricity. Before working on the dishwasher, disconnect the electricity. This can be done by pulling the plug out of the wall receptacle. Be sure that you only remove the dishwasher plug. Or disconnect the electricity at the fuse panel or circuit breaker panel. Turn off the electricity.
WARNING Some diagnostic tests will require you to test the components with the power turned on. When you disassemble the control panel, you can position it in such a way that the wiring will not make contact with metal. This act will allow you to test the components without electrical mishaps.
4. Remove the bottom panel. In order to gain access to the water heater operating thermostat terminals, the bottom panel must be removed (see Figure 14-16). The bottom panel is held on with either two or four screws, depending on the model. Remove the screws, and remove the panel. Inspect the wiring connections first.
5. Remove and test the motor start relay. Remove the motor start relay from the dishwasher (Figure 14-53) by removing the screw that holds the relay in place. Disconnect the wires from the relay. Set your ohmmeter to the R x 1 scale, and measure the coil’s resistance. The coil will read less than 1 ohm if it is good. Next, attach your ohmmeter probes to the relay contacts; you will check the relay contacts for continuity by turning the relay upside down. If you do not know which way is up or down on the relay, there is an arrow and the word “up” stamped on the relay. The motor start relay contacts should be closed, and the ohmmeter will read zero resistance. With the ohmmeter probes still attached to the relay, turn the relay right-side-up to check the continuity of the contacts—the relay contacts will be open, and the ohmmeter will read infinite resistance.
FIGURE 14-53 The dishwasher motor start relay is located behind the lower front panel.
6. Install a new dishwasher motor start relay. To install the new motor start relay, just reverse the disassembly procedure and reassemble. Then reconnect the electricity and test the dishwasher.
Electronic Control Board, Display Board, and Touch Pad Panel
The electronic control board monitors all of the functions and cycles. When servicing this component, check all wiring for loose connections at the wiring harness, connector plugs, and the pins. Loose connections are common and most likely will cause the dishwasher to operate erratically.
The typical complaints associated with the electronic control board, display board, and touch pad panel are:
• Dishwasher won’t run or power up.
• Unable to program the dishwasher.
• The display board will not display anything.
• One or more key pads will not accept commands.
• Unusual display readouts and/or error codes.
When dealing with these complaints, perform the following steps:
NOTE To prevent electrostatic discharge (ESD) from damaging expensive electronic components, follow the steps in Chapters 6, 9, and 11.
1. Verify the complaint. Verify the complaint by operating the dishwasher. Turn off the electricity to the appliance and wait for two minutes before turning it back on. If a fault code appears, look up the code. If the dishwasher will not power up, locate the technical data sheet behind the control panel or under the tub of the dishwasher for diagnostics information. On some models you will need the actual service manual for the model you are working on to properly diagnose the dishwasher. The service manual will assist you in properly placing the dishwasher in the service test mode for testing the dishwasher functions.
2. Check for external factors. You must check for external factors not associated with the appliance. Is there electricity to the dishwasher? The voltage at the receptacle is between 108 volts and 132 volts during a load on the circuit. Do you have the correct polarity? (See Chapter 6.) Check for a blown thermal fuse in the circuit.
3. Disconnect the electricity. Before working on the dishwasher, disconnect the electricity. This can be done by pulling the plug out of the wall receptacle. Be sure that you only remove the dishwasher plug. Or disconnect the electricity at the fuse panel or circuit breaker panel. Turn off the electricity.
WARNING Some diagnostic tests will require you to test the components with the power turned on. When you disassemble the control panel, you can position the panel against the door so that the wiring will not make contact with the door. This act will allow you to test the components without electrical mishaps.
4. Remove the control panel. To remove the control panel, remove the screws along the top inside edge of the door (see Figure 14-31). On some models, you might have to remove the door latch knob in order to completely remove the control panel.
5. Test the electronic control board, display board, or touch pad panel. If you are able to run the dishwasher diagnostic test mode, check the different functions of the dishwasher. Use the technical data sheet for the model you are servicing to locate the test points from the wiring schematic. Do not forget to check all wiring connections and wiring. Using the technical data sheet, test the key pad matrix, display board LEDs, input voltages, and output voltages on the electronic control board.
6. Remove the electronic control board, display board, or touch pad panel. T o remove the defective component, remove the covers that shield the control, and then remove the screws that secure the boards to the control panel (Figure 14-54). Disconnect the connectors from the electronic control board, display board, or the touch pad panel. On some models, the touch pad panel might be glued to the control panel. Once you remove the defective part, you will have to replace it with a new one.
FIGURE 14-54 An exploded view of the electronic components in a dishwasher.
7. Install the new component. To install a new electronic control board, display board, or touch pad panel, just reverse the disassembly procedure and reassemble. Reinstall the console panel, and restore the electricity to the dishwasher. Test the dishwasher operation.
Turbidity Sensor
The turbidity sensor (Figure 14-55a and b) is located on the motor and pump assembly. Its main purpose is to measure the amount of suspended food particles in the wash water. If it senses food particles, on some models, an extra wash cycle will be added to the length of the dishwashing cycle.
FIGURE 14-55a A typical turbidity sensor used to detect food particles in the wash water.
FIGURE 14-55b A turbidity sensor located in the pump assembly.
The typical complaints associated with the turbidity sensor are:
• The dishes are not coming out clean at the end of the cycle.
• Food remains on the dishes.
1. Verify the complaint. Verify the complaint by operating the dishwasher through its cycles. On electronic models, turn off the electricity to the appliance and wait for two minutes before turning it back on. If a fault code appears, look up the code. If the dishwasher will not power up, locate the technical data sheet behind the control panel or under the tub of the dishwasher for diagnostics information. On some models you will need the actual service manual for the model you are working on to properly diagnose the dishwasher. The service manual will assist you in properly placing the dishwasher in the service test mode for testing the dishwasher functions.
2. Check for external factors. You must check for external factors not associated with the appliance. Is the appliance installed properly? Does the appliance have the correct voltage? The voltage at the receptacle is between 108 volts and 132 volts during a load on the circuit. Do you have the correct polarity? (See Chapter 6.) Is the water hot enough?
3. Disconnect the electricity. Before working on the dishwasher, disconnect the electricity. This can be done by pulling the plug out of the wall receptacle. Be sure that you only remove the dishwasher plug. Or disconnect the electricity at the fuse panel or at the circuit breaker panel. Turn off the electricity.
WARNING Some diagnostic tests will require you to test the components with the power turned on. When you disassemble the control panel, you can position it in such a way that the wiring will not make contact with metal. This act will allow you to test the components without electrical mishaps.
4. Remove the bottom panel. In order to gain access to the pump and motor assembly the bottom panel must be removed (see Figure 14-16). The bottom panel is held on with either two or four screws, depending upon the model. Remove the screws and remove the panel.
5. Test and remove the turbidity sensor. After locating the turbidity sensor (Figure 14-55b), remove the wires and test the sensor, using the ohms scale on the multimeter. Verify the reading against the technical data sheet or the service manual for proper specifications. Before removing the turbidity sensor, place a pan underneath to collect the water. To remove the sensor on this model, just twist and turn and pull out.
6. Reinstall the turbidity sensor. To reinstall the turbidity sensor, just reverse the order of step 5. Before restoring the electricity to the dishwasher, pour a gallon of water into the tub and check for leaks underneath the tub. Restore the electricity to the dishwasher, and run the dishwasher through a cycle. Check for leaks again. If no leaks are found, reinstall the bottom panel.
Diagnostic Charts
The following diagnostic charts will help you to pinpoint the likely causes of the various dishwasher problems (Figures 14-56 through 14-65). Schematics are included in Figures 14-66 through 14-81.
FIGURE 14-56 Dishwasher diagnostic flowchart: Dishwasher will not run at all.
FIGURE 14-57 Dishwasher diagnostic flowchart: Water not entering the dishwasher.
FIGURE 14-58 Dishwasher diagnostic flowchart: Dishwasher runs continuously.
FIGURE 14-59 Dishwasher diagnostic flowchart: Dishwasher motor won’t run.
FIGURE 14-60 Dishwasher diagnostic flowchart: Dishwasher won’t dry.
FIGURE 14-61 Dishwasher diagnostic flowchart: Water in the tub at the end of the cycle.
FIGURE 14-62 Dishwasher diagnostic flowchart: Low water level.
FIGURE 14-63 Dishwasher diagnostic flowchart: Low water temperature.
FIGURE 14-64 Dishwasher diagnostic flowchart: Dishwasher overfills.
FIGURE 14-65 Dishwasher diagnostic flowchart: Dishwasher will not drain.
FIGURE 14-66 Water valve noise chart.
FIGURE 14-67 The typical dishwasher electrical schematic: The wash cycle has already been selected, and the pushbutton switch contacts are closed.
FIGURE 14-68 This illustration shows the active circuits while the dishwasher tub is filling up with water.
FIGURE 14-69 This illustration shows the active circuits while the dishwasher is draining the water out of the tub.
FIGURE 14-70 A typical strip circuit wiring diagram for a dishwasher with electronic components.
FIGURE 14-71 A typical wiring diagram for an electronic dishwasher model.
FIGURE 14-72 A typical strip circuit of the fill cycle for an electronic dishwasher.
FIGURE 14-73 A typical strip circuit for the wash circuit in an electronic dishwasher.
FIGURE 14-74 A typical strip circuit for the water heating circuit for an electronic dishwasher.
FIGURE 14-75 A typical strip circuit for the drain cycle in an electronic dishwasher.
FIGURE 14-76 A typical strip circuit for the air dry in an electronic dishwasher.
FIGURE 14-77 A typical strip circuit of the dry circuit in an electronic dishwasher.
FIGURE 14-78 A typical dishwasher wiring diagram with a mechanical timer.
FIGURE 14-79 A typical timing sequence chart for a dishwasher. This chart and the wiring diagram in Figure 14-78 are used together for diagnosing dishwasher faults.
FIGURE 14-80 A typical electronic dishwasher wiring diagram.
FIGURE 14-81 A typical strip circuit for the wiring diagram in Figure 14-80.


