YEAST DOUGHS
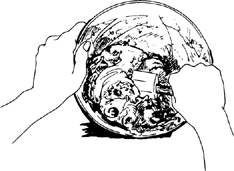
THE AVERAGE FRENCH HOUSEHOLD does no yeast baking at all except for babas, savarins, and an occasional brioche. It certainly does no bread making, and there is no need to because every neighborhood has its own boulangerie serving freshly baked bread every day of the week but one, usually Monday, when the boulanger takes his day off. Thus you cannot even find a bread pan in a French household supply store, and there are no French recipes for homemade bread. All of the recipes here, therefore, are those used by professionals whose techniques we have worked out for the home baker, using standard ingredients and household equipment.
Whether you are a home or a professional baker, you will find that time is really the key to successful bread making. Just as it takes time for cheese to ripen and wine to age, it takes time for yeast to do its full work in a dough. The function of yeast is not only to push the dough up but, equally important, to develop its flavor and its texture. Yeast feeds and multiplies on the starch in the flour. Flour also contains gluten, and it is the gluten that allows the dough to rise and stay risen in the oven because gluten molecules become gluey when moistened and join together in an elastic web throughout the dough. Then, while the yeast cells are feeding and multiplying on the starch, their voracious activity forms tiny pockets of gas that push up the surrounding mesh of gluten, making the dough rise. At the same time the gluten itself, if given time, goes through a slow ripening process that gives the dough flavor, cohesion, and elasticity. These important developments in the gluten must take place if a very simple dough, such as that for plain French bread, is to turn into something splendidly satisfying to eat. Thus, rather than trying to speed things up by using lots of yeast and a warm rising temperature, you want to provide time for ripening by slowing everything down with a minimum of yeast, a tepid temperature, and several risings.
Many reasons are given for the doleful state of much contemporary bread both here and in France: it is not baked in wood-fired ovens; both the flour and water are full of chemicals; it is machine-kneaded; and so forth. The villain in the bread basket is speed: the yeast has not been given the time it needs to accomplish its triple function of developing flavor and texture as well as volume.
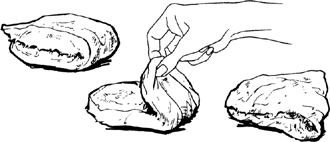
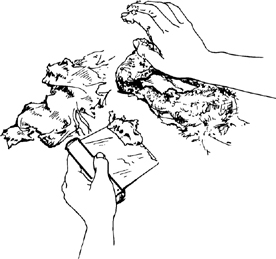
Yeast is a living organism, but it is inactive or dormant when you buy it, either as a fresh cake wrapped in silver paper or as dry yeast in a sealed envelope. Fresh cake yeast must be a uniformly creamy gray with no spots of discoloration, and is perishable; it will keep only about a week under refrigeration but for several weeks when wrapped airtight and frozen. Dry-active yeast should be stored in a cool, dry place, or in the refrigerator or freezer; use it before the expiration date stamped on the envelope. Either type of yeast may be used, but both must be completely liquefied before the yeast is ready to become active. Although you can mix it, as is, into the dry ingredients and blend in warm water, we prefer the almost as rapid but visually positive method of liquefying it separately.
When you know your yeast is fresh, you need have no doubts about its capacities. If you think it may be stale do not hesitate to make it prove itself by dissolving it in the warm water called for in your recipe; stir in also a tablespoon of flour and a pinch of sugar. It is active and ready to use if it begins to foam and to increase in volume in about 8 minutes: the yeast cells, spurred on by the sugar, are feeding on the flour.
Anyone used to American bread making will be surprised to find that the doughs for all of the following recipes are light, soft, and sticky when first made because the dough is to triple rather than double in volume during its first and usually its second rise: this is the period during which it develops its flavor and texture. Rather than rising in a warm place of around 85 degrees, which would cause it to ferment and acquire an unpleasant yeasty-sour taste, it must rise in the low 70’s if you can possibly manage it, or at an even lower temperature if you wish to delay the process.
We therefore suggest that you do not attempt your first bread-making spree in a hot kitchen. When you are used to doughs and know how they should look, smell, and feel, you can adjust your procedures to the weather, letting the dough rise part of the time in the refrigerator, for instance, or deflating it when partially risen and letting it push itself up several times. Rainy or humid weather and steamy rooms also have their adverse affect, making dough unduly sticky, even sweaty; pick a dry day and a dry room, then, for your first venture. In other words, make everything as easy as possible for yourself.
Although it will take you a minimum of 7 hours from start to finish for most of these recipes, that does not mean that you are hovering over your dough for 7 straight hours. During almost all of this time the dough is sitting quietly by itself, rising in one form or another. Because you can slow down the rise by lowering the temperature, you may set it in the refrigerator or the freezer when you have to go out, and continue when you return. Thus, although you cannot successfully speed things up, you can otherwise fit bread making into almost any pattern that suits your schedule. Each of the recipes indicates various stopping points, and there is a delayed-action chart at the end of the French bread recipe.
A heavy-duty table-model electric beater with a dough hook works very well for mixing and kneading dough, and can be adapted nicely to the French processes. Notes are at the end of each Master Recipe.

PLAIN FRENCH BREAD
A fine loaf of plain French bread, the long crackly kind a Frenchman tucks under his arm as he hurries home to the family lunch, has a very special quality. Its inside is patterned with holes almost like Swiss cheese, and when you tear off a piece it wants to come sideways; it has body, chewability, and tastes and smells of the grain. Plain French bread contains only flour, water, salt, and yeast, because that is the law in France. The method, however, is up to each individual baker. Until the 1800’s and before commercial yeast was known, all bread was made with a levain, meaning dough left over from the previous batch; the procedure involved numerous risings and mixings to develop sufficient yeast cells for the day’s quota of bread. Later a brewer’s-yeast-and-flour batter was developed that simplified the process, but it was not until the 1870’s that the kind of yeast we use today was manufactured in France. Since then the making of French bread has undergone many changes, some of which, notably the accelerated mechanical kneading and fast rising systems used by some bakers, have had a disastrous affect on quality. Again, this is a question of trying to save time at the expense of taste and texture, because excellent bread may be made using modern ingredients, equipment, and methods.
We have had the great good fortune of being able to work with Professor R. Calvel, of the École Professionelle de Meunerie, a trade school established in Paris to teach the profession of milling and baking to students and bakers from all over France. The science of bread making and the teaching of its art are the life work of Professor Calvel, and thanks to his enthusiastic help, which set us on the right track, we think we have developed as professional a system for the home baker as anyone could hope for. You will be amazed at how very different the process is from anything you have done before, from the mixing and rising to the very special method of forming the dough into loaves.
French bakers make plain French bread out of unbleached flour that has a gluten strength of 8 to 9 per cent. Most American all-purpose flour is bleached and has a slightly higher gluten content as well as being slightly finer in texture. It is easier to make bread with French flour than with American all-purpose flour, and the taste and texture of the bread are naturally more authentic. (The so-called bread flour available in some mail-order houses usually has an even higher gluten content than all-purpose flour, so do not use it for plain French bread.) You will undoubtedly wish to experiment with flours if you become a serious bread maker, but because we find that any of the familiar brands of all-purpose flour works very well, we shall not complicate the recipe by suggesting an obscure or special brand. If you do experiment, however, simply substitute your other flour for the amount called for in the recipe; you may need a little bit more water or a little bit less, but the other ingredients and the method will not change.
Bakers’ ovens are so constructed that one slides the formed bread dough from a wooden paddle right onto the hot, fire-brick oven floor, and a steam-injection system humidifies the oven for the first few minutes of baking. Steam allows the yeast to work a little longer in the dough and this, combined with a hot baking surface, produces an extra push of volume. In addition, steam coagulating the starch on the surface of the dough gives the crust its characteristic brown color. Although you can produce a good loaf of French bread without steam or a hot baking surface, you will get a larger and handsomer loaf when you simulate professional conditions. We give both systems—the Master Recipe, which requires no special equipment, and the simulated baker’s oven system.
Sour dough is an American invention, not French, and you will not find anything like American sour dough in France. But you can adapt your sour dough recipe to the method described here for plain French bread. We think you will find that our recipe will give you an excellent result.
Unless you plan to go into the more elaborate simulation of a baker’s oven, you need no unusual equipment for the following recipe. Here are the requirements, some of which may sound odd but will explain themselves when you read the recipe.
A 4- to 5-quart mixing bowl with fairly vertical rather than outward-slanting sides
A kneading surface of some sort, 1½ to 2 square feet
A rubber spatula and either a metal scraper or a stiff wide metal spatula
1 or 2 unwrinkled canvas pastry cloths or stiff linen towels upon which the dough may rise
A stiff piece of cardboard or plywood 18 to 20 inches long and 6 to 8 inches wide, for unmolding dough from canvas to baking sheet
Finely ground cornmeal, or pasta pulverized in an electric blender, to sprinkle on unmolding board so as to prevent dough from sticking
The largest baking sheet that will fit into your oven
A razor blade for slashing the top of the dough
A soft pastry brush or fine-spray atomizer for moistening dough before and during baking
A room thermometer to verify rising-temperature
 PAIN FRANÇAIS
[Plain French Bread]
Count on a minimum of 6½ to 7 hours from the time you start the dough to the time it is ready for the oven, and half an hour for baking. While you cannot take less time, you may take as much more time as you wish by using the delayed-action techniques described at the end of the recipe.
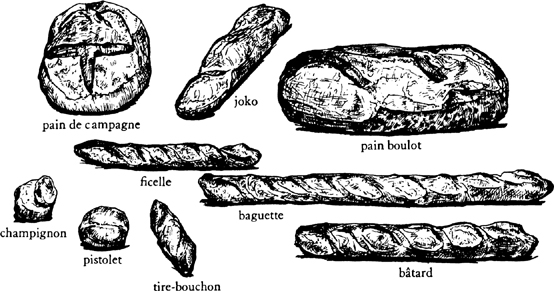
For 1 pound of flour, making 3 cups of dough, producing:
3 long loaves, baguettes, 24 by 2 inches, or bâtards, 16 by 3 inches
Or 6 short loaves, ficelles, 12 to 16 by 2 inches
Or 3 round loaves, boules, 7 to 8 inches in diameter
Or 12 round or oval rolls, petits pains
Or 1 large round or oval loaf, pain de ménage or miche; pain boulot
1) The dough mixture—le fraisage (or frasage)
NOTE: List of equipment needed is in paragraph preceding this recipe.

1 cake (0.6 ounce) fresh yeast or 1 package dry-active yeast
⅓ cup warm water (not over 100 degrees) in a measure
3½ cups (about 1 lb.) all-purpose flour, measured by scooping dry-measure cups into flour and sweeping off excess
2¼ tsp salt
1¼ cups tepid water (70 to 74 degrees)
Stir the yeast in the warm water and let liquefy completely while measuring flour into mixing bowl. When yeast has liquefied, pour it into the flour along with the salt and the rest of the water.
NOTE: We do not find the food processor satisfactory here, since the dough is so soft the machine clogs; however, you can use a heavy-duty mixer with dough hook, and finish it up by hand.
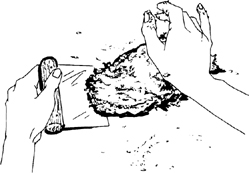
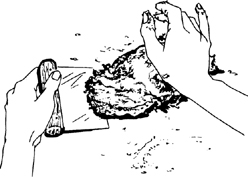
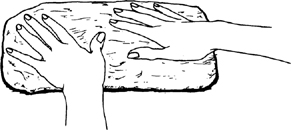
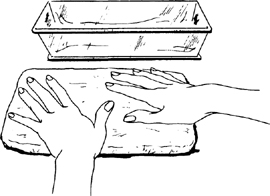
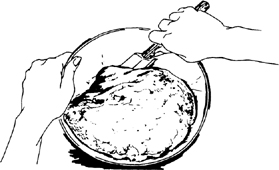
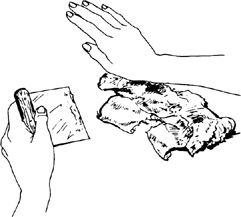
Stir and cut the liquids into the flour with a rubber spatula, pressing firmly to form a dough, and making sure that all bits of flour and unmassed pieces are gathered in. Turn dough out onto kneading surface, scraping bowl clean. Dough will be soft and sticky. Let it rest for 2 to 3 minutes while you wash and dry the bowl. |
|
2) Kneading—pétrissage
The flour will have absorbed the liquid during this short rest, and the dough will have a little more cohesion for the kneading that is about to begin. Use one hand only for kneading and keep the other clean to hold a pastry scraper, to dip out extra flour, to answer the telephone, and so forth. Your object in kneading is to render the dough perfectly smooth and to work it sufficiently so that all the gluten molecules are moistened and joined together into an interlocking web. You cannot see this happen, of course, but you can feel it because the dough will become elastic and will retract into shape when you push it out.
|
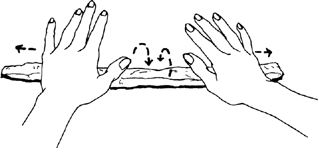
Start kneading by lifting the near edge of the dough, using a pastry scraper or stiff wide spatula to help you if necessary, and flipping dough over onto itself. Scrape the dough off the surface and slap it down; lift edge and flip it over again, repeating the movement rapidly. |
In 2 to 3 minutes the dough should have enough body so that you can give it a quick forward push with the heel of your hand as you flip it over. Continue to knead rapidly and vigorously in this way. If it remains too sticky, knead in a sprinkling of flour. (Whole kneading process will take 5 to 10 minutes, depending on how vigorous and expert you become.) |
|
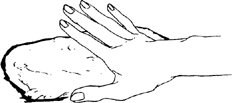
Shortly after this point, the dough should have developed enough elasticity so that it draws back into shape when pushed, indicating that the gluten molecules have united and are under tension like a thin web of rubber; the dough should also begin to clean itself off the kneading surface, although it will stick to your fingers if you hold a pinch for more than a second or two. Let it rest for 3 to 4 minutes. Knead again for a minute: the surface should now look smooth; the dough will be less sticky but it will still remain soft. It is now ready for its first rise.
3) First rising—pointage premier temps (3 to 5 hours at around 70 degrees)
You now have approximately 3 cups of dough that is to rise 3½ times its original volume, or to about 10½ cups. Fill the mixing bowl with 10½ cups of tepid water and make a mark to indicate that level on the outside of the bowl (note that the bowl should have fairly upright sides; if they are too outward slanting, the dough will have difficulty rising). Pour out the water, dry the bowl, and place the dough in it; slip bowl into a large plastic bag or cover with plastic, and top with a folded bath towel. Set on a wooden surface (marble or stone are too cold) or on a folded towel or pillow, and let rise free from drafts anyplace where the temperature is around 70 degrees; if the room is too hot, set bowl in water and keep renewing water to maintain it at around 70 degrees. Dough should take at least 3 hours to rise to 10½ cups; if the temperature is lower, it will simply take longer.
(*) DELAYED ACTION: See chart at end of recipe.
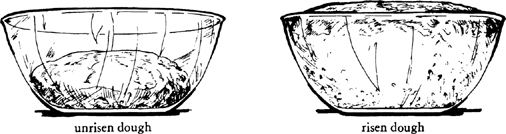
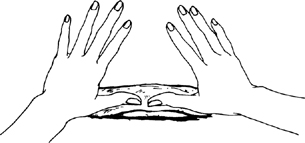
When fully risen, the dough will be humped into a slight dome, showing that the yeast is still active; it will be light and spongy when pressed. There will usually be some big bubbly blisters on the surface, and if you are using a glass bowl you will see bubbles through the glass.
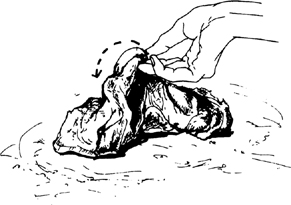
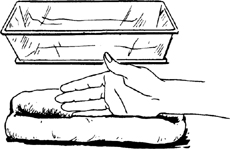
4) Deflating and second rising—rupture; pointage deuxième temps (1½ to 2 hours at around 70 degrees)
The dough is now ready to be deflated, which will release the yeast-engendered gases and redistribute the yeast cells so that the dough will rise again and continue the fermentation process.
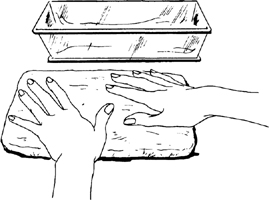
With a rubber spatula dislodge dough from inside of bowl and turn out onto a lightly floured surface, scraping the bowl clean. If dough seems damp and sweaty, sprinkle with a tablespoon of flour. |
|
|
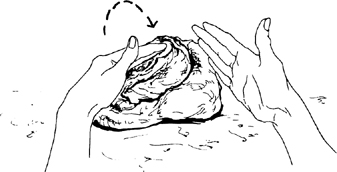
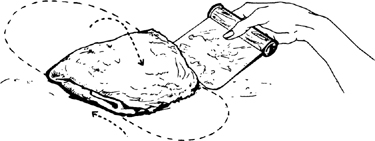
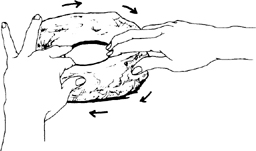
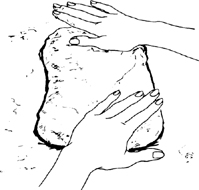
Lightly flour the palms of your hands and flatten the dough firmly but not too roughly into a circle, deflating any gas bubbles by pinching them. |
Lift a corner of the near side and flip it down onto the far side. Do the same with the left side, then the right side. Finally lift the near side and tuck it just under the edge of the far side. The mass of dough will look like a rounded cushion. |
|
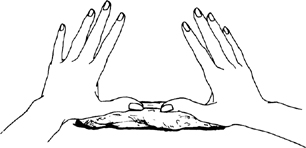
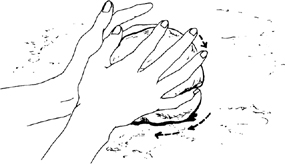
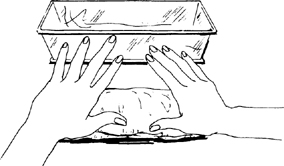
Slip the sides of your hands under the dough and return it to the bowl. Cover and let rise again, this time to not quite triple, but again until it is dome-shaped and light and spongy when touched.
(*) DELAYED ACTION: See chart at end of recipe.
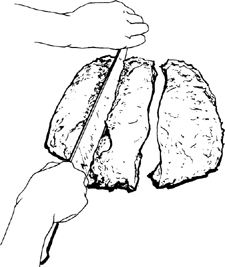
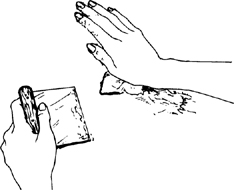
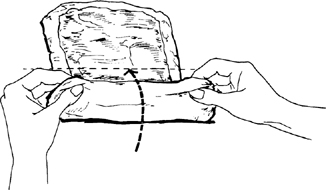
5) Cutting and resting dough before forming loaves
Loosen dough all around inside of bowl and turn out onto a lightly floured surface. Because of its two long rises, the dough will have much more body. If it seems damp and sweaty, sprinkle lightly with flour.
|
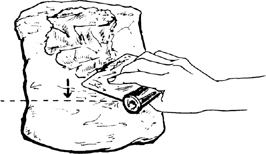
Making clean, sure cuts with a large knife or a scraper, divide dough into 3 equal pieces for long loaves, or whatever is specified for other shapes and sizes. |
After you have cut each piece, lift one end and flip it over onto the opposite end to fold the dough in two; place dough at far side of kneading surface. Cover loosely with a sheet of plastic and let rest for 5 minutes before forming. This relaxes the gluten enough for shaping, but not long enough for the dough to begin rising again. |
|
While the dough is resting, prepare the rising surface: smooth the canvas or linen toweling on a large tray or baking sheet, and rub flour thoroughly into the entire surface of the cloth to prevent the dough from sticking.
6) Forming loaves—la tourne; la mise en forme des pâtons
Because French bread stands free in the oven and is not baked in a pan, it has to be formed in such a way that the tension of the coagulated gluten cloak on the surface will hold the dough in shape. Following are illustrated directions for the familiar long loaf—the bâtards (baked size 16 by 3 inches); other shapes are described and illustrated at the end of the recipe. Baguettes are much too long for home ovens.
After the 3 pieces of dough have rested 5 minutes, form one piece at a time, keeping the remaining ones covered.
|
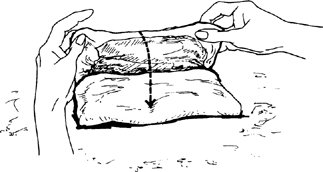
Working rapidly, turn the dough upside down on a lightly floured kneading surface and pat it firmly but not too roughly into an 8- to 10-inch oval with the lightly floured palms of your hands. Deflate any gas bubbles in the dough by pinching them. |
Fold the dough in half lengthwise by bringing the far edge down over the near edge. |
|
|
Being sure that the working surface is always very lightly floured so the dough will not stick and tear, which would break the lightly coagulated gluten cloak that is being formed, seal the edges of the dough together, your hands extended, thumbs out at right angles and touching. |
Roll the dough a quarter turn forward so the seal is on top. |
|
|
Flatten the dough again into an oval with the palms of your hands. |
Press a trench along the central length of the oval with the side of one hand. |
|
|
Fold in half again lengthwise. |
This time seal the edges together with the heel of one hand, and roll the dough a quarter turn toward you so the seal is on the bottom. |
|
|
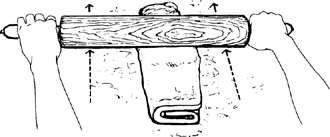
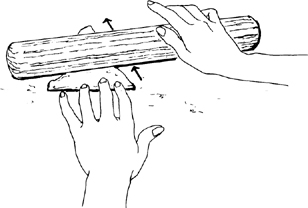
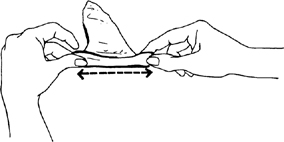
Now, by rolling the dough back and forth with the palms of your hands, you will lengthen it into a sausage shape. Start in the middle, placing your right palm on the dough, and your left palm on top of your right hand. |
Roll dough forward and backward rapidly, gradually sliding your hands toward the two ends as the dough lengthens. |
|
Deflate any gas blisters on the surface by pinching them. Repeat the rolling movement rapidly several times until the dough is 16 inches long, or whatever length will fit on your baking sheet. During the extension rolls, keep circumference of dough as even as possible and try to start each roll with sealed side of dough down, twisting the rope of dough to straighten the line of seal as necessary. If seal disappears, as it sometimes does with all-purpose flour, do not worry.
Place the shaped piece of dough, sealed side up, at one side of the flour-rubbed canvas, leaving a free end of canvas 3 to 4 inches wide. (The top will crust slightly as the dough rises; it is turned over for baking so the soft, smooth underside will be uppermost.) |
|
Pinch a ridge 2½ to 3 inches high in the canvas to make a trough, and a place for the next piece. Cover dough with plastic while you are forming the rest of the loaves. |
|
|
After all the pieces of dough are in place, brace the two sides of the canvas with long rolling pins, baking pans, or books, if the dough seems very soft and wants to spread out. Cover the dough loosely with a flour-rubbed dish towel or canvas, and a sheet of plastic. Proceed immediately to the final rising, next step. |
7) Final rise—l’apprêt—1½ to 2½ hours at around 70 degrees
The covered dough is now to rise to almost triple in volume; look carefully at its pre-risen size so that you will be able to judge correctly. It will be light and swollen when risen, but will feel still a little springy when pressed.
It is important that the final rise take place where it is dry; if your kitchen is damp, hot, and steamy, let the bread rise in another room or dough will stick to canvas and you will have difficulty getting it off and onto the baking sheet. It will turn into bread in the oven whatever happens, but you will have an easier time and a better loaf if you aim for ideal conditions.
Preheat oven to 450 degrees 30 minutes before estimated baking time.
(*) DELAYED ACTION: See chart at end of recipe.
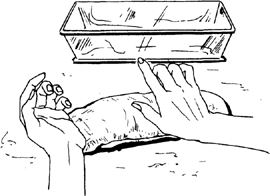
8) Unmolding risen dough onto baking sheet—le démoulage
The 3 pieces of risen dough are now to be unmolded from the canvas and arranged upside down on the baking sheet. The reason for this reversal is that the present top of the dough has crusted over during its rise; the smooth, soft underside should be uppermost in the oven so that the dough can expand and allow the loaf its final puff of volume. For the unmolding you will need a non-sticking intermediate surface such as a stiff piece of cardboard or plywood sprinkled with cornmeal or pulverized pasta.
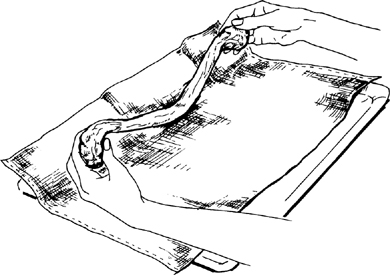
Remove rolling pins or braces. Place the long side of the board at one side of the dough; pull the edge of the canvas to flatten it; then raise and flip the dough softly upside down onto the board. |
|
Dough is now lying along one edge of the unmolding board: rest this edge on the right side of a lightly buttered baking sheet. Gently dislodge dough onto baking sheet, keeping same side of dough uppermost: this is the soft smooth side, which was underneath while dough rose on canvas. If necessary, run sides of hands lightly down the length of the dough to straighten it. Unmold the next piece of dough the same way, placing it to the left of the first, leaving a 3-inch space. Unmold the final piece near the left side of the sheet.
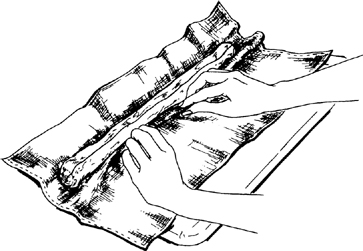
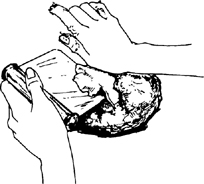
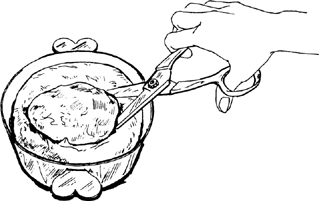
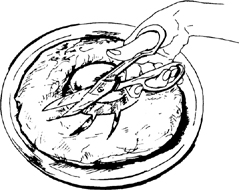
9) Slashing top of the dough—la coupe
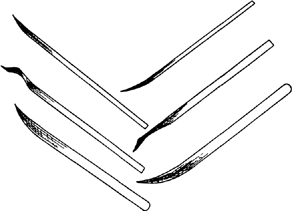
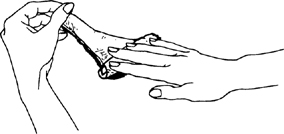
The top of each piece of dough is now to be slashed in several places. This opens the covering cloak of gluten and allows a bulge of dough underneath to swell up through the cuts during the first 10 minutes of baking, making decorative patterns in the crust. These are done with a blade that cuts almost horizontally into the dough to a depth of less than half an inch. Start the cut at the middle of the blade, drawing toward you in a swift, clean sweep. This is not quite as easy as it sounds, and you will probably make ragged cuts at first; never mind, you will improve with practice. Use an ordinary razor blade and slide one side of it into a cork for safety; or buy a barber’s straight razor at a cutlery store.
For a 16- to 18-inch loaf make 3 slashes. Note that those at the 2 ends go straight down the loaf but are slightly off center, while the middle slash is at a slight angle between the two. Make the first cut at the far end, then the middle cut, and finally the third. Remember that the blade should lie almost parallel to the surface of the dough. |
|
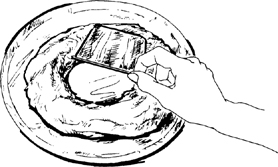
As soon as the dough has been slashed, moisten the surface either by painting with a soft brush dipped in cold water, or with a fine-spray atomizer, and slide baking sheet onto rack in upper third of preheated oven. Rapidly paint or spray dough with cold water after 3 minutes, again in 3 minutes, and a final time 3 minutes later. Moistening the dough at this point helps the crust to brown and allows the yeast action to continue in the dough a little longer. The bread should be done in about 25 minutes; the crust will be crisp, and the bread will make a hollow sound when thumped.
If you want the crust to shine, paint lightly with a brush dipped in cold water as soon as you slide baking sheet out of oven.
11) Cooling—2 to 3 hours
Cool the bread on a rack or set it upright in a basket or large bowl so that air can circulate freely around each piece. Although bread is always exciting to eat fresh from the oven, it will have a much better taste when the inside is thoroughly cool and has composed itself.
12) Storing French bread
Because it contains no fats or preservatives of any kind, French bread is at its best when eaten the day it is baked. It will keep for a day or two longer, wrapped airtight and refrigerated, but it will keep best if you freeze it—let the loaves cool first, then wrap airtight. To thaw, unwrap and place on a baking sheet in a cold oven; heat the oven to 400 degrees. In about 20 minutes the crust will be hot and crisp, and the bread thawed. The French, of course, never heat French bread except possibly on Monday, the baker’s holiday, when the bread is a day old.
13) Canvas housekeeping
After each bread session, if you have used canvas, brush it thoroughly to remove all traces of flour and hang it out to dry before putting away. Otherwise the canvas could become moldy and ruin your next batch of dough.
As noted in the Master Recipe, there are numerous points at which you can slow down the action or stop it altogether, by setting the dough in a colder place, or refrigerating or freezing it. Exact timings for any of these delaying procedures are impossible to give because so much depends on what has taken place during the slow-down, how cold the dough is when it starts to rise again, and so forth. All you need to remember is that you are in complete control: you can always push down a partially risen dough; you can slow the action with cold; you can speed it with warmth. You will work out your own systems and the following chart will help you:
TO DELAY THE FIRST RISING, SET DOUGH IN A COLDER PLACE
| Approximate Hours of Rise | at Degrees F. |
| 5–6 | 65 |
| 7–8 | 55 |
| 9–10 | Refrigerator |
TO STOP ACTION ALTOGETHER AFTER FIRST OR SECOND RISE
Deflate, wrap airtight, and freeze. Limit: A week to 10 days, probably more for plain French bread dough, and risky after 10 days for doughs with butter and eggs. (We shall not venture farther upon this uncertain limb.)
TO DELAY SECOND RISING
a) Set dough in a colder place.
b) Set a plate on top of dough and a 5-lb. weight; refrigerate.
TO DELAY OR FREEZE AFTER DOUGH IS FORMED
a) Set dough in a colder place.
b) Form dough on lightly oiled sheet; cover airtight and refrigerate or freeze, but note preceding time limit.
TO START ACTION AFTER THAWING
a) Thaw overnight in refrigerator; complete the rise at room temperature.
b) Set at 80 degrees until thawed; complete the rise at room temperature.
VARIATIONS
Cut the original dough, Step 5, into 5 or 6 pieces and form as illustrated in the recipe, but making thinner sausage shapes about ½ inch in diameter. When they have risen, slash as illustrated, Step 9.
Cut the dough into 10 or 12 pieces and form like bâtards, but you will probably not have to lengthen them at all after the two foldings and sealings. When they have risen, make either 2 parallel slashes, or a single slash going from one end to the other.
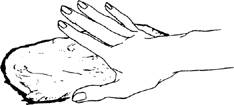
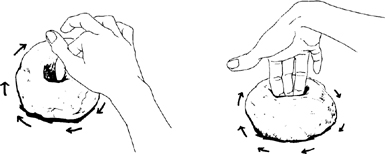
When you want bread for big sandwiches or for toast, a big round loaf is attractive. The object here is to force the cloak of coagulated gluten to hold the ball of dough in shape: the first movement will make a cushion; the second will seal and round the ball, establishing surface tension. To begin the process, after the risen dough has been cut and has rested 5 minutes, Step 5, place it on a lightly floured surface.
Lift the left side of the dough with the side of your left hand and bring it down almost to the other side. |
|
|
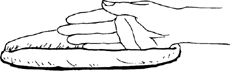
Scoop up that side and push it back almost to the left side. Revolve dough a quarter turn clockwise and repeat the movement eight to ten times. This movement gradually smooths the bottom of the dough and establishes the necessary surface tension; think of the surface of the dough as if it were a fine sheet of rubber you were stretching in every direction. |
Then turn the dough smooth side up and begin rotating it between the palms of your hands, tucking a bit of the dough under the ball as you rotate it. In a dozen turns you should have a neatly shaped ball with a little pucker of dough, la clé, underneath where the edges have all joined together. |
|
Place the dough pucker side up on flour-rubbed canvas; seal the pucker by pinching with your fingers. Flour lightly, cover loosely, and let rise to almost triple its size. After unmolding upside down on the baking sheet, slash it as follows:
|
Large loaves are usually slashed in a cross: make one vertical slash and complete the horizontal cuts as illustrated. Medium loaves may have a cross, a single central slash, or a semicircular slash around half the circumference. |
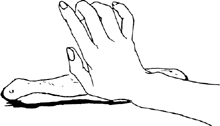
Cut the original dough, Step 5, into 10 to 12 pieces. After they have rested 5 minutes, form them one at a time, leaving the rest of the dough covered. The principles are the same here as for the preceding round loaves, but make the preliminary cushion shape with your fingers rather than the palms of your hands.
For the second stage, during which the ball of dough is rotated smooth side up, roll it under the palm of one hand, using your thumb and little finger to push the edges of the dough underneath and to form the pucker, where the edges join together. |
|
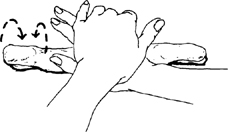
Place the formed ball of dough pucker side up on the flour-rubbed canvas and cover loosely while forming the rest. Space the balls 2 inches apart. When risen to almost triple its size, lift gently with lightly floured fingers and place pucker side down on baking sheet. Rolls are usually too small for a cross; make either one central slash or the semicircular cut.
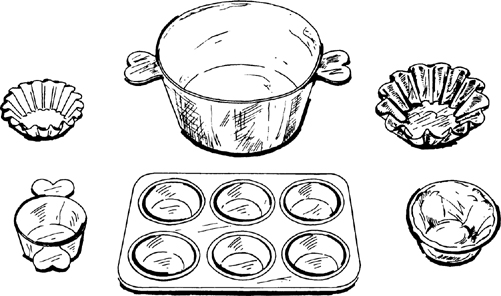
Baking in the ordinary way, as described in the preceding recipe, produces an acceptable loaf of bread, but does not nearly approach the glory you can achieve when you turn your home oven into a baker’s oven. Merely providing yourself with the proper amount of steam, if you do nothing else, will vastly improve the crust, the color, the slash patterns, and the volume of your bread; steam is only a matter of plopping a heated brick or stone into a pan of water in the bottom of the oven. The second provision is a hot surface upon which the naked dough can bake; this gives that added push of volume that improves both the appearance and the slash patterns. When you have the hot baking surface, you will then also need a paddle or board upon which you can transfer dough from canvas to hot baking surface. For the complete setup, here is what you should have, and any building-supply store stocks these items.
Metal will not do as a hot baking surface because it burns the bottom of the dough. The most practical and easily obtainable substance is ordinary red floor tiles ¼ inch thick. They come in various sizes such as 6 by 6 inches, 6 by 3 inches, and you need only enough to line the surface of an oven rack. Look them up under Tiles in your directory, and ask for “quarry tiles,” their official name.
A piece of 3⁄16-inch plywood about 20 inches long and 8 inches wide.
When you are doing 3 long loaves, you must slide them together onto the hot asbestos; to do so you unmold them one at a time from the canvas with one board and arrange them side by side on the second board, which takes the place of the baker’s wooden paddle, la pelle. Buy a piece of 3⁄16-inch plywood slightly longer but 2 inches narrower than your oven rack.
White cornmeal or small pasta pulverized in the electric blender until it is the consistency of table salt. This is called fleurage.
Something that you can heat to sizzling hot on top of the stove and then slide into a pan of water in the oven to make a great burst of steam: a brick, a solid 10-lb. rock, piece of cast iron or other metal. A 9 × 12-inch roasting pan 2 inches deep to hold an inch of water and the hot brick.
Instead of letting the formed dough rise on canvas, sur couche, many French bakers place each piece in a canvas-lined wicker or plastic form called a banneton; from this you turn the risen dough upside down directly onto a board and then slide it into the oven. Various sizes and shapes are available in French bakery-supply houses.

These are bakers’s blades, lames, for slashing dough; they are about 4 inches long and ¼ inch wide, with very sharp, curved ends. |
|
At least 30 to 40 minutes before the end of the final rise, Step 7 in the Master Recipe, line the rack of your oven with quarry tiles, slide onto upper-third level, and preheat oven to 450 degrees. At the same time set the brick or metal over very high heat on top of the stove so that it will get sizzling hot, the hotter the better.
|
Provide yourself with 2 stiff spoons or spatulas, or with fire tongs for lifting brick from stove top into pan of water in bottom of oven when the time comes, and test lifting the brick to be sure you have the instruments to do the job. NOTE: You may use a spray bottle rather than a brick; it works reasonably well though less dramatically. |
When the final rise is complete, sprinkle pulverized cornmeal or pasta on the long side of the unmolding board and on the surface of the sliding board. Your object now is to unmold the loaves one at a time from the canvas to the sliding board, then to slide the 3 of them together onto the hot tiles in the oven. Place the long side of board at one side of the dough, then raise and flip the dough softly upside down onto board. |
|
Slip the dough, still upside down, from the unmolding board onto the right side of the sliding board. Line up the rest of the dough side by side in the same manner.
Slash the dough as described in Step 9.
Place pan of cold water on the lowest rack of an electric oven, or on the floor of a gas oven, add sizzling hot brick, and close oven door.
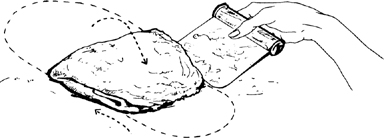
The 3 pieces of dough are now to be slid together off the sliding board onto the hot tiles in the oven: the movement is one quick, smooth jerk like that old magician’s trick of pulling the cloth from under a tableful of dishes. Open the oven and, holding the sliding board at the two ends nearest you, rapidly extend your arms so the far end of the board rests on the far end of the asbestos at the back of the oven. Then with one quick jerk, pull the board toward you and the three loaves will slide off onto the tiles. This must be a fast and confident action because if you pause midway, the dough will rumple off the board and once it touches the hot tiles you cannot move or reshape it, although it will come loose after 5 to 6 minutes of baking. You may muff this every once in a while, and produce some queerly deformed shapes, but they will all bake into bread.
Remove the brick and pan of water after 5 to 8 minutes of baking; the crust will have started to brown lightly. The oven should be dry for the rest of the baking. Total baking time will be about 25 minutes for bâtards; the bread is done when it makes a hollow thump if tapped, and when the crust is crisp and, hopefully, nicely browned.
Certainly one of the fascinating aspects of cooking is that you can almost endlessly improve upon what you have done, and when you realize that professional bakers have spent years learning their trade it would be surprising indeed if your first loaves were perfect in every respect. If they seem below standard in any of the following points, here are some possible explanations.
If you have not used the hot brick and pan of water steam-contraption, you will not get a very brown crust. Or if you have used the brick, perhaps it was not really sizzling hot; heat it 15 minutes longer the next time, or use 2 bricks. On the other hand, your oven thermostat might be inaccurate, and the oven was not really at the required 450 degrees. A third possibility is that your dough might have been under-salted; check your measurements carefully in Step 1 the next time.
If you were using the brick system, you might have had too much steam in the oven; next time use a smaller brick, or heat it a little less, or take it out several minutes sooner. Another possibility is that the dough mixture in Step 1 got an overdose of salt, and salt affects color; next time be sure your teaspoons are level.
A tough crust is usually due to humidity: the day was damp and sticky, or your kitchen was steamy, and the starch has coagulated and hardened on the surface of the dough.
Go over the instructions in Step 9 to check on whether you cut them as directed. On the other hand, it might be that the bread had over-risen in Step 7, just before baking, and the yeast had no strength left for its final push in the oven. Conversely, you might not have let it rise enough in this step and the dough was too heavy to bulge out the way it should.
This is always due to insufficient rising, particularly during the pre-bake rise in Step 7. Next time be sure it feels light and springy, and looks swollen, and that it has risen to almost triple its original size before it goes into the oven.
Again, the only reason for this is insufficient time taken for rising: the yeast has not had an opportunity to produce the slow aging and maturing that develops flavor. For your next batch, follow the timing and temperature requirements particularly in Step 3, for the first rise.
A yeasty over-fermented smell and taste are due more often to the dough having risen at too high a temperature than to its having over-risen. Next time, watch the room temperature at which it is rising, and if you are making bread in hot weather, you will have to take a longer time and let it rise in the refrigerator.
French bread dough is too soft to work in the electric food processor, but the heavy-duty mixer with dough hook, illustrated in the equipment section at the end of the book, works perfectly. The dough-hook attachment that comes with some hand-held electric mixers and the hand-cranking bread pails are slower and less efficient, to our mind, than hand kneading. In any case, when you are using electricity, follow the steps in the recipe as outlined, including the rests; do not over-knead, and for the heavy-duty mixer, do not go over a moderate speed of number 3 or 4, or you risk breaking down the gluten in the dough. When the kneading is finished, take the dough out of the bowl and give it a minute or so of hand kneading, just to be sure it is smooth and elastic throughout. Then proceed with the recipe as usual, from Step 3 on.
PAIN DE MIE[White Sandwich Bread—for sandwiches, canapés, toast, and croûtons]
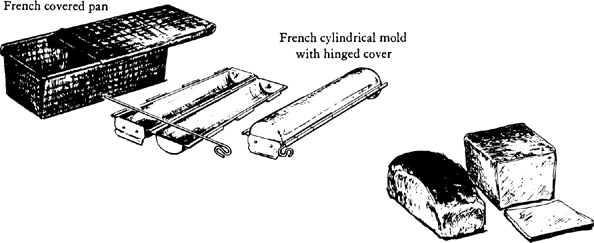
It is almost impossible in present-day America to find the firm, close-grained, evenly rectangular, unsliced type of white bread that is essential for professional-looking canapés, appetizers, and fancy sandwiches. In French this is pain de mie, meaning that the mie, the crumb or inside, is more important than the crust; in fact the crust exists merely as a thin and easily sliced covering. French boulangeries form and bake the bread in special covered molds; the bread rises during baking so that it fills the mold completely and emerges absolutely symmetrical. The form can be round or cylindrical, but it is usually rectangular. You can easily achieve the round or the rectangular shapes by baking in any straight-sided bread pan or baking dish, covering the pan with foil and a baking sheet, and topping that with some kind of weight to keep the bread from pushing up out of shape while it is in the oven.

For about 1 pound of flour, making 3 cups of dough, to fill one 8-cup covered pan or two 4-cup covered pans
1) The preliminary dough mixture—le fraisage. Either by hand:
1 cake (0.6 ounce) fresh yeast, or 1 package dry-active yeast
3 Tb warm water (not over 100 degrees) in a measure
2 tsp salt
1⅓ cups tepid milk in a measure
3½ cups unbleached all-purpose flour (scooped and leveled)
A 4- to 5-quart bowl with fairly straight sides
A rubber spatula, and a pastry scraper or stiff metal blade
Mix the yeast in the warm water and let it liquefy completely while measuring out the rest of the ingredients. Dissolve the salt in the tepid milk. Measure the flour into the mixing bowl. Then stir in the liquefied yeast and salted milk with a rubber spatula, cutting and pressing the dough firmly together into a mass, being sure all bits of flour and unblended pieces are gathered in. Turn dough out onto a flat kneading surface, scraping bowl clean. Dough will be quite soft and sticky; let it rest for 2 to 3 minutes while you wash and dry the bowl.
|
Start kneading by lifting the near side of the dough, using a scraper or spatula to help you, and flipping it over onto the other side. Scrape dough off surface and slap down again; lift, flip over and slap down again, repeating the movement rapidly. |
|
|
In 2 to 3 minutes dough should have enough body so that you can give it a quick forward push with the heel of your hand as you flip it over. If it remains too sticky for this, knead in a sprinkling of flour. When it begins to clean itself off the working surface and draw back into shape, it is ready for the next step—kneading in the butter. |
3) Kneading in the butter
4 Tb (½ stick) chilled butter
When butter is incorporated into a dough in most French recipes, it is added after kneading.
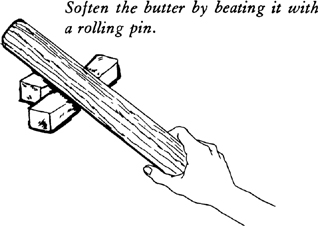
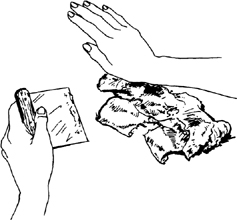
Soften the butter by beating it with a rolling pin. Then smear it out with a scraper, spatula, or the heel of your hand until it is soft and malleable but still cold. |
|
|
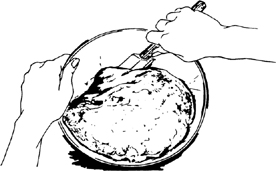
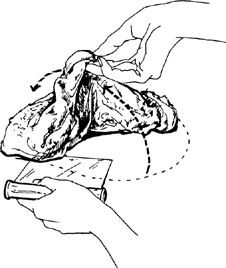
By tablespoon bits, start rapidly folding and smearing the butter into the dough with the heel (not the palm) of your hand, then gather the dough into a mass with your scraper and smear again. Keep working in more bits of butter as each previous addition is partially absorbed. |
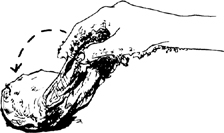
Dough will be ropy, very messy, and even stickier until it begins to absorb the butter. Work fast to prevent the butter from turning oily, always using the heel of your hand, and also cutting the dough with scraper or spatula. In a few minutes dough will again become smooth and elastic. Proceed to Step 4. |
|
Using the same proportions as for hand-made dough, dissolve the yeast and add it to the salted milk. Place the 3½ cups of flour in the container of the food processor (unless you have a small machine, in which case divide all ingredients by half and do it in two batches). Cut the butter into pieces, and add to the flour, along with the salt. Process for several seconds until butter is broken into flour, then with the processor going, pour in 1¼ cups of yeast-milk; continue pouring by driblets, watching carefully, until dough balls up on top of steel blade. Process, with dough riding on blade, for 15 seconds—this constitutes the preliminary kneading. Turn the dough out onto your work surface and proceed to Step 4, below.
NOTE: If you happen to add too much liquid and the machine clogs, sprinkle in more flour and the machine will often start up again. If not, remove dough and continue by hand.
4) Then let the dough rest 2 to 3 minutes. Knead again briefly with the heel of your hand until dough begins to clean the butter off the kneading surface and off your hand. It is now sufficiently kneaded, although it will remain quite soft and somewhat sticky.
5) First rising—pointage premier temps—3 to 4 hours at around 70 degrees
The clean 4- to 5-quart mixing bowl
A large plastic bag that bowl will fit into, or a large sheet of plastic
A bath towel
You will have about 3 cups of unrisen dough, and it is to rise 3½ times in volume or to 10½ cups. Fill the bowl with 10½ cups of tepid water and make a mark on the outside to guide you; pour out the water, dry the bowl, and place the dough in it. Slip bowl into plastic bag or top with plastic and cover with the towel. Set on a wooden or plastic surface or on a folded towel or pillow and place at a temperature of 68 to 72 degrees.
Dough should take a minimum of 3 hours to rise for the yeast to do its best work. When dough has risen to the 10½-cup mark, or to 3½ times its original volume, it will feel light and springy when pressed, and is ready for its second rise.
(*) DELAYED ACTION: See chart.
6) Deflating and second rising—rupture; pointage deuxième temps—1½ to 2 hours at around 70 degrees
The dough is now to be thoroughly deflated and folded to expel accumulated gas, and to redistribute the yeast into an even finer network of gluten that will result in a close-grained texture when the bread is baked.
With a rubber spatula or the slightly cupped fingers of one hand, dislodge dough from inside of bowl and turn out onto a lightly floured surface, scraping the bowl clean. If dough seems damp and sweaty, sprinkle with a tablespoon of flour. |
|
|
With the lightly floured palms of your hands, pat and push the dough out onto a roughly shaped rectangle 10 to 12 inches long. |
With the help of a scraper or spatula, fold the right side over toward the center, then fold the left side over to cover it, as though folding a business letter. Pat the dough out again into a rectangle, fold again in three, and put the dough back in the bowl. Cover with plastic and towel and let rise a second time, to not quite triple in volume, or to slightly below the 10½-cup mark on the bowl. |
|
White vegetable shortening
An 8-cup rectangular breadpan with vertical or only slightly outward-slanting sides (for example, 9½ by 5½ inches, 2¾ inches deep), or a round pan, or two 4-cup pans
Remember to preheat oven to 435 degrees in time for next step. Grease inside of bread pan (if pan is new, grease heavily then roll flour around inside and knock out excess). With a rubber spatula or the slightly cupped fingers of one hand, loosen dough from bowl and turn out onto a lightly floured surface. If you are making 2 loaves, cut dough cleanly in half with one chop of a long knife. Lift one end of dough and flip it over on to its opposite end. To relax the gluten and make dough easier to form, let rest 7 to 8 minutes covered with plastic.
Following are illustrated directions for forming rectangular loaves. For cylindrical and circular forms, use the French bread system.
|
With the lightly floured palms of your hands, pat and push the dough out into a roughly shaped rectangle slightly longer than your bread pan. |
Fold the dough in half lengthwise. |
|
|
Seal edges of dough together with your thumbs as illustrated, or with the heel of one hand. Roll dough a quarter turn forward, so seal is on top. |
Flatten the dough again into a rectangle. |
|
|
Press a trench along the central length of the dough with the side of your hand. |
Fold again in two lengthwise and seal the edges together with the heel of your hand. Roll dough a quarter turn toward you, so seal is underneath. |
|
|
Place the dough smooth side up in the prepared pan, pressing it down snugly into the corners with your knuckles. Pan should be no more than ⅓ to ⅖ full. |
(*) You can freeze the dough at this point, wrapping pan airtight. To continue with the recipe, let thaw for several hours in the refrigerator or at room temperature.
For the final rising, set pan uncovered at a temperature of 75 to 80 degrees until dough has risen to slightly more than double, or to fill the pan by no more than ¾. It is important when you are to bake in a covered pan that you do not let the dough rise more than this, as it must have room to finish swelling and to fill the pan while it is in the oven. When dough has risen, bake at once.
(*) You can delay the rising action by setting the pan in the refrigerator, or even by weighting it down under refrigeration. In either case, the pan should be covered airtight, then set uncovered at room temperature for 20 to 30 minutes before baking. If dough has over-risen, bake it uncovered or deflate by pressing it down and letting it rise again to the correct height.
7) Baking, cooling, and storing—oven at 435 degrees; baking time 40 minutes
A perfectly smooth sheet of aluminum foil 1½ inches larger all around than bread pan, and greased on shiny side
A baking sheet or a pan large enough to cover entire top of bread pan
A 5-pound weight of some sort, such as a brick
A cake rack, for cooling bread after baking
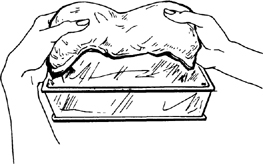
Oven has been preheated to 435 degrees. Cover bread pan with aluminum foil, greased side down. Set pan on a rack in middle level of preheated oven, cover pan with baking sheet or second pan, and center the weight on top.
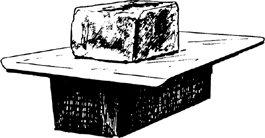
Bake undisturbed for 35 to 40 minutes (30 for small loaves), then slide rack to front of oven. Standing well enough aside in case bread should burst out of pan (which could occur only if you had let it over-rise before baking), see if bread is done. The bread should have shrunk slightly from sides of pan so it will unmold easily, and the crust should be lightly browned. When thumped, the loaf should make a hollow sound. If not quite done, return to pan, cover with foil and baking sheet, and bake 5 to 10 minutes more. Unmold and cool on a rack.
When thoroughly cool, in 1½ to 2 hours, wrap airtight and refrigerate. Flavor and texture improve after 12 to 24 hours, and you should probably wait 36 hours if you want very thin slices for sandwiches or Melba toast.
This bread freezes perfectly; thaw it in its wrapper either in the refrigerator or at room temperature.
If you want a loaf that swells up in the oven, bake the dough in an open pan, one that holds twice the volume of the unrisen dough, in this case a 6-cup pan. During its final rise, Step 6, let the dough come up almost to the edge of the pan. Just before baking, glaze the top of the dough by painting it with a tablespoon of milk in which you have dissolved ⅛ teaspoon of sugar. Oven temperature and timing are the same as in the preceding Master Recipe; if the top of the bread seems to be coloring too much, cover loosely with heavy brown paper or a sheet of aluminum foil.
You may omit the butter in the Master Recipe if you wish. This will give you a lighter and whiter loaf; you may prefer it this way for Melba toast.
Use 2-day-old pain de mie. Cut off the crusts at the two ends. With a very sharp long knife, such as a ham slicer, cut the bread into even slices less than 1⁄16-inch thick. Arrange the slices, overlapping them by no more than a third of their length, on 1 or 2 large baking sheets and set in upper- and lower-middle levels of a 275-degree oven for about an hour, turning bread over once or twice and switching baking sheets from one rack to the other. Toast is done when bread is crisp, slightly curly, and a very pale brown. When cold and wrapped airtight, Melba toast freezes perfectly; thaw and re-crisp for a few minutes in a 350-degree oven.
[Raisin Bread—to serve with tea, or for toast. See also Pain Brioché aux Raisins]
For 4 cups of risen dough, filling two 5-cup covered pans or one 8-cup open pan
1 to 1½ cups (5 to 8 ounces) small currant raisins
Ingredients for pain de mie, preceding Master Recipe
To soften the raisins, soak in 1 quart of very hot water for 10 to 15 minutes. Drain, twist hard in the corner of a towel to squeeze out as much accumulated water as possible. Pat thoroughly dry in paper towels; spread out on a dry towel until you are ready to use them. Knead the raisins into the dough near the end of Step 3, when the butter has been almost absorbed. Since the weight of the raisins will hold the dough down, the first rise, Step 5, will be only to triple in the allotted time. Baking time and oven temperature are the same as for pain de mie.
[Egg Bread—to serve with butter and jam, for fancy sandwiches such as mousse of foie gras, for toast; an alternate to brioche dough for Koulibiac, sausage in brioche, and their like]
This is a lovely light-textured yellow bread. With another egg and three times the butter it would be a true brioche. Although you will find this dough quite a bit stickier and softer to handle than pain de mie, the technique for making it is the same.
For about 1 pound of flour, making 4 cups of unrisen dough, to fill two 6-cup covered pans, two 4-cup open pans, or for 2 dozen individual rolls formed in small molds or muffin tins
1) Mixing and kneading the dough—either by hand or machine
1 package (0.6 ounce) fresh yeast or 1 package dry-active yeast
¼ cup warm water in a measure
1 Tb salt
2 Tb sugar
¼ cup tepid milk
3½ cups (about 1 lb.) all-purpose flour (measure by scooping dry-measure cups into flour and sweeping off excess)
A 4- to 5-quart mixing bowl with fairly straight rather than outward-slanting sides
4 eggs (U.S. graded “large”; if chilled, set for 5 minutes in warm water)
Sprinklings of flour as needed
1 stick (4 ounces) chilled butter
Sprinkle yeast in warm water and let liquefy completely. Then stir in the salt, sugar, and milk. Measure the flour into the mixing bowl, make a well in the center, add the eggs and the yeast mixture. Cut and mix everything together with a rubber spatula to form a dough. Turn out onto kneading surface and let dough rest for 2 to 3 minutes. Following illustrated directions for pain de mie, knead by lifting, folding, slapping, and pushing with the heel of your hand. Dough will be stickier than that for pain de mie; if it remains unusually so, knead in a tablespoon or so more flour. When dough begins to clean itself off kneading surface, start working in the butter by tablespoon bits. When butter is absorbed, let dough rest for 2 to 3 minutes. Knead again briefly until dough cleans butter off kneading surface and off your hands.
Or mix and knead the dough in a food processor, following directions for pain de mie.
Follow Steps 5, 6, and 7 in the Master Recipe for the first and second risings in a covered bowl and the final rise in the bread pan. Follow Step 8 for baking, except preheated oven should be at 400 degrees and baking time will be about 35 minutes. The surrounding crust will be a little darker than for pain de mie. Pain brioché may be eaten warm or cold, although it will slice more easily after 24 hours. It freezes perfectly.
[Egg Bread with Raisins]
Pain brioché makes heavenly raisin bread, eaten plain with butter, or toasted. Follow directions for pain de mie aux raisins.
Although the wonderfully buttery, light, and thoroughly delectable texture of fresh brioches may persuade you they are manna from another planet, brioche dough differs from pain de mie dough only in that eggs are used rather than milk, and a very much larger proportion of butter is incorporated. Actually, you can use equal amounts of butter and flour, but we think the proportions of 3 parts butter to 4 parts flour make a much more manageable dough with a delicious texture and taste.
In France, brioches are served for breakfast with butter and jam, or for tea, or with the coffee break. Stale brioche may be sliced and toasted, or hollowed out and used as a container for sauced foods or appetizers.
NOTE: The following recipe is for the classic hand-made brioche dough. For making it in the electric food processor, follow the general directions for pain de mie, first dissolving the yeast, then mixing it with the eggs, before blending the butter and flour in the processor with the salt and sugar. Blend in ¾ of the liquid, then add the rest by dribbles until the dough balls up on the blade. Finish kneading briefly by hand, as described at the end of Step 4.
PÂTE À BRIOCHE FINE[Brioche Dough—for all sizes and shapes of brioches, and for Koulibiac, sausage in brioche, and their like]
You must allow a minimum 8½ hours from the time you start brioche dough to the time it is ready for the oven. Five hours are needed for the first rise, 2 for the second, half an hour for chilling, and 1 to 1½ hours for the final pre-bake rise. You may find it convenient to start the first rise in the late afternoon and complete the second one overnight in the refrigerator; you can then form and bake the brioche in the morning. However, as you will see from the delayed-action notes in the recipe, you can pretty well make it suit whatever schedule you wish.
For about ½ pound of flour, making 2⅔ cups of unrisen dough, enough to fill one 6-cup mold or nine to ten ½-cup molds
1) The preliminary dough mixture—le fraisage
3 eggs (U.S. graded “large”; if chilled, place in warm water for 5 minutes)
A 2-cup measure
A fork
Warm the eggs if chilled. Break them into the measure and blend with a fork. You should have ⅔ cup.
1 cake fresh yeast (0.6 ounce) or 1 package dry-active yeast
3 Tb warm water (not over 100 degrees) in a measure
1 tsp sugar
Mix the yeast in the warm water, add the sugar, and let yeast liquefy completely.
1¾ cups (about 8 ounces) all-purpose flour (measure by scooping dry-measure cups into flour and sweeping off excess)
A 3- to 4-quart mixing bowl
A rubber spatula
2 tsp sugar
1¼ tsp salt
A pastry scraper or stiff spatula
Measure the flour into the mixing bowl. Make a well in the center with the rubber spatula and pour in the eggs. Sprinkle on the additional sugar and the salt; scrape in the liquefied yeast mixture. Cut and stir liquids and flour together with a rubber spatula, then turn out onto kneading surface, scraping bowl clean. Dough will be very soft and sticky. Work it with scraper or stiff spatula for a moment to blend ingredients completely, then scrape to side of kneading surface and let dough rest while you prepare the butter, next step.
2) Preparing the butter 6 ounces (1½ sticks) chilled unsalted butter A rolling pin |
|
|
Smear it out with a scraper, spatula, or the heel of your hand until it is soft and malleable but still cold. Place at one corner of kneading surface until you are ready to use it, Step 4 (refrigerate in hot weather). |
This will be a very soft and sticky dough that now contains the minimum amount of flour; you will probably knead in more if dough remains too soft. Knead with one hand, keeping the other clean for emergencies.
Using scraper or spatula, start flipping the near side of the dough over onto the far side, the right side onto the left, and so forth, rapidly and vigorously a dozen times or more until dough begins to have body and elasticity. |
|
|
When dough has enough body, lift and slap it down roughly on the kneading surface repeatedly, using scraper to help you. Sprinkle on more flour by tablespoons (up to 3 or 4 in all if necessary) if dough remains too soft and sticky. |
It should be a soft dough that will stick to your fingers if you hold a pinch of it for more than 2 to 3 seconds. Knead until it has enough elasticity to draw back into shape when pushed out, probably 4 to 5 minutes, then let it rest for 2 to 3 minutes. Knead again for a moment and it is ready for the butter.
4) Kneading in the butter By 2-tablespoon bits, start folding, kneading, and smearing the butter into the dough with the heel of your hand; then gather the dough into a mass, chopping it into small pieces with your scraper and smearing again. Keep working in more bits of butter as each previous addition is partially absorbed. |
|
|
Dough will be ropy, sticky, and very messy indeed until it begins to absorb the butter. Work rapidly, especially if the kitchen is warm, and be sure you are using the heel, not the palm, of your hand. |
You may finish kneading with a scraper or spatula, which will prevent the butter from becoming too warm and turning oily. Do not hesitate to chill the dough for 20 minutes or so if this happens, and then continue.
When all the butter is absorbed, the dough will look rather fluffy. Let it rest for 2 to 3 minutes, and knead briefly again. Kneading is finished when dough draws back into shape after being pushed out.
5) First rising—pointage premier temps—5 to 6 hours at around 70 degrees
A clean 3- to 4-quart mixing bowl
A large plastic bag that bowl will fit into, or a large sheet of plastic
A bath towel
You have 2⅔ cups of dough that is to rise to almost triple in volume, or to about 7 cups. Fill bowl with 7 cups of tepid water, make a mark on the outside of the bowl to guide you, pour out water and dry the bowl. Place dough in bowl, slip into plastic bag or cover with plastic and arrange bath towel on top. Set on a wooden or plastic surface or on a towel or pillow. For best texture and flavor, dough should take 5 to 6 hours to rise to the 7-cup mark, at which point it will feel light and springy, though somewhat sticky because of the butter.
NOTE: In hot weather you will probably have to set bowl in refrigerator from time to time to prevent butter from melting and oozing out of dough.
(*) DELAYED ACTION: Set bowl in refrigerator for a short delay; for a longer one, cover with waxed paper, a plate, and a 10-lb. weight to slow or even prevent its rising.
6) Deflating—rupture With a rubber spatula or the slightly cupped fingers of one hand, dislodge dough from inside of bowl and turn out onto a lightly floured surface, scraping bowl clean. Sprinkle surface of dough with a teaspoon or so of flour. |
|
|
With the lightly floured palms of your hands, pat and push dough out into a roughly shaped rectangle about 10 inches long. |
With the help of a scraper or spatula, flip the right side of the dough over toward the center, then flip the left side over to cover it, as though folding a business letter. Pat the dough out again into a rectangle, fold again in three, and replace the dough in the bowl. Cover again with plastic and a towel.
(*) If you want to freeze brioche dough, this is the best time to do so, but see notes on freezing.
7) Second rising—pointage deuxième temps—2 to 6 hours or more, depending on temperature
Brioche dough is usually chilled before it is formed so that it can be shaped easily; chilling may be done either during or after the second rise, whichever works out best for your cooking schedule.
room temperature method:
Let dough rise to 2 times its original volume, or to about 5½ cups, at a temperature of around 70 degrees. This should take 1½ to 2 hours. Then dislodge from bowl with a rubber spatula or the slightly cupped fingers of one hand, and refrigerate on a large plate or platter covered with waxed paper, another plate, and a weight. Dough should be ready to form in 30 to 40 minutes.
refrigerator method:
Let dough start to rise at around 70 degrees for an hour, then refrigerate. Dough will continue to rise for an hour or more until the butter congeals. If you wish to leave it overnight, cover with a plate and a weight when you refrigerate it.
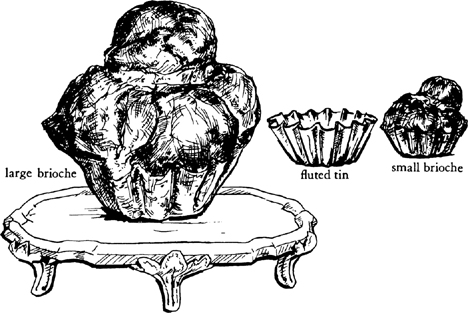
Brioches are usually baked in fluted molds with slightly outward-slanting sides. However, you can use anything you have available, from a baking dish or ovenproof bowl for large brioches to pyrex cups or muffin tins for small ones.
The final rise before baking is to almost double in volume, until the dough feels light and softly springy when touched. The ideal rising temperature is around 75 degrees, and you have to watch the dough carefully on a hot day because higher temperatures melt the butter so that it oozes out of the dough. If this starts to happen, refrigerate the dough from time to time. It is difficult to predict how long the final rise will take; if the dough was thoroughly chilled before forming, it will take longer to rise. You must usually count on at least an hour, and it must really rise and soften or it will bake into a rather firm and dense brioche. Following are directions for forming and baking large, small, and ring brioches.
GROSSE BRIOCHE À TÊTE[Large Brioche with Ball-shaped Head]
1) Forming the brioche
1 tsp soft butter
A 6-cup circular fluted mold or a cylindrical baking dish
The preceding brioche dough, chilled
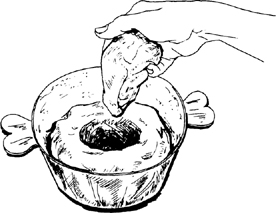
Butter the interior of the mold or dish. With lightly floured hands on a lightly floured board, form ¾ of the dough into a smooth ball by kneading it lightly and rolling it between the palms of your hands. Place the ball in the bottom of the mold.
|
Make a funnel-shaped hole in the center of the dough 2½ inches wide at the top diameter and about 2 inches deep, using your first 3 fingers. Roll the remaining dough between the lightly floured palms of your hands to make a ball, then a tear-drop shape. Insert pointed end of tear drop into hole. |
2) Final rising—1 to 2 hours at 75 degrees
Set uncovered and free from drafts at a temperature of around 75 degrees until dough has almost doubled in volume, and feels light and softly springy when touched. Be sure your oven has been preheated to 475 degrees by the time the brioche is ready to bake.
(*) DELAYED ACTION: You can set mold in refrigerator, covering it with a bowl to prevent dough from crusting; you can cover the formed dough airtight and freeze, but see notes.
3) Glazing and clipping
1 egg beaten with 1 tsp water in a small bowl
A pastry brush
A pair of sharp-pointed scissors
Just before baking, paint surface with beaten egg, being sure not to glaze where the head joins the main body of the brioche as this could glue the two together and prevent the head from rising. In a moment, glaze with a second coat.
|
To help head in shaping up during baking, make 4 to 5 scissor clips in the large ball close under the head and slanting inward about half the width of the head. |
4) Baking, cooling, and storing—oven at 475 degrees, then 350; baking time: 40 to 50 minutes
Place the mold with the risen, glazed, and clipped brioche on a baking sheet in the middle or lower-middle level of the preheated 475-degree oven. In 15 to 20 minutes, when the brioche has risen and started to brown lightly, turn thermostat down to 350 degrees. Total baking time will be 40 to 50 minutes; brioche is done when it has begun to show a very faint line of shrinkage from the mold, or when a knife or straw plunged down through the center comes out clean. If, during baking, brioche seems to be browning too much, cover loosely with heavy brown paper or foil.
Cool on a rack for 15 to 20 minutes before serving. Brioches may be eaten slightly warm or cool; cold brioches may be warmed for 10 to 15 minutes in a 350-degree oven.
(*) Brioches dry out and become stale almost within 12 hours of baking. To preserve their freshness, wrap airtight and freeze; large frozen brioches take about half an hour to thaw in a 350-degree oven.
VARIATIONS
[Small Individual Brioches with Ball-shaped Heads]
Choose either ½-cup, slant-sided fluted molds for small brioches, or baking cups or muffin tins. Form in the same way as large brioches, filling the molds half full and letting dough rise to almost double. Paint twice with egg glaze and clip under the heads in several places just before baking. Bake about 15 minutes at 475 degrees in middle level of oven.
Brioche en Couronne[Ring-shaped Brioche] |
|
The brioche dough, chilled
A baking sheet
Optional: an ovenproof bowl or cup
Knead the chilled dough into a ball and place on a lightly floured surface.
Make a hole in the center with your finger, twirling dough around your finger to enlarge the hole and inserting more fingers as the hole gets bigger.
When hole is large enough to do so, insert both hands and gently stretch dough while twirling it on floured surface. The object is to make a doughnut shape 10 to 12 inches in diameter. |
|
Place shaped dough on a lightly buttered baking sheet and let rest 10 minutes to relax gluten, then widen the circle a little more.
|
To keep center of dough from closing in during rising and baking, insert a lightly buttered ovenproof bowl or cup in hole. |
Let dough rise, uncovered, to almost double at a temperature of around 75 degrees, until dough is light and springy to the touch. Paint with a double coating of egg glaze (1 egg beaten with 1 tsp of water) just before baking.
Then clip top of dough at 1-inch intervals, making cuts about 1 inch deep, pointing scissors toward outside of ring at a 45-degree angle. |
|
Bake 20 to 30 minutes in the middle level of a preheated 475-degree oven until nicely puffed and browned. A knife or straw plunged into the center of one side should come out clean. If brioche browns too much during baking, cover loosely with heavy brown paper or aluminum foil.
[Brioche with Raisins]
Whether or not this molded ring-shaped raisin brioche originated with Viennese bakers, it is usually considered by the French to be an Alsatian raisin cake of uncertain orthography, as you will see it spelled also Kugelhopf, Kougelhof, Gougelhop, and even Gugelhupf. Bakers frequently make Kougloff out of leftover brioche dough, softening it with a little milk or additional butter as they knead in the raisins just before dropping the dough into its mold.
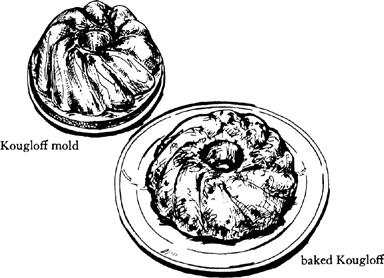
For a 6-cup Kougloff
Special requirements
¾ cup (4 ounces) small currant raisins
1 to 1½ tsp soft butter
A 6-cup Kougloff mold, or any fluted ring mold 3½ to 4 inches deep and about 8½ inches at rim diameter that holds 6 cups
¼ cup shaved blanched almonds (skinless almonds sliced paper thin, available in cans or plastic)
To soften raisins, soak 10 to 15 minutes in very hot water; drain, twist hard in the corner of kitchen towel to squeeze out accumulated water, and spread out on a paper towel until needed. Butter the mold heavily, then sprinkle a tablespoon of the almonds in the bottom, reserving the rest until later.
1) Softening the dough
If needed, 3 to 4 Tb milk and/or butter
So that it will mold smoothly, dough for Kougloffs must be soft and sticky. If you are making the dough specifically for a Kougloff, knead in only 4 of the 6 ounces of butter called for in Steps 2 and 4 of the Master Recipe and complete the recipe through Step 8. After the second rise, knead in the remaining 2 ounces of butter and the raisins. If you are using leftover brioche dough, soften it by kneading in milk and/or butter by half tablespoons, then knead in the raisins.
2) Filling the mold and final rise
A pastry scraper or stiff metal spatula
A rubber spatula
The remaining almonds
A tablespoon or so of flour
Gather a 2-tablespoon gob of the soft dough on the end of your scraper or metal spatula and use the rubber spatula to dislodge it and place it on the bottom of the prepared mold. Continue spreading it around the mold to make a layer. Sprinkle or press more almonds against inside of mold, and add another layer of dough; continue thus until all dough is used. Sprinkle lightly with flour and press dough gently against sides and cone of mold with floured fingers. Mold will be about ½ filled. Let rise uncovered at around 75 degrees for an hour or more, until mold is almost filled.
3) Baking—oven at 475 degrees, then at 350; 30 to 40 minutes
Bake at 475 degrees in middle or lower-middle level of preheated oven for about 15 minutes, or until dough has risen and started to color. Then lower thermostat to 350 degrees for rest of baking. Kougloff is done when it shows a faint line of shrinkage from sides of mold and when the sides are nicely browned. Serve slightly warm or cool, with butter.
The processor can work wonderfully with some doughs. The trick is to process the dry ingredients and butter first, then—with the machine running—to pour in ¾ of the liquid called for. Never stop the machine; add the rest of the liquid by dribbles until the dough masses on top of the blade and rolls around under the cover for 15 to 20 seconds, for the preliminary kneading. If dough is too damp, it will not mass; sprinkle in a little flour, which may help. If not, knead by hand. By experimenting, you will find the way that works best for you. |
|
The best time to freeze brioche dough is after the second rise, but you may also do so after it has been formed and before the final rise. However, and probably because of the high butter and egg content, its life in the freezer is not long: a week to 10 days is all we would suggest.
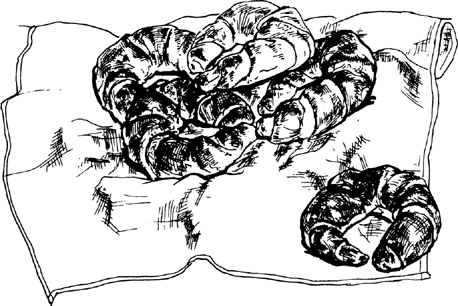
The most delicious of French croissants, to our mind, are those called croissants de boulanger, which are made of risen yeast-milk-and-flour dough that is flattened out, slathered with butter, folded in three, and rolled and folded again three times as though you were making French puff pastry. There are other formulas for croissants, including some which are really puff pastry or brioche dough rolled into crescent shapes. And in some of the quick methods the yeast dough has only a short single rise, resulting in a semi-puff pastry. None of these, to our mind, produces the tenderly layered, puffy, deliciously buttery croissant one dreams of. The old classic method does just this—and why go to all the trouble of making croissants otherwise?
The minimum time required for making croissants is 11 to 12 hours. Included are 3 hours and 1½ hours for the rising of the initial dough, two rest periods of 1½ to 2 hours each, and a final pre-baking rise of about an hour. Therefore, if you want freshly baked croissants for breakfast you will have to stay up all night as the bakers do. However, they will taste just as fresh if you make them ahead and freeze them either fully baked or ready to bake, as indicated in the recipe.
1) The basic dough
½ cake (0.3 ounce) fresh yeast or 1½ tsp dry-active yeast
3 Tb warm water (not over 100 degrees) in a measure
1 tsp sugar
Mix the yeast in the warm water with the sugar and let liquefy completely while measuring out the rest of the ingredients.
1¾ cups (about ½ lb. all-purpose flour measured by scooping dry-measure cups into flour and leveling off with straight-edged knife)
A 3- to 4-quart mixing bowl
2 tsp sugar
1½ tsp salt
⅔ cup milk warmed to tepid in a small saucepan
2 Tb tasteless salad oil
A rubber spatula
A pastry scraper or stiff metal spatula
Measure the flour into the mixing bowl. Dissolve the additional sugar and the salt in the tepid milk. When yeast has liquefied, pour it along with the milk mixture and oil into the flour. Blend the elements into a dough by cutting and pressing with the rubber spatula, being sure all bits of flour are gathered in. Turn dough out onto kneading surface, scraping bowl clean. Let rest for 2 to 3 minutes while you wash and dry the bowl. The short rest allows flour to absorb liquid; dough will be quite soft and sticky.
|
Start kneading by lifting near edge, using scraper or spatula to help you, and flipping it over onto the other side. Rapidly repeat the movement from one side to the other and end over end 8 to 10 times until dough feels smooth and begins to draw back into shape when pushed out. This is all the kneading it should have; you want just enough body so dough will hold together when eventually rolled, but you do not want to over-activate the gluten and make dough difficult to handle. |
The clean 3- to 4-quart mixing bowl
A large plastic bag or sheet of plastic
A bath towel
You will have about 2 cups of dough that is to rise to 3½ times its original volume, or to 7 cups. Fill bowl with 7 cups of tepid water, make a mark on the outside at the 7-cup mark to guide you. Pour out the water, dry the bowl, and put the dough into it.
Cover with plastic and bath towel, and place at a temperature of between 70 and 72 degrees. In 3 or 4 hours dough should have risen to the 7-cup mark, and will be light and springy when touched.
Deflate by loosening dough from edges of bowl with a rubber spatula or the cupped fingers of one hand, and turn it out onto a lightly floured surface. With the lightly floured palms of your hands, pat and push the dough out into a rectangle about 8 by 12 inches. Fold in three as though folding a business letter. Return dough to bowl; cover again with plastic and bath towel.
Let rise a second time, but only to double the original volume. Then loosen dough from edges of bowl and turn out onto a lightly floured plate. Cover airtight and refrigerate for 20 minutes, which will make the next step easier.
(*) DELAYED ACTION: Set dough in a colder place to rise, or let it rise the second time overnight in the refrigerator. After second rise, when dough has been turned out of bowl onto plate, you may freeze it for a week.
3) Rolling in the butter; turns 1 and 2
4 to 7 ounces (1 to 1¾ sticks) chilled unsalted butter
A rolling pin (see illustrated comments)
Flour as needed
A pastry scraper
Waxed paper or plastic
A plastic bag
Butter is now to be softened and rolled in layers with the dough. If this is your first attempt, use the minimum quantity. During all the following operations, roll rapidly and keep the dough well chilled—warm, limp dough is impossible to work with!
|
Butter must now be worked into a smooth but still cold paste that can be spread evenly on the dough and then rolled with it. Beat butter with rolling pin to soften it. |
Then smear it out with the heel of your hand or a scraper or spatula until it is of very easy spreading consistency but still cold; it must not become soft and oily—refrigerate if necessary. |
|
|
Place chilled dough on a lightly floured pastry marble or board. With the lightly floured palms of your hands push and pat it out into a rectangle about 14 by 8 inches. |
Spread butter as evenly as possible over the upper two thirds of the dough rectangle, leaving a ¼-inch unbuttered border all around. |
|
|
Dough is now to be folded into three layers, just as though you were folding a business letter. Fold the bottom (unbuttered) third up to the middle. |
Fold the top (buttered third down to cover it, making three even layers of dough separated by 2 layers of butter. This is called Turn Number 1. |
|
|
For Turn Number 2, lightly flour the top of the dough and your rolling surface, turn the dough so the edge of the top flap is to your right, as though it were a book you were going to open. Roll the dough into a rectangle about 14 inches by 6 inches. Roll rapidly, starting an inch from the near end and going to within an inch of the far end. |
Fold again in three. You now have 7 layers of dough separated by 6 layers of butter; at the end of the fourth roll there will be 55 layers of dough.
Sprinkle dough lightly with flour, wrap in waxed paper or plastic, place in a plastic bag and refrigerate. Dough must now rest for 1 to 1½ hours to deactivate the gluten so that you can make the two final rolls without difficulty.
4) Turns 3 and 4—after a rest of 1½ to 2 hours in the refrigerator
Unwrap dough, sprinkle lightly with flour, and deflate by tapping lightly several times with rolling pin. Cover and let rest for 8 to 10 minutes, again to relax gluten. Being sure that the top and bottom of dough are always lightly floured, start rolling dough into a rectangle 14 by 6 inches. If you notice that butter has congealed into hard flakes, beat dough with light firm taps for a minute or so, going from one side to the other until butter has softened: it must be able to extend the length and width of the rectangle inside the dough as you roll it out. Fold rectangle in three, roll again into a rectangle, and fold in three to complete the final turn. Wrap and chill for 2 hours before forming dough into croissants, or leave overnight covered with a board and a 5-lb. weight.
5) Forming croissants—after dough has rested 2 hours in refrigerator
The dough is now ready to be rolled out into the usual rectangle and then cut into triangles that are rolled up and twisted into crescent shapes. Professionals use either the ingenious triangle-cutting roller illustrated, or do all the cutting by hand. To make everything as easy as possible for yourself, refrigerate all pieces of dough you are not actually working on.
PRELIMINARIES
A large sheet of plastic
A large, lightly buttered baking sheet (14 by 16 inches at least)
Unwrap chilled dough, place on a lightly floured surface, and deflate by tapping several times gently with rolling pin. Cover with plastic and let rest 10 minutes, to relax gluten.
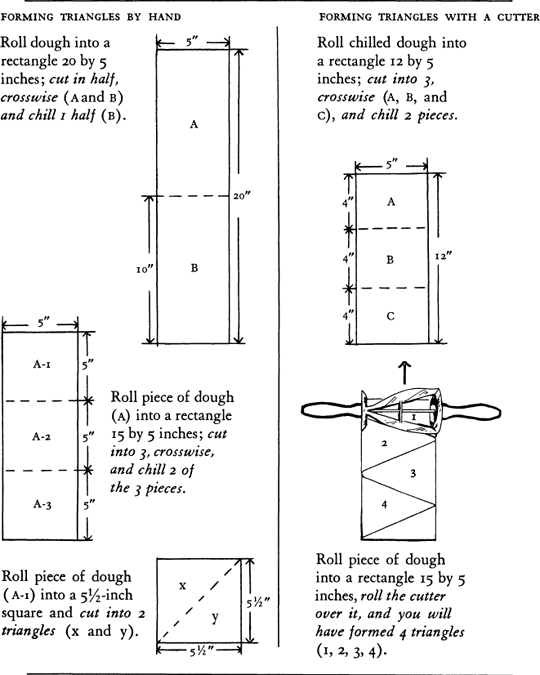
TURNING TRIANGLES INTO CRESCENTS OR CROISSANTS Holding one of the triangles of dough by its large end, roll it out toward the point to make the triangle about 7 inches long. |
|
|
Then, to extend the large end slightly, stretch the 2 top angles of the triangle lightly between your thumbs and forefingers, enlarging end about an inch in all. |
Start rolling up the croissant first by folding the large end forward onto itself. Then, holding the point with the fingers of your left hand, finish the roll under the fingers and palm of your right hand. |
|
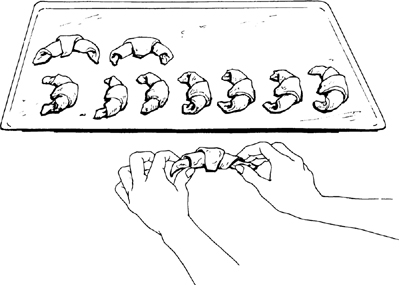
Bend the 2 ends down to form a crescent shape and place on a lightly buttered baking sheet, with point resting inside curve and against surface of baking sheet. Form the rest of the triangles into croissants in the same manner.
(*) DELAYED ACTION: Formed croissants may be wrapped airtight and frozen for a week, if dough was not frozen before.
Cover croissants loosely with a large sheet of plastic and set at a temperature of around 75 degrees for their final pre-baking rise. Dough should almost triple in size and feel light and springy when touched; if it does not rise and feel light, the baked croissants will be heavy and hard rather than tender, puffy, and light. In hot weather you may have to set dough in refrigerator from time to time to prevent butter from softening and oozing out.
(*) DELAYED ACTION: For a slower rise, set dough in a colder place or refrigerate; if thoroughly chilled, leave at room temperature 20 to 30 minutes before baking. Risen croissants may be frozen for a few days and baked in their frozen state.
7) Glazing, baking, and storing—oven preheated to 475 degrees
A pastry brush
1 egg beaten with 1 tsp water in a small bowl
A cake rack
Just before baking, paint the croissants with egg glaze, then set in middle level of preheated oven for 12 to 15 minutes, until croissants are nicely puffed and brown. Cool on a rack for 10 to 15 minutes before serving.
Croissants are at their best when freshly baked; even refrigerated in an airtight container, they are never as good the next day. Freezing is the best preservation: wrap airtight when croissants are thoroughly cool and freeze. To thaw and serve, set frozen croissants on a lightly buttered baking sheet and place in a preheated 400-degree oven for 5 minutes.
PASTRY DOUGHS
Pastry doughs, both tart and pie doughs and puff pastry, play an immensely important part in every phase of French cooking from little hot appetizers to quiches, and from pâtés en croûte to strawberry tarts, mille-feuilles, and Pithiviers. If pie dough has always been your culinary bugaboo, remember that no one is born a pastry chef, everyone has had to learn, and that the first big step is to make the decision that you are now, today, going to learn to make a decent pie crust. Then make pie dough every day or two for a week or more; serve everything you can think of in pastry. You will be surprised how quickly you develop the technique, and you will then be in the masterful position of having an endless number of delicious concoctions at your fingertips. All the recipes here are for at least 1 pound of flour. Our feeling is that if you are going to make dough at all you might as well make a lot, because it keeps beautifully in the freezer.