VARIATIONS
[Grated Zucchini Simmered in Cream]
After sautéing the zucchini, Step 1 in the preceding Master Recipe, pour in about 1 cup of crème fraîche or heavy cream; simmer the zucchini for several minutes until cream has been absorbed and thickened. Reheat just before serving, and fold in a tablespoon or so of soft butter.
[Grated Zucchini Sautéed in Olive Oil with Garlic]
Rather than sautéing the grated zucchini in butter, use olive oil for Step 1 in the Master Recipe. Retain the shallots or scallions if you wish, and add to them 1 or 2 cloves of mashed or finely minced garlic.
[Sauté of Grated Zucchini and Chopped Spinach]
The addition of spinach gives more character to a zucchini dish or zucchini gives more tenderness to a spinach dish, whichever way you want to look at it. Substitute this attractive combination for plain zucchini in any of the preceding or following variations. We have suggested olive oil and garlic here, but you may prefer the butter and shallots of the Master Recipe. We have also directed that the spinach receive a brief preliminary blanching in boiling water; however, this may be dispensed with if your spinach is young, tender, and fresh from the garden.
For 6 to 8 servings

2 to 2½ lbs. zucchini
About 2 lbs. fresh spinach
A large kettle of boiling salted water
A colander
Following the directions, trim, wash, grate, salt, squeeze, and dry the zucchini. While it is draining with salt, trim and wash the spinach; drop it into the rapidly boiling water and boil for a minute or two, just until limp. Drain, refresh in cold water, squeeze dry, and chop.
2 to 3 Tb olive oil
1 or 2 large cloves of mashed garlic
Salt and pepper
2 to 3 Tb soft butter
When zucchini has been squeezed and dried, sauté, tossing and turning frequently, in the hot oil with the garlic. When almost tender, stir in the chopped spinach. About 10 minutes before serving, reheat, tossing and stirring, then cover pan and let cook several minutes over low heat, until spinach is as tender as you wish it to be. Season carefully to taste. Remove from heat and fold in the butter, a tablespoon at a time. Turn into a hot dish and serve immediately.
[Gratin of Zucchini, Rice, and Onions with Cheese]
The tian is, or was in the old days, a shallow, rectangular, earthenware Provençal baking dish. Anything cooked in it becomes a tian, just as something like chicken cooked in a casserole becomes a casserole of chicken. The tian, as a name, has been in vogue lately, but its shape and contents can vary considerably. Zucchini and rice are typical, as are additions of Swiss chard and spinach; thus you could use the preceding combination of zucchini and spinach, if you wish, rather than zucchini alone as suggested here. Serve with roasts, steaks, chops, calf’s liver, broiled fish or chicken, or as a first course.
For 6 people
2 to 2½ lbs. zucchini
½ cup plain, raw, untreated white rice
1 cup minced onions
3 to 4 Tb olive oil
2 large cloves garlic, mashed or finely minced
2 Tb flour
About 2½ cups hot liquid: zucchini juices plus milk, heated in a pan
About ⅔ cup grated Parmesan cheese (save 2 Tb for later)
Salt and pepper
A heavily buttered 6- to 8-cup, flameproof baking and serving dish about 1½ inches deep
2 Tb olive oil
Following the directions, trim, wash, grate, salt, squeeze, and dry the zucchini. While it is draining (reserve the juices,) drop the rice into boiling salted water, bring rapidly back to the boil, and boil exactly 5 minutes; drain and set aside. In a large (11-inch) frying pan, cook the onions slowly in the oil for 8 to 10 minutes until tender and translucent. Raise heat slightly and stir several minutes until very lightly browned. Then stir in the grated and dried zucchini and the garlic. Toss and turn for 5 to 6 minutes until zucchini is almost tender. Sprinkle in the flour, stir over moderate heat for 2 minutes, and remove from heat. Gradually stir in the hot liquid, being sure the flour is well blended and smooth. Return over moderately high heat and bring to the simmer, stirring. Remove from heat again, stir in the blanched rice and all but 2 tablespoons of the cheese. Taste very carefully for seasoning. Turn into buttered baking dish, strew remaining cheese on top, and dribble the olive oil over the cheese. (Preheat oven in time for baking.)
(*) AHEAD-OF-TIME NOTE: May be prepared several hours or a day in advance of final cooking.
About half an hour before serving, bring to simmer on top of stove, then set in upper third of a preheated 425-degree oven until tian is bubbling and top has browned nicely. The rice should absorb all the liquid.
[Molded Custard of Zucchini, Onions, and Cheese]
Here is a delightful concoction that is elegant to serve either as a first course, a luncheon dish, or to accompany roast or broiled chicken, a saddle of lamb, or veal or lamb chops. It is a mixture of grated and sautéed zucchini, cooked onions, cheese, cream, and eggs that is unmolded after baking, and then sprinkled with buttered bread crumbs and parsley. One of its most attractive qualities, besides its flavor, is the rather moist texture given it by the cheese, reminiscent of the soft center in a fine soufflé.
EGG PROPORTIONS FOR UNMOLDED CUSTARDS: For a custard of this type, count on 2 “large” eggs for every cup of other ingredients; one quart of ingredients, then, calls for 8 (1½ to 1⅔ cups) “large” eggs and a 6-cup baking dish.
For 6 people
1) The zucchini mixture
About 2 lbs. zucchini
2 cups minced onions
3 Tb butter
1 Tb olive oil or cooking oil
Salt and pepper
A 1-quart measure
A rubber spatula
Following the directions, trim, wash, grate, salt, squeeze, and dry the zucchini; you should have 2 to 2⅓ cups approximately. While zucchini is draining, cook the onions slowly for 12 to 15 minutes or longer, with the butter and oil, in a large (11-inch) frying pan until onions are very tender, translucent, and just beginning to brown. Raise heat, stir in the zucchini; toss and turn for 5 to 6 minutes. Cover pan and cook zucchini several minutes longer over low heat, until tender. Season to taste and scrape into quart measure.
2) The custard mixture—for about 5½ cups
4 ounces (1 cup lightly pressed) mixed grated Parmesan and Swiss cheese
1 cup all-purpose cream, more if needed
A 2½- to 3-quart mixing bowl and a wire whip
8 “large” eggs (1½ to 1⅔ cups)
Salt and pepper to taste
A heavily buttered 6-cup cylindrically shaped baking dish about 3½ inches deep (such as a charlotte), bottom lined with buttered waxed paper
Add the cheese to the vegetables in the quart measure, and pour in enough cream, stirring, to reach the 4-cup mark. Turn the mixture into the bowl, scraping measure clean. Break eggs into measure, being sure you have at least 1½ cups; beat to blend yolks and whites, and fold into the zucchini mixture. Taste carefully for seasoning, and turn into baking dish.
(*) AHEAD-OF-TIME NOTE: May be completed in advance to this point; cover and refrigerate. Stir up gently before proceeding. Chilled custard will probably take 10 to 15 minutes longer to bake than unchilled custard.
3) Baking—allow 1 hour; preheat oven to 375 degrees
A pan about 3 inches deep and large enough to hold baking dish easily
Boiling water
When you are ready to bake the custard, set baking dish in pan; pour in enough boiling water to come about ⅔ the way up outside of dish. Place in lower-middle level of preheated oven. To assure yourself of a smooth, bubble-free custard, regulate oven heat so that water in pan never quite simmers throughout the cooking; lower thermostat to 350 degrees in 15 minutes, and you will probably lower it to 325 or 300 degrees near end of baking. Custard should be done in 35 to 40 minutes: the top center will look set rather than loosely liquid when you gently shake the pan. A knife or skewer plunged down through middle of custard will emerge almost clean, looking slightly oily with perhaps a tiny curd of custard clinging here and there. Remove baking dish from pan and let custard settle for 20 minutes before unmolding it.
4) Serving
3 to 4 Tb clarified butter (melted butter, skimmed; clear liquid butter spooned off milky residue)
A small (7- to 8-inch) frying pan
½ cup dry, not-too-fine crumbs from non-sweetened homemade-type white bread
3 to 4 Tb minced fresh parsley
Salt and pepper to taste
While custard is baking or cooling, or at any other convenient time, prepare bread-crumb and parsley garnish as follows: Heat clarified butter in pan, and when bubbling stir in bread crumbs. Sauté for several minutes over moderately high heat, stirring continuously until crumbs are lightly browned. Remove from heat, and when cool, stir in the parsley and seasonings.
A hot, lightly buttered serving plate
After custard has settled 20 minutes, run a thin knife around edge of custard. Turn serving plate upside down over baking dish, reverse the two and unmold custard onto plate. Sprinkle with the parsley and crumbs, and serve as soon as possible.
(*) AHEAD-OF-TIME NOTE: If you are not ready to serve, do not unmold custard, but leave it in its dish in the pan of hot water and in the turned-off oven. It will stay warm for a good half hour or longer, and may then be unmolded immediately.
Stuffed zucchini can well be a first course, especially when the stuffing is rice or vegetables. The best sizes for stuffing are 6 to 8 inches, and one zucchini half is usually sufficient for a first course or as a vegetable garnish to go with the meat course. Serve 2 or even 3 halves per person when the zucchini is the main course.
 COURGETTES FARCIES AUX AMANDES
[Zucchini Stuffed with Almonds and Cheese]
This is a particularly attractive stuffing, not only because almonds are unusual, but also because the flavor of the zucchini survives the stuffing. Serve as a separate course, or with veal chops or scallops, or roast, broiled, or sautéed chicken.
For 6 servings
1) Preparing the zucchini for stuffing
3 zucchini all of a size, about 8 by 2 inches
A large kettle of boiling, salted water
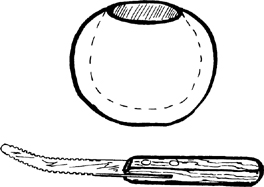
A grapefruit knife
Salt
Paper towels
Trim and scrub the zucchini; blanch about 10 minutes in boiling salted water, just until flesh yields to pressure, as directed. Cut in half lengthwise. Using grapefruit knife, hollow out the cores of each zucchini half, to make boat-shaped cases with the sides and bottom about ⅜ inch thick. Salt lightly and drain hollow side down on towels. Chop the removed zucchini flesh, squeeze out vegetable water in paper towels, and reserve flesh for stuffing.
2) The almond, cheese, and bread-crumb stuffing—for about 2 cups
¼ cup finely minced onions
1½ Tb olive oil or cooking oil
A 6- to 8-inch pan
The chopped zucchini flesh
A 2-quart mixing bowl
2½ ounces (½ cup loosely packed) ground blanched almonds (grind them in an electric blender)
½ cup heavy cream
½ to ⅔ cup dry, fairly fine crumbs from nonsweetened homemade-type white bread
2 ounces (½ cup lightly pressed down) grated Swiss cheese (save 3 Tb for later)
1 “large” egg
Salt and pepper to taste
2 to 3 big pinches powdered clove
Stir the onions into the oil, cover pan, and cook over low heat, stirring occasionally, for 8 to 10 minutes, or until onions are tender and translucent. Uncover, raise heat and let them just begin to brown, then stir in the chopped zucchini flesh and sauté for several minutes, until zucchini is tender. Scrape into bowl, and stir in the almonds and cream. Stir in ⅓ cup of the bread crumbs, blending thoroughly, then all but 3 tablespoons of the cheese, and finally the egg. Mixture should hold its shape softly when lifted in a spoon; if too soft, beat in more crumbs by small spoonfuls, mixing thoroughly. Blend in salt and pepper to taste, and the powdered clove.
3) Stuffing and baking the zucchini—25 to 30 minutes at 400 degrees
A heavily buttered rectangular or oval baking and serving dish just large enough to hold the 6 zucchini halves in 1 layer
3 Tb each of the remaining bread crumbs and cheese, mixed in a small bowl
3 Tb melted butter
Arrange the zucchini halves skin side down in the baking dish and fill with the stuffing, heaping it into a dome on each half. Sprinkle each with the cheese and bread crumbs, and dribble on the melted butter.
(*) AHEAD-OF-TIME NOTE: May be prepared to this point a day in advance of baking; cover and refrigerate.
Bake in upper third of preheated oven for 25 to 30 minutes, until bubbling hot and browned on top. (Do not overcook, letting zucchini shells become too soft for serving.) Serve from baking dish, or arrange around meat platter.
(*) AHEAD-OF-TIME NOTE: May be kept warm, but again, do not let zucchini shells soften.
VARIATIONS
[Zucchini Stuffed with Rice and Peppers]
Another stuffing for zucchini, this one is equally good cold or hot. Prepare, stuff, and bake the zucchini exactly as described in the preceding recipe, but make the stuffing as follows.
Rice and pepper stuffing with tomato topping—2 cups for six 8- by 2-inch zucchini halves
½ cup diced onions
4 Tb olive oil (save 2 Tb for later)
½ cup diced green peppers
1 large clove mashed garlic
The chopped zucchini cores
⅓ cup plain, raw, white, untreated, long-grain rice
1 egg
⅓ cup grated Parmesan cheese (save 3 Tb for later)
3 Tb fresh minced parsley
Salt and pepper
3 medium-sized tomatoes, peeled, seeded, juiced, and chopped
Stir the onions into the oil in a medium-sized (10-inch) frying pan, cover and cook over low heat, stirring occasionally, for 8 to 10 minutes until tender. Uncover, raise heat and brown very lightly, stirring, then add the green peppers, garlic, and zucchini cores. Cover and cook slowly for several minutes more until peppers are tender. Turn into mixing bowl. Meanwhile, in a pan of boiling salted water, boil the rice for exactly 10 minutes, drain, and add to mixing bowl. Beat in the egg, then the cheese and parsley. Season carefully with salt and pepper. Mound the stuffing in the blanched and hollowed-out zucchini halves. Season tomato pulp with salt and pepper, spread over the stuffing, cover with the remaining cheese, and sprinkle on the remaining olive oil. Bake for 25 to 30 minutes in upper third of preheated 425-degree oven until bubbling hot and cheese topping has browned lightly.
You may stuff zucchini, following the general method outlined in the Master Recipe, with all kinds of mixtures, including other vegetables, leftover meat combinations, sausage mixtures, and so forth. See the complete list of possibilities.
Oignons Farcis—Choux Farcis
[Onions Stuffed with Rice, Cheese, and Herbs]
Onions hollowed out and stuffed with rice and chopped, cooked onion cores need only a little cheese, cream, and a pinch of herbs to point up their flavor. Served hot, they add great distinction to a platter of broiled chicken or fish, and are always attractive with roasts, steaks, and chops. Serve them cold with cold meats or fish, or as part of an hors d’oeuvre display. The following recipe is for giant onions, but smaller ones are done the same way: whatever their size, you hollow them out raw, blanch them until barely tender, then stuff and bake them. If you do not blanch them first, they will take hours to cook and might well burst out of shape in the process. (See the list of other stuffing possibilities.)
For 6 large onions
1) Coring and blanching the onions
6 very large, firm, fresh, perfect onions at least 3½ inches in diameter if possible, yellow or white
A small, sharp knife and a grapefruit knife
A large kettle of boiling salted water
A slotted spoon and a colander

One at a time, shave off pointed end and root end of onions and peel off skin along with one outside layer of flesh. The whole onions are now to be hollowed out to form onion cups.
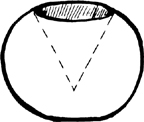
With sharp knife, cut cone-shaped core out of the top side of the onion. (Reserve all onion flesh for Step 2.) |
|
|
Being careful not to make sides and bottom too thin (they should be almost ½ inch thick, or about 4 layers for onions this size), use grapefruit knife to dig circular sections out of body of onion to make a cup shape. |
Drop the onion cups into the boiling water. When it comes back to the boil, boil slowly, uncovered, for 10 to 15 minutes until onions are just tender when pierced but still very definitely hold their shape. Remove carefully and drain upside down in a colander. (Reserve boiling water for next step.)
2) The rice, onion, and cheese stuffing
The onion cores
3 to 4 Tb butter
A large frying pan with cover
A 3-quart mixing bowl
While onion cups are blanching, mince all usable onion leftovers. Cook slowly in butter in covered pan 8 to 10 minutes, stirring occasionally, until tender and translucent; uncover pan, raise heat, and brown very lightly, stirring. Measure 1 cup into mixing bowl. (Remainder, if any, may be refrigerated or frozen.)
⅓ cup plain, raw, white untreated rice
The boiling onion-cooking water
After onion cups have been blanched and removed, stir rice into boiling water and boil slowly for 10 to 12 minutes, until rice is almost but not quite tender. Drain thoroughly, and add to mixing bowl.
⅓ cup grated Parmesan cheese
¼ cup crème fraîche or heavy cream
½ cup dry, not-too-fine crumbs from nonsweetened homemade-type white bread (for now and for Step 3)
¼ cup minced parsley
2 Tb fresh minced basil or 1 tsp fresh minced tarragon (or ¼ to ½ Tb fragrant dried basil, oregano, sage, or tarragon)
Salt and pepper to taste
Stir the cheese and cream into the rice and onions, then 2 tablespoons of the bread crumbs. If mixture does not hold its shape softly, blend in a spoonful or so more crumbs to thicken and bind it. Stir in the herbs and seasonings.
3) Stuffing and baking the onions—1 to 1¼ hours at 375 degrees
3 to 4 Tb melted butter
A heavily buttered flame-proof baking dish just large enough to hold onions easily, such as a 12-inch casserole 3 inches deep
½ cup dry white wine or dry white French vermouth
½ to 1 cup beef stock or bouillon
The bread crumbs
A bulb baster
Preheat oven to 375. Butter or oil the outside of the onion cups and arrange in the baking dish. Sprinkle interiors lightly with salt and pepper, and fill with the stuffing, heaping it into a half-inch dome. Sprinkle with a teaspoon of bread crumbs and of melted butter. Pour the wine around the onions, and enough stock or bouillon to come ⅓ the way up the onions. Bring to simmer on top of stove, then set in lower middle of preheated oven.
Bake uncovered for 1 to 1¼ hours, regulating oven so that liquid remains at the slow simmer, and basting outside of onions several times with liquid in dish. Onions are done when a knife pierces them easily, but they should not overcook and lose their shape. Outside layer will toughen slightly, but insides will be tender. Top of stuffing should brown attractively, but if it is browning too much, cover loosely with foil or brown paper. Serve from baking dish, or arrange around the meat or vegetable platter. Add any onion juices to whatever sauce you are making.
(*) AHEAD-OF-TIME NOTE: May be baked in advance and kept warm or reheated.
CHOU FARCI[Stuffed Whole Cabbage]
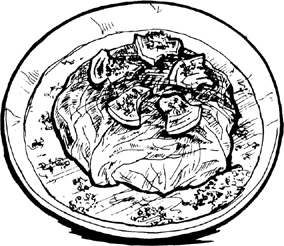
Stuffed cabbage is the kind of dish that guests and family always seem to love because it has the hearty, earthy look and the rich, satisfying aroma that promise good eating. To stuff a whole cabbage you first make a delicious mixture using something like the fresh sausage and ham suggested here, or leftover meat as in the variation following it. You then pull off the cabbage leaves, boiling them until pliable, and re-form the cabbage into approximately its original shape with your delicious mixture spread between layers of leaves. Finally you braise, sauce, and serve it up, and it looks just like a beautiful, decorated, whole cabbage sitting on the serving platter. You must, of course, have some method for holding the cabbage leaves in the shape of the whole while braising. If you have struggled to mold cabbage with string, towels, cheesecloth, or even the net shopping bag that is occasionally used in Provence, we think you will welcome the ease of the following bowl-molding method. Parslied boiled potatoes, French bread, and rosé wine would go well with the cabbage.
NOTE: Braised stuffed cabbage is equally good cold, and could well be baked specially for a cold lunch or a picnic. If so, drain and unmold it as soon as it is done, so there will be no bits of congealed fat on the leaves.
For 8 to 10 people
1) Fresh sausage, rice, and ham stuffing—about 6 cups
2 cups (1 lb.) fresh sausage meat, preferably homemade
A medium sized (10-inch) frying pan
A 5- to 6-quart mixing bowl and large wooden spoon
1½ cups diced mild-cured ham (such as a store-bought ready-to-cook ham slice)
2 cups minced onions
2 cups boiled rice (⅔ cup raw rice, boiled)
½ tsp sage
½ tsp caraway seeds
¼ cup minced fresh parsley
2 cloves mashed garlic
1 egg
Salt and pepper
(Start the water boiling for Step 2.) Break up the sausage meat and sauté over moderate heat for 5 to 6 minutes, just until it is beginning to brown lightly. Remove to mixing bowl, leaving fat in pan. Brown the ham lightly in the fat; remove it to the bowl, again leaving fat in pan. Finally stir in the onions and cook slowly for 8 to 10 minutes, until tender and beginning to brown very lightly. Scrape them into the bowl and beat in all the rest of the ingredients. Taste carefully for seasoning, adding more salt and herbs if you feel them necessary. (Chopped, blanched leaves from the heart of the cabbage will be stirred in later.)
2) Preparing the cabbage for stuffing
A firm, fresh, crisp 2¼- to 2½-lb. cabbage (about 8 inches in diameter), either the crinkle-leafed Savoy or the smooth-leafed Danish or domestic
A large kettle of boiling salted water
A large tray covered with a towel
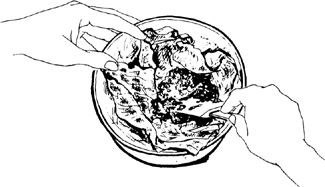
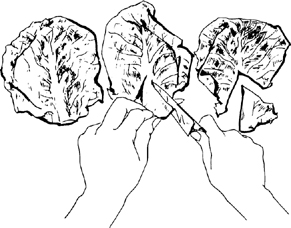
With a small, stout knife, make a bias cut all around the stem of the cabbage, going 2 to 2½ inches deep, and remove the tough core. Discard any outside leaves that seem tough or wilted. If you have the crinkle-leafed Savoy cabbage, you usually need not blanch it to remove the leaves. Peel them off carefully so as not to tear them, until you come to the heart, where leaves are small and bend inward. Drop as many cabbage leaves as will easily fit into the boiling water and boil, uncovered, for 3 to 4 minutes, until leaves are pliable enough to bend without breaking. (This is called blanching.) Drain on towel and continue with the rest of the leaves and the heart, boiling it 5 minutes.
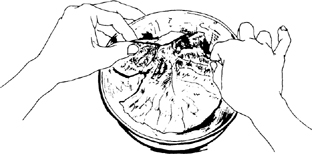
If you have a smooth-leafed cabbage (or an unpeelable Savoy), drop the whole cabbage core side down into the boiling water. In 5 minutes, start loosening leaves carefully, nudging them off the cabbage with 2 long spoons as they free themselves from the core. Remove these leaves to the tray. Continue loosening and removing leaves to tray until you come to the heart, where leaves bend inward. Leave heart to boil for 5 minutes, and add as many of the removed leaves as will easily fit, boiling them 3 to 4 minutes or until they are just pliable. Continue with the rest of the leaves. (Do not discard boiling water yet.) Chop the heart of the cabbage, salt and pepper lightly, and stir into the already prepared stuffing from Step 1.
3) Other miscellaneous preliminaries
10 to 12 slices of lean salt pork or bacon approximately 4 by 1½ inches and ⅜ inch thick
The boiling cabbage water
1 medium onion, sliced
1 medium carrot, sliced
2 Tb rendered goose or pork fat, or cooking oil
The frying pan
Drop the slices of salt pork or bacon into the boiling water and boil slowly for 10 minutes. Drain, rinse in cold water, and set aside on paper toweling. Meanwhile, cook the vegetables in the fat or oil until tender and just beginning to brown, then remove to a side dish. (Note that there is also a sauce base in Step 6, which you may prepare now if you wish.)
4) Stuffing the cabbage
A lightly buttered 2½- to 3-quart stainless-steel bowl, flame-proof mold, baking dish, or charlotte mold 3½ to 4 inches deep (with a cover)
Salt and pepper
3 to 4 cups excellent brown stock or bouillon
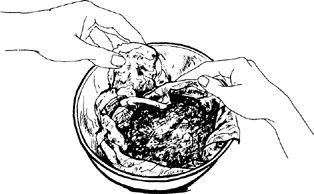
Lay several strips of the blanched pork or bacon in the bottom of the stainless steel bowl or flameproof mold and cover with the lightly browned carrot and onion slices.
Starting with the largest and greenest of the blanched cabbage leaves, lay them curved side down and stem end up in the mold, to cover bottom and sides. Sprinkle lightly with salt and pepper. |
|
|
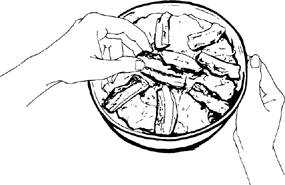
Spread a layer of stuffing over the lower third of the leaves. Cover the stuffing with cabbage leaves. Salt and pepper them lightly, and spread on more stuffing. |
As you build up layers, slip leaves down side of mold to be sure sides are well covered. |
|
|
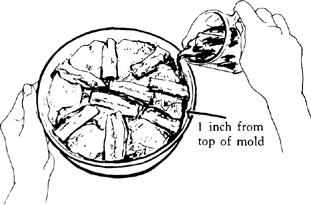
When you have used all the stuffing, and mold is filled to within ½ inch of top, cover filling with a final layer of leaves and arrange the rest of the blanched salt pork or bacon on top. |
Pour enough stock or bouillon between outside leaves and side of mold to come about an inch from the top. (*) AHEAD-OF-TIME NOTE: May be prepared in advance to this point and cooked the next day. Cover with plastic wrap and refrigerate. Add 20 to 30 minutes more to cooking time if cabbage has been chilled. |
|
5) Braising—2½ to 3 hours at 400 degrees and 350 degrees
Waxed paper
The cover for the mold
A pan to hold the mold and to catch drippings
A bulb baster
Additional stock or bouillon if needed
Optional: a meat thermometer
Preheat oven to 400 degrees. Bring filled mold slowly to the full simmer on top of the stove. Lay the waxed paper over the cabbage and cover the mold. Set in pan and place in lower middle of preheated, 400-degree oven. In 20 to 30 minutes, when liquid in mold is slowly and steadily simmering, turn thermostat down to 350 degrees and regulate oven heat so that liquid is always very slowly simmering throughout the 2½ to 3 hours of cooking. Baste occasionally with the cooking liquid, and add a little more stock if liquid evaporates below the halfway mark. (2½ to 3 hours are needed for heat to penetrate into center of cabbage, where a meat thermometer should read 165 to 170 degrees.)
(*) AHEAD-OF-TIME NOTES are at end of Step 4.
6) Sauce and serving
½ cup finely minced onions
1 Tb rendered goose or pork fat, or cooking oil
A heavy-bottomed, 2-quart, enameled or stainless saucepan with cover
1 clove mashed garlic
1 lb. (3 to 4 medium) tomatoes peeled, seeded, juiced, and chopped (1½ cups pulp); or part fresh tomatoes and part sieved, canned Italian-type plum tomatoes
½ tsp sage
Salt and pepper to taste
While cabbage is braising, or at any other convenient time, make the sauce base as follows: Stir the onions into the fat, cover pan, and cook over low heat, stirring occasionally, for 8 to 10 minutes or until onions are tender and translucent but not browned. Add the garlic, tomatoes, and sage; cover and simmer 10 minutes. Uncover, season to taste, and set aside.
If needed: ½ Tb cornstarch blended with 1 Tb tomato juice or bouillon
A frying pan
A hot serving dish
3 Tb minced fresh parsley
When cabbage is done, keep cover on mold and drain cooking liquid into the tomato sauce base; let simmer while you are finishing the cabbage. Sauce should thicken lightly. If it does not, remove from heat, blend in cornstarch, and simmer 2 minutes more. Carefully correct seasoning.
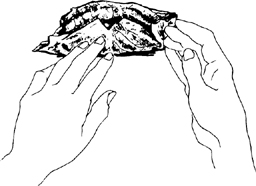
Remove pork or bacon pieces from top of cabbage and set aside. Drain cabbage again, then turn serving dish upside down over mold and reverse the two, unmolding cabbage onto the dish. Remove vegetables and pork from top of cabbage. Pat pork or bacon strips dry on paper towels, and brown very lightly in frying pan; arrange them decoratively over the cabbage. Spoon the sauce around the cabbage, decorate with the parsley, and serve as soon as possible.
(*) AHEAD-OF-TIME NOTES: Sauce may be finished and pork or bacon sautéed well in advance of serving, then reheated. Keep cabbage warm, loosely covered, and unmold at last minute. (Omit sautéing the pork strips at bottom of mold.) However, if you leave the cabbage too long, or cool and reheat it, you risk losing its freshly cooked quality.
VARIATIONS
[Stuffed Cabbage Leaves for Individual Servings]
When you wish a less elaborate presentation, a little quicker cooking, have fewer people to serve, or want an attractive way to use a bit of leftover meat, you may make as many or as few servings as you wish by wrapping a stuffing in individual cabbage leaves. Usually served hot, these are also delicious cold on a bed of lettuce or watercress, and garnished with sliced tomatoes and cucumbers in a vinaigrette sauce.
For 12 stuffed cabbage leaves, serving 4 to 6
12 large blanched cabbage leaves 7 to 8 inches long (Step 2 in preceding Master Recipe)
One at a time, lay blanched cabbage leaves curved side down on cutting board and cut a wedge about 2 inches long out of the tough bottom stem.
About 2 cups of stuffing (that in the preceding recipe, the one at the end of this section, or one from the list)
Place a loaf-shaped mound of stuffing on lower third of leaf just above wedge cut.
|
Start rolling leaf toward tip. At the halfway mark, fold each side over stuffing to enclose it. |
Finish rolling up the leaf, and complete the rest of the leaves in the same manner. |
|
1 each: medium-sized carrot and onion sliced and lightly browned (Step 3 in preceding recipe)
A lighdy buttered 2-quart flameproof baking and serving dish 2 inches deep (such as a 9- by 12-inch oval)
Optional: the rest of the cabbage leaves, blanched and roughly chopped
Salt, pepper, and ¼ tsp ground sage, rosemary, or thyme
12 slices of lean salt pork or bacon, 4 by 1½ inches, ⅜ inch thick, and blanched (Step 3 in preceding recipe)
About 2 cups of excellent brown stock or bouillon
Aluminum foil
A bulb baster
The tomato-sauce base, Step 6 in preceding Master Recipe
Strew the sliced cooked carrots and onions in the bottom of the baking dish and spread the optional blanched and chopped cabbage over it. Season with salt, pepper, and rosemary or thyme. Lay the stuffed cabbage leaves on top, seam-side down and close together. Salt and pepper them lightly, cover each with a strip of blanched salt pork or bacon, and pour around them enough stock or bouillon almost to cover. Enclose top of dish tightly with aluminum foil.
(*) AHEAD-OF-TIME NOTE: May be completed in advance to this point. Refrigerate, and bake the next day if you wish.
Bake for 1 to 1¼ hours in a preheated 350-degree oven, basting occasionally with the liquid in the dish. Drain cooking liquid into the tomato sauce base and boil down rapidly to thicken. Carefully correct seasoning and pour back over the cabbage rolls. Brown the pork or bacon strips lightly in a frying pan and arrange over the cabbage, sprinkle with parsley, and serve.
[Ball-shaped Stuffed Cabbage Leaves]
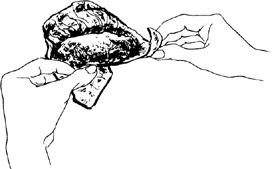
Rather than sausage shapes, you may form the leaves into round shapes resembling individual cabbages. To do so, blanch the leaves as directed and cut a wedge out of bottom of stem. Place leaf curved side down on the corner of a towel. Heap 2 to 3 tablespoons of stuffing in the center, fold rest of leaf over stuffing, then twist into a ball in the towel to force a round shape. Arrange balls smooth side up and close together in a dish, and bake as in preceding recipe, but 1 hour of cooking should be sufficient.
ANOTHER STUFFING
For about 6 cups
1½ cups minced onions
3 Tb rendered goose or pork fat, or cooking oil
½ cup dry crumbs from nonsweetened, homemade-type white bread
⅔ cup light cream
3 cups ground cooked lean beef, preferably braised, but any type of cooked beef will do
1½ cups ground cooked lean ham (mild-cured boiled or baked ham, or ready-to-cook ham slice)
½ cup grated Parmesan cheese
2 to 3 cloves mashed garlic
¾ tsp ground rosemary or thyme
2 eggs
½ cup minced fresh parsley
Salt and pepper to taste
Cook the onions in fat or oil in a covered saucepan over low heat for 8 to 10 minutes until tender; raise heat and cook a few minutes more until lightly browned. Meanwhile blend the bread crumbs and cream in a small bowl and let stand while assembling rest of ingredients. Finally beat the cooked onions, crumbs, meats, cheese, garlic, herbs, eggs, and parsley vigorously together to blend. Carefully season to taste, adding more herbs if you feel them necessary.
Ounce for ounce, potatoes have fewer calories than fresh peas, lima beans, or sweet corn, yet potatoes come so near to being the complete food that one can survive healthily on a diet of potatoes only, plus a very small amount of fat, for as much as 5 months. Nutrition aside, the potato is an endlessly fascinating gastronomical object which, since its introduction by Parmentier into France during the reign of Louis XVI, has received tremendous French culinary attention. We shall not, in this short section, go into the fundamental cooking methods because they are available in any good basic cookbook. We offer instead a number of out-of-the-ordinary simmers and sautés, a deliciously fattening potato pie, two of the classics illustrated, pommes Anna and pommes duchesse, and we begin with a group of useful potato facts.
When you are buying potatoes, choose those that look clean and healthy, that are firm to the touch, smooth, dry, free from cracks, and with no suggestion of sprouting (greenish-white nubbins of growth appearing at the small depressions called the eyes). Be sure, also, that the potatoes are potato-colored, that is, uniformly brownish or reddish with no hint of green. Green means that they have been exposed to sun or light, either in the field or in storage, and green potatoes develop a bitter taste. Potatoes are sometimes waxed and sometimes colored reddish, a harmless cosmetic treatment designed to enhance their customer appeal; if so, this fact should be indicated clearly on the bin or package.
Unless you happen to have a proper root cellar where you can store potatoes in the dark at a temperature of 55 degrees and at a humidity of 85 to 90 per cent, buy only what you will use within a week or so. Potatoes kept at 60 to 70 degrees have the best cooking flavor, but they begin to sprout after a few weeks. Potatoes stored at below 40 degrees, the temperature of your refrigerator, resist sprouting and withering but gradually develop a sweet taste because the potato starches transform themselves into sugar. Thus, keep your small store of potatoes at normal room temperature in heavy brown paper sacks so they will be protected from light. Separate different types or you will run into cooking irregularities.
Potatoes are a far more complicated vegetable to grow, harvest, store, and classify than any of us who are not in the business would ever dream. New varieties are constantly being tested out that will survive in specific climates, that will resist the myriad viruses and diseases which attack potato plants, and that will more perfectly meet public tastes and the specific demands of dehydrators, chip manufacturers, and other industrial users. Potatoes of one variety can vary from one year to the next in a certain growing locality because of weather, or the same variety will be mealy in one area and not in another because of soil and climatic differences. The tradition of choosing old potatoes for baking and mashing, and new potatoes for boiling still holds true in part, but so much has happened to the potato since grandmother’s day that a list of varieties classified according to buying areas and uses would be out of date almost as soon as it appeared in print. Thus we shall go no further than specify “boiling” potatoes when we mean the type that holds its shape in cooking, and “baking” potatoes when we want a mealy, floury potato for baking or mashing. If your market does not have its potatoes clearly labeled as to baking and mashing, frying, boiling, or all-purpose, ask the head of the vegetable department to help you.
[Sliced Potatoes Simmered in Cream and Basil]
This is a top-of-the-stove recipe in which sliced potatoes are boiled briefly in water to neutralize any milk-curdling properties they may possess, then simmered until tender in a cream sauce with garlic and basil. You may set them aside and reheat again just before turning them into a vegetable dish with more basil, parsley, and butter. Serve with roast red meats, steaks, chops, or broiled chicken.
For 4 to 6 people
2 lbs. “boiling” potatoes
A large saucepan of boiling salted water
A colander
Peel the potatoes. Cut into slices about ¼ inch thick and 1¼ inches in diameter. You should have around 7 cups. Drop them into the boiling water, bring rapidly back to the boil again, and boil for 3 minutes. Drain immediately.
3 Tb butter
A heavy-bottomed 3-quart saucepan (no-stick recommended)
1½ Tb flour
A wooden spoon and a wire whip
1½ cups milk heated in a small saucepan
¾ cup heavy cream; more cream (or milk) if needed
About 1 Tb fresh minced basil; or ½ tsp fragrant dried basil (or oregano)
1 to 2 large cloves of mashed garlic
½ tsp salt
Big pinch of white pepper
A cover for the pan
Make a white roux as follows: Melt the butter in the saucepan, blend in the flour, and stir over moderate heat for 2 minutes to cook the flour without browning. Remove from heat, and when roux has stopped bubbling, vigorously blend in all of the hot milk at once with your wire whip, beating until mixture is perfectly smooth. Blend in the ¾ cup of cream, the herb, garlic, salt, and pepper. Return over moderately high heat, stirring with whip as sauce thickens very lightly and comes to the boil. Simmer 2 minutes, then fold in the potatoes. Sauce should just cover potatoes; add a little more cream or milk if necessary. Bring to simmer, correct seasoning, cover pan, and simmer very slowly for 10 to 15 minutes, until potatoes are tender. Stir up gently from bottom once or twice to be sure potatoes are not sticking; they will have absorbed half of the liquid before they are done and if sauce seems too thick you may always add a little more milk.
(*) AHEAD-OF-TIME NOTE: May be completed in advance to this point. Spoon a little milk or cream over top of potatoes and either set aside uncovered or keep warm, partially covered, in a pan of simmering water.
2 to 4 Tb soft butter
2 to 3 Tb fresh minced basil and parsley, or parsley only
A warm, lighdy buttered vegetable dish
Reheat potatoes just before serving. Carefully correct seasoning. Gently fold in the butter and ⅔ of the herbs with a rubber spatula. Turn into vegetable dish, decorate with the remaining herbs, and serve at once.
The preceding potatoes are delicious with tarragon rather than basil, a good solution for wintertime, since dried tarragon is usually far more fragrant than dried basil.
[Gratin of Sliced Potatoes and Endives]
Both endives and potatoes go beautifully with chicken or veal, and here they are combined into one dish. For each cup of sliced raw potatoes you will need 2 cups of sliced raw Belgian endives. The natural moisture in the endives provides enough liquid for the potatoes, while the butter, lemon juice, shallots, and cheese that bake along with them contribute delicious additional flavors.
For 8 people—baking time about 1¼ hours
2½ lbs. very fresh, white, firm Belgian endive with leaves tightly closed at the tips
1¼ lbs. “boiling” potatoes
2 Tb soft butter
A 3½- to 4-quart baking dish about 2½ inches deep (such as a 12-inch round one, or an 11- by 16-inch oval)
1 Tb lemon juice
½ cup melted butter
Salt and white pepper
⅔ cup coarsely grated Swiss cheese
¼ cup finely minced shallots or scallions
Buttered waxed paper
A cover for the dish
Preheat oven to 400 degrees. Trim root ends, and wash endives rapidly under cold running water. Slice cross-wise into pieces ¾ inch thick and set aside. You should have 8 cups. Wash and peel potatoes, cut into slices ¼ inch thick and about 1¼ inches in diameter. You should have 4 cups. Smear the butter in the baking dish and arrange in it half the sliced endives. Sprinkle with half the lemon juice, and 2 tablespoons of melted butter. Season lightly with salt and pepper, and spread on half the cheese. Over this arrange the 4 cups of potatoes in layers, sprinkling each with salt and pepper, a little of the butter, and the minced shallots or scallions. Spread the rest of the endives over the potatoes, seasoning them with lemon juice, salt and pepper, and all but 1 tablespoon of the remaining butter. Omit the cheese, reserving for later.
Lay the buttered waxed paper over the endives, cover the dish, and bake in middle level of 400-degree oven for 15 to 20 minutes, or until you can hear the contents bubbling. Turn oven down to 350 or even 325 degrees for the rest of the baking, regulating heat so that vegetables simmer slowly throughout the rest of the cooking, which will be 1 to 1¼ hours. When potatoes are tender if pierced with a fork, remove dish from oven, and reset thermostat to 425 degrees. Spread remaining ⅓ cup of cheese over the vegetables and dribble on the remaining butter.
(*) AHEAD-OF-TIME NOTE: Dish may be completed an hour or so in advance up to this point. Set partially uncovered in a 100- to 120-degree warming oven, or over a pan of almost simmering water. As long as potatoes are warm and have a little ventilation, they will not lose their fresh-tasting quality.
About 15 minutes before serving, set dish uncovered in upper third of preheated 425-degree oven until contents are bubbling hot and cheese topping has browned lightly.
[Sliced Potatoes Sautéed with Lemon and Garlic]
This excellent, crusty sauté of potatoes needs to be done in a large non-sticking pan where the potatoes have room to toss, turn, and crust. Serve them with eggs, sausages, pork chops, broiled chicken, steaks, or fish.
For 6 servings
2 lbs. “boiling” potatoes all of a size for even slices
A large saucepan with just enough boiling salted water to cover potatoes
Olive oil (or 3 Tb butter and 2 or more Tb olive oil or cooking oil)
A large (11-inch) frying pan (no-stick recommended especially for this recipe)
The grated peel of ½ lemon
2 large cloves of garlic, mashed
Big pinch of nutmeg
Salt and pepper
Peel the potatoes, cut into slices ¼ inch thick and 1¼ inches in diameter (or cut into ½-inch dice, if you prefer); you should have 6 to 7 cups. Drop into boiling, salted water, and boil about 5 minutes, or until barely tender. (Eat a piece to check; do not overcook.) Drain thoroughly. Film frying pan with a ⅛-inch layer of oil (or butter and oil), set over moderately high heat, and when very hot but not smoking add enough potatoes to make 1 full layer. Toss and turn frequently for several minutes, shaking and swirling the pan by its handle, until potatoes are beginning to brown lightly. Add some more potatoes, and continue to toss them in the pan until the new addition is beginning to brown. If necessary, add a little more oil and continue with more potatoes; however, about ¾ inch of potatoes will be the maximum you can handle in the pan.
When all potatoes are lightly brown, toss with the lemon peel, garlic, nutmeg, salt and pepper. Continue sautéing and tossing several minutes more until potatoes are as brown as you wish them to be.
(*) AHEAD-OF-TIME NOTE: May be kept warm at this point, pan set partially covered over 2 asbestos mats over low heat. As long as they are warm and ventilated, potatoes will retain their fresh taste for at least half an hour.
If available: 1 Tb minced fresh basil
2 to 3 Tb minced fresh parsley
2 or more Tb butter
About 1 Tb lemon juice
A hot serving plate or the meat platter
Just before you are ready to serve, reheat to sizzling and toss with the herbs and butter. Check seasoning again, and toss with lemon juice to taste. Turn out onto plate and serve immediately.
[Hashed Brown Potatoes with Tomatoes and Herbs]
Another recipe for sautéed potatoes, this time with pork bits, onions, and tomatoes, calls for the potatoes to be mashed down with a fork when soft so that they look like an omelette when turned out onto their serving plate. Arrange sausages, sautéed chicken, chops, hamburgers, or poached or fried eggs around the potatoes, and you need only a green vegetable or salad for the perfect informal meal.
1) The pork and onions
4 to 5 ounces (about ⅔ cup) bacon chunk or lean salt pork cut into ¼-inch dice
A pan with 2 quarts water
1 Tb olive oil or cooking oil
A large (11-inch) frying pan (no-stick recommended especially for this recipe)
⅔ cup minced onions
A cover for the pan
A sieve set over a small bowl
Simmer the diced bacon or pork in the water for 10 minutes, drain and dry in paper towels. Cook for several minutes with the olive oil in the frying pan until it begins to brown lightly. Stir in the onions, cover the pan, and cook over low heat, stirring occasionally, for 8 to 10 minutes until onions are tender. Raise heat and cook, stirring, to brown the onions very lightly. Scrape into sieve, pressing fat out of ingredients into bowl. Return fat to frying pan; reserve pork and onions for Step 3.
2) Sautéing the potatoes
About 2 lbs. “boiling” potatoes (7 cups, sliced)
Paper towels
More oil as needed
A mixing fork or a wooden spoon
Salt and pepper
While onions are cooking, peel the potatoes, cut into slices about ⅛ inch thick and 1¼ inches in diameter. Dry thoroughly in paper towels. Add more oil to pan if needed, to film it by 1⁄16 inch. Raise heat to moderately high, and when fat is very hot but not smoking, add the potatoes. Toss and turn frequently for several minutes, shaking and swirling the pan by its handle, until potatoes begin to brown. Lower heat slightly, cover pan, and cook for 5 to 10 minutes, tossing frequently, until potatoes are tender. Uncover, mash roughly with mixing fork or wooden spoon, and season to taste.
3) Finishing the recipe
1 lb. tomatoes, peeled, seeded, juiced, and chopped (1½ cups tomato pulp)
1 to 2 large cloves mashed garlic
¼ tsp mixed herbs such as herbes de Provence or Italian seasoning
The cooked pork bits and minced onion
A hot serving dish
Raise heat to high. Fold in the tomatoes, garlic, and herbs along with the cooked pork bits and onions. Season again to taste, and sauté uncovered for several minutes to brown. Potatoes should slide around in a mass, and you may be able to flip them over, to brown both sides.
(*) AHEAD-OF-TIME NOTE: If you are not ready to serve, set partially uncovered over low heat and 2 asbestos mats, where potatoes will keep warm without harm for half an hour at least. Reheat to sizzling just before serving.
If you have browned top and bottom of the potato mass, you may serve it like a flat cake, sliding potatoes from pan onto plate. Otherwise they will be most attractive in the form of an oval omelette: flip the two sides over the middle, and reverse the pan onto the serving plate so the potatoes land browned side up.
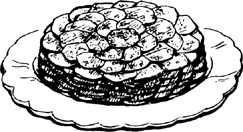
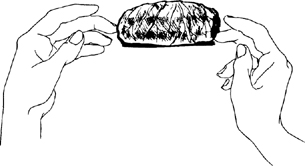
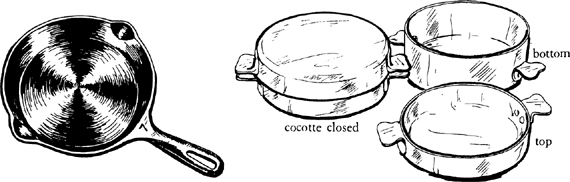
Pommes Anna looks like a brown cake 6 to 8 inches in diameter and 2 inches high, and it smells marvelously of potatoes and butter. That, in effect, is all it is: thinly sliced potatoes packed in layers in a heavy pan, bathed in clarified butter, and baked in a very hot oven so that the outside crusts enough for the potatoes to be unmolded without collapsing. The contrast of crusty exterior and tender, buttery interior is quite unlike anything else in potato cookery, and to many pommes Anna is the supreme potato recipe of all time. It was created during the era of Napoleon III and named, as were many culinary triumphs in those days, after one of the grandes cocottes of the period. Whether it was an Anna Deslions, an Anna Judic, or simply Anna Untel, she has also immortalized the special double baking dish itself, la cocotte à pommes Anna, which is still being made and which you can still buy at a fancy price. It is of heavy copper.
A thick, flameproof baking dish of some sort is actually one of the keys to pommes Anna, because it must be an excellent heat conductor. Although the copper cocotte Anna is a beautiful object, its absolutely vertical sides, 3-inch depth, and frequent tendency to sticky-bottom troubles make it less easy to use than other possibilities.
The familiar American cast-iron frying pan with its fairly vertical sides and short, straight handle is actually the best of all for pommes Anna. The potatoes are easier to unmold from this than from the French type of iron frying pan with its sloping sides and long handle. However, either will do, as will a thick, flameproof, ceramic baking dish or a thick cast-aluminum one with no-stick interior. The essential is to have a material that will get thoroughly hot all over, to brown and crust the outside of the potatoes.
Having furnished yourself with the right pan, you then want to make sure the potato slices will not stick to it, because you must be able to unmold them at the end of the cooking. Therefore, use clarified butter, dry the potatoes thoroughly before the cooking begins, and finish the cooking once you have begun it, or else the potatoes will exude moisture and stick to the pan. As you will note in the recipe, cooking begins at once, on the top of the stove as you are arranging the potatoes in the pan; this is to dry the bottom layers and start the brown crust forming. In the classic recipe you then finish the cooking in a hot oven, which usually gives a more professional result, but you may complete the cooking on top of the stove, as suggested in the cheese variation following the Master Recipe.
Pommes Anna and its variations go especially well with roast saddle of lamb, leg of lamb, roast beef, chops, sautéed chicken, plain or fancy steaks, and roast game.
POMMES ANNA[Mold of Sliced Potatoes Baked in Butter]
Your object, in arranging the sliced potatoes in their dish for this very special recipe, is not only to fill the dish but to make a reasonably neat design in the bottom and around the sides so that when the potatoes are unmolded they will present a handsome exterior. For the sides you may either arrange an edging of overlapping upright slices braced by horizontal interior layers, or build up a wall of evenly spaced horizontal slices as you fill the pan. We have suggested the latter, simpler, system here.
For about 8 cups of sliced potatoes, serving 6 people
1) Preliminaries
½ lb. (2 sticks) butter
3 lbs. “boiling” potatoes (more if needed)
Paper towels
Preheat oven to 450 degrees. Set one rack in very bottom level, and another just above it. Clarify the butter: melt it, skim off scum, and spoon the clear liquid butter off the milky residue. Peel the potatoes, trim into cylinders about 1¼ inches in diameter so that you will have uniform slices, then slice cylinders into even rounds ⅛ inch thick. You should have about 8 cups. Dry thoroughly in paper towels. (Do not wash potatoes after peeling, because you want the starch to remain in, so potatoes will mass more easily into a cake.)
2) Arranging the potatoes in the dish
A heavy cast-iron frying pan about 8 inches top diameter and 2 to 2½ inches deep, or one of the other possibilities in paragraphs preceding recipe
Salt and pepper
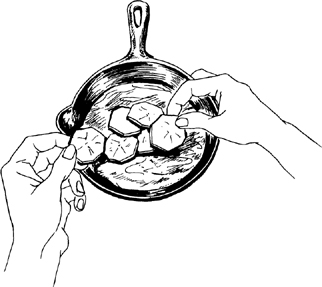
Pour ¼ inch of the clarified butter into the pan and set over moderate heat. When hot, start rapidly arranging the first layer of potatoes in the bottom of the pan as follows.
Arrange one potato slice in the center of the pan. Overlap a circle of potato slices around it. Overlapping in the opposite (counter-clockwise) direction rapidly arrange a second circle around the first and continue with another (clockwise) overlapping circle if necessary, to rim the edge of the pan. Pour on a spoonful of the clarified butter. |
|
|
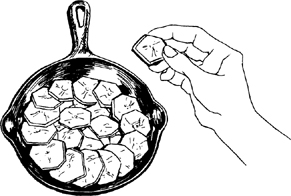
Reversing direction again, rapidly arrange an evenly overlapping layer of potatoes around circumference of pan, fill in the center with more potatoes, and baste with another spoonful of butter. Shake pan not too roughly by handle to be sure potatoes are not sticking, and sprinkle on salt and pepper. |
Continue filling the pan with layers of potatoes basted with butter and seasoned with salt and pepper, always being sure that the layer around the circumference of the pan is evenly spaced. Remember, also, to shake the pan by its handle from time to time, to be sure potatoes are not sticking. Fill the pan completely, allowing potatoes to form a ¼- to ½-inch dome in the center; they will sink during cooking. You should have added enough butter so that you can see it bubbling up the sides of the pan; excess will be poured out after cooking.
3) Baking
A heavy saucepan, 7 inches bottom diameter, or whatever will fit into the potato pan
A heavy, close-fitting cover for the potato pan
A pizza tray or roasting pan to catch drippings
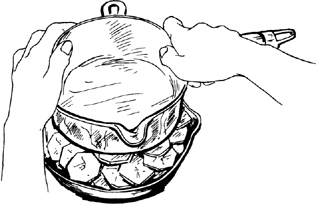
Butter bottom of saucepan and press it down hard on the potatoes, forcing the layers together. Butter underside of cover, place it on the potato pan set on upper of the two oven racks. Set drip pan under the potatoes, on rack below, to catch bubblings-up of butter (which could otherwise set fire to your oven).
Bake for 20 minutes. Uncover, press potatoes down hard again with bottom of saucepan, and continue baking 20 to 25 minutes more, uncovered. (If baked all the time with cover on, potatoes tend to pick up an off taste.) Press down potatoes again before end of baking. Gently draw an edge of the potatoes away from side of dish: potatoes are done if brown and crusty. Bake 5 minutes or so more if necessary.
4) Unmolding and serving
A bowl for excess butter
A flexible-blade spatula
If needed: a buttered baking sheet
A lightly buttered, hot serving dish
When potatoes are done, place cover slightly askew on pan and drain out excess butter, which may be used again in other cooking. Run spatula around edge of pan. Shake pan, and if potatoes have stuck to bottom, run spatula carefully under potatoes to loosen them, but disturb them as little as possible. If you feel it will be easier to unmold them first onto a baking sheet and slide them onto the serving dish, do so; otherwise invert the dish over the potato pan, reverse the two, and potatoes will drop onto dish. They should look like a brown cake.
Unmolding troubles: You should have no trouble, but if some potatoes do stick to pan, scrape them off and put them in place on the potato cake. If you have had trouble and potatoes look messy or pale, simply push or mound them into a reasonable shape, sprinkle with cheese or bread crumbs, drizzle on a little butter, and brown briefly under the broiler.
(*) AHEAD-OF-TIME NOTE: After unmolding the potatoes, cover loosely with foil and set in a warming oven (120 degrees), or on an electric hot-tray, or over simmering water. They will keep nicely for half an hour at least as long as they are warm and have a little circulation of air.
VARIATIONS
[Truffled Sliced Potatoes Baked in Butter]
All you need for this variation is the wherewithal for a number of sliced truffles, as many as you wish. Proceed as in the Master Recipe, but intersperse truffles with the potato slices after the first layer of potatoes has been arranged in the pan, and end with a layer of potatoes.
[Mold of Sliced Potatoes and Cheese Cooked in Butter]
This is a more informal method of forming pommes Anna, and you may omit the cheese if you wish. Here all the cooking is done on top of the stove, which is a convenience when your oven is in use.
For 6 people
4 to 5 Tb clarified butter
A heavy, medium-sized (10-inch) frying pan, either cast iron or no-stick
About 2½ lbs. “boiling” potatoes in round, 1¼-inch slices ⅛ inch thick, well dried
About 4 ounces (1 cup) Swiss cheese cut into 1-inch slices less than ⅛ inch thick (use slicing slot of a grater)
Salt and pepper
Small pinches of nutmeg
A cover for the frying pan
A flexible-blade spatula
A hot serving dish
Following illustrated directions in preceding Master Recipe, pour ¼ inch of butter into frying pan. Set over moderate heat and rapidly arrange an overlapping layer of potato slices in the pan, shaking pan gently from time to time to prevent sticking. Baste with a sprinkling of butter, arrange a second layer over the first, and over this second layer of potatoes arrange a layer of cheese slices. Season the third layer of potatoes with salt, pepper, and a speck of nutmeg. Continue filling the pan with potatoes, cheese, seasonings, and end with a layer of potatoes. When filled, shake pan gently again and let cook 3 to 5 minutes over moderately high heat to be sure the bottom of potatoes is crusting. Then cover pan and set over low heat for about 45 minutes, or until potatoes are tender when pierced with a small knife. (Be sure heat is not too high, or bottom of potatoes will brown too much.) Run spatula all around edge of pan and underneath to loosen potatoes, and unmold upside down on serving dish.
[Potato Pie with Herbs and Cream]
Another attractive way to serve potatoes is to mold them in pastry, and bake in a flan ring or false-bottomed cake pan, which comes off when the potatoes are done; the pie then stands free on a serving dish. In this excellent recipe, the sliced potatoes are seasoned with melted butter and herbs, and when they are tender inside their crust, a mixture of cream and beaten egg is poured into them through the chimney hole. The tourte can well be the main course for a lunch or supper, along with a mixed vegetable salad, possibly some cold meat, and a Riesling, Sylvaner, or rosé wine. Or serve it with steaks, hamburgers, broiled chicken, or fish. Any leftovers may be reheated, but are also good cold.
For a 9-inch pie, 8 to 12 servings
1 tsp soft butter
The mold: a 9-inch flan ring set on a baking sheet, or a round, 9-inch false-bottomed cake pan
Either ½ the recipe for pâte briseé ordinaire Formula 1;
Or a ready mix
¼ cup (not pressed down) chopped fresh parsley
Either 2 Tb minced fresh green herbs (basil and chives);
Or 1½ Tb minced shallots or scallions and ¼ tsp dried oregano or sage
4 Tb (½ stick) butter melted in a saucepan
6 cups thinly sliced all-purpose potatoes in a bowl of cold water
Salt and pepper
A pastry brush and cup of cold water
A chimney: the metal tube end of a pastry bag or a small metal funnel, buttered
1 egg beaten with 1 tsp water in a 1-cup measure
⅓ cup heavy cream
Preheat oven to 425 degrees. Butter inside of flan ring and surface of baking sheet, or inside of cake pan. Roll ⅔ of the pastry into a circle 14 inches in diameter (so that you will have a 1½-inch overhang), and line the mold, letting overhang fall around outside rim. Stir the parsley and herbs into the butter. Drain and dry the potatoes and spread ⅓ on the bottom of the lined mold. Stirring butter and herb mixture, pour ⅓ of it over the potatoes and sprinkle potatoes with salt and pepper. Complete filling mold in same manner. Fold overhanging pastry over potatoes, and moisten top of pastry with water. Roll out remaining pastry into a circle 9½ inches in diameter, roll up on pin, and unroll over mold. Roll pin over pastry to trim it the size of the mold, then press it down with the balls of your fingers over the moistened bottom layer to seal. Make a chimney hole in top of pastry and insert funnel. Paint top of pastry with beaten egg, and make cross-hatch marks over pastry with the back of a knife or the tines of a table fork. Blend cream into remainder of beaten egg, and refrigerate for later.
Baking—about 1 hour
Immediately set tourte in lower-middle level of preheated 425-degree oven and bake for about 30 minutes, until pastry is nicely but not too deeply browned. Then turn thermostat down to 350 degrees for rest of baking; cover tourte loosely with foil or brown paper if it is browning too much. As soon as potatoes are tender when you poke them through the chimney hole, tourte is done. By spoonfuls, pour the egg and cream mixture into the pie through the chimney, tilting pie in all directions so that cream will flow all over. Bake another 5 minutes or so to set the mixture, and tourte is ready to serve; unmold and slide onto a hot serving dish.
(*) AHEAD-OF-TIME NOTES: If tourte is done before you are ready to serve, keep it warm, uncovered, in a turned-off oven or 120-degree warming oven. If wait is to be more than 15 minutes, do not add egg and cream until a few minutes before serving, then reheat in a 350-degree oven.
POMMES DUCHESSE[Mashed Potato Mixture for Borders and Other Decorations]

Even hamburgers look dressy in a fluted border of pommes duchesse, and fluted mounds of potatoes placed around a meat platter are elegant indeed. Consisting only of mashed potatoes, egg yolks, butter, and cream, pommes duchesse is a very simple mixture and perfectly delicious when you use the best ingredients, meaning live potatoes rather than dehydrated ones. Serve pommes duchesse anywhere that mashed potatoes would naturally go, such as around a platter that is to hold boeuf bourguignon or coq au vin, or piped around the creamed eggs or fish that are to be gratinéed, or with steaks, chops, or broiled fish.
You may prepare and form the potatoes in advance, and bake them just before serving; once baked and browned, however, they must be served fairly soon or they will lose their light, freshly cooked quality. We prefer egg yolks to whole eggs in the mixture because we think that egg whites have a drying-out effect, although they do give the potatoes a slight puff. If you like a puff anyway, use 1 egg and 1 yolk for each 2 cups of potatoes rather than the 3 yolks for 2 cups (6 for 4 cups) suggested here.
For 4 cups of mashed potatoes, serving 6 to 8
1) The potato mixture
2½ lbs. “baking” potatoes all of a size for even cooking (6 or 7 potatoes 4½ by 2 inches, for instance)
A heavy-bottomed saucepan
Cold water
1½ tsp salt per quart of water
A cover for the pan
A colander or sieve
A potato ricer, or a food mill with medium disk, or an electric mixer
A quart measure
A rubber spatula and a wooden spoon
6 egg yolks in a small bowl
6 Tb soft butter
4 to 6 Tb crème fraîche or heavy cream
¾ to 1 tsp salt
⅛ tsp white pepper
Pinch of nutmeg
A pan of hot but not simmering water large enough to hold potato pan
Scrub the potatoes under warm water, drop into saucepan of cold water to cover, add salt, and set over high heat. When water comes to the boil, boil slowly, partially covered, for about 25 minutes usually. Test for doneness by cutting a potato in half, taking a slice from inside the half and eating it: potato should hold its shape, but should be cooked through, tender, mealy, and ready to eat. Drain, and peel at once, holding potato on a fork. Immediately put potatoes through a ricer or food mill, or beat with electric mixer, to make a smooth, lump-free purée. Measure 4 cups into saucepan and stir over moderate heat for 2 to 3 minutes until potatoes film bottom of pan, indicating that most of excess moisture has evaporated. Remove from heat, beat in the egg yolks, then the butter and 4 tablespoons of the cream. Beat in a little more cream by dribbles if you think the potatoes will take it, but mixture must be fairly firm so that it will hold its shape when formed. Beat in the salt, pepper, and nutmeg; taste carefully and correct seasoning as necessary. Set potato pan in pan of hot water.
(*) AHEAD-OF-TIME NOTE: Potatoes must be warm if you are to form them smoothly and easily. If you are not quite ready, cover pan partially and beat rather frequently with a wooden spoon. Note that warm potatoes are never covered airtight; a slight circulation of air prevents them from developing an off taste.
A wooden spoon
The warm pommes duchesse mixture
A rubber spatula
A 12- to 14-inch canvas pastry bag with ¾-inch cannelated nozzle
A lightly buttered, flameproof serving platter, such as a 12- by 14-inch oval
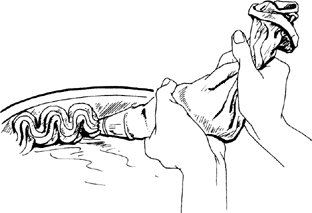
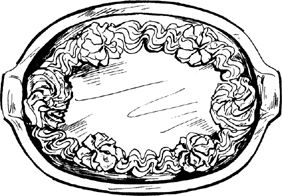
Vigorously beat the warm potato mixture to be sure it is smooth and pliable, then scoop into pastry bag. Squeeze out into a decorative design around the edge of the platter.
Use a winding ribbon design, for instance, and add rosettes if you wish. When you have a small pastry bag and run out of potatoes rather quickly, rosettes hide breaks in the pattern. |
|
2 to 3 Tb finely grated Swiss or Parmesan cheese
3 to 4 Tb melted butter
Sprinkle the potatoes with a dusting of cheese and dribble on melted butter. (Although egg glaze may be used and gives better over-all color, we do not like the taste and texture of egg film when it has hardened over the browned potatoes.)
(*) AHEAD-OF-TIME NOTE: Set aside; cover loosely when cool and refrigerate.
3) Browning and serving
Either bake in upper third of a preheated 400-degree oven for 25 to 30 minutes until lightly browned, or brown slowly for 5 minutes or so under a slow broiler. Browning under the broiler leaves a moister texture but you must watch carefully that the potatoes do not burn. Once browned, serve as soon as possible because the potatoes will taste dry and stale if cooled and reheated.
VARIATIONS
Using the same general method as described in the Master Recipe, flute individual nests of the potato mixture on buttered heatproof serving dishes, shells, or plates; sprinkle the potatoes with cheese and melted butter, and brown as described in Step 3. For individual mounds squeeze the potatoes out on a buttered baking sheet and proceed in the same manner, lifting them off with a spatula for serving.
[Cheese Flavored Pommes Duchesse]
For cheese-flavored pommes duchesse, which you may use in any of the preceding or following suggestions, beat ⅓ cup finely grated Parmesan cheese into the finished potato mixture in Step 1 of the Master Recipe (1 tablespoon of cheese for every cup of the potato mixture). In this case, because the cheese is strong, you may use instant mashed potatoes, adding the minimum amount of liquid suggested on the package, so that you may beat in enough cream to give the potatoes flavor and interest without making them too soft to form.
[Mashed Potato Pancakes from the Leftovers]
Leftover pommes duchesse is delicious when formed into cakes and sautéed in butter. This works for browned pommes duchesse but is more successful with the uncooked mixture, and although you may bake rather than sauté the potatoes, which is easier to do, much the best flavor and texture comes from sautéing.
For a dozen 3-inch cakes, serving 4 to 6 people
About 2 cups of the pommes duchesse mixture, Step 1 in preceding Master Recipe
1 cup dry, not-too-fine crumbs from nonsweetened, homemade-type white bread
A sheet of waxed paper on a tray
5 to 6 Tb clarified butter (melted butter, skimmed; clear liquid butter spooned off milky residue)
A large (11-inch) frying pan, preferably no-stick
A buttered baking sheet
If the potato mixture is freshly made, let it cool. Either rolling and patting them in the lightly floured palms of your hands, or forming them on waxed paper with a wet rubber spatula, make smooth cakes of the potato mixture 3 inches in diameter and ¾ inch thick. As each is formed, place it on the bread crumbs, heap crumbs on top, pat a thin layer in place, and arrange the cakes in one layer on waxed paper.
(*) AHEAD-OF-TIME NOTE: If you are not going to sauté them immediately, cover and refrigerate; they will keep perfectly well until the next day.
Preheat oven to 200 degrees. Shortly before serving, film frying pan with ⅛ inch of the clarified butter, heat to very hot but not browning, and arrange as many potato cakes in pan as will easily fit in one layer. Sauté for 3 to 4 minutes on one side, until nicely browned and crusted, turn and sauté on the other side. Arrange on baking sheet and keep warm in oven while sautéing the rest, adding more butter to pan as necessary. The potato cakes may be kept warm for 15 minutes or more, but are at their best and freshest the sooner you serve them.
[Filled Potato Cakes]
With a stuffing of ham, mushrooms, and cheese, potato cakes become a main course. Serve them with a green vegetable or a salad. Rather than sautéing them, you may find baking easier.
For 8 cakes 3½ inches in diameter, serving 4 or more people
Ingredients for the preceding potato cakes plus:
¼ lb. (1 cup) finely diced fresh mushrooms
1 Tb minced shallots or scallions
Salt and pepper
⅓ cup finely minced ham
½ cup grated Swiss cheese
Sauté the mushrooms and shallots or scallions in a tablespoon of the butter in a small pan until mushroom pieces begin to separate from each other and to brown very lightly. Season with salt and pepper, add the minced ham, and sauté a minute more. Set aside. Form half of the potato mixture into 8 disks 3½ inches in diameter and about ¼ inch thick. Spread the ham and mushrooms in the center of each, and top with grated cheese. Cover with disks made from the remaining potatoes.
To cook, either dredge in bread crumbs and sauté in clarified butter as in preceding recipe, or arrange on a buttered baking sheet, sprinkle with bread crumbs and melted butter, and bake in upper third of a preheated 400-degree oven for 25 to 30 minutes until lightly browned.
Any change from routine is a happy event, particularly when it is a substitute for the usual starchy vegetable choices. Here is a clever purée of beans and pumpkin, two purées involving turnips, plus a turnip sauté, and a new kind of crêpe made of green peppers and tomatoes.
[Purée of Pumpkin or Winter Squash and White Beans]
A combination of pumpkin or squash and beans goes especially well with goose, duck, turkey, pork, or sausages. This is also one of the few vegetable recipes where you may successfully substitute canned or frozen ingredients for fresh, as noted near the end of the directions in Step 1, and in the ingredients for Step 2.
For 4 to 6 people
1) The pumpkin or squash
1¼ cups mirepoix vegetables (½ cup each of finely diced onions and celery; ¼ cup diced carrots)
3 Tb butter
A covered 2½- to 3-quart flameproof baking and serving dish 2½ to 3 inches deep
2 lbs. yellow-fleshed winter squash or pumpkin (6 cups peeled and roughly sliced)
Optional: 1 to 2 cloves mashed garlic
1 imported bay leaf
⅛ tsp thyme
½ tsp salt
½ cup water
Waxed paper cut to fit top of dish
Preheat oven to 350 degrees. Cook the mirepoix vegetables in butter in the covered dish over low heat, stirring occasionally, for 8 to 10 minutes, until vegetables are tender but not browned. Stir in the squash or pumpkin, optional garlic, herbs, salt, and water. Bring to a simmer on top of stove, lay waxed paper over vegetables, cover, and bake in middle level of preheated oven for 30 to 40 minutes, stirring up once or twice to be sure vegetables are not browning. Add 2 to 3 tablespoons more liquid if all has evaporated before squash or pumpkin is tender. (If using canned or frozen squash or pumpkin, cook mirepoix vegetables until tender, then add garlic, herbs, and ¼ cup water; cover and boil slowly for about 10 minutes until liquid has evaporated.) Remove bay leaf.
2) The beans; baking and serving
About 2½ cups cooked or canned white beans such as Great Northern, pea beans, or Italian cannellini beans (for quick soaking and pressure cooking of dried beans, see Volume I, page 400)
A food mill with medium disk
A large mixing bowl
A rubber spatula and wooden spoon
2 “large” eggs
½ cup heavy cream
2 ounces (½ cup) grated Swiss cheese
Salt and white pepper
3 Tb butter
Preheat oven to 425 degrees in time for baking. Purée the squash or pumpkin mixture along with the beans through food mill into bowl. Beat in the eggs, cream, all but 2 tablespoons of the cheese, and salt and pepper to taste. Smear 1 tablespoon of the butter in the baking dish, spoon in the purée, sprinkle reserved cheese on top and dot with the remaining butter.
(*) AHEAD-OF-TIME NOTE: May be completed a day ahead to this point. When cold, cover and refrigerate. Allow 10 to 15 minutes longer in oven if mixture is chilled.
About half an hour before serving, bake uncovered in upper third of preheated 425-degree oven until bubbling hot and top has browned nicely.
[Purée of Rice and Turnips with Herbs and Garlic]
Unless your guests know that Freneuse is Turnipville, on one of the serpentine twists of the Seine northwest of Paris, they will have no other clue to identify this marvelous mixture. Serve it with red meats, pork, sausages, chops, goose, and ducklings.
For 4 to 6 people
2 cups milk, more if needed
A heavy-bottomed 2-quart saucepan (no-stick would be useful)
1 cup rice
½ tsp salt
2 Tb butter
2 to 3 large cloves of mashed garlic
¼ tsp Italian seasoning, or thyme and bay leaf
3 to 4 white turnips, about 3 inches in diameter, peeled and roughly chopped (2 to 3 cups)
A food mill
Bring the milk to the simmer, add the rice, salt, butter, garlic, and seasonings. Simmer, stirring occasionally, for 10 minutes, until rice is partially tender. Stir in the turnips, adding more milk, if necessary, to submerge the vegetables. Cover and simmer 10 to 15 minutes more, stirring occasionally, until turnips are tender. Liquid should be almost entirely absorbed; if not, uncover and boil, stirring, to evaporate it. Purée through food mill and return to pan.
(*) AHEAD-OF-TIME NOTE: May be completed to this point.
Salt and white pepper to taste
2 to 3 Tb butter or heavy cream
A hot serving dish
Minced parsley
Shortly before serving, reheat, stirring. Carefully correct seasoning. Stir in the butter or cream by spoonfuls. Turn into a hot serving dish and decorate with the parsley.
[Purée of Yellow Turnips—Rutabagas]
Firm, fresh rutabagas with their crisp, moist flesh and fine, sweet flavor are every bit as good as the best white turnips, especially when they are simmered with butter and turned into a fragrant, yellow purée. Serve with a roast goose or duck, a loin of pork, a dinner of homemade sausages, or a lamb or beef stew.
Because rutabagas appear to have originated in Scandinavia, they are called swedes by the English and sometimes navets de Suède by the French. The rutabaga is a distinct species of vegetable, related to both the cabbage and the turnip, which accounts for one of its other French names, chou-rave à chair jaune. A number of varieties exist, some of which are animal fodder, and in France that type was often all one had to eat during two long world wars. Although modern improvements have created varieties to meet the taste of the most discriminating châtelaine, rutabagas are still a distasteful reminder of bitter days to many Frenchmen, which accounts for this recipe’s charmingly evasive title.
For 4 to 6 people
1½ to 2 lbs. firm, crisp rutabaga, peeled and cut into 1-inch pieces (6 to 7 cups)
A heavy-bottomed 2-quart saucepan
About 2 cups water
1½ tsp salt
3 Tb butter
A cover for the pan
A food mill set over a mixing bowl
Place rutabaga chunks in saucepan with enough water to come ⅔ the way up the vegetables. Add salt and butter, bring to the boil, cover and boil slowly, tossing occasionally, for about 30 minutes or until tender. Drain, reserving cooking liquid, and purée rutabaga through food mill into bowl.
4 Tb rendered goose fat, pork fat, or butter
⅓ cup all-purpose flour (measure by scooping dry-measure cup into flour and sweeping off excess with a knife)
A wooden spoon and wire whip
The hot turnip-cooking juices
¼ cup heavy cream
Salt and pepper
A lightly buttered warm vegetable dish
Fresh parsley
Melt the fat or butter in the saucepan, blend in the flour, and stir over moderate heat until flour and fat foam together for 2 minutes without browning at all. Remove from heat, and when it has stopped bubbling blend in 1 cup of the cooking juices, beating vigorously with wire whip until mixture is perfectly smooth. Return over moderately high heat, stirring with whip as mixture thickens and comes to the boil. Boil, stirring, for 2 minutes. Sauce should be very thick, but not so thick that it will not combine with the puréed turnips: beat in more cooking liquid (or milk) by spoonfuls if you think it necessary. Finally beat the turnip purée and the cream into the sauce, and season carefully to taste.
(*) AHEAD-OF-TIME NOTES: May be prepared even a day in advance; cover and refrigerate when cool.
About 30 minutes before serving, cover and reheat over simmering water, stirring occasionally. To serve, turn into a hot vegetable dish and decorate with parsley.
[Fresh, Young White Turnips Sautéed in Butter]
Winter and early spring are the time for early crop turnips, which are tender enough to need no blanching and are at their best cooked simply in butter. Whether round, oval, or top-shaped and with or without their green leaves, buy them smooth, firm, small, clean, unblemished, and all of a size for even cutting and shaping. Their flesh, when you cut into them raw, must be moist, crisp, and sweetly turnipy. Serve sautéed turnips with duck, goose, turkey, pork, roast beef or lamb, steaks or chops. They are also attractive as part of a vegetable garnish in combination with such others as glazed carrots and sautéed mushrooms, or buttered fresh peas. The following recipe is for a small amount, but if you wish to cook more, do the preliminary sauté in batches, and finish them off all together in a covered casserole in a 325-degree oven.
About 12 fresh, young white turnips 2 to 2½ inches in diameter (2½ lbs. without tops)
2 or more Tb butter
1 or more Tb olive oil or cooking oil
A large (11-inch) frying pan (no-stick recommended)
¼ tsp salt, more as necessary
Big pinch pepper
A cover for the pan
With a small, sharp knife, peel the turnips, removing outer skin and the white underskin that covers the moist flesh. You now want to cut them in the form of large garlic cloves, all pieces approximately the same size: if you have round turnips, for example, quarter them lengthwise, and round off the sharp edges, saving trimmings for turnip soup or adding them to one of the preceding purées.
Melt 2 tablespoons of butter with 1 of oil in frying pan over moderately high heat. When butter foam is beginning to subside, indicating fat is hot enough, add as many turnips as will fit in one crowded layer. Toss and turn frequently, shaking and swirling the pan by its handle, for 4 to 5 minutes, until turnips are beginning to brown very lightly. (If you are sautéing in 2 batches, turn browned turnips into a side dish, add more butter and oil if needed, brown the second batch, then return all to the pan.) Toss turnips with the salt and pepper, cover pan, and cook over very low heat, tossing occasionally, for about 10 minutes more or until turnips are tender. Be careful turnips do not brown too much. Be sure also not to overcook them; they should be just tender but still hold their shape.
2 to 3 Tb more butter
Salt and pepper as needed
3 to 4 Tb fresh minced parsley
A hot vegetable dish or the meat platter
Just before serving, reheat to sizzling, toss with more salt and pepper as needed, then with the additional butter, and finally with the parsley. Turn into hot vegetable dish or onto platter and serve.
[Pepper, Onion, Tomato, and Cheese Pancakes]
Cooked bell peppers, onions, tomatoes, cheese, and herbs plus a light batter to bind them all together are the basic ingredients for this attractive vegetable combination, which is cooked like pancakes. Serve them with roasts, chops, or broiled chicken, and any leftovers are delicious with cold hors d’oeuvre or on a picnic. They are, in addition, a splendid background for diced poultry, veal, or pork leftovers, which you may include in the mixture; topped with a poached or fried egg and a tomato or cheese sauce, they are an ample main course for informal meals.
For 12 4-inch pancakes
1) The crêpe batter—for ¾ cup
⅓ cup flour, preferably “instant blending” (measure by scooping dry-measure cup into flour and leveling off with knife)
1 “large” egg
¼ tsp salt
1½ tsp cooking oil
⅓ cup milk, plus a little more if needed
An electric blender, or a bowl, whip, and sieve
Either whirl all ingredients in a blender; or place flour in bowl, beat in rest of ingredients, and strain through sieve. Batter should be like heavy cream; if too thick, thin out with drops of milk. You may use it immediately if you have instant-blending flour; otherwise let it rest for an hour at least.
2) The pipérade mixture—for 1½ cups
1½ cups sliced onions
3 Tb olive oil or cooking oil
An 8-inch frying pan with cover
1½ cups sliced green bell peppers
3 to 4 ripe, red tomatoes peeled, seeded, juiced, and sliced (1½ cups)
2 to 3 large cloves of garlic, mashed
Salt and pepper to taste
2 Tb fresh minced parsley, plus 1 Tb fresh minced basil or ½ tsp of dried oregano
Cook the onions in the oil for 8 to 10 minutes, or until tender and translucent. Add the peppers and cook another 3 to 4 minutes to soften slightly. Then add the sliced tomato pulp and garlic; cover pan for several minutes until tomatoes have rendered their juice. Uncover, raise heat, and boil for several minutes, tossing pan by handle to blend ingredients, until liquid has almost completely evaporated. Season carefully to taste, and toss with the herbs.
3) Cooking the crêpes
(You may prefer several 8-inch crêpes cut into wedges; the following is for 4-inch crêpes cooked 3 at a time in a 10-inch pan.)
5 ounces Swiss cheese cut into ⅜-inch dice (about ¾ cup)
The pipérade turned into a 2-quart bowl
A rubber spatula
½ cup or more of the crêpe batter
Cooking oil
A heavy 10-inch frying pan (no-stick recommended)
A ¼-cup measure
1 or 2 oiled baking sheets
A pancake turner
Blend the cheese into the pipérade along with ½ cup of the batter. Brush frying pan with oil and set over moderately high heat. When hot but not quite smoking, ladle in ¼ cup of the crêpe mixture as a test. Cook about 2 minutes on one side, until little holes appear through the surface, at which time bottom should be nicely browned. Turn and cook about 1 minute on other side, then remove to a baking sheet. Crêpe should just hold together, with only enough batter in the mixture to enrobe the ingredients. Add a little more batter to bowl if you feel it necessary, but too much makes for doughy crêpes. Cook the rest of the crêpes and arrange on baking sheets.
Just before serving, reheat for 5 minutes or so in a preheated 425-degree oven.
For the same amount of batter, use:
1 cup each sliced onions, peppers, and tomatoes for the pipérade
⅓ cup diced cheese
1 cup diced cooked poultry, veal, pork, ham, sausages, or fish
[Sweet and Sour Onions Braised with Raisins—Hot or Cold]
Serve these hot with roast pork, duck, goose, game, or cold along with hors d’oeuvre, and cold meat and poultry. They should be considered more as a garnish, relish, or condiment than a vegetable, and if you are using tiny pearl onions, 6 per serving should be sufficient.
For about 2 cups, serving 6 to 8
3 cups (10 ounces; 40 to 50) small, white pearl onions
A saucepan of boiling water
A heavy-bottomed 2-quart saucepan with cover
½ cup beef or chicken bouillon
½ cup water
1 tsp dry mustard blended with 1¼ Tb wine vinegar
2 Tb olive oil
1½ Tb sugar
¼ tsp salt
1 medium tomato, peeled, seeded, juiced, and chopped
⅓ cup currants (small, black, seedless raisins)
1 large clove garlic, mashed
¼ tsp thyme
1 bay leaf
⅛ tsp pepper
A serving dish
Drop the onions into the boiling water and boil 1 minute to loosen skins. Drain. Shave off 2 ends, peel, and pierce a cross in the root end of each to help onions retain their shape while cooking. Place onions in a saucepan with all the ingredients listed except for the herbs and pepper. Bring to the simmer, skim for several minutes, then add the thyme, bay leaf, and pepper; cover and simmer slowly about 1 hour, or until the onions are tender but still hold their shape. Add a little more water if necessary during cooking; however, liquid should be reduced to a syrup when onions are done; if not, boil down at end of cooking. Transfer to dish and serve hot or cold, decorated, if you wish, with parsley.
[Peeled and Sliced Sweet Peppers in Garlic and Oil]
A typical informal first course in Provence might include the local black olives, sliced hard-boiled eggs, anchovies, capers, and slices of green or red sweet peppers turned in olive oil, salt, and garlic. The only trick to this recipe is that you will have to peel the peppers, which is quite a different matter from peeling eggs. A number of pepper-peeling systems are on the books, including spearing them on a long fork and turning then one-by-one over a gas flame, baking in a hot oven, baking in a slow oven, boiling them, steaming them in a covered dish, dropping in hot oil, broiling them until the skin puffs and blackens. We like broiling because it is the quickest, the surest, and it cooks the flesh just enough so that the pepper is ready to cut and serve as soon as you have peeled it.
All sweet peppers both here and in France belong to the same species, Capsicum annuum, native to the tropics and including a large number of shapes and sizes. Most of those found in American markets are 2½ to 4 inches in diameter, 4 to 5 inches long, and a deep green color. (When peppers are fully mature they are yellow or red, and perishable to ship long distances; probably the only red peppers you will see are those grown locally.) Pick peppers that are brightly colored, glossy, firm, and thick-fleshed, with no pockmarks, brown patches, or soft spots anywhere on their surface. Like their distant cousin, the eggplant, raw peppers prefer a temperature of 45 to 50 degrees and a humidity of 90 per cent. Unless you can reproduce these conditions, buy only what you will use within a day or two because they will deteriorate rapidly when stored where they are either too hot or too cold.
1) Peeling the peppers
4 medium-sized peppers, green, red, yellow, or mixed
A shallow baking dish big enough to hold peppers easily, such as a pie plate
A cutting board
A sharp knife and a table fork
Preheat broiler to very hot. Arrange peppers in dish and place so surface of peppers is an inch from broiling element. As soon as skin facing broiler has puffed and blackened, in 2 to 3 minutes, turn peppers on another face, and finally on each end, so that all of skin has puffed. Remove peppers to cutting board. One by one, rapidly cut in half lengthwise, remove stem and seeds, and scrape off skin. (This should be done as soon as possible and before peppers cool; if blackened skin remains too long on pepper, it can darken the flesh under it.)
2) Dressing the peppers
1 medium clove of garlic, mashed
¼ tsp salt
A small bowl and a pestle or wooden spoon
⅓ cup excellent olive oil
A serving dish
Plastic wrap
Mash garlic and salt until salt has dissolved completely, then beat in olive oil. Cut peppers into lengthwise strips ⅜ inch wide and arrange layers in dish, spooning dressing over each layer. Cover and let steep, tilting dish and basting with the dressing occasionally, for 20 minutes before serving.
(*) AHEAD-OF-TIME NOTE: May be made several days in advance; cover airtight and refrigerate. Remove half an hour before serving to de-congeal oil.
[Artichoke Bottoms Stuffed with Mushroom Purée, Poached Eggs Optional—a Cold Entrée]
Here is one of those perfect first-course dishes for special guests and formal dinners. Whole artichokes are boiled and the leaves carefully removed to preserve the bottoms; the bottoms are then filled with a mixture of puréed and marinated raw mushrooms, the scraped-off flesh from the leaves, mayonnaise, and herbs. A helping hand is welcome here, because leaf scraping is rather slow work. However, if you are alone and unhurried, you may boil the artichokes one day, scrape them the next, and fill them on the morning of the third day. When you want to serve this as a main-course luncheon dish, add la surprise, poached eggs, which blend perfectly with mushrooms, artichokes, and mayonnaise.
1) Preparing the artichokes
6 large, fresh, fine artichokes 4 to 4½ inches in diameter
A large kettle containing 7 to 8 quarts boiling salted water
A food mill with middle-sized disk, or a sieve
Following illustrated directions in Volume I, pages 423–5, trim the artichokes, being sure all the tough green part is cut off bottoms and small leaves are broken from circumference. Boil slowly, uncovered, for 35 to 45 minutes until bottoms are tender when pierced with a knife. (Prepare mushrooms and mayonnaise, Steps 2 and 3, while the artichokes boil.)
Drain upside down in a colander. When cool, carefully remove the leaves, keeping bottoms intact. Scrape out and discard hairy choke from center of each artichoke bottom. With a teaspoon, scrape flesh from the inside of leaves and bottom of heart (soft cone of leaves covering choke). Purée the scraped flesh through food mill or sieve, then twist hard in the corner of a towel to extract as much water as possible. Place puréed flesh in a bowl.
2) The purée of raw mushrooms
½ lb. (1 quart) very fresh, firm, unblemished mushrooms
¼ tsp salt
Big pinch of pepper
2 Tb very finely minced shallots or scallions
1 Tb lemon juice
A 2-quart bowl
With a large, sharp knife, chop the mushrooms into a very fine mince, almost a purée. Blend them in the bowl with the salt, pepper, shallots or scallions, and lemon juice. Marinate for 15 to 20 minutes. Then, a handful at a time, twist mushrooms in the corner of a towel to squeeze out as much vegetable liquid as possible. Add the mushrooms to the bowl containing the puréed artichoke flesh.
3) Final assembly
About 1½ cups thick homemade mayonnaise (the hard-yolk tartare minus the trimmings but plus the sieved egg white, Volume I, page 90, is particularly recommended)
1 Tb fresh minced tarragon or ¼ tsp dried tarragon
4 Tb fresh minced parsley (reserve half for decorations)
Salt and pepper to taste
The cooked artichoke bottoms
Optional: 6 cold poached eggs or 6-minute peeled eggs (oeufs mollets)
A serving dish or individual plates lined with lettuce leaves or watercress
3 to 4 Tb heavy cream, crème fraîche, or sour cream
The artichoke and mushroom purées are now to be seasoned and piled into the artichoke bottoms: by spoonfuls stir mayonnaise into the vegetables, adding probably 3 to 4 tablespoons in all but not enough to thin out purée, which must remain thick and hold its shape. Stir in the herbs and taste carefully for seasoning. Sprinkle artichoke bottoms lightly with salt and pepper, and mound the purée in them, smoothing it into a dome. (If you are using eggs, lay them in the artichokes between 2 layers of the purée.) Arrange the artichokes in the dish or plates. Just before serving, stir the cream into the mayonnaise, then spoon a dollop over the top of each artichoke, and decorate with parsley.
(*) AHEAD-OF-TIME NOTE: It is usually perfectly safe to complete the recipe the day before serving, except for the final bit of mayonnaise, and to cover and refrigerate the artichokes. To avoid all risks of turned mayonnaise, however, we suggest that you complete the final assembly only an hour or so before serving.